Faster feature implementation with Server Driven UI
Why this new architecture is so successful in further developing the iOS app for Dutch postal company PostNL


For more than a decade, we have been building iOS and Android apps for our clients. We use both native and cross-platform approaches. A few years ago, we added a new method to our app development toolbox: Server Driven UI (SDUI). In short, SDUI combines the best of both worlds: native UX quality with the speed and flexibility of cross-platform.
One of the key reasons for its effectiveness is the speed of development. While it initially takes time to set up, with SDUI, new features can be rolled out without the apps having to lift a finger. The flows are built and released on the server. This allows for faster implementation of new features and complete flows.
Till now, we have been able to apply SDUI in about six different projects. One of them being the parcel tracking app for Dutch postal company PostNL. While SDUI may not be suitable for every project, it has been particularly effective for building an App Clip, widgets and other cool new features we’ve recently added in the PostNL apps. In this blog post, I explain how.
SDUI architecture
The development process of the PostNL apps followed the ‘classic’ approach: two native applications that connect to PostNL's APIs, with the apps being responsible for presenting the information to the users. However, after the initial release of the app, there was a growing demand for faster implementation of new features in the app.
This is an interesting challenge that we also see with other projects. There are various solutions to this, each with its own advantages and disadvantages. After a few years of app development for PostNL using the traditional approach, it became clear to us that the time was ripe to introduce Server Driven UI (SDUI) to the landscape.
But what exactly is SDUI? My colleague Laurens described it as follows in a previous article: "Server Driven UI moves the responsibilities of what is visible on screen to the server. Effectively, the server defines which components are part of a screen and their order; these are described in the API. The apps render their native implementation of all the components. This allows the apps to deliver a high quality user experience with all features native to their platform."
So, the ability to share logic is a significant advantage of SDUI, allowing for dynamic adjustments of screens and building complete flows from start to finish once across platforms. While cross-platform alternatives such as React Native or Flutter offer similar promises, they often come at the cost of app quality. With SDUI, you’re able to provide a higher quality user experience with all features native to both iOS and Android.
At PostNL, SDUI allows for a wide range of possibilities. Not only can the order of user interface elements be dynamically adjusted on individual screens, but entire flows can also be built from start to finish.This means that new features can be rolled out seamlessly without requiring any changes to the app source code, reducing app development effort.
In this blog post, I will not delve into the technical details and possibilities of the SDUI architecture itself, but rather focus on how it is implemented at PostNL. You can find more details about SDUI itself in articles by my colleagues Laurens and Sebastian.
Of course, this transition didn't happen all at once.We have already implemented the vast majority of the necessary flows in SDUI, which means we already have a full toolkit to quickly build new features for the apps. The remaining flows are also on our roadmap for future implementation.
Scan & Go
One of the new features we recently built is Scan & Go. In short, this feature involves scanning and sending your package without having to wait in line at the checkout. For a PostNL pilot, it was necessary to build this new flow in the app. Previously, we would build the same flow for both iOS and Android. This means showing a starting point, such as a CTA button, from within the app and presenting a flow of screens in which the user can complete their need.
Now, the server builds the entrance, screens, and the order of the screens in the flow. The server also links the screens with the right backend services. The apps had already added some small missing functionalities, such as scanning a barcode, in a prior release. When the server finishes building the feature, it is immediately available in the app.
App Clips
During the testing phase of the Scan & Go flow, we discovered that this new way of sending a package was not as smoothly as we had aimed for. The flow starts by tapping against a NFC chip. If a user did not have the app installed, they would be redirected to the website where they would receive instructions on how to download the app. After downloading, the user would then have to hold their phone against the NFC chip once again. Unfortunately, this process was confusing to most users. It also lengthened the overall process, which was counterproductive to our goals. This led us to question how we could provide a seamless flow for customers who did not have the app.
In Android, we already took away the hurdle of installing the PostNL app by creating an Android Instant App that offers a native-like experience nonetheless. So you can imagine that for the iOS counterpart, App Clips had been on our wishlist for some time. (My colleague Mathijs' blog post provides a more detailed explanation of this feature.) However, our current architecture prevented us from meeting the strict 10MB requirement for App Clips. The packages used in the app alone were already larger than this limit, and they were deeply intertwined within our new SDUI architecture. Therefore, sharing all the code between two targets was not a viable solution. Additionally, there were certain functionalities, such as login or analytics, that we deemed irrelevant for the App Clip.
The only solution was to separate the core SDUI logic from the app target, so we can reuse SDUI for other targets without having to include the full app codebase. This presented a significant challenge, but my colleague Sander was able to achieve this within two weeks. The result was a Swift Package called "SDUI" that could be utilized in any target, including the App Clip target. Assets, functions and views could be externally injected into this package, providing us with enough flexibility to include or exclude specific features.
🇳🇱 👋 Hey Dutchies!
Even tussendoor... we zoeken nieuwe Q'ers!
To understand how target-based injection works, it is necessary to first summarize how SDUI screens are created. This logic is stored in the SDUI package:
- ScreenFactory: Is responsible for transforming JSON into domain objects (Screens, Actions, Components).
- protocol ScreenFactoryDelegate: Lives inside the ScreenFactory and serves as the gateway for injecting external components, actions, and more.
An abstract overview of this functionality is as follows:
public struct ScreenFactory {
  let delegate: any ScreenFactoryDelegate

  func makeScreen(_ screen: Api.Screen) throws -> Screen {
    // create screen
  }

  func makeAction(_ action: Api.Action) -> Action? {
    case .firstAction(let action):
      return makeFirstAction(action)
    case .secondAction(let action):
      return delegate.makeExternalAction(.second(action), for: self)
  }
}
public enum ExternalAction {
  case second(Api.SecondAction)
    // more external actions
}

public protocol ScreenFactoryDelegate {
  func makeExternalAction(_ action: ExternalAction, for factory: ScreenFactory) -> Action?
  // more external functions
}
public protocol ScreenFactoryDelegate {
  func makeExternalAction(_ action: ExternalAction, for factory: ScreenFactory) -> Action?
  // more external functions
}
Targets that wish to use the ScreenFactory must now pass a ScreenFactoryDelegate where they can choose to support the “secondAction” or return nil. By adopting this approach, different targets can share the same SDUI functionality while also leaving out any unnecessary functionality.
This allows us to now show almost any SDUI flow in the app in the App Clip target as well. The App Clip knows nothing about the flows, but can display them based on a deep link:
- App receives a deep link
- App sends it to the server
- The server sends a screen back
- The app displays the screen
import SDUI

let controller = SDUI.ScreenController(screen: screen, environment: environment)
setRootViewController(SDUI.ScreenNavigationController(rootViewController: controller))
The only thing the AppClip has to do is to create a ScreenFactoryDelegate that conforms to the SDUI.ScreenFactoryDelegate. The rest of the screen building logic comes from the SDUI package. In the above example, the environment that is passed to ScreenController contains the ScreenFactoryDelegate (among other things).
For now, we restrict which deep links are allowed in code. Adding a new flow would then be a matter of adding an extra if statement. In a second iteration of this code, that may not be necessary either. We could as well lift the restriction and let the server decide if a deep link is allowed or not.
In regards to the 10MB limit, we unfortunately were unable to comply with those requirements. Despite our efforts to reduce the size of our AppClip as much as possible, it still remained around 11MB. However, we were fortunate enough that Apple recently decided to increase the limit to approximately 15MB for iOS 16. With this in mind, we made the decision to release the AppClip exclusively for iOS 16 users.
Widgets
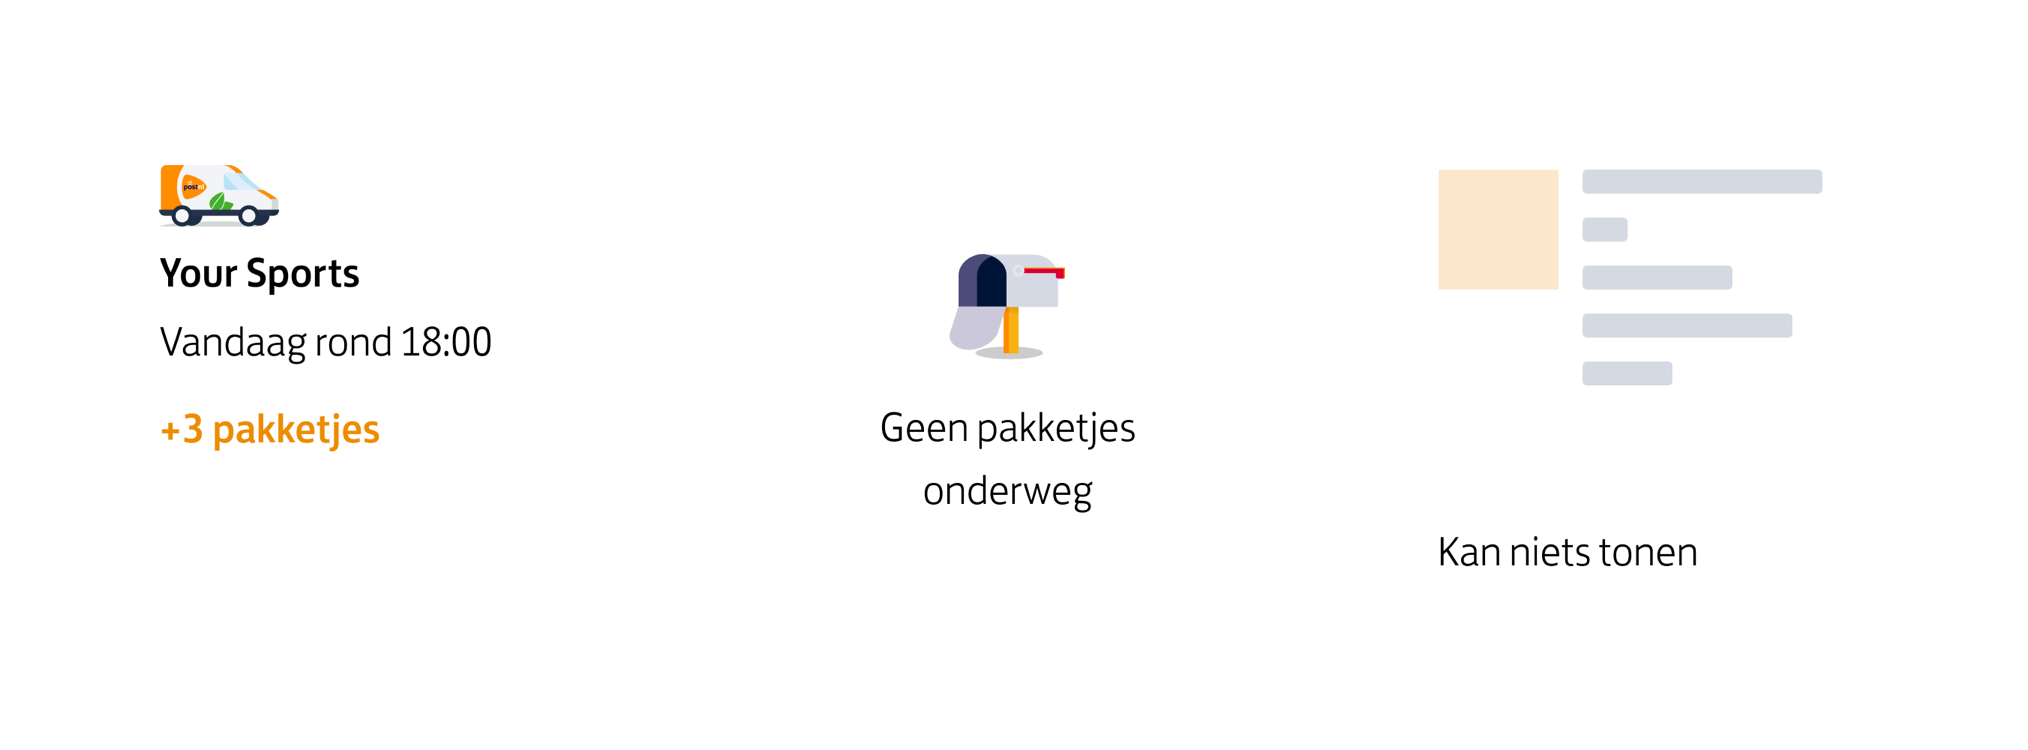
The other interesting feature we have built in SDUI is widgets. Since we have limited screen real estate for a widget, widgets are defined by views rather than components.
An SDUI app can contain an infinite number of screens with sections, components, and actions. However, we cannot use this structure for the widget since the user interacts differently with it. Here's how we have set up SDUI for a widget:
- Widget refreshes every 30 seconds or when the app goes to the background.
- A call to the SDUI widget endpoint is made. This call asks the server which view should be shown to the user.
- The server returns a JSON that describes the view. The type of content could be Shipment, Empty or Error. For example:
{
  "type": "Shipment",
  "icon": {
    "asset": "Van"
  },
  "url": "https://jouw.postnl.nl/track-and-trace/3SABC12345678-NL-1000AA",
  "title": "Your Sports Winkel",
  "description":  "Vandaag\n18:00 - 20:00",
  "footer": {
    "title": "+3 pakketjes onderweg"
    "url": "postnl://ontvangen?source=widget"
  }
}
The type of the content can also be “Empty” or “Error”. The server returns these types if there are no shipments or there happens to be an error getting the shipments. This is the JSON of an Empty view:
{
  "type": "Empty",
  "message": "Geen pakketjes naar je onderweg"
}
4. We decode the JSON and map it to a enum:
public enum Widget: Codable, Hashable {
  case empty(WidgetEmpty)
  case error(WidgetError)
  case shipment(WidgetShipment)
  case unknown

  public init(from decoder: Decoder) throws {
    let type: WidgetType? = try? decoder.decodeType()
    switch type {
      case .empty:
        self = try .empty(decoder.decodeValue())
      case .error:
        self = try .error(decoder.decodeValue())
      case .shipment:
        self = try .shipment(decoder.decodeValue())
      case .none:
        self = .unknown
    }
  }
}
5. The result of this mapping is passed to the RootView, which shows the right widget:
switch result {
  case .success(.some(let info)):
    switch info {
      case .empty(let message):
        WidgetEmptyView(message: message)
      case .error(let message):
        WidgetErrorView(message: message)
      case .shipment(let viewData):
        viewData.makeView(for: widgetFamily)
    }
  case .failure:
    WidgetErrorView(message: .preview)
  default:
    EmptyView()
}
Wrap up
To summarize, the implementation of SDUI in the PostNL app has proven to be a successful solution for faster feature implementation and dynamic adjustments to screens. While SDUI may not be suitable for every project, it has been particularly effective for PostNL due to reusability, the speed of development, and the ability to share logic between platforms.
The implementation of Scan & Go, App Clips, and widgets in SDUI have provided valuable insights into the flexibility and potential of this architecture. For example, the implementation of App Clips presented a significant challenge due to the 10MB limit. However, by separating SDUI from the app target, PostNL was able to meet the strict requirements for App Clips.
It's important to note that SDUI can be a significant time investment in the beginning. Building the toolkit and setting up the architecture can slow down development at first. Additionally, while SDUI allows for ‘just building’ once, the flows still need to be built on the server, and the apps still need to build all components and actions twice. You will move faster in the long run, but not by the factor of platforms you have. Therefore, for small and condensed projects with a tight time frame, SDUI may not necessarily be the best choice. It's important to consider the scalability and reusability of the architecture before deciding to implement SDUI.
If you’d like to get a more in-depth, nuanced view on using Server Driven UI in production apps, please check the recording of our recent meetup with talks by my colleagues Jaap and Laurens.
Do you also love working with new app technologies? Check our job vacancies (in Dutch) at werkenbij.q42.nl!