ASP.NET Core Basics: Sharing Code via NuGet Packages and DLL Files

ASP.NET Core has a great code-sharing feature where you can easily share classes, functions and more between projects and thus save time in development. Check out this blog post on how to do this via NuGet packages and DLL files.
ASP.NET Core is a formidable and complete platform for web development and one of its main features is the code-sharing function.
One of the best-known ways of using this resource is through the NuGet package. This way, despite the vast majority of libraries being created by companies, you as a programmer can create your own libraries, use them in your projects and share them with your friends. Another well-known way is by importing DLL files.
In this article, we will learn how to create a function from scratch in ASP.NET Core that can be shared between applications and see the benefits of sharing code in practice.
Code-Sharing Pros and Cons
Sharing code in ASP.NET Core is a good practice because it has benefits that facilitate routine development. Check out some of the pros below:
- Code reuse
- Decreased repeated code
- Standardization
- Easy implementation
- Version control
Despite bringing many advantages, there are also some points that should be taken into account when sharing code. Check out some of the cons below:
- Take extra care when deploying
- Increased rework when controlling versions
- Greater dependency between applications
What are the Ways to Share Code in ASP.NET Core?
In ASP.NET Core, there are two main ways to share code—through NuGet packages, as previously mentioned, and through .dll files.
Next, we will look more closely at each method and how to implement them in a web application in ASP.NET Core.
Sharing Code via NuGet Package
What is NuGet?
NuGet is a mechanism through which developers can create, share and consume code.
This code is usually provided in the form of “packages” that contain compiled code (such as DLLs) along with other content needed by the projects that consume these packages.
In short, a NuGet package is a file with the .nupkg extension that contains compiled code (DLLs) and is generated when compiling a program if enabled. Developers can share packages and publish them on a public or private host.
Consumers get these packages from suitable hosts, add them to their projects, and call a package’s functionality in the project’s code.
If you want to know more about NuGet Package, I suggest reading this article: What is NuGet.
About the Application
To demonstrate the use of code sharing, let’s first create a Class Library project in .NET 7 containing a service class to calculate the Customer discount value, which will become a NuGet package and be consumed by an API. Then we will do the same import via the DLL file.
You can access the full project code here: source code.
Creating Our NuGet Package
Prerequisites:
- Visual Studio
- .NET 7
In Visual Studio, choose the option “Create a new project,” choose “Class Library,” and choose a name (I’m using DiscountCalculation.Library).
Then choose the .NET version (I’m using version 7.0), and click on Create.
Note that a file (Class1.cs) has been created. You can delete it because we don’t need it.
The next step is to create the model class, which will be the class that will represent the Customer entity. So, create a new folder called “Models” and inside it create the class below:
- Customer
public Customer(string? name, string? email)
    {
        Id = Guid.NewGuid();
        Name = name;
        Email = email;
    }

    public Guid Id { get; set; }
    public string? Name { get; set; }
    public string? Email { get; set; }
The next class will be the class that will simulate a database. As the purpose of this article is to share code, we will just simulate a database with fake data. Feel free to implement a real database. If you are interested, you can use this article as a basis: Applying the CQRS Pattern in an ASP.NET Core Application in the “Creating the Database Context” and “Running EF Core Commands” sections.
So, create a new folder called “Data” and inside it create the class below:
- DbContext
using DiscountCalculation.Library.Models;

namespace DiscountCalculation.Library.Data;

public class DbContext
{
    public List<Customer> Customers()
    {
        var Customers = new List<Customer>()
        {
            new Customer("Teddy", "teddy@mail.com"),
            new Customer("John", "john@mail.com"),
            new Customer("Maria", "maria@mail.com"),
            new Customer("Sandy", "sandy@mail.com"),
            new Customer("Paul", "poul@mail.com"),
            new Customer("Simone", "simone@mail.com"),
        };

        return Customers;
    }
}
Next, let’s create an enum that will contain the values that will be used to calculate the discount. So, create a new folder called “Enums” and inside it create the enum below:
- DiscountValue
namespace DiscountCalculation.Library.Enums;
public enum DiscountValue
{
    IsClubMember = 20,
    CreditCard = 3,
    Debit = 10
}
Next, let’s create the interface that will contain the method responsible for calculating the discount. So, create a new folder called “Interfaces” and inside it create the interface below:
- IDiscountService
namespace DiscountCalculation.Library.Interfaces;

public interface IDiscountService
{
    public decimal Calculate(string CustomerName, bool isClubMember, string paymentMethod);
}
Finally, let’s create the service class that will implement the previously created interface and also contains the discount calculation. Note that we have a switch condition that will calculate the discount amount based on the provided payment method.
So, create a new folder called “Services” and inside it create the class below:
- DiscountService
using DiscountCalculation.Library.Data;
using DiscountCalculation.Library.Enums;
using DiscountCalculation.Library.Interfaces;

namespace DiscountCalculation.Library.Services;
public class DiscountService : IDiscountService
{
    private readonly DbContext _db;

    public DiscountService(DbContext db)
    {
        _db = db;
    }

    public decimal Calculate(string CustomerName, bool isClubMember, string paymentMethod)
    {
        var Customers = _db.Customers();

        bool validCustomer = Customers.FirstOrDefault(c => c.Name == CustomerName) is not null;
        decimal discountValue = 0;

        if (validCustomer is false)
            return discountValue;

        discountValue = paymentMethod switch
        {
            "Debit" => (decimal)DiscountValue.Debit,
            "Credit" => (decimal)DiscountValue.CreditCard,
            _ => 0,
        };

        if (isClubMember)
            return discountValue + (decimal)DiscountValue.IsClubMember;
        else
            return discountValue;
    }
}
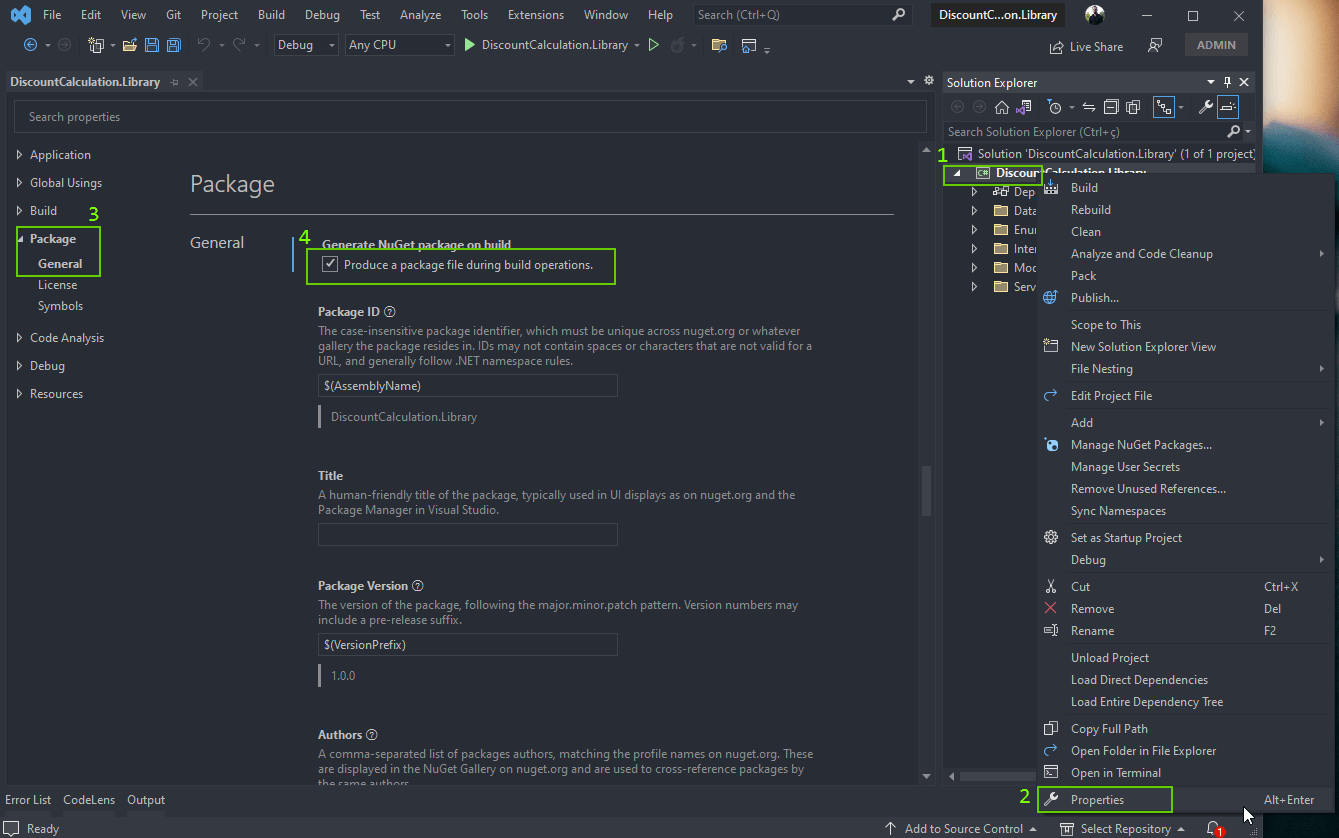
All the coding of our NuGet package is ready. Now we only need the last part, which is to generate the package. To do this, in Visual Studio, right-click on the “DiscountCalculation.Library” project and choose the “Properties” option.
In the window that opens, click on the “Package” tab and then on “General” and check the option “Produce a package file during build operations” as shown in the image below:
Then, right-click again on the project and click on the “Build” option.
Now, access the directory where the project was created and enter the “bin” folder and then the “debug.” Inside there will be a file with the .nupkg extension ready to be used in any .NET compatible application.
And so we finished our NuGet package, but it’s not over yet. Next we’re going to create an application that will consume this package.
Using the NuGet Package
To use the NuGet package, let’s create a Minimal API that will provide some data for the discount calculation method and will return the result obtained.
To create the application in Visual Studio, choose the option “Create a new project” then “ASP.NET Core Web API.” Name it (this article will use the name “CustomerAPI”), then choose version 7.0 of .NET and leave the “Use controllers” option unchecked and click “Create.”
Then, let’s create the model classes for Customer and DiscountResult. Create a new folder called “Models” and inside it create the following classes:
- Customer
namespace CustomerAPI.Models;
public class Customer
{
    public Customer(string? name, bool isClubMember, string paymentMethod)
    {
        Name = name;
        IsClubMember = isClubMember;
        PaymentMethod = paymentMethod;
    }

    public string? Name { get; set; }
    public bool IsClubMember { get; set; }
    public string? PaymentMethod { get; set; }
}
- DiscountResult
namespace CustomerAPI.Models;
public class DiscountResult
{
    public decimal DiscountValue { get; set; }
}
Now let’s add the NuGet package we created earlier. You will need to create a folder somewhere of your choice, then name it “NuGet Local Packages” and place the file with the extension .nupkg previously generated inside it.
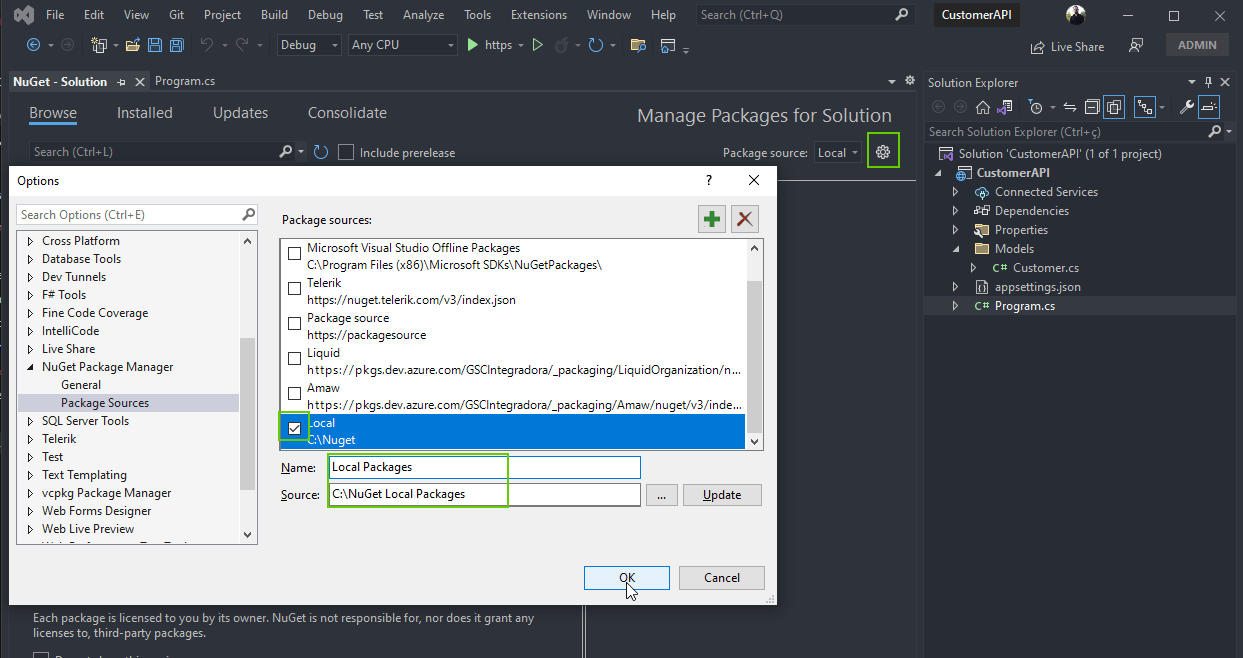
Then in Visual Studio access the menu “Tools” -> “NuGet Package Manager” -> “Manage NuGet Packages for Solution…”
In the window that opens, click on the gear icon in the right corner. In the next window, click on the “+” icon. Here we will add the source of our NuGet package, which is the folder where you placed the file with .nupkg extension. Enter a name and click OK.
The images below show the whole process:
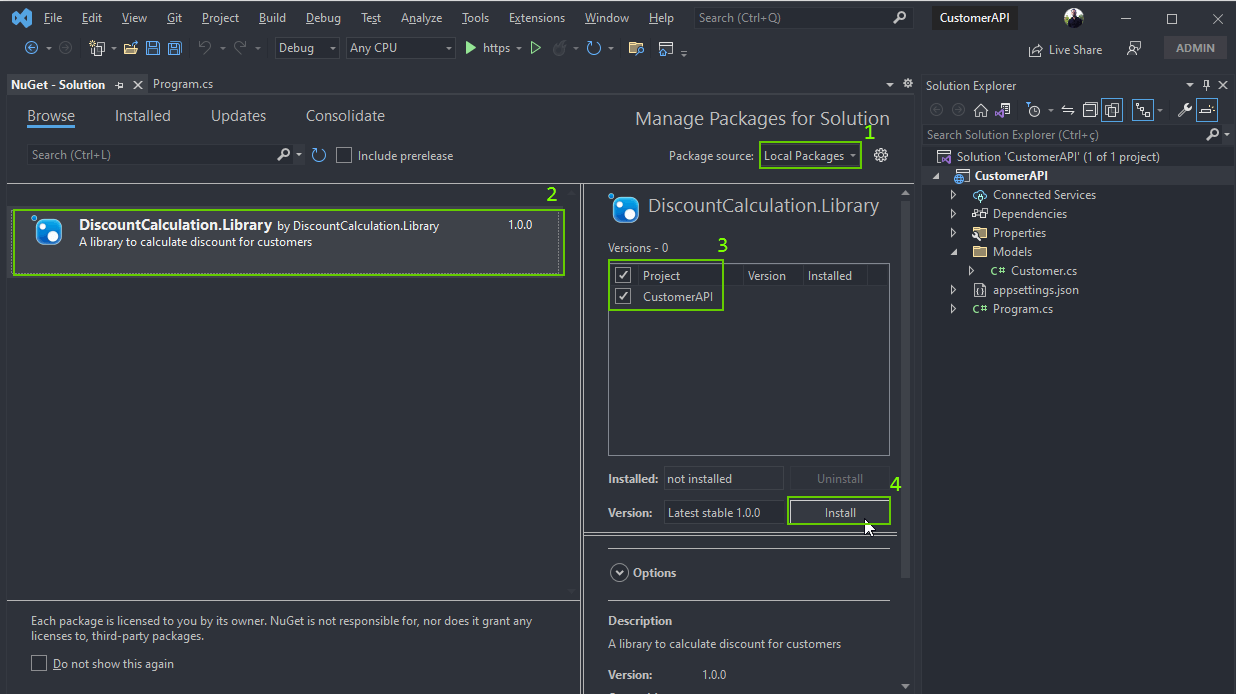
Then select the created configuration “Local Packages” and then click “install,” as shown in the image below:
Finally, let’s create the API endpoint that will use the discount calculation method.
So, in the Program.cs file, delete the code below—this code is generated automatically and we won’t need it:
var summaries = new[]
{
    "Freezing", "Bracing", "Chilly", "Cool", "Mild", "Warm", "Balmy", "Hot", "Sweltering", "Scorching"
};

app.MapGet("/weatherforecast", () =>
{
    var forecast = Enumerable.Range(1, 5).Select(index =>
        new WeatherForecast
        (
            DateOnly.FromDateTime(DateTime.Now.AddDays(index)),
            Random.Shared.Next(-20, 55),
            summaries[Random.Shared.Next(summaries.Length)]
        ))
        .ToArray();
    return forecast;
})
.WithName("GetWeatherForecast")
.WithOpenApi();

internal record WeatherForecast(DateOnly Date, int TemperatureC, string? Summary)
{
    public int TemperatureF => 32 + (int)(TemperatureC / 0.5556);
}
Now, let’s add the code regarding the endpoint. In the first lines of the Program.cs file, add the code below, which is responsible for importing the model class and NuGet package.
using CustomerAPI.Models;
using DiscountCalculation.Library.Data;
using DiscountCalculation.Library.Interfaces;
using DiscountCalculation.Library.Services;
Then, above the “AddendPointsapiexplore () method” add the code below. It is responsible for the injection of service and context class dependence of the NuGet package.
builder.Services.AddSingleton<DbContext>();
builder.Services.AddTransient<IDiscountService, DiscountService>();
Finally, we will add the code regarding the endpoint which will use the discount calculation method and return the corresponding value. Above the “app.run ()” method, add the code snippet below:
app.MapPost("/caculateDiscount", ([FromBody]Customer customer, [FromServices] IDiscountService discountService) =>
{
    var discountValue = discountService.Calculate(customer.Name, customer.IsClubMember, customer.PaymentMethod);

    var result = new DiscountResult { DiscountValue = discountValue };

    return discountValue != 0 ? Results.Ok(result) : Results.BadRequest();

})
.WithName("caculateDiscount")
.WithOpenApi();
Testing the Application
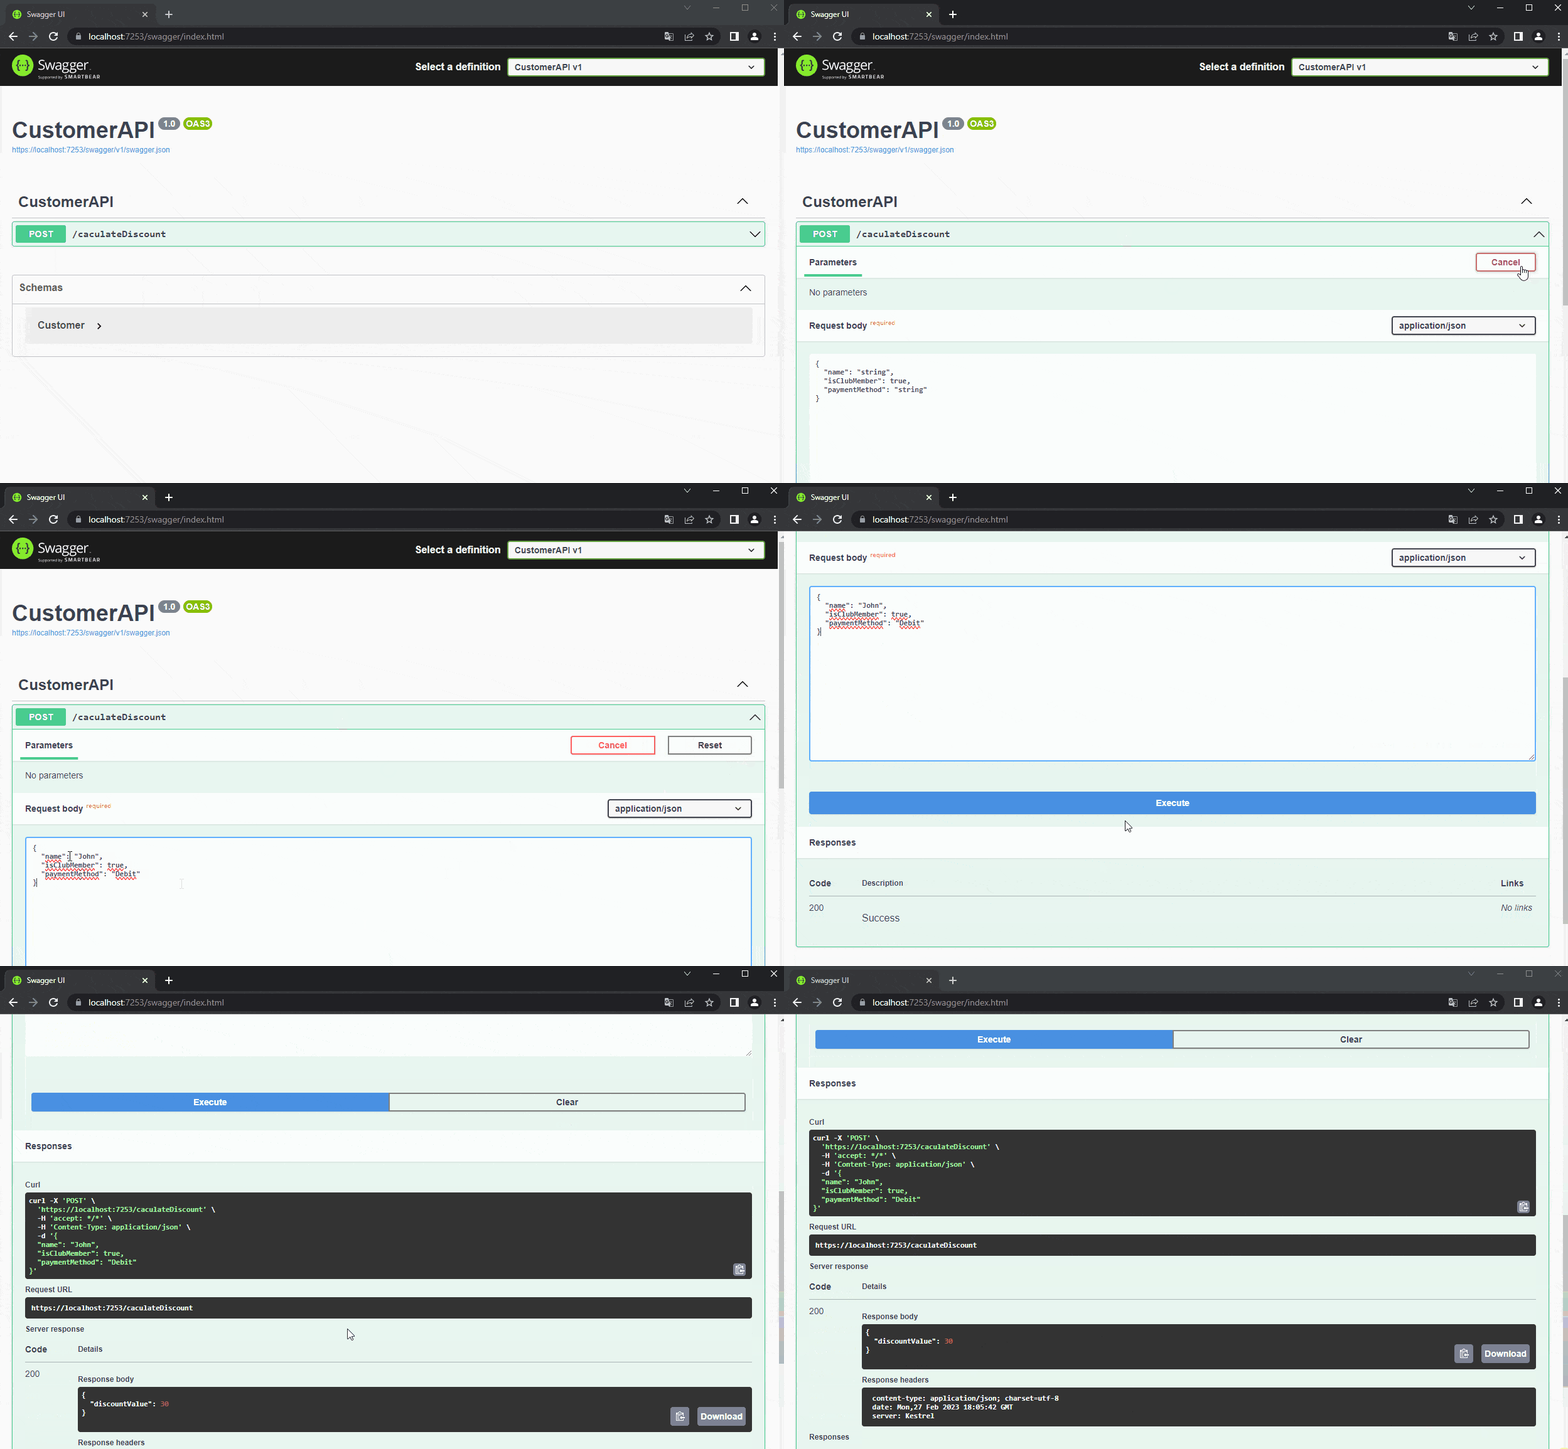
To test it, just run the application that a window of your browser will open with the Swagger interface. Then, add the data below in the body of the request and click on execute:
{
  "name": "John",
  "isClubMember": true,
  "paymentMethod": "Debit"
}
The GIF below shows the execution through the Swagger interface:
If everything is right, the request will return with the data below:
{
   "discountValue": 30
}
Note that we sent in the “name” field a valid user, which is already defined in the library. We also sent that the user is a member of the club and that the payment method is “Debit,” so the user got the maximum discount according to the calculation performed in the library method.
Now send the following in the request body:
{
   "name": "John",
   "isClubMember": false,
   "paymentMethod": "Credit"
}
Probably the return this time was:
{
   "discountValue": 3
}
This is because the user was not a member of the club and the payment method was credit, so, according to the calculation, our user only obtained the minimum discount amount.
We finished importing the library through NuGet Package.
Using the DLL File
Now let’s do the same import via the DLL file. Remove the library from the project by opening the NuGet package window, selecting the library and clicking “Uninstall.”
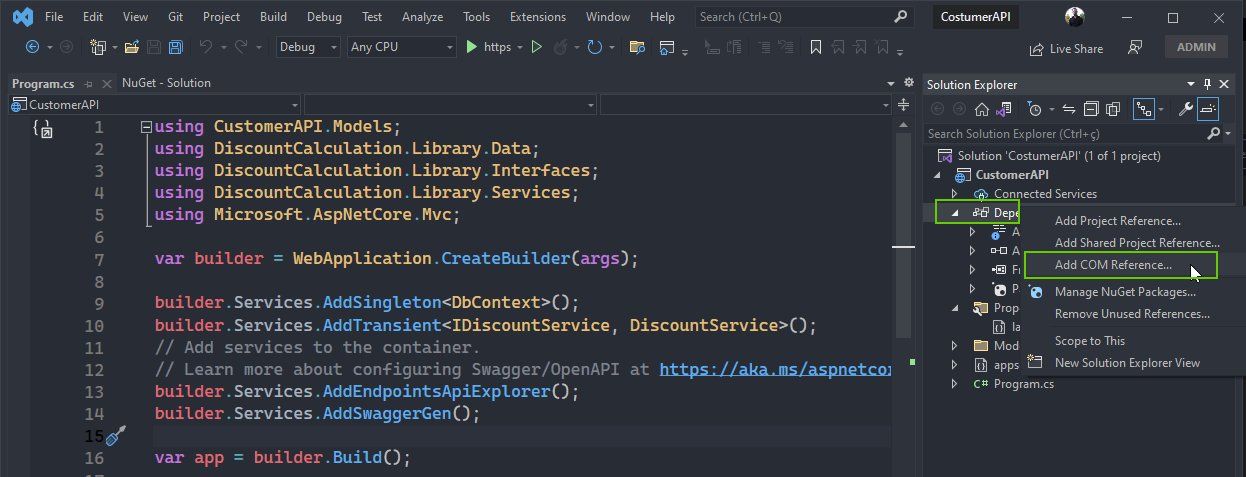
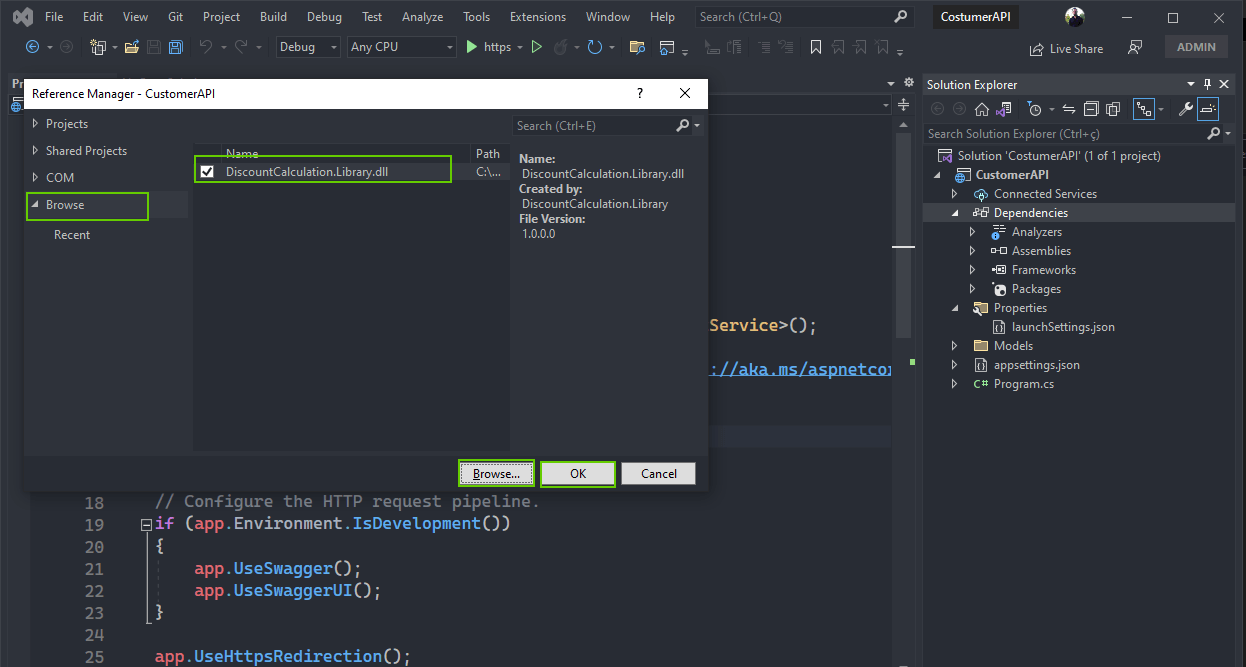
Then right-click on the project’s “Dependencies” resource, then choose the “Add COM reference…” option. Click “Browse” and navigate to the project directory where you created the library (DiscountCalculation.Library\bin\Debug\net7.0) and select the DLL file that appears and then click “Ok.” This is the simplest way to add dependencies.
The images below show the import process via the DLL file:
Conclusion
Code sharing is an incredible feature of ASP.NET Core, but many developers avoid using it because they are unfamiliar with the subject or find it a little complicated. In this article we saw that creating shareable libraries is very simple.
So, whenever the opportunity arises, consider using this native ASP.NET Core feature.

