First Impressions of the TreeView in Telerik UI for Xamarin

This post will get you familiar with the TreeView component in the Telerik UI for Xamarin suite – how it can be used, some of its key features and how to set it up for your mobile applications.
One of the reasons the TreeView component (AKA, RadTreeView) was created is to cover the scenarios where a hierarchical data presentation is needed. Of course, this is not the only scenario in which the control can be used, but it is the best fitting one.
The control features the following built-in functionalities:
- Hierarchical navigation
- Expand/collapse APIs
- Commands support
- CheckBox support
- DataBinding
- UI Virtualization
- Customization capabilities via ItemTemplateSelectors
- Theming
We will take a closer look at the Customization example from our TreeView QSF (quick start framework) and see how the TreeView is configured.
Defining the Scenario
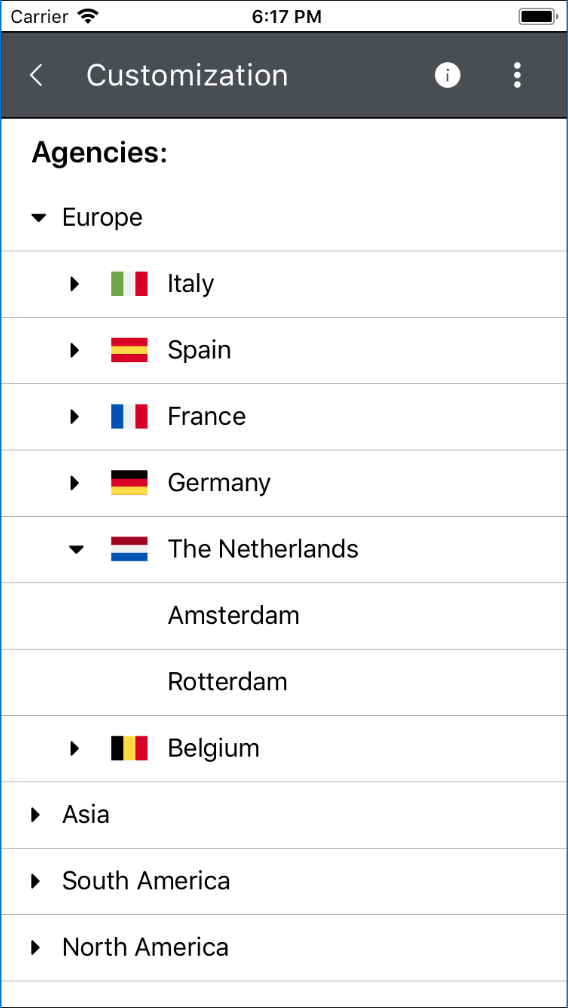
The example shows all cities worldwide in which an organization has at least one office. The cities are grouped by their country, and the countries are grouped by their continent.
Setting up the Data
The two most important steps here are providing the ItemsSource and HierarchyAdapter. In other words, users should provide the raw data that will be visualized and an adapter which can retrieve the children of each data entry. Based on this, the RadTreeView creates the hierarchy. In the example below the ItemsSource is a simple ObservableCollection containing business objects describing a continent.
Without the HiearchyAdapter, the RadTreeView will only display the root level items of the ItemsSource. To properly display the hierarchy, the Telerik.XamarinForms.Common.IHierarchyAdapter interface must be implemented. It has two methods – GetItems() and GetItemAt(). In GetItems(), the adapter should return all children of the item passed as the only parameter. The GetItemAt() should return a specific child of a provided item. For more details you can refer to the source code of the example. Once these steps are made the hierarchical data will be visualized.
Most likely at this point the visualized result will not fit your design requirements. That is because when no ItemTemplate or ItemTemplateSelector is applied, the RadTreeView will render whatever the ToString() method of each business item returns. To beautify the visualization, additional steps should be taken.
Creating Item Templates
Now that the data is set, we can proceed with customizing the look of the items. The RadTreeView allows you to apply a different DataTemplate for each item through a DataTemplateSelector. In the example this is achieved by the ItemTemplateSelector class. The specific implementation can be seen in the GitHub repo. As you can see, in addition to the selecting logic the class exposes several properties of DataTemplate. This allows setting the properties in XAML like so:
<telerikDataControls:RadTreeView.ItemTemplateSelector>
  <local:ItemTemplateSelector>
    <local:ItemTemplateSelector.ContinentTemplate>
      <DataTemplate>
        <!-- ... -->
      </DataTemplate>
    </local:ItemTemplateSelector.ContinentTemplate>
    <local:ItemTemplateSelector.CountryTemplate>
      <DataTemplate>
        <!-- ... -->
      </DataTemplate>
    </local:ItemTemplateSelector.CountryTemplate>
    <local:ItemTemplateSelector.CityTemplate>
      <DataTemplate>
        <!-- ... -->
      </DataTemplate>
    </local:ItemTemplateSelector.CityTemplate>
  </local:ItemTemplateSelector>
</telerikDataControls:RadTreeView.ItemTemplateSelector>
Admiring the Result
In the different <DataTemplate> declarations, you can create the required design for each of the items in the hierarchy. Once this is done you can sit back, relax and enjoy your work.

Wrapping Up
Now you should be able to properly feed data to the RadTreeView as well as to implement a custom design for the items. As always, more information about the rest of the features of the component can be found in our online documentation. You can also share your feedback and suggestions for the suite through the Feedback Portal.
If this is the first time you are hearing about the Telerik UI for Xamarin suite and want to try it our for your mobile application development, you can do so by going to the website or directly downloading a free trial.
Thanks and happy coding!

