
If you have services deployed in an AWS VPC, you have probably had some challenges getting to them. SSH works but is limited. Adding ingress rules to security groups is risky and high-maintenance.
But there’s another way — you can deploy a Tailscale subnet router, running in a Docker container, right into that VPC. All you need is a key from Tailscale, and a new Terraform module I’ve published.
Why this module?
I previously wrote all about the things that Tailscale can do that I find particularly useful. Most of it was about point-and-clicking your way to VPN bliss.
But the AWS VPC question is a little different. When setting up Docker build hosts, I’ll usually add Tailscale into the mix there so that host shows up on my tailnet. However, to get there, I need to get SSH access in to install it, authorize it… it’s a bit of manual work, still.
On top of that, I’m a huge believer in infrastructure as code. So, for a project I was working on, I wanted to find out how tricky it might be to add a Tailscale subnet router right into the existing Terraform code of everything I’m already provisioning.
I went looking for a module that someone had already done. But, at least one was overcomplicated for my needs, and they all required me to build and push a custom Docker image. The most promising one, David Norton’s, looked good — so I dug in.
Then I found some great news: since that time, Tailscale’s official Docker image now has everything we need to deploy our router. We don’t need a custom image anymore!
Give me the code!
If you want to just use the default VPC in your AWS account, using this module is incredibly simple:
data "aws_vpc" "default" {
  default = true
}

data "aws_security_group" "default_vpc_default" {
  vpc_id = data.aws_vpc.default.id
  name   = "default"
}

data "aws_subnets" "default_vpc" {
  filter {
    name   = "vpc-id"
    values = [data.aws_vpc.default.id]
  }
}

# Set TF_VAR_tailscale_auth_key in your environment, or pass on the command line
variable "tailscale_auth_key" {
  type      = string
  sensitive = true
}

module "router" {
  source  = "atomicobject/tailscale-router/aws"
  version = ">= 1.1.2, < 2.0.0"

  name               = "tailscale-subnet-router"
  tailscale_auth_key = var.tailscale_auth_key
  vpc_id             = data.aws_vpc.default.id
  subnet_ids         = data.aws_subnets.default_vpc.ids
  security_group_ids = [data.aws_security_group.default_vpc_default.id]
}
In this code, the data blocks are looking up the VPC and the details needed to launch the router. The module itself will do the honors.
The module needs the following:
- The ID of the VPC to deploy into.
- The subnet IDs to deploy into. This example looks them all up and deploys the router into them all.
- The security group IDs to attach. This example gets the default VPC’s default security group, which — in a default configuration — will allow the router to reach anything in the VPC that has the default security group in an ingress rule.
It also needs one thing it can’t look up: a Tailscale auth key. That will take a few setup steps.
Get ready to authorize.
Before you do anything else, you may want to set up tags. Tags take over the ownership of your machine so ACL rules can apply to them.
I use a tag called “server,” which has no rights to connect to anything in the tailnet but can still be used as a subnet router. I also set up the tag to auto-approve the route advertised by the router. This will save a step when it is deployed and comes up.
{
    "tagOwners": {
        "tag:server": ["[email protected]"],
    },
    "acls": [
        {
            "action": "accept",
            "src": ["[email protected]"],
            "dst": ["*:*"]
        },
    ],
    "autoApprovers": {
        "routes": {
            "172.31.0.0/16": ["tag:server"],
        },
    },
}
This ACL set does a few things:
- The “tagOwners” block allows me to assign the “server” tag to machines.
- The “acls” block allows my machines to connect to anything on the tailnet. It does not allow the server-tagged machines to make their own connections into the tailnet.
- The “autoApprovers” block allows a machine-tagged “server” to advertise the 172.31 IP address block (which matches my VPN) without a need for me to manually approve it when it comes up.
Get your key ready.
Head over to Keys in your Tailscale admin interface. There, you can generate a new auth key.
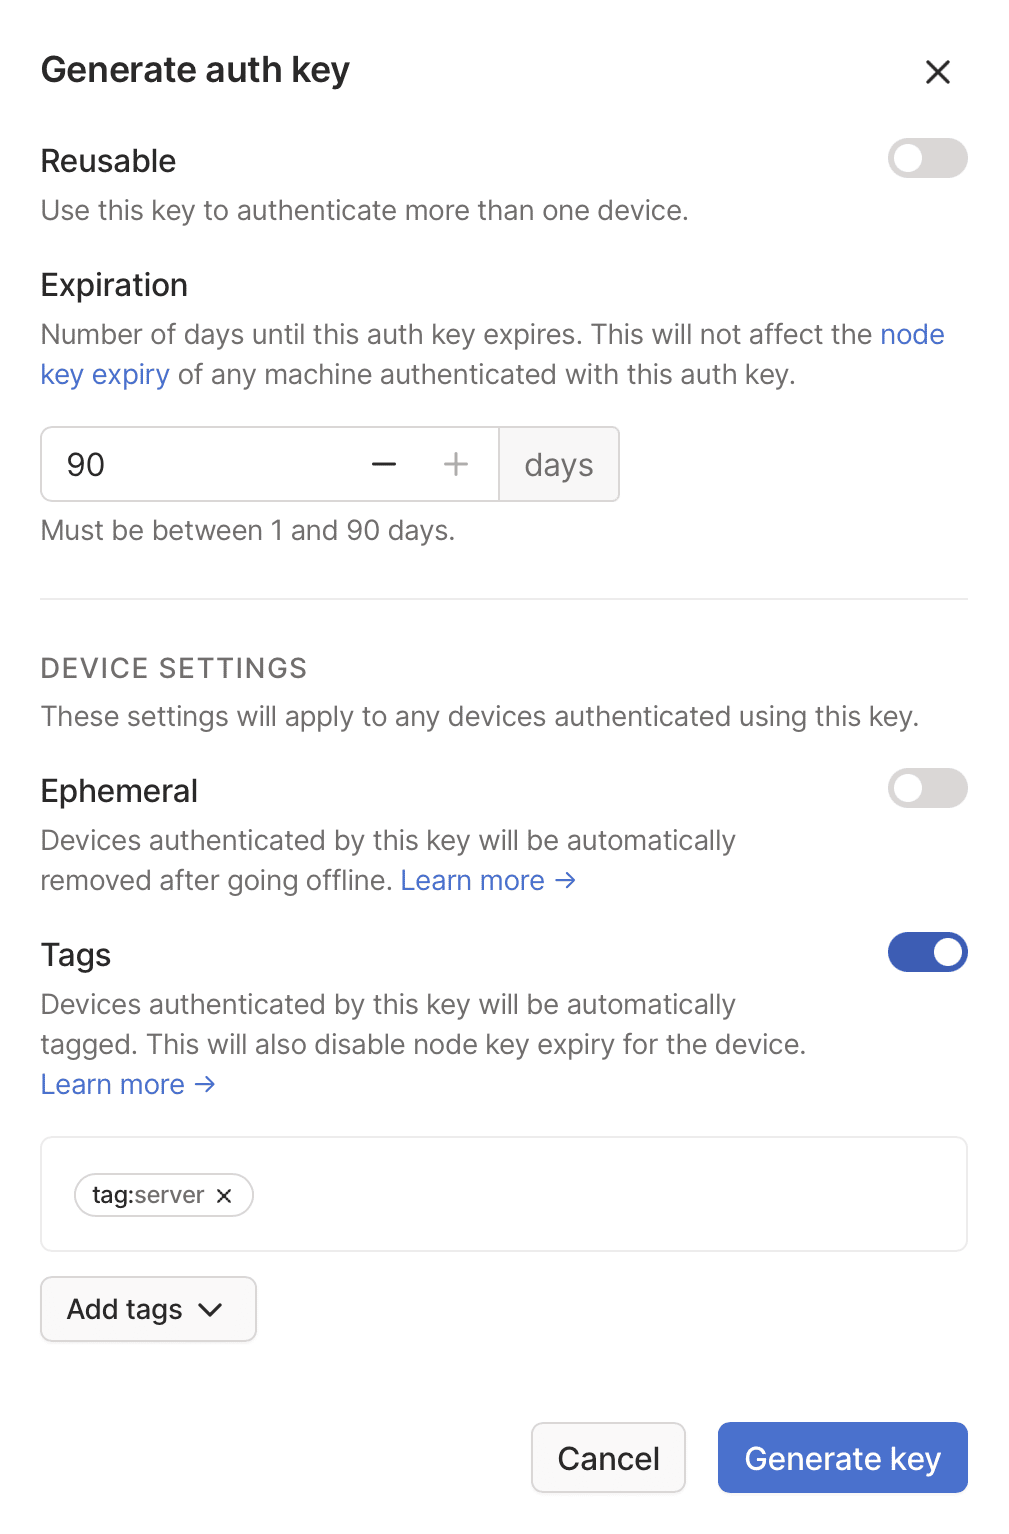
Any key will work, but I recommend you do a few things to minimize the amount of maintenance you need to undertake.
- Make the key non-reusable. This doesn’t mean that your router will lose authorization if the container is stopped — it saves a node key after authorization that will allow a new container to pick up where the last one left off.
- Set expiration to as long as you want to continue using this key to authorize. Remember — the machine will use its node key, which it gets after authorization, to stay on the tailnet. You aren’t setting a time limit on your router’s connection.
- I don’t recommend making the key ephemeral. If your router container stops temporarily (I stop mine whenever I’m not using it), you don’t want the machine removed from Tailscale so it can come back online when started again.
- I highly recommend tags. In addition to applying ACLs, tags have usefulness here because they’ll create a non-expiring node key when authorizing — meaning your router will stay in the tailnet as long as it needs to.
Once you’re ready, hit Generate key, then get the key somewhere that Terraform will pick it up — for example, in your environment, in TF_VAR_tailscale_auth_key.
Apply the changes.
You’re ready! Type terraform init, then terraform apply and a subnet router will be deployed.
You should see it appear in your Tailscale machines list shortly. If you suspect problems, have a look in ECS for logs.
Once everything’s up, then all you need to do is be signed into your tailnet. If the ACL and security group gods are smiling on you, you’ll be able to access all your VPC resources just like your computer was inside the VPC. Connect to a database, hit API endpoints with Curl, and SSH into servers.
You’ll never want to use a bastion host again.