
How to Create a Quick and Easy E-Shop with Reporting and ASP.NET Core or jQuery

Explore an e-shop application built with Telerik UI for ASP.NET Core and Kendo UI for jQuery, bolstered by the power of Telerik Reporting for things like invoicing and order reports.
The e-shop applications demonstrate how the Telerik UI for the ASP.NET Core and Kendo UI for the jQuery components can be used to create an online store. In addition, you will learn how to integrate reporting functionalities with Telerik Reporting.
In this blog post, we will go into detail about how the applications are developed and what components and technologies are used.
Contents
- What is included in the applications?
- What technologies are used?
- Which are the main components used?
- How Telerik Reporting is integrated
What Is Included in the Applications?
The user can create an account, log in to the website and complete their account information, such as phone, password and shipping address. This information can be edited and reviewed through the “Profile” section.
The products in the e-shop are split into categories, and the complete product catalog can be downloaded in different formats through the “Download Product Catalog” on the homepage. The products page has an option for a grid or list view. Also, the products can be sorted by price or name; filtered by discount, model, rating, price and weight; or searched through the search menu available on each page.
Each product has its own details page and a list of similar products. When the user opens a specified product, this product appears in the “Recently viewed” section on the homepage. This functionality is a common requirement when developing an online shop.
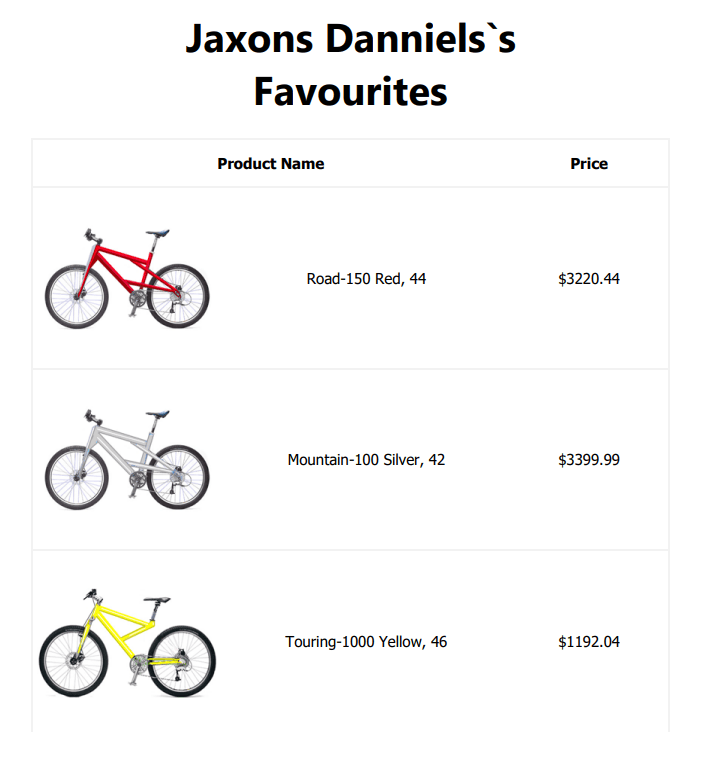
Another useful feature is the selection of favorite products and exporting them in PDF format through the Favorites section. Besides that, there is a shopping cart for each logged user. The shopping cart items can be transferred into an active order by clicking the “Check-out” button.
The user can create multiple orders and review detailed order information and order invoice.
What Technologies Are Used?
Both e-shop applications are developed with ASP.NET Core MVC framework and Entity Framework Core and work with Microsoft SQL Server user database.
The Telerik UI for ASP.NET Core wrappers/Kendo UI for jQuery widgets with a combination with the Kendo UI Fluent Sass-based theme implement the application look and feel.
An important part of the applications is the integration with Telerik Reporting. The shop reports are created through Telerik Reporting, which allows you to integrate different types of reports in your web, cloud-based and desktop applications.
Which Are the Main Components Used?
ScrollView
After the user is successfully logged in, on the homepage two ScrollViews will be rendered. While the ScrollView on the top is loading static images, the Top Picks ScrollView is loading its data from a remote endpoint. In the Top Picks ScrollView, a template is used in order to style the content of the items.
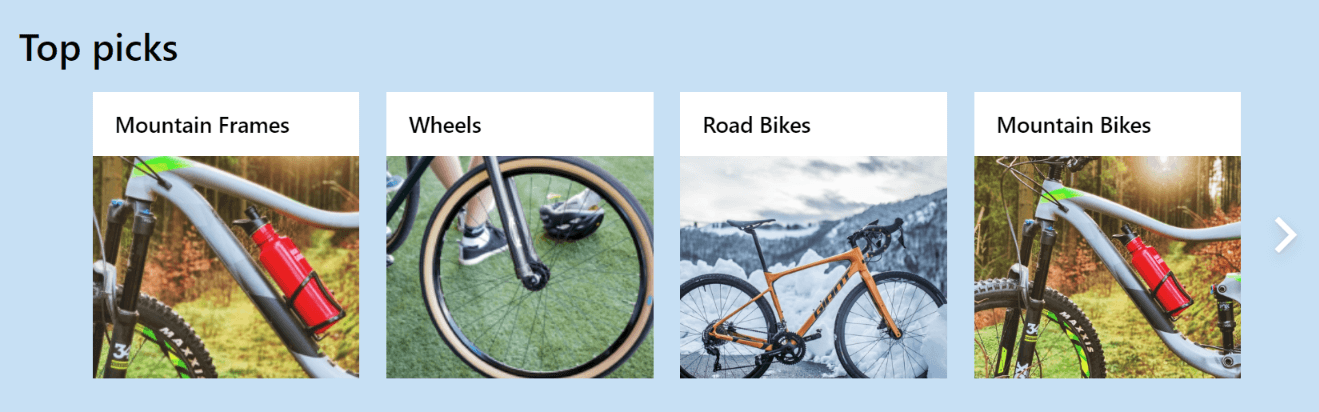
On the homepage, the user could select a “top pick” or select one of the main categories and then select a subcategory of products. In both cases, a page with the products for the selected subcategory will be displayed.
ListView
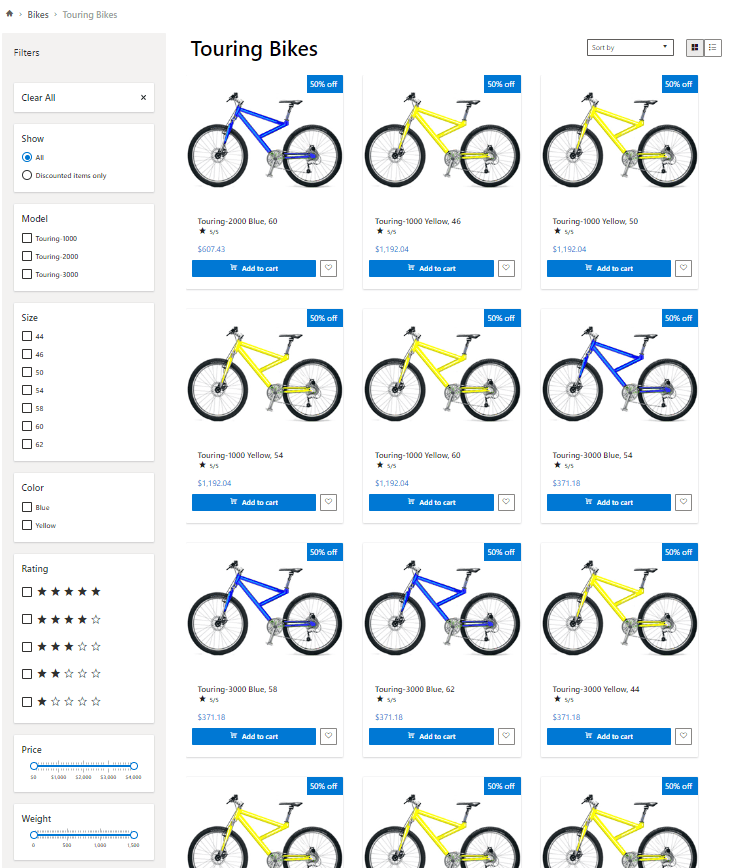
The Products page is a great example of how a ListView can be used along with the other Kendo UI components to display items in an online shop and achieve a great user experience.
Above the ListView, there is an external DropDownList where the user can select the sorting preferences. Clicking on the icons displayed in the ButtonGroup placed next to the sorting DropDownList allows the user to change the views in the ListView. Basically, the appearance of the different views is achieved by simply setting different values for the grid option of the ListView.
On the left side of the Products page, different Kendo UI widgets, such as CheckBoxGroup, RadioGroup and Slider are displayed. Upon changing the selection in the widgets, the data in the ListView is filtered.
This page demonstrates not only how the Kendo UI components can be used together to achieve a great user experience while filtering items, but also is an example of how a complex filter can be created and used to filter the Kendo DataSource.
Grid
The Grid is used in multiple places in the app:
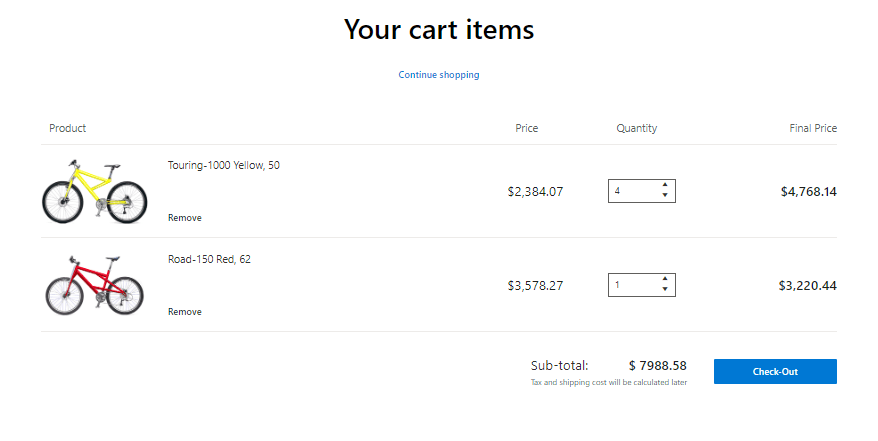
While reviewing the products, the user can add desired products to the cart by clicking the “Add to Cart” button. Then, when the user clicks on the cart icon in the menu on the top, the ShoppingCart is displayed using the Grid component.
The Grid displayed in the ShoppingCart view is a good example of a Grid with “incell” editing where the editing is enabled only for a specific column:
After the shopping cart is checked out, a page with all the orders made by the user is displayed. The Grid displayed in the “OrdersPage” illustrates an example of utilizing the column template option and formatting different types of data. The OrderDate column shows formatting of dates, and the Total column demonstrates formatting of numbers. In the last column of the Grid, a template is used to display a link leading to the order detail page.

By clicking the “View Orders” link on the “OrdersPage,” the user could review the details for a specific order. In the order detail Grid, a template is used to display the image of the product. The “View Invoice” button will open an invoice generated through Telerik Reporting. You can read more about the integration with Telerik Reporting below.
TabStrip with Forms
TabStrip is a navigational component suitable for the user profile page to organize the respective user data into a set of tabs. You can integrate other UI components, such as a Form. The Profile section in the e-shop contains a TabStrip with a Form in each tab. Each logged user can edit their account information and password and save the changes.

Captcha with Form
The Contacts page has a Form with an integrated Captcha. The Captcha component is set up with a server-side provider. This way, the Captcha images are generated and validated on the server side of the web application. It has a quick and easy implementation. By integrating the Captcha inside the Form, the form submission is automatically aborted if the user does not enter the text from the Captcha image correctly.

How Telerik Reporting Is Integrated
As mentioned in the introduction, the demo application showcases how to generate an order invoice, export a PDF document with the user’s favorite products, and download or print a complete product catalog.
These reports can be easily implemented with the help of Telerik Reporting. For step-by-step guidance on how to embed Telerik Reporting into your ASP.NET Core web application, refer to this tutorial.
Integration Essentials
- Installing the following list of required NuGet packages from the Telerik NuGet feed:
- Telerik.Reporting.Services.AspNetCore
- Telerik.Reporting.WebServiceDataSource
- Telerik.Reportin.OpenXmlRendering
- Configuring the Reporting REST Service in the Program.cs file:
using Telerik.Reporting.Cache.File;
using Telerik.Reporting.Services;
using Services.Interfaces;
using Services;

var builder = WebApplication.CreateBuilder(args);
…
builder.Services.TryAddSingleton<IReportServiceConfiguration>(sp => new ReportServiceConfiguration
{
	ReportingEngineConfiguration = sp.GetService<IConfiguration>(),
	HostAppId = "Html5ReportViewerDemo",
	Storage = new FileStorage(),
	ReportSourceResolver = new UriReportSourceResolver(
		System.IO.Path.Combine(GetReportsDir(sp)))
});

…

static string GetReportsDir(IServiceProvider sp)
{
    var iwhe = sp.GetService<IWebHostEnvironment>();
    if (iwhe == null)
    {
        throw new ArgumentNullException(nameof(sp));
    }
	return Path.Combine(iwhe.ContentRootPath, "Reports");
}
- Creating the ReportsController:
namespace Web.Controllers
{
    using Telerik.Reporting.Services.AspNetCore;
    using Telerik.Reporting.Services;
    using Microsoft.AspNetCore.Mvc;
    using System.Net.Mail;
    using System.Net;

    [Route("api/reports")]
    public class ReportsController : ReportsControllerBase
    {
        public ReportsController(IReportServiceConfiguration reportServiceConfiguration)
            : base(reportServiceConfiguration)
        { }
    }
}
Implementing a shared View that initializes the HTML5 Report Viewer.
The shared View (“/Shared/ReportViewer.cshtml”) contains a Report Viewer, whose purpose is to display Telerik Reports and allow the user to interact with them. This is a great approach since the same View can be reused for all application reports. You just need to configure the “serviceUrl” and “reportSource” options in the
telerik_ReportViewermethod:
@{
    ViewData["Title"] = "Report Viewer";
    var parameter = Html.Raw(Json.Serialize(Model.Parameters));
}

@model Models.ViewModels.ReportSourceModel

<script src=" https://reporting.cdn.telerik.com/16.2.22.1109/js/telerikReportViewer.min.js"></script>

    	<div class="report-container">
        <div id="reportViewer1">
            loading...
        </div>
    	</div>

    <script type="text/javascript">
        $(document).ready(function () {
            $("#reportViewer1")
                .telerik_ReportViewer({
                    serviceUrl: "@Context.Request.PathBase.Value/api/reports",
                    reportSource: {
                        report: '@Model.ReportId',
                        parameters: @parameter
                    },
                    viewMode: telerikReportViewer.ViewModes.INTERACTIVE,
                    scaleMode: telerikReportViewer.ScaleModes.FIT_PAGE_WIDTH,
                    scale: 0.6,
                    sendEmail: { enabled: true }
                });
        });
    </script>
The serviceUrl matches the URL of the ReportsController route, and the report option value in the “reportSource” configuration refers to the file name of the report definition,
which comes from the Model.
Reports:
- Product Catalog
On the application homepage, a product catalog with categories and subcategories can be opened through the Telerik Report Viewer.
When clicking the “Download Product Catalog” button, a request to the ProductCatalog Action in the Home Controller will be sent. The ProductCatalog Action will load the relevant .trdp file into the ReportViewer:
public IActionResult ProductCatalog()
    {
        var reportSource = new ReportSourceModel()
        {
            ReportId = "ProductCatalog.trdp"
        };
        return View("~/Views/Shared/ReportViewer.cshtml", reportSource);
}
For a more detailed example of a product catalog, you can refer to the Telerik Reporting Product Catalog Report Demo.
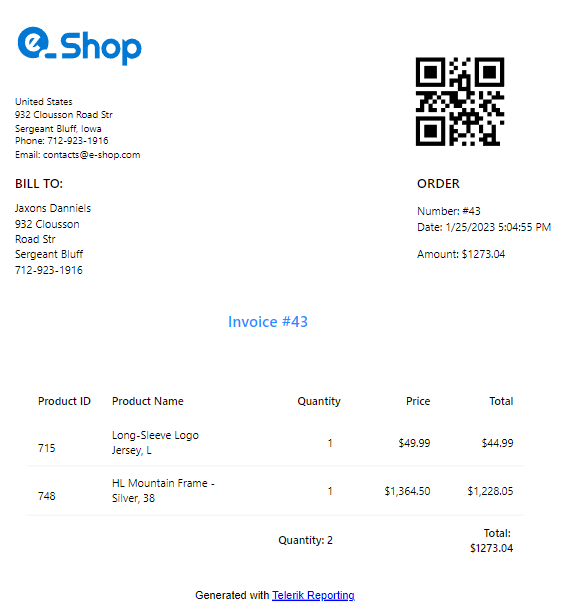
- Order Invoice
As described earlier in the post, the user can create new orders, view the list of the already purchased orders, view the details for each order, and also get an invoice for each order.
Go to “Orders” and click on the “View Order” link for a specific order. Then, click the “View Invoice” button that is displayed below the Grid containing the order details. Clicking on the button will send a request to the Invoice Action in the Account Controller.
The implementation of the Invoice Action is similar to the one for the ProductCatalog above. Basically, the needed .trdp file (in this case it is “OrderInvocie.trdp”) will be sent to the ReportViewer to create a report. The difference is that in this scenario a parameter with the invoice number is sent to the report, as well. Thus, the ReportViewer will use the sent parameter to retrieve the data for the selected invoice and will create a report for it.
{
    Dictionary<string, object> parameters = new Dictionary<string, object>();
    parameters.Add("OrN", orderNumber);
    var reportSource = new ReportSourceModel()
    {
        ReportId = "OrderInvoice.trdp",
        Parameters = parameters
     };
     return View("~/Views/Shared/ReportViewer.cshtml", reportSource);
}
- PDF Export
The exporting of all favorite products in PDF format is implemented on the server as per the following approach:
- Get the saved favorite products of the currently logged user from the database.
- Create a UriReportSource and pass the serialized favorite products data as a parameter to the Report Source.
- Use the RenderReport method to render the report in PDF format. This method converts the contents of the report to a byte array in the specified format, as explained in the generating reports locally section in the Telerik Reporting documentation.
- Return the produced document to the client.
As a result, the PDF document will be exported to the user’s machine.
Here you can review the Action that handles the PDF export:
[HttpGet]
public async Task<ActionResult> FavouritesReport()
{
    var userEmail = User.FindFirstValue(ClaimTypes.Email);
    var userDetails = await userService.GetUserPersonalDetails(userEmail);
    var userName = userDetails.FirstName + " " + userDetails.LastName;
    var reportData = new FavoriteUserProductViewModel()
    {
        UserName = userName,
        FavoriteReportProducts = new List<FavoriteReportProductViewModel>()
    };

    var favoriteProductIds = HttpContext.Session.Get<List<int>>("_Favorites");
    var favoriteProducts = userService.GetFavoriteProductsById(favoriteProductIds);

    foreach (var favoriteProduct in favoriteProducts)
    {
        byte[]? largePhotoData = await productService.GetProductLargePhotoById((int)favoriteProduct.PhotoId);
        reportData.FavoriteReportProducts.Add(new FavoriteReportProductViewModel
        {
            Id = favoriteProduct.Id,
            ProductName = favoriteProduct.Name,
            Price =(decimal)favoriteProduct.FinalPrice,
            LargePhoto = largePhotoData
        });
    }
    var reportProcessor = new Telerik.Reporting.Processing.ReportProcessor();
    var reportSource = new Telerik.Reporting.UriReportSource();
    reportSource.Uri = "./Reports/FavouritesNew.trdp";
    string parameterValue = Newtonsoft.Json.JsonConvert.SerializeObject(reportData);
    reportSource.Parameters.Add("JSONData", parameterValue);
    Telerik.Reporting.Processing.RenderingResult result = reportProcessor.RenderReport("PDF", reportSource, null);
    if (!result.HasErrors)
    {
        return File(result.DocumentBytes, "application/pdf", "favourites.pdf");
        //use this code if you want to save the file locally

    //string fileName = result.DocumentName + "." + result.Extension;
    //string path = System.IO.Path.GetTempPath();
    //string filePath = System.IO.Path.Combine(path, fileName);
    //
    //using (System.IO.FileStream fs = new System.IO.FileStream(filePath, System.IO.FileMode.Create))
    //{
    //    fs.Write(result.DocumentBytes, 0, result.DocumentBytes.Length);
    //}
    }
    return NotFound();
}
You can explore the full implementation of the demo applications on the following links:
Telerik UI for ASP.NET Core
Kendo UI for jQuery
Try Now
Try any of these incredible products for free today:
Or, get all three under the same convenient license with Telerik DevCraft.
The DevCraft bundle is the most powerful collection of Telerik .NET and Kendo UI JavaScript developer UI libraries and tools. It includes modern, feature-rich, professionally designed UI components for web, desktop and mobile applications; embedded reporting and report management solutions; document processing libraries, automated testing and mocking tools.
DevCraft will arm your developers with everything needed to deliver outstanding applications in less time and with less effort.
With award-winning technical support delivered by the developers who built the products and a ton of resources and trainings, you can rest assured that you have a stable provider to rely on for your everyday challenges along your software development journey.
This post was co-authored by Neli Kondova and Mihaela Lukanova.

Neli Kondova
Neli Kondova is a Technical Support Engineer on the Kendo UI for jQuery team. She has been working with Kendo UI products since 2017, when she joined the company. Apart from work, she likes traveling to new places and spending time with her family.
Related Posts
Comments
All articles
Topics

Latest Stories
in Your Inbox
Subscribe to be the first to get our expert-written articles and tutorials for developers!
All fields are required