
Not sure what WordPress full site editing is and why you should care about it?
If you've paid attention to the last few WordPress releases, you might've noticed that the term "full site editing" keeps cropping up.
But at the same time, if you've already built your WordPress website using a "traditional" WordPress theme, you probably haven't noticed anything different in your day-to-day life when managing your site.
So…what is full site editing? And is it something you should learn about?
In our complete guide, we're going to cover everything that beginners need to know about WordPress full site editing, including the following:
- What WordPress full site editing is and how it helps
- The requirements to use/access full site editing
- A basic introduction to full site editing concepts and interfaces
- How to use full site editing to customise your header and blog post templates
Let's get started!
What is WordPress full site editing?

Full site editing (sometimes abbreviated as FSE) is a collection of features that help you build your entire website using blocks, including your header, footer, and blog templates.
The first full site editing features arrived in WordPress 5.8 (released July 2021), but each subsequent release has added new features and full site editing will continue to be the main focus of most major WordPress releases going forward.
When the block editor was first released, you only used it to write your posts and pages. In a more technical sense, you were limited to using blocks in your theme's content area.
You could fully edit all of a post or page's content, but you couldn't touch other areas of your site such as your header and footer.
Additionally, you couldn't control the actual templates of your posts - you could only add the content. For example, you weren't able to change the location of a post's title or featured image, nor could you adjust what the author biography box looked like.
Full site editing changes that by letting you edit every single part of your site using blocks.
What can you build with full site editing?
In a more technical sense, full site editing lets you customise your theme's "templates" using blocks.
Your typical WordPress theme is made up of four key template types (though there are other smaller templates):
- Header - this typically displays at the top of every page on your site and includes your logo, navigation menu, and so on.
- Footer - this typically displays at the bottom of every page on your site.
- Single - this is the template for a single piece of content (e.g. blog post). For example, it defines where to insert the post's title, where to add the feature image, where to add the main content from the post editor, what the author box looks like, and so on.
- Archive - this is the page that lists multiple pieces of content. For example, your main archive template is the page that lists all of your most recent blog posts. You might also have archives to list all the posts in a certain category, from a certain author, and so on.
With full site editing, you can customise all of these templates using blocks - no code needed.
Why is full site editing helpful?
The biggest advantage of full site editing is that it lets you control your theme's templates without needing to know code.
This essentially lets you design your own custom website theme using the block editor.
For example, let's say that you want to customise your site's header.
With the "old" way of doing things, your theme's developer would typically give you some options in the real-time Customiser. Depending on the theme, you might have a ton of options to customise different parts of the header or you might just have a few options.
The important thing, though, is that you were only able to make the customisations that your theme's developer gave you options for.
With full site editing, that dynamic is gone. By creating your own designs with blocks, you'll have total control over the layout, style, content, and so on.
Full site editing themes will shift more towards being preset style themes and block patterns, rather than the more structured themes that currently exist for WordPress where the theme actually controls the layout of your content.
The requirements to use WordPress full site editing
In order to use full site editing, you need to specifically be using a full site editing-compatible WordPress theme.
As of January 2023, some popular WordPress themes are still not compatible with full site editing. If you want to build a site using full site editing (or just test it out), you'll need to choose your theme based on that decision.
To find full site editing-compatible WordPress themes, you can use the Full Site Editing feature filter at the WordPress.org theme directory - click here to go straight to compatible themes.
All of the recent default WordPress themes are also compatible with full site editing, including Twenty Twenty-Two and Twenty Twenty-One.
How to access and use the new WordPress Site Editor
Next, let's pivot to some more hands-on tips for how to actually use the new WordPress full site editing features.
We'll start with a general overview of the new WordPress Site Editor, which is what you'll use for full site editing. We'll also cover some important terms that you need to understand.
Then, in the next section, we'll look at two specific examples of using the Site Editor for full site editing - customising your site's header and blog post templates.
How to open the WordPress Site Editor
Assuming you're using a WordPress theme that supports full site editing, you can open the Site Editor by going to Appearance → Editor in your WordPress dashboard.
You'll notice that the Appearance → Customise menu no longer exists, which is because full site editing replaces the older Customiser that most "traditional" WordPress themes use.

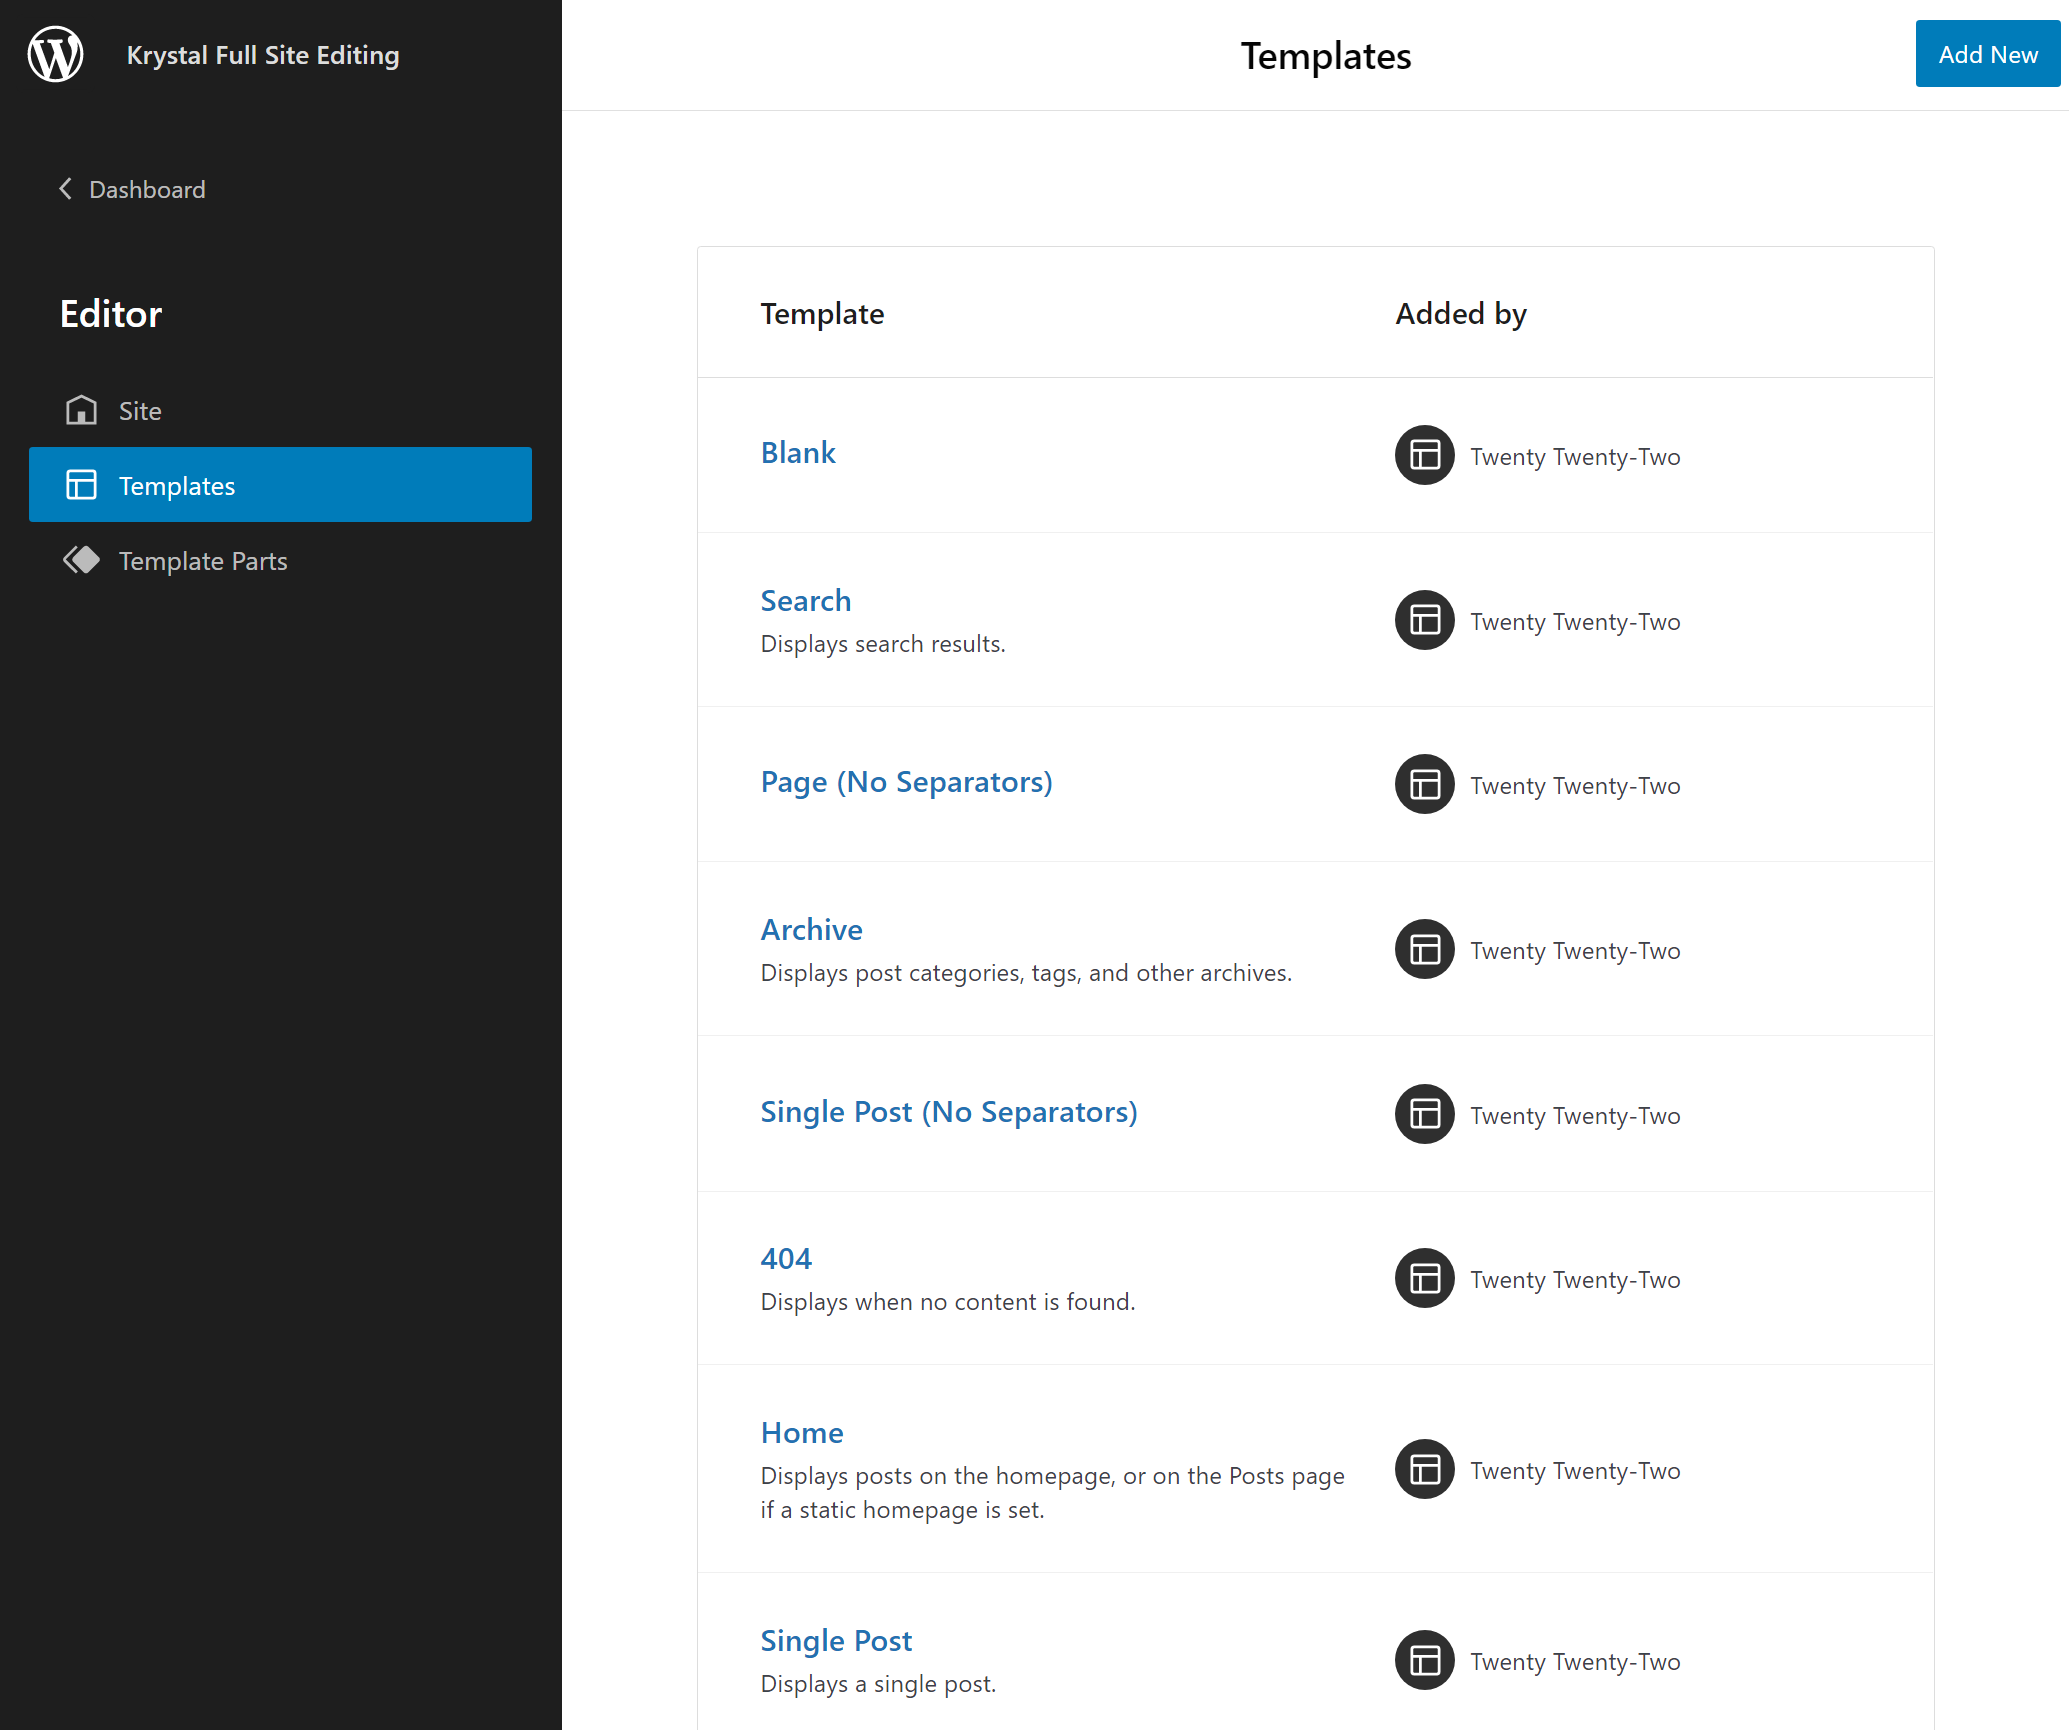
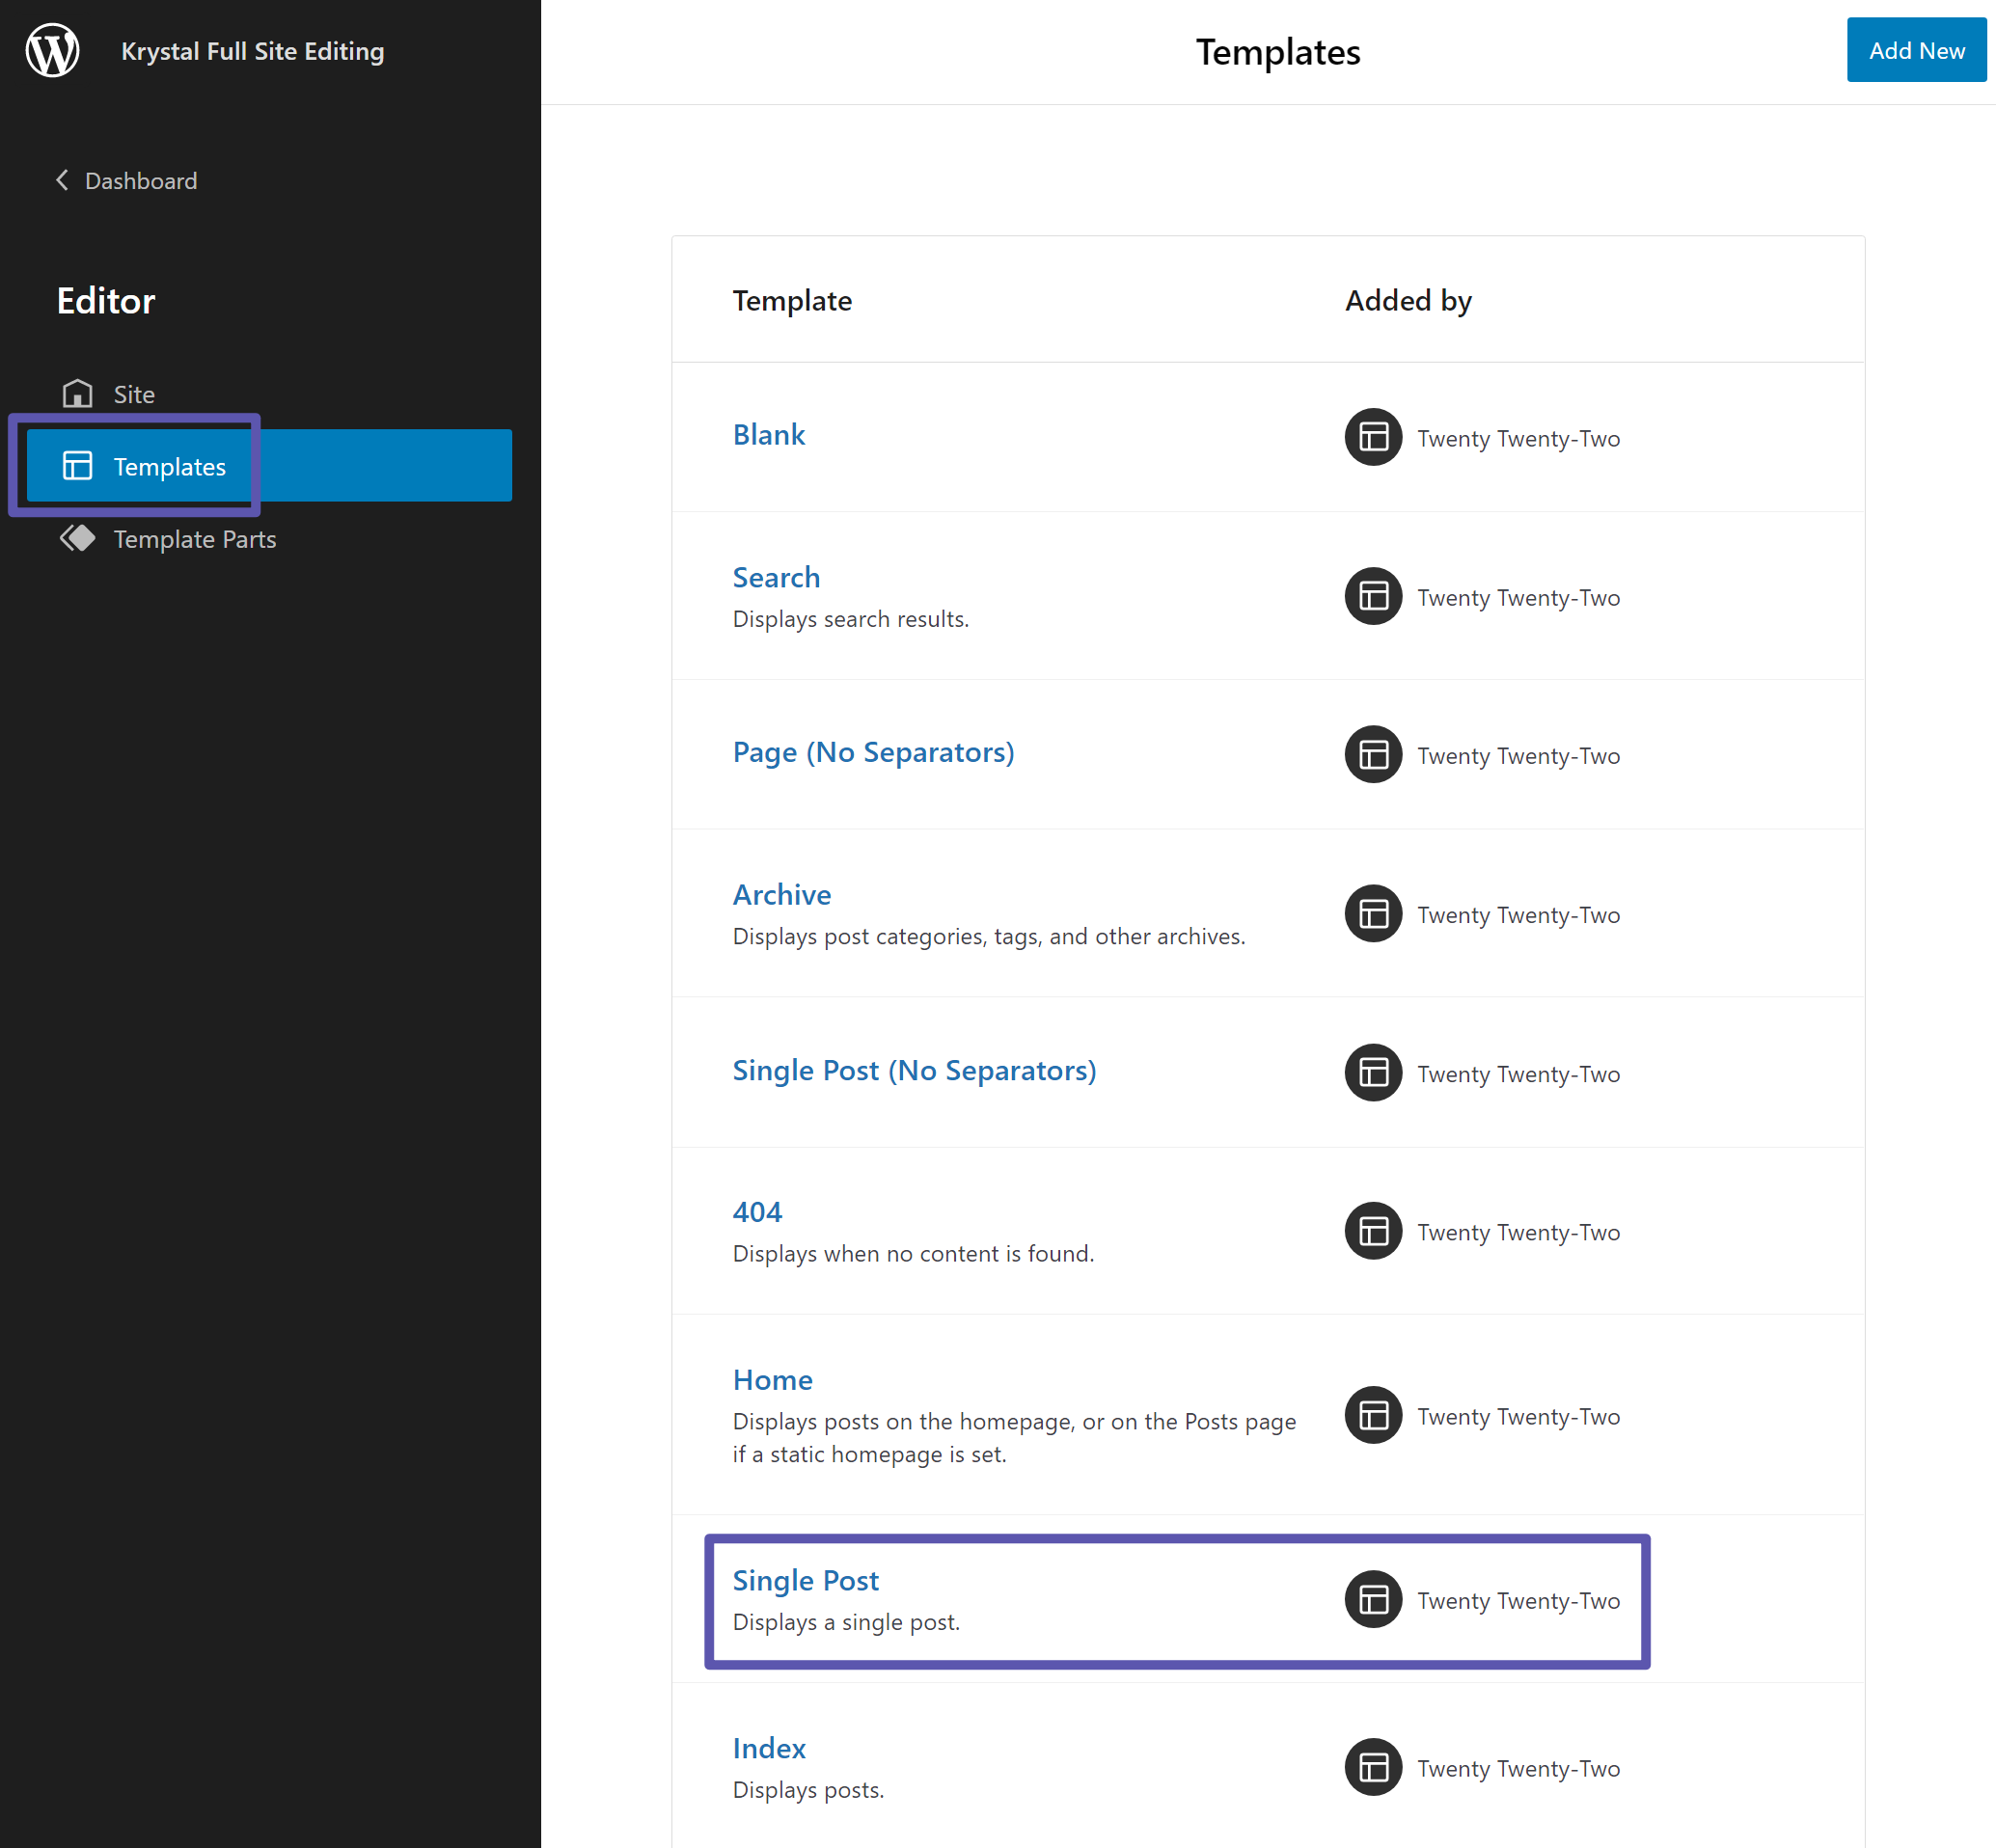
How to choose a template
When you first open the Site Editor, it will show you the template for your homepage. The interface is the same as the block editor that you use to write posts and pages, just with a few tweaks to access full site editing features.
To access a full list of templates (and the ability to create new templates), you can click on the WordPress logo in the top-left corner.
This will expand a slide-out menu where you can choose either Templates or Template Parts.
What's the difference between templates vs template parts in WordPress full site editing?
- Template Parts - these are templates for part of a complete page. For example, your header template is a template part. You would never have a page that displays just your header. But your header will be _part _of other templates on your site.
- Templates - these are templates for entire pages. For example, the templates that your blog posts use or the template for the blog listing page. Templates can include template parts. For example, the template for your blog posts will include your header. If you ever update the header template part, those changes will automatically apply to every template that uses that header.
Once you choose the relevant option, you'll see a list of all the templates on your site. You can edit any of the existing templates (or template parts) by selecting them or create a new one by clicking the Add New button in the top-right corner.
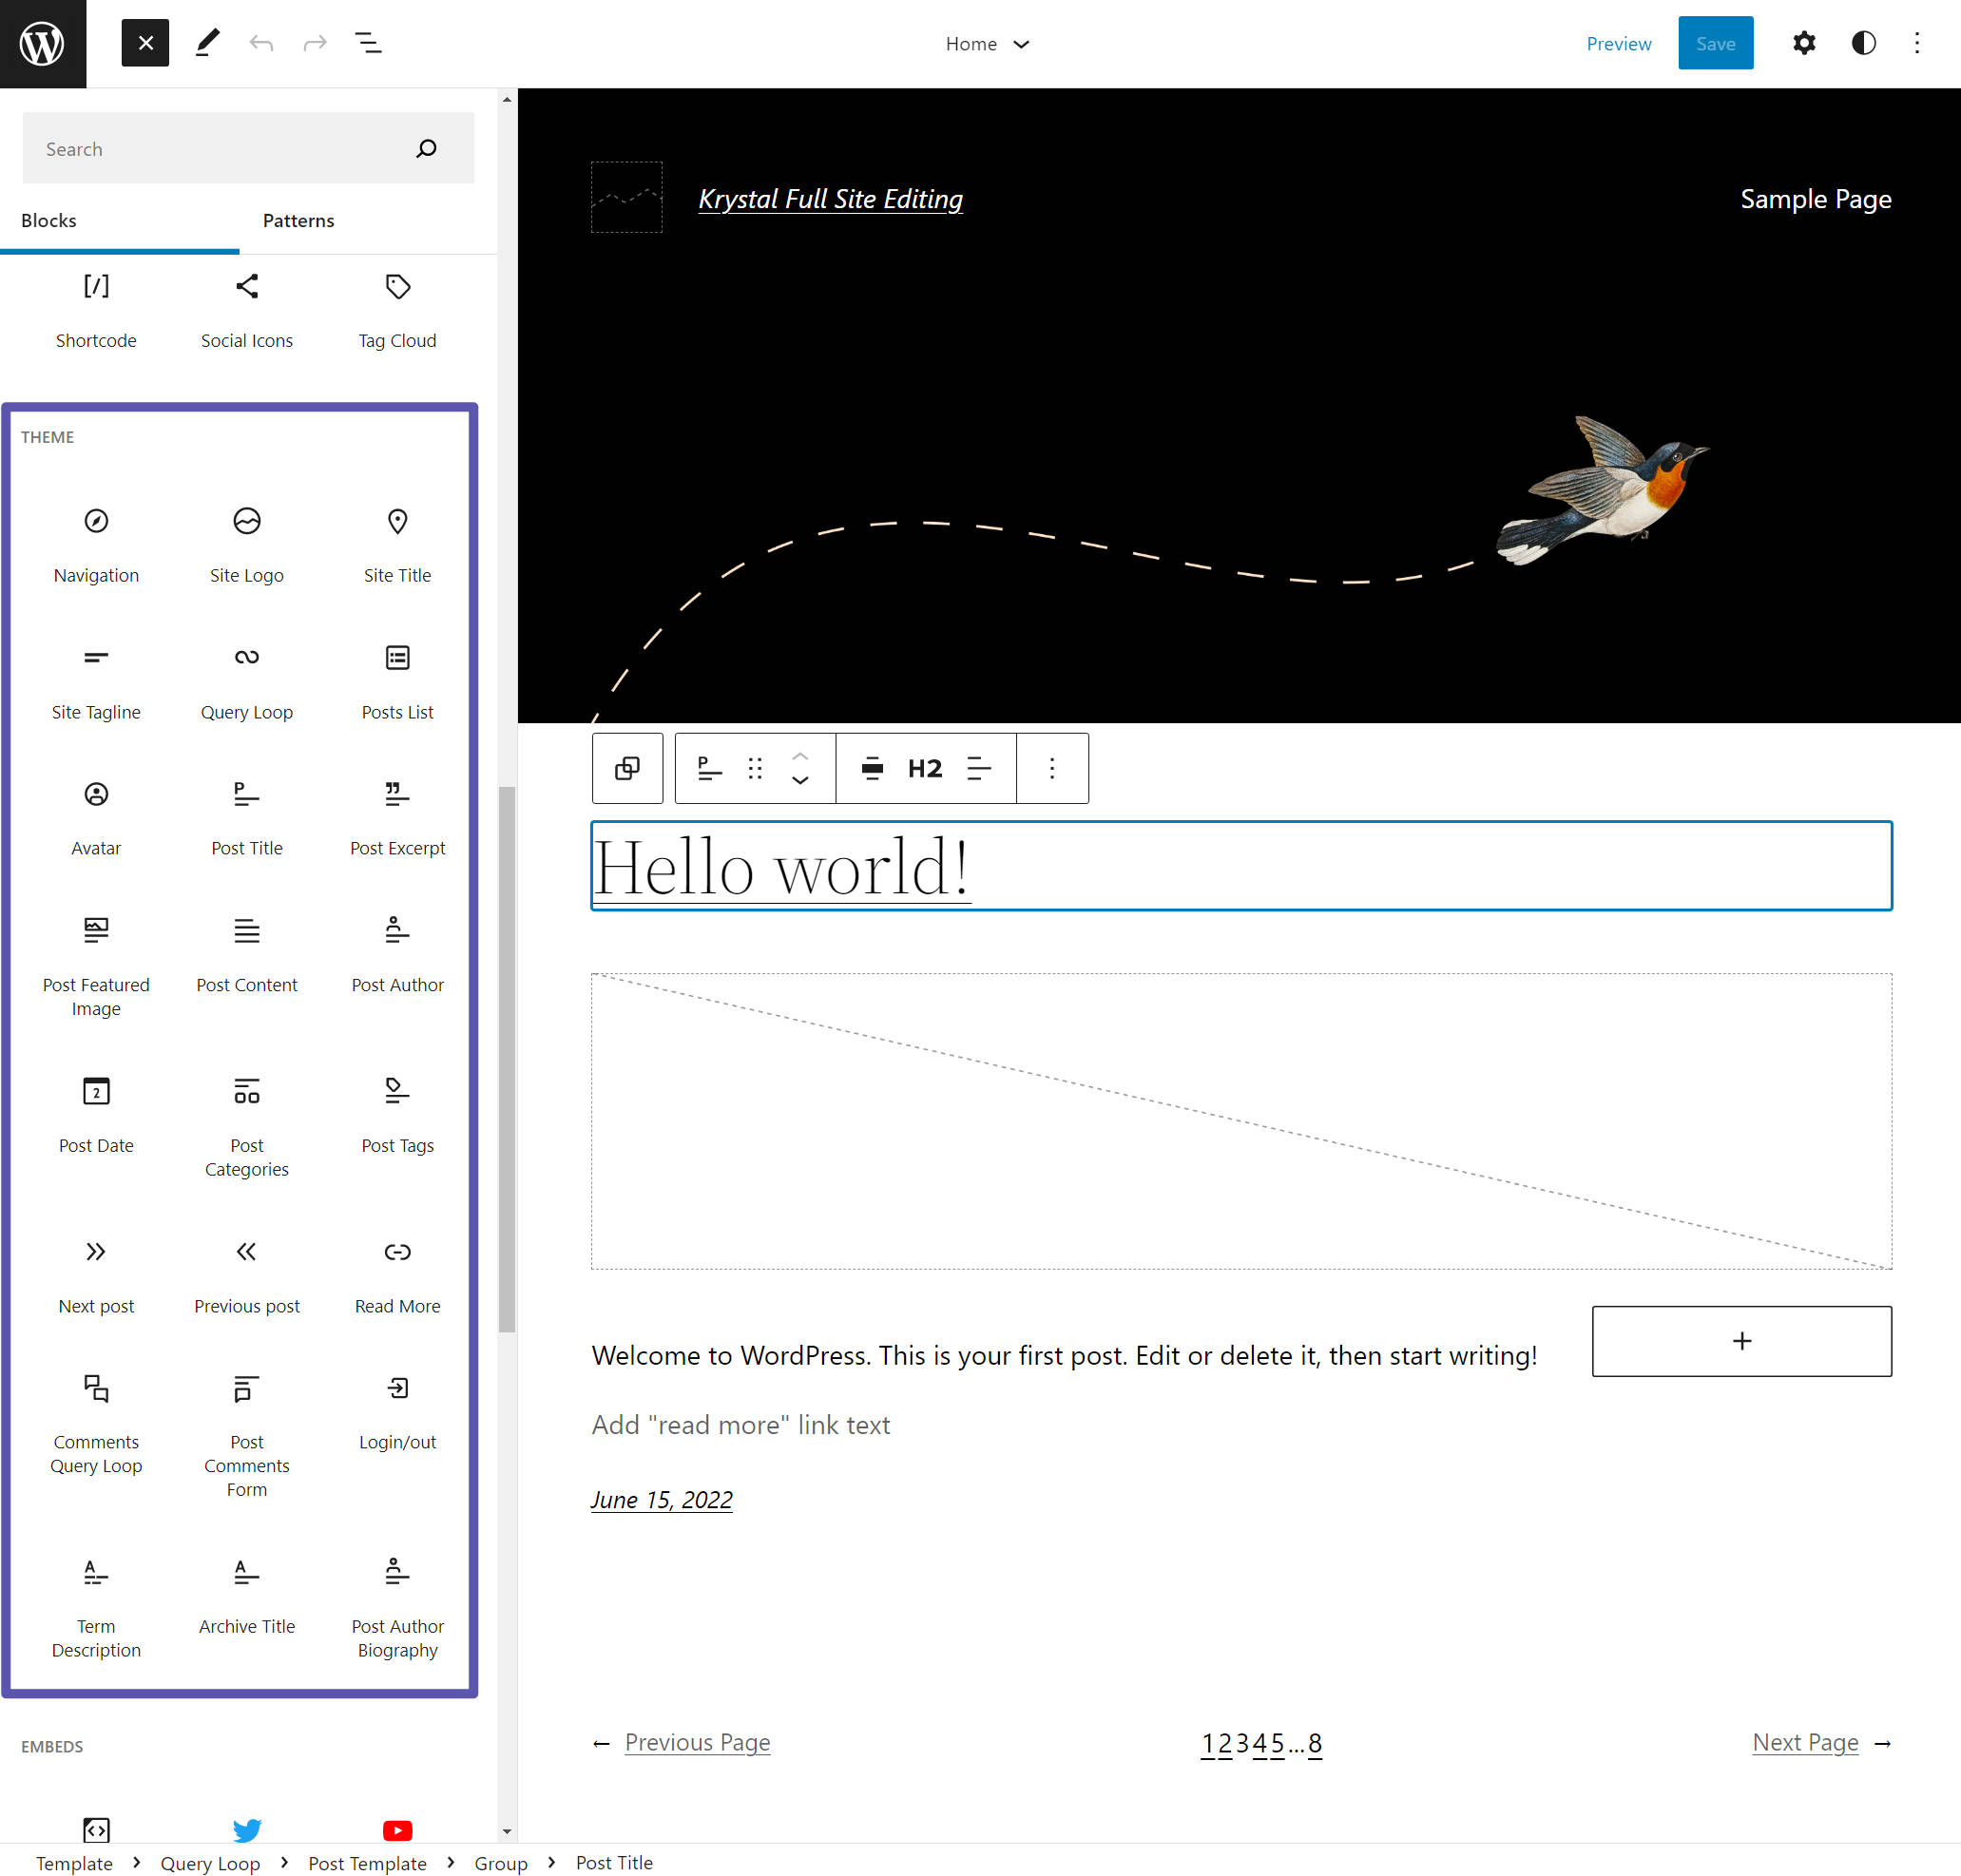
Understanding theme blocks
To help you create your site's templates, full site editing gives you access to special theme blocks that help you dynamically insert content in your templates.
For example, let's say you're customising the template that your blog posts will use and you want to control where the post's title appears.
To do that, you'll get a special Post Title block. The Post Title block will dynamically insert each post's title according to your layout and styling. You'll get other similar blocks for the post content, author, comments, and so on.
You can find all of these blocks by looking at the Theme section in the block inserter.
Understanding the Styles Editor (global styles)
The last piece in the WordPress full site editing puzzle is global styles, which help you control the default styles of your theme and its blocks.
The Styles editor currently lets you perform two main functions:
- You can change your theme's global colours and typography, along with basic spacing. Your theme might also include multiple presets that you can browse.
- You can edit the default colours, typography, and spacing for individual blocks, such as the Button block, Heading block, and so on. You can still override these using individual block settings when needed.
To open the Styles editor, you can click the Styles icon in the top-right corner of the Site Editor. This will open a sidebar where you can access the style settings.
To access sitewide styles, use the options at the top. To access the styles for blocks, you can click the Blocks option below, which will expand a list of all the blocks on your site.

How to Customise Your Header With Full Site Editing
Now that you know how WordPress full site editing works at a high level, let's get into two specific examples of how you can use full site editing to customise your site (assuming you're using a compatible theme, of course).
First, let's look at how to customise your site's header.
As you learned above, a header is a "template part" because it will be part of your other templates.
Here's how it works…
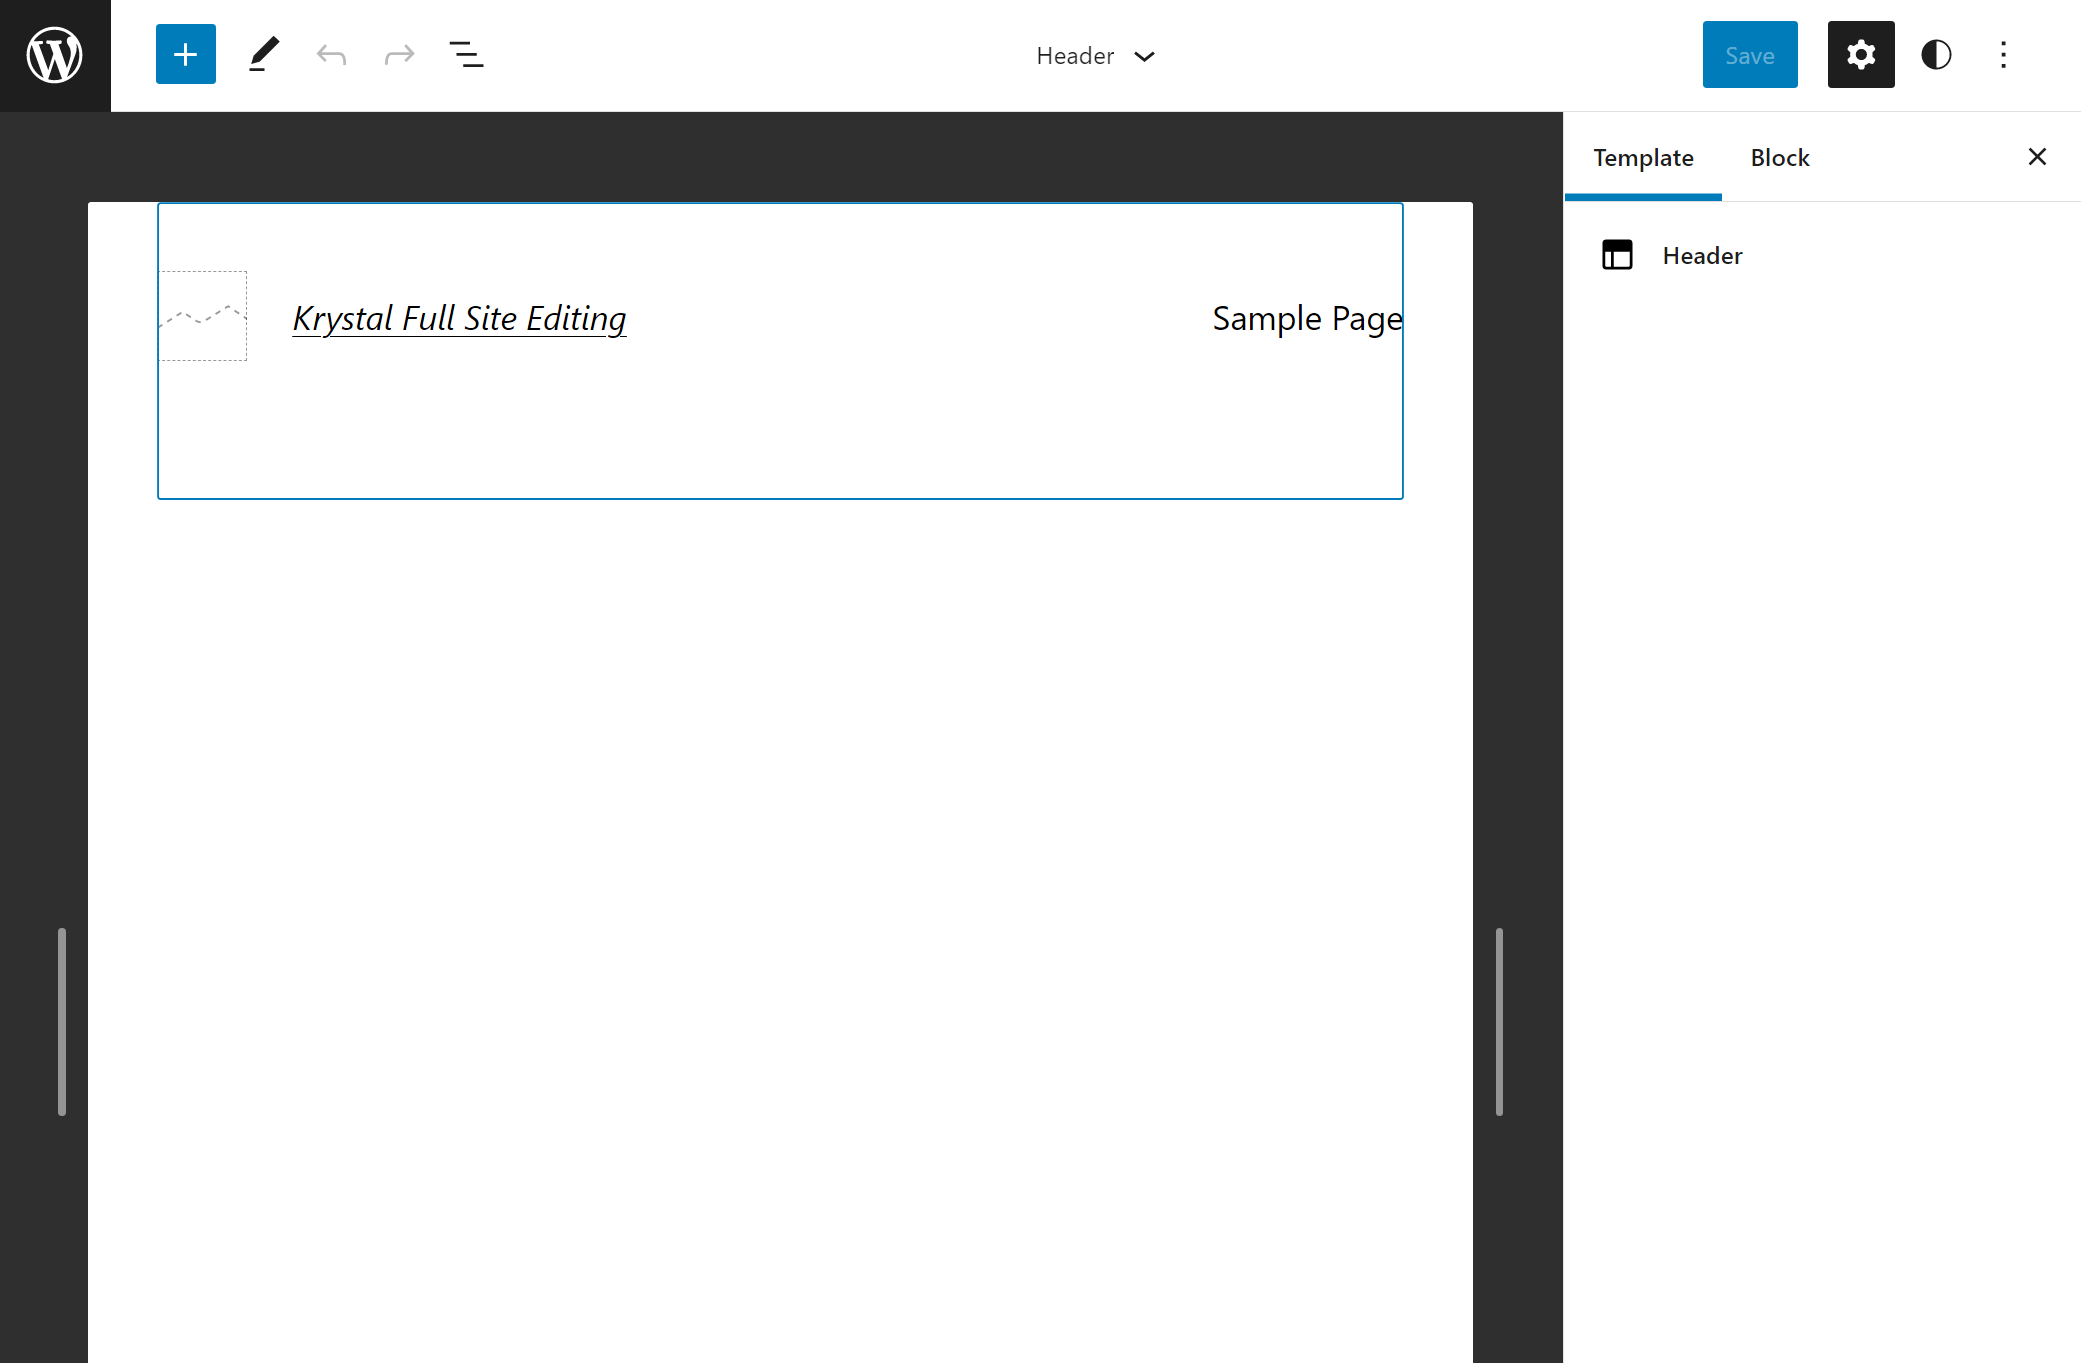
1. Edit or create a header template part
To begin, go to the Template Parts list and either edit one of your theme's existing header template parts or create your own. You can create multiple header template parts and use them in different templates, if desired.
Once you do that, you should see the header template part in the editor:
2. Use blocks to control content and layout
Now, you can use theme blocks and/or regular blocks to control the content and layout of your header.
For most headers, these are the blocks that you'll likely want to include:
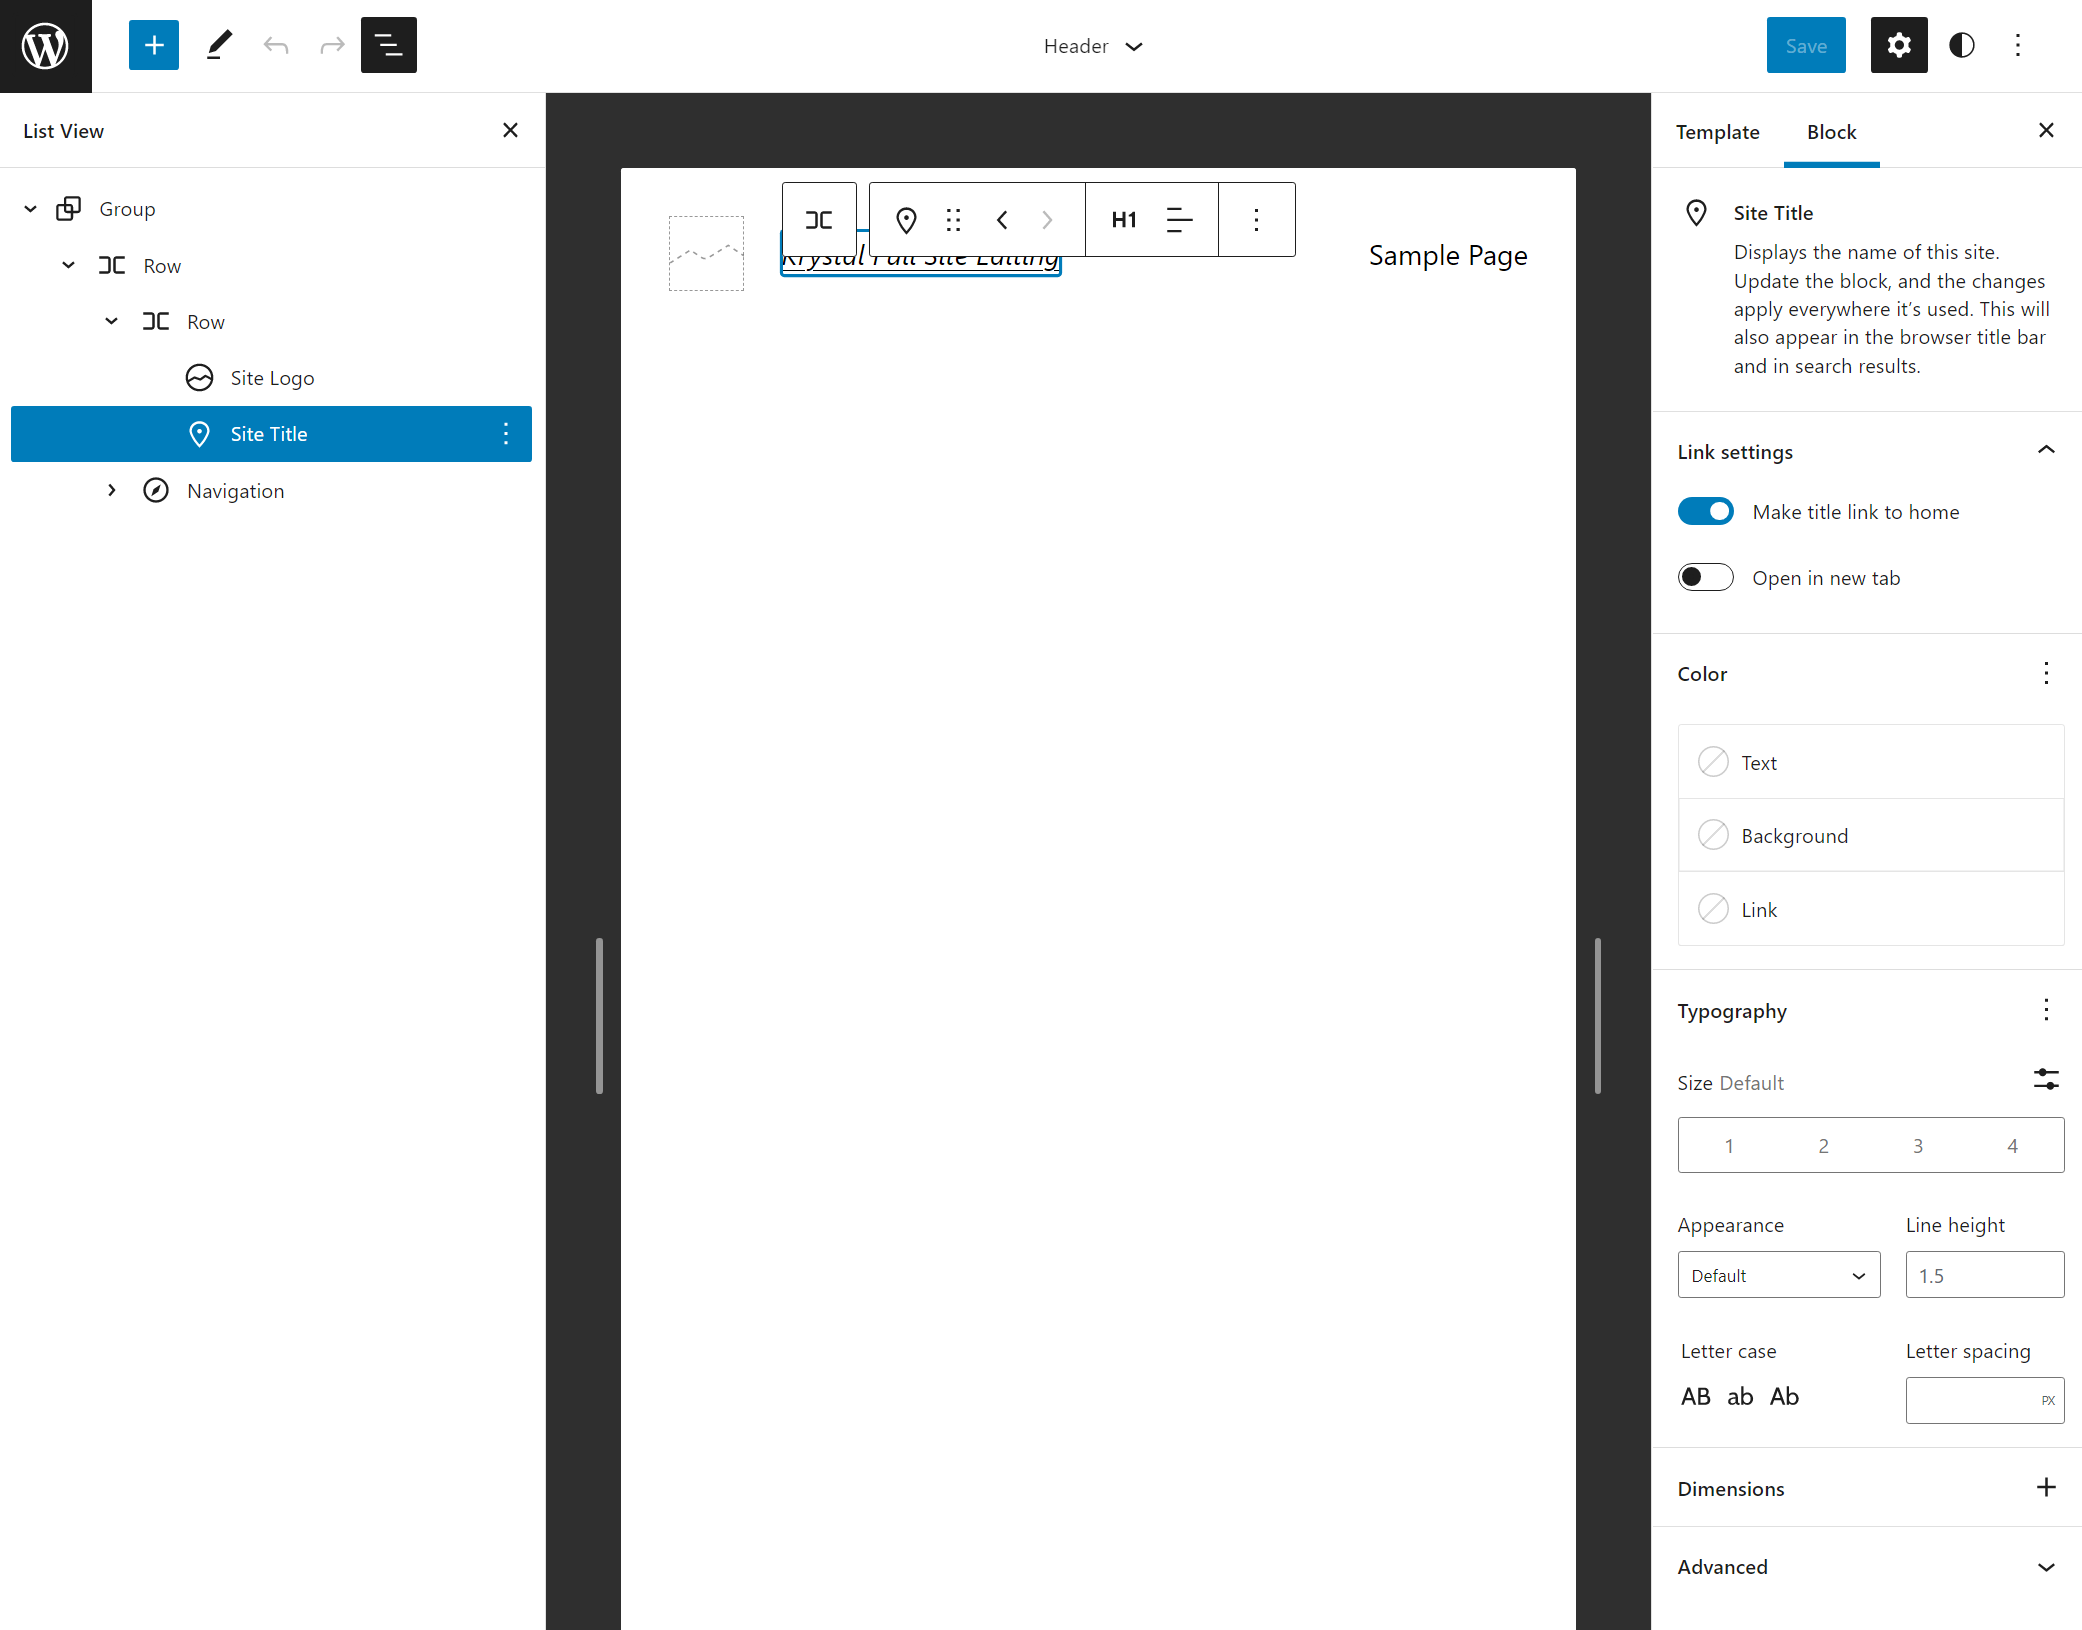
- Site Logo - dynamically inserts your site's logo. You can upload your logo once and then easily change it in the future.
- Site Title - dynamically inserts your site's title from the WordPress settings (Settings → General).
- Navigation - lets you add a navigation menu (this is a very important block so we'll give it a dedicated section below).
You're also free to use other blocks or leave out certain blocks. For example, maybe you only want to include the site logo, but not the site title.
When you add a block, you can use its settings to control its layout and behaviour, just like you were creating a blog post.
Here's an example of a simple header:
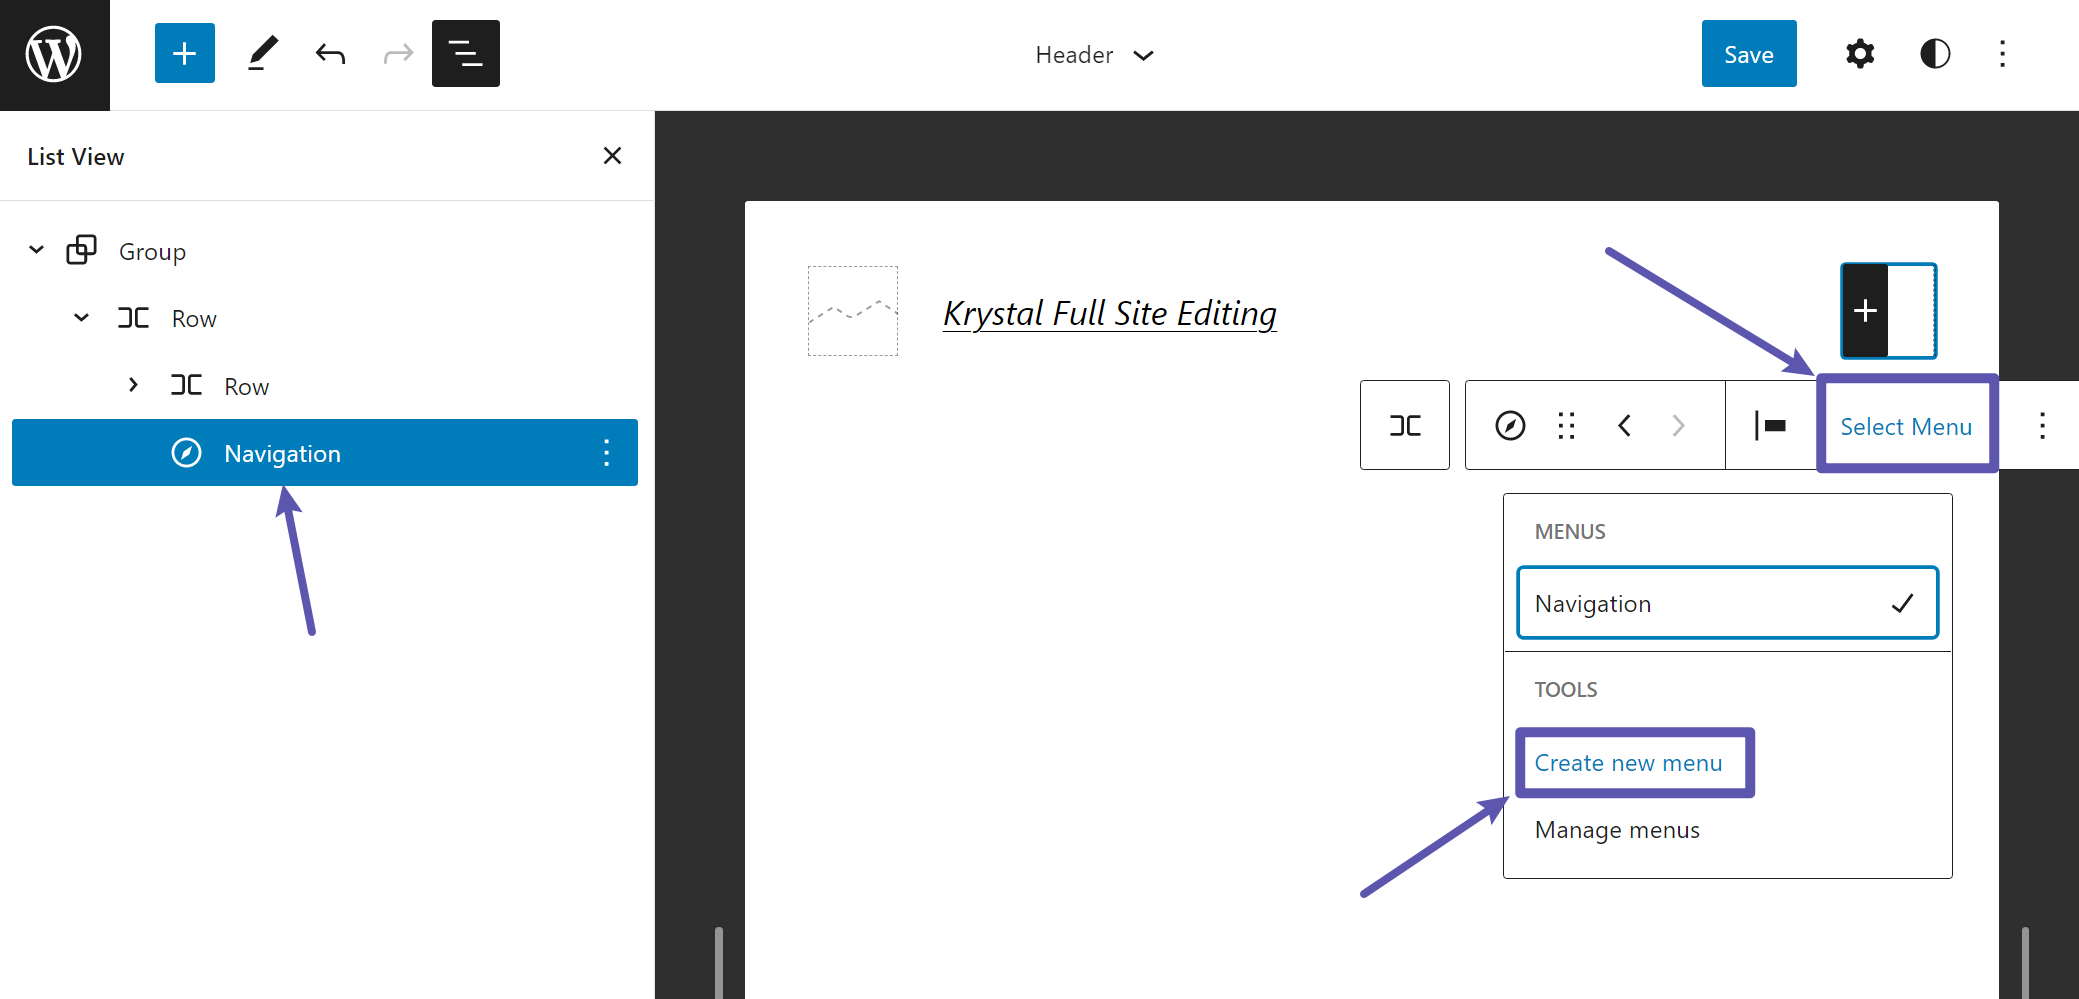
3. Use the Navigation block to create your menu
With full site editing, you no longer get the dedicated menu editor (Appearance → Menus) that you might be used to. Instead, you'll use the new Navigation block.
When you add a new Navigation block, you'll see a blank space or maybe the text "Start empty". To choose a menu, click the Select Menu option on the block toolbar.
If you don't see this option, make sure you've selected the main Navigation block (you can use List View to help with this).
This will expand a dropdown that lets you create a new menu.
When you open the block inserter, you'll now get some new special blocks to build your menu, including setting up various types of links or creating a submenu:
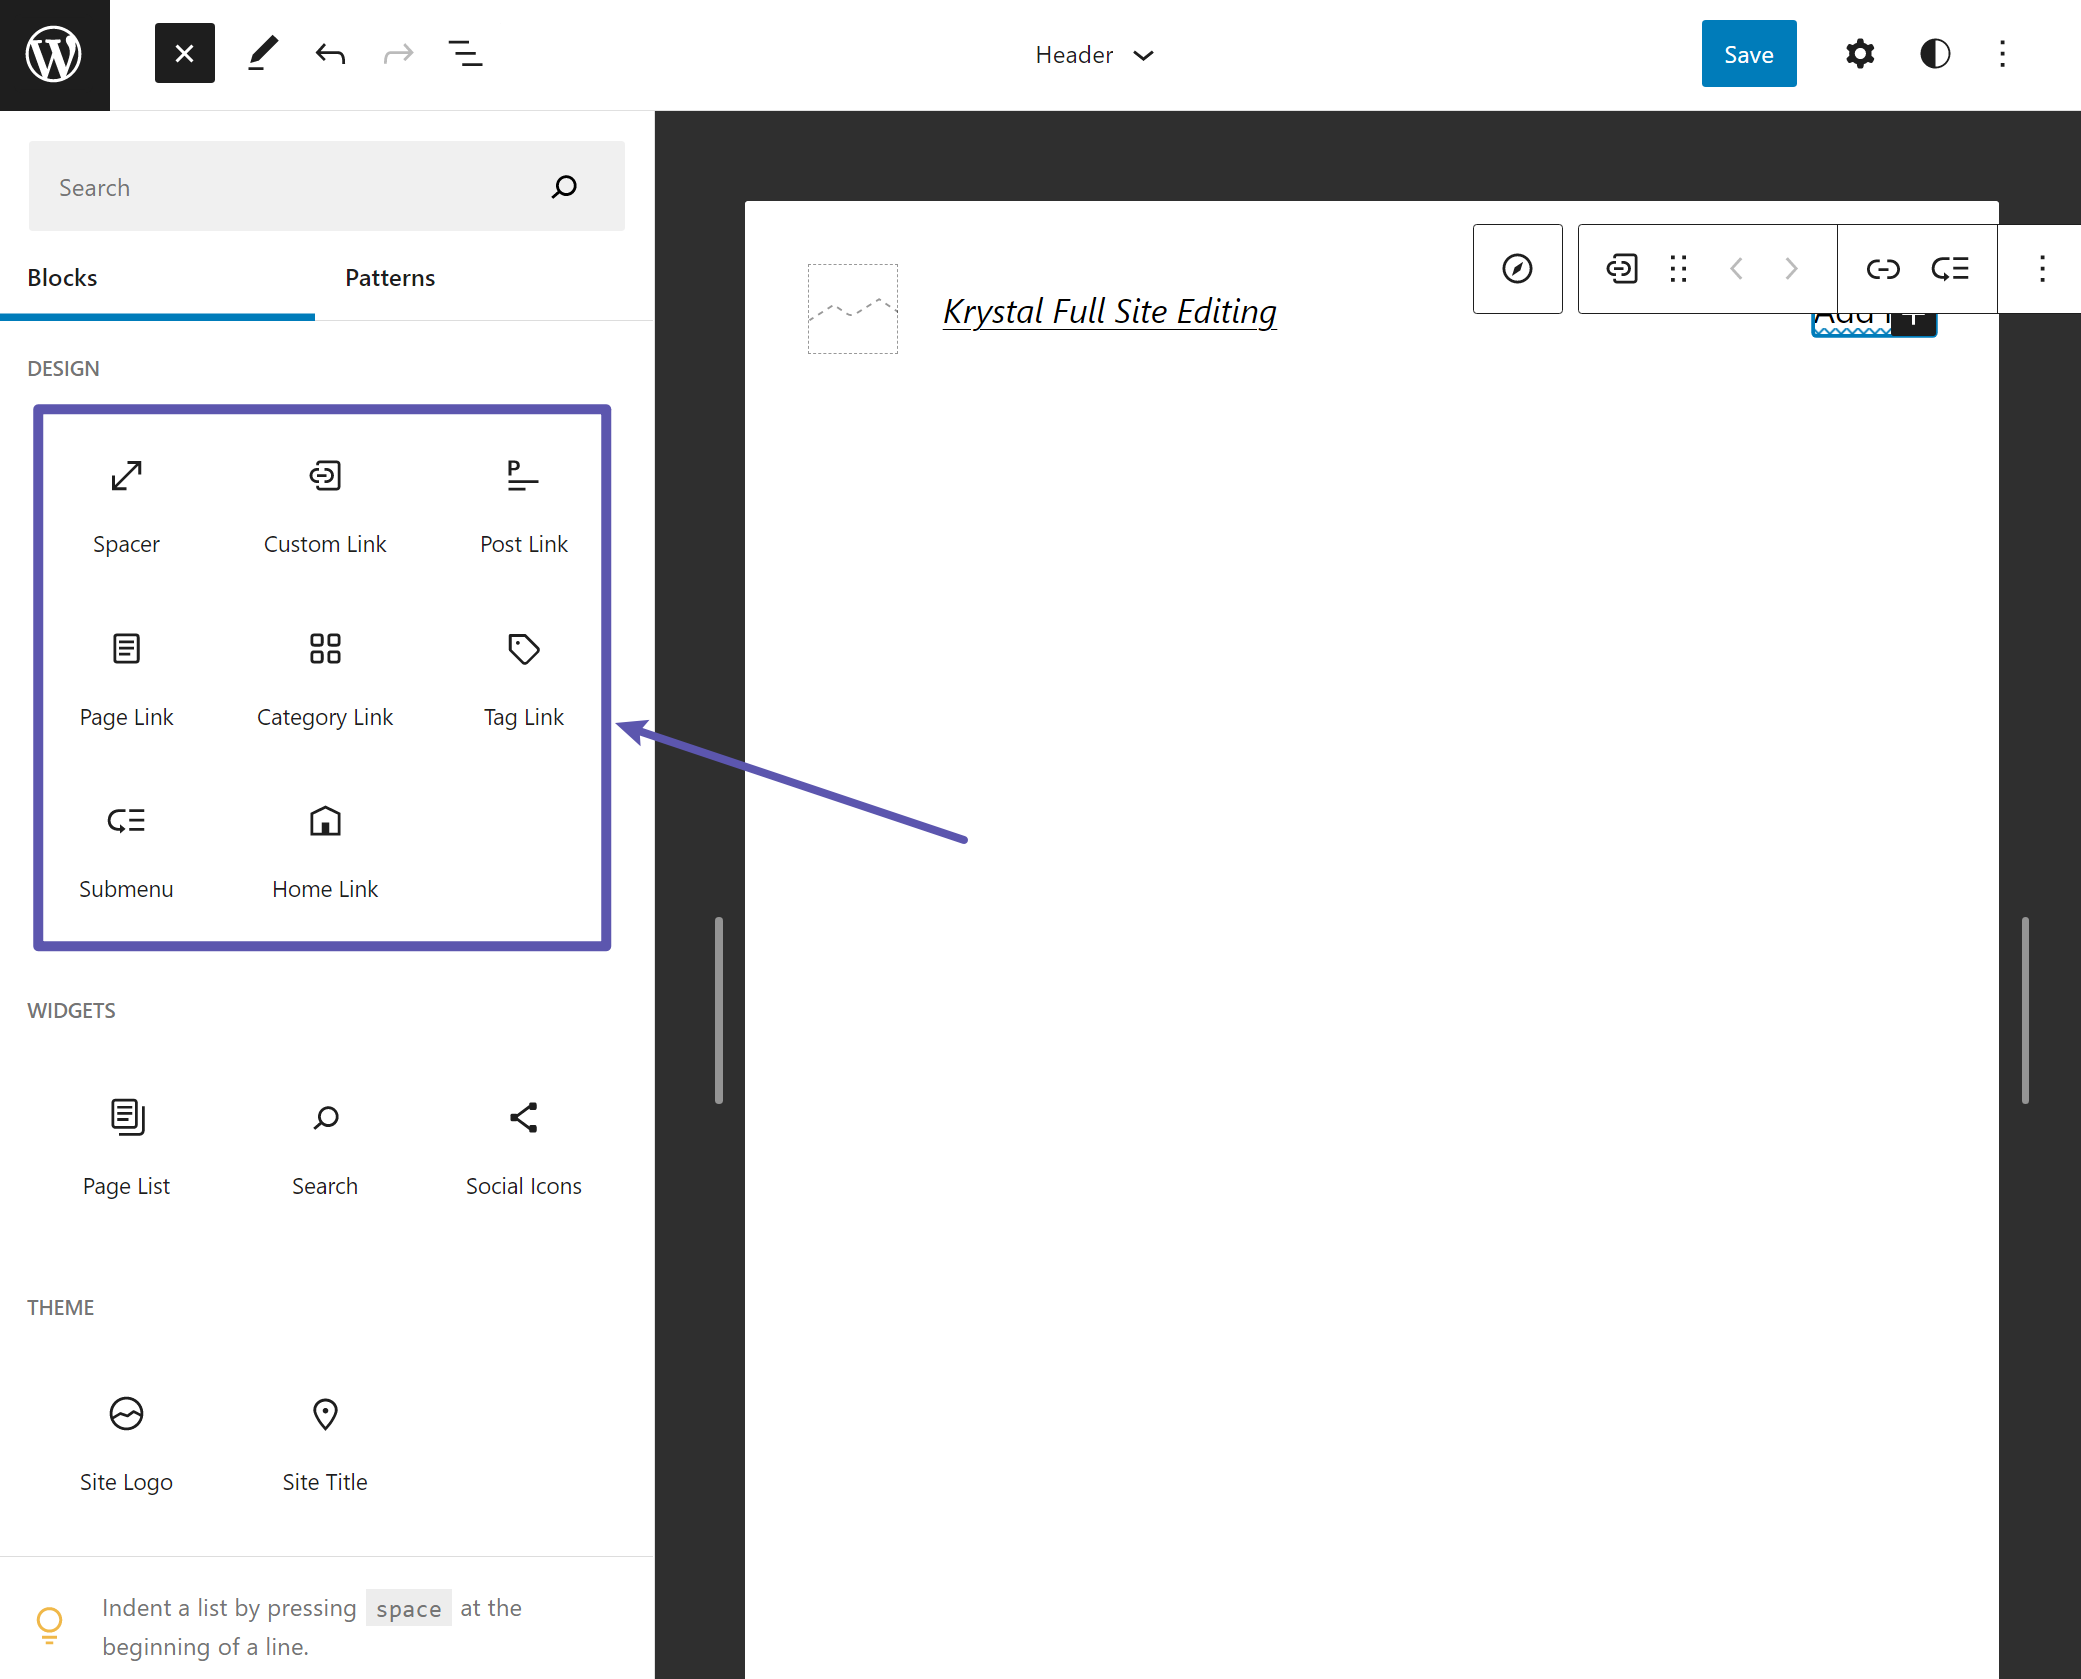
You can use these blocks to set up the content of your menu. Then, if you ever update your menu in the future, those changes will automatically apply to every instance of that menu.
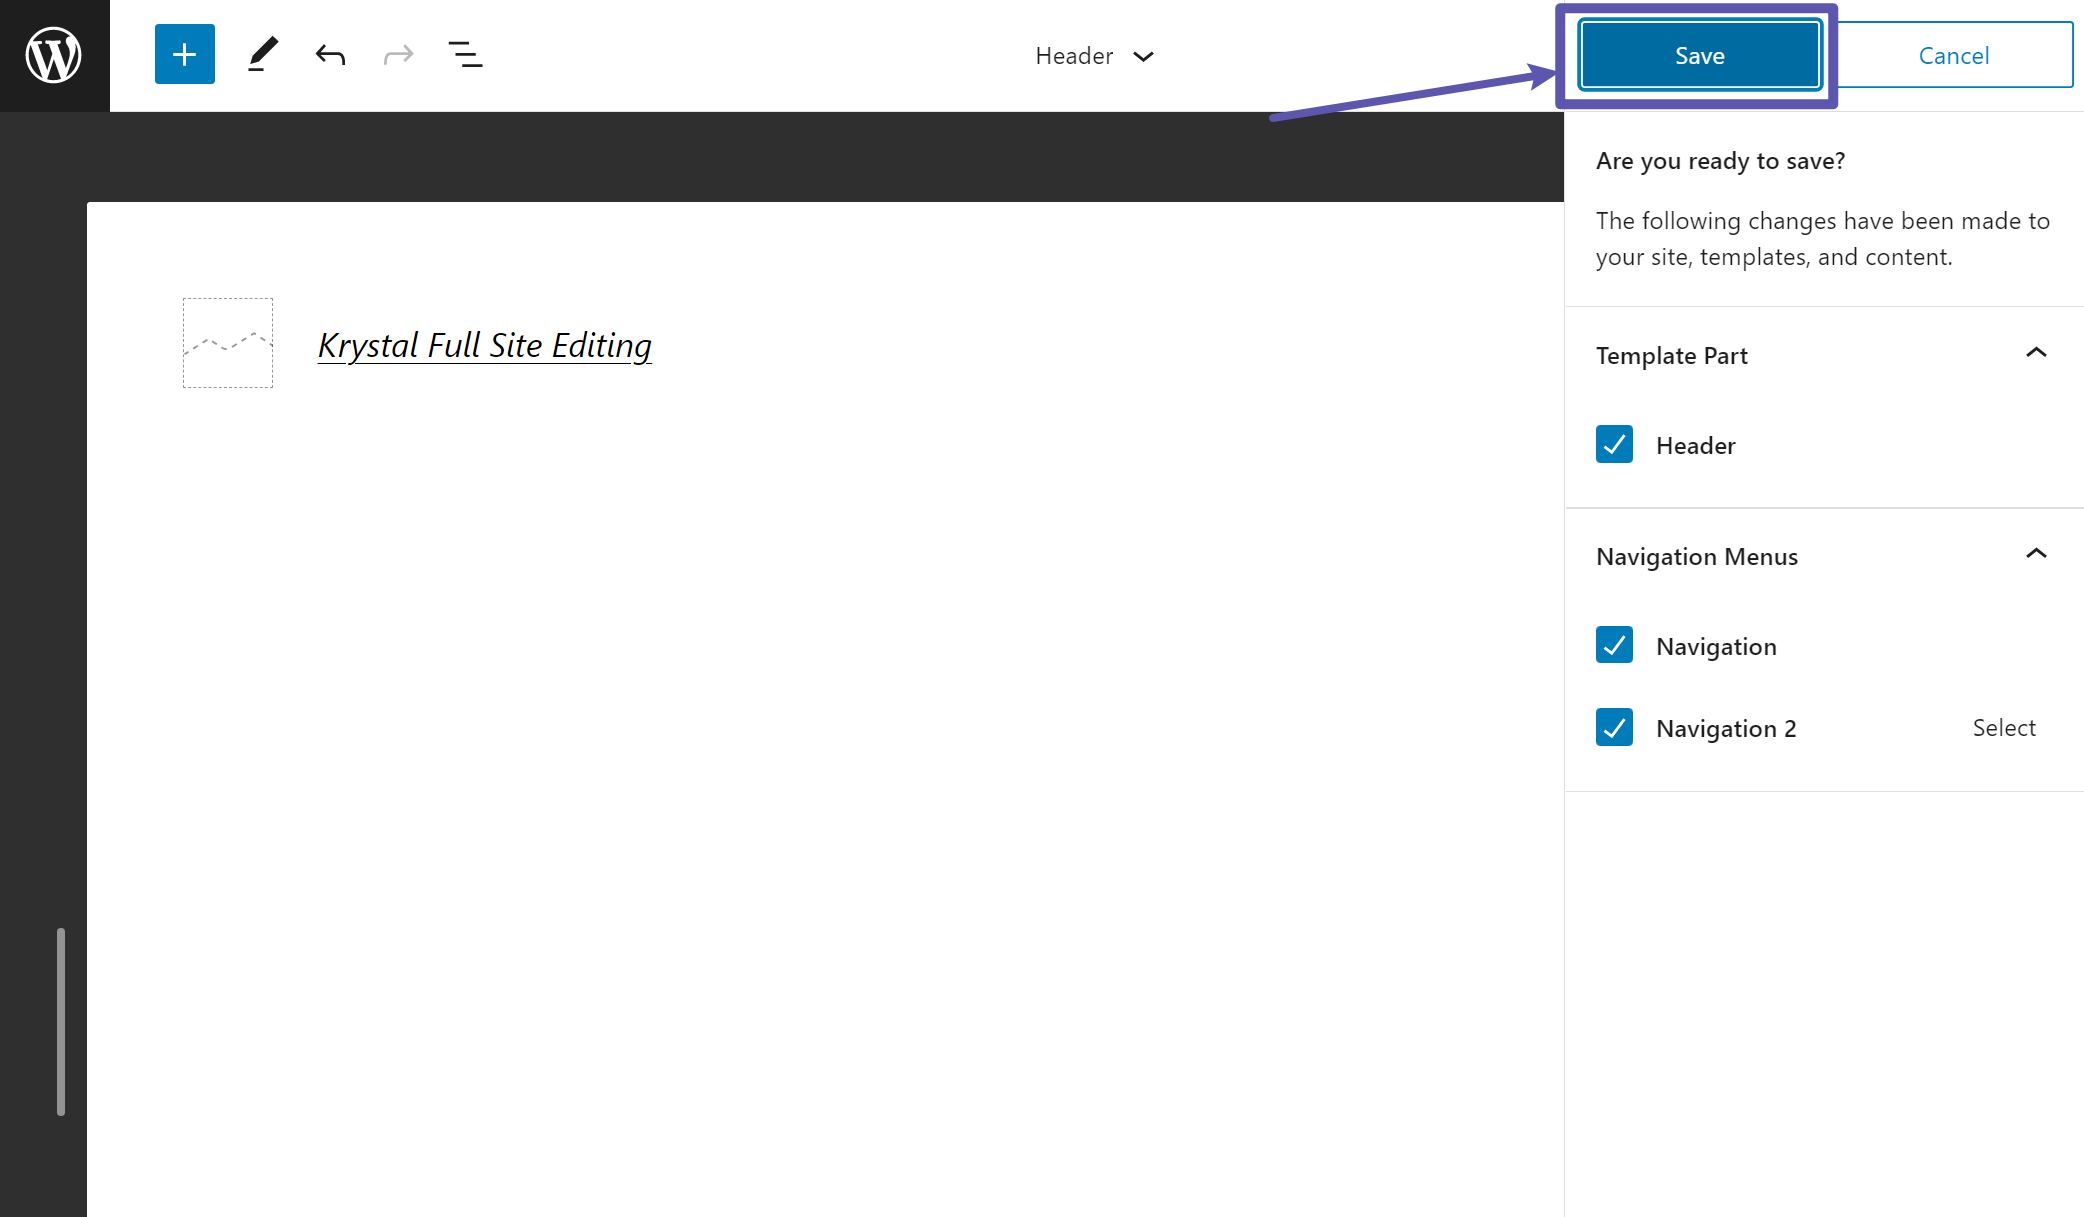
4. Save your changes
When you're finished, click the Save button. You'll see an option to save both your header, along with any navigation menus that you've created.
How to customise your blog post template with full site editing
Next, let's look at how to customise a blog post template using WordPress full site editing.
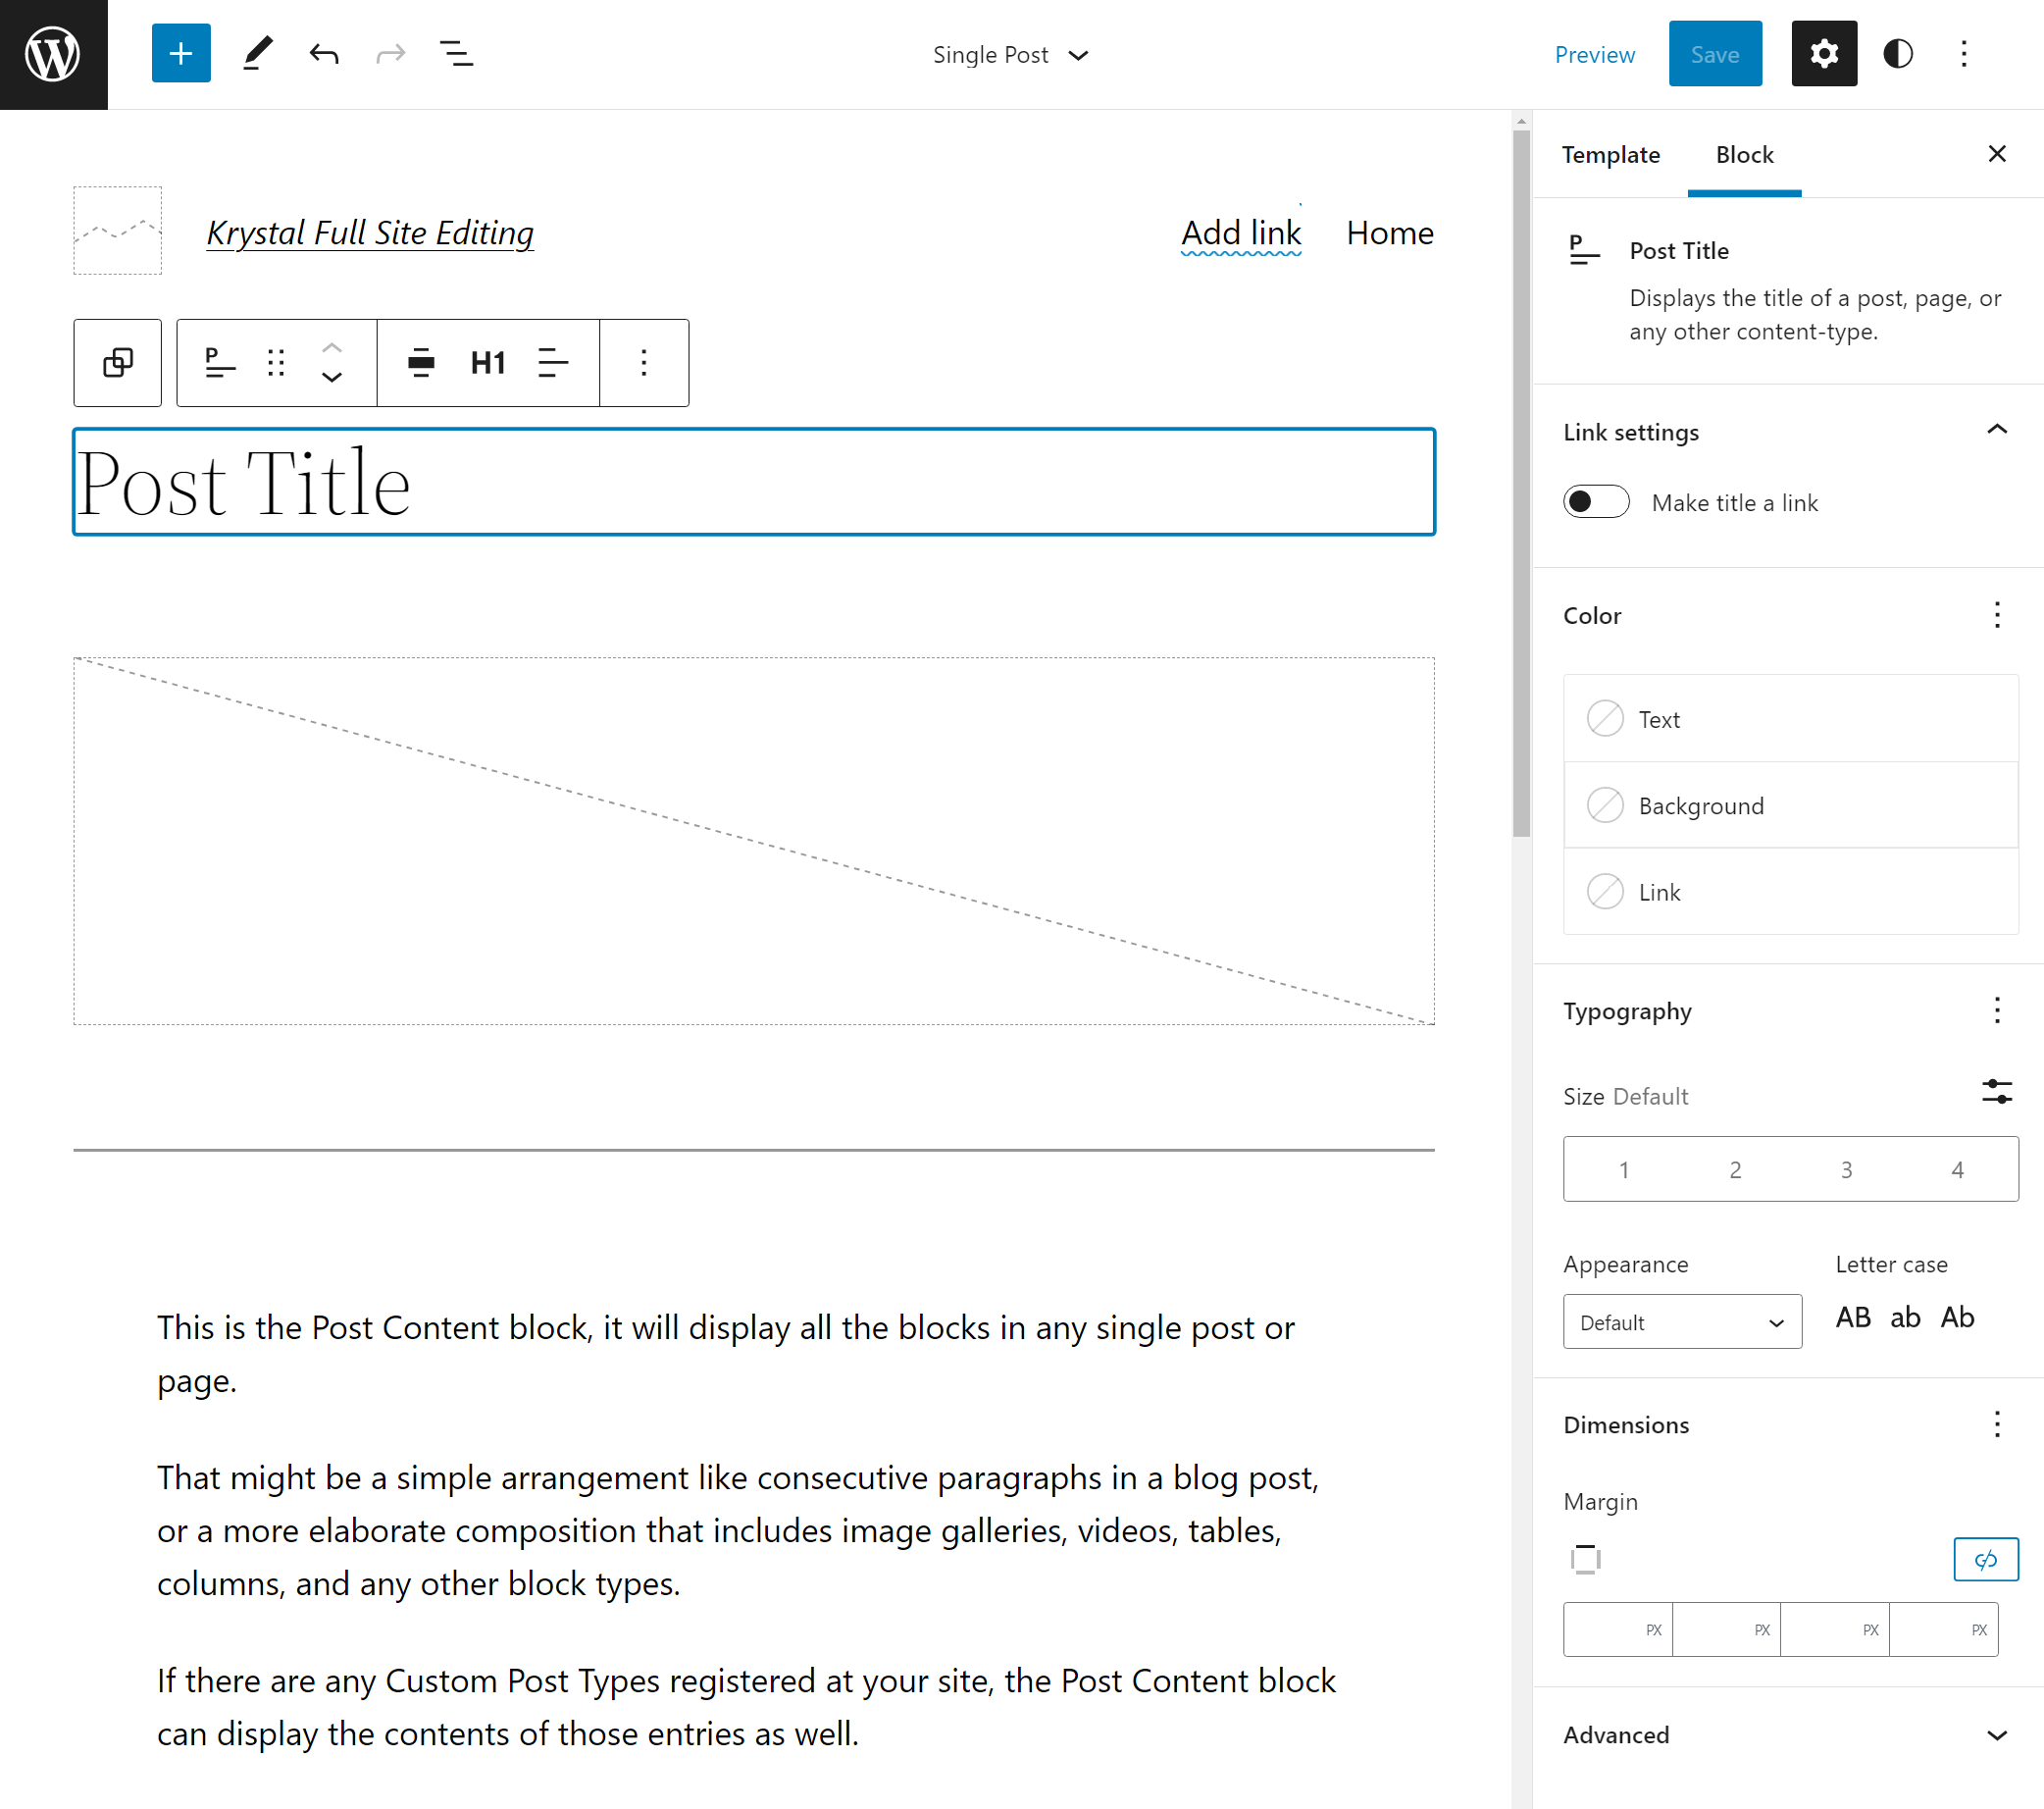
1. Edit the Single Post template
To begin, go to the full Templates list and edit the existing Single Post template. This is the default template that all of your blog posts will use.
2. Customise template using theme blocks
Your single post should have a header template part at the top (maybe the header that you created in the previous step) and a content area below that.
You can also manually add it by using the Header block.
To customise the layout of the content area, you can use the theme blocks and regular blocks as needed.
Here are some of the blocks that you'll likely want to include in a single post template:
- Post Title
- Post Featured Image
- Post Content
- Post Date
- Post Author
- Post Author Biography
- Post Categories
- Post Tags
- Post Comments Form
- Comments Query Loop (lets you control the layout of your comments section)
- Next Post / Previous Post
You can also add regular blocks, such as creating multi-column layouts using the Columns block.
As with any other blocks, each theme block will give you additional settings in the sidebar to control styles, layouts and functionality.
3. Save your template
When you're happy with the design of your single post template, click the Save button in the top-right corner to save your changes.

All of your blog posts that were using the default template will now use this layout automatically. It won't affect blog posts where you chose a custom template, though.
Get started with WordPress full site editing today
Going forward, full site editing will continue to become a larger and larger force in WordPress, so it will be helpful to understand how it works.
While you certainly won't be forced to use full site editing, future core WordPress releases will be focused primarily on developing this functionality. Additionally, more and more developers will start moving to this block-based theme approach.
If you want to see what it's all about, here's what you can do:
- Set up a test site.
- Install a full site editing theme
- Follow our guide from above to start customising your theme's templates.
If you're using Krystal Hosting, you can easily set up a safe testing environment by creating a staging site. Use these links to learn more about Krystal Hosting and how to create a staging site.
Share this article
About the author

Darren H
I'm Darren and I'm the Senior Copywriter at Krystal. Words are what I do. Aside from writing, I play guitar and sing in my band Machineries Of Joy, work on getting my 2nd Dan in Taekwondo and seek adventure with my wife and daughter.
Join our newsletter
No spam. Just the latest news, events, product updates, promotions and more delivered to your inbox.