


Microservices have been quite popular in the Java ecosystem ever since Spring Boot and Spring Cloud made them easy to build and deploy. Things have gotten even easier in recent years with the proliferation of new Java frameworks built specifically for microservices: MicroProfile, Micronaut, Quarkus, and Helidon. Not only do these frameworks provide an excellent developer experience, but they also tend to have built-in Docker support. They even work with GraalVM, so you can compile your apps to native code!
To be fair, MicroProfile isn't a framework; it's a spec with many implementations. In fact, both Quarkus and Helidon have MicroProfile flavors you can use.
Today, I'll show you how to build a Java microservices architecture that leverages micro frontends for the UI. The backend will use Spring Boot and Spring Cloud, while the frontend will use React. You can also use Angular or Vue if you'd like.
This tutorial is also available as a screencast.
NOTE: This video uses JHipster 7.9.3. All the steps will still work with JHipster 8.1.0, but you have to use Java 17 and Node 18.
Prerequisites:
- Java 17+
- Node.js 18+
- Docker Desktop
- JHipster 8.1.0
You can install JHipster with npm:
npm i -g generator-jhipster@8Java Microservices with Spring Boot and JHipster
JHipster is an application generator that creates a Spring Boot backend. You can configure it to use SQL or NoSQL databases, plain ol' Spring MVC, or reactive with WebFlux. It also generates a UI for your REST API and offers you the choice of Angular, React, or Vue. Last year, I showed you how to build reactive Java microservices with Spring Boot and JHipster. In this tutorial, you'll build a gateway with Spring Cloud Gateway. Then, you create a blog microservice and a store microservice, each with its own database.
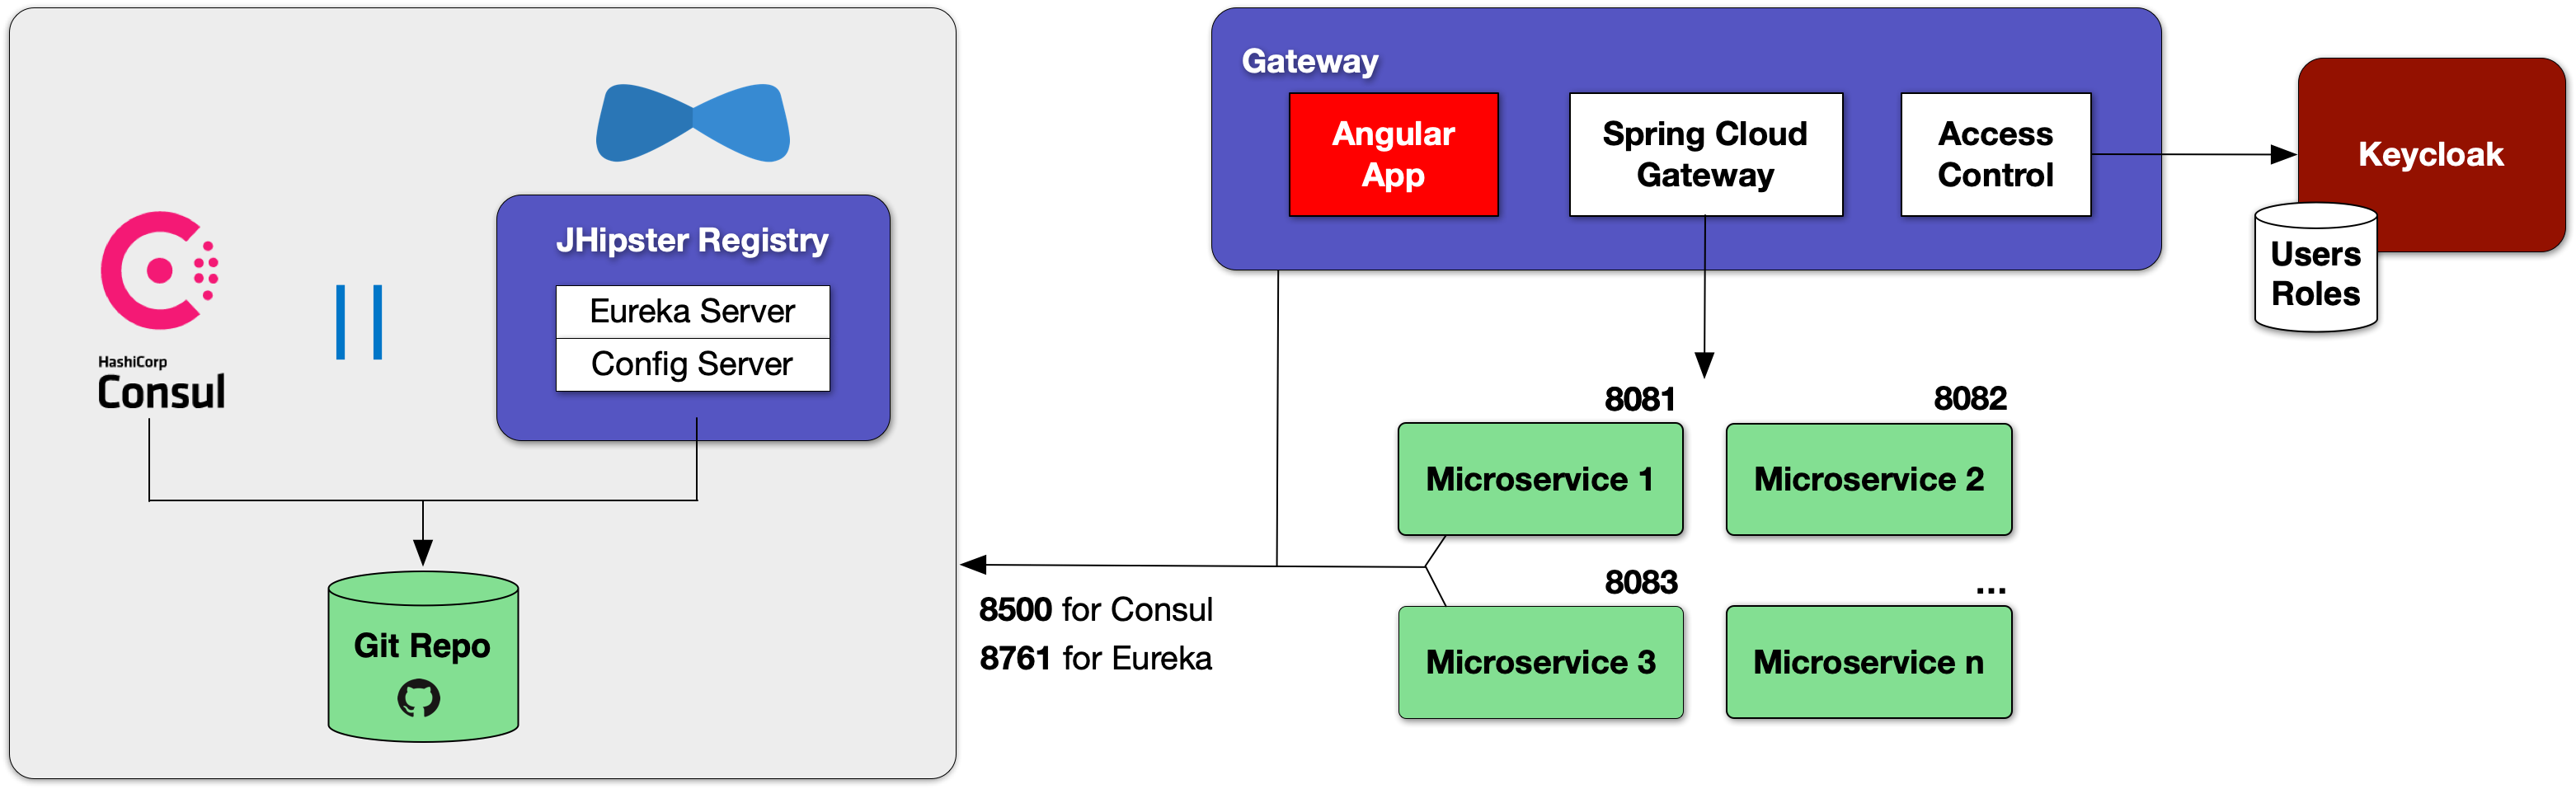
This microservices architecture had one major flaw: the UI for it is a monolith, with all its files on the gateway. This isn't good from a loose-coupling point of view because changes in a microservice might require changes in the UI. Instead of being able to deploy the microservice independently, you have to deploy the gateway too.
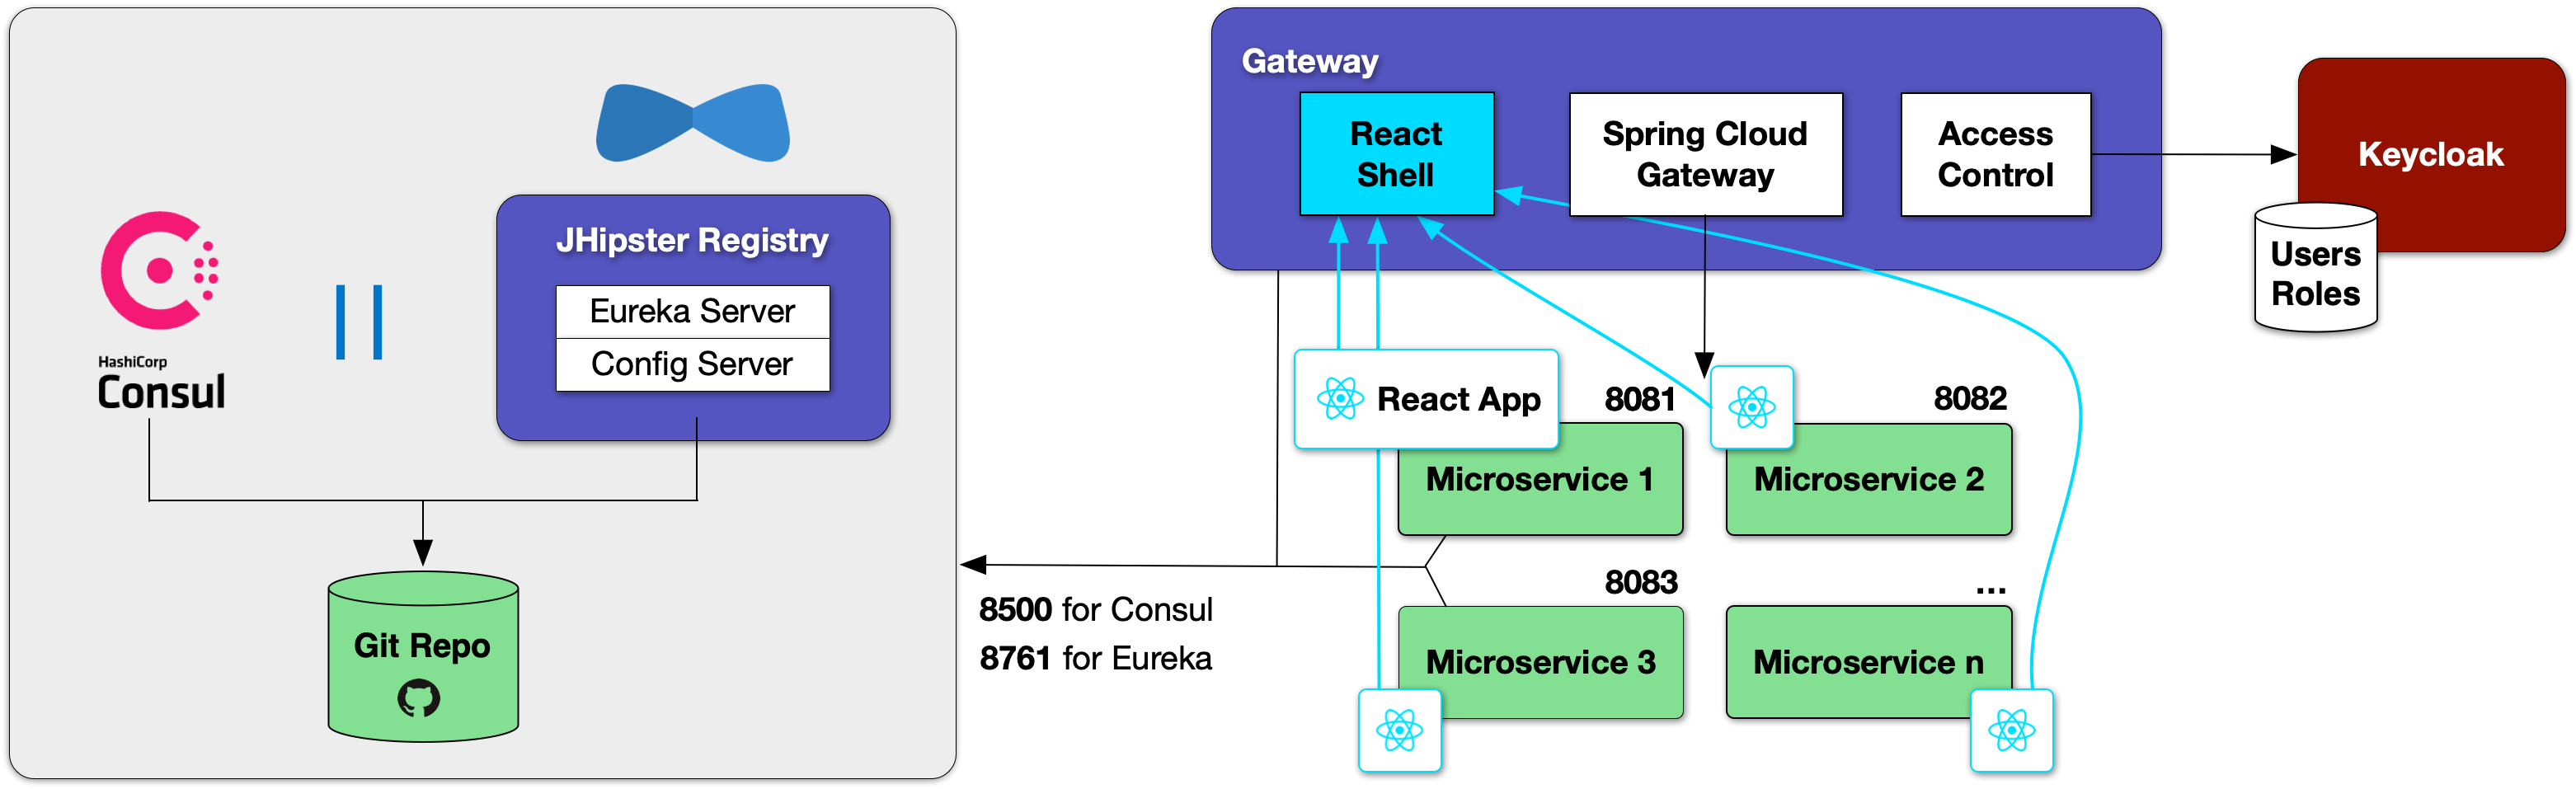
Today, I'm proud to show you how you can solve this problem with micro frontends. JHipster recently added support for micro-frontends. Microfrontends provide a way for you to remotely load and execute code at runtime so your microservice's UI can live in the same artifact without being coupled to the gateway!
In the previous paragraph, you might notice I spelled micro frontends three different ways. The current literature is all over the place on this one!
I'm going to use "micro frontends" for the remainder of this post since that's what Cam Jackson used in his Micro Frontends article on Martin Fowler's blog.
A Quick Introduction to Module Federation
Webpack's Module Federation is one of the best-known implementations for micro frontends. Its ModuleFederationPlugin allows a build to provide or consume modules with other independent builds at runtime. It even allows you to share libraries between frontends to reduce the size of remote bundles.
Zack Jackson is the creator of Module Federation and recently collaborated with Manfred Steyer to create Native Federation. This means you can use micro frontend concepts with any build tool, not just webpack.
Why Should Java Developers Care?
I think micro frontends are a fascinating architectural concept. Microservices weave everything together on the backend with protocols like HTTP and gRPC. With micro frontends, it's all HTTP. You can see your app get stitched together by watching your browser's network console and seeing remote modules-load.
I've encountered quite a few monolith UIs in my time as a consultant. The backend was beautiful microservice architecture, but it was all tightly coupled on the frontend. There's a good chance many Java developers don't care about the UI because they just work on the beautiful backends. However, if you consider yourself a Java web developer, micro frontends are as revolutionary as HTML5!
And that's the beauty of this tutorial; you don't have to write any micro frontends. JHipster can create them for you!
Micro Frontends in Action with JHipster
I used a JDL (JHipster Domain Language) file named reactive-ms.jdl to create the reactive Java microservices tutorial I mentioned earlier. You can see this file online in the JDL samples repository.
I copied this file to reactive-mf.jdl and changed a few things for this tutorial:
- Enabled micro frontends by adding
microfrontends [blog, store]to the gateway's definition. - Changed the client framework from Vue to React.
- Added
clientFramework reactand Cypress to each microservice. - Changed the service discovery to Consul.1
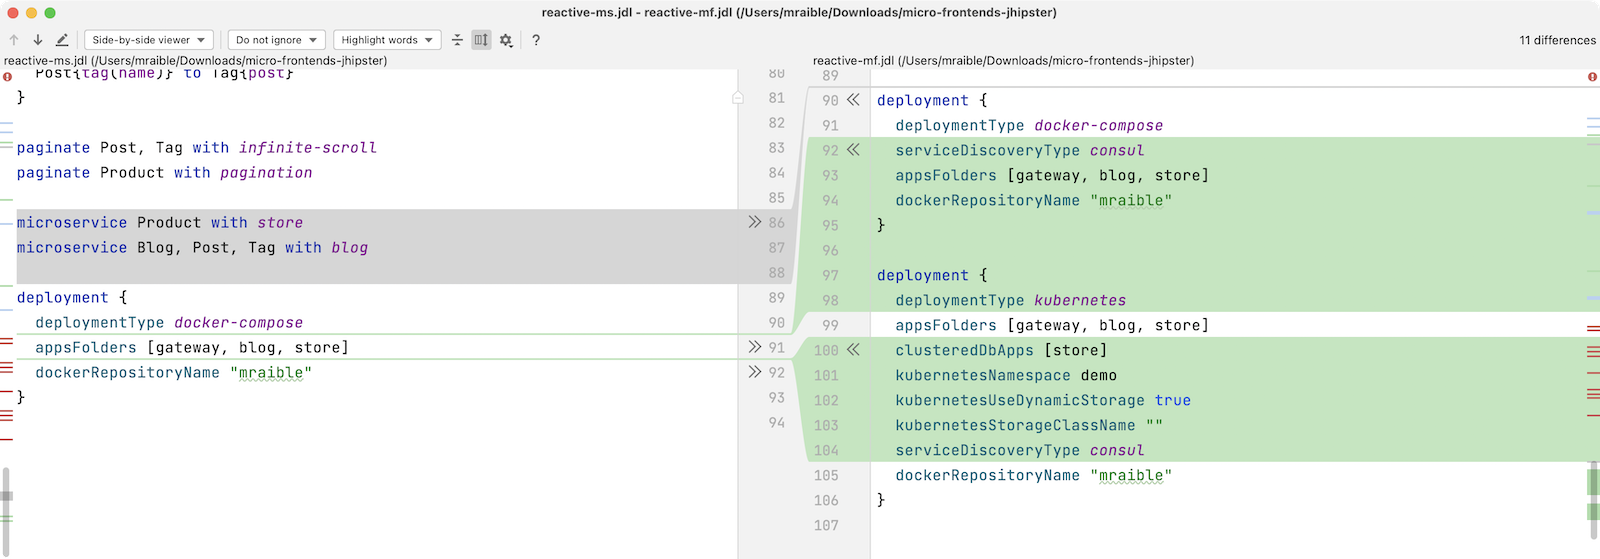
- Added a deployment section for Kubernetes.
⚠️ JHipster's JDL allows you to specify different client frameworks, but micro frontends will only work if you set the same one for all your apps.
Run the following command to create a new directory for your micro frontends project:
take micro-frontends-jhipster
# mkdir micro-frontends-jhipster && cd micro-frontends-jhipster if you don't have to take installed
Download both the -ms and -mf JDLs and compare them in IntelliJ IDEA. You'll need IDEA's Command-line Launcher for the idea command to work.
jhipster download reactive-ms.jdl
jhipster download reactive-mf.jdl
idea diff reactive-ms.jdl reactive-mf.jdl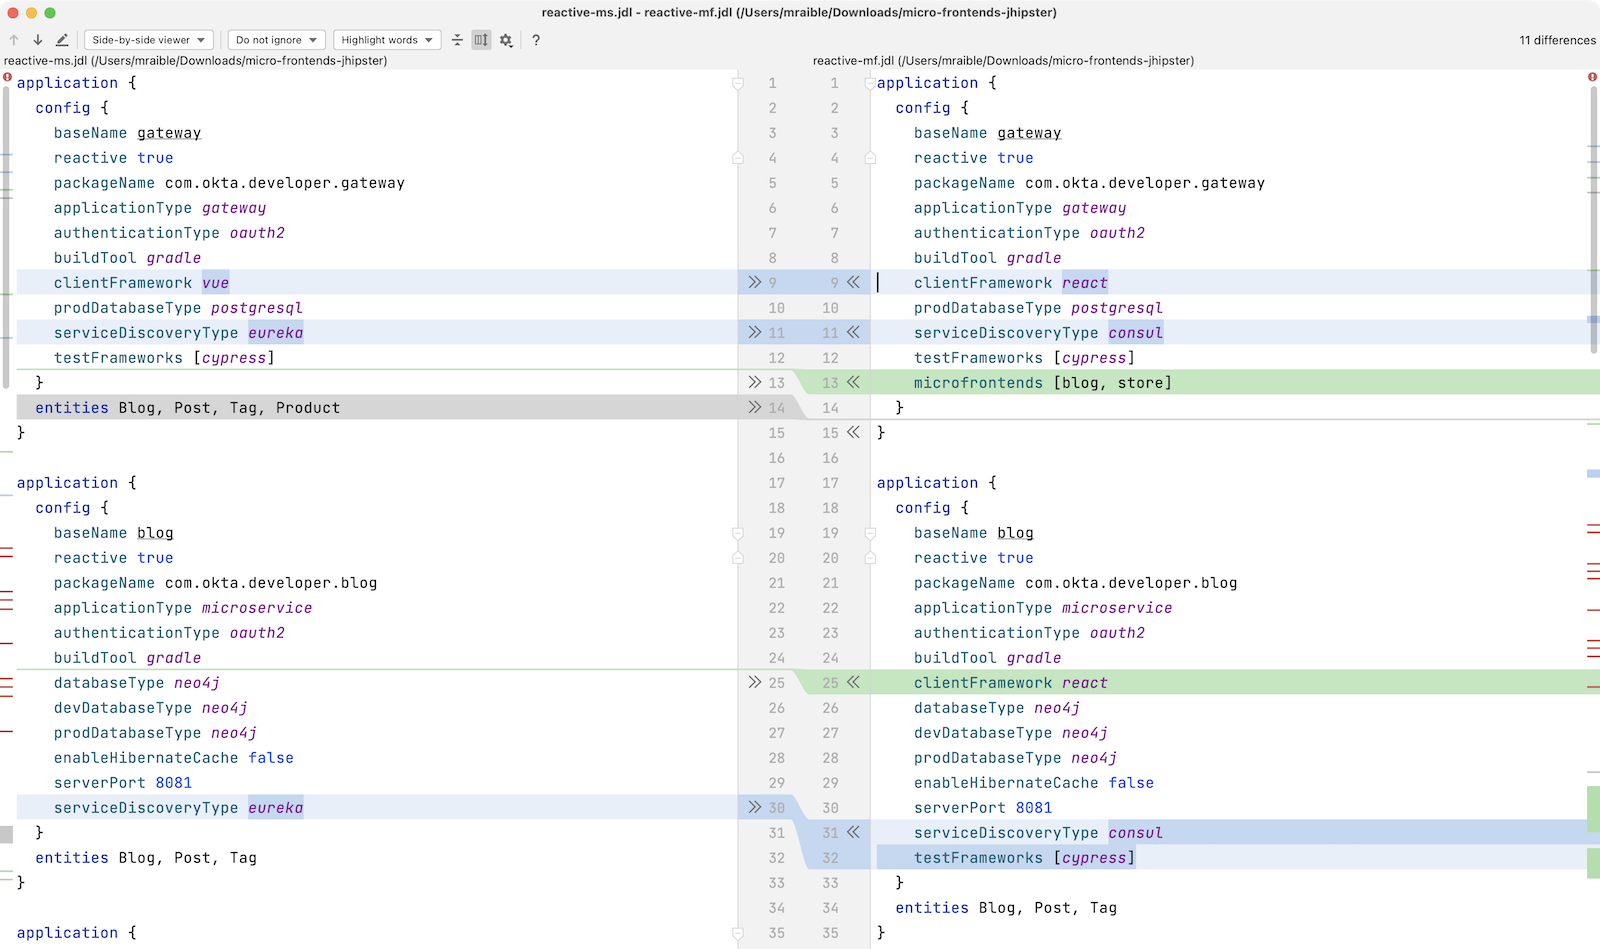
💡 TIP: The JHipster JDL Plugin is a handy tool for working with JDL files.
Micro frontend options: Angular, React, and Vue
JHipster has support for the big three JavaScript frameworks: Angular, React, and Vue. All are implemented using TypeScript, and a newly generated app should have around 70% code coverage, both on the backend and frontend.
There is also a Svelte blueprint, but it does not support micro frontends at the time of this writing.
Build Java microservices with Spring Boot and WebFlux
To generate a microservices architecture with micro frontend support, run the following command:
jhipster jdl reactive-mf.jdl --monorepository --workspacesThe last two arguments are optional, but I expect you to use them for this tutorial. Without the monorepository flag, the gateway and microservices would have their own Git repos. The workspaces flag enables npm workspaces, which is kinda like having an aggregator pom.xml that allows you to execute commands across projects. It also makes it, so there's only one node_modules in the root directory. To learn more, I recommend egghead's Introduction to Monorepos with NPM Workspaces.
If you want to use Angular, you can pass in --client-framework angular to override the JDL value. For example:
# Micro Frontends with Angular
jhipster jdl reactive-mf.jdl --client-framework angular --monorepository --workspaces
If you'd rather try out Vue, use the following:
# Micro Frontends with Vue
jhipster jdl reactive-mf.jdl --client-framework vue --monorepository --workspaces
Run your reactive Spring Boot microservices
When the process is complete, cd into the gateway directory and start Consul, Keycloak, and PostgreSQL using Docker Compose.
cd gateway
docker compose -f src/main/docker/consul.yml up -d
docker compose -f src/main/docker/keycloak.yml up -d
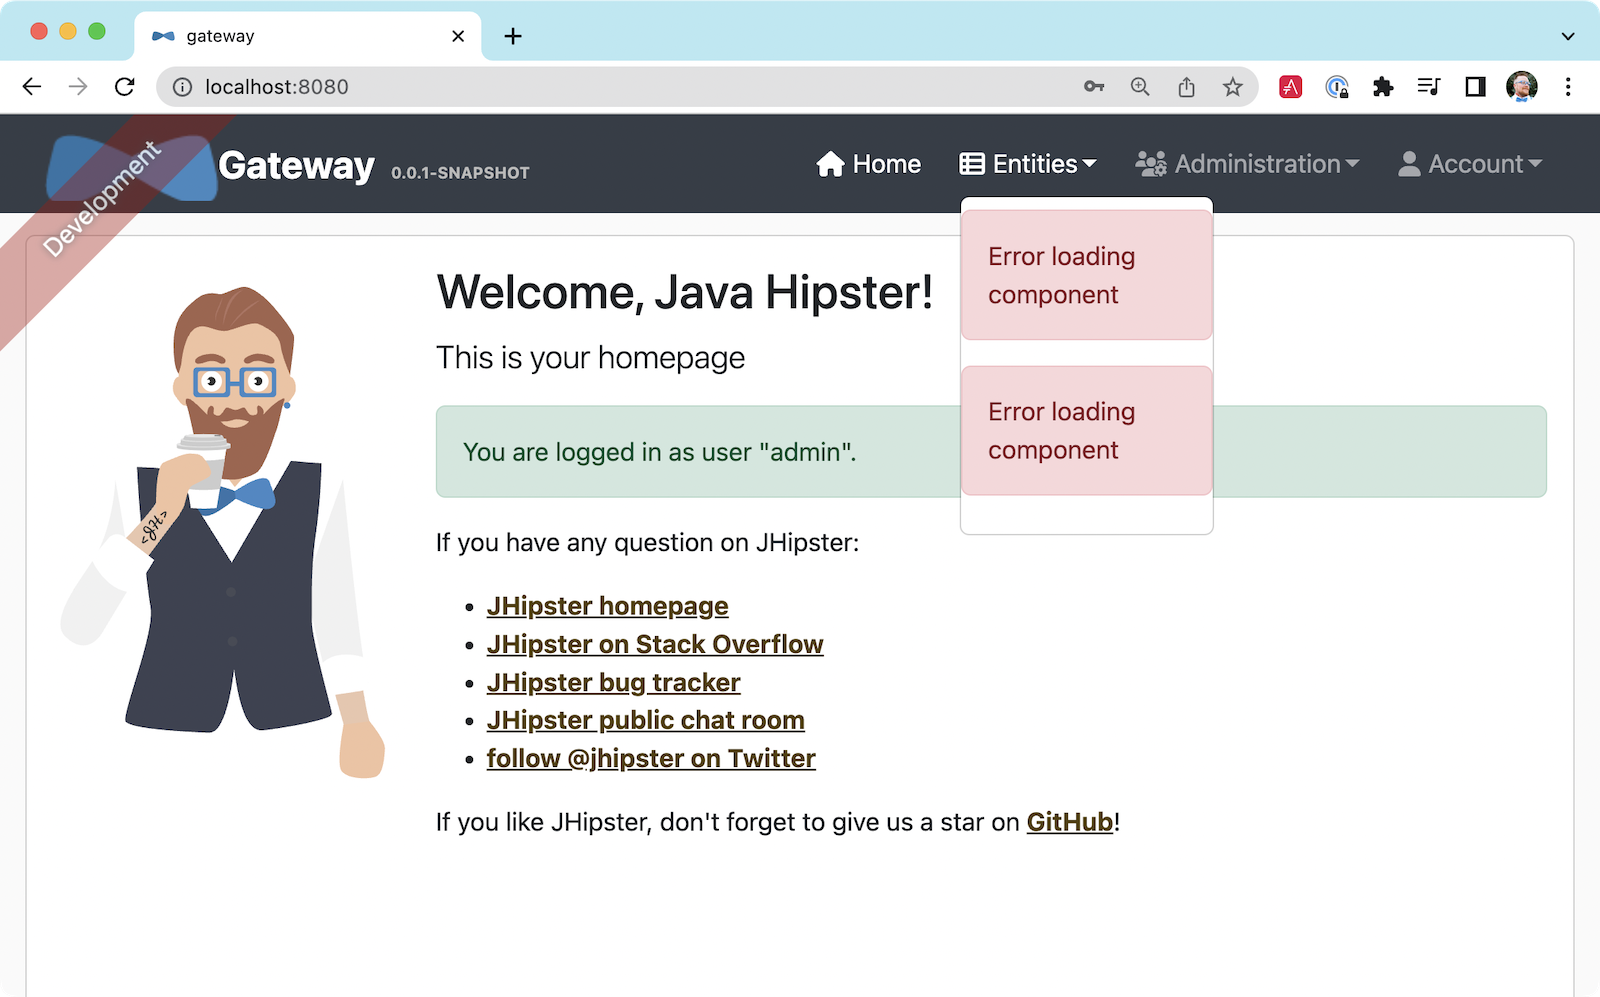
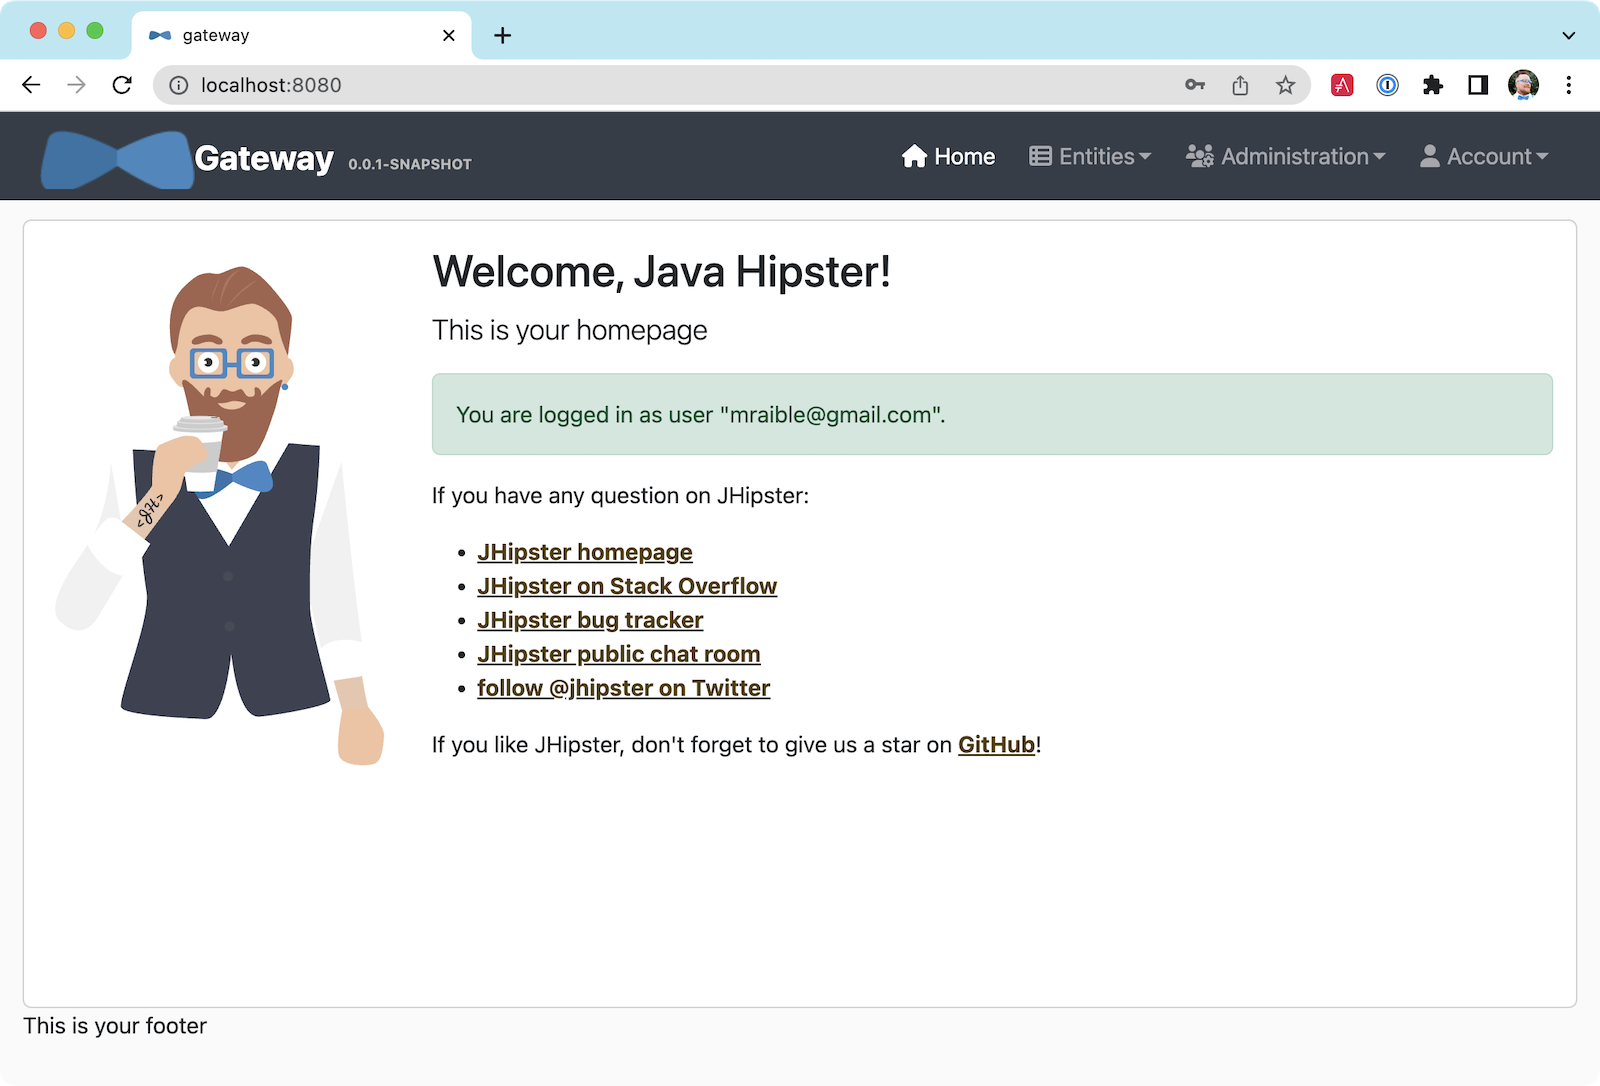
docker compose -f src/main/docker/postgresql.yml up -dThen, run ./gradlew (or npm run app:start if you prefer npm commands). When the startup process completes, open your favorite browser to http://localhost:8080, and log in with the credentials displayed on the page.
You'll be redirected back to the gateway, but the Entities menu won't have any links because the micro frontends it tries to load are unavailable.
Start the blog by opening a terminal and navigating to its directory. Then, start its database with Docker and the app with Gradle.
npm run docker:db:up
./gradlew
Open a new terminal and do the same for the store microservice.
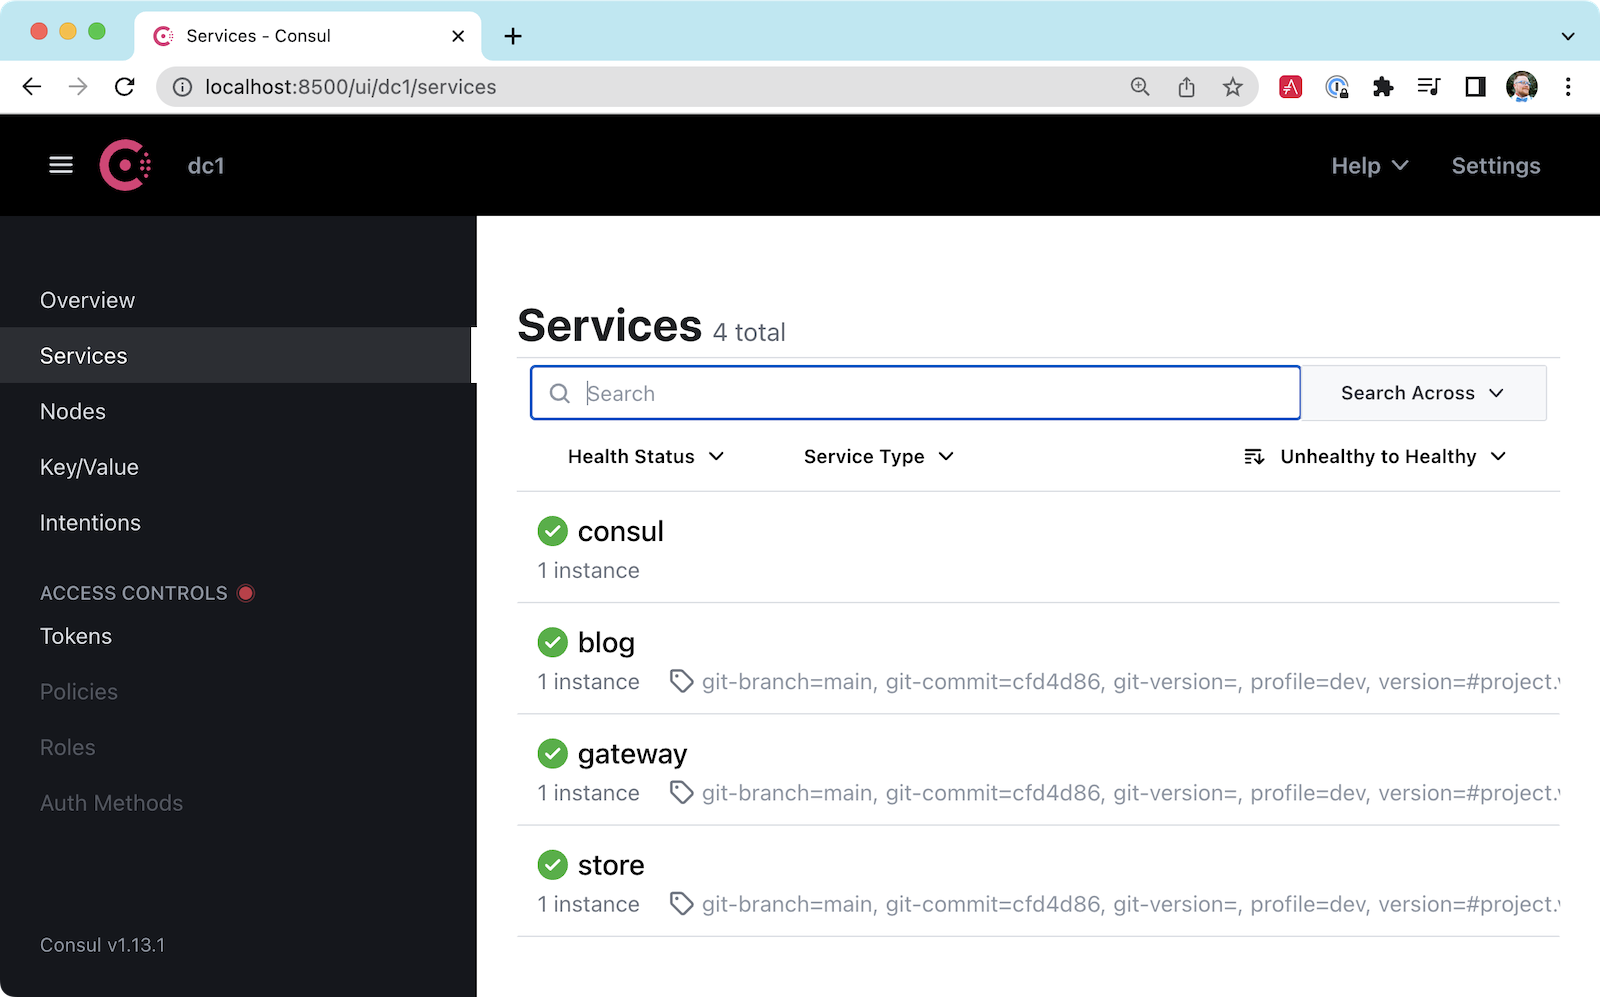
You can verify everything is started using Consul at http://localhost:8500.
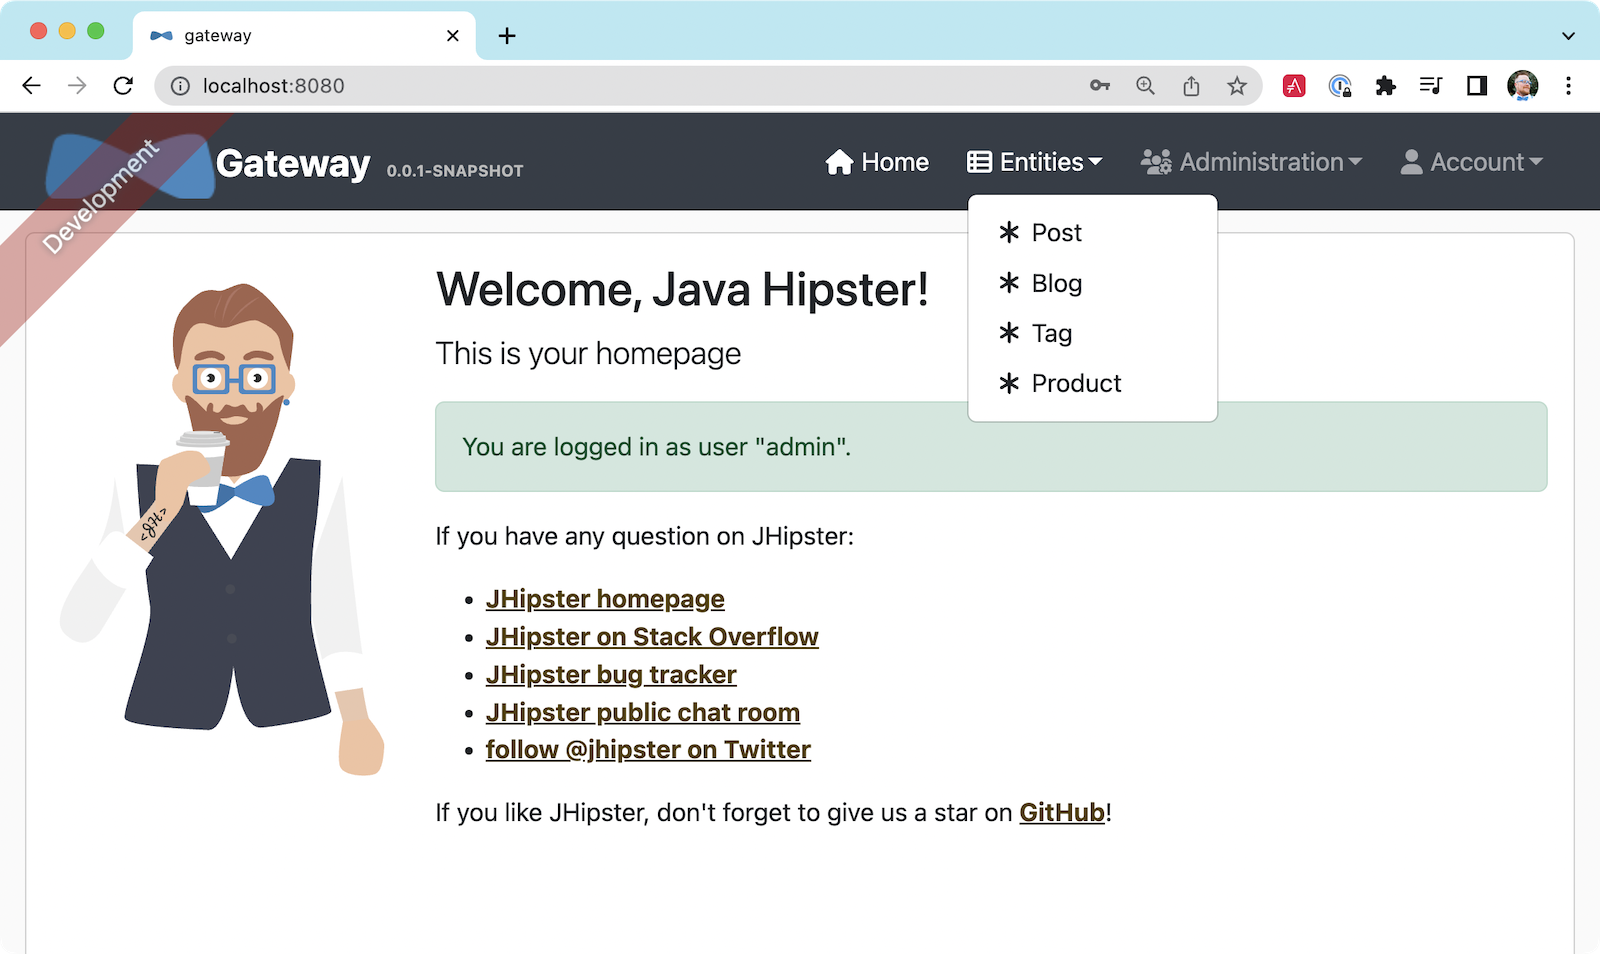
Refresh the gateway app; you should see menu items to navigate to the microservices now.
Zero turnaround development that sparks joy
At this point, I've only shown you how to run the Spring Boot backends with their packaged React apps. What if you want to work on the UI and have zero turnarounds that spark joy? ✨🤗
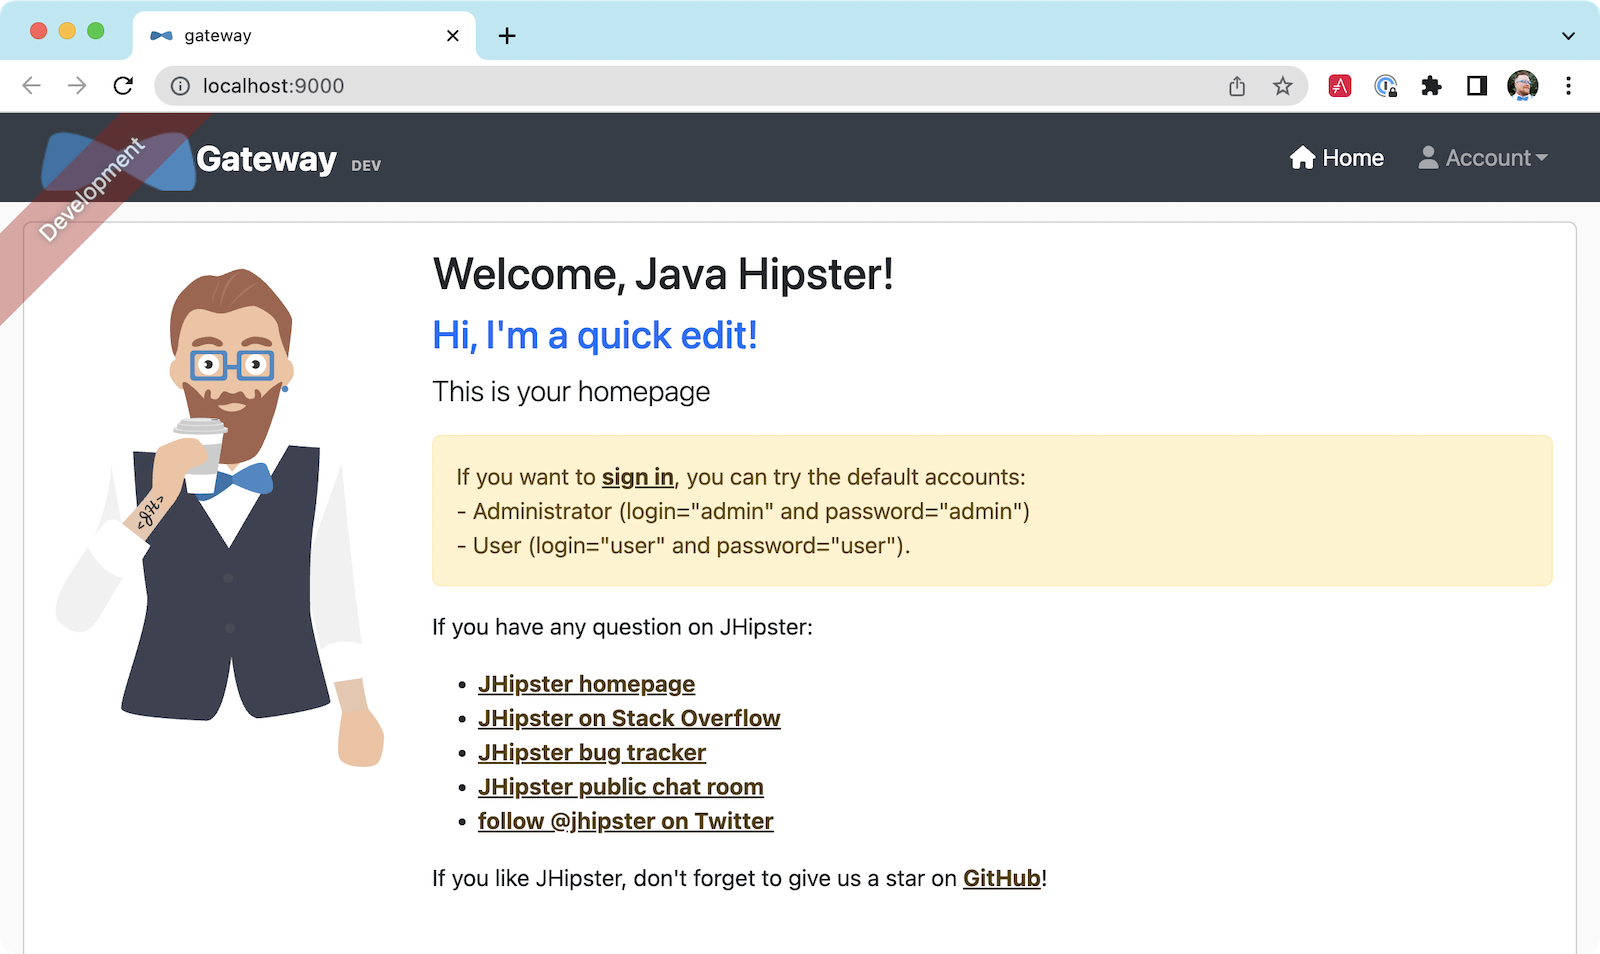
In the gateway app, run npm start. This command will run the UI on a web server, open a browser window to http://localhost:9000, and use Browsersync to keep your browser in sync with your code.
Modify the code in gateway/src/main/webapp/app/modules/home/home.tsx to make a quick change. For example, add the following HTML below the <h1>.
<h2 className="text-primary">
  Hi, I'm a quick edit!
</h2>
You'll see this change immediately appear within your browser.
Remove it, and it'll disappear right away too.
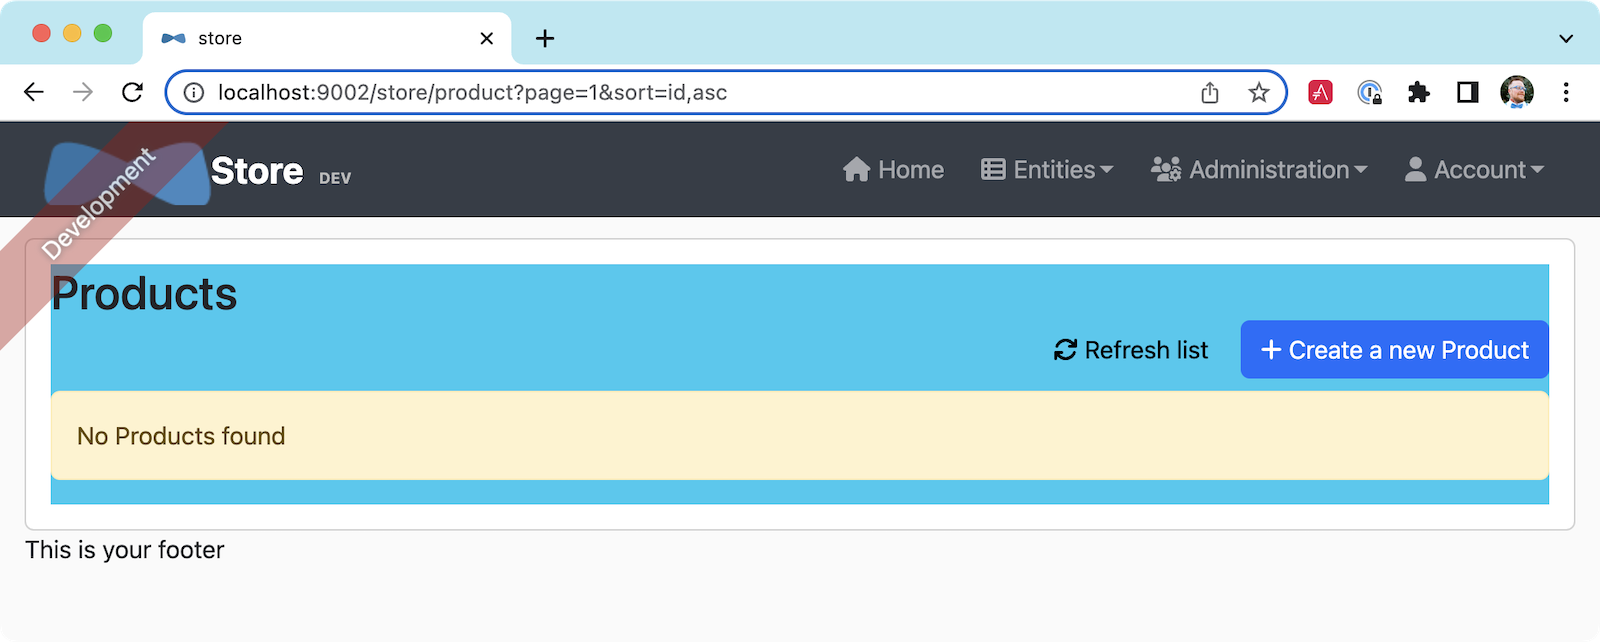
Now, open another terminal and navigate into the store directory. Run npm start, and you'll have a similar zero-turnaround experience when modifying files in the store app. The app will start a webserver on http://localhost:9002, and there will only be one menu item for the product. Modify files in the store/src/main/webapp/app/entities/store/product directory, and you'll see the changes in your browser immediately. For example, change the wrapper <div> in product.tsx to have a background color:
<div className="bg-info">The UI will change before you can Cmd + Tab back to your browser.
The backend has quick turnaround abilities, too, thanks to Spring Boot devtools. If you modify a backend class, recompiling it will cause Spring Boot to reload your component lickety-split. It's pretty slick!
A look under the hood of micro frontends
When you're learning concepts like micro frontends, it's often helpful to look at the code that makes things work.
The gateway's webpack.microfrontend.js handles specifying the shared dependencies and components between apps. The src/main/webapp/app/shared/layout/menus/entities.tsx file contains the menu items for each micro frontend.
gateway/webpack/webpack.microfrontend.js
const ModuleFederationPlugin = require('webpack/lib/container/ModuleFederationPlugin');

const packageJson = require('../package.json');
// Microfrontend api, should match across gateway and microservices.
const apiVersion = '0.0.1';

const sharedDefaults = { singleton: true, strictVersion: true, requiredVersion: apiVersion };
const shareMappings = (...mappings) => Object.fromEntries(mappings.map(map => [map, { ...sharedDefaults, version: apiVersion }]));

const shareDependencies = ({ skipList = [] } = {}) =>
Object.fromEntries(
  Object.entries(packageJson.dependencies)
    .filter(([dependency]) => !skipList.includes(dependency))
    .map(([dependency, version]) => [dependency, { ...sharedDefaults, version, requiredVersion: version }]),
);

module.exports = ({ serve }) => {
return {
  optimization: {
    moduleIds: 'named',
    chunkIds: 'named',
    runtimeChunk: false,
  },

  plugins: [
    new ModuleFederationPlugin({
      shareScope: 'default',
      shared: {
        ...shareDependencies(),
        ...shareMappings(
          'app/config/constants',
          'app/config/store',
          'app/shared/error/error-boundary-routes',
          'app/shared/layout/menus/menu-components',
          'app/shared/layout/menus/menu-item',
          'app/shared/reducers',
          'app/shared/reducers/locale',
          'app/shared/reducers/reducer.utils',
          'app/shared/util/date-utils',
          'app/shared/util/entity-utils',
        ),
      },
    }),
  ],
  output: {
    publicPath: 'auto',
  },
};
};
The blog's webpack.microfrontend.js looks similar, except that it exposes its remoteEntry.js, menu items, and routes.
blog/webpack/webpack.microfrontend.js
const ModuleFederationPlugin = require('webpack/lib/container/ModuleFederationPlugin');
const { DefinePlugin } = require('webpack');

const packageJson = require('../package.json');
// Microfrontend api, should match across gateway and microservices.
const apiVersion = '0.0.1';

const sharedDefaults = { singleton: true, strictVersion: true, requiredVersion: apiVersion };
const shareMappings = (...mappings) => Object.fromEntries(mappings.map(map => [map, { ...sharedDefaults, version: apiVersion }]));

const shareDependencies = ({ skipList = [] } = {}) =>
Object.fromEntries(
  Object.entries(packageJson.dependencies)
    .filter(([dependency]) => !skipList.includes(dependency))
    .map(([dependency, version]) => [dependency, { ...sharedDefaults, version, requiredVersion: version }]),
);

module.exports = ({ serve }) => {
return {
  optimization: {
    moduleIds: 'named',
    chunkIds: 'named',
    runtimeChunk: false,
  },

  plugins: [
    new ModuleFederationPlugin({
      name: 'blog',
      filename: 'remoteEntry.js',
      shareScope: 'default',
      exposes: {
        './entities-menu': './src/main/webapp/app/entities/menu',
        './entities-routes': './src/main/webapp/app/entities/routes',
      },
      shared: {
        ...shareDependencies(),
        ...shareMappings(
          'app/config/constants',
          'app/config/store',
          'app/shared/error/error-boundary-routes',
          'app/shared/layout/menus/menu-components',
          'app/shared/layout/menus/menu-item',
          'app/shared/reducers',
          'app/shared/reducers/locale',
          'app/shared/reducers/reducer.utils',
          'app/shared/util/date-utils',
          'app/shared/util/entity-utils',
        ),
      },
    }),
    new DefinePlugin({
      BLOG_I18N_RESOURCES_PREFIX: JSON.stringify(''),
    }),
  ],
  output: {
    publicPath: 'auto',
  },
};
};
Build and Run with Docker
To build Docker images for each application, run the following command from the root directory.
npm run java:dockerThe command is slightly different if you're using a Mac with Apple Silicon.
npm run java:docker:arm64💡 TIP: You can see all npm scripts with
npm run.
Then, navigate to the docker-compose directory, stop the existing containers, and start all the containers.
cd docker-compose
docker stop $(docker ps -a -q);
docker compose up
This command will start and run all the apps, their databases, Consul, and Keycloak. To make Keycloak work, you must add the following line to your host's file (/etc/hosts on Mac/Linux, c:\Windows\System32\Drivers\etc\hosts on Windows).
127.0.0.1 keycloakThis is because you will access your application with a browser on your machine (where the name is localhost, or 127.0.0.1), but inside Docker, it will run in its own container, where the name is keycloak.
If you want to prove everything works, ensure everything is started at http://localhost:8500, then run npm run e2e -ws from the root project directory. This command will run the Cypress tests that JHipster generates in your browser.
Switch Identity Providers
JHipster ships with Keycloak when you choose OAuth 2.0 / OIDC as the authentication type. However, you can easily change it to another identity provider, like Auth0!
First, you'll need to register a regular web application. Log in to your Auth0 account (or sign up if you don't have an account). You should have a unique domain like dev-xxx.us.auth0.com.
Select Create Application in the Applications section. Use a name like Micro Frontends, select Regular Web Applications, and click Create.
Switch to the Settings tab and configure your application settings:
- Allowed Callback URLs:
http://localhost:8080/login/oauth2/code/oidc - Allowed Logout URLs:
http://localhost:8080/
Scroll to the bottom and click Save Changes.
In the roles section, create new roles named ROLE_ADMIN and ROLE_USER.
Create a new user account in the users section. Click the Role tab to assign the roles you just created to the new account.
Make sure your new user's email is verified before attempting to log in!
Next, head to Actions > Flows and select Login. Create a new action named Add Roles and use the default trigger and runtime. Change the onExecutePostLogin handler to be as follows:
exports.onExecutePostLogin = async (event, api) => {
  const namespace = 'https://www.jhipster.tech';
  if (event.authorization) {
    api.idToken.setCustomClaim('preferred_username', event.user.email);
    api.idToken.setCustomClaim(`${namespace}/roles`, event.authorization.roles);
    api.accessToken.setCustomClaim(`${namespace}/roles`, event.authorization.roles);
  }
}
This code adds the user's roles to a custom claim (prefixed with https://www.jhipster.tech/roles). This claim is mapped to Spring Security authorities in SecurityUtils.java in the gateway app.
Select Deploy and drag the Add Roles action to your Login flow.
Edit docker-compose/central-server-config/application.yml and append the following YAML block to add your Auth0 settings.
jhipster:
  security:
    oauth2:
      audience: https://<your-auth0-domain>/api/v2/

spring:
  security:
    oauth2:
      client:
        provider:
          oidc:
            issuer-uri: https://<your-auth0-domain>/ # make sure to include the trailing slash!
        registration:
          oidc:
            client-id: <your-client-id>
            client-secret: <your-client-secret>
NOTE: Want to have all these steps automated for you? Vote for issue #351 in the Auth0 CLI project.
Stop all your Docker containers with Ctrl + C and start them again.
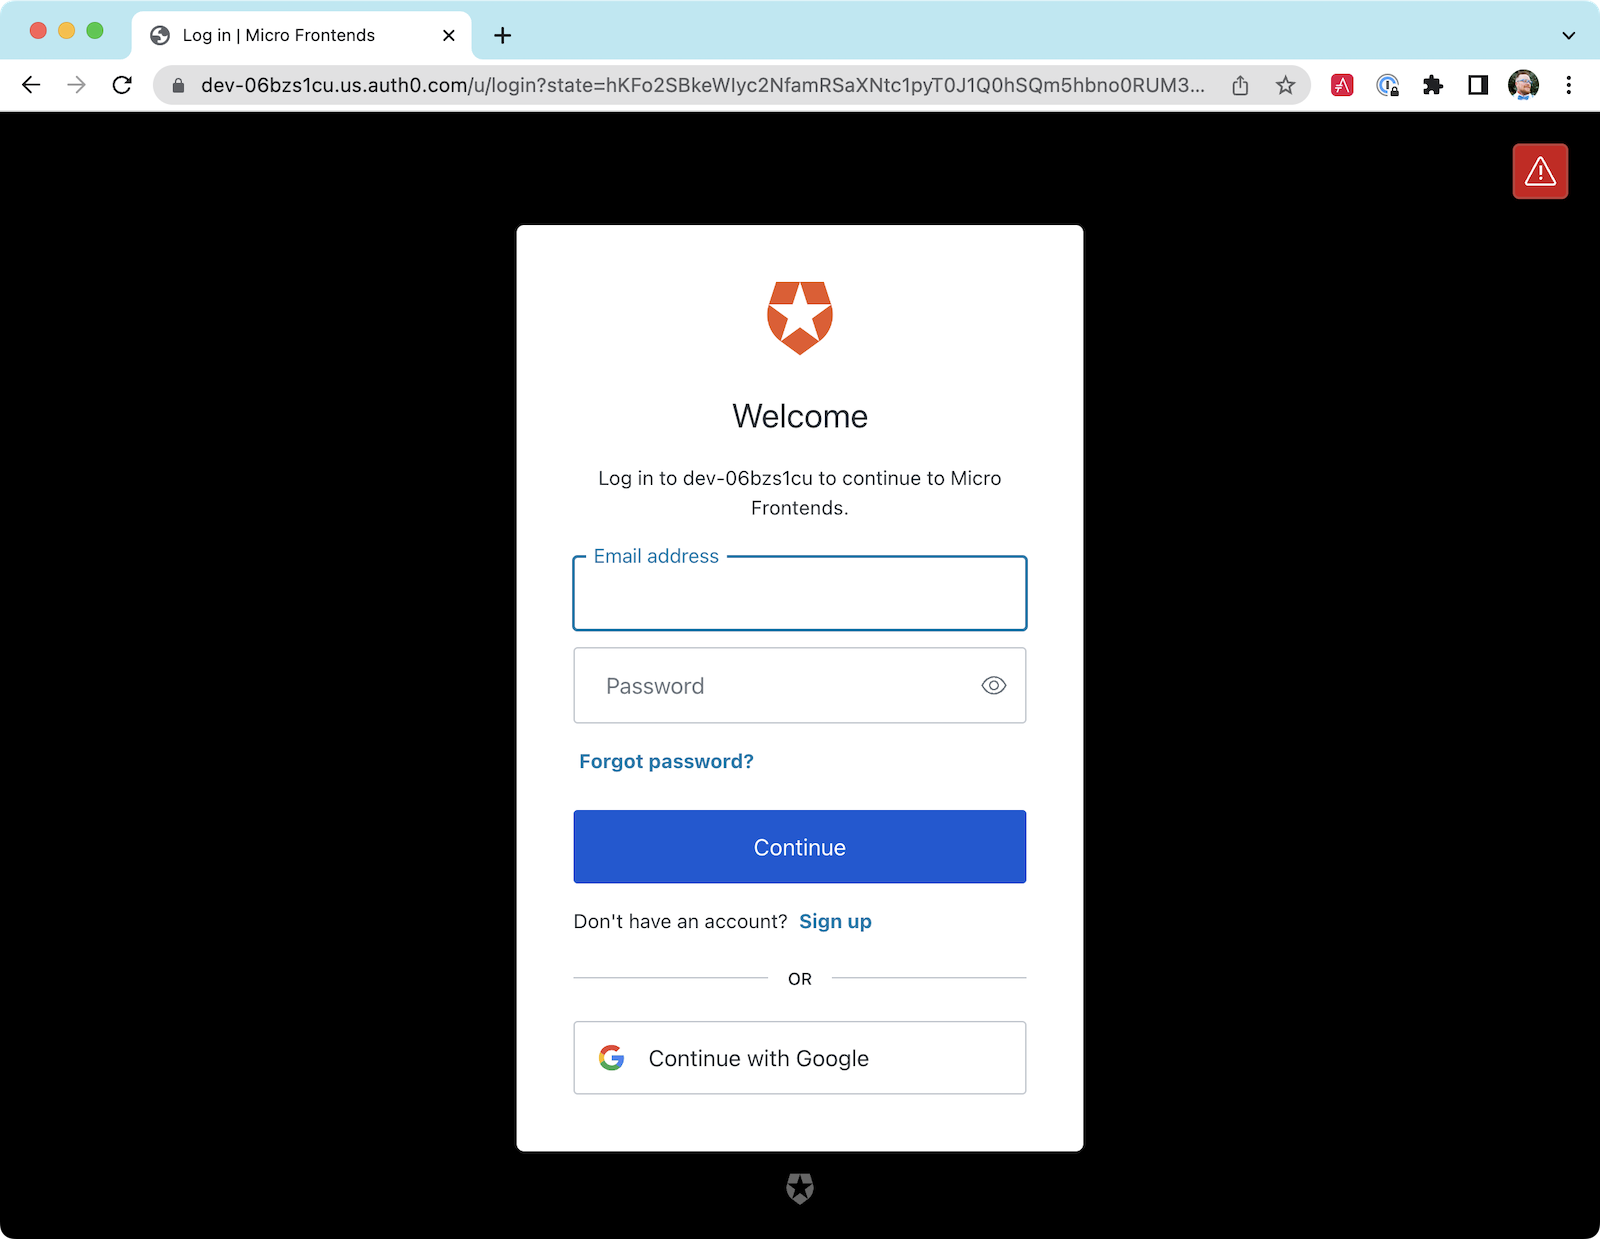
docker compose upNow, Spring Security will be configured to use Auth0, and Consul will distribute these settings to all your microservices. When everything is started, navigate to http://localhost:8080 and click sign in. You will be prompted for your Auth0 credentials.
After entering your credentials, you'll be redirected back to the gateway, and your username will be displayed.
You should be able to add, edit, and delete blogs, posts, tags, and products, proving that your microservices and micro frontends can talk to each other.
If you'd like to use Okta for your identity provider, see JHipster's documentation.
💡 You can configure JHipster quickly with the Okta CLI:
okta apps create jhipsterDeploy with Kubernetes
The JDL you used to generate this microservices stack has a section at the bottom for deploying to Kubernetes.
deployment {
  deploymentType kubernetes
  appsFolders [gateway, blog, store]
  clusteredDbApps [store]
  kubernetesNamespace demo
  kubernetesUseDynamicStorage true
  kubernetesStorageClassName ""
  serviceDiscoveryType consul
  dockerRepositoryName "mraible"
}
The jhipster jdl command generates a kubernetes directory with this information and configures all your apps, databases, and Consul to be Kubernetes-ready. If you have a Kubernetes cluster created, you can deploy to its demo namespace using the following command.
./kubectl-apply.sh -fIt also generates files for Kustomize and Skaffold if you'd prefer to use those tools. See the kubernetes/K8S-README.md file for more information.
I won't go into the nitty-gritty details of deploying a JHipster microservices stack to cloud providers with K8s, mainly because it's covered in previous blog posts. The first post below shows how to run Minikube locally, encrypt your secrets, and deploy to Google Cloud.
- Kubernetes to the Cloud with Spring Boot and JHipster
- Kubernetes Microservices on Azure with Cosmos DB
- Run Microservices on DigitalOcean with Kubernetes
- JHipster Microservices on AWS with Amazon Elastic Kubernetes Service
- CI/CD Java Microservices with CircleCI and Spinnaker
The JHipster team also has a blog you can follow at dev.to/jhipster.
Learn More about Micro Frontends and Microservices
I hope you enjoyed this overview of how to use micro frontends within a Java microservices architecture. I like how micro frontends allow each microservice application to be self-contained and deployable, independent of the other microservices. It's also pretty neat how JHipster generates Docker and Kubernetes configuration for you. Cloud-native FTW!
You can find the source code for this example on GitHub in the @oktadev/auth0-micro-frontends-jhipster-example repository.
If you'd like to learn more about micro frontends and microservices, I recommend these posts:
- Micro Frontends with Angular, Module Federation, and Auth0
- How to Build Micro Frontends Using Module Federation in Angular
- Secure and Deploy Micro Frontends with Angular
- Reactive Java Microservices with Spring Boot and JHipster
- What are Microservices?
Please follow @auth0 and @oktadev on Twitter. We also have YouTube channels that you might enjoy at youtube.com/auth0 and youtube.com/oktadev. If you have any questions, please leave a comment below!


