Most modern web applications are powered by a REST API under the hood. That way, developers can separate the front-end code from the back-end logic, and users can interact with the interface dynamically. In this three-part tutorial series, you’ll build a REST API with the Flask web framework.
You’ll create a foundation with a basic Flask project then add endpoints and connect them to a SQLite database. You’ll test your API with Swagger UI API documentation that you’ll build along the way.
In the first part of this tutorial series, you’ll learn how to:
- Build a base Flask project with a REST API
- Handle HTTP requests with Connexion
- Define API endpoints using the OpenAPI specification
- Interact with your API to manage data
- Build API documentation with Swagger UI
After finishing the first part of this series, you’ll move on to the second part, where you’ll learn to use a proper database to store your data permanently instead of relying on in-memory storage.
This tutorial series is a hand-on guide on how to create a REST API with Flask and interact with it using CRUD operations. If you want to refresh your knowledge on working with APIs, then you can give Python and REST APIs: Interacting With Web Services a read.
You can download the code for the first part of this project by clicking the link below:
Source Code: Click here to download the free source code that you’ll use to build a REST API with the Flask web framework.
Demo
In this three-part tutorial series, you’ll build a REST API to keep track of notes for people that may visit you throughout the year. In this tutorial, you’ll create people like the Tooth Fairy, the Easter Bunny, and Knecht Ruprecht.
Ideally, you want to be on good terms with all three of them. That’s why you’ll send them notes, to increase the chance of getting valuable gifts from them.
You can interact with your application by leveraging the API documentation. Along the way, you’ll build a basic front end that reflects the contents of your database:
In the first part of this series, you’ll create a base Flask project and plug in your first API endpoints. At the end of this part, you’ll be able to see a list of people in the front end and manage each person in the back end:
By leveraging Swagger UI, you’ll create handy documentation for your API along the way. That way, you’ll have the opportunity to test how your API works at each stage of this tutorial and get a useful overview of all your endpoints.
Planning Part One
Besides building the Flask project foundation, you’re going to create a REST API that provides access to a collection of people and to the individuals within that collection. Here’s the API design for the people collection:
| Action | HTTP Verb | URL Path | Description |
|---|---|---|---|
| Read | GET |
/api/people |
Read a collection of people. |
| Create | POST |
/api/people |
Create a new person. |
| Read | GET |
/api/people/<lname> |
Read a particular person. |
| Update | PUT |
/api/people/<lname> |
Update an existing person. |
| Delete | DELETE |
/api/people/<lname> |
Delete an existing person. |
The REST API that you’ll be building will serve a simple people data structure where the people are keyed to the last name, and any updates are marked with a new timestamp.
The dataset that you’ll be working with looks like this:
PEOPLE = {
    "Fairy": {
        "fname": "Tooth",
        "lname": "Fairy",
        "timestamp": "2022-10-08 09:15:10",
    },
    "Ruprecht": {
        "fname": "Knecht",
        "lname": "Ruprecht",
        "timestamp": "2022-10-08 09:15:13",
    },
    "Bunny": {
        "fname": "Easter",
        "lname": "Bunny",
        "timestamp": "2022-10-08 09:15:27",
    }
}
One of the purposes of an API is to decouple the data from the application that uses it, thereby hiding the data implementation details. Later in this tutorial series, you’ll save your data in a database. But for the start, an in-memory data structure works fine.
Getting Started
In this section, you’ll prepare the development environment for your Flask REST API project. First, you’ll create a virtual environment and install all the dependencies that you need for your project.
Create a Virtual Environment
In this section, you’ll build your project structure. You can name the root folder of your project any way you like. For example, you could name it rp_flask_api/. Create the folder and navigate into it:
$ mkdir rp_flask_api
$ cd rp_flask_api
In this case, you name the root folder of your project rp_flask_api/. The files and folders that you create over the course of this series will be located in either this folder or its subfolders.
After you navigate to the project folder, it’s a good idea to create and activate a virtual environment. That way, you’re installing any project dependencies not system-wide but only in your project’s virtual environment.
Select your operating system below and use your platform-specific command to set up a virtual environment:
With the commands shown above, you create and activate a virtual environment named venv by using Python’s built-in venv module. The parenthesized (venv) in front of the prompt indicate that you’ve successfully activated the virtual environment.
Add Dependencies
After you’ve created and activated your virtual environment, it’s time to install Flask with pip:
(venv) $ python -m pip install Flask==2.2.2
The Flask micro web framework is the the main dependency that your project requires. On top of Flask, install Connexion to handle the HTTP requests:
(venv) $ python -m pip install "connexion[swagger-ui]==2.14.1"
To also make use of auto-generated API documentation, you install Connexion with the added support for Swagger UI. Later in this tutorial, you’ll learn more about the Python packages that you just installed.
Initiate Your Flask Project
The main file of your Flask project will be app.py. Create app.py in rp_flask_api/ and add the following content:
# app.py

from flask import Flask, render_template

app = Flask(__name__)

@app.route("/")
def home():
    return render_template("home.html")

if __name__ == "__main__":
    app.run(host="0.0.0.0", port=8000, debug=True)
You import the Flask module, giving the application access to the Flask functionality. You then create a Flask application instance named app. Next, you connect the URL route "/" to the home() function by decorating it with @app.route("/"). This function calls the Flask render_template() function to get the home.html file from the templates directory and return it to the browser.
In short, this code gets a basic web server up and running and makes it respond with a home.html template, which will be served to a browser when navigating to the URL "/".
Note: Flask’s development server defaults to port 5000. On newer macOS versions, this port is already in use by the macOS AirPlay receiver. Above, you’ve changed the port of your Flask app with port=8000. If you want, you can change the AirPlay receiver preferences on your Mac instead.
Flask expects home.html in a template directory named templates/. Create the templates/ directory and add home.html:
<!-- templates/home.html -->

<!DOCTYPE html>
<html lang="en">
<head>
    <meta charset="UTF-8">
    <title>RP Flask REST API</title>
</head>
<body>
    <h1>
        Hello, World!
    </h1>
</body>
</html>
Flask comes with the Jinja Templating Engine, which enables you to enhance your templates. But your home.html template is a basic HTML file without any Jinja features. That’s okay for now, because the purpose of home.html is to verify that your Flask project responds as intended.
With the Python virtual environment active, you can run your application with this command line in the directory containing the app.py file:
(venv) $ python app.py
When you run app.py, a web server will start on port 8000. If you open a browser and navigate to http://localhost:8000, you should see Hello, World! displayed:
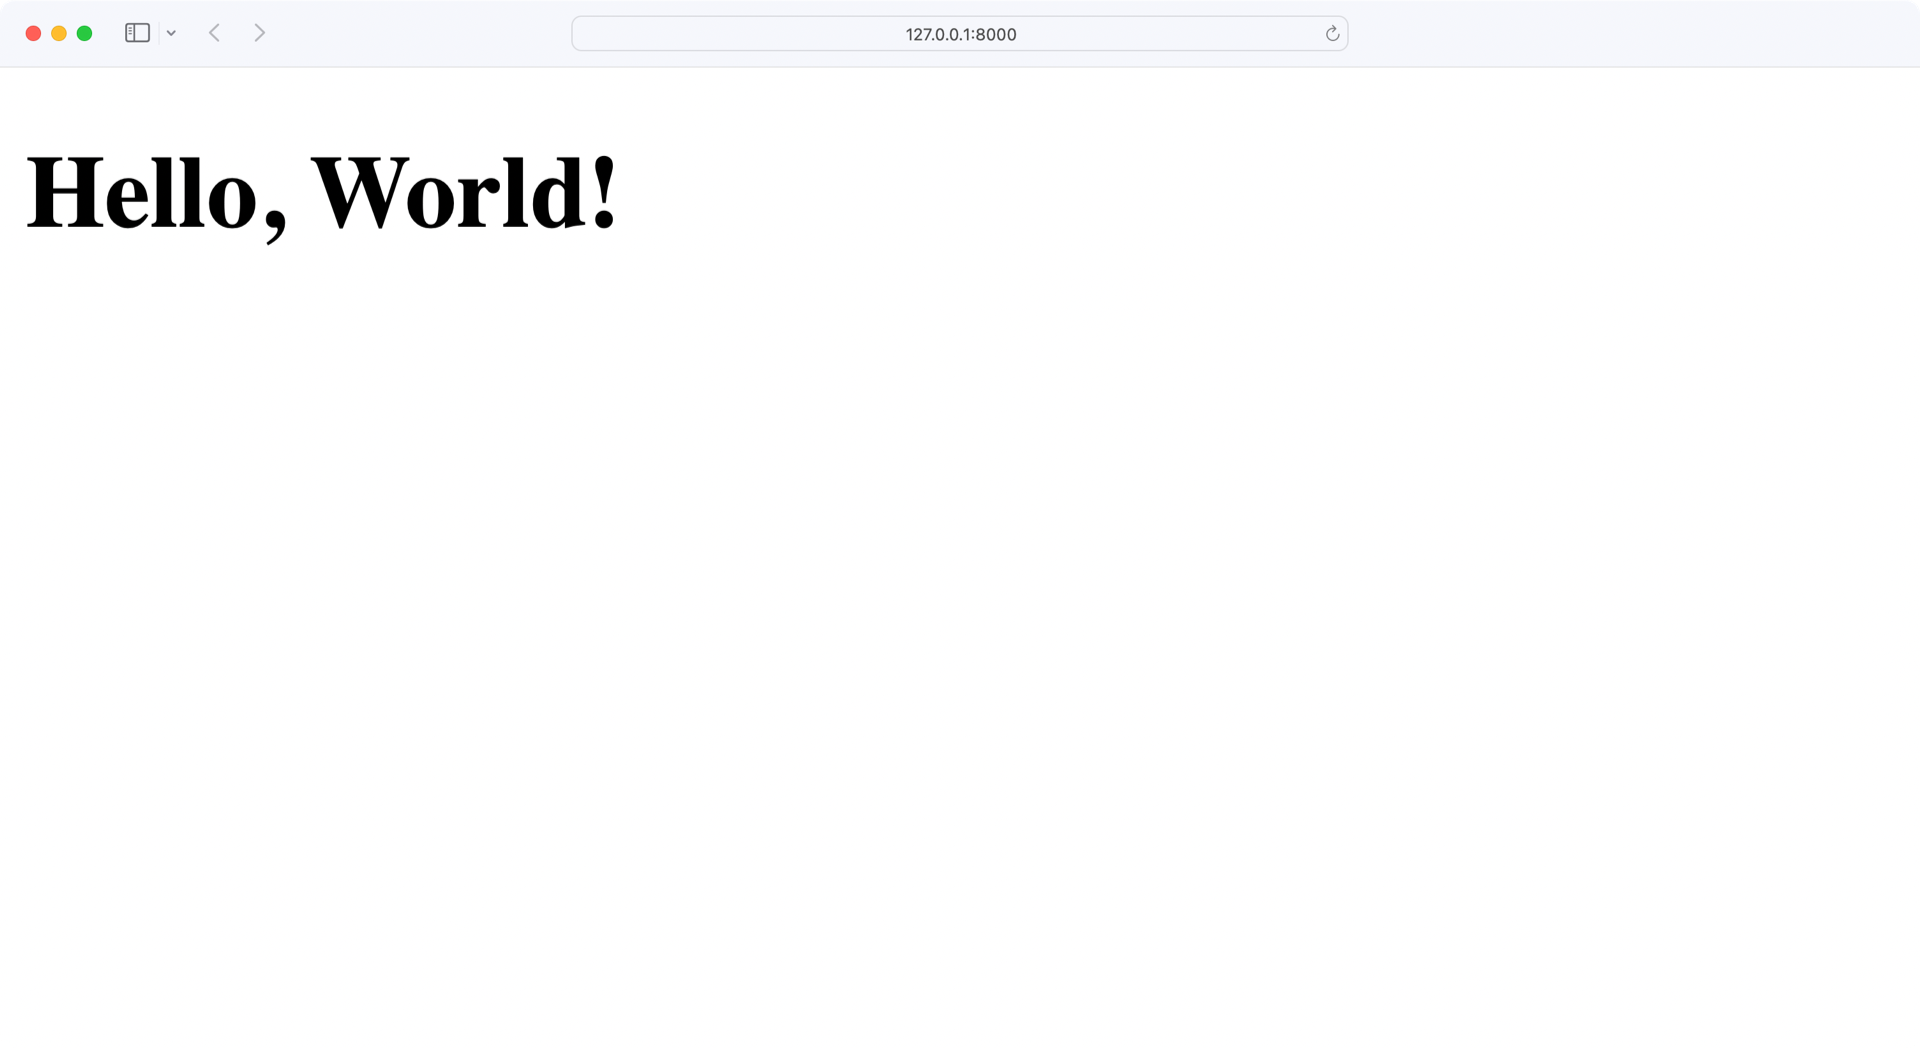
Congratulations, your web server is running! You’ll extend the home.html file later to work with the REST API that you’re developing.
By now, your Flask project structure should look like this:
rp_flask_api/
│
├── templates/
│   └── home.html
│
└── app.py
This is a great structure for starting any Flask project. You may find that the source code will come in handy when you’re working on future projects. You can download it here:
Source Code: Click here to download the free source code that you’ll use to build a REST API with the Flask web framework.
In the next sections, you’ll expand the project and add your first REST API endpoints.
Adding Your First REST API Endpoint
Now that you’ve got a working web server, you can add your first REST API endpoint. To do this, you’ll use Connexion, which you installed in the previous section.
The Connexion module allows a Python program to use the OpenAPI specification with Swagger. The OpenAPI Specification is an API description format for REST APIs and provides a lot of functionality, including:
- Validation of input and output data to and from your API
- Configuration of the API URL endpoints and the expected parameters
When you use OpenAPI with Swagger, you can create a user interface (UI) to explore the API. All of this can happen when you create a configuration file that your Flask application can access.
Create the API Configuration File
The Swagger configuration file is a YAML or JSON file containing your OpenAPI definitions. This file contains all of the information necessary to configure your server to provide input parameter validation, output response data validation, and URL endpoint definition.
Create a file named swagger.yml and begin adding metadata to it:
# swagger.yml

openapi: 3.0.0
info:
  title: "RP Flask REST API"
  description: "An API about people and notes"
  version: "1.0.0"
When you define an API, you must include the version of your OpenAPI definition. You use the openapi keyword for this. The version string is important because some parts of the OpenAPI structure may change over time.
Also, just like each new Python version includes new features, there may be keywords added or deprecated in the OpenAPI specification.
The info keyword begins the scope of the API information block:
title:Title included in the Connexion-generated UI systemdescription:Description of what the API provides or is aboutversion:Version value for the API
Next, add servers and url, which define the root path of your API:
# swagger.yml

# ...

servers:
  - url: "/api"
By providing "/api" as the value of url, you’ll be able to access all of your API paths relative to http://localhost:8000/api.
You define your API endpoints in a paths block:
# swagger.yml

# ...

paths:
  /people:
    get:
      operationId: "people.read_all"
      tags:
        - "People"
      summary: "Read the list of people"
      responses:
        "200":
          description: "Successfully read people list"
The paths block begins the configuration of the API URL endpoint paths:
/people:The relative URL of your API endpointget:The HTTP method that this URL endpoint will respond to
Together with the url definition in servers, this creates the GET /api/people URL endpoint that you can access at http://localhost:8000/api/people.
The get block begins the configuration of the single /api/people URL endpoint:
operationId:The Python function that’ll respond to the requesttags:The tags assigned to this endpoint, which allow you to group the operations in the UIsummary: The UI display text for this endpointresponses: The status codes that the endpoint responds with
operationId must contain a string. Connexion will use "people.read_all" to find a Python function named read_all() in a people module of your project. You’ll create the corresponding Python code later in this tutorial.
The responses block defines the configuration of the possible status codes. Here, you define a successful response for the status code "200", containing some description text.
You can find the complete content of the swagger.yml file in the collapsible below:
Below, you’ll find the full source code of your OpenAPI definition:
# swagger.yml

openapi: 3.0.0
info:
  title: "RP Flask REST API"
  description: "An API about people and notes"
  version: "1.0.0"

servers:
  - url: "/api"

paths:
  /people:
    get:
      operationId: "people.read_all"
      tags:
        - "People"
      summary: "Read the list of people"
      responses:
        "200":
          description: "Successfully read people list"
You’ve organized this file in a hierarchical manner. Each indentation level represents a level of ownership, or scope.
For example, paths marks the beginning of where all the API URL endpoints are defined. The /people value indented under that represents the start of where all the /api/people URL endpoints will be defined. The get: scope indented under /people holds the definitions associated with an HTTP GET request to the /api/people URL endpoint. This pattern goes on for the entire configuration.
The swagger.yml file is like a blueprint for your API. With the specifications that you include in swagger.yml, you define what data your web server can expect and how your server should respond to requests. But so far, your Flask project doesn’t know about your swagger.yml file. Read on to use Connexion to connect your OpenAPI specification with your Flask app.
Add Connexion to the App
There are two steps to adding a REST API URL endpoint to your Flask application with Connexion:
- Add an API configuration file to your project.
- Connect your Flask app with the configuration file.
You already added a configuration file named swagger.yml in the last section. To connect the API configuration file with your Flask app, you must reference swagger.yml in your app.py file:
 1# app.py
 2
 3from flask import render_template # Remove: import Flask
 4import connexion
 5
 6app = connexion.App(__name__, specification_dir="./")
 7app.add_api("swagger.yml")
 8
 9@app.route("/")
10def home():
11    return render_template("home.html")
12
13if __name__ == "__main__":
14    app.run(host="0.0.0.0", port=8000, debug=True)
The import connexion statement adds the module to the program. The next step is creating the application instance using Connexion rather than Flask. Internally, the Flask app is still created, but it now has additional functionality added to it.
Part of the app instance creation includes the parameter specification_dir in line 6. This tells Connexion which directory to look in for its configuration file. In this case, it’s the same directory that you run app.py from.
In line 7, you tell the app instance to read the swagger.yml file from the specification directory and configure the system to provide the Connexion functionality.
Return Data From Your People Endpoint
In the swagger.yml file, you configured Connexion with the operationId value "people.read_all". So, when the API gets an HTTP request for GET /api/people, your Flask app calls a read_all() function within a people module.
To make this work, create a people.py file with a read_all() function:
 1# people.py
 2
 3from datetime import datetime
 4
 5def get_timestamp():
 6    return datetime.now().strftime(("%Y-%m-%d %H:%M:%S"))
 7
 8PEOPLE = {
 9    "Fairy": {
10        "fname": "Tooth",
11        "lname": "Fairy",
12        "timestamp": get_timestamp(),
13    },
14    "Ruprecht": {
15        "fname": "Knecht",
16        "lname": "Ruprecht",
17        "timestamp": get_timestamp(),
18    },
19    "Bunny": {
20        "fname": "Easter",
21        "lname": "Bunny",
22        "timestamp": get_timestamp(),
23    }
24}
25
26def read_all():
27    return list(PEOPLE.values())
In line 5, you create a helper function named get_timestamp() that generates a string representation of the current timestamp.
You then define the PEOPLE dictionary data structure in line 8, which is the data you’ll work with in this part of the tutorial series.
The PEOPLE dictionary stands in for a proper database. As PEOPLE is a module variable, its state persists between REST API calls. However, any data that you change will be lost when you restart your web application. This is not ideal, but it’s fine for now.
Then you create the read_all() function in line 26. Your server will run read_all() when it receives an HTTP request to GET /api/people. The return value of read_all() is a list of dictionaries with information about a person.
Running your server code and navigating your browser to http://localhost:8000/api/people will display the list of people on-screen:
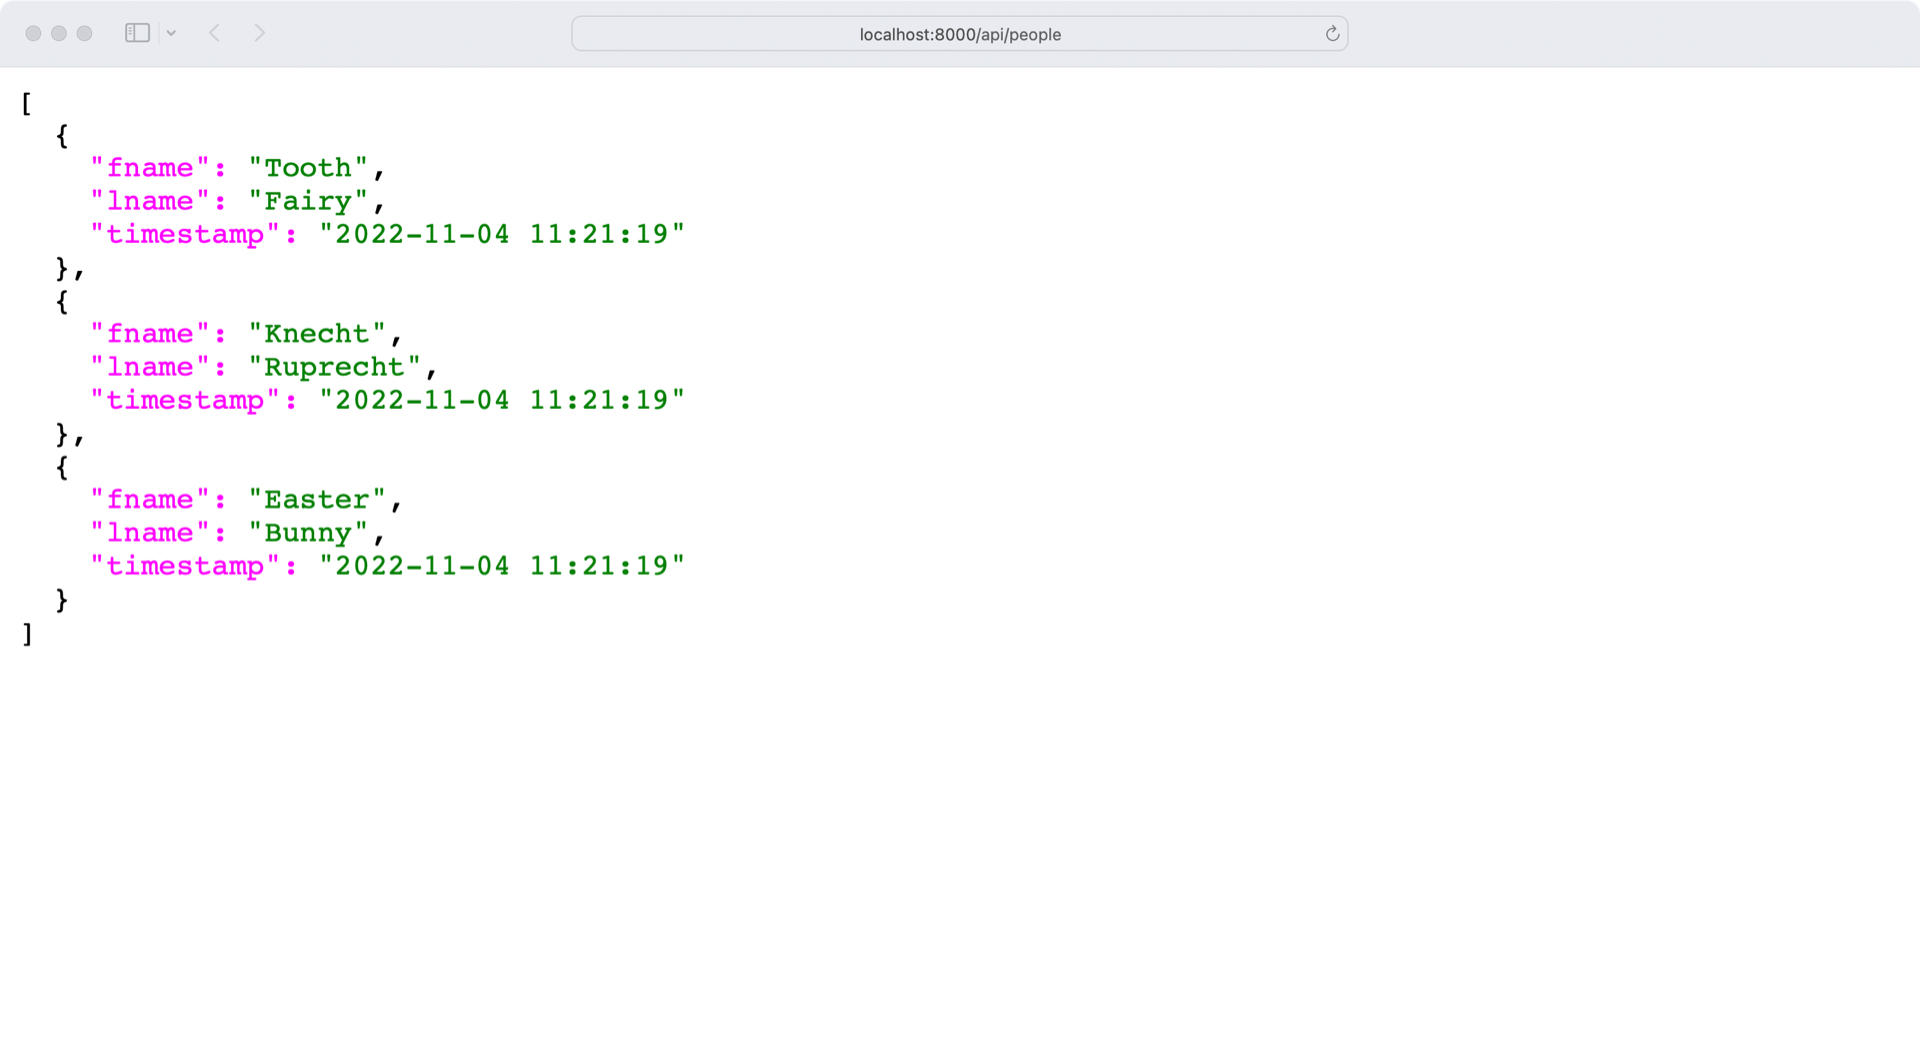
Congratulations, you’ve created your first API endpoint! Before continuing on your way to building out your REST API with multiple endpoints, take a moment and explore the API a bit more in the next section.
Explore Your API Documentation
Currently you have a REST API running with a single URL endpoint. Your Flask app knows what to serve based on your API specification in swagger.yml. Additionally, Connexion uses swagger.yml to create API documentation for you.
Navigate to localhost:8000/api/ui to see your API documentation in action:
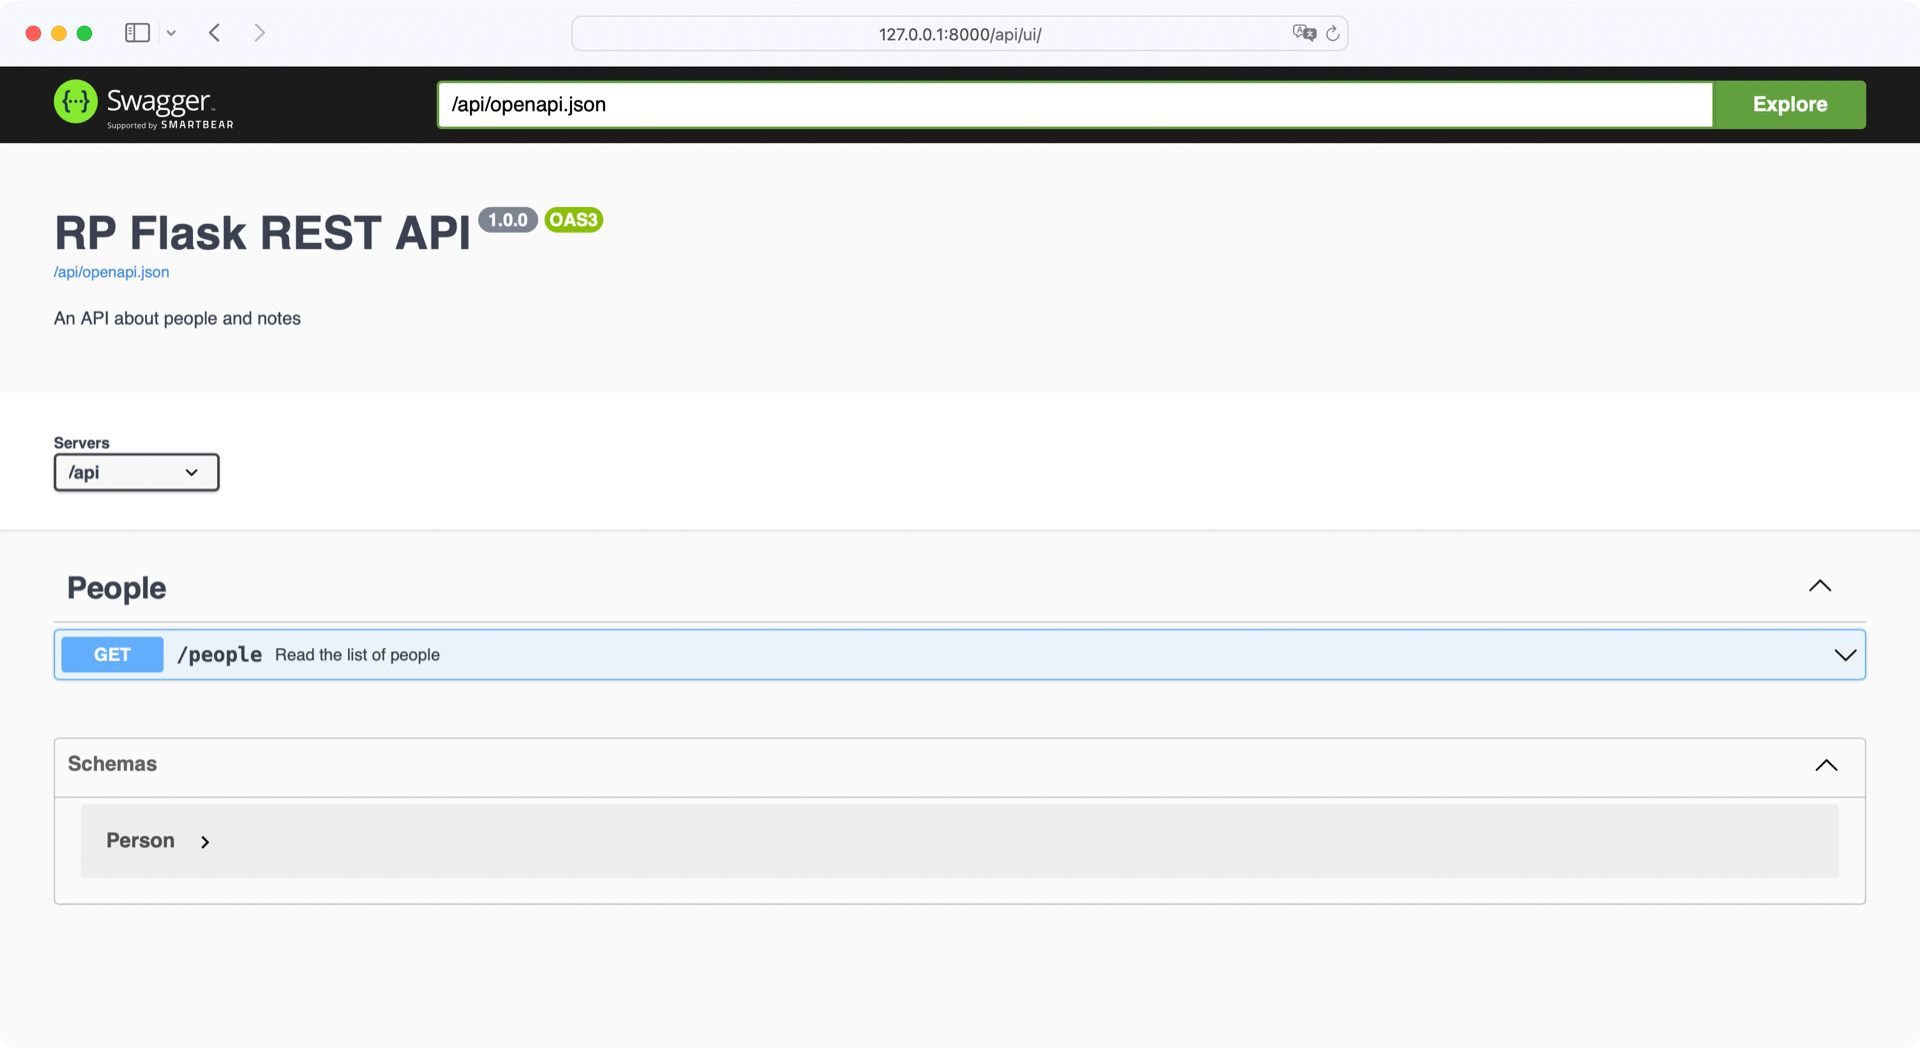
This is the initial Swagger interface. It shows the list of URL endpoints supported at your http://localhost:8000/api endpoint. Connexion builds this automatically when it parses the swagger.yml file.
If you click on the /people endpoint in the interface, then the interface will expand to show more information about your API:
This displays the structure of the expected response, the content-type of that response, and the description text that you entered about the endpoint in the swagger.yml file. Any time the configuration file changes, the Swagger UI changes as well.
You can even try the endpoint out by clicking the Try it out button. This feature can be extremely useful when your API grows. The Swagger UI API documentation gives you a way to explore and experiment with the API without having to write any code to do so.
Using OpenAPI with the Swagger UI offers a nice, clean way to create the API URL endpoints. So far, you’ve only created one endpoint to serve all people. In the next section, you’ll add additional endpoints to create, update, and delete people in your collection.
Building Out the Complete API
So far, your Flask REST API has one endpoint. Now it’s time to build out an API providing full CRUD access to your people structure. As you recall, the definition of your API looks like this:
| Action | HTTP Verb | URL Path | Description |
|---|---|---|---|
| Read | GET |
/api/people |
Read a collection of people. |
| Create | POST |
/api/people |
Create a new person. |
| Read | GET |
/api/people/<lname> |
Read a particular person. |
| Update | PUT |
/api/people/<lname> |
Update an existing person. |
| Delete | DELETE |
/api/people/<lname> |
Delete an existing person. |
To achieve this, you’ll extend both the swagger.yml and people.py files to fully support the API defined above.
Work With Components
Before you define new API paths in swagger.yml, you’ll add a new block for components. Components are building blocks in your OpenAPI specification that you can reference from other parts of your specification.
Add a components block with schemas for a single person:
# swagger.yml

openapi: 3.0.0
info:
  title: "RP Flask REST API"
  description: "An API about people and notes"
  version: "1.0.0"

servers:
  - url: "/api"

components:
  schemas:
    Person:
      type: "object"
      required:
        - lname
      properties:
        fname:
          type: "string"
        lname:
          type: "string"
# ...
To avoid code duplication, you create a components block. For now, you save only the Person data model in the schemas block:
type:The data type of the schemarequired:The required properties
The dash (-) in front of - lname indicates that required can contain a list of properties. Any property that you define as required must also exist in properties, which includes the following:
fname:The first name of a personlname:The last name of a person
The type key defines the value associated with its parent key. For Person, all properties are strings. You’ll represent this schema in your Python code as a dictionary later in this tutorial.
Create a New Person
Extend your API endpoints by adding a new block for the post request in the /people block:
# swagger.yml

# ...

paths:
  /people:
    get:
        # ...
    post:
      operationId: "people.create"
      tags:
        - People
      summary: "Create a person"
      requestBody:
          description: "Person to create"
          required: True
          content:
            application/json:
              schema:
                x-body-name: "person"
                $ref: "#/components/schemas/Person"
      responses:
        "201":
          description: "Successfully created person"
The structure for post looks similar to the existing get schema. One difference is that you also send requestBody to the server. After all, you need to tell Flask the information that it needs to create a new person. Another difference is operationId, which you set to people.create.
Inside of content, you define application/json as the data exchange format of your API.
You can serve different media types in your API requests and API responses. Nowadays APIs commonly use JSON as the data exchange format. This is good news for you as a Python developer, because JSON objects look very much like Python dictionaries. For example:
{
    "fname": "Tooth",
    "lname": "Fairy"
}
This JSON object resembles the Person component that you were defining earlier in swagger.yml and that you’re referencing with $ref in schema.
You’re also using a 201 HTTP status code, which is a success response that indicates the creation of a new resource.
Note: If you want to learn more about HTTP status codes, then you can check out Mozilla’s documentation about HTTP response status codes.
With people.create, you’re telling your server to look for a create() function in the people module. Open people.py and add create() to the file:
 1# people.py
 2
 3from datetime import datetime
 4from flask import abort
 5
 6# ...
 7
 8def create(person):
 9    lname = person.get("lname")
10    fname = person.get("fname", "")
11
12    if lname and lname not in PEOPLE:
13        PEOPLE[lname] = {
14            "lname": lname,
15            "fname": fname,
16            "timestamp": get_timestamp(),
17        }
18        return PEOPLE[lname], 201
19    else:
20        abort(
21            406,
22            f"Person with last name {lname} already exists",
23        )
In line 4, you’re importing Flask’s abort() function. Using abort() helps you send an error message in line 20. You raise the error response when the request body doesn’t contain a last name or when a person with this last name already exists.
Note: A person’s last name must be unique, because you’re using lname as a dictionary key of PEOPLE. That means you can’t have two people with the same last name in your project for now.
If the data in the request body is valid, you update PEOPLE in line 13 and respond with the new object and a 201 HTTP code in line 18.
Handle a Person
So far, you’re able to create a new person and get a list with all your people. In this section, you’ll update swagger.yml and people.py to work with a new path that handles a single existing person.
Open swagger.yml and add the code below:
# swagger.yml

# ...

components:
  schemas:
    # ...
  parameters:
    lname:
      name: "lname"
      description: "Last name of the person to get"
      in: path
      required: True
      schema:
        type: "string"

paths:
  /people:
    # ...
  /people/{lname}:
    get:
      operationId: "people.read_one"
      tags:
        - People
      summary: "Read one person"
      parameters:
        - $ref: "#/components/parameters/lname"
      responses:
        "200":
          description: "Successfully read person"
Similar to your /people path, you start with the get operation for the /people/{lname} path. The {lname} substring is a placeholder for the last name, which you have to pass in as a URL parameter. So, for example, the URL path api/people/Ruprecht contains Ruprecht as lname.
Note: The URL parameters are case sensitive. That means you must type a last name like Ruprecht with an uppercase R.
You’ll use the lname parameter in other operations, too. So it makes sense to create a component for it and reference it where needed.
operationId points to a read_one() function in people.py, so head over to that file again and create the missing function:
# people.py

# ...

def read_one(lname):
    if lname in PEOPLE:
        return PEOPLE[lname]
    else:
        abort(
            404, f"Person with last name {lname} not found"
        )
When your Flask app finds the provided last name in PEOPLE, then it returns the data for this particular person. Otherwise, the server will return a 404 HTTP error.
To update an existing person, update swagger.yml with this code:
# swagger.yml

# ...

paths:
  /people:
    # ...
  /people/{lname}:
    get:
        # ...
    put:
      tags:
        - People
      operationId: "people.update"
      summary: "Update a person"
      parameters:
        - $ref: "#/components/parameters/lname"
      responses:
        "200":
          description: "Successfully updated person"
      requestBody:
        content:
          application/json:
            schema:
              x-body-name: "person"
              $ref: "#/components/schemas/Person"
With this definition of the put operation, your server expects update() in people.py:
# people.py

# ...

def update(lname, person):
    if lname in PEOPLE:
        PEOPLE[lname]["fname"] = person.get("fname", PEOPLE[lname]["fname"])
        PEOPLE[lname]["timestamp"] = get_timestamp()
        return PEOPLE[lname]
    else:
        abort(
            404,
            f"Person with last name {lname} not found"
        )
The update() function expects the arguments lname and person. When a person with the provided last name exists, then you update the corresponding values in PEOPLE with the person data.
To get rid of a person in your dataset, you need to work with a delete operation:
# swagger.yml

# ...

paths:
  /people:
    # ...
  /people/{lname}:
    get:
        # ...
    put:
        # ...
    delete:
      tags:
        - People
      operationId: "people.delete"
      summary: "Delete a person"
      parameters:
        - $ref: "#/components/parameters/lname"
      responses:
        "204":
          description: "Successfully deleted person"
Add the corresponding delete() function to person.py:
# people.py

from flask import abort, make_response

# ...

def delete(lname):
    if lname in PEOPLE:
        del PEOPLE[lname]
        return make_response(
            f"{lname} successfully deleted", 200
        )
    else:
        abort(
            404,
            f"Person with last name {lname} not found"
        )
If the person you want to delete exists in your dataset, then you remove the item from PEOPLE.
Both people.py and swagger.yml are complete for this part of the tutorial. You can download the complete files by clicking the link below:
Source Code: Click here to download the free source code that you’ll use to build a REST API with the Flask web framework.
With all the endpoints to manage people in place, it’s time to try out your API. Since you used Connexion to connect your Flask project with Swagger, your API documentation is ready for you when you restart your server.
Explore Your Complete API Documentation
Once you’ve updated the swagger.yml and people.py files to complete the people API functionality, the Swagger UI system will update accordingly and look something like this:
This UI allows you to see all of the documentation that you’ve included in the swagger.yml file and to interact with all of the URL endpoints making up the CRUD functionality of the people interface.
Unfortunately, any changes that you make won’t persist when you restart your Flask application. That’s why you’ll plug a proper database in to your project in the next part of this tutorial series.
Conclusion
In this part of the tutorial series, you created a comprehensive REST API with Python’s Flask web framework. With the Connexion module and some additional configuration work, useful documentation and an interactive system can be put in place. This makes building a REST API a very enjoyable experience.
In the first part of this tutorial series, you learned how to:
- Build a base Flask project with a REST API
- Handle HTTP requests with Connexion
- Define API endpoints using the OpenAPI specification
- Interact with your API to manage data
- Build API documentation with Swagger UI
In part two of this series, you’ll learn how to use a proper database to store your data permanently instead of relying on in-memory storage as you did here.


