Types of Realtime GraphQL Subscriptions
GraphQL has a particular type of operation, called subscription, that enables you to add real-time or reactive features to your applications.
How does a GraphQL Subscription work? The client subscribes to a particular event on the server, and whenever that event occurs, the server pushes the update to the client.
An event can represent data creation, modification, or deletion. For instance, let’s say you have a voting application. You can set up a subscription to notify you when someone votes. Here is a subscription example:
subscription votes {
  vote {
    created_at
    option {
      poll {
        question
      }
      text
    }
  }
}
The subscription returns the updated results whenever a new vote is inserted into the database.
How are GraphQL Subscriptions implemented? They use the WebSocket protocol to keep a persistent connection between the client and the server. The connection stays open until either party terminates it.
Types of Subscriptions
Hasura comes with two types of subscriptions - live queries and streaming subscriptions.
Live Queries
Live queries represent one way of retrieving real-time data and are a pattern of GraphQL subscriptions.
You can see an example of a live query below:
query @live {
  vote {
    created_at
    option {
      poll {
        question
      }
      text
    }
  }
}
The structure looks similar to a regular query, but it uses the @live directive and works differently under the hood.
Rather than observing specific events, a live query observes data. Live queries react to changes in the latest query result. The server sends the updated result to the client whenever the result changes.
Streaming Subscriptions
Hasura also supports streaming over GraphQL subscriptions, known as Streaming Subscriptions.
With a streaming subscription, the client opens a new connection and specifies an offset (or cursor value). The subscription then sends ordered data from that offset. The offset acts as a starting point.
It’s recommended for the offset (or cursor value) to represent unique or sortable values. The server keeps track of each subscription offset, and after streaming the data, it updates the cursor. This way, the client receives each piece of data exactly once. In other words, it avoids duplicate data. It also acts as some sort of state that ensures data does not get lost from the stream.
In other words, streaming subscriptions uses WebSockets and GraphQL subscriptions to stream data from a starting point specified by the client.
Streaming Subscriptions vs. Live Queries
Subscriptions react to specific events, whereas live queries observe data. A subscription reacts to an event like a record insertion, whereas the live query reacts to data changes.
Their syntax differs as well. The live queries use the @live directive, which is not present in the subscription syntax. It’s important to note that live queries in Hasura do not use the @live or any other directive. In Hasura, live queries are just a pattern in which you fetch the entire result of a given query every single time, mimicking the liveness of it.
Lastly, the streaming subscriptions have some sort of state, whereas the live queries do not. The offset in streaming subscriptions allows the client to store the state of where they are reading from. With live queries, the client subscribes and gets the latest values.
@defer and @stream
The @defer and @stream directives represent another way for GraphQL servers to stream data to the client. They enable GraphQL servers to split the requested data into multiple priority levels. This way, the GraphQL server can stream the critical data first and resolve the rest in separate response payloads.
Consider the following example:
query AuthorQuery($id: String) {
    author(id: "8j32hugjijgreij") {
        name
        bio
        avatar
        ...SocialMediaLinks @defer(label: "socialMediaLinksFragment")
    }
}

fragment SocialMediaLinks on Author {
    socialMediaLinks {
        twitter
        instagram
        youtube
    }
}
The use of the @defer directive on the SocialMediaLinks fragment indicates that it has a lower priority than the other fields. As a result, the fragment is excluded from the initial response and sent in the subsequent response payloads.
With the @defer directive, you can specify the query parts that are not essential and can be delivered later. It’s important to mention that the @defer directive can only be used on fragments.
The @stream directive works similarly, but it can be applied only to fields of type List.
Consider the following example:
query AuthorQuery($id: String) {
    author(id: "8j32hugjijgreij") {
        name
        bio
        avatar
        articles @stream(initialCount: 1, label: "articlesStream") {
            title
            url
            brief
        }
    }
}
The use of the @stream directive on the articles field means that it only returns one article in the initial response payload. The initialCount argument specifies how many records to return in the first payload.
The rest of the articles are resolved asynchronously and returned in the following payloads.
The @stream and defer directives solve the problem where the GraphQL response is sent only after the whole request is completed. With these two directives, you can send part of the data to the client in the initial response and send the rest in subsequent payloads.
GraphQL Application
To put the new learnings into practice, you will build an application that uses GraphQL subscriptions. The application is split into two parts:
- the GraphQL server - you build a server from scratch
- the client - you build a client that consumes data from the server
GraphQL Server Implementation
You will build the GraphQL server with Node.js, Express, and Apollo. The server does not use a database to avoid introducing extra complexity to the tutorial. It uses a JSON file to act as a database.
Start by creating the project structure as follows:
mkdir graphql-app

cd graphql-app

mkdir src

touch src/index.js src/schema.js src/resolvers.js data.js
After running the above commands, you will have 4 files inside the src folder.
The next step is initializing the Node.js project and installing the required dependencies. Run the following commands in the graphql-app folder:
npm init -y

npm i express graphql graphql-subscriptions apollo-server-express apollo-server-core graphql-ws ws @graphql-tools/schema

npm i nodemon --save-dev
These dependencies are all required to build and run the GraphQL server. Before going further, open package.json and replace the "scripts" object with the following code:
"scripts": {
    "start": "nodemon src/index.js"
 }
This way, you do not have to stop and restart the server each time you make a change. The server automatically refreshes and shows the new changes.
Server code
Now that the project is set up, it’s time to build the server. Open the file index.js and write the following code:
// GraphQL Server - index.js

const { ApolloServer } = require("apollo-server-express");
const { ApolloServerPluginDrainHttpServer } = require("apollo-server-core");
const { makeExecutableSchema } = require("@graphql-tools/schema")
const { WebSocketServer } = require("ws");
const { useServer } = require("graphql-ws/lib/use/ws");
const express = require("express");
const http = require("http");
const typeDefs = require("./schema");
const resolvers = require("./resolvers");

// from docs
// https://www.apollographql.com/docs/apollo-server/integrations/middleware/#swapping-out-apollo-server
// https://www.apollographql.com/docs/apollo-server/data/subscriptions
async function startServer() {
    const app = express();
    const httpServer = http.createServer(app);
    const wsServer = new WebSocketServer({
        server: httpServer,
        path: '/graphql'
    });

    const schema = makeExecutableSchema({ typeDefs, resolvers });

    const serverCleanup = useServer({ schema }, wsServer);

    const server = new ApolloServer({
        schema,
        plugins: [
            ApolloServerPluginDrainHttpServer({ httpServer }),
            {
                async serverWillStart() {
                    return {
                        async drainServer() {
                            await serverCleanup.dispose();
                        }
                    }
                }
            }
        ]
    });

    await server.start();

    server.applyMiddleware({ app });

    httpServer.listen({ port: 4000 }, () => {
        console.log(`🚀 Server ready at http://localhost:4000${server.graphqlPath}`);
    });
}

startServer();
What’s happening in the above code?
Firstly, you import the required packages, schema, and resolvers at the top of the file.
After that, you create an Express app and an httpServer. The httpServer is required to set up the HTTP and WebSocket servers, and it takes the Express app as an argument.
Going further, you create a new WebSocket server using the httpServer created previously.
You also need to build a schema from the type definitions and resolvers. That's what the method makeExecutableSchema allows you to do. The WebSocket server and ApolloServer then use the schema.
After that, you use the userServer method to start the WebSocket server with the schema created previously.
Lastly, you create the Apollo server.
GraphQL Schema
It’s time to define the GraphQL schema for this application. Open the schema.js file and add the following code:
// GraphQL Schema - schema.js

const { gql } = require("apollo-server-express");

const typeDefs = gql`
    type Note {
        id: ID!
        title: String!
        content: String!
        username: String!
    }

    type Query {
        notes: [Note]
        note(id: Int): Note
    }

    type Mutation {
        addNote(id: ID!, title: String!, content: String!, username: String!): Note
    }

    type Subscription {
        noteCreated: Note
    }
`;

module.exports = typeDefs;
The above code describes the shape of the data. You can see that it describes what a "Note" looks like. It also specifies the available queries and the mutation a client can perform.
In this case, the client can:
- retrieve all notes
- retrieve a specific note
- add a new note
- get updates when a new note is added
GraphQL Resolvers
Previously, you defined the available operations but did not implement the logic. For example, when someone uses the mutation addNote, how should it behave?
That's what you will do now - you will implement the GraphQL resolvers. In the simplest terms, the GraphQL resolvers implement the logic required to resolve the queries, mutations, and subscriptions.
// GraphQL Resolvers - resolvers.js

const { PubSub } = require("graphql-subscriptions");
const notes = require("./data");

const pubsub = new PubSub();

const resolvers = {
    Query: {
        notes() {
            return notes;
        },
        note: (_, args) => {
            const note = notes.find((note) => note.id === args.id);
            return note;
        }
    },
    Mutation: {
        addNote: (_, args) => {
            const newNote = {
                id: args.id,
                title: args.title,
                content: args.content,
                username: args.username
            }

            notes.push(newNote);
            pubsub.publish("NOTE_CREATED", { noteCreated: args })

            return newNote;
        }
    },
    Subscription: {
        noteCreated: {
            subscribe: () => pubsub.asyncIterator(["NOTE_CREATED"])
        },
    }
}

module.exports = resolvers;
In the above code, you use the PubSub class from the graphql-subscriptions package. The PubSub stands for "publish/subscribe", which is a messaging system. The system allows the publishers to broadcast messages asynchronously to the subscribers interested in a specific event.
In this example, the clients can subscribe to the NOTE_CREATED event and receive updates whenever a new note is added.
It’s important to mention that the PubSub class is intended only for development purposes. It’s not recommended for production. You can read more here.
Dummy data
The last step is to add some dummy data to the data.js file. Open the file and add the following code:
// Dummy data - data.js

let notes = [
    {
        "id": 1,
        "title": "Learn React Hooks",
        "content": "This is a reminder to continue learning about React hooks",
        "username": "John Doe"
    },
    {
        "id": 2,
        "title": "Learn Hasura",
        "content": "Learn how to build a backend with Hasura",
        "username": "Kris Noel"
    }
];

module.exports = notes;
Now you have some initial data for the application to work with.
Test the application
Start the application by running npm start in the "graphql-app" directory. After it starts, you can access the server at http://localhost:4000/graphql.
You can use the Apollo studio to query and mutate the data. You can also subscribe to new updates.
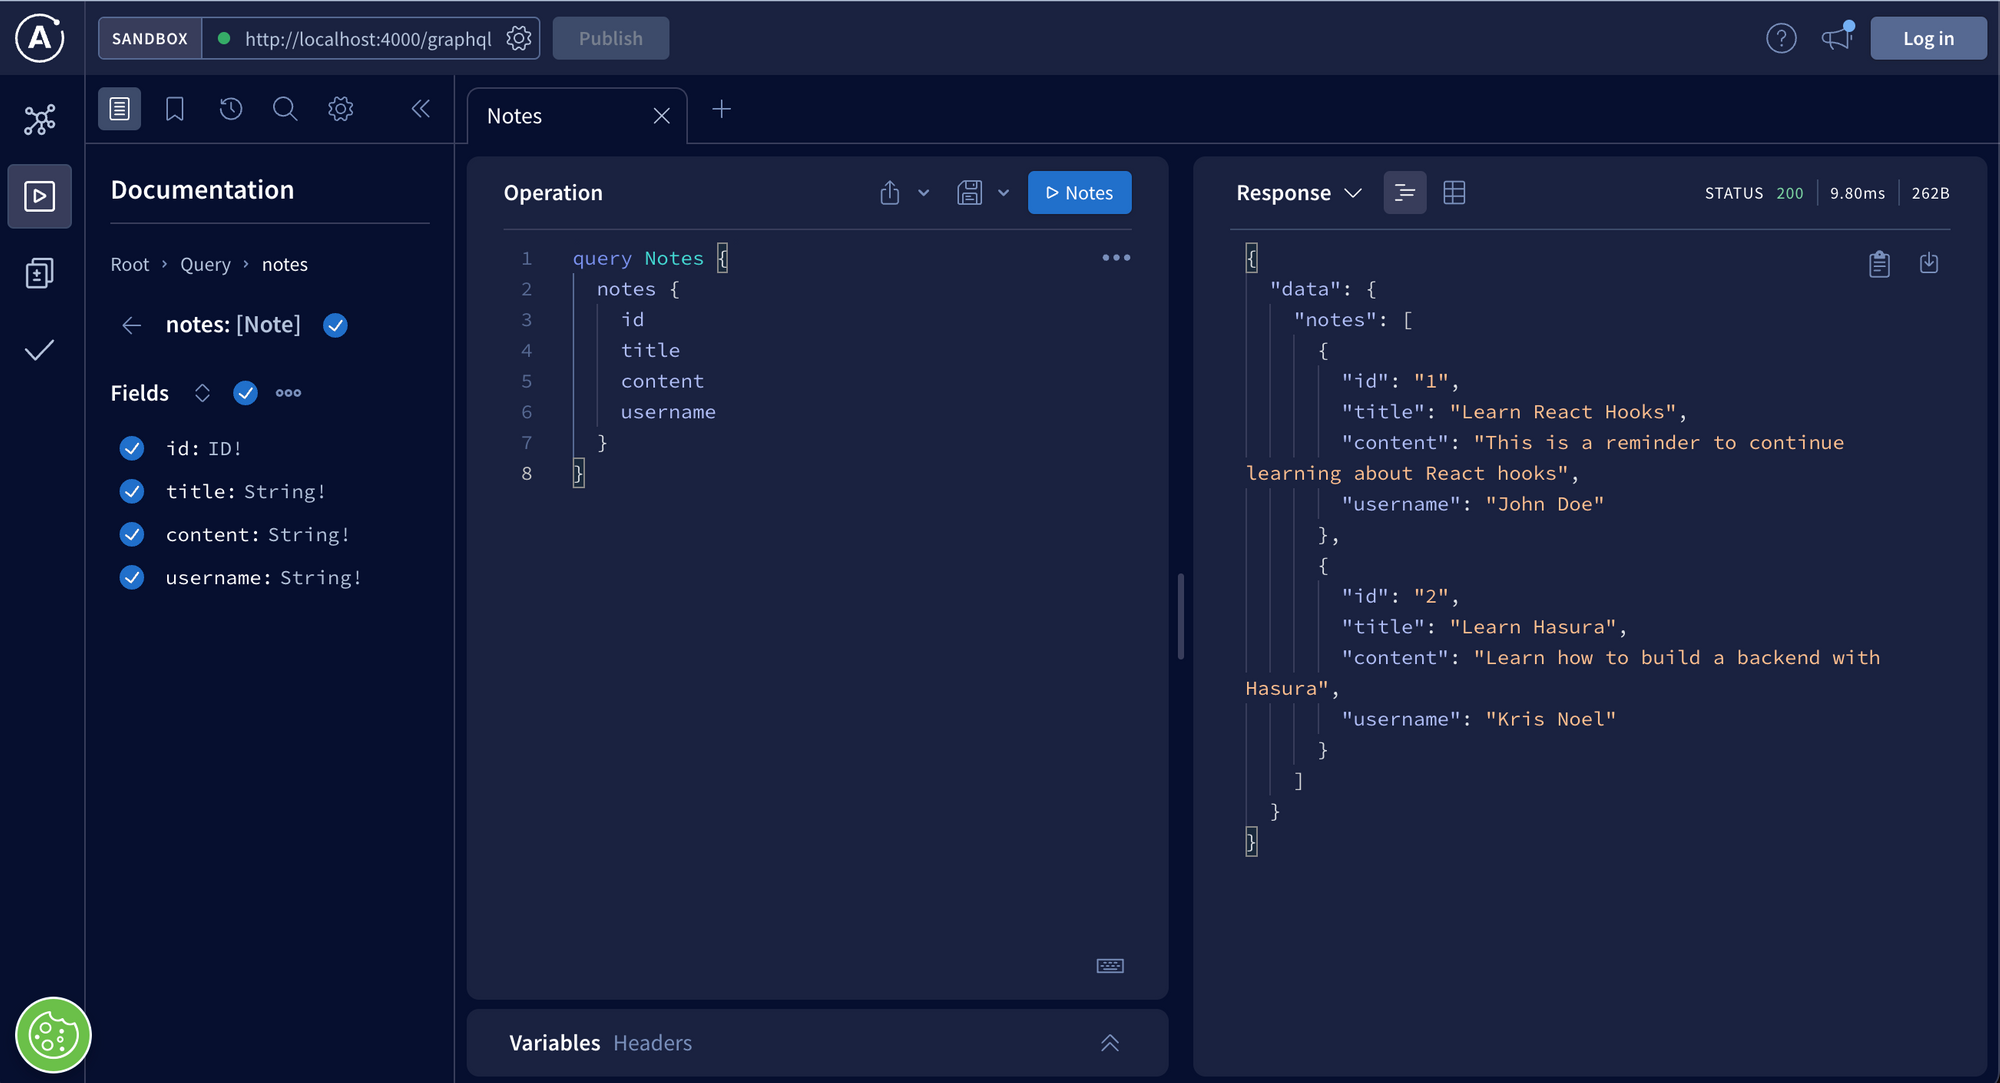
The above image shows an example of querying all the notes. Play around and try out the other queries, mutations, and subscriptions.
GraphQL Client
The last step involves building the front-end client with React. Run the following commands inside the graphql-app folder:
npx create-react-app client

npm install @apollo/client graphql graphql-ws
The first command creates a React project and the second command installs the necessary packages. After the installation finishes, modify the project to look as follows:
📂 graphql-app
 └ 📂 client
   └ 📁 node_modules
     📁 package-lock.json
     📁 package.json
     📁 public
     📁 README.md
     └ .env
     📂 src
      └ App.css
      └ App.js
      └ apolloClient.js
      └ index.css
      └ index.js
      └ 📂 components
        └ InitialNotes.jsx
        └ LatestNotes.jsx
        └ Note.jsx
Now that you have the project structure in place, you can start by configuring the Apollo client. Open the apolloClient.js file and add the following code:
// Apollo client configuration - apolloClient.js

import { ApolloClient, InMemoryCache, split, HttpLink } from '@apollo/client';
import { getMainDefinition } from '@apollo/client/utilities';
import { GraphQLWsLink } from '@apollo/client/link/subscriptions';
import { createClient } from 'graphql-ws';

const httpLink = new HttpLink({
    uri: 'http://localhost:4000/graphql'
  });

const wsLink = new GraphQLWsLink(createClient({
    url: 'ws://localhost:4000/graphql'
}));

const splitLink = split(
    ({ query }) => {
      const definition = getMainDefinition(query);
      return (
        definition.kind === 'OperationDefinition' &&
        definition.operation === 'subscription'
      );
    },
    wsLink,
    httpLink,
);

const client = new ApolloClient({
    link: splitLink,
    cache: new InMemoryCache()
});

export default client;
Since the application supports subscriptions, you must set up a WebSocket connection. Queries and mutations use the HTTP protocol, but the subscriptions use the WebSocket protocol.
You also have a split function that checks the operation type to determine what transport protocol to use. If it’s a query or mutation, it uses the HTTP link or the WebSocket link if it’s a subscription.
Lastly, you create the Apollo client and export it so you can use it in other places.
Note component
You need to create the component that renders one note. Open the src/Note.jsx file and add the following code:
// Note component - note.jsx

import "../App.css";

function Note({ note }) {
    return (
        <div className="card">
            <h2>{note.title}</h2>
            <p>{note.content}</p>
            <p className="author">by {note.username}</p>
        </div>
    )
}

export default Note;
You will use this component in the InitialNotes.jsx and LatestNotes.jsx files.
Initial notes
When you built the GraphQL server, you added some dummy data - 2 example notes. The InitialNotes.jsx component is the one that renders those notes.
// Initial notes - InitialNotes.jsx

import { gql, useQuery } from "@apollo/client";
import Note from "./Note";

const ALL_NOTES = gql`
    query {
        notes {
            id
            title
            content
            username
        }
    }
`;

function InitialNotes() {
    const { data, loading, error } = useQuery(ALL_NOTES);

    if (loading) return <div>Loading...</div>

    if (error) return <div>Error occured...</div>

    const notes = data.notes;

    return (
        <div>
            { notes.map((note) => (
                <Note key={note.id} note={note} />
            )) }
        </div>
    )
}

export default InitialNotes;
The component uses the useQuery hook from the Apollo client to execute the ALL_NOTES query. It then renders each note on the page.
Latest notes
You also need a component to display the latest notes added to the database. That's the purpose of the LatestNotes.jsx component.
The component uses the useSubscription hook to execute the LATEST_NOTE subscription. Whenever the hook receives data, it updates the allNotes state with the new data. Then it renders the latest notes on the page.
// Latest notes - LatestNotes.jsx

import { gql, useSubscription } from "@apollo/client";
import { useState } from "react";
import Note from "./Note";
import '../App.css';

const LATEST_NOTE = gql`
  subscription {
    noteCreated {
      id
      title
      content
      username
    }
  }
`;

function LatestNotes() {
  const [ allNotes, setAllNotesState ] = useState([]);

  const { data, error, loading } = useSubscription(LATEST_NOTE, {
    onSubscriptionData: ({ subscriptionData: { data } }) => {
      setAllNotesState((state) => [...state, data.noteCreated])
    }
  });

  if (error) return <div>Error occured...</div>

  return (
    <div>
      { allNotes.map((note) => (
        <Note key={note.id} note={note} />
      )) }
    </div>
  )
}

export default LatestNotes;
Each time a new note is added, the LatestNotes.jsx component renders it on the page.
Update index.js and .env
Before running the application, replace the content of index.js with the following code:
import { ApolloProvider } from "@apollo/client";
import client from "./apolloClient";
import LatestNotes from "./components/LatestNote";
import InitialNotes from "./components/InitialNotes";
import './App.css';

function App() {
  return (
    <ApolloProvider client={ client }>
      <div className="App">
        <h1 className="title">Notes</h1>
        <div>
          <InitialNotes/>
          <LatestNotes/>
        </div>
      </div>
    </ApolloProvider>
  );
}

export default App;
Now open the .env file and add the following line:
PORT=1234
Save the files, and the client code is done!
Test the application
Start the client by running npm start in the client directory. Also, make sure the GraphQL server is running.
Once the app starts, you can navigate to http://localhost:1234/ to test the application.
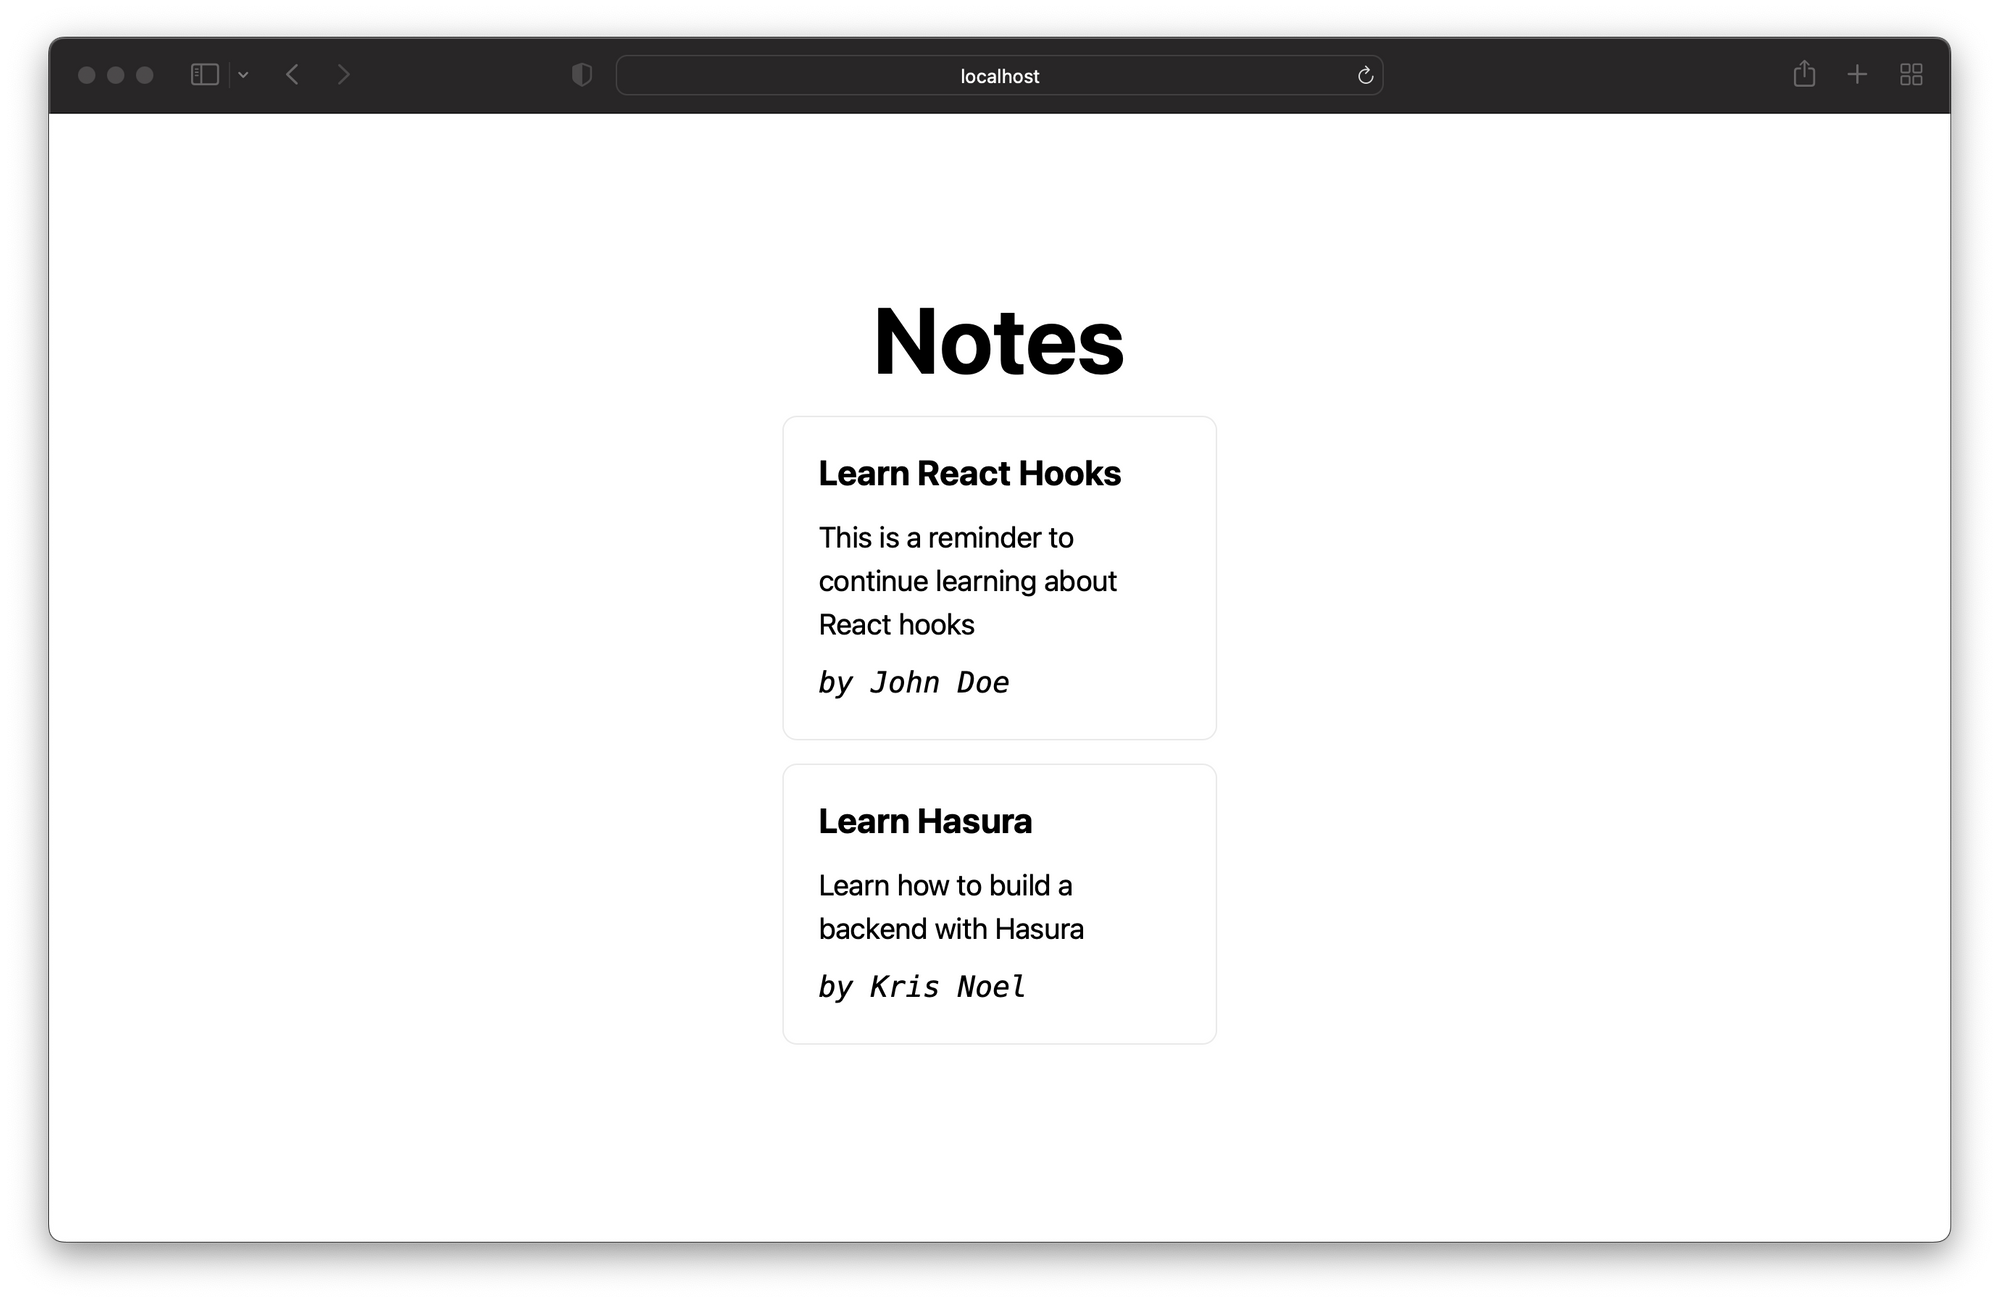
As you can see, it renders the initial notes on the page. You can test the subscription by going to the GraphQL server and adding a new note, as shown in the image below.
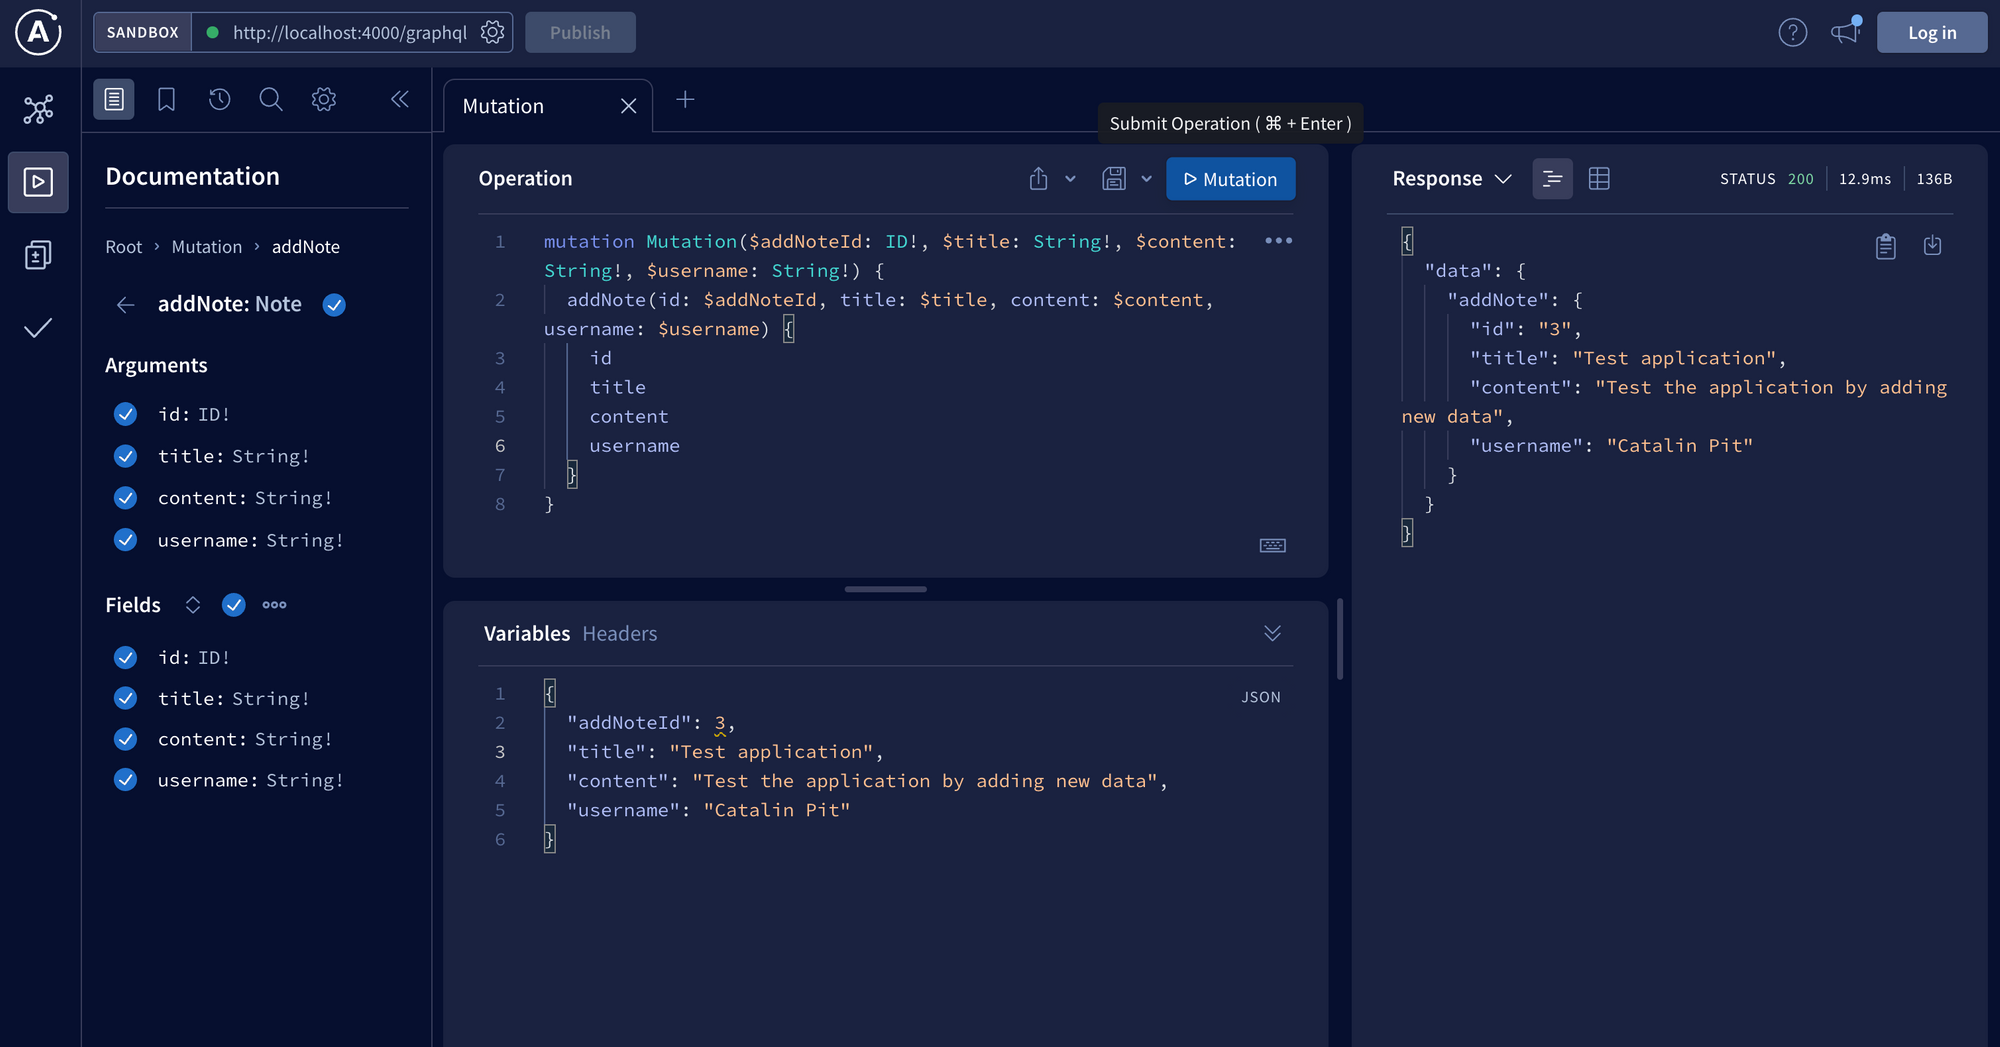
You can copy the mutation and variables from this gist.
You should see the new note displayed if you visit the client after performing the mutation. The image below shows the webpage with the new note.
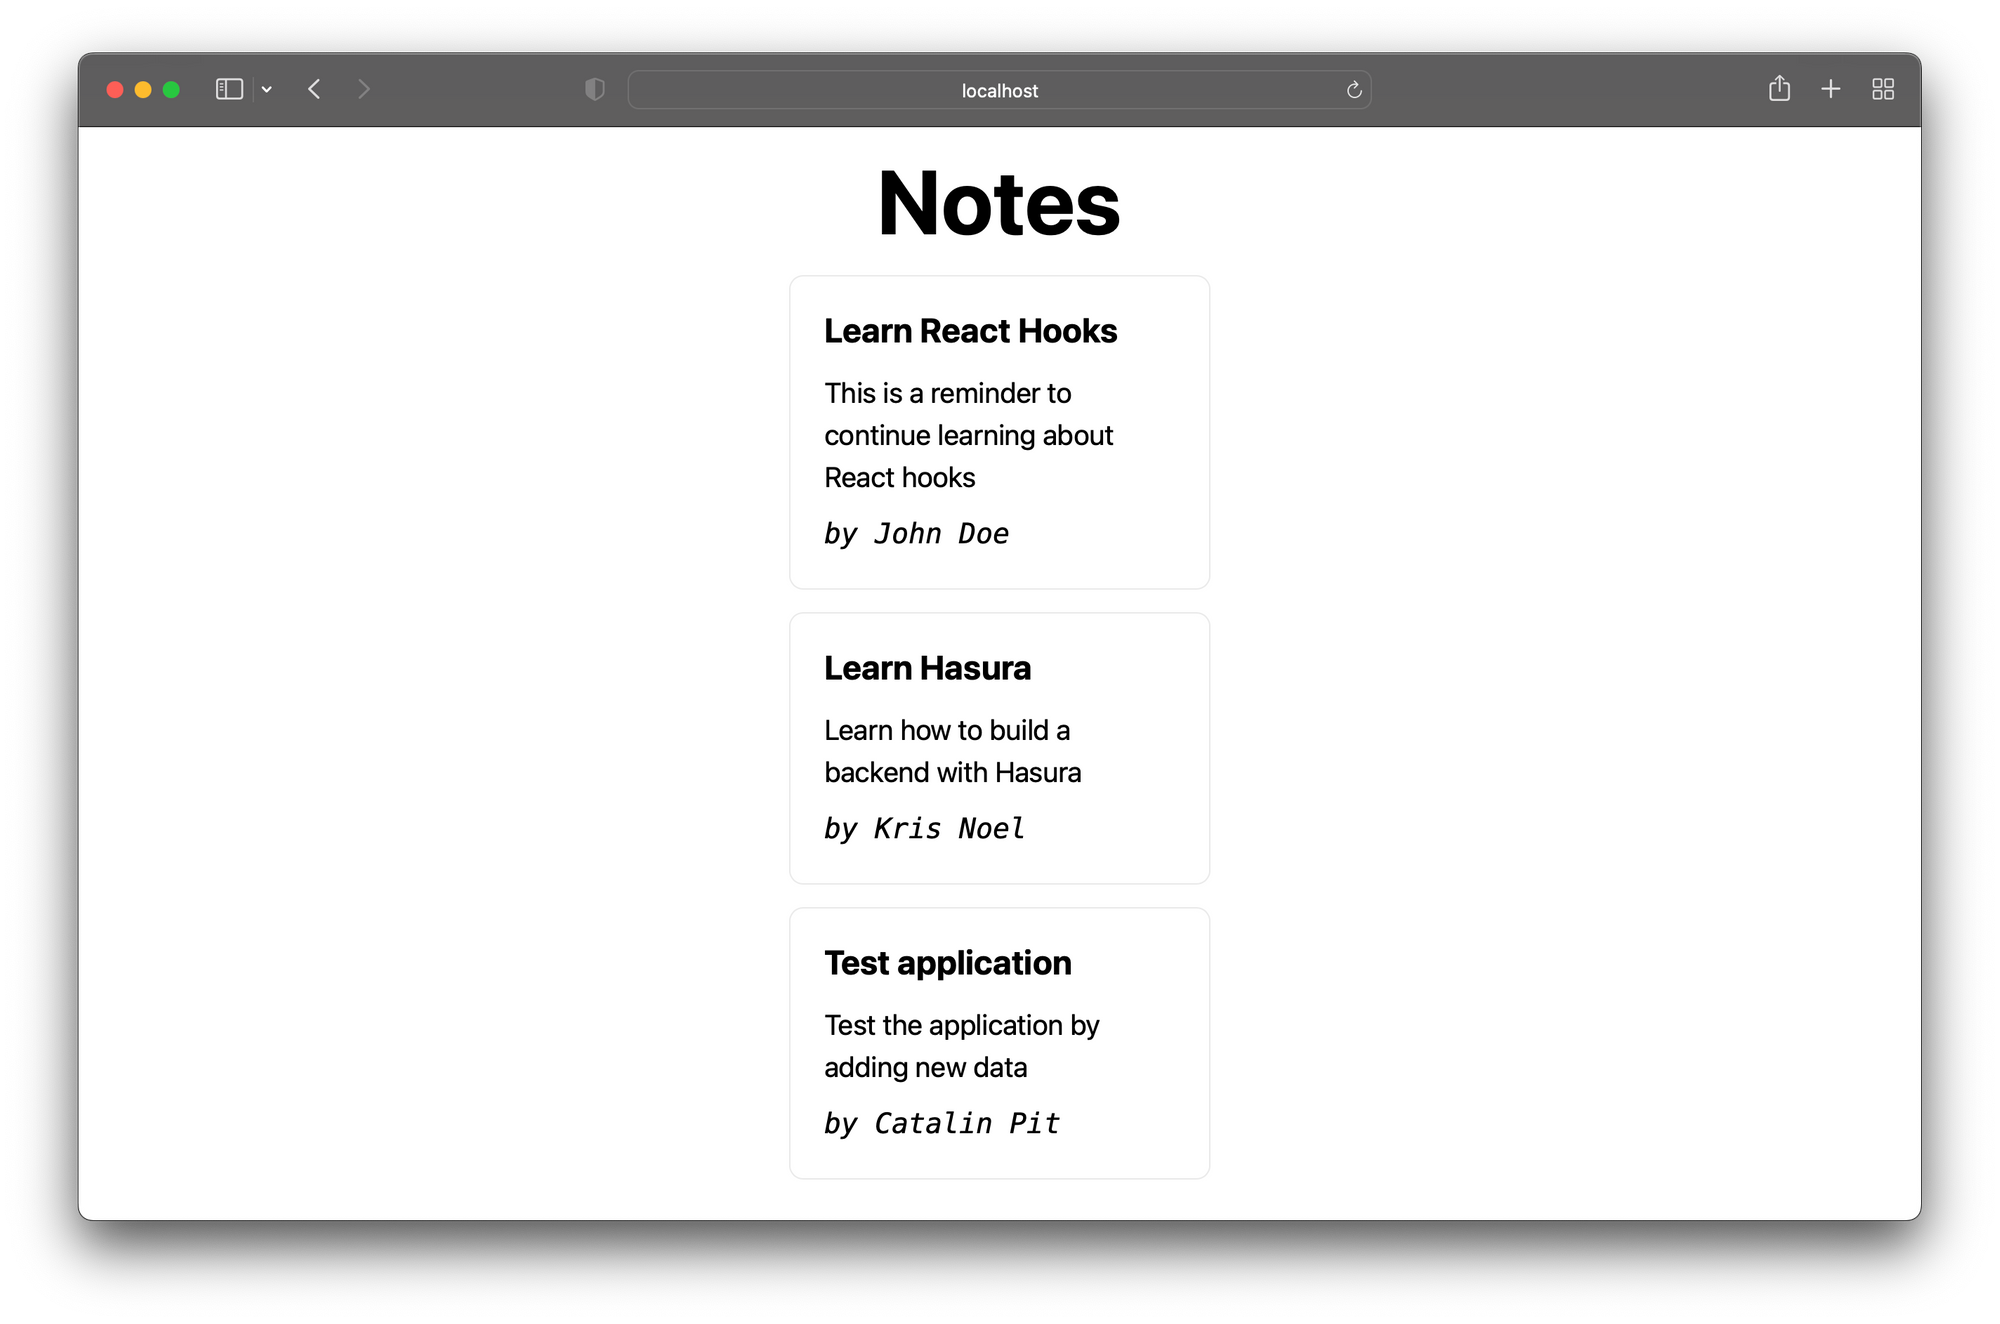
To see the subscriptions in action, open the server and client in separate browser tabs and put them side by side. Then add new notes, and you will see them displayed on the page in real-time.
You are done, congratulations! You learned about the different types of subscriptions and built an application that shows them in action.
Custom GraphQL Server vs. Hasura
In this article, you built a GraphQL server manually. Even if the server is relatively basic, you had to use eight packages and write quite a bit of code. Imagine when the server gets more complex.
So what if I told you there is another way to build a GraphQL API? You can use Hasura, a GraphQL Engine that turns your database into an instant, real-time GraphQL API.
In simpler terms, Hasura connects to the provided database, and it automatically generates an API based on the tables and views. It gives you GraphQL schema and resolvers out of the box without writing any backend code.
To see the difference between a custom-built GraphQL API and Hasura, you will implement the same API with Hasura.
Build the GraphQL API with Hasura
The fastest and easiest way to use Hasura is via the Hasura Cloud. Click the button to sign-up:
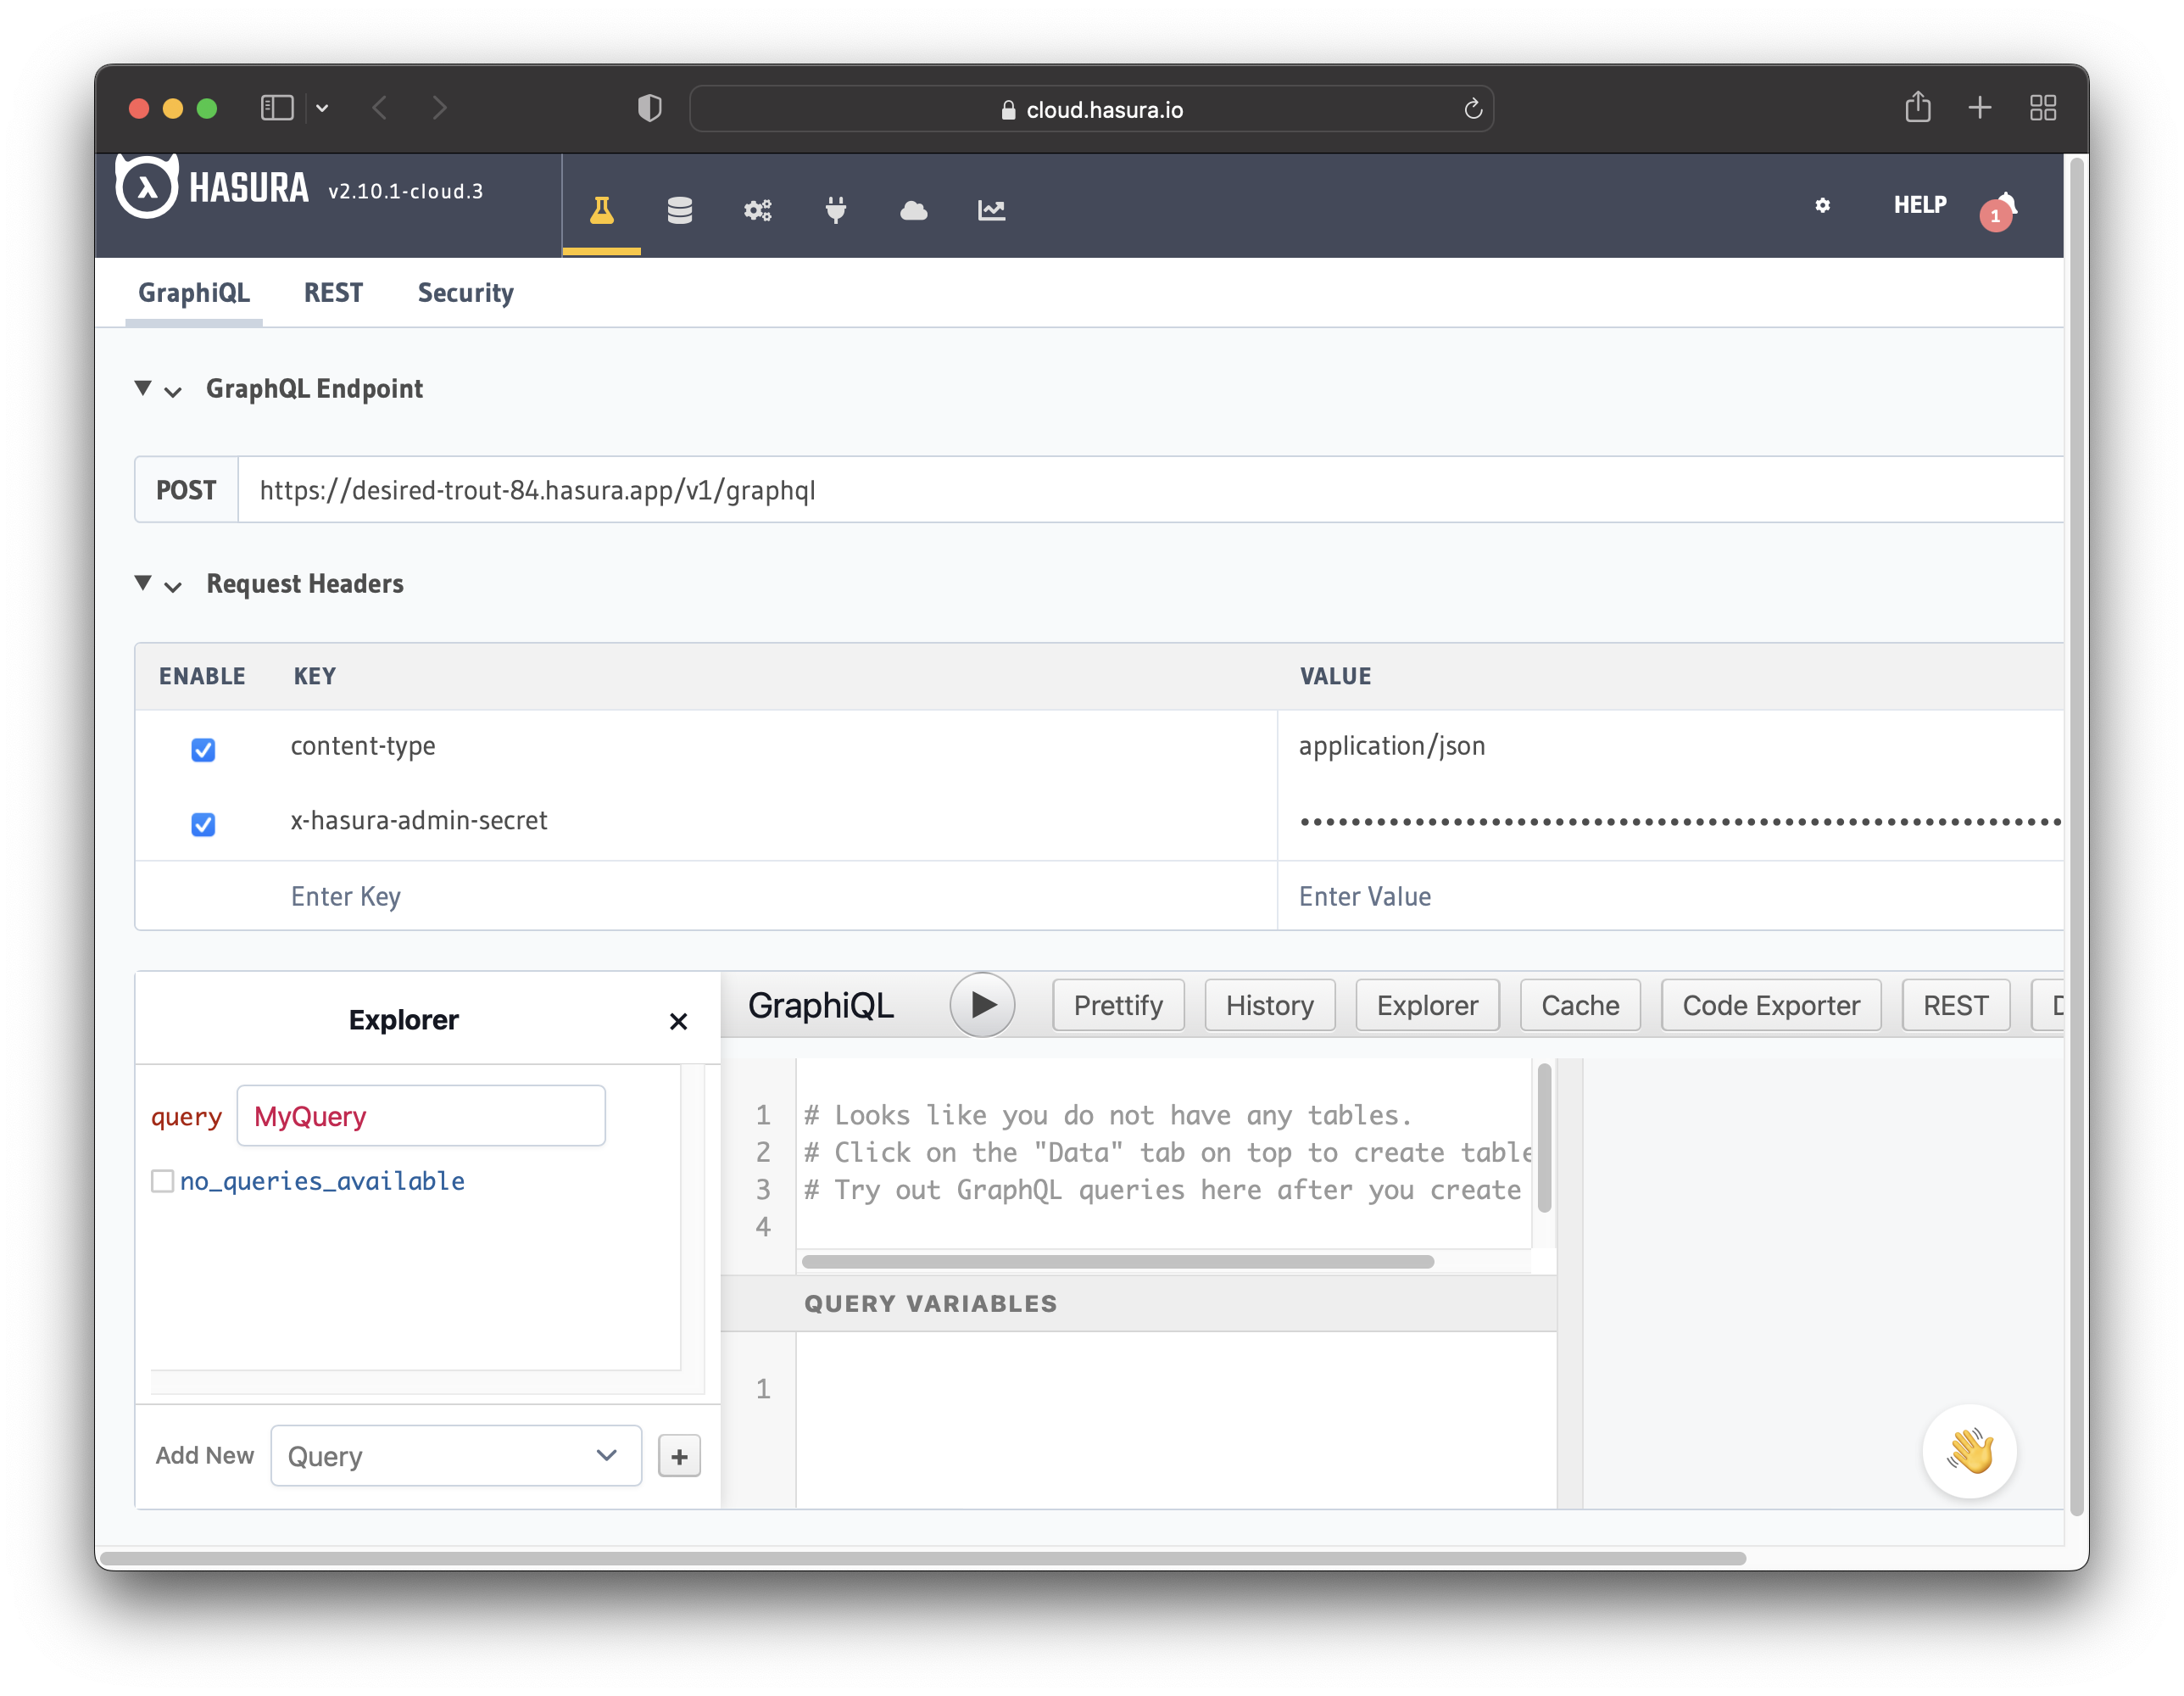
After that, create a new Hasura project and launch the console. The figure below illustrates what you should see.
The next step involves connecting the application to a database. You can connect your app to an existing database or a new one.
In this example, the application uses a new database.
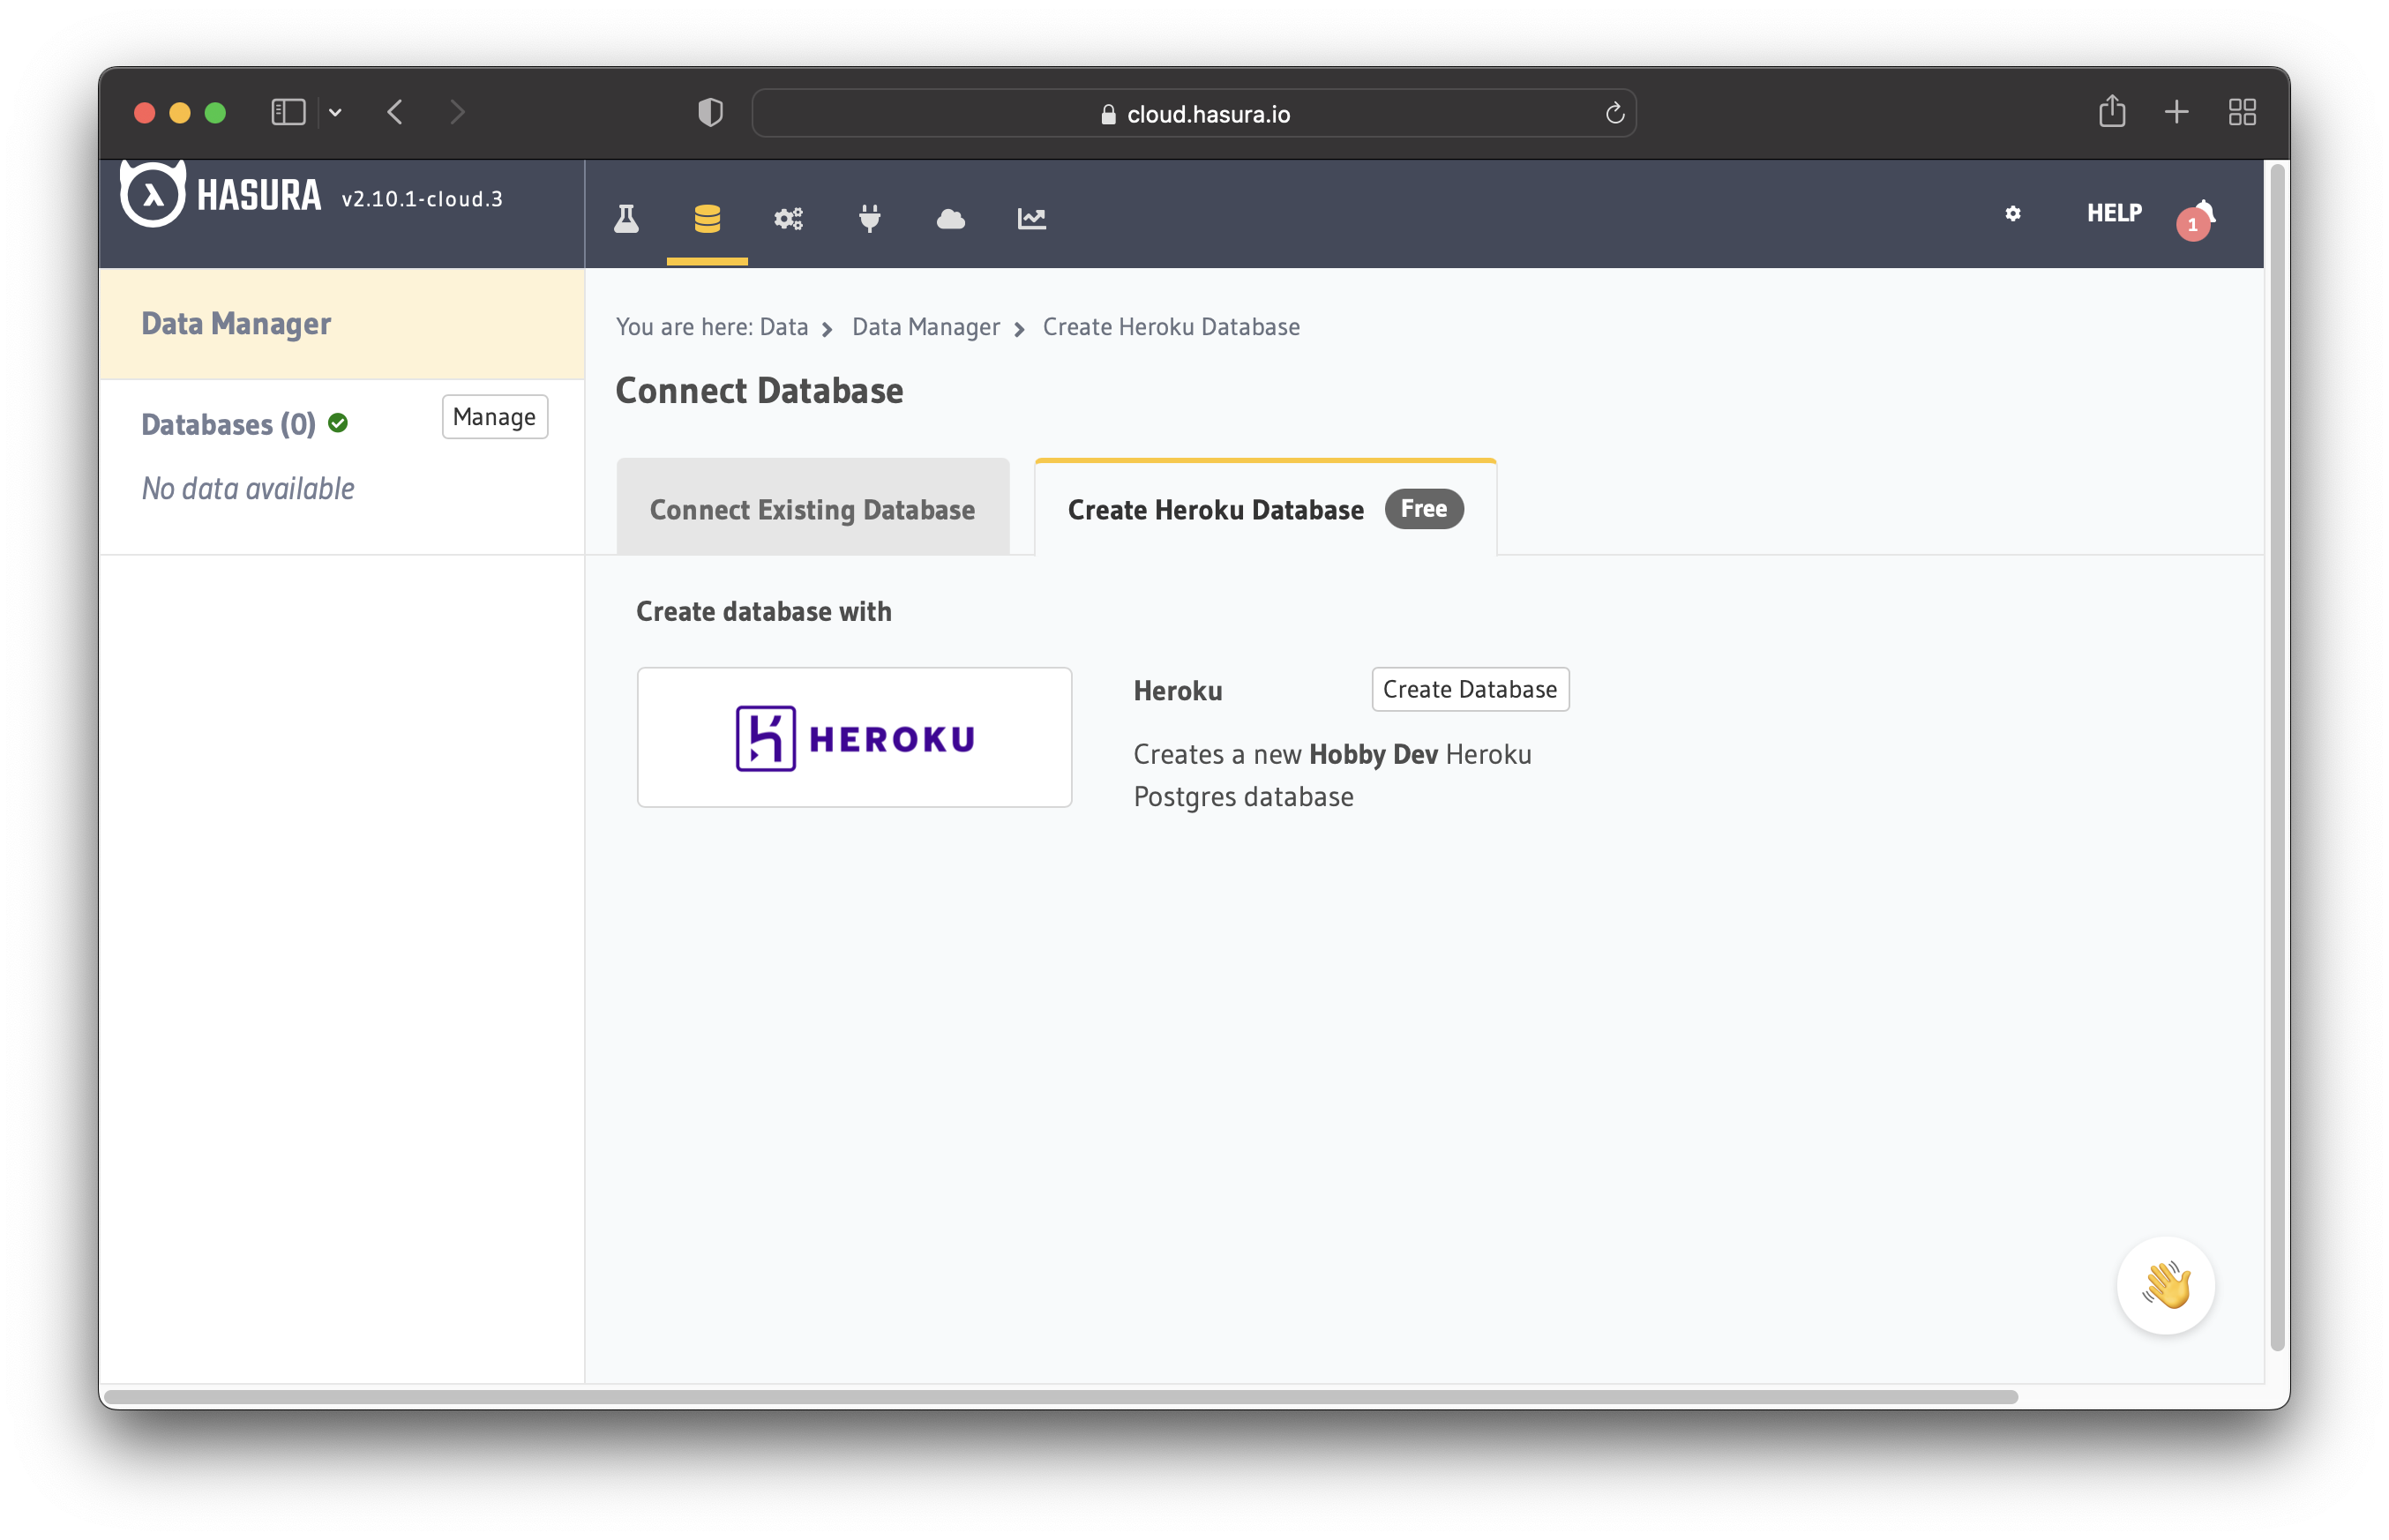
Click the button saying "Create Database" to add a new database.
After adding the database, navigate to "Data -> Create table" to create a new table. Create the table note with the following columns:
idof type UUID (Primary Key)titleof type Textcontentof type Textusernameof type Text
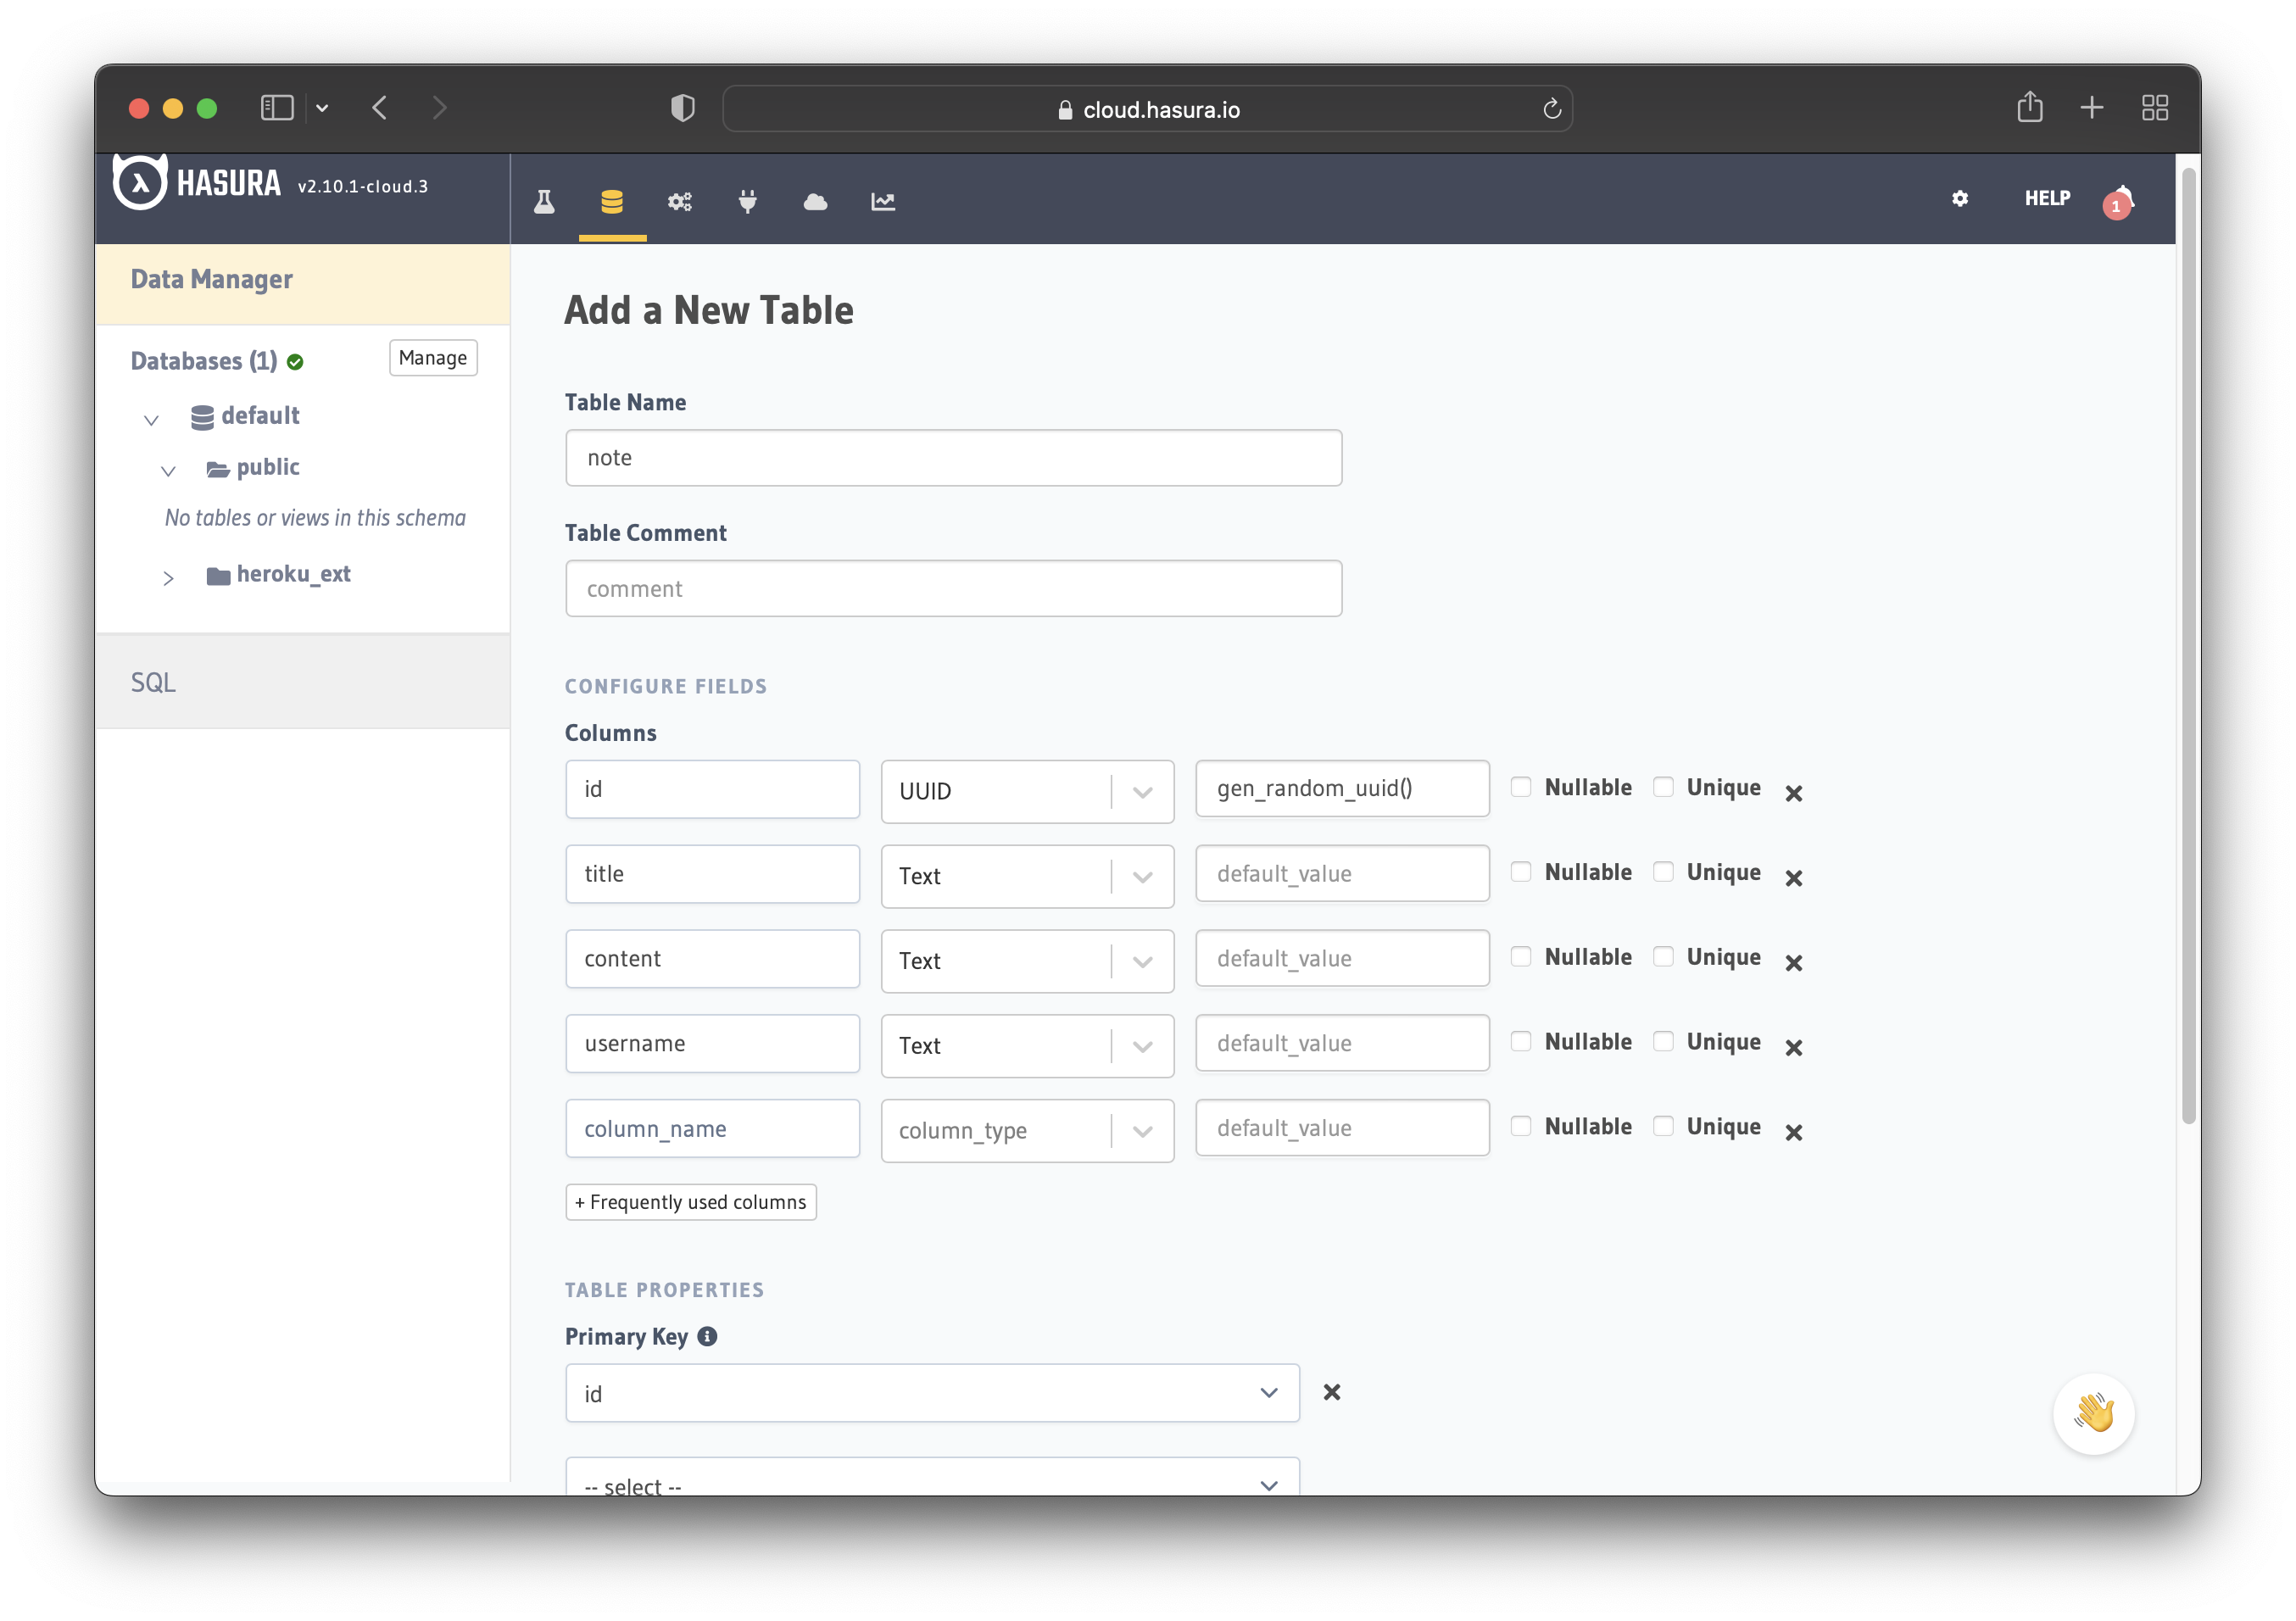
Save the table and you are done! You have a GraphQL API, which you can use to query and mutate data. It also comes with GraphQL subscriptions by default.
If you need help with getting started on the cloud, adding a database, or creating a table, check the documentation.
Test the API
Let's test the API by adding, reading, and subscribing to notes. Go to the "API" tab and perform the following mutation:
mutation add_note {
  insert_note_one(object: {
    title: "Learn Hasura",
    content: "Learn how to build a GraphQL API with Hasura",
    username: "John Doe"
  }) {
    id
  }
}
The image below illustrates the mutation in action. Looking at the "Explorer" tab, you can see all the available mutations. You can add, update and delete notes.

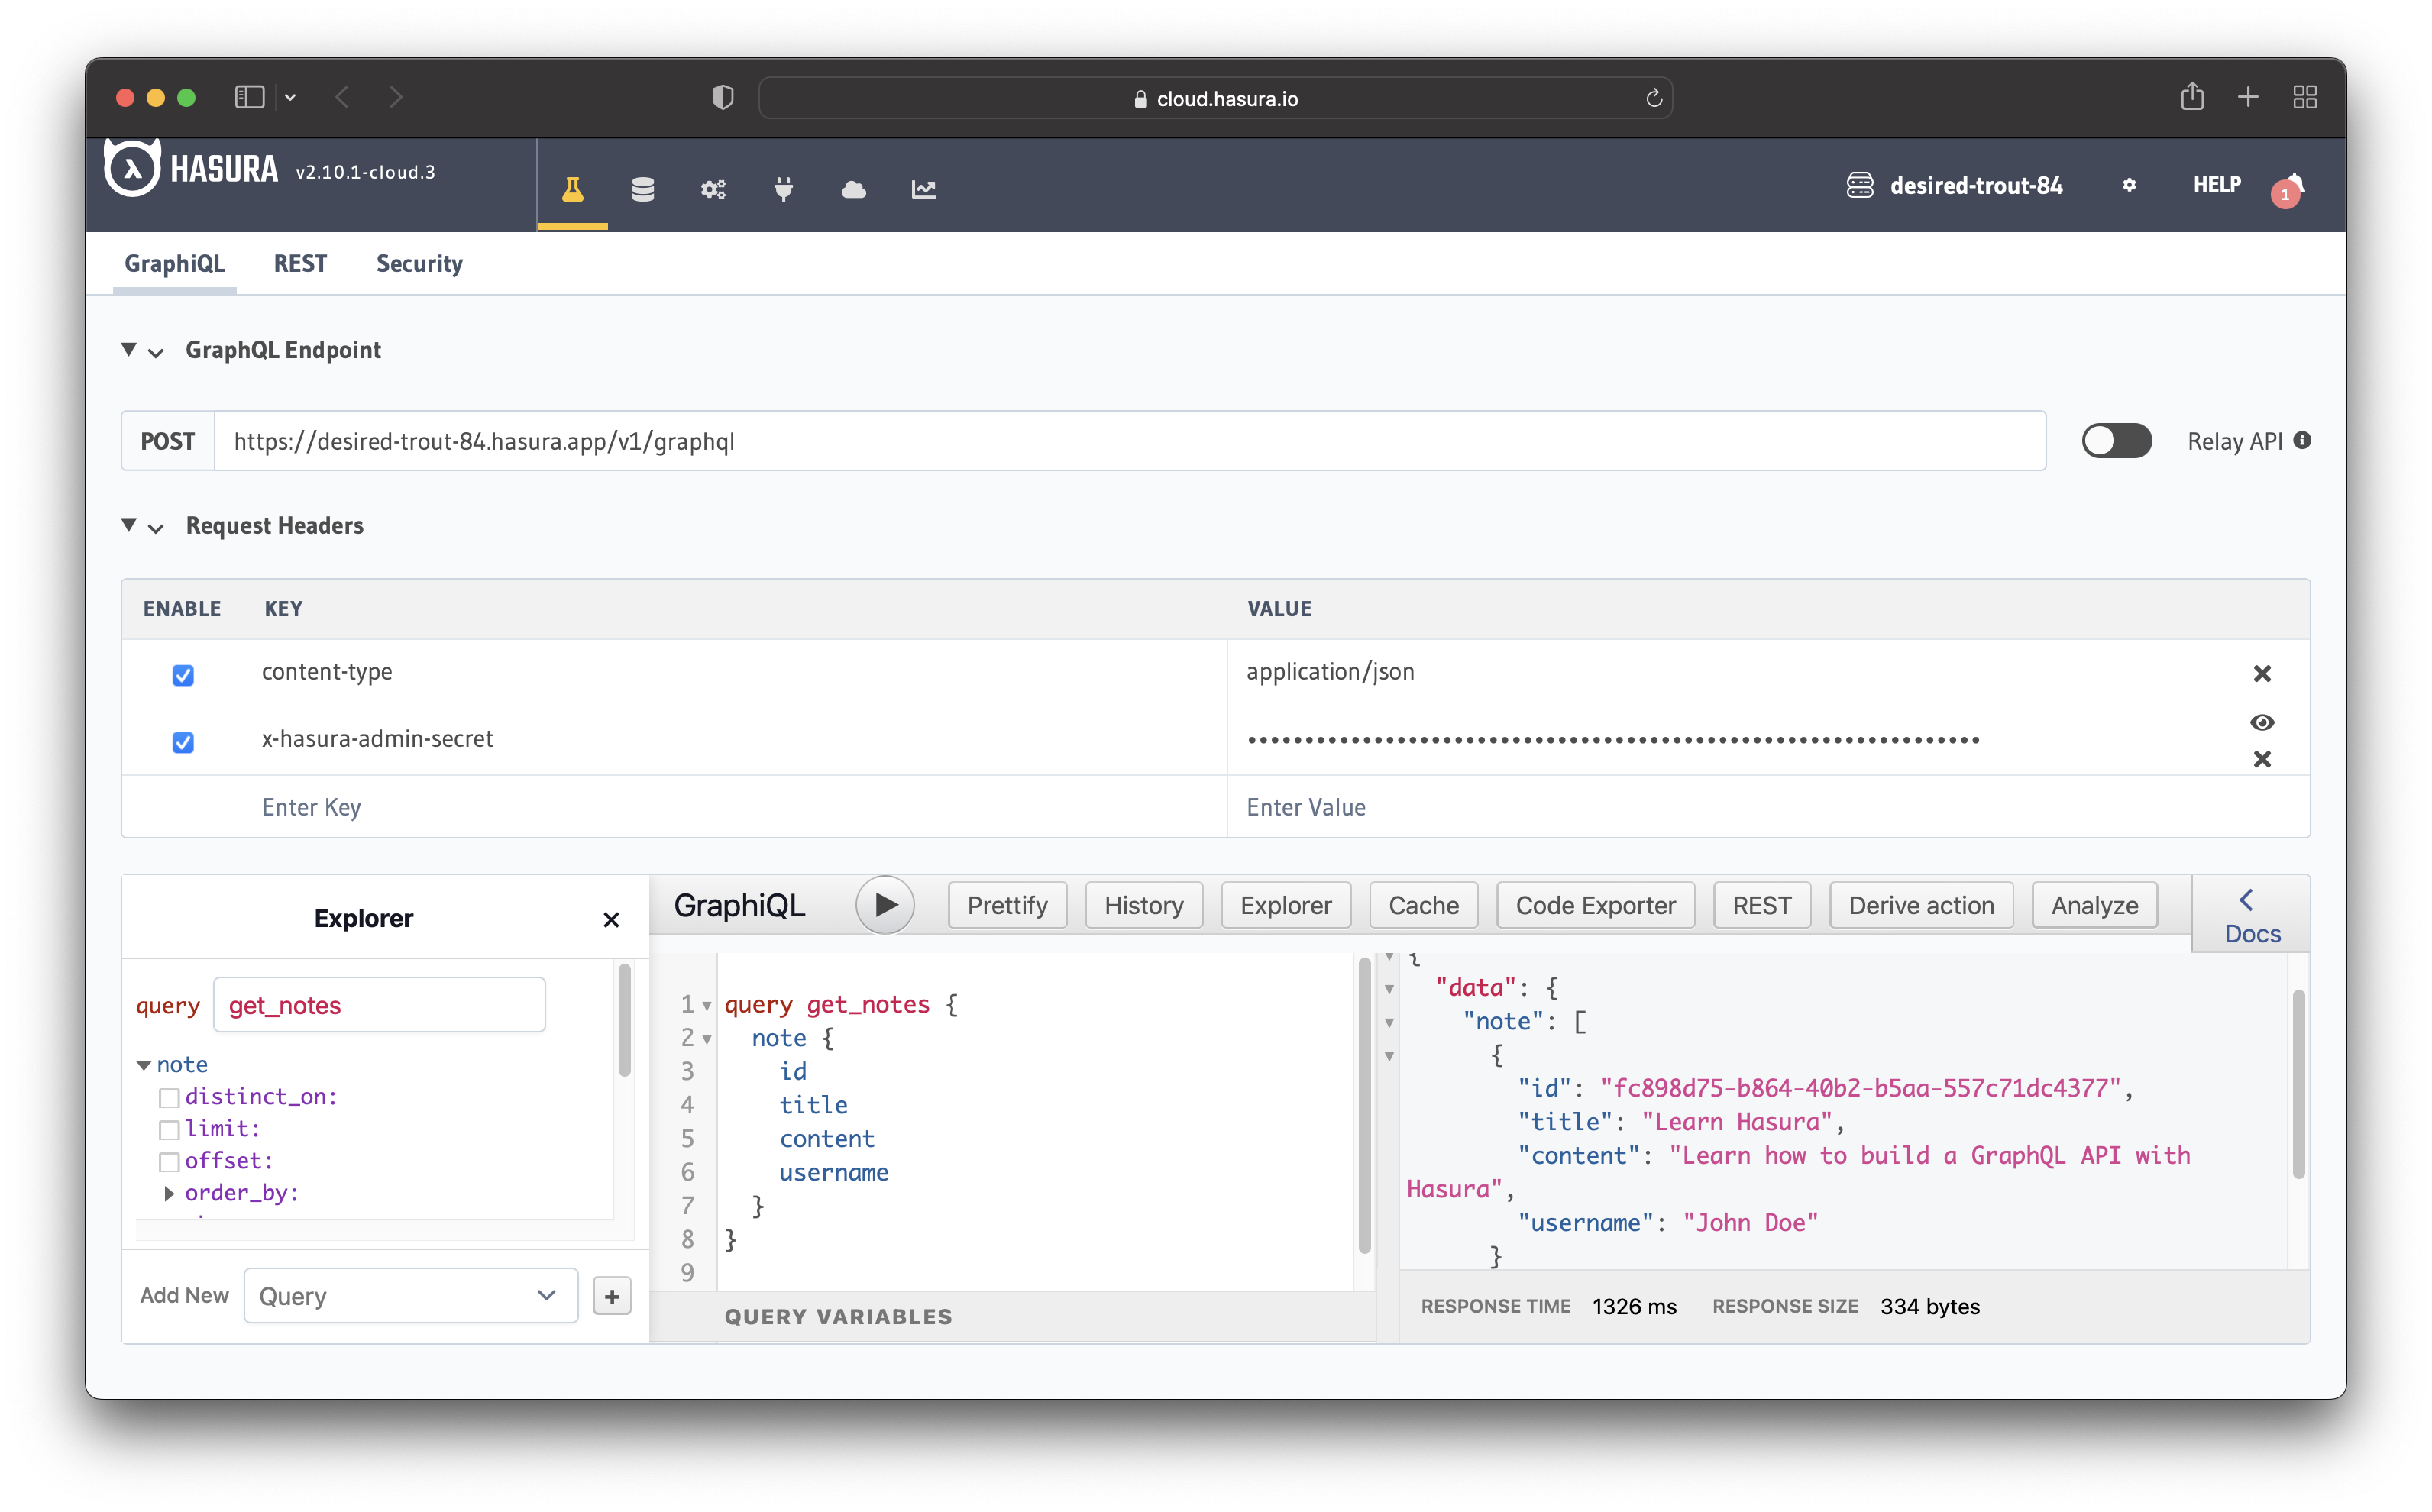
Now let's query the database to see the note added previously. Run the following query:
query get_notes {
  note {
    id
    title
    content
    username
  }
}
The image illustrates the query in action. You can see it returns the note you added previously.
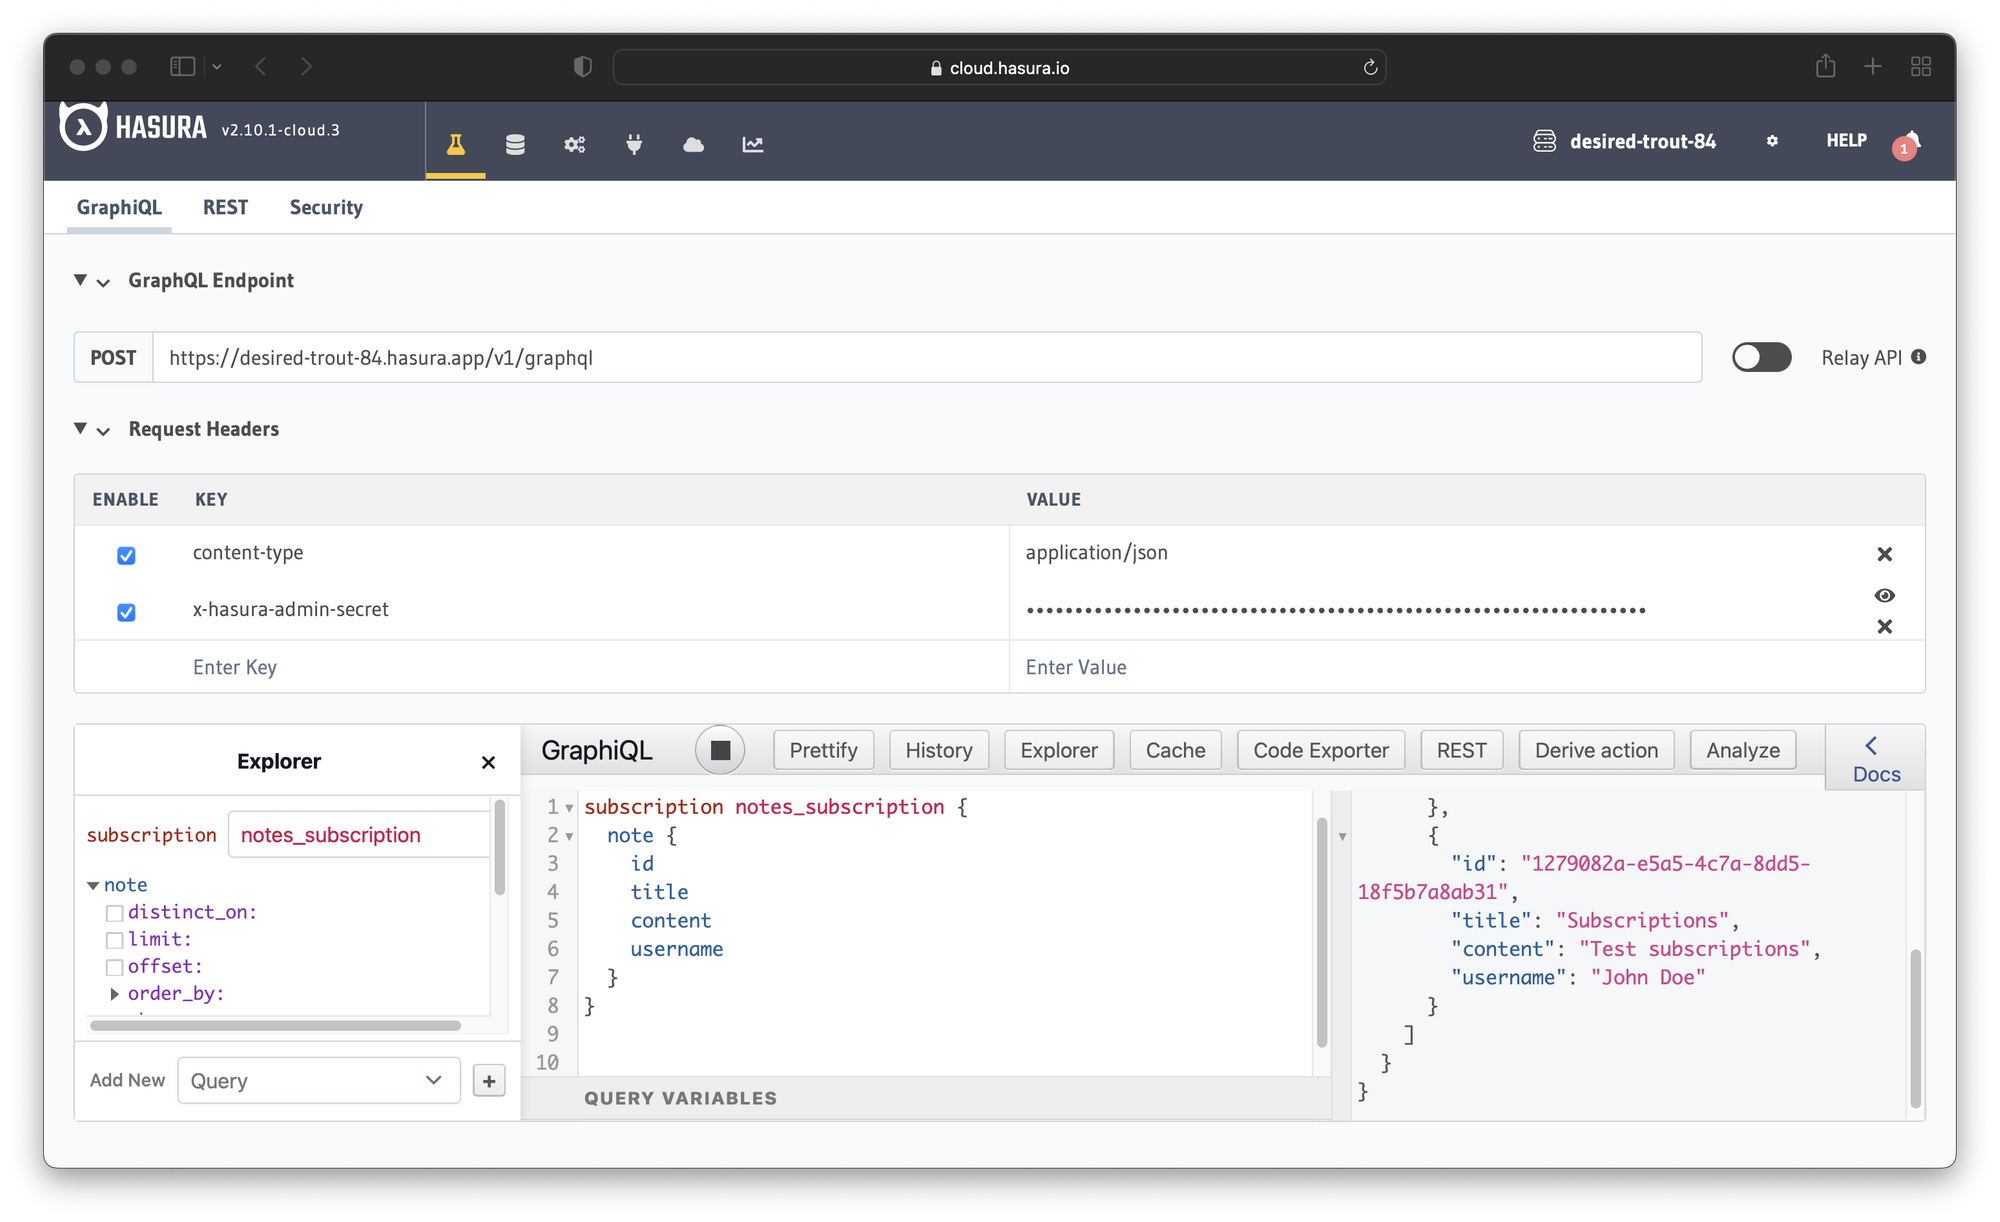
Lastly, you can test the subscriptions. Run this subscription in GraphiQL:
subscription notes_subscription {
  note {
    id
    title
    content
    username
  }
}
Now open the project console in another tab and perform a mutation. If you check the subscription, you should see the new note.
At this point, you tried all the GraphQL operations: queries, mutations, and subscriptions. You have all those operations out of the box without writing a single line of code.
Comparison
The first noticeable difference between a custom-built GraphQL API and Hasura is that you do not need to write any code with Hasura. You have an API up and running in just a few clicks. You do not have to create things like the GraphQL schema and resolvers yourself.
Hasura also comes with real-time capabilities, such as GraphQL subscriptions and live queries by default. You do not need extra configuration.
In case you need custom business logic or you need to plug in your existing GraphQL/REST APIs, you can do it through Remote Schemas and Actions.
Moreover, Hasura has other features such as authorization, caching, rate limiting, monitoring, and analytics. You can see the complete list of features here.
Comparing the two, we can conclude that building a GraphQL API with Hasura is faster, and it also comes with many features out of the box. It speeds up the development process considerably and lets you focus on more important things.