Authentication is one of the most important aspects of any application. It improves app security by verifying users before granting them access to different parts of the application. Authentication also enables companies to keep track of how many people are using their products.

It’s vitally important to configure authentication correctly. In fact, the Open Web Application Security Project (OWASP) identifies identification and authentication failures in its list of top ten web application security risks.
This tutorial will demonstrate the step-by-step process for implementing JWT user authentication in NestJS.
Jump ahead:
This tutorial is a hands-on demonstration. To follow along, ensure you have the following installed:
NestJS is a server-side application framework for Node.js that allows you to create scalable and efficient apps. It’s written in TypeScript and constructed with Express.js, a lightweight framework that’s fantastic on its own but lacks structure.
Nest has support for object-oriented programming, functional programming, and functional reactive programming. This frame work is a great choice if you want a lot of structure on your app’s backend.
Nest has similar syntax and structure to Angular, a frontend framework. It also employs TypeScript, services, and dependency injection, just like Angular. Nest uses modules and controllers and allows you to use the command-line interface to create controllers for a file.
To set up the project, you’ll first need to install the Nest CLI globally with the following command:
npm i -g @nestjs/cli
Once the installation is complete, create a new project, like so:
nest new auth-with-nest
Next, you’ll be prompted to choose a package manager to install the dependencies. For this demonstration, we’ll use Yarn.

Choose yarn and press the Enter key. Now, wait while Yarn installs all the required dependencies required to run the application.
To set up and connect your database, install the Mongoose package, bcrypt, and the NestJS wrapper with the following command:
npm install --save @nestjs/mongoose @types/bcrypt mongoose bcrypt
Now, update the app.module.ts file and set up Mongoose, like so:
import { MongooseModule } from '@nestjs/mongoose';
@Module({
  imports: [MongooseModule.forRoot('mongodb://localhost/authentication')],
})
In the above snippet, we imported the MongooseModule into the root AppModule.
To keep your code clean and well organized, create a module specifically for NestJS CLI users by running the following command:
nest g module users
The above code creates a user folder with a users.module.ts file and an app.module.ts updates file.
To create a user schema, create a users.model.ts file in the src/users folder and add the following code:
import { Prop, Schema, SchemaFactory } from '@nestjs/mongoose';
import { Document } from 'mongoose';

export type UserDocument = User & Document;

@Schema()
export class User {
  @Prop()
  username: string;

  @Prop()
  password: string;
}

export const UserSchema = SchemaFactory.createForClass(User);
Here, we’ve defined the shape of our User schema with the @Schema() decorator and the @Prop() decorator.
Mongoose will map the schema to a MongoDB collection. The schema defines the shape of the collection’s documents.
Now, replace the code in the user/user.module.ts file and make the userSchema available in the imports with the following code:
import { Module } from '@nestjs/common';
import { UsersService } from './user.service';
import { UsersController } from './user.controller';
import { MongooseModule } from "@nestjs/mongoose"
import { UserSchema } from "./user.model"

@Module({
  imports: [MongooseModule.forFeature([{ name: "user", schema: UserSchema }])],
  providers: [UsersService],
  controllers: [UsersController]
})
export class UserModule {}
With the user schema created, run the below command to create a user service:
nest g service users
This code creates a users.service.ts file and updates the app.module.ts file.
N.B., you can choose to create your files and folders manually, but the NestJS CLI will make your life easier by automatically updating the necessary folders
Now, add the following code to the users.service.ts file:
import { Injectable } from '@nestjs/common';
import { InjectModel } from '@nestjs/mongoose';
import { Model } from 'mongoose';
import { User, UserDocument } from './users.model';

@Injectable()
export class UsersService {
    constructor(@InjectModel('user') private readonly userModel: Model<UserDocument>) { }
    async createUser(username: string, password: string): Promise<User> {
        return this.userModel.create({
            username,
            password,
        });
    }
    async getUser(query: object ): Promise<User> {
        return this.userModel.findOne(query);
    }
}
Here, we used the @InjectModel() decorator to inject the userModel into the UsersService.
Now let’s create a user controller to define the API routes:
nest g service users
Add the code to the users.controller.ts file:
import { Body, Controller, Post, Get, Param } from '@nestjs/common';
import { UsersService } from './users.service';
import { User } from './users.model';
import * as bcrypt from 'bcrypt';

@Controller('auth')
export class UsersController {
    constructor(private readonly usersService: UsersService) { }

    @Post('/signup')
    async createUser(
        @Body('password') password: string,
        @Body('username') username: string,
    ): Promise<User> {
        const saltOrRounds = 10;
        const hashedPassword = await bcrypt.hash(password, saltOrRounds);
        const result = await this.usersService.createUser(
            username,
            hashedPassword,
        );
        return result;
    }
}
Here, we defined two API routes and consumed the services we created. We used bcrypt to hash the user password.
Let’s start by creating an auth module, like so:
nest g module auth
This command will create a new folder, auth, with an auth.module.ts file; it will also update the app.module.ts file.
Now, let’s implement a JSON web token to authenticate users into the application.
To get started, install the following dependencies:
npm install --save @nestjs/jwt passport-jwt
npm install --save-dev @types/passport-jwt
Next, create a new file, local.auth.ts, and add the following code:
import { Strategy } from 'passport-local';
import { PassportStrategy } from '@nestjs/passport';
import { Injectable, UnauthorizedException } from '@nestjs/common';
import { AuthService } from './auth.service';

@Injectable()
export class LocalStrategy extends PassportStrategy(Strategy) {
  constructor(private authService: AuthService) {
    super();
  }

  async validate(username: string, password: string): Promise<any> {
    const user = await this.authService.validateUser(username, password);
    if (!user) {
      throw new UnauthorizedException();
    }
    return user;
  }
}
Here, we implemented a passport-local strategy to authenticate the JSON web token. By default, the passport-local strategy expects username and password properties in the request body.
We also implemented the validate() method which the Passport middleware will call to verify the user using an appropriate strategy-specific set of parameters.
Next, replace the code in the AuthModule with the following:
import { Module } from "@nestjs/common"
import { UserModule } from "src/user/user.module";
import { AuthService } from "./auth.service"
import { PassportModule } from "@nestjs/passport"
import { JwtModule } from '@nestjs/jwt';
import { AuthController } from './auth.controller';
import { UsersService } from "src/user/user.service";
import { MongooseModule } from "@nestjs/mongoose"
import { UserSchema } from "../user/user.model"
import { LocalStrategy } from './local-strategy';


@Module({
  imports: [UserModule, PassportModule, JwtModule.register({
    secret: 'secretKey',
    signOptions: { expiresIn: '60s' },
  }), MongooseModule.forFeature([{ name: "user", schema: UserSchema }])],
  providers: [AuthService, UsersService, LocalStrategy],
  controllers: [AuthController],
})
export class AuthModule { }
Here, we imported the PassportModule and JwtModule into the array of imports. Then we used the register method to register JWT, providing the secret and expiration time.
We also made the UserSchema available in the imports and added the UserService and our LocalStrategy to the array of providers.
N.B., for security reasons, always save your JWT secret in an environment variable
Now, let’s add authentication features to the application.
With JWT and Passport configured, run the following command to create auth.service.ts and auth.controller.ts files in the auth folder.:
nest generate service auth
nest generate controller auth
Next, open the auth/auth.service.ts file and authenticate the users with the following code:
import { Injectable, NotAcceptableException } from '@nestjs/common';
import { UsersService } from 'src/user/user.service';
import * as bcrypt from 'bcrypt';
import { JwtService } from '@nestjs/jwt';

@Injectable()
export class AuthService {
    constructor(private readonly usersService: UsersService, private jwtService: JwtService) { }
    async validateUser(username: string, password: string): Promise<any> {
        const user = await this.usersService.getUser({ username });
        if (!user) return null;
        const passwordValid = await bcrypt.compare(password, user.password)
        if (!user) {
            throw new NotAcceptableException('could not find the user');
        }
        if (user && passwordValid) {
            return user;
        }
        return null;
    }
    async login(user: any) {
        const payload = { username: user.username, sub: user._id };
        return {
            access_token: this.jwtService.sign(payload),
        };
    }
}
Here, we created the validateUser method to check if a user from the user.model matches a user record from the database. If there is no match, the method returns a null value.
We also created the login method which uses the jwtService.sign method to generate a JWT access token for the returned user from the validate from our LocalStrategy.
Now, add the code snippet below to the auth/auth.controller.ts file to create a route for the user login.
import { Controller, Request, Post, UseGuards } from '@nestjs/common';
import { AuthService } from './auth.service';
import { AuthGuard } from '@nestjs/passport';

@Controller()
export class AuthController {
    constructor(private authService: AuthService) { }

    @UseGuards(AuthGuard('local'))
    @Post('auth/login')
    async login(@Request() req) {
        return this.authService.login(req.user);
    }
}
Here, we used the @UseGuards() decorator to enforce authentication when a user requests the login route. With the AuthGuard class, we’re able to authenticate a user using the local strategy.
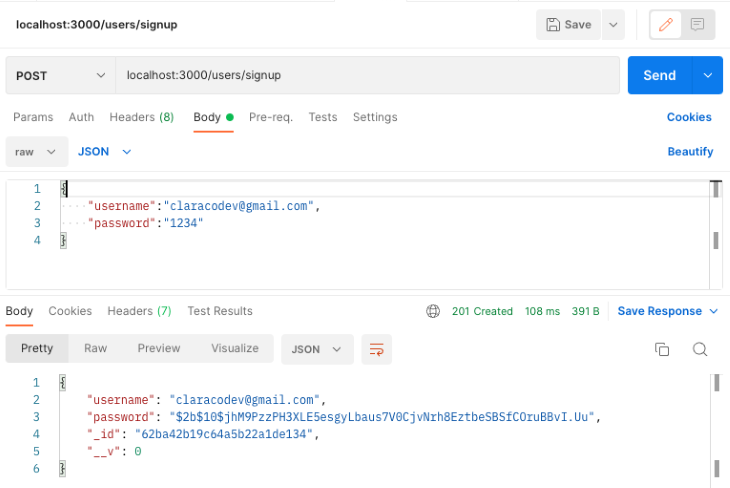
Now let’s test the application using Postman. We’ll start with the signup route.
First, start the application:
npm run start
Next, open Postman and test the signup route by sending a post request to the endpoint. localhost:3000/users/signup.
Now, test the login endpoint by sending a post request to the endpoint. localhost:3000/auth/login.
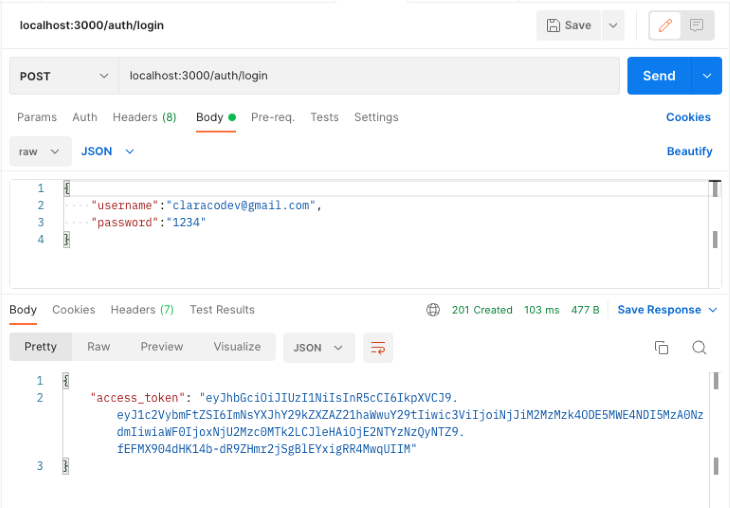
If the username and password exist in the database, the user will receive an access_token as shown above. With the access_token, the user will be able to access the protected routes in the API.
In this tutorial, we provided an overview of NestJS and then demonstrated how to implement JWT user authentication on a NestJS API.
Now that you have this knowledge, how will you handle user authentication in your next Nest project? To learn more about NestJS JWT authentication, refer to the official documentation.
Install LogRocket via npm or script tag. LogRocket.init() must be called client-side, not
server-side
$ npm i --save logrocket

// Code:

import LogRocket from 'logrocket';
LogRocket.init('app/id');
// Add to your HTML:

<script src="https://cdn.lr-ingest.com/LogRocket.min.js"></script>
<script>window.LogRocket && window.LogRocket.init('app/id');</script>

Eleventy (11ty) is a compelling solution for developers seeking a straightforward, performance-oriented approach to static site generation.

Explore some CSS tools that offer the perfect blend of efficiency and flexibility when handling CSS, such as styled-components and Emotion.

RedwoodJS announced support for server-side rendering and RSCs in its Bighorn release. Explore this feature for when it’s production-ready.

The AHA stack — Astro, htmx, and Alpine — is a solid web development stack for smaller apps that emphasize frontend speed and SEO.


9 Replies to "How to implement JWT authentication in NestJS"
`Creating the user controller`
there is a typo in the nestjs command it should be controller not service again
Also I think you messed up the order of steps for the auth module since the local strategy needs the auth service which is mentioned further down on how to create it.
missing :
npm install –save @nestjs/passport passport passport-local
npm install –save-dev @types/passport-local
and local strategy
import { Strategy } from ‘passport-local’;
import { PassportStrategy } from ‘@nestjs/passport’;
import { Injectable, UnauthorizedException } from ‘@nestjs/common’;
import { AuthService } from ‘./auth.service’;
@Injectable()
export class LocalStrategy extends PassportStrategy(Strategy) {
constructor(private authService: AuthService) {
super();
}
async validate(username: string, password: string): Promise {
const user = await this.authService.validateUser(username, password);
if (!user) {
throw new UnauthorizedException();
}
return user;
}
}
So, I’m rendering templates via Nest.js, and some of those templates include client-side JavaScript (via tags) that needs to do API requests from the browser. What is the proper way to send the access token to the frontend so that it can be used via the JavaScript running in the browser? Should I just set the access token in the pre-rendered HTML (e.g. as an attribute of the element, so that the client-side JavaScript can just query the DOM to get the token for API requests? Or is that unsafe/non-secure?
Sending access tokens to the frontend, especially if they’re intended to be used by client-side JavaScript, is a sensitive area that requires a security-focused approach. Here are some common practices and considerations:
HTTP-Only Cookies: One common method for sending tokens to the frontend securely is to use HTTP-only cookies. These cookies cannot be accessed through JavaScript, thereby reducing the risk of cross-site scripting (XSS) attacks. But this method isn’t directly useful if your client-side script needs to access the token.
Avoid Inline JavaScript: When you’re rendering templates server-side, avoid placing sensitive data in inline JavaScript or in the DOM. This can expose the data to XSS attacks.
Frontend Session: If your frontend app requires the token, you might consider a strategy where you fetch the token in a secured way after the initial page load. This might be done through a secure API endpoint that returns the token as a JSON payload, which your frontend app can then store in memory (not in local storage due to security concerns). This token can then be used for subsequent API requests.
Short-Lived Tokens: If tokens must be exposed to frontend code, make sure they are short-lived. This reduces the potential damage in case of exposure.
Avoid Local Storage for Sensitive Tokens: The Web Storage (local storage and session storage) is vulnerable to XSS attacks. If an attacker can run JavaScript on your page, they can retrieve the tokens stored there. Instead, if you must store a token on the frontend, consider keeping it in a JavaScript variable which will exist only for the life of the page.
Content Security Policy (CSP): Implement a strong CSP for your web application. This reduces the risk of XSS attacks by controlling which scripts and resources can be loaded and executed.
Always Use HTTPS: Always ensure your application runs over HTTPS. This encrypts the traffic between the client and the server, protecting the token from being intercepted.
Refresh Tokens: If using short-lived access tokens, also use refresh tokens (stored securely server-side) to obtain a new access token once the old one expires. This way, even if an access token is exposed, its short lifespan combined with the inability to refresh it limits potential damage.
In summary, if your client-side JavaScript absolutely requires the access token, ensure you’re following best practices to minimize risks, such as those mentioned above. Ideally, reduce direct exposure of tokens to frontend code as much as possible.
So what’s the reason behind using passport-local middleware, when one can just verify password in login method and call “validate” afterwards or throw an error? This middleware is useless in this case
What seems to be missing from this article is once logged in, how is the retuned jwt used to ensure the user is authenticated on a per route basis.
I am getting this error
plz advise.Thanks
ERROR [ExceptionHandler] JwtStrategy requires a secret or key
TypeError: JwtStrategy requires a secret or key
add the jwt secret as template string, like `${process.env.JWT_SECRET}`