We highly value security here at Percona, and in this blog post, we will show how to protect your Percona Monitoring and Management (PMM) Server with an SSL certificate and automate its lifecycle by leveraging a proxy server.
Introduction
As you may know, PMM Server provides a self-signed SSL certificate out-of-the-box to encrypt traffic between the client (web or CLI) and the server. While some people choose to use this certificate in non-critical environments, oftentimes protected by a private network, it is definitely not the best security practice for production environments.
I have to mention that a self-signed certificate still achieves the goal of encrypting the connection. Here are a few things, or problems, you should know about when it comes to self-signed certificates in general:
- they cannot be verified by a trusted Certificate Authority (CA)
- they cannot be revoked as a result of a security incident (if issued by a trusted CA, they can be revoked)
- when used on public websites, they may negatively impact your brand or personal reputation
This is why most modern browsers will show pretty unappealing security warnings when they detect a self-signed certificate. Most of them will prevent users from accidentally opening websites that do not feature a secure connection (have you heard of the thisisunsafe hack for Chrome?). The browser vendors are obviously attempting to raise security awareness amongst the broad internet community.
We highly encourage our users to have their SSL certificates issued by a trusted Certificate Authority.
Some people find it overwhelming to keep track of expiry dates and remember to renew the certificates before they expire. Until several years ago, SSL certificates had to be paid for and were quite expensive. Projects like Let’s Encrypt — a non-profit Certificate Authority — have been devised to popularize web security by offering SSL certificates absolutely free of charge. However, their validity is only limited to three months, which is quite short.
We will explore the two most popular reverse proxy tools which allow you to leverage an SSL certificate for better security of your PMM instance. More importantly, we will cover how to automate the certificate renewal using those tools. While PMM Server is distributed in three flavors — docker, AMI, and OVF — we will focus on docker being our most popular distribution.
All scripts in this post assume you have a basic familiarity and experience of working with docker and docker compose.
Reverse proxies
While the choice of open source tools is quite abundant these days, we will talk about two of them that I consider being the most popular: nginx and traefik.
In order to try one of the solutions proposed here, you’ll need the following:
- docker engine
- docker compose v2
- a public domain name
- a DNS record of type A which features the public IP of your server (or cloud VM)
Let’s take a look at our network diagram. It shows that the proxy server is standing between PMM Server and its clients. This means that the proxy, not PMM Server, takes care of terminating SSL and encrypting traffic.

Nginx
Nginx came to the market in 2004, which is quite a solid age for any software product. It has gained tremendous adoption since then and to this date, it powers many websites as a reverse proxy. Let’s see what it takes to use Nginx for SSL certificate management.
First, let me remind you where PMM Server stores the self-signed certificates:
1 2 3 4 5 6 7 | % docker exec -t pmm-server sh -c "ls -l /srv/nginx/*.{crt,key,pem}" total 24 -rw-r--r-- 1 root root 6016 Jun 10 11:24 ca-certs.pem -rw-r--r-- 1 root root 977 Jun 10 11:24 certificate.crt -rw-r--r-- 1 root root 1704 Jun 10 11:24 certificate.key -rw-r--r-- 1 root root 424 Jun 10 11:24 dhparam.pem |
We could certainly pass our own certificates by mounting a host directory containing custom certificates or, alternatively, by copying the certificates to the container. However, that would require us to issue the certificates first. What we want to achieve is to get the certificates issued automatically. I must say that even though nginx does not offer such functionality out of the box, there are a few open source projects that effectively close that gap.
One such project is nginx-proxy. It seems to be quite mature and stable, boasting of 16K GitHub stars. It has a peer project — acme-companion — which takes care of the certificate lifecycle. We will use them both, so ultimately we will end up running three separate containers:
- nginx-proxy – the reverse proxy
- acme-companion – certificate management component
- pmm-server – the proxied container
Prior to launching the containers, the following steps need to be completed:
- Choose a root directory for your project.
- Create a directory
./nginxin your project root (docker will take care of creating the nested directories). This will be your project root folder. - Create a file
./nginx/proxy.conf. This file is mostly needed to override the default value ofclient_max_body_size, which happens to be too low, so PMM can properly handle large payloads. The file’s contents should be as follows:
1 2 3 4 5 6 7 8 9 10 11 12 13 14 15 16 17 18 19 | # proxy.conf server_tokens off; client_max_body_size 10m; # HTTP 1.1 support proxy_http_version 1.1; proxy_buffering off; proxy_set_header Host $http_host; proxy_set_header Upgrade $http_upgrade; proxy_set_header Connection $proxy_connection; proxy_set_header X-Real-IP $remote_addr; proxy_set_header X-Forwarded-For $proxy_add_x_forwarded_for; proxy_set_header X-Forwarded-Proto $proxy_x_forwarded_proto; proxy_set_header X-Forwarded-Ssl $proxy_x_forwarded_ssl; proxy_set_header X-Forwarded-Port $proxy_x_forwarded_port; # Mitigate httpoxy attack proxy_set_header Proxy ""; |
Prior to launching the containers, the following steps need to be completed:
- Choose a root directory for your project.
- Create a directory
./nginxin your project root (docker will take care of creating the nested directories). This will be your project root folder. - Create a file
./nginx/proxy.conf. This file is mostly needed to override the default value ofclient_max_body_size, which happens to be too low, so PMM can properly handle large payloads. The file’s contents should be as follows:
Note that most recent versions of docker client come with
docker composesub-command, while earlier versions may require you to additionally install a python-based docker-compose tool.
Here is what docker-compose.yml looks like. You can go ahead and create it while making sure to replace my-domain.org with your own public domain name.
1 2 3 4 5 6 7 8 9 10 11 12 13 14 15 16 17 18 19 20 21 22 23 24 25 26 27 28 29 30 31 32 33 34 35 36 37 38 39 40 41 42 43 44 45 46 47 48 49 50 51 52 53 54 55 56 57 58 59 60 61 62 63 64 | # docker-compose.yml version: '3' services: nginx: image: nginxproxy/nginx-proxy container_name: nginx environment: - DEFAULT_HOST=pmm.my-domain.org ports: - '80:80' - '443:443' restart: always volumes: - ./nginx/proxy.conf:/etc/nginx/proxy.conf:ro - ./nginx/vhost.d:/etc/nginx/vhost.d:ro - ./nginx/certs:/etc/nginx/certs:ro - ./nginx/html:/usr/share/nginx/html - ./nginx/dhparam:/etc/nginx/dhparam - /var/run/docker.sock:/tmp/docker.sock:ro letsencrypt: image: nginxproxy/acme-companion container_name: acme-companion restart: always environment: - NGINX_PROXY_CONTAINER=nginx - DEFAULT_EMAIL=admin@my-domain.org depends_on: - nginx volumes: - ./nginx/vhost.d:/etc/nginx/vhost.d - ./nginx/certs:/etc/nginx/certs - ./nginx/html:/usr/share/nginx/html - /var/run/docker.sock:/var/run/docker.sock:ro pmm-server: container_name: pmm-server image: percona/pmm-server:2 restart: unless-stopped environment: - VIRTUAL_HOST=pmm.my-domain.org - LETSENCRYPT_HOST=pmm.my-domain.org - VIRTUAL_PORT=80 - DISABLE_TELEMETRY=0 - ENABLE_DBAAS=1 - ENABLE_BACKUP_MANAGEMENT=1 - ENABLE_ALERTING=1 - GF_ANALYTICS_CHECK_FOR_UPDATES=false - GF_AUTH_LOGIN_COOKIE_NAME=pmm_session - GF_SECURITY_DISABLE_GRAVATAR=true depends_on: - nginx volumes: - pmm-data:/srv expose: - '80' volumes: pmm-data: name: pmm-data external: false |
Now launch your site by running docker compose up -d. That’s it! If you type docker ps -a in the terminal, you will see all three containers listed:
1 2 3 4 5 6 | % docker ps -a CONTAINER ID IMAGE COMMAND CREATED STATUS PORTS NAMES 07979480350c percona/pmm-server:2 "/opt/entrypoint.sh" 1 hours ago Up 1 hours (healthy) 80/tcp, 443/tcp pmm-server b7ed4cbf1064 nginxproxy/acme-companion "/bin/bash /app/entr…" 1 hours ago Up 1 hours acme-companion d35da441c103 nginxproxy/nginx-proxy "/app/docker-entrypo…" 1 hours ago Up 1 hours 0.0.0.0:80->80/tcp, :::80->80/tcp, 0.0.0.0:443->443/tcp, :::443->443/tcp nginx |
Should anything go wrong, you can troubleshoot by checking the container logs, i.e. docker logs pmm-server or docker logs acme-companion maybe useful to explore.
Restrict access to PMM
Sometimes you need to restrict access to known IPs or networks. Gladly, nginx-proxy allows you to easily configure that. All you need to do is:
- create a text file with the name of your domain — for example,
pmm.my-domain.org— and save it to./nginx/vhost.d/123456789# Contents of pmm.my-domain.org# Allow trafic from known IP addresses or networksallow 127.0.0.0/8; # internal networkallow 100.1.1.0/20; # another networkallow 219.24.87.93; # just one IP address# Reject traffic from all other IPs and networksdeny all; - finally, restart the container with docker restart
pmm-server.
From now on, if someone tries to access your PMM Server from an IP address that is not in the allow list, they should get the error HTTP 403 Forbidden.
Test the connection security
While protecting your connection with an SSL certificate is a good idea, there are a whole lot of other security concerns that the certificate alone does not address. There are a few useful web services out there that allow you to not only verify your certificate but also perform a number of other vital checks to test the connection, such as sufficient cipher strength, use of outdated security protocols, vulnerability to known SSL attacks, etc.
Qualys is one such service, and all it takes to review the certificate is to go to their web page, enter the domain name of your site, and let them do the rest. After a few minutes you should see a scan report like this:

Voilà! We have achieved a very high rating of connection security without really spending much time! That’s the magic of the tool ?
Prior to using the Nginx proxy, I could never achieve the same result from the first attempt and the best score I could get was “B”. It took me time to google up what every warning of the scan report meant and it took even more time to find a proper solution and apply it to my configuration.
To wrap it up — if you keep your version of Nginx and its companion updated, it’ll save you a ton of time and also make your TLS comply with the highest security standards. And yes, certificate rotation before expiry is guaranteed.
Traefik
Traefik is a more recent product. It was first released in 2016 and has gained substantial momentum since then.
Traefik is super popular when it comes to using it as a proxy server and a load balancer for docker and Kubernetes alike. Many claim Traefik to be more powerful and flexible compared to Nginx, but also a bit more difficult to set up. Unlike Nginx, Traefik can manage the certificate lifecycle without additional tools, which is why we will launch only two containers — one for PMM Server and one for Traefik proxy.
Basic configuration
To get started with a very minimal Traefik configuration please follow the steps below.
- choose a root directory for your project
- create a basic
docker-compose.ymlin the root folder with the following contents:123456789101112131415161718192021222324252627282930313233343536373839404142434445464748495051525354555657585960version: '3'services:traefik:image: traefik:v2.7container_name: traefikrestart: alwayscommand:- '--log.level=DEBUG'- '--providers.docker=true'- '--providers.docker.exposedbydefault=false'- '--entrypoints.web.address=:80'- '--entrypoints.websecure.address=:443'- '--certificatesresolvers.le.acme.httpchallenge=true'- '--certificatesresolvers.le.acme.httpchallenge.entrypoint=web'- '--certificatesresolvers.le.acme.storage=/letsencrypt/acme.json'ports:- '80:80'- '443:443'volumes:- ./letsencrypt:/letsencrypt- /var/run/docker.sock:/var/run/docker.sock:ronetworks:- wwwpmm-server:image: percona/pmm-server:2container_name: pmm-serverrestart: alwaysenvironment:- DISABLE_TELEMETRY=0- ENABLE_DBAAS=1- ENABLE_BACKUP_MANAGEMENT=1- ENABLE_ALERTING=1- GF_ANALYTICS_CHECK_FOR_UPDATES=false- GF_AUTH_LOGIN_COOKIE_NAME=pmm_session- GF_SECURITY_DISABLE_GRAVATAR=truevolumes:- pmm-data:/srvexpose:- '80'labels:- 'traefik.enable=true'- 'traefik.http.routers.pmm.rule=Host(`pmm.my-domain.org`)'- 'traefik.http.routers.pmm.entrypoints=websecure'- 'traefik.http.routers.pmm.tls.certresolver=le'networks:- wwwvolumes:pmm-data:name: pmm-dataexternal: falsenetworks:www:name: wwwexternal: false - replace my-domain.org with the domain name you own
- make sure ports 80 and 443 are open on your server and accessible publicly
- create a directory
letsencryptin the root of your project — it will be mounted to the container so Traefik can save the certificates
If you run docker ps -a, you will see two containers in the output:
1 2 3 4 5 | % docker ps -a CONTAINER ID IMAGE COMMAND CREATED STATUS PORTS NAMES 4a2746c26738 traefik:v2.7 "/entrypoint.sh --pr…" 52 seconds ago Up 48 seconds 0.0.0.0:80->80/tcp, :::80->80/tcp, 0.0.0.0:443->443/tcp, :::443->443/tcp traefik 27943a8edfef percona/pmm-server:2 "/opt/entrypoint.sh" 52 seconds ago Up 48 seconds (healthy) 80/tcp, 443/tcp pmm-server |
If you face any issues, you can troubleshoot by checking the logs of Traefik container with docker logs traefik. For obvious performance reasons, we advise you to decrease the log verbosity by setting the log.level parameter to INFO.
Advanced configuration
A closer analysis of the basic configuration confirms that it suffers from a few problems, in particular:
- Visiting http://pmm.my-domain.org will result in
HTTP 404 Not found, i.e. no redirect is configured by default. - Qualys SSL report rates our configuration with a “B”, which is insufficient for prod environments. It highlights three issues:
- the server supports outdated, or insecure, TLS protocols 1.0 and 1.1

- the server uses quite a few weak ciphers

- absence of security headers in proxy response
- the server supports outdated, or insecure, TLS protocols 1.0 and 1.1

We will try to address all of the mentioned issues one by one.
- Redirect HTTP to HTTPSTraefik uses a special HTTP option called entryPoint. It can be easily achieved by passing the following parameters to Traefik:12--entrypoints.web.http.redirections.entryPoint.to=websecure--entrypoints.web.http.redirections.entryPoint.scheme=https
- Avoid using outdated protocols TLS 1.0 and 1.1
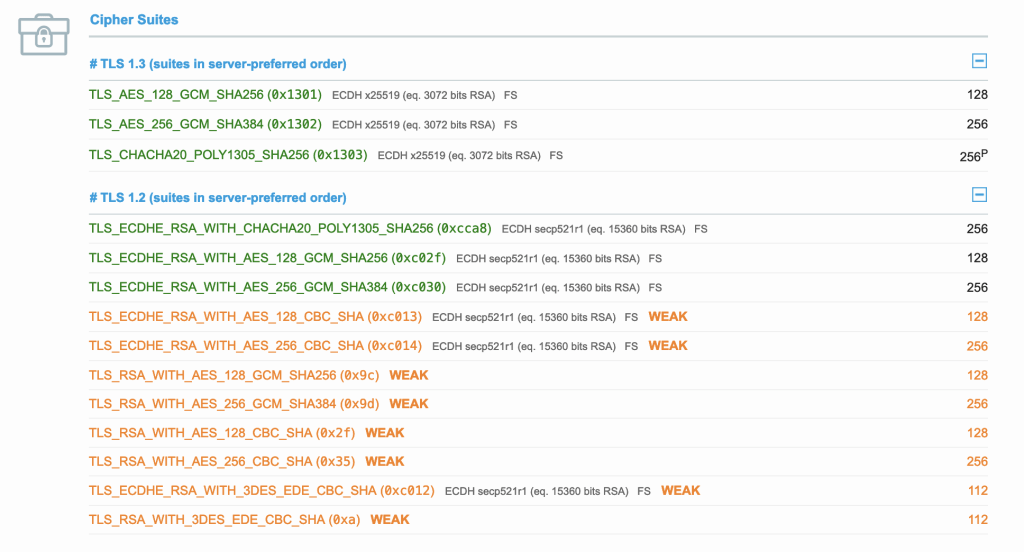
- Avoid using weak ciphers
As those two issues relate to TLS, why not combine the solution for both in one? Traefik offers two types of configuration — static and dynamic. The number of options necessary to address the ciphers can get quite big, this is why we’ll choose to use the dynamic configuration, i.e. put everything in a file versus inline in our
docker-compose.ymlfile. Therefore, let’s create a file calleddynamic.ymland place it in the project root:12345678910111213141516tls:options:default:minVersion: VersionTLS12sniStrict: truepreferServerCipherSuites: truecipherSuites:- TLS_ECDHE_RSA_WITH_CHACHA20_POLY1305_SHA256- TLS_ECDHE_RSA_WITH_AES_128_GCM_SHA256- TLS_ECDHE_RSA_WITH_AES_256_GCM_SHA384- TLS_CHACHA20_POLY1305_SHA256- TLS_AES_256_GCM_SHA384- TLS_AES_128_GCM_SHA256curvePreferences:- secp521r1- secp384r1As you can see here, we limit the TLS version only to the most secure, the same is true for the cipher suites and cryptoalgorythmic preferences. The file name can be anything you like, so we will need to point Traefik to the file containing the dynamic configuration. To do this, we will leverage the
file providerparameter:12- '--providers.file=true'- '--providers.file.filename=/dynamic.yml' - Add security headers to the proxy response
Additional security headers will go to the static configuration though:
12345678- 'traefik.http.routers.pmm.middlewares=secureheaders@docker'- 'traefik.http.middlewares.secureheaders.headers.forceSTSHeader=true'- 'traefik.http.middlewares.secureheaders.headers.stsPreload=true'- 'traefik.http.middlewares.secureheaders.headers.stsIncludeSubdomains=true'- 'traefik.http.middlewares.secureheaders.headers.stsSeconds=315360000'- 'traefik.http.middlewares.secureheaders.headers.contentTypeNosniff=true'- 'traefik.http.middlewares.secureheaders.headers.browserXssFilter=true'- 'traefik.http.middlewares.secureheaders.headers.frameDeny=true'
That should be it for Traefik. We have successfully addressed all security concerns, which is confirmed by a fresh SSL report.

For your convenience, I will put the final version of yml file below.
docker-compose.yml
1 2 3 4 5 6 7 8 9 10 11 12 13 14 15 16 17 18 19 20 21 22 23 24 25 26 27 28 29 30 31 32 33 34 35 36 37 38 39 40 41 42 43 44 45 46 47 48 49 50 51 52 53 54 55 56 57 58 59 60 61 62 63 64 65 66 67 68 69 70 71 72 | version: '3' services: traefik: image: traefik:v2.7 container_name: traefik hostname: traefik command: - '--log.level=DEBUG' - '--providers.docker=true' - '--providers.docker.exposedbydefault=false' - '--providers.file=true' - '--providers.file.filename=/dynamic.yml' - '--entrypoints.web.address=:80' - '--entrypoints.web.http.redirections.entryPoint.to=websecure' - '--entrypoints.web.http.redirections.entryPoint.scheme=https' - '--entrypoints.websecure.address=:443' - '--certificatesresolvers.le.acme.httpchallenge=true' - '--certificatesresolvers.le.acme.httpchallenge.entrypoint=web' - '--certificatesresolvers.le.acme.storage=/letsencrypt/acme.json' ports: - '80:80' - '443:443' volumes: - ./letsencrypt:/letsencrypt - ./dynamic.yml:/dynamic.yml - /var/run/docker.sock:/var/run/docker.sock:ro networks: - www pmm-server: image: percona/pmm-server:2 container_name: pmm-server restart: always environment: - DISABLE_TELEMETRY=0 - ENABLE_DBAAS=1 - ENABLE_BACKUP_MANAGEMENT=1 - ENABLE_ALERTING=1 - GF_ANALYTICS_CHECK_FOR_UPDATES=false - GF_AUTH_LOGIN_COOKIE_NAME=pmm_session - GF_SECURITY_DISABLE_GRAVATAR=true volumes: - pmm-data:/srv expose: - '80' labels: - 'traefik.enable=true' - 'traefik.http.routers.pmm.rule=Host(`pmm.my-domain.org`)' - 'traefik.http.routers.pmm.entrypoints=websecure' - 'traefik.http.routers.pmm.tls.certresolver=le' - 'traefik.http.routers.pmm.middlewares=secureheaders@docker' - 'traefik.http.middlewares.secureheaders.headers.forceSTSHeader=true' - 'traefik.http.middlewares.secureheaders.headers.stsPreload=true' - 'traefik.http.middlewares.secureheaders.headers.stsIncludeSubdomains=true' - 'traefik.http.middlewares.secureheaders.headers.stsSeconds=315360000' - 'traefik.http.middlewares.secureheaders.headers.contentTypeNosniff=true' - 'traefik.http.middlewares.secureheaders.headers.browserXssFilter=true' - 'traefik.http.middlewares.secureheaders.headers.frameDeny=true' networks: - www volumes: pmm-data: name: pmm-data external: false networks: www: name: www external: false |
Some security aspects
Docker socket
I’m sure you noticed the following section in docker-compose.yml:
1 2 | volumes: - '/var/run/docker.sock:/var/run/docker.sock:ro' |
You may say it’s not super secure to pass the docker socket to one or more containers, right? True, but this is a hard requirement if we want to automate things. It turns out, that both the proxy server and its companion are doing many things under the hood to make it happen, so they need access to docker runtime to be able to listen to docker events and react to them.
Consider this example: if you add a new service (or site in our case) to the same or a different docker-compose.yml and then launch it with docker compose up -d, the proxy will detect this event and request a new certificate from a Certificate Authority or pick it up from the storage, if it has already been issued. Only then it will be able to pass the certificate to your service. This kind of low-level control over docker runtime is what makes it possible for Nginx or Traefik to manipulate other containers. The mission would be impossible without the socket.
Oftentimes, when developing apps or services, engineering teams will put all their services — backend, frontend, and database — in one docker-compose.yml, which is super convenient as it can be shared within the team. However, you will certainly want to isolate prod from non-prod environments. For instance, if your database server is also deployed in a docker container, it should be done in a different environment, much more hardened ?️ than this.
The use of port 80
It may appear weird to mention port 80, which is the standard port used for unencrypted HTTP, in a blog post about security. Nonetheless, both Nginx and Traefik rely on it being open on the server end. This is because we used the so-called HTTP challenge (read more about challenge types here), which is supported by most proxies and is the easiest to implement. When the CA is about to process the request to issue a certificate, it needs to verify your domain ownership. It does so by querying a special .well-known endpoint on your site which can only be available on port 80. Then, in case of success, it proceeds to issue the certificate.
Both proxy servers provide quite convenient options for redirecting HTTP to HTTPS, which is also good for search engine optimization (SEO).
Conclusion
I find it difficult to disagree that automating the SSL certificate lifecycle, especially if you own or maintain more than just a few public sites (or PMM servers ?), is a much more pleasant journey than doing it manually. Thankfully, the maturity and feature completeness of the open source proxies are amazing, they are used and trusted by many, which is why we recommend you try them out as well.
P.S. There is so much more you can do with your configurations, i.e. add compression for the static assets, harden your security even more, issue a wildcard certificate, etc., but that would be too much for one post and it is probably a good topic to explore in the next one.
Have you tried some other proxies? How do they compare to Nginx or Traefik? We’d love to hear about your experiences, please share them with us via our community forums.