Building and delivering software isn't easy. Everyone wants to have a consistent quality and to be able to deliver new functionality quickly. In this write-up, I will demonstrate Continuous Integration and Continuous Delivery for a Simple .NET application using AWS Developer tools.
Assumptions - I am assuming that you have prior working knowledge of AWS EC2, IAM roles, IAM policies and S3 before checking out this post. I will try and share reference links for items that are outside the scope of this particular write-up. You are here because you are looking to build a pipeline for a .Net Application on Windows Server with IIS installed. I will not be talking about any Linux stuff here. I will probably do a post for Linux in the near future.
What AWS Services will be used to build the CI/CD pipeline?
 What sample application are we going to use for the demonstration? For this demo, we are going to use a
Simple Hello World.Net MVC Application. The solution can be cloned from the public GIT repository that I have created for this blog post. You can use visual studio to view the contents and debug the application locally.
What sample application are we going to use for the demonstration? For this demo, we are going to use a
Simple Hello World.Net MVC Application. The solution can be cloned from the public GIT repository that I have created for this blog post. You can use visual studio to view the contents and debug the application locally.
 There are a lot of steps that are involved in setting up the continuous deployment pipeline. I have broken these steps into different parts and will go over them one by one to make things easier to understand.

 and, uncheck Git Credential Manager because we will be using Credentials Helper instead.
 Step 3. Run "
aws configure" to configure the CLI to interact with AWS in the default region. I am going to use "
us-east-1" region for the entire setup. You can choose whichever is nearest to you. Those keys have already been rotated, in case you were wondering.
Step 3. Run "
aws configure" to configure the CLI to interact with AWS in the default region. I am going to use "
us-east-1" region for the entire setup. You can choose whichever is nearest to you. Those keys have already been rotated, in case you were wondering.
 Step 4. Configure the Credential Helper For use with HTTPS Communication Protocol
 How do I create CodeCommit Repository?
Step 5. Create a CodeCommit repository in AWS. This will be created in the default region you selected earlier. [code lang="powershell"]aws codecommit create-repository --repository-name proj-helloworld --repository-description "Sample .NET MVC application"[/code] You can use the Console as well to create the repository if you don't like to use CLI.
How do I migrate my application code to CodeCommit Repository?
Step 6. Migrate the Git Repository to AWS CodeCommit.
How do I create CodeCommit Repository?
Step 5. Create a CodeCommit repository in AWS. This will be created in the default region you selected earlier. [code lang="powershell"]aws codecommit create-repository --repository-name proj-helloworld --repository-description "Sample .NET MVC application"[/code] You can use the Console as well to create the repository if you don't like to use CLI.
How do I migrate my application code to CodeCommit Repository?
Step 6. Migrate the Git Repository to AWS CodeCommit.
 Now we have our repository in CodeCommit, we will proceed with setup and configuration for CodeBuild.
Example - If I were to run 100 Builds on a Windows, build.general1.medium instance per day each lasting 2.6 mins each then I will be charged around (3*100*0.018) $5.4 per day.
For more information on pricing, please check the official AWS documentation
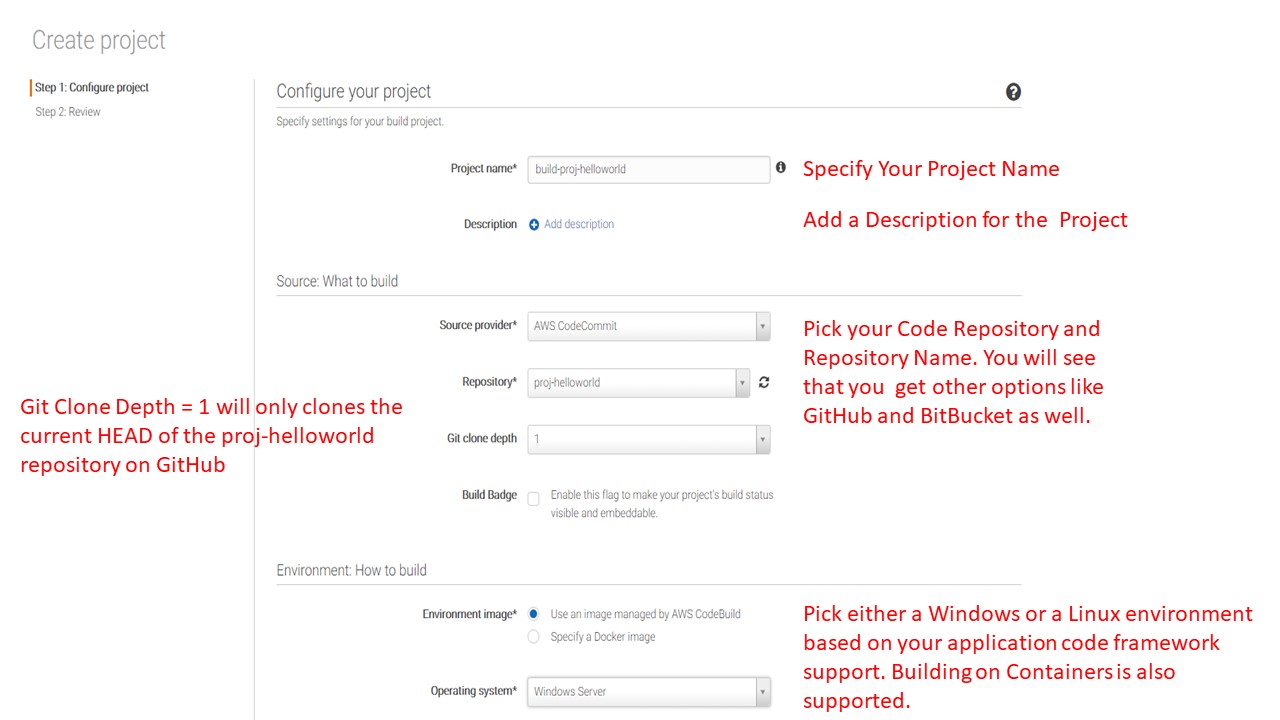
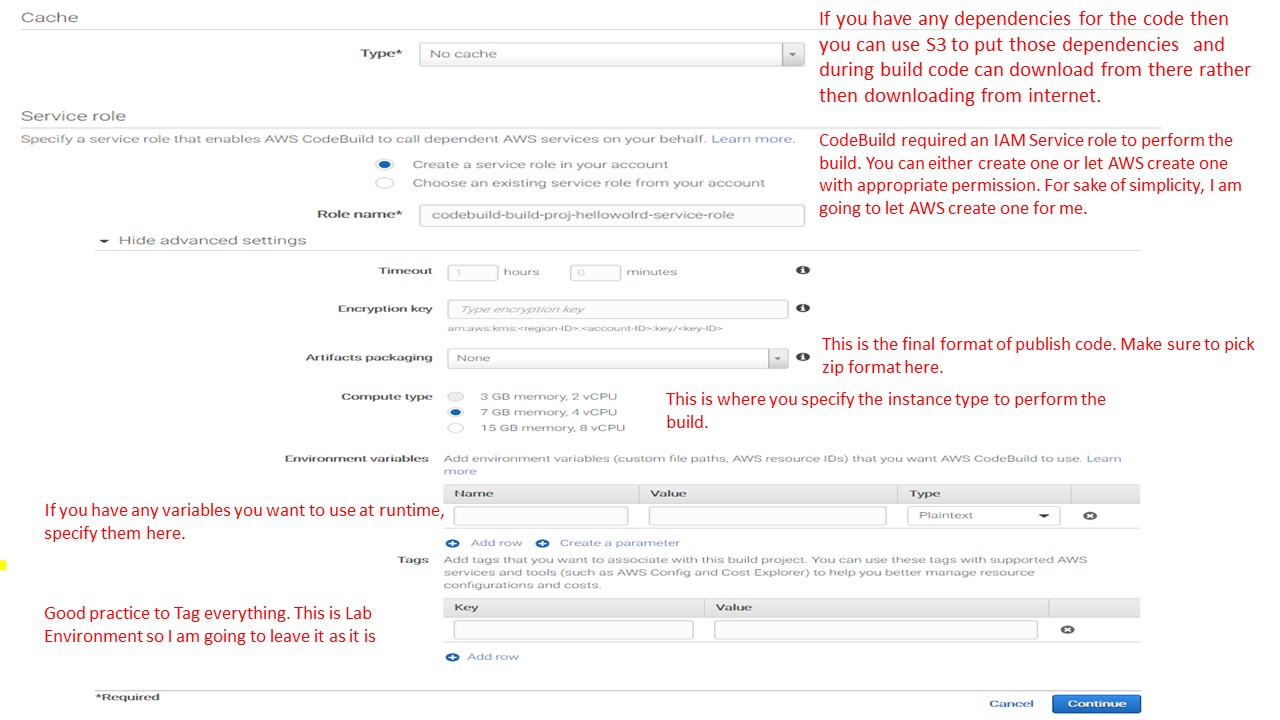
How do I set up and configure CodeBuild? Open the AWS CodeBuild console at
https://console.aws.amazon.com/codebuild/. Create a project using the CodeCommit Repository. See below for the configuration details:
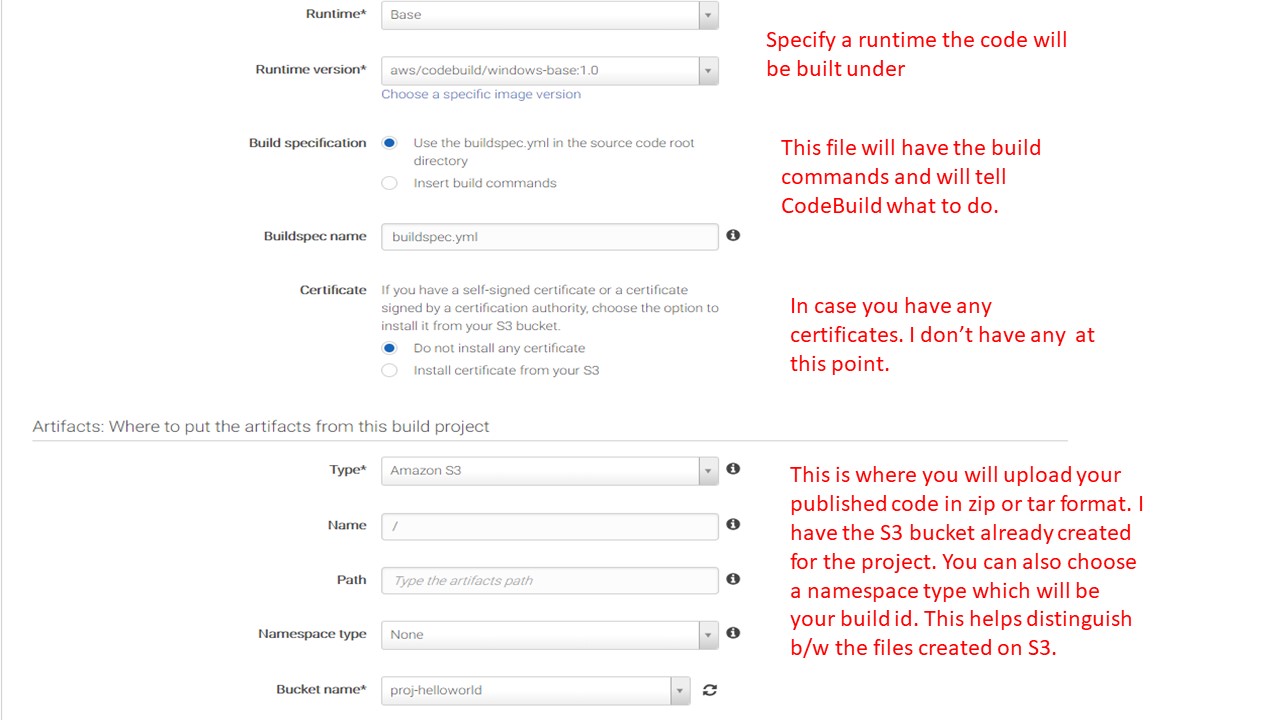
 What is the buildspec.yml file? A
build spec is a collection of build commands and related settings, in YAML format, that AWS CodeBuild uses to run a build. Without a build spec, AWS CodeBuild will not be able to successfully convert your build input into build output, nor will it be able to locate the build output artifact in the build environment to upload to your output bucket. Below is the build spec file from the sample project:
What is the buildspec.yml file? A
build spec is a collection of build commands and related settings, in YAML format, that AWS CodeBuild uses to run a build. Without a build spec, AWS CodeBuild will not be able to successfully convert your build input into build output, nor will it be able to locate the build output artifact in the build environment to upload to your output bucket. Below is the build spec file from the sample project:
 How do I test my build? Open the AWS CodeBuild console at
https://console.aws.amazon.com/codebuild/. Select your previously created project and start the build.
How do I test my build? Open the AWS CodeBuild console at
https://console.aws.amazon.com/codebuild/. Select your previously created project and start the build.
 If everything goes smoothly then you build will succeed and you will see the screen below output screen.
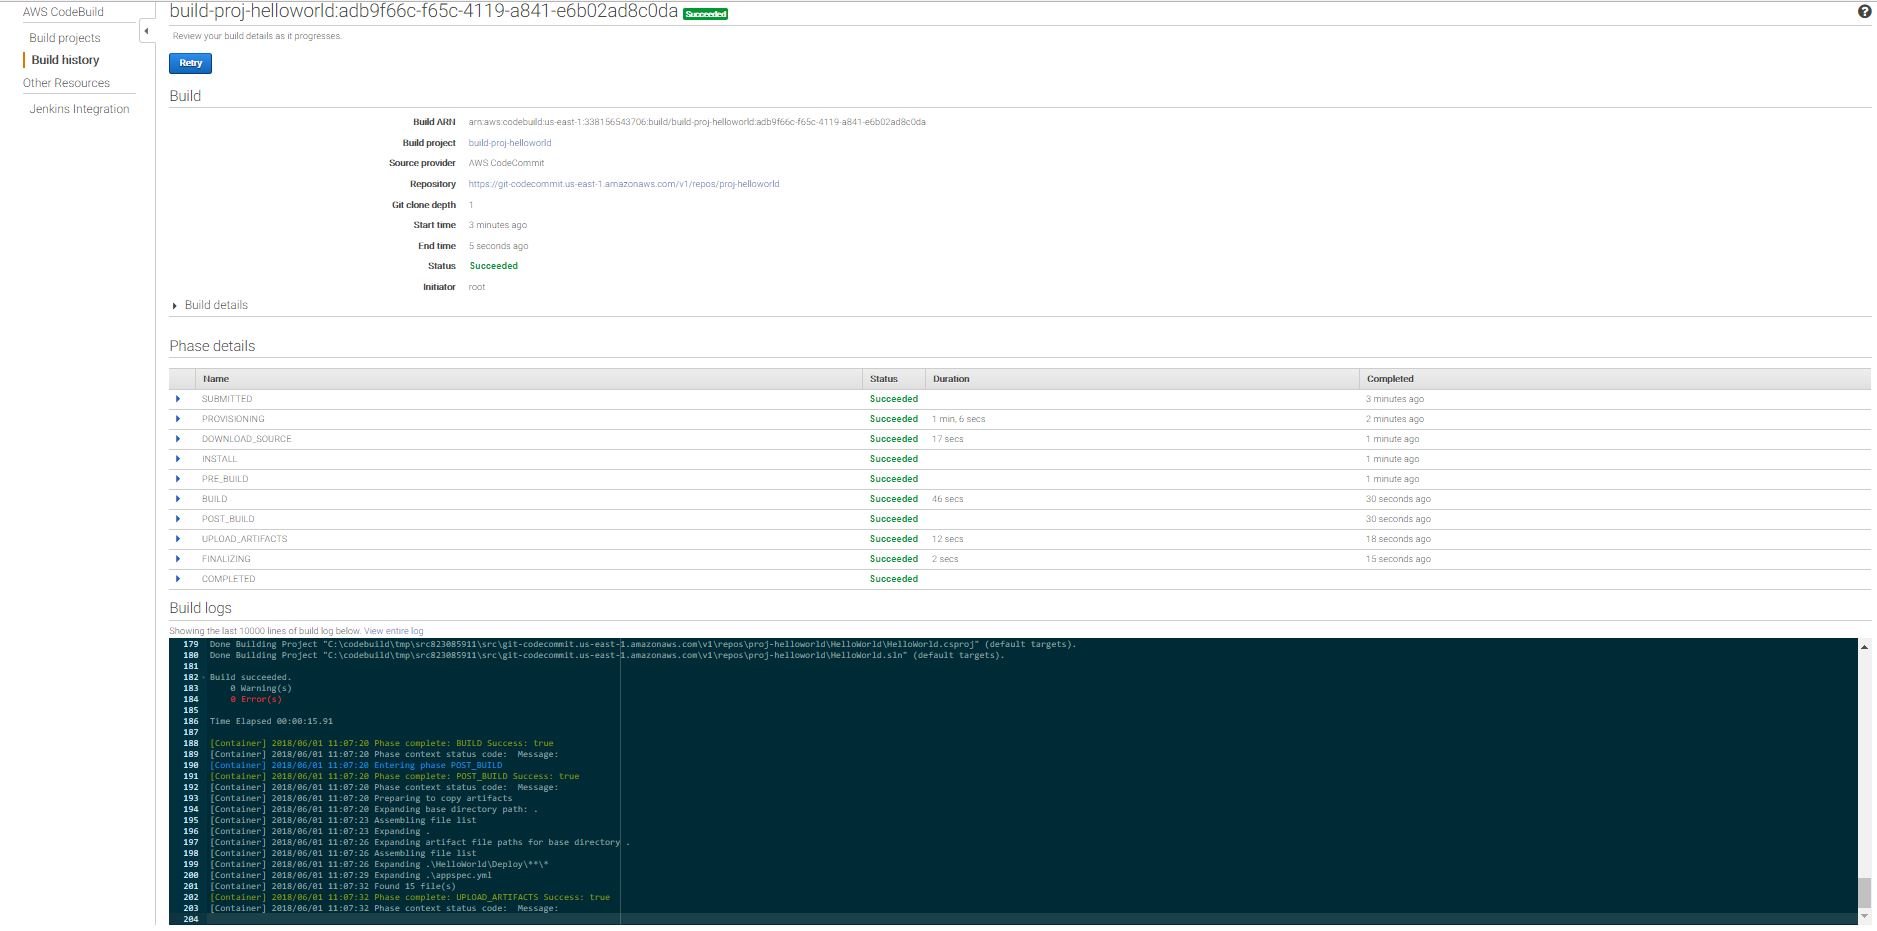 Now you can move to the S3 portal and check your published code in the bucket you picked for uploading your artifacts. This code is ready for deployment and next, we will be deploying this to an EC2 Server using CodeDeploy.
Note - The build will not always go smoothly. I had an issue with the below error:
Error MSB4019: The imported project "C:\Program Files (x86)\MSBuild\Microsoft\VisualStudio\v14.0\WebApplications\Microsoft.WebApplication.targets" was not found. Confirm that the path in the <Import> declaration is correct and that the file exists on disk. This is a very common issue on build servers where you don't have Visual Studio installed. I actually added the package using NuGet in the Solution and updated .csproj to import the path in the package directory.
Now, we have our build running successfully we will look at the deployment phase.
Now you can move to the S3 portal and check your published code in the bucket you picked for uploading your artifacts. This code is ready for deployment and next, we will be deploying this to an EC2 Server using CodeDeploy.
Note - The build will not always go smoothly. I had an issue with the below error:
Error MSB4019: The imported project "C:\Program Files (x86)\MSBuild\Microsoft\VisualStudio\v14.0\WebApplications\Microsoft.WebApplication.targets" was not found. Confirm that the path in the <Import> declaration is correct and that the file exists on disk. This is a very common issue on build servers where you don't have Visual Studio installed. I actually added the package using NuGet in the Solution and updated .csproj to import the path in the package directory.
Now, we have our build running successfully we will look at the deployment phase.

 Once the instance is set up, we need to install CodeDeploy Agent on this EC2 Instance. This agent will be responsible for delivering our software to this EC2 instance. Please see the official
Install Guide for Windows for more details on how to install CodeDeploy Agent. You can alternatively use the below code to install CodeDeploy using PowerShell. [code lang="powershell"] Set-ExecutionPolicy RemoteSigned Import-Module AWSPowerShell New-Item –Path "c:\temp" –ItemType "directory" -Force powershell.exe -Command Read-S3Object -BucketName aws-codedeploy-us-east-1 -Key latest/codedeploy-agent.msi -File c:\temp\codedeploy-agent.msi c:\temp\codedeploy-agent.msi /quiet /l c:\temp\host-agent-install-log.txt powershell.exe -Command Get-Service -Name codedeployagent [/code]
How do I set up a deployment using AWS CodeDeploy?
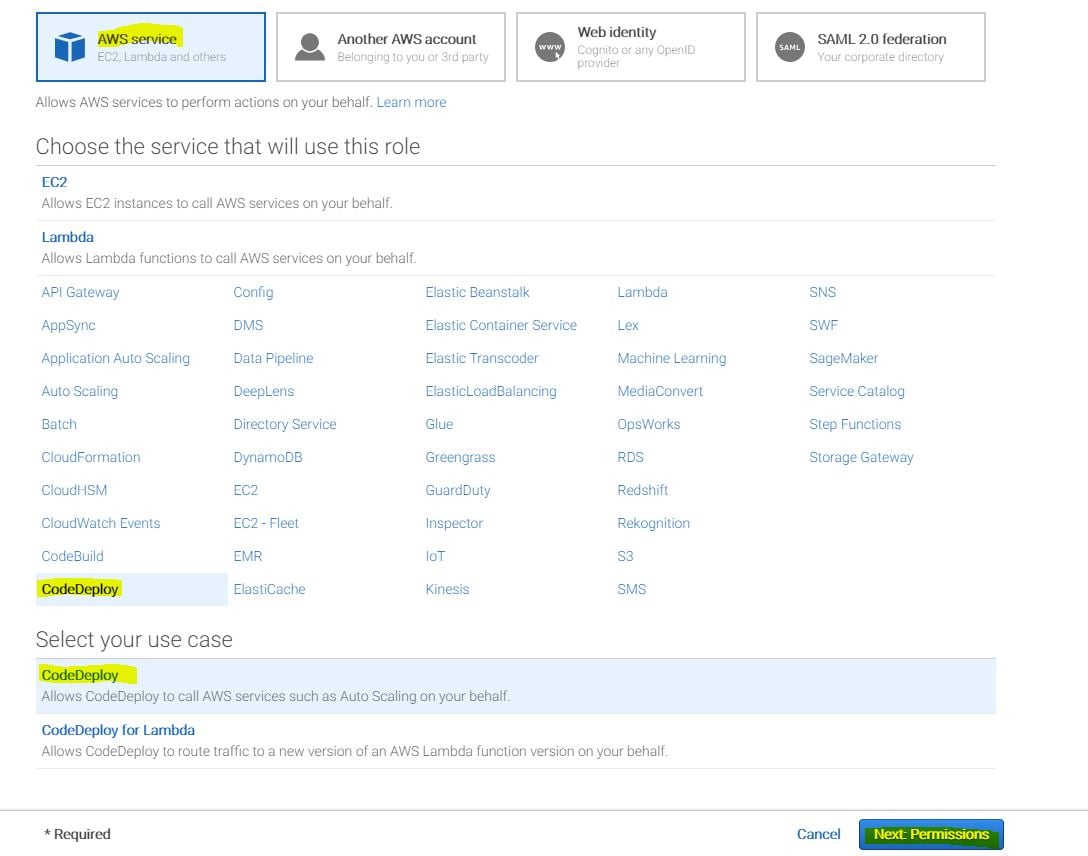
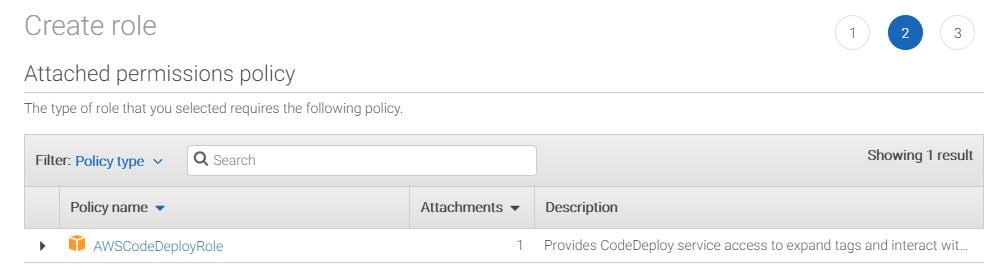
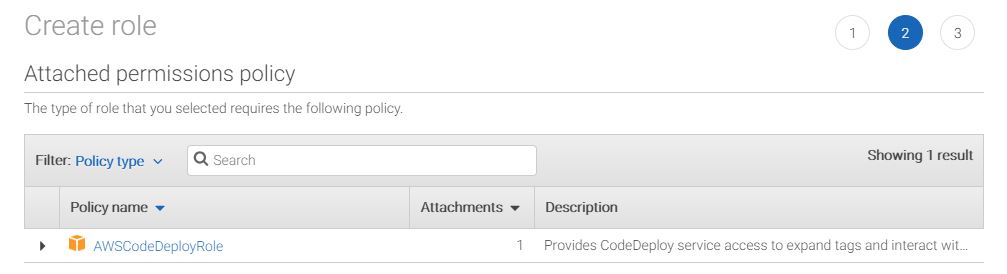
Step 1. Create a Service for CodeDeploy. Navigate to IAM and create a Role for CodeDeploy AWS Service. See below to choose the Service and Policy (populated automatically) when creating a role.
Once the instance is set up, we need to install CodeDeploy Agent on this EC2 Instance. This agent will be responsible for delivering our software to this EC2 instance. Please see the official
Install Guide for Windows for more details on how to install CodeDeploy Agent. You can alternatively use the below code to install CodeDeploy using PowerShell. [code lang="powershell"] Set-ExecutionPolicy RemoteSigned Import-Module AWSPowerShell New-Item –Path "c:\temp" –ItemType "directory" -Force powershell.exe -Command Read-S3Object -BucketName aws-codedeploy-us-east-1 -Key latest/codedeploy-agent.msi -File c:\temp\codedeploy-agent.msi c:\temp\codedeploy-agent.msi /quiet /l c:\temp\host-agent-install-log.txt powershell.exe -Command Get-Service -Name codedeployagent [/code]
How do I set up a deployment using AWS CodeDeploy?
Step 1. Create a Service for CodeDeploy. Navigate to IAM and create a Role for CodeDeploy AWS Service. See below to choose the Service and Policy (populated automatically) when creating a role.
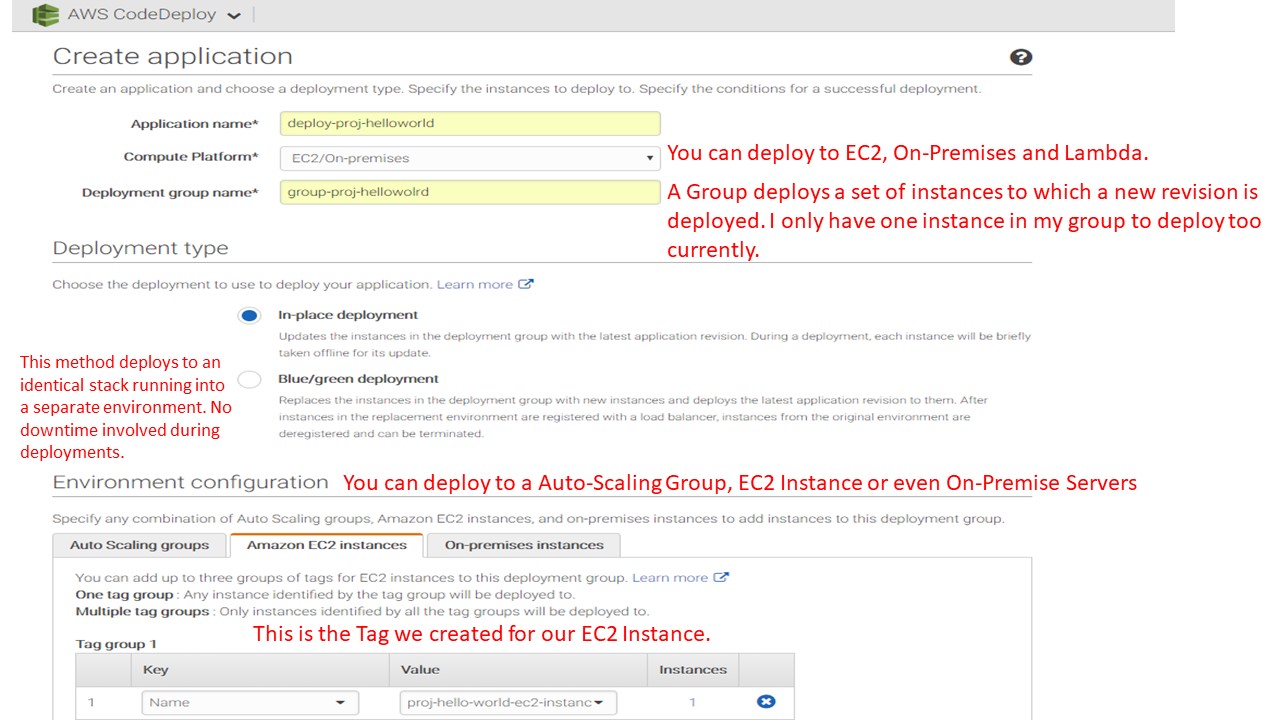
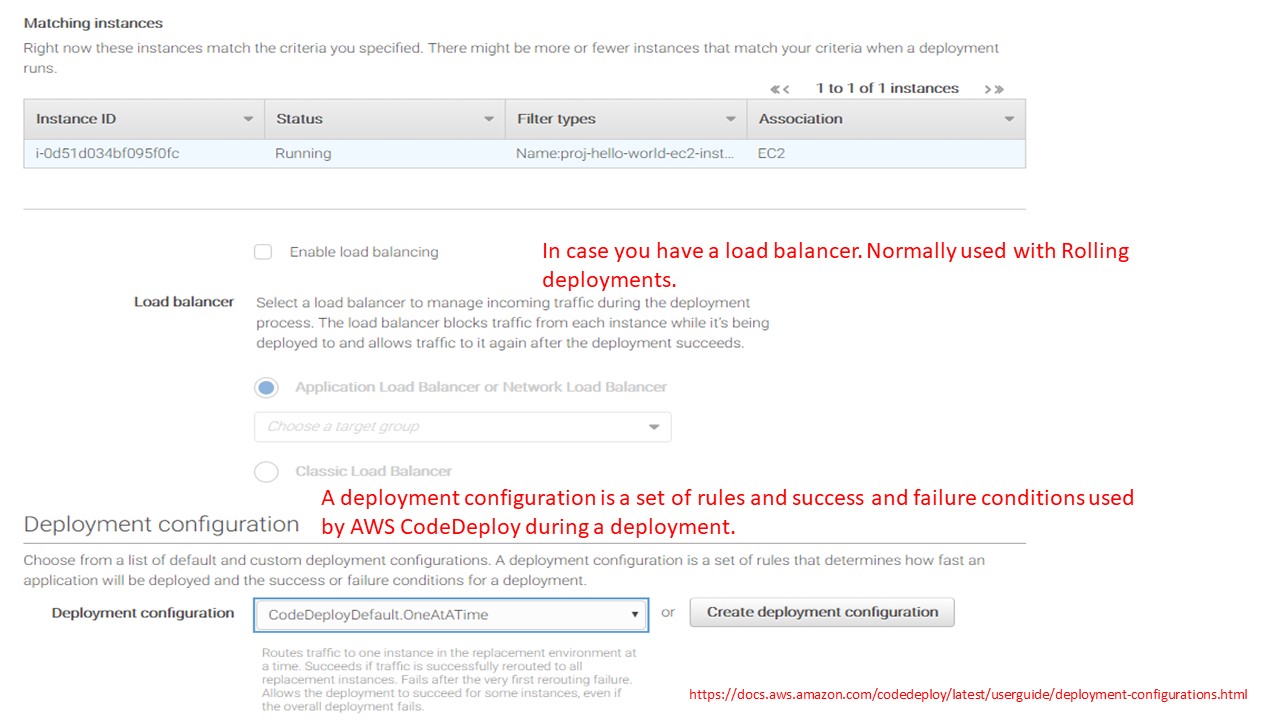
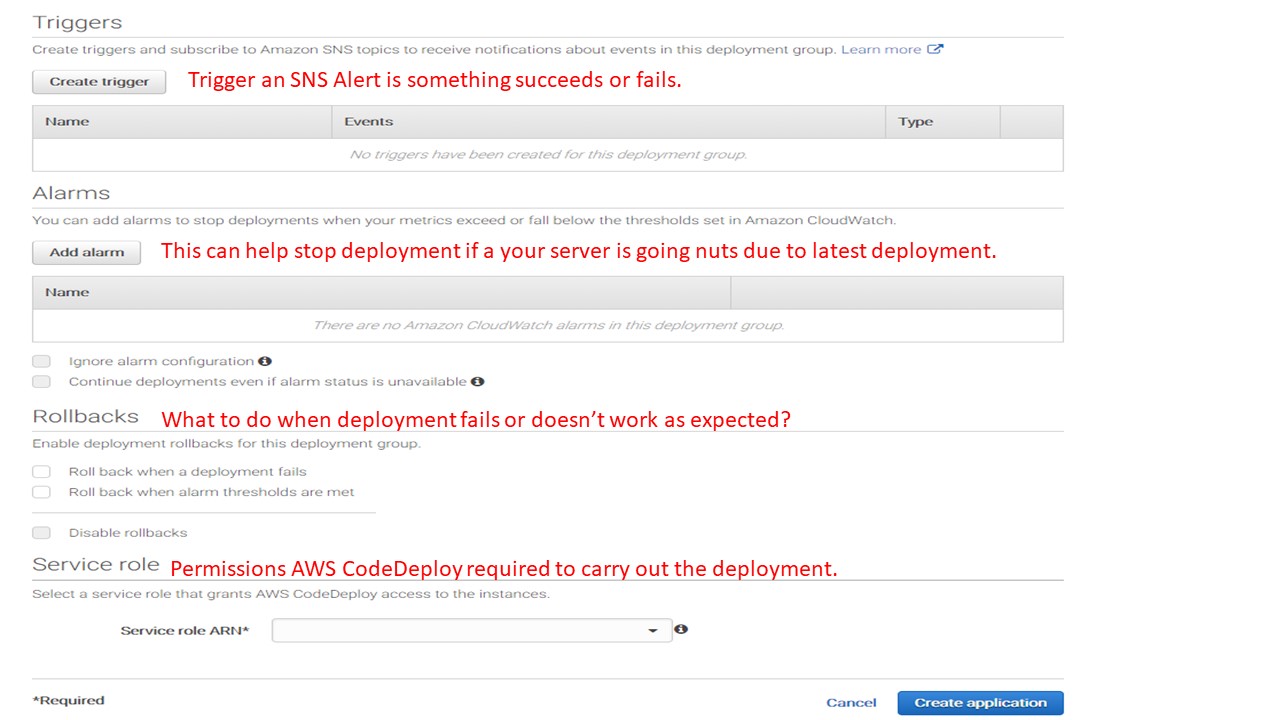
 Step 2. Navigate to CodeDeploy in the AWS Console and Create an Application. Use the Service Role created in step#1 to set up the application.
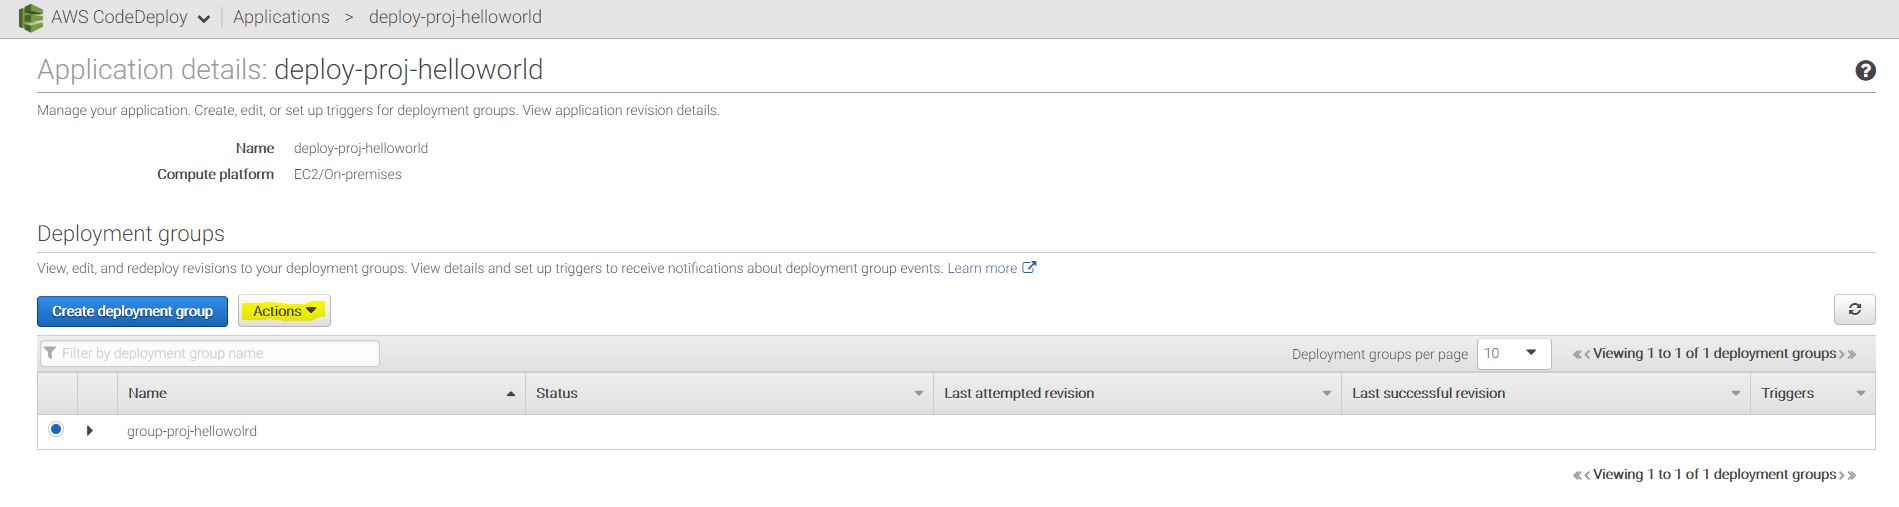
 Step 3. Test the Deployment. Navigate to your Application in the AWS Console and Create an Application. Use the Service Role created in step#1 to set up the application.
How do I test the deployment?
Step 3. Test the Deployment. Navigate to your Application in the AWS Console and Create an Application. Use the Service Role created in step#1 to set up the application.
How do I test the deployment?


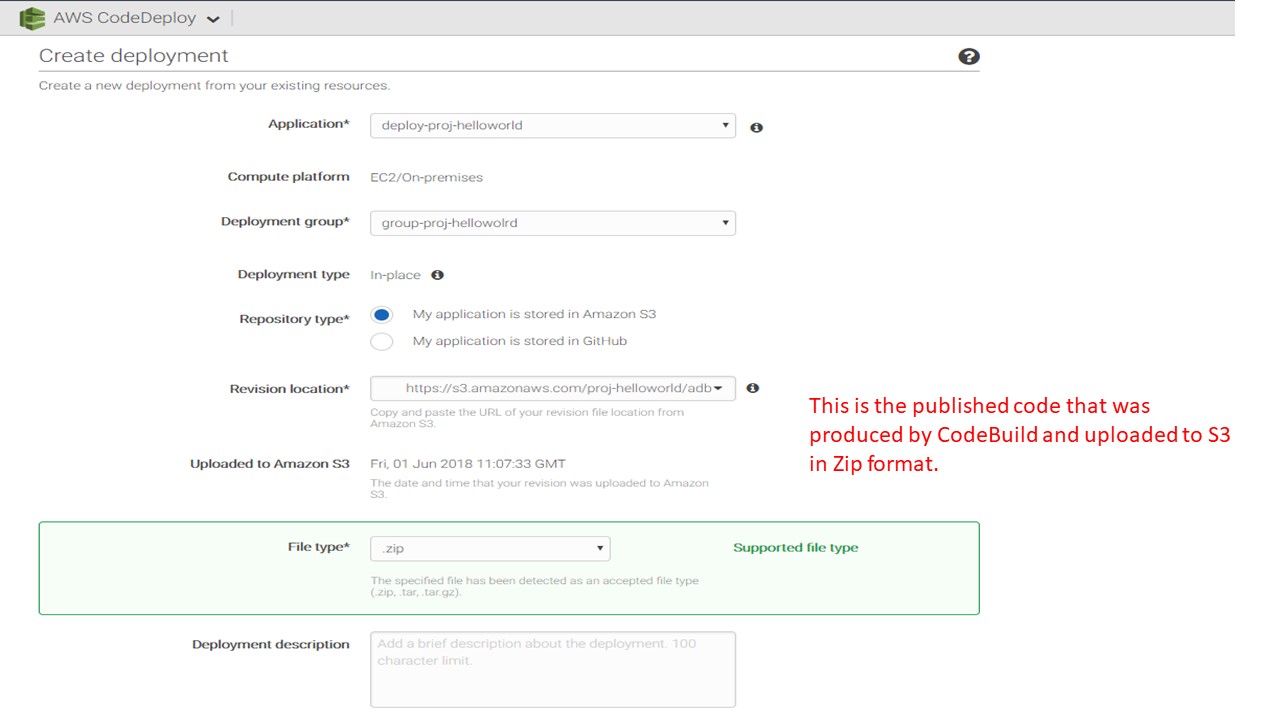
 This will deploy the application to the EC2 Server successfully and you can test it using the Public IP in your browser and the web application will load successfully in the browser.
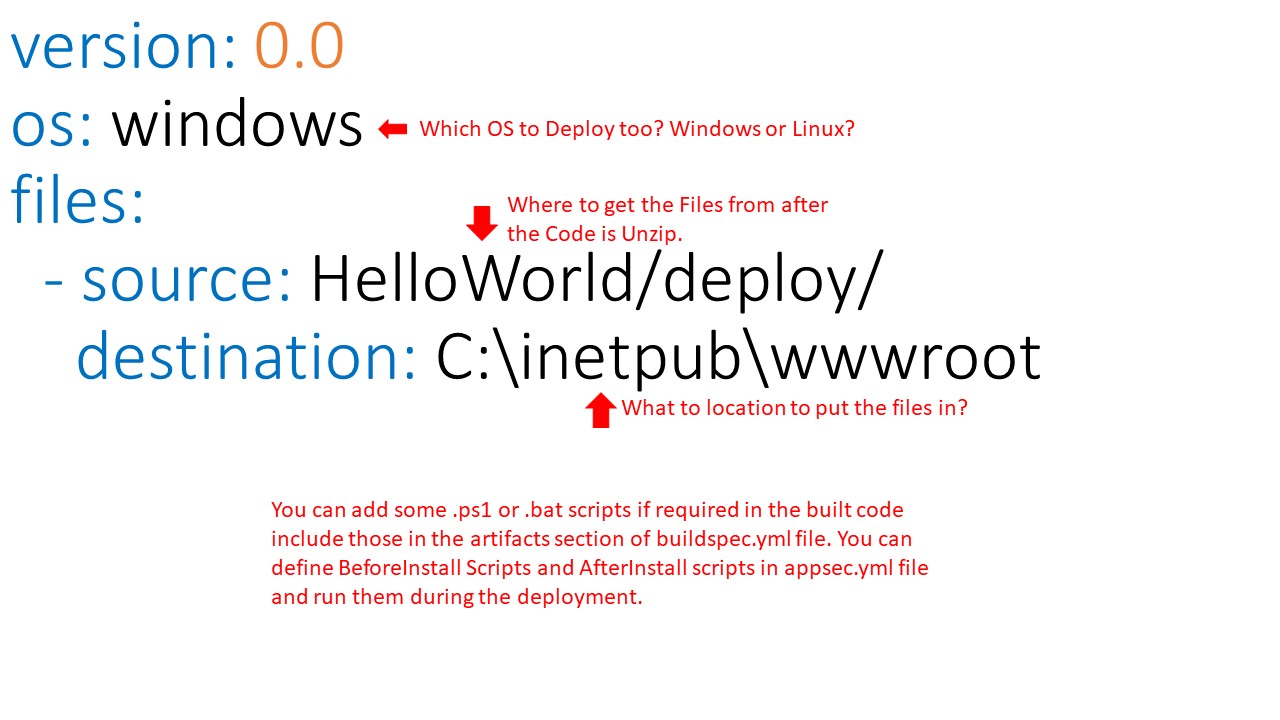
Where did we specify the deployment path? The deployment path is specified in the appspec.yml file. This is why it was included in the published code and was included in build artifacts. This is what our appspec.yml file looks like.
This will deploy the application to the EC2 Server successfully and you can test it using the Public IP in your browser and the web application will load successfully in the browser.
Where did we specify the deployment path? The deployment path is specified in the appspec.yml file. This is why it was included in the published code and was included in build artifacts. This is what our appspec.yml file looks like.
 If you want to learn more about configuring appspec.yml file, please check the official documentation
here.
Now, we have our build and deployment tested successfully, we can work on building a continuous
delivery pipeline.
If you want to learn more about configuring appspec.yml file, please check the official documentation
here.
Now, we have our build and deployment tested successfully, we can work on building a continuous
delivery pipeline.
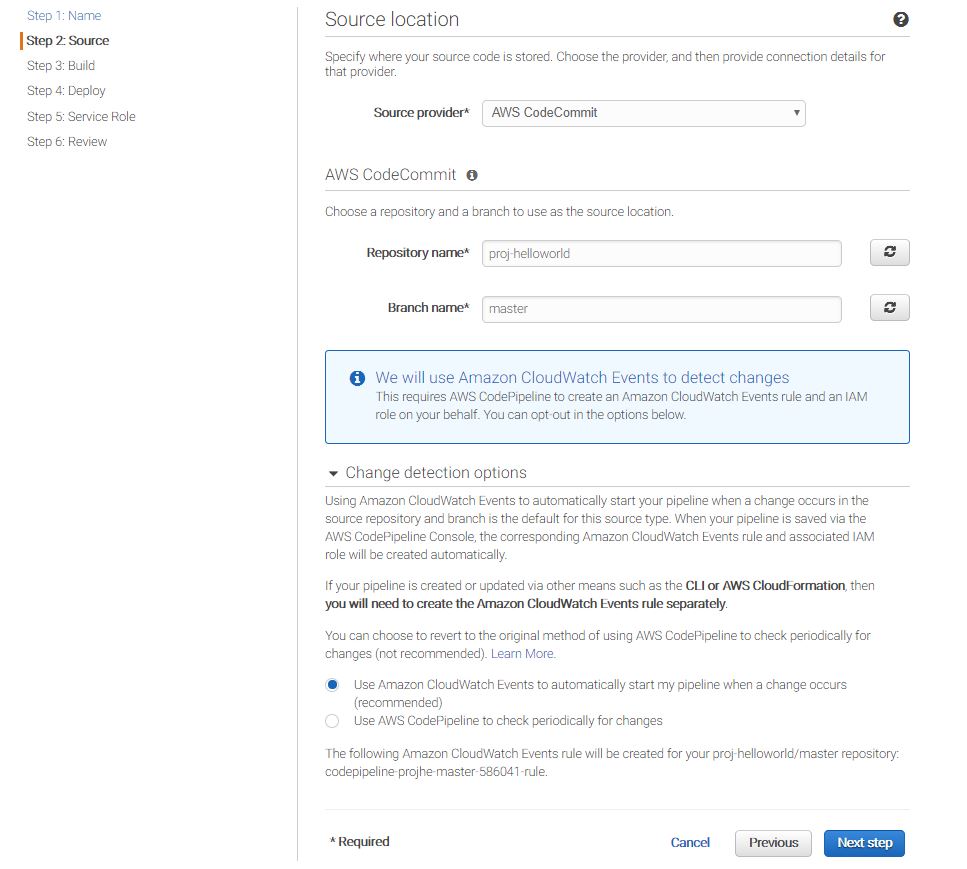
 Step 2 - Specify the Source Code Repository you want the code to be built from. Ensure that you select the option when to deliver the code by picking a detection option. Either you can schedule the same to run periodically or every time you make changes to your repository.
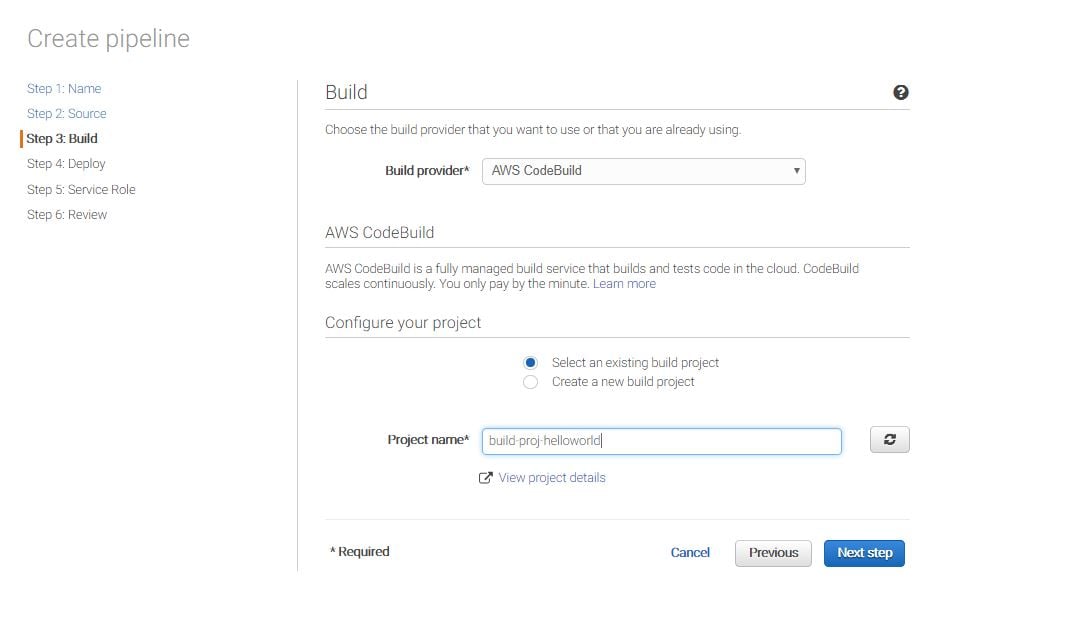
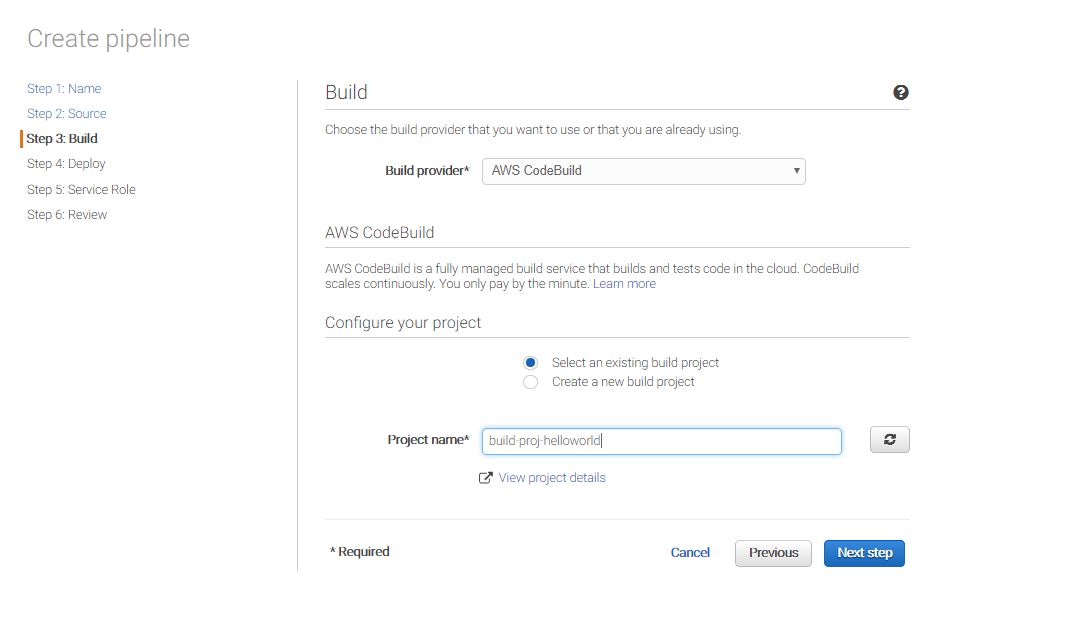
 Step 3 - Provide how would you like the pipeline to perform the build. Ideally, you will pick the CodeBuild Project that you created earlier.
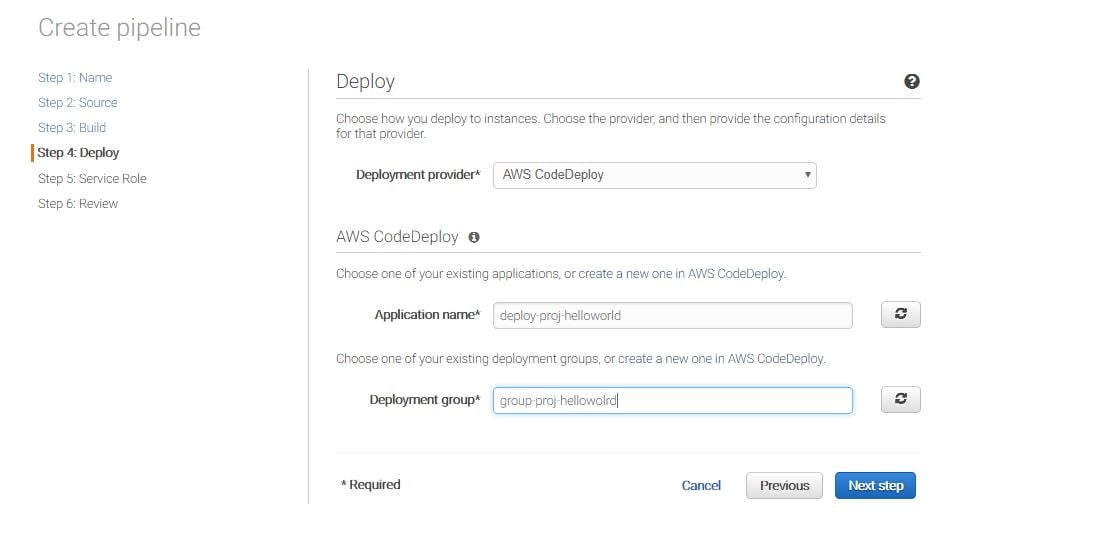
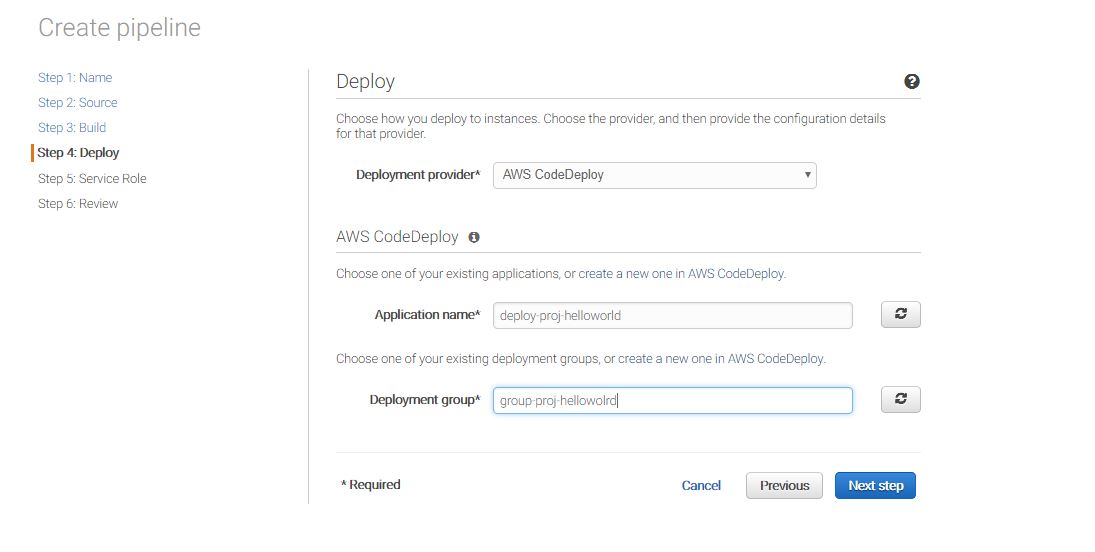
 Step 4 - Add the deployment group that you created earlier to deployments to your EC2 Server.
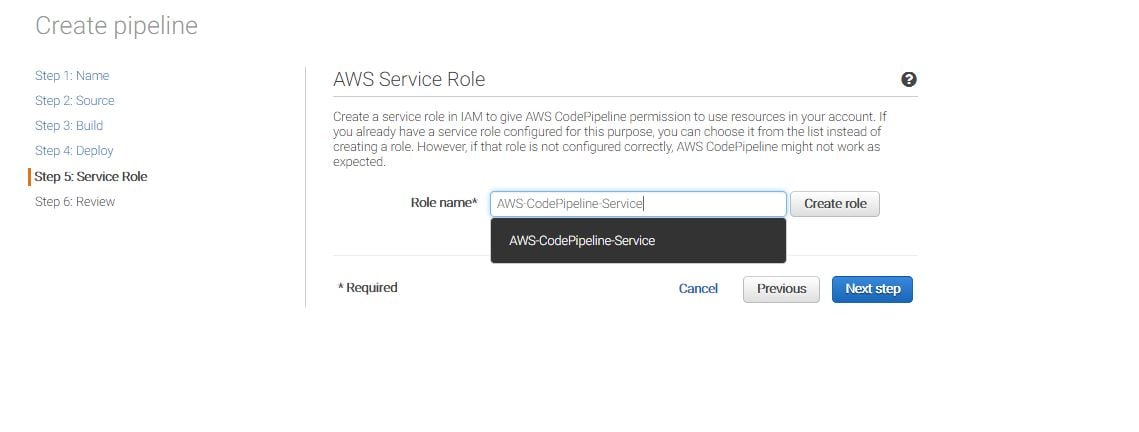
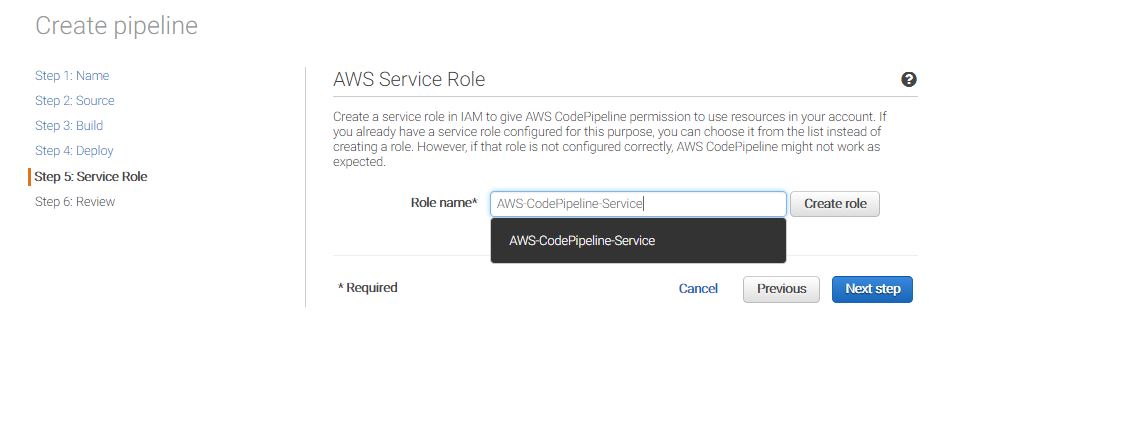
 Step 5 - Create a Service Role which will allow AWS CodePipeline to interact with other AWS services which delivering the application code. Use the Create Role Button to let AWS create the role automatically for you.
 Step 6 - Review and create the pipeline.
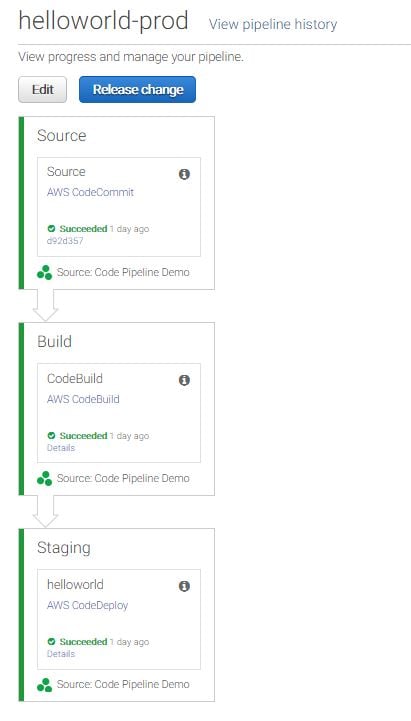
How do I test the continuous delivery pipeline? Select your pipeline and release the change. AWS will build the code in CodeBuild and move the published code to S3 bucket. This will be a separate S3 bucket and will be created and managed by CodePipeline. From there, CodePipeline will use CodeDeploy to deploy the published code to deployment group containing your EC2 Servers. If everything was set up correctly, you should see something like this after the code is released to the server:
Step 6 - Review and create the pipeline.
How do I test the continuous delivery pipeline? Select your pipeline and release the change. AWS will build the code in CodeBuild and move the published code to S3 bucket. This will be a separate S3 bucket and will be created and managed by CodePipeline. From there, CodePipeline will use CodeDeploy to deploy the published code to deployment group containing your EC2 Servers. If everything was set up correctly, you should see something like this after the code is released to the server:
 You can add more stages to CodePipeline like Deployment to Test Server first and then an approval stage where someone will have to approve the deployment before the code is deployed on production by simply using the EDIT button.
We have successfully configured a continuous delivery pipeline which will build and deliver our software to production at each new release without any manual intervention.
You can add more stages to CodePipeline like Deployment to Test Server first and then an approval stage where someone will have to approve the deployment before the code is deployed on production by simply using the EDIT button.
We have successfully configured a continuous delivery pipeline which will build and deliver our software to production at each new release without any manual intervention.
 What sample application are we going to use for the demonstration? For this demo, we are going to use a
Simple Hello World.Net MVC Application. The solution can be cloned from the public GIT repository that I have created for this blog post. You can use visual studio to view the contents and debug the application locally.
What sample application are we going to use for the demonstration? For this demo, we are going to use a
Simple Hello World.Net MVC Application. The solution can be cloned from the public GIT repository that I have created for this blog post. You can use visual studio to view the contents and debug the application locally.
Setup and configuration
This is what we will have once we have our pipeline configured and functional: There are a lot of steps that are involved in setting up the continuous deployment pipeline. I have broken these steps into different parts and will go over them one by one to make things easier to understand.

AWS CodeCommit
To start with, we will 1. migrate the existing code from Github to AWS CodeCommit. AWS CodeCommit is a version control service hosted by Amazon Web Services that you can use to privately store and manage assets in the cloud. CodeCommit is simply like any other version control system available out there. It is as secure as any code you will put into a CodeCommit repository, and will be automatically be encrypted by AWS KMS service without having to do any additional configuration. How much will CodeCommit cost? The first five active users (IAM users that have permissions to manage CodeCommit) can operate for a month for absolutely no cost provided they don't cross the preset limits. Any additional user will be charged $1/user/month. First five users are entitled to:- Unlimited repositories
- 50 GB-month of storage
- 10,000 Git requests/month
- Unlimited repositories
- 10 GB-month of storage per active user
- 2,000 Git requests/month per active user
- $0.06 per GB-month
- $0.001 per Git request
How do I set up users for AWS CodeCommit?
Step 1. You will need to log in to the AWS console and then switch to IAM. Here you can create a user with following options: Access type - Programmatic Access (if you want to assign console access then you can feel free to do that as well) Policy - AWSCodeCommitFullAccess (since this is a developer environment, I will keep things simple and grant my developer full access to manage CodeCommit) Remember to save access keys and secret keys generated at IAM user creation time. You will not be able to retrieve these keys at a later stage. If you are not aware of how to create an IAM user then please refer, AWS documentation to create AWS IAM User.How do I set up the local machine to interact with CodeCommit?
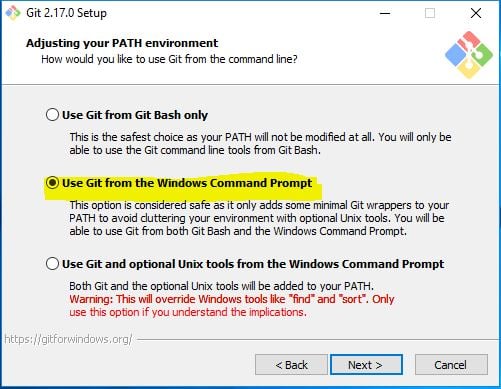
Step 2. On the Windows machine that you will be using to develop the application, normally your own desktop machine, do the following:- Install the AWS-CLI with all default options. You can find the install guide and installer here.
- Install Git on your desktop. You can download it for Windows from the official download link.
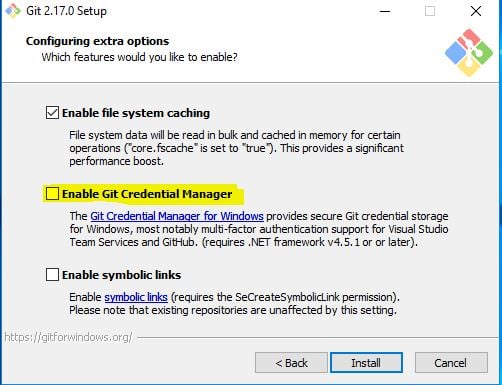
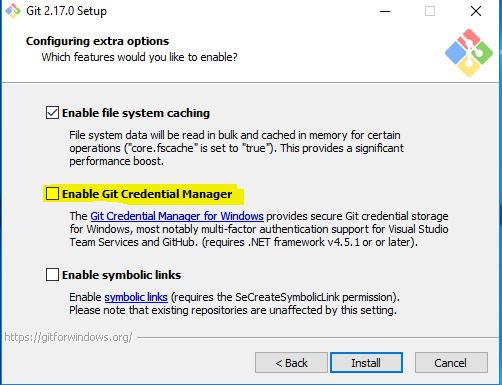
- Install AWSToolsAndSDKForNet.msi so that you can configure the Credential Helper to use with HTTPS Communication Protocol for GIT.
 and, uncheck Git Credential Manager because we will be using Credentials Helper instead.
 Step 3. Run "
aws configure" to configure the CLI to interact with AWS in the default region. I am going to use "
us-east-1" region for the entire setup. You can choose whichever is nearest to you. Those keys have already been rotated, in case you were wondering.
Step 3. Run "
aws configure" to configure the CLI to interact with AWS in the default region. I am going to use "
us-east-1" region for the entire setup. You can choose whichever is nearest to you. Those keys have already been rotated, in case you were wondering.
 Step 4. Configure the Credential Helper For use with HTTPS Communication Protocol
- Open cmd
- Move to cd "C:\Program Files (x86)\AWS Tools\CodeCommit"
- run command "git-credential-AWSS4.exe". This will create a .config file to configure our credentials
- run command "git config --global --edit". Take a look at .config file contents.
 How do I create CodeCommit Repository?
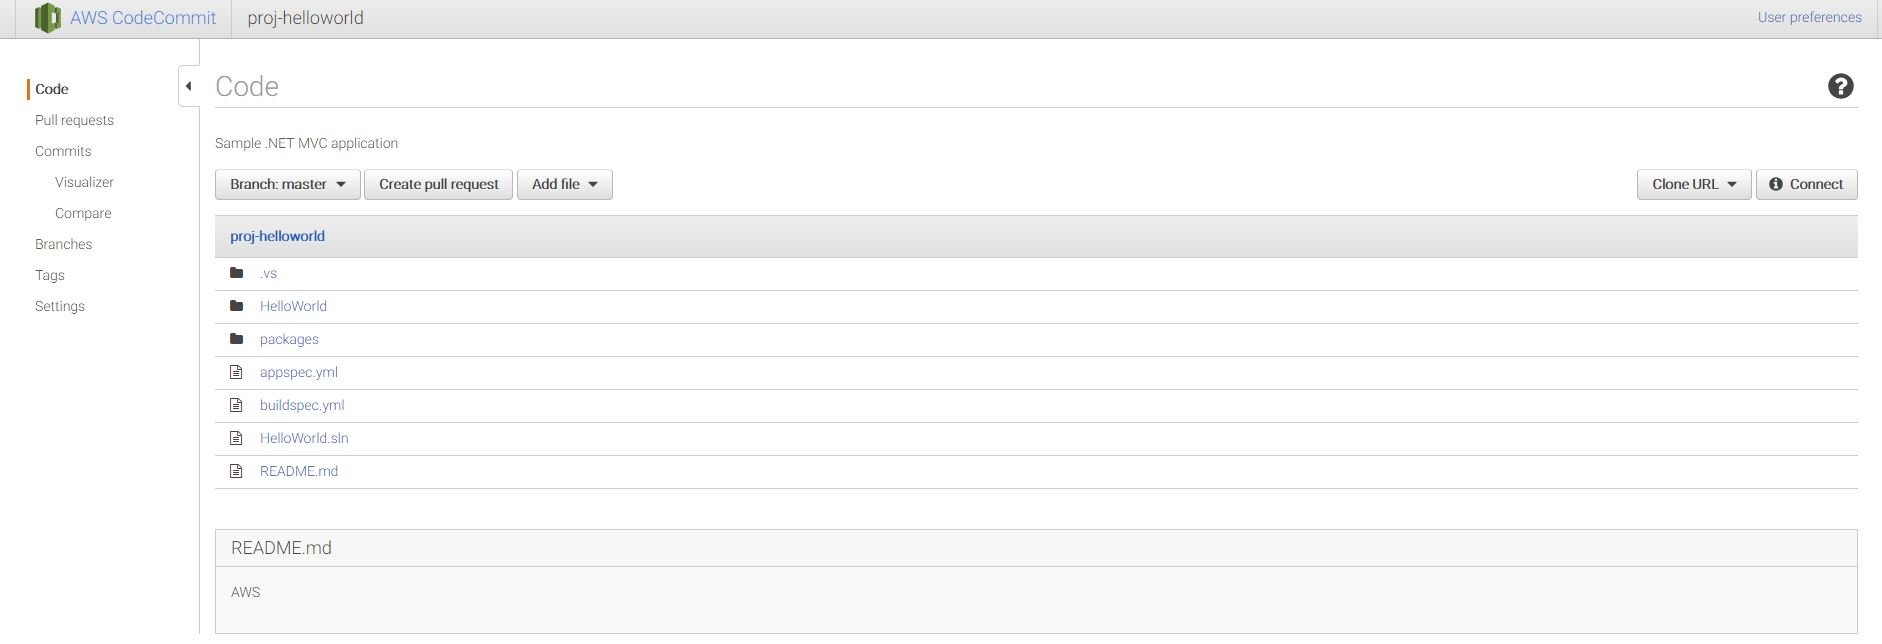
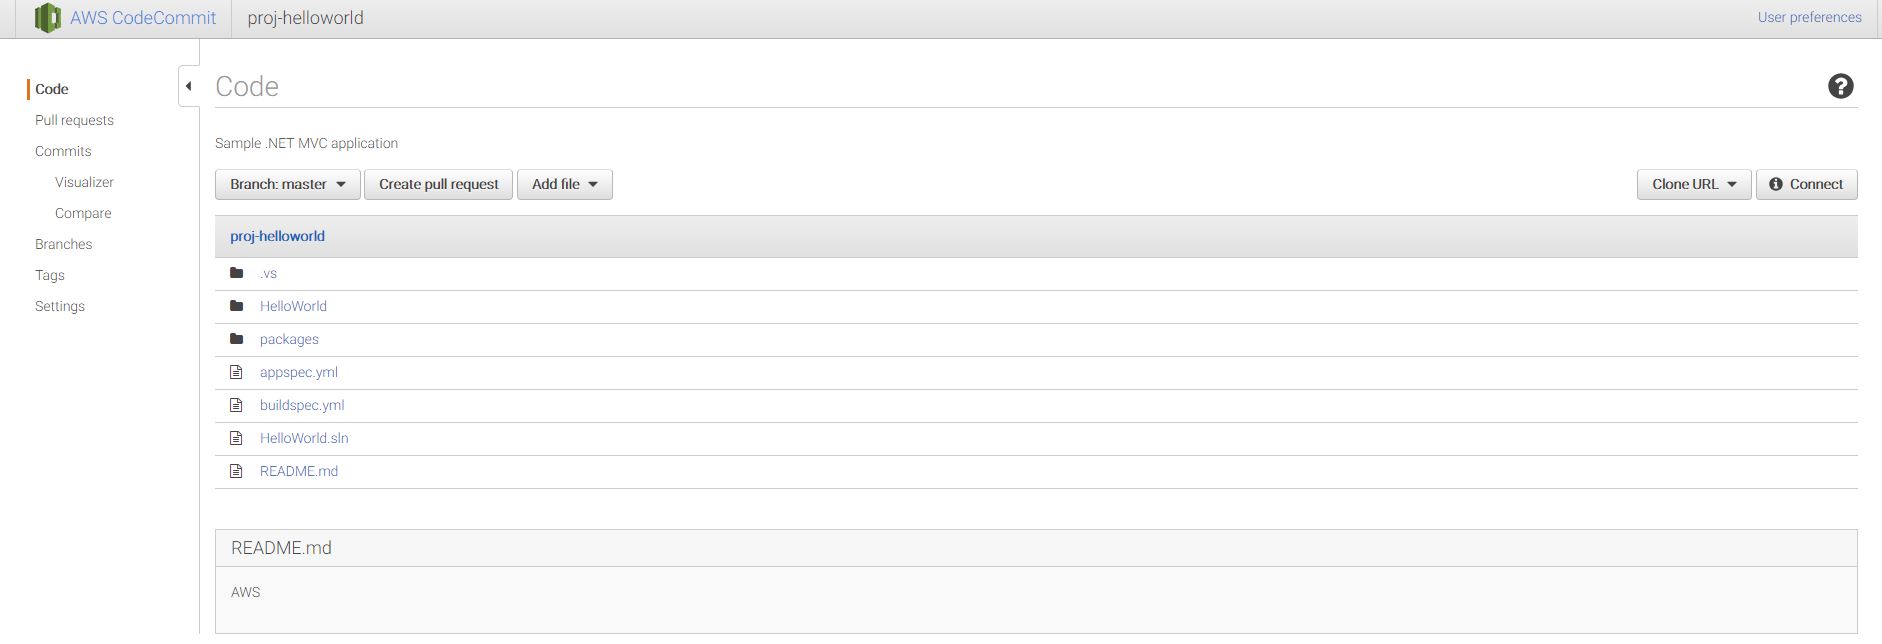
Step 5. Create a CodeCommit repository in AWS. This will be created in the default region you selected earlier. [code lang="powershell"]aws codecommit create-repository --repository-name proj-helloworld --repository-description "Sample .NET MVC application"[/code] You can use the Console as well to create the repository if you don't like to use CLI.
How do I migrate my application code to CodeCommit Repository?
Step 6. Migrate the Git Repository to AWS CodeCommit.
How do I create CodeCommit Repository?
Step 5. Create a CodeCommit repository in AWS. This will be created in the default region you selected earlier. [code lang="powershell"]aws codecommit create-repository --repository-name proj-helloworld --repository-description "Sample .NET MVC application"[/code] You can use the Console as well to create the repository if you don't like to use CLI.
How do I migrate my application code to CodeCommit Repository?
Step 6. Migrate the Git Repository to AWS CodeCommit.
- Clone the GIT repository to the local machine:
- [code lang="bash"]git clone https://github.com/pythianarora/proj-aws-dev-tools.git temp-local-proj-aws-dev-tools[/code]
- Get the CodeCommit Repository URL to push to:
- [code lang="bash"]aws codecommit get-repository --repository-name proj-helloworld[/code]
- Push this to AWS CodeCommit repository:
- [code lang="bash"]git push https://git-codecommit.us-east-1.amazonaws.com/v1/repos/proj-helloworld --all[/code]
- Delete temp folder on local.
- Clone CodeCommit repository to local:
- [code lang="bash"]git clone https://git-codecommit.us-east-1.amazonaws.com/v1/repos/proj-helloworld local-proj-helloworld[/code]
 Now we have our repository in CodeCommit, we will proceed with setup and configuration for CodeBuild.
AWS CodeBuild
We will now configure 2. CodeBuild to build our application code. AWS CodeBuild is a fully managed build service that compiles source code, runs tests, and produces software packages that are ready to deploy. CodeBuild does integrate with Github as well, but I wanted to do do this write-up with all services in AWS. How much will CodeBuild cost? With CodeBuild you are charged based on the duration it takes for your build to execute. Build duration is calculated in minutes, from the time you submit your build until your build is terminated, rounded up to the nearest minute.| Compute instance type | Memory (GB) | vCPU | Linux price per build minute ($) | Windows price per build minute ($) |
|---|---|---|---|---|
| build.general1.small | 3 |
2 | 0.005 | N/A |
| build.general1.medium | 7 |
4 | 0.010 | 0.018 |
| build.general1.large | 15 |
8 | 0.020 | 0.036 |


 What is the buildspec.yml file? A
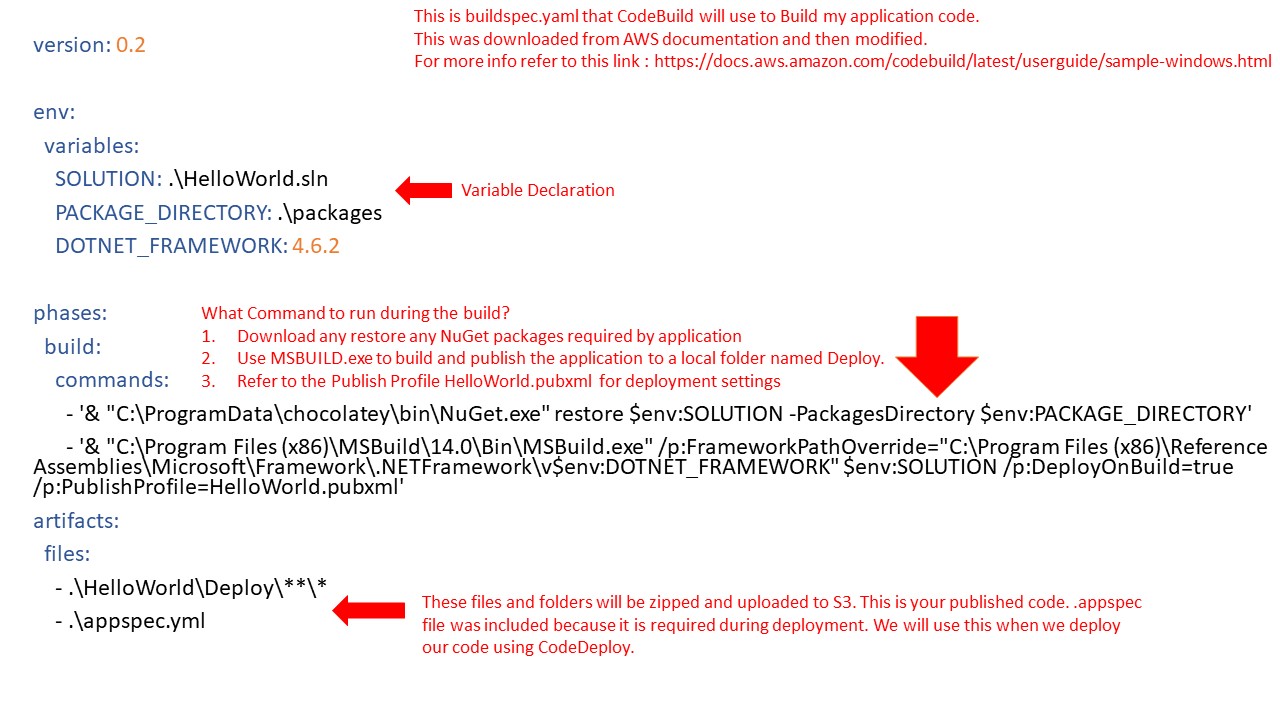
build spec is a collection of build commands and related settings, in YAML format, that AWS CodeBuild uses to run a build. Without a build spec, AWS CodeBuild will not be able to successfully convert your build input into build output, nor will it be able to locate the build output artifact in the build environment to upload to your output bucket. Below is the build spec file from the sample project:
What is the buildspec.yml file? A
build spec is a collection of build commands and related settings, in YAML format, that AWS CodeBuild uses to run a build. Without a build spec, AWS CodeBuild will not be able to successfully convert your build input into build output, nor will it be able to locate the build output artifact in the build environment to upload to your output bucket. Below is the build spec file from the sample project:
 How do I test my build? Open the AWS CodeBuild console at
https://console.aws.amazon.com/codebuild/. Select your previously created project and start the build.
How do I test my build? Open the AWS CodeBuild console at
https://console.aws.amazon.com/codebuild/. Select your previously created project and start the build.
 If everything goes smoothly then you build will succeed and you will see the screen below output screen.
 Now you can move to the S3 portal and check your published code in the bucket you picked for uploading your artifacts. This code is ready for deployment and next, we will be deploying this to an EC2 Server using CodeDeploy.
Note - The build will not always go smoothly. I had an issue with the below error:
Error MSB4019: The imported project "C:\Program Files (x86)\MSBuild\Microsoft\VisualStudio\v14.0\WebApplications\Microsoft.WebApplication.targets" was not found. Confirm that the path in the <Import> declaration is correct and that the file exists on disk. This is a very common issue on build servers where you don't have Visual Studio installed. I actually added the package using NuGet in the Solution and updated .csproj to import the path in the package directory.
Now, we have our build running successfully we will look at the deployment phase.
Now you can move to the S3 portal and check your published code in the bucket you picked for uploading your artifacts. This code is ready for deployment and next, we will be deploying this to an EC2 Server using CodeDeploy.
Note - The build will not always go smoothly. I had an issue with the below error:
Error MSB4019: The imported project "C:\Program Files (x86)\MSBuild\Microsoft\VisualStudio\v14.0\WebApplications\Microsoft.WebApplication.targets" was not found. Confirm that the path in the <Import> declaration is correct and that the file exists on disk. This is a very common issue on build servers where you don't have Visual Studio installed. I actually added the package using NuGet in the Solution and updated .csproj to import the path in the package directory.
Now, we have our build running successfully we will look at the deployment phase.

AWS CodeDeploy
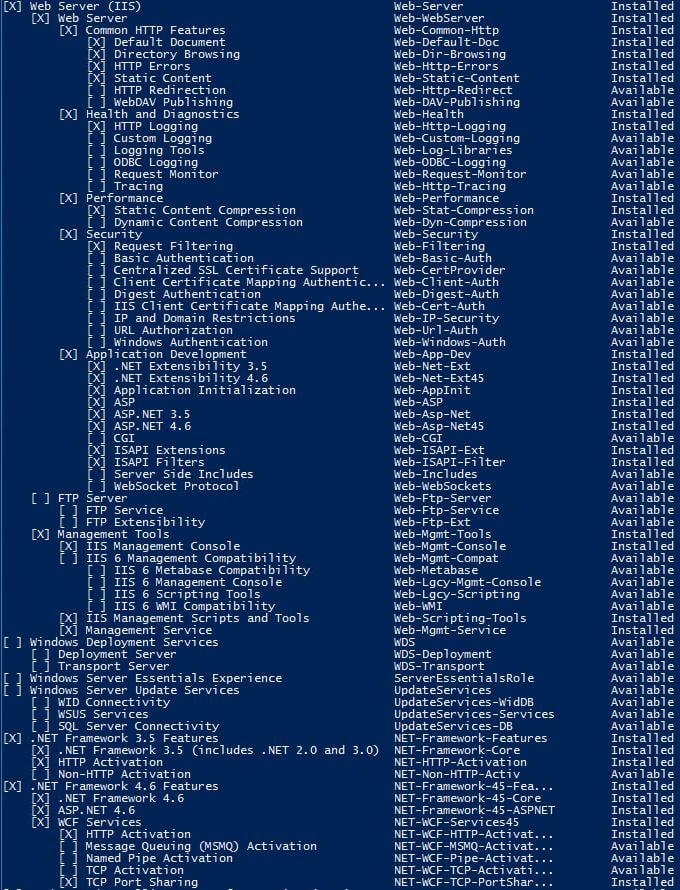
Now we will 3. deploy the code to an EC2 Server using AWS CodeDeploy. AWS CodeDeploy is a deployment service that automates application deployments to Amazon EC2 instances, on-premises instances, or serverless Lambda functions. I am going to perform a quick, in-place deployment to demonstrate the concept but AWS CodeDeploy presents a lot of deployment options including Blue-Green Deployment. If you are interested in learning more about CodeDeploy, check the official documentation. How much will CodeDeploy cost? It is free for any deployments to EC2/Lambda. You pay $0.02 per on-premises instance update using AWS CodeDeploy. Where is the deployment going to happen? Create an EC2 Server with following settings:- AMI - Microsoft Windows Server 2016 Base
- Instance Type - t2.micro
- Instance Details - Leave everything default as this is a Lab environment and I am not interested in setting up VPC for the same. You will need to need to attach an EC2 role to this instance that will give S3 access to this instance. For details on creating the role for EC2 instance to access S3, refer this AWS documentation here.
- Storage - Leave this to default i.e. 30 GB EBS root volume for windows.
- Add Tags - This is important because this is what we are going to use when Deploying toy instance from CodeDeploy. Create a Nametag
- Name: proj-hello-world-ec2-instance
- Security Groups - Add RDP and HTTP ports for source - 0.0.0.0/0 - For lab setup so I don't need to lock this down.
- Key Pair - Launch and Create a Key Pair to connect to the instance.
 Once the instance is set up, we need to install CodeDeploy Agent on this EC2 Instance. This agent will be responsible for delivering our software to this EC2 instance. Please see the official
Install Guide for Windows for more details on how to install CodeDeploy Agent. You can alternatively use the below code to install CodeDeploy using PowerShell. [code lang="powershell"] Set-ExecutionPolicy RemoteSigned Import-Module AWSPowerShell New-Item –Path "c:\temp" –ItemType "directory" -Force powershell.exe -Command Read-S3Object -BucketName aws-codedeploy-us-east-1 -Key latest/codedeploy-agent.msi -File c:\temp\codedeploy-agent.msi c:\temp\codedeploy-agent.msi /quiet /l c:\temp\host-agent-install-log.txt powershell.exe -Command Get-Service -Name codedeployagent [/code]
How do I set up a deployment using AWS CodeDeploy?
Step 1. Create a Service for CodeDeploy. Navigate to IAM and create a Role for CodeDeploy AWS Service. See below to choose the Service and Policy (populated automatically) when creating a role.
Once the instance is set up, we need to install CodeDeploy Agent on this EC2 Instance. This agent will be responsible for delivering our software to this EC2 instance. Please see the official
Install Guide for Windows for more details on how to install CodeDeploy Agent. You can alternatively use the below code to install CodeDeploy using PowerShell. [code lang="powershell"] Set-ExecutionPolicy RemoteSigned Import-Module AWSPowerShell New-Item –Path "c:\temp" –ItemType "directory" -Force powershell.exe -Command Read-S3Object -BucketName aws-codedeploy-us-east-1 -Key latest/codedeploy-agent.msi -File c:\temp\codedeploy-agent.msi c:\temp\codedeploy-agent.msi /quiet /l c:\temp\host-agent-install-log.txt powershell.exe -Command Get-Service -Name codedeployagent [/code]
How do I set up a deployment using AWS CodeDeploy?
Step 1. Create a Service for CodeDeploy. Navigate to IAM and create a Role for CodeDeploy AWS Service. See below to choose the Service and Policy (populated automatically) when creating a role.

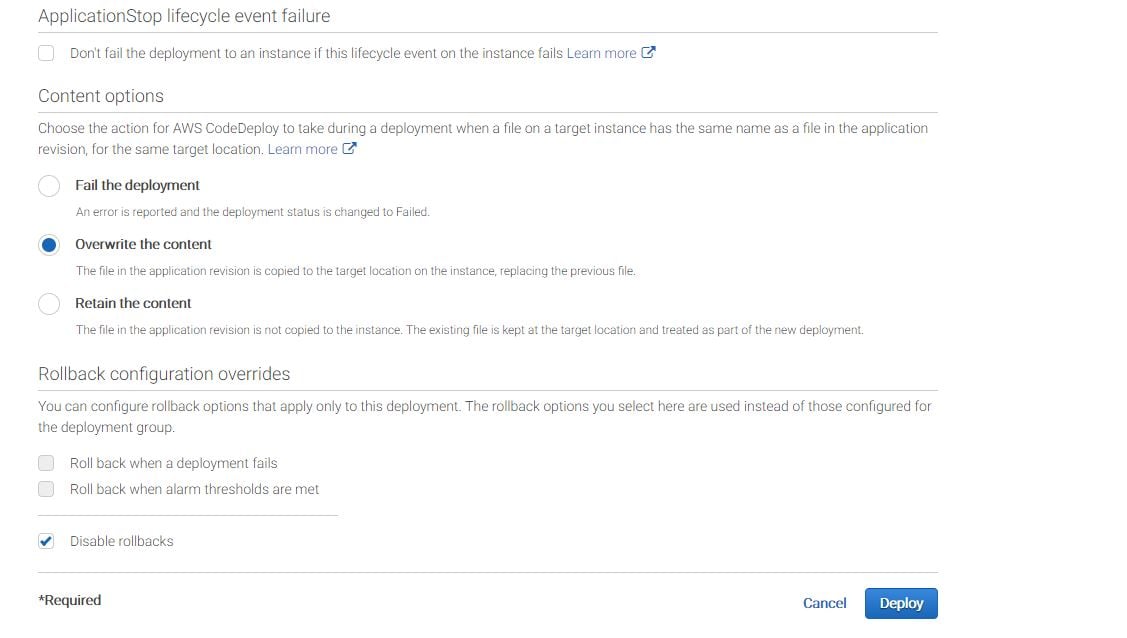
 Step 2. Navigate to CodeDeploy in the AWS Console and Create an Application. Use the Service Role created in step#1 to set up the application.


 Step 3. Test the Deployment. Navigate to your Application in the AWS Console and Create an Application. Use the Service Role created in step#1 to set up the application.
How do I test the deployment?
Step 3. Test the Deployment. Navigate to your Application in the AWS Console and Create an Application. Use the Service Role created in step#1 to set up the application.
How do I test the deployment?
- Navigate to "
 This will deploy the application to the EC2 Server successfully and you can test it using the Public IP in your browser and the web application will load successfully in the browser.
Where did we specify the deployment path? The deployment path is specified in the appspec.yml file. This is why it was included in the published code and was included in build artifacts. This is what our appspec.yml file looks like.
This will deploy the application to the EC2 Server successfully and you can test it using the Public IP in your browser and the web application will load successfully in the browser.
Where did we specify the deployment path? The deployment path is specified in the appspec.yml file. This is why it was included in the published code and was included in build artifacts. This is what our appspec.yml file looks like.
 If you want to learn more about configuring appspec.yml file, please check the official documentation
here.
Now, we have our build and deployment tested successfully, we can work on building a continuous
delivery pipeline.
If you want to learn more about configuring appspec.yml file, please check the official documentation
here.
Now, we have our build and deployment tested successfully, we can work on building a continuous
delivery pipeline.

AWS CodePipeline
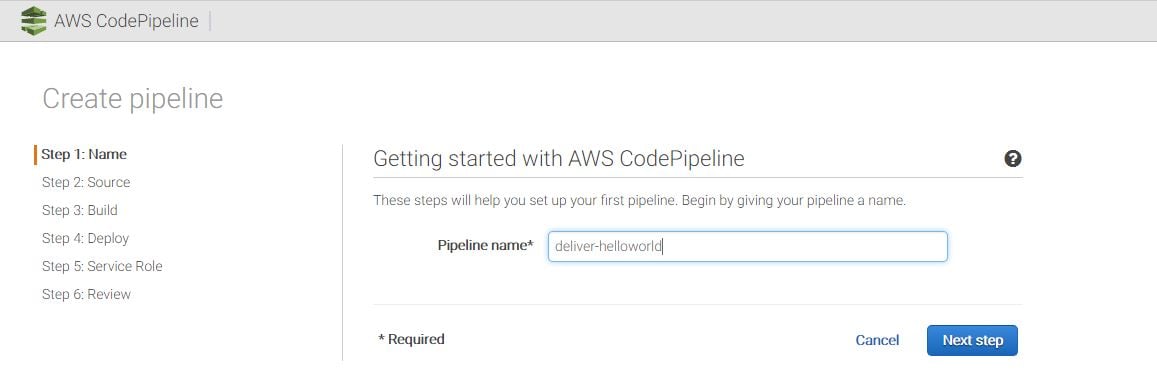
Now, we will 4. build a pipeline to continuously deliver the code using CodePipeline. AWS CodePipeline is a continuous delivery service you can use to model, visualize, and automate the steps required to release your software. Using AWS Pipeline is ready simple and you can even integrate an approval process in the pipeline before delivering your code to Production. How much will CodePipleline cost? AWS CodePipeline costs $1 per active pipeline per month. To encourage experimentation, pipelines are free for the first 30 days after creation. CodePipleline creates an S3 bucket to store artifacts. These artifacts are your published code that comes from CodeDeploy. You will be charged additionally as per S3 storage usage. How do I set up a continuous delivery pipeline using AWS CodePipeline? This is going going to be the easiest to set up of all. Step 1 - Navigate to CodePipeline in the AWS Console and provide a Pipeline Name. Step 2 - Specify the Source Code Repository you want the code to be built from. Ensure that you select the option when to deliver the code by picking a detection option. Either you can schedule the same to run periodically or every time you make changes to your repository.
 Step 3 - Provide how would you like the pipeline to perform the build. Ideally, you will pick the CodeBuild Project that you created earlier.
 Step 4 - Add the deployment group that you created earlier to deployments to your EC2 Server.
 Step 5 - Create a Service Role which will allow AWS CodePipeline to interact with other AWS services which delivering the application code. Use the Create Role Button to let AWS create the role automatically for you.
 Step 6 - Review and create the pipeline.
How do I test the continuous delivery pipeline? Select your pipeline and release the change. AWS will build the code in CodeBuild and move the published code to S3 bucket. This will be a separate S3 bucket and will be created and managed by CodePipeline. From there, CodePipeline will use CodeDeploy to deploy the published code to deployment group containing your EC2 Servers. If everything was set up correctly, you should see something like this after the code is released to the server:
Step 6 - Review and create the pipeline.
How do I test the continuous delivery pipeline? Select your pipeline and release the change. AWS will build the code in CodeBuild and move the published code to S3 bucket. This will be a separate S3 bucket and will be created and managed by CodePipeline. From there, CodePipeline will use CodeDeploy to deploy the published code to deployment group containing your EC2 Servers. If everything was set up correctly, you should see something like this after the code is released to the server:
 You can add more stages to CodePipeline like Deployment to Test Server first and then an approval stage where someone will have to approve the deployment before the code is deployed on production by simply using the EDIT button.
We have successfully configured a continuous delivery pipeline which will build and deliver our software to production at each new release without any manual intervention.
You can add more stages to CodePipeline like Deployment to Test Server first and then an approval stage where someone will have to approve the deployment before the code is deployed on production by simply using the EDIT button.
We have successfully configured a continuous delivery pipeline which will build and deliver our software to production at each new release without any manual intervention.