The Link technology in Synapse is used to synchronize data from different data sources to Synapse Analytics. Synapse Link for CosmoDB and Synapse Link for Dataverse were already released. Now it’s time for a new and very important one: Azure Synapse Link for SQL.
The Azure Synapse Link for SQL can be used with Azure SQL Database and SQL Server 2022 to synchronize tables using these databases as sources and a Synapse Dedicated Pool as a destination.
When using Synapse Link, you are not really creating a Data Warehouse, but you are executing a big step in this direction.
The process between production and the Data Warehouse is called ETL – Extract, Transform and Load. You must execute these three steps: Extract from production, Transform the extracted data for the data warehouse structure, and Load the data into the data warehouse.
Sometimes these steps can be executed in a different sequence and many times it’s more complex with even more steps. The steps can also be expressed as an ELT process, Extract, Load and Transform. As you may notice, the difference is the sequence of the steps. In this case, you first load the data, and, after that, you transform the data.
The Load process is usually done to a staging area, where you will execute the transformation of the data to the format required by a data warehouse.
Synapse Link doesn’t execute any transformation on the data. It extracts the data from the source and loads it into the destination. In summary, using Synapse Link, you create a staging environment using very simple steps to transfer the data.
The staging environment is important because it reduces the workload over the production environment. If you transform the data before loading, the production environment would be affected by the transformation workload. On the other hand, loading the data to a staging environment and leaving the transformation for later, the transformation workload will be executed over the staging environment.
Another benefit of this staging environment is the possibility to use this environment for reporting, instead of run reports over production. In some cases, you may would like to use Synapse Link specially for that, even if you are not planning the further transformations into a data warehouse yet.
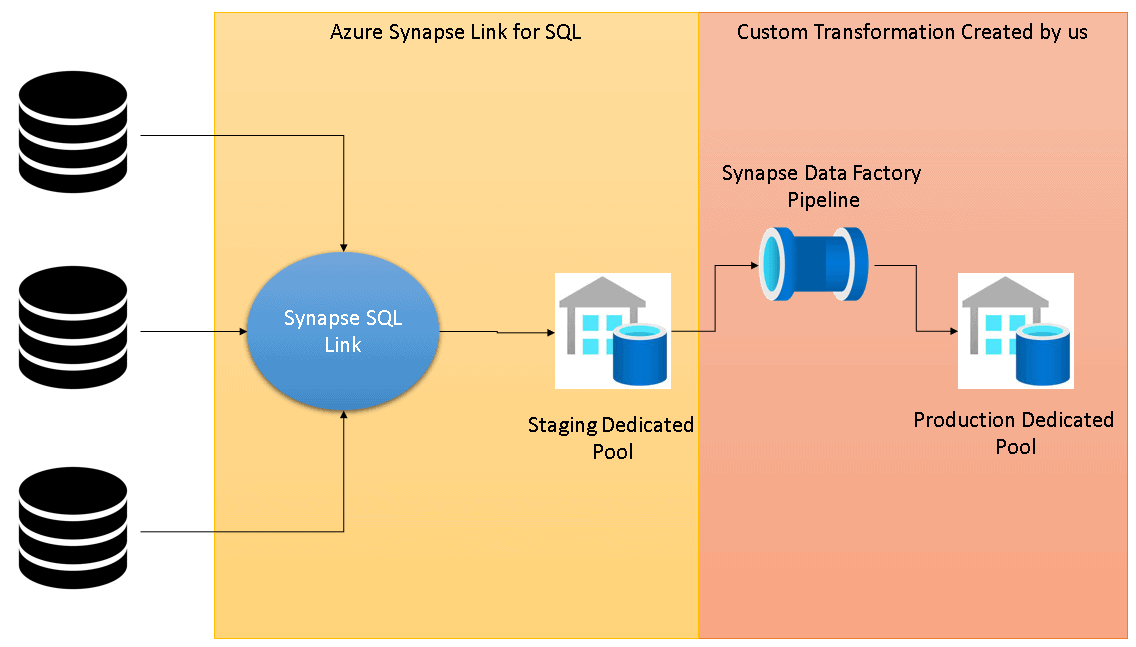
Besides relieving the production environment from the transformation workload, the staging environment can also help in scenarios with multiple data sources with similar structures. For example, imagine a company with a main office and many different branches. Each branch has its own database, but the data stored has the same schema, for the same business.
In this scenario, Azure Synapse Link for SQL can be used to synchronize the data from all the branches to a centralized staging environment. This becomes an additional benefit of Azure Synapse Link for SQL and the staging area it can easily create.
Azure Synapse Link for SQL basic elements
The structure of Azure Synapse Link for SQL uses two key elements which are always present in the different scenarios where you can implement it.
Change Feed: The change feed is a new feature included in Azure SQL Database and SQL Server 2022 to provide support to Azure Synapse Link for SQL. You may already know SQL Server has two different features to allow the control of changes in a production environment: the Change Data Capture, also known as CDC and Change Tracking. However, Microsoft decided to implement a third method to ensure the workload over the production environment would be as light as possible. This is the purpose of the Change Feed.
Integration Runtime: The IR is the same one used for pipeline execution. The IR is responsible for the start/stop operations on the source database. It can be used as an autoresolved IR or a self-hosted IR, according to the scenario which will be implemented.
Azure Synapse Link for SQL Scenarios
Azure Synapse Link for SQL can be implemented in 3 different scenarios:
Azure SQL Database: The fact both services are online inside Azure makes the implementation easier. Azure SQL Database makes some steps easier.
SQL Server 2022 in an Azure VM: SQL Server 2022 requires some additional steps for the use of Azure Synapse Link for SQL. The fact it’s installed in an Azure VM makes the process easier, allowing use of an Autoresolved integration runtime. This scenario worked well during my tests, but it’s not confirmed yet as a fully supported scenario. Officially, for SQL Server 2022, a self-hosted integration runtime is required.
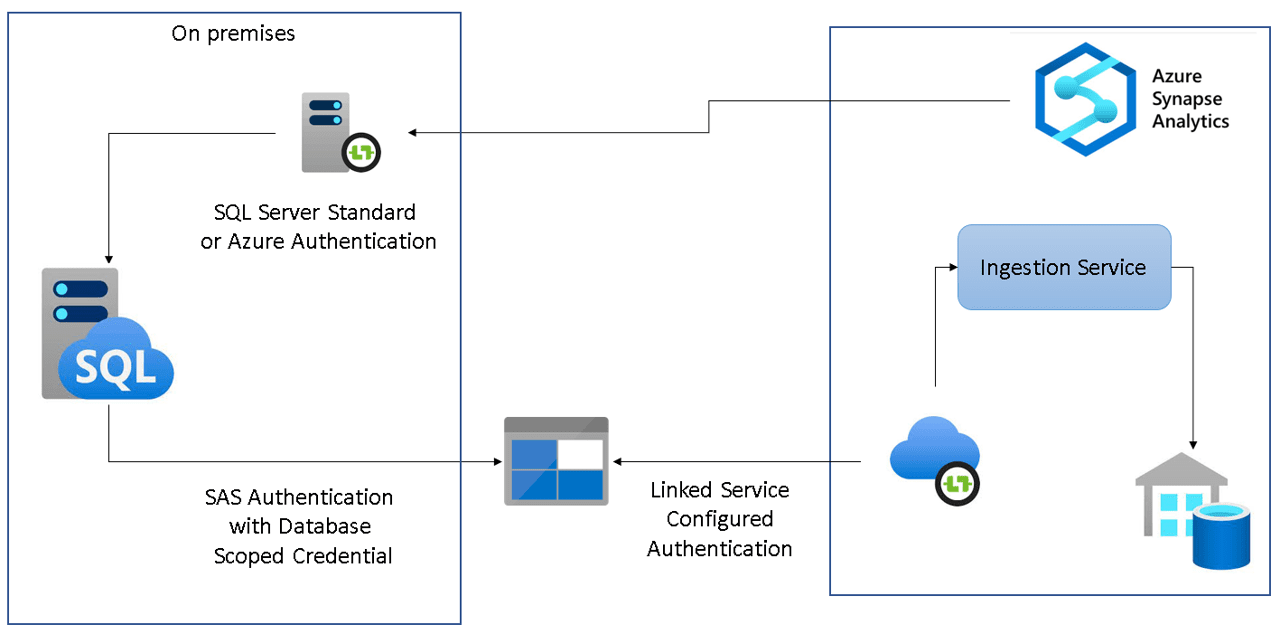
SQL Server 2022 on premises: This is the scenario requiring the most work. Since the server is on premises, you will need to use a self-hosted integration runtime installed on premises to send the data to the landing zone in the cloud. The services in the cloud will not access the on-premises environment. The self-hosted IR will be the responsible for start/stop operations, and the SQL Server on premises will send the data to the cloud.
Azure Synapse Link for SQL Architecture
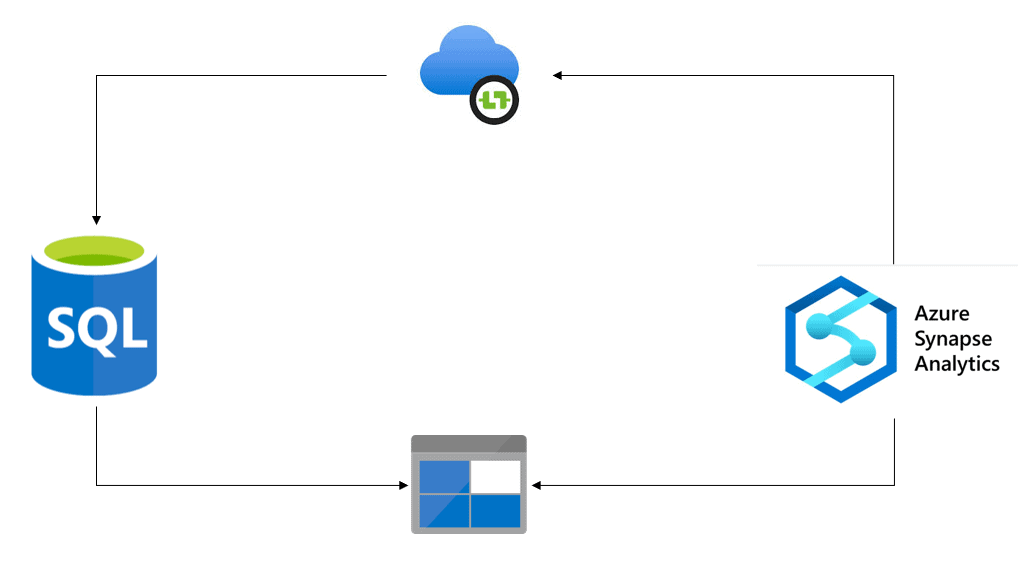
The basic architecture is always the same: an integration runtime is used to control the start/stop of the Link on the source database. The source database needs to support the change feed feature, it means it needs to be an Azure SQL Database or SQL Server 2022.
The source database will send all the new or changed records to a landing zone. The Synapse Workspace will load the data from the landing zone to the target database.
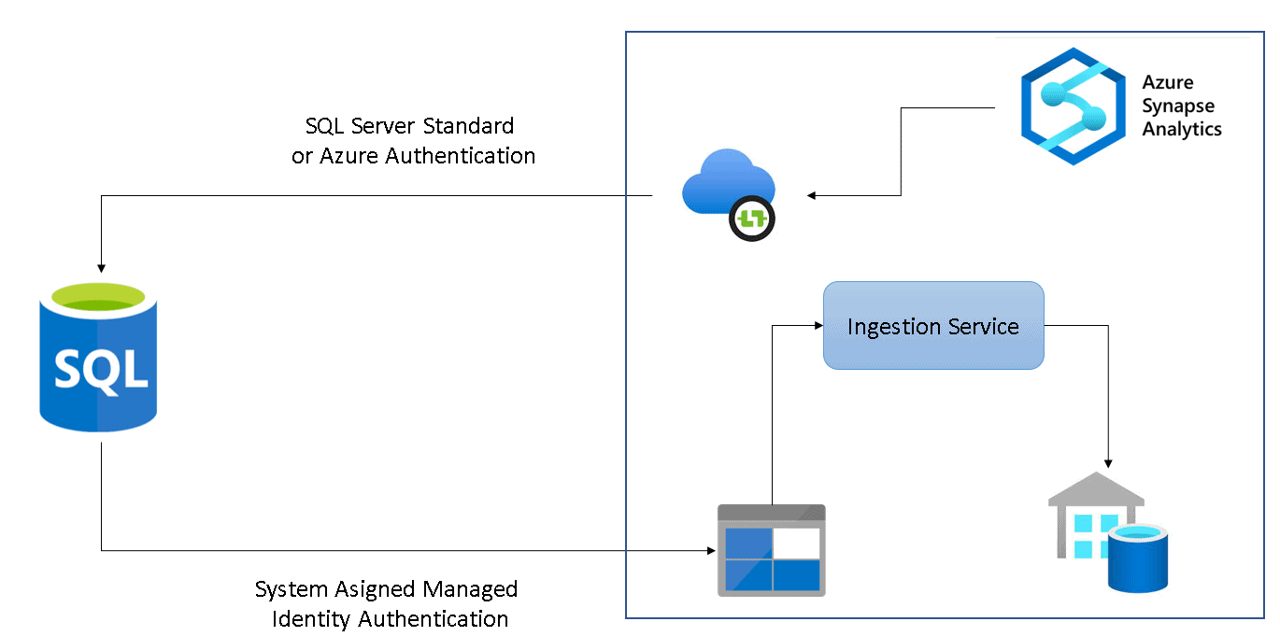
If the source database is an Azure SQL Database, the landing zone will be internal to the Synapse Workspace. There will not be access to the landing zone. The Azure SQL Database will need to have a system managed identity which will be used to access and save the data in this internal landing zone.
Internally, Synapse Analytics has an Ingestion Service responsible for loading the data from the landing zone to the Dedicated SQL Pool
If the source database is a SQL Server 2022, the landing zone will be explicitly created as an ADLS Gen 2 Account. During the start of the link the integration runtime (IR) will create a database scoped credential to allow SQL Server to access the ADLS Gen 2 Account. This credential will be using a SAS token to authenticate to the ADLS Gen 2 Account.
The start/stop process is executed by the IR, which will connect to the source database using the authentication provided on the linked service.
The authentication to the source SQL can use SQL Standard Authentication or Managed Identity. If it uses managed identity, the Azure AD user will need to receive access the source SQL.
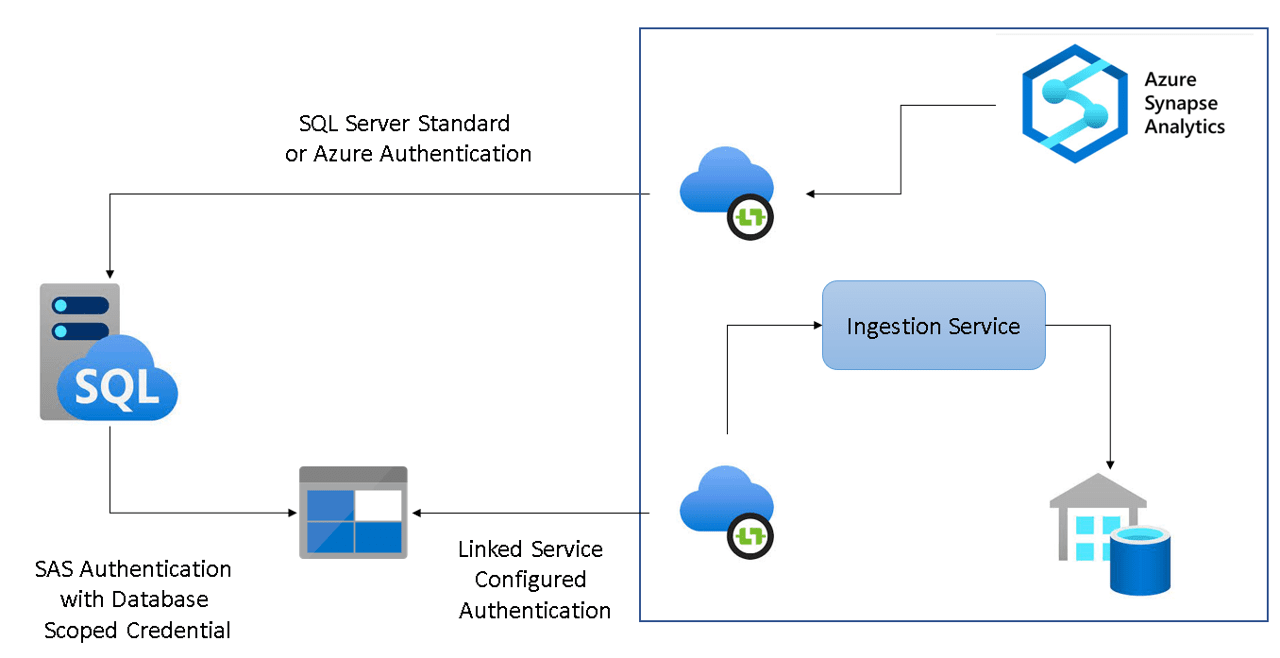
Finally, if the source SQL is on premises, the IR will need to be a self-hosted IR in the on-premises environment.
Provisioning the Azure Synapse Link for SQL
The Azure Synapse Link for SQL provisioning is done using Synapse Studio. Some steps are slightly different depending on the provisioning scenario.
- On the Synapse Studio left toolbar, click the Integrate button
- Click the Add button ‘+’
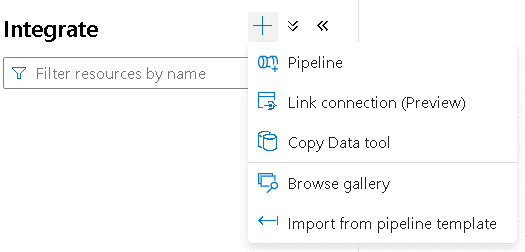
- Click the Link Connection menu item
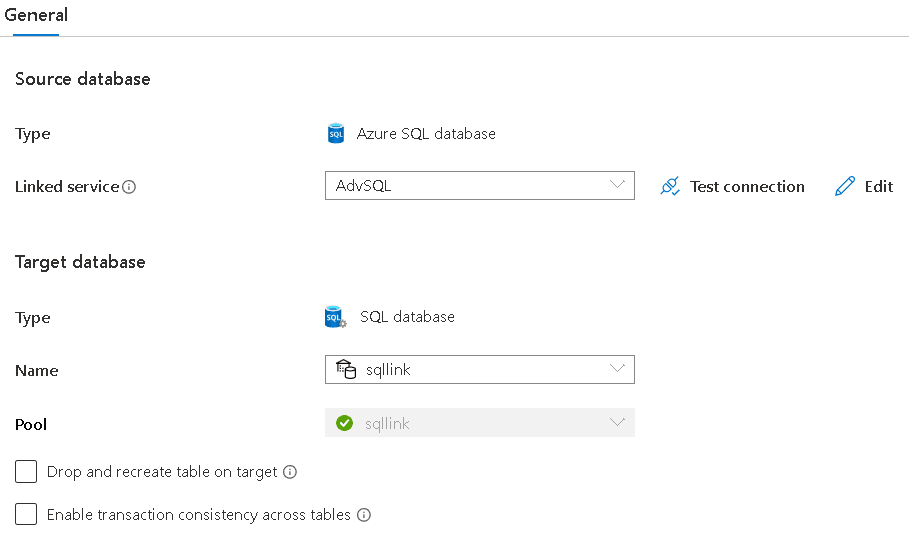
- On the New Link Connection window select Azure SQL as the source type

- On Source Linked Service, select New to create a new linked service
Linked Services are used by Synapse Analytics to establish a connection to external services. Every linked service uses an integration runtime (IR) to execute actions on the connected service.
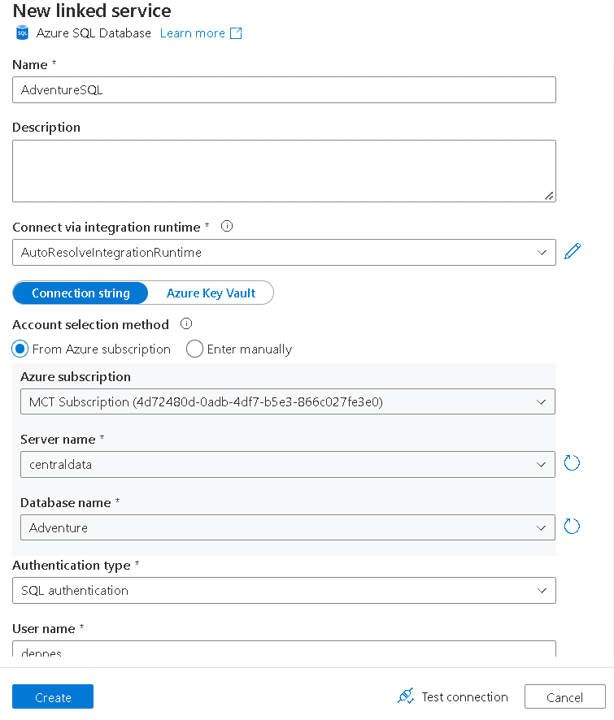
- On the Name textbox, type the name AdventureSQL
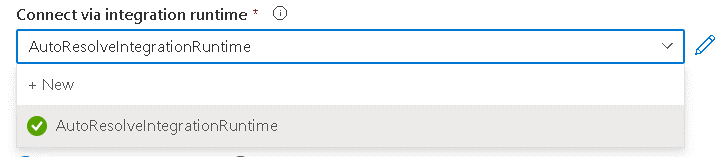
- Choose the integration runtime to be used. For Azure SQL, the auto-resolved runtime works, you don’t need to use a self-hosted one.
- Select the Azure SQL you will be connecting to.
You can select the Azure SQL from a subscription you have access to, or you can manually insert a connection string. The result for the service will be the same. This creates an interesting level of flexibility:
- You can configure the Link Connection even if your azure account doesn’t have access to the source server. The connection string can be inserted manually, and the authentication can be recovered from an Azure Key Vault
- Theoretically, the connection could be established to any SQL Server, including SQL Server on premise or in other clouds. In practice, Link Connections can only be established with Azure SQL Database or SQL Server 2022. Anyway, the creation of a linked service can have other purposes beyond the use for the Synapse Link.
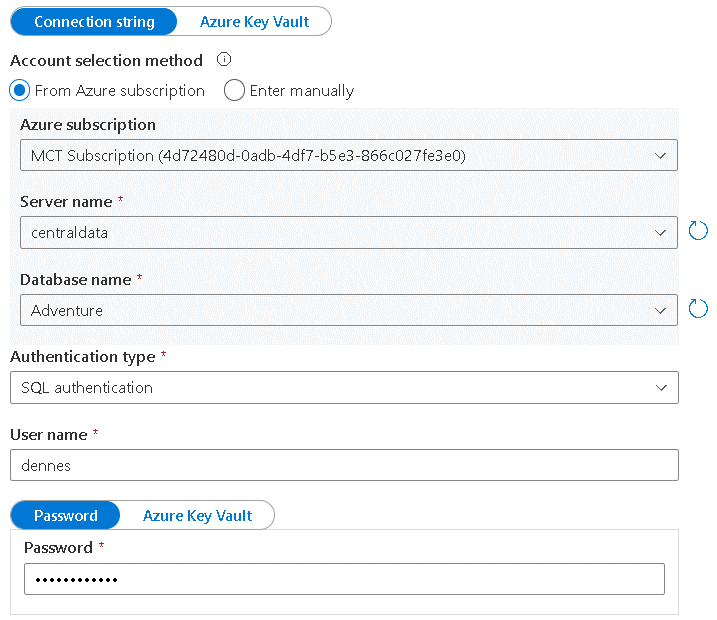
- Choose the Authentication Type which will be used.
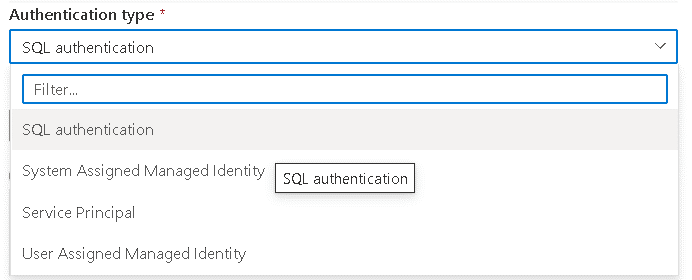
SQL authentication is a very well-know authentication. The other types are the following:
System Assigned Managed Identity: This is the Managed Identity automatically assigned to the Synapse Workspace by Azure
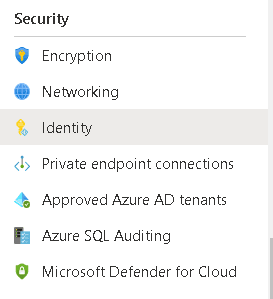
User Assigned Managed Identity: This is the customized managed identity assigned to the workspace by the developer. You can assign custom managed identities on the Identity menu item on the workspace, as you may notice on the images below. You can assign multiple managed identities, because in it’s possible to control the permissions to each linked service in an isolated way. This option is not supported by Synapse Link at the moment

Service Principal: Service principal is a special kind of identity. This identity is often used by applications to connect to azure resources. Create this kind of identity by creating an app registration on the Azure Active Directory. This option is not supported by Synapse Link at the moment
Even if the authentication used is the SQL authentication, the user making the configuration doesn’t need to know the password, the password could be retrieved from Azure Key Vault.
You may notice that although a linked service has 4 authentication options to an Azure SQL Database, only two of them, SQL authentication and System Assigned Managed Identity, are supported at the moment. This once again highlights the fact that Linked Services are used for many purposes in Synapse Analytics, not only for Azure Synapse Link for SQL.
When using a System Assigned Managed Identity, Identity with Azure SQL Database, you will need to add it as db_owner of the Azure SQL Database. The code bellow illustrates this with a System Managed Identity.
|
1 2 3 |
CREATE USER maltasynapselink FROM EXTERNAL PROVIDER; ALTER ROLE [db_owner] ADD MEMBER maltasynapselink; |
- Click the Test Connection link
The access to Azure SQL Database is controlled by a firewall. Using Azure Synapse Link for SQL, it’s Synapse which will access the Azure SQL Database. In order to allow this access, there are three options:
Enable access to Azure Services: This option opens the firewall to any service inside Azure, either the service is in your tenant or not. It’s the easiest option, used very often, but has the highest risk. I wrote about this in this article https://www.red-gate.com/simple-talk/cloud/azure/eight-azure-sql-configurations-you-may-have-missed/
Open the firewall to the Synapse Ips: Synapse has a specific range of Ips in Azure. You can open the Azure SQL Database firewall to this specific range of Ips. It’s safer than enabling access to all Azure services, but you can’t be sure that only your Synapse Workspace will be able to pass through the firewall.
In the future, the use of Private Endpoints may become available for Azure Synapse Link for SQL, but at the moment it’s not supported.
I delivered a technical session about Azure SQL networking, you can watch on this link https://www.youtube.com/watch?v=RKZy5MkqFDQ&list=PLNbt9tnNIlQ5pVwZFRVpoBG8uQTs8aIcz&index=20

- Click the Create button
- Select the tables you would like to include in your Link Connection
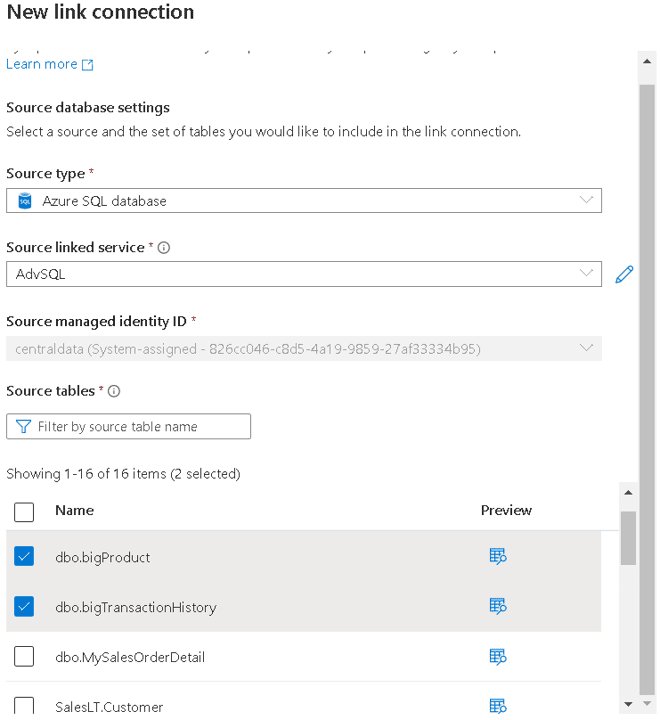
The image above contains the Source managed identity ID. When using Azure SQL Database as a source, it needs to have a managed identity. Synapse will provide access permissions to this identity to access the internal landing zone, as explained before in this article.
You can read more about Azure SQL Managed Identity here https://www.red-gate.com/simple-talk/blogs/azure-sql-and-managed-identity/
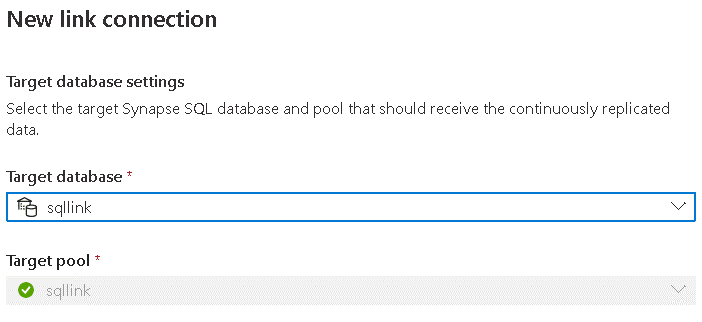
- Select the target dedicated SQL Pool and database
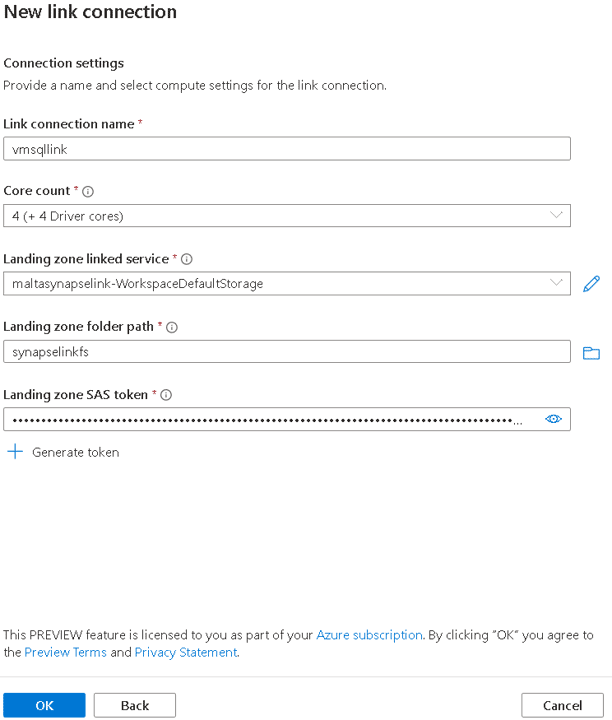
- On the New Link Connection window, in the Link Connection Name textbox, type sqldbconnection
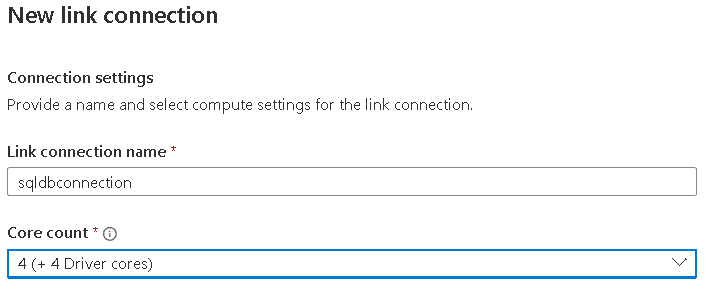
- Select the number of cores you would like to use for the ingestion service running behind the Link Connection.
You don’t need to use one single Link Connection for all your tables. You can break down your tables in multiples Link Connections. One reason to do so is the number of transactions each table receives. You can create Link Connections with a higher number of cores for the heaviest tables and a different Link Connection for the tables with a smaller number of transactions.
- Click the Ok button. This will complete the initial Link Connection creation, and you will see the Link Connection configuration window as the image below.
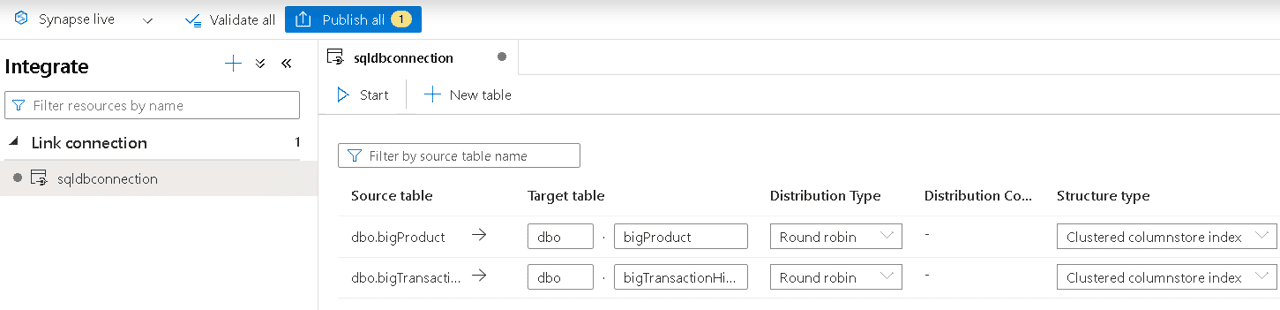
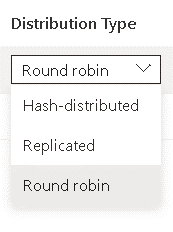
- On the following window, you have the option to select the distribution type (Round Robin, Hash or Replicated).
You can read more about table distribution here: https://docs.microsoft.com/en-us/azure/synapse-analytics/sql-data-warehouse/sql-data-warehouse-tables-distribute?WT.mc_id=DP-MVP-4014132
-
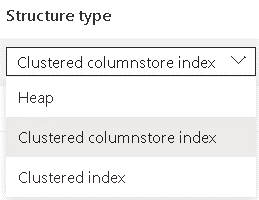
- On the same window, you have the option to select the table structure (Clustered Columnstore Index, Heap or Clustered Index)
You can read more about table design here: https://docs.microsoft.com/en-us/azure/synapse-analytics/sql-data-warehouse/sql-data-warehouse-tables-overview?WT.mc_id=DP-MVP-4014132
-
-
- Still on the same window, you can customize the schema and table name.
-
Important: Initially the schema and table name will be the same as in the source system. However, the schema will not be created by Azure Synapse Link for SQL. If the schema doesn’t exist in the target dedicated pool the execution will generate an error. If you are using a schema other than DBO, you need to create the schema before starting the link
Additional Options
There are two additional options you can set before publishing the Link Connection. The image below illustrates these options
Drop and recreate table on target
When this option is selected, if the target tables already exist, they will be dropped. This means the synchronization will need to start again, transferring all the data from the source to the target.
This is something you would not like to happen. However, it’s important to keep in mind how the Stop button for the Link Connection works. It’s easy: Don’t stop the link. Every time you stop the link, when you start it again, it will be required to drop the destination tables and start from the beginning.
There is no need to stop the link. If you would like to include or exclude tables, you can do this without stopping the link. If you remove a table from the Link Connection and add it again, the table will be re-seeded, but only this single table, not all tables in the Link Connection.
Very Important: You never stop a Link Connection. If you stop a Link Connection, you will need to drop the target tables and start the synchronization again from the beginning and this will be heavy. Interruptions can happen, you can stop the SQL Pool, but there is no need to stop the Link Connection and you shouldn’t do it.
Enable transaction consistency across tables
This option will ensure the records will be transaction consistent across the tables in the same Link connection.
Of course, not all tables in your source database will have this transactional relation. You don’t need to limit yourself to a single link connection for each source. You can break down your tables among multiple link connections, grouping the tables according to the transactional consistency needed.
Starting the Link Connection
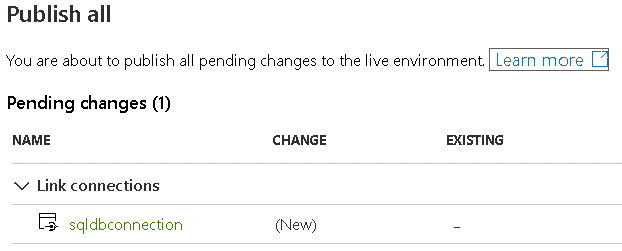
After configuring the Link Connection, you must publish the changes on the workspace before starting the link.
The Publish button is always highlighted when there are pending changes in the workspace. Once you click the Publish button, you can review the changes on the Publish All window and click the new Publish button on this window.
After publishing, you can click the Start button on the Link Connection. Once started, as mentioned before on this article, you don’t stop the Link Connection. If you stop the Link Connection, you will need to start the synchronization again from the beginning.
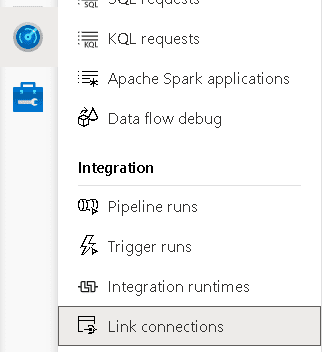
Monitoring the Link Connection
Once you start the Link Connection, you can monitor it on the Monitor tab, Link Connections menu item.
The monitoring information is displayed in two different levels: The existing link connections and the tables inside each link connection.

There are two levels of possible errors:
-
-
- Link Level errors: Errors on the level of the link. For example, if the link can’t reach the source machine to start the configuration, this is a link level error. The link level errors are also highlighted on the Link window on the Integrate tab.
- Table Level errors: Any error specific to one table. For example, if the primary key of the table is not acceptable for the table, it will appear as a table level error.
-
Important: Even if all the tables have errors, they will not appear as errors on the Link window. The message on the Link window advises you to check the monitoring even if it appears the Link is running correctly. This is a good advice, as you may notice in the image below, from the Link window, in the Integrate tab.

Once you click one existing link connection inside the Link Connections monitoring window, you can see the tables inside the link connection, like the example below.
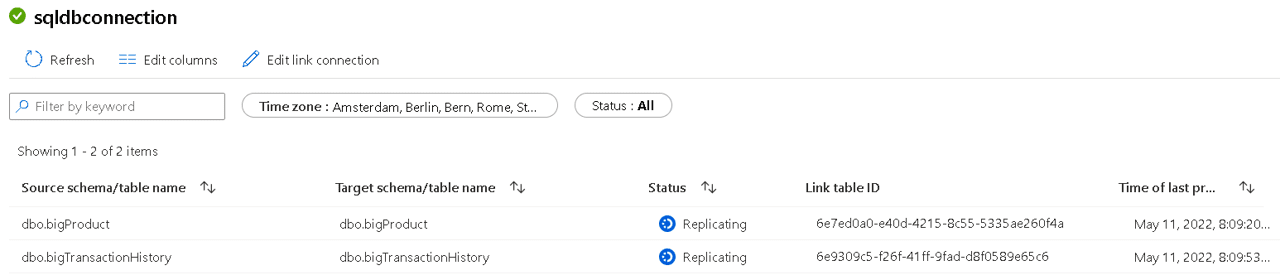
There are three possible statuses for the tables inside the Link Connection:
-
-
- Snapshotting, when the initial table snapshot is being created to initialize the link.
- Replicating, when the replication is running correctly.
- Error, when an error has happened
-
Azure Synapse Link for SQL and SQL Server 2022
There are very few differences when implementing the Azure Synapse Link for SQL with SQL Server 2022. Let’s analyse them.
The source database requires a master key
As explained before, a database scoped credential will be created to allow SQL Server to access the landing ADLS Gen 2 account. If your database doesn’t have a master key yet, you can create it using the statement below.
|
1 |
create master key encrypt by password='YourPassword' |
After starting the Link Connection, you can check the database scoped credential by using the query below.
|
1 |
select * from sys.database_credentials |

The source database requires an Owner
Sometimes, when restoring a database from a backup or after some other activities, the database can end up without a database owner.
This is not a good practice and the lack of the owner in the configuration can cause some other problems as well.
You can use the statement below to set the owner for the database. In the statement below, I’m defining SA as the owner. This is not a good practice. You may need to plan better which login you will set as the database owner.
|
1 |
alter authorization on Database::AdvWorks2019 to sa |
You can read more about the importance of the database owner choice on this article: https://www.red-gate.com/simple-talk/blogs/careful-trustworthy-setting/
The landing area is explicitly created as an ADLS Gen 2 Account
When creating a Link Connection using SQL Server as a source, the landing area is provisioned together the Link Connection. As you may notice on the image below, you will need to configure an ADLS Gen 2 Account as a landing area.
Some considerations at this point:
-
-
- The ADLS Gen 2 Account will be connected to the Synapse Workspace using a linked service.
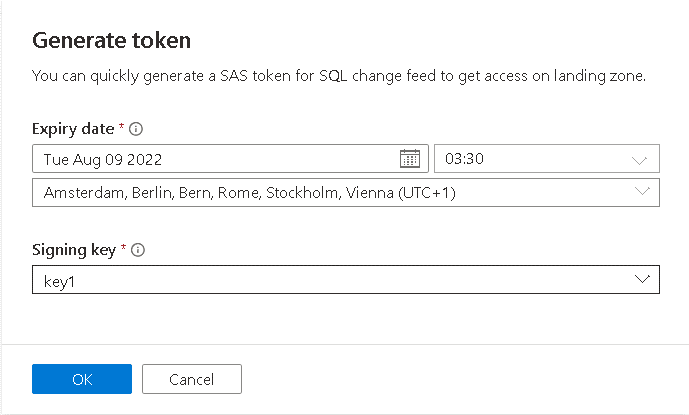
- The connection from SQL Server to the landing zone will be made using a SAS key which will be created in the source SQL Server during the process of starting the link
- The Link Connection will use the IR configured in the linked service to access the landingzone. It will use the linked service authentication to access the landing zone
- The ADLS Gen 2 account needs to be created before the Azure Synapse Link for SQL provisioning process.
- You can create the SAS key during the Link Connection provisioning process by clicking the Generate Token link. This will open the window you can see on the image below.
-
-
-
- As every SAS key, this one also has an expiration date and will need to be rotated.
-
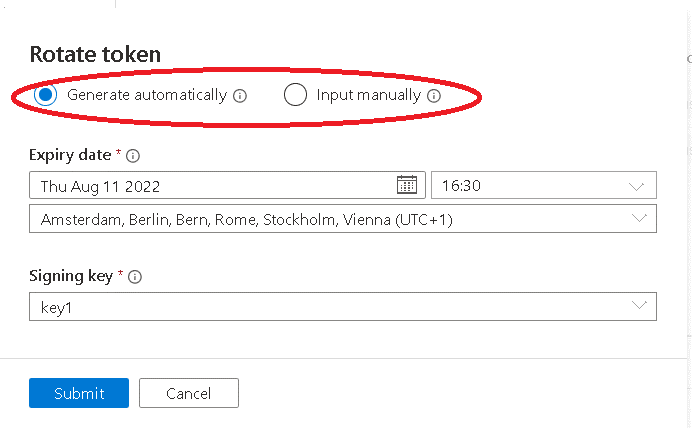
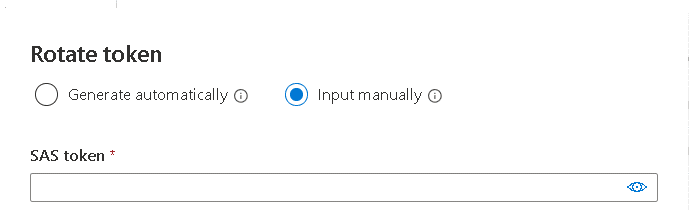
You rotate the key without stopping the Azure Synapse Link for SQL (what is something you should never do, as mentioned before). The image below shows the Rotate Token button on the Link Connection properties window.

The Rotate Token window is slightly different than the window to create the token. When rotating the token, you have the option to create a new SAS key or input one manually. This means that you can decide about using an Azure Storage Account Policy later, after the container is already in use.
-
-
- You can create the SAS key manually instead of letting the provisioning process create the key for you.
-
Creating the key manually allows you to create the key linked to an azure storage policy, which can make it easier to automate the rotation of the key. You can read more about the benefit of Storage Account policies on this link: https://www.red-gate.com/simple-talk/blogs/azure-storage-policies-control-sas-from-the-server-side/
If you decide to create the SAS key manually, it’s important to mind the SAS key will need the following permissions: RACWDL (Read, Add, Create, Write, Delete and List)
Summary
The Azure Synapse Link for SQL is not the entire way from production to a data warehouse, but it makes the ETL/ELT process way easier by synchronizing the data with the Synapse dedicated SQL Pool, relieving the production environment from further ETL workload, and allowing you to proceed from this point with the transformation of the data for the data warehouse.

Load comments