
WordPress offers one of the easiest ways to build and manage a website. However, if you have multiple websites with different domains, maintaining each website separately can be a hassle.
A great workaround to this problem is using WordPress Multisite with domain mapping. It provides you with the functionality to manage multiple sites with different domains on a single backend using a single WordPress installation.
That’s why in this tutorial, we’ll show you the process of how to create a WordPress Multisite with different domains.
5 steps for setting up your WordPress multisite with different domains
Step 1. Turn on WordPress Multisite
WordPress Multisite comes built-in with the core WordPress software (available at WordPress.org), but is disabled by default. So after you install WordPress on your main domain, the first step is to enable WordPress Multisite. For that, you need to edit a WordPress configuration file known as wp-config.php.
The wp-config.php file is usually located at the root folder of your WordPress website. It can be reached via SSH or SFTP.
You can edit the file either by using an FTP client or through the File Manager app provided in the control panel of your hosting account.
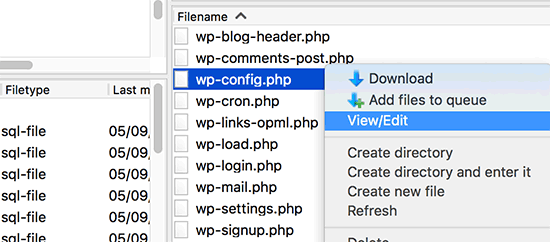
Locate the wp-config.php file in the root directory of your main site. Then add the following code just above the line that says “That’s all, stop editing! Happy publishing”.
/* Multisite */
define( 'WP_ALLOW_MULTISITE', true );
Save your changes and upload the file back to your website’s root folder.
Once you have edited the wp-config.php file, come back to your WordPress admin dashboard. Reload the page to make sure that the changes have taken effect.
Step 2. Set up Multisite network settings
To configure your multisite installation, go to Tools » Network Setup. Select Sub-domains as “Addresses of Sites in your Network.” Also give a title and admin email address for your multisite network.
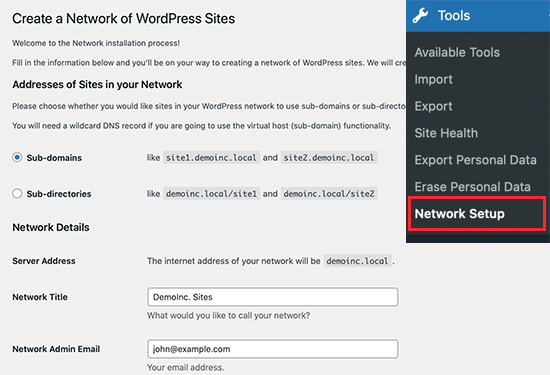
To continue, click Install. On the next screen, WordPress will ask you to add two pieces of code. The first snippet is to be added to the wp-config.php file similar to how you added the previous code.
In addition, add the following code to your wp-config.php file. It ensures that users can log in to each site in the multisite network:
define('COOKIE_DOMAIN', $_SERVER['HTTP_HOST'] );
The second snippet of code is to be added to your WordPress .htaccess file. It is intended to replace the default WordPress .htaccess rules.
Next, log in to your WordPress admin dashboard (wp-admin) once again. Locate the menu item in the admin toolbar which says My Sites. Then go to Network Admin » Dashboard.
Step 3. Add different domains to your WordPress multisite network
Now, it’s time to create your first new site with a unique domain name that’s separate from your primary domain. In your WordPress admin dashboard, go to Sites » Add New.
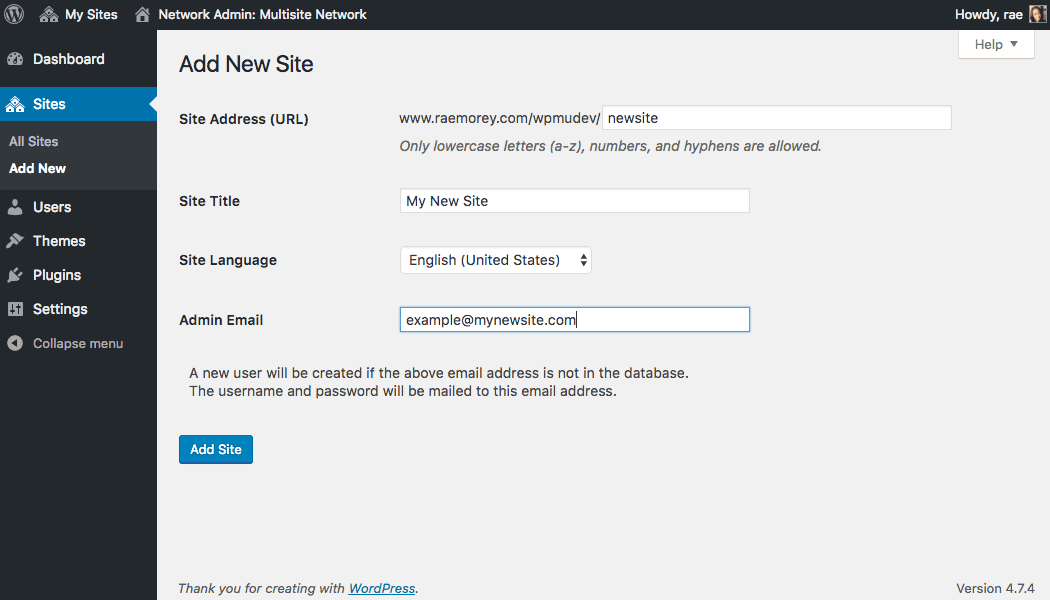
Enter details such as Site Address, Site Title, Site language, and the network admin email address. You can add any string in the Site Address field for now because we’ll later change that to your custom domain.
Click the Add Site button. Then go to Sites » All Sites and click Edit below the website you just added. On the next screen, enter the custom domain name you intend to assign to this website in the Site Address field.

Click Save Changes and you’re done. You can follow the same process to add more websites in your WordPress multisite network with different domains.
Step 4. Add custom domains to your hosting account
By now, you have added some sites to the multisite network and assigned custom domains in WordPress. But none of the websites will be accessible from their custom domains. This is because the custom domains don’t yet point to your hosting servers.
Most modern WordPress hosts help you add multiple different domains to your account with ease. If you’re using Krystal’s Managed WordPress hosting, for example, you can add custom domains by following a few simple steps.
Log in to your Krystal hosting account and go to cPanel » Domains. To add a new website with a custom addon domain, click Addon Domains.

On the next page, add the following details:
- New Domain Name - Type in the domain name here, but without the "www".
- Subdomain/FTP Username - cPanel will create a subdomain and an FTP account for your new domain.
- Document Root - This is the location to store all the files related to your new website. This is typically a subdirectory of your public_html/ folder, but you can pick any directory name you prefer.
Since you’re going to manage multiple websites, it’s better to put the domain's document root at the topmost level. So instead of being public_html/newdomain.com, it would be newdomain.com. This can prevent a number of issues down the line and make it easy to manage your websites.
Click Add Domain, and repeat the same process for all your different domains.
However, if you want to add a new website or subsite as a custom subdomain, complete the steps provided here.
Step 5. Make sure to install SSL certificates
It’s important to install an SSL certificate for the primary network domain, and use server name indication (SNI) for all the mapped domains. It will not just help keep your multisite network secure, but also improve SEO. This is because Google ranks SSL-certified websites better than others in search engine result pages.
If you use a hosting provider such as Krystal’s WordPress hosting, the good news is that the SSL certificate is provided as a standard. So you don’t need to lift a finger.
That’s it. Once this final step is complete, you can manage all of your WordPress sites with different domains from the same admin panel.
Advantages of using Krystal hosting to manage your WordPress multisite with different domains
Krystal’s Onyx Managed WordPress hosting is your best bet. Notable features of Krystal Managed WordPress hosting include: * Ultra-reliable performance with 99.99% uptime guarantee * Automated back-ups to protect and restore your data * Fully managed assistance from WordPress experts * Powerful multi-site control dashboard with all plans * Free Let’s Encrypt SSL certificate with every domainWhy use a WordPress multisite network for different domains
A WordPress multisite network with different domains not only makes it easy to find all your sites, but helps build a better brand. Whether you’re launching product subsites for an organisation or hosting client websites on one multisite network, mapping different domains is the right decision.
As you can see from this post, mapping custom domains to the sites in your network isn’t as hard these days as it used to be. WordPress 4.5 has made the process much easier with the introduction of WordPress Multisite Domain Mapping.
So no more fiddling with external domain mapping plugins and complex configurations. A few clicks and you’ll be up and running with an efficient multisite network with different domains. And if you’re starting from scratch, take Krystal’s Managed WordPress hosting for a test drive today!
If you want to find out more about the personalised help that our Onyx managed WordPress hosting customers receive, feel free to get in touch via Live Chat.
Share this article
About the author

Darren H
I'm Darren and I'm the Senior Copywriter at Krystal. Words are what I do. Aside from writing, I play guitar and sing in my band Machineries Of Joy, work on getting my 2nd Dan in Taekwondo and seek adventure with my wife and daughter.
Join our newsletter
No spam. Just the latest news, events, product updates, promotions and more delivered to your inbox.