How To Use Fiddler Everywhere With Real-Time Apps

Working with real-time applications requires extra attention to analyze the data that is constantly transferred between the client and the server. To assist in this task, Fiddler Everywhere has the best resources through WebSocket inspectors. Check out this article on how to use them.
With the frequent use of smart devices connected to the internet, the need for real-time communication is something increasingly present in people’s lives. Real-time applications have flourished, especially in recent years. Perhaps the best known of them are social networking apps, but there are several others that have the same relevance and need—video conferencing apps, online games, chat, ecommerce transactions and many others.
With the high demand for this type of application, the need to maintain these applications has also increased to support user demand. In this article, we’ll build a real-time app and look at the importance of analyzing the data that makes up those apps, the benefits of capturing WebSocket traffic, and how this can be an easy task using Fiddler Everywhere.
What Are WebSockets?
WebSockets are web applications that perform a process called “handshake” between the application and the server. In simple terms, the application establishes a connection with the server and transfers data between them, keeping the connection open, which makes this process very fast—thus allowing communication in real-time.
This technology is not exclusive to .NET. There are WebSockets present in other platforms, such as Node. In the context of ASP.NET Core, it is possible to implement WebSockets from scratch, but there is a very useful native library called SignalR, which contains everything needed to implement a real-time application. If you want to know more about SignalR, I suggest reading the official Microsoft documentation, which you can access through this link: Introduction to SignalR.
Next, we will create an application and implement a WebSocket. Then we will analyze how this process is done through Fiddler Everywhere.
About the Project
The project that we will create in this article will be a web project developed with .NET 6, in which we will use the resources of SignalR. It will be a simple chat message application to demonstrate using Fiddler Everywhere and how to analyze data between client and server with the help of Fiddler features.
You can access the complete source code of the final project at this link: Source Code.
Project Implementation
Prerequisites
- Fiddler Everywhere
- Visual Studio 2022 and .NET 6 SDK
Creating the Web App
- In Visual Studio 2022, select Create a new project.
- Select ASP.NET Core Web App, and then hit Next.
- Name the project something like ChatSignalR.
- Select .NET 6.0 (Long-term support) and then Create.
Adding the SignalR Client Library to the Project
The SignalR server library is included in the ASP.NET Core shared framework. The JavaScript client library isn’t automatically included, so that is why, in this tutorial, we’ll be using Library Manager (LibMan) to get the client library from unpkg.
So, in Visual Studio:
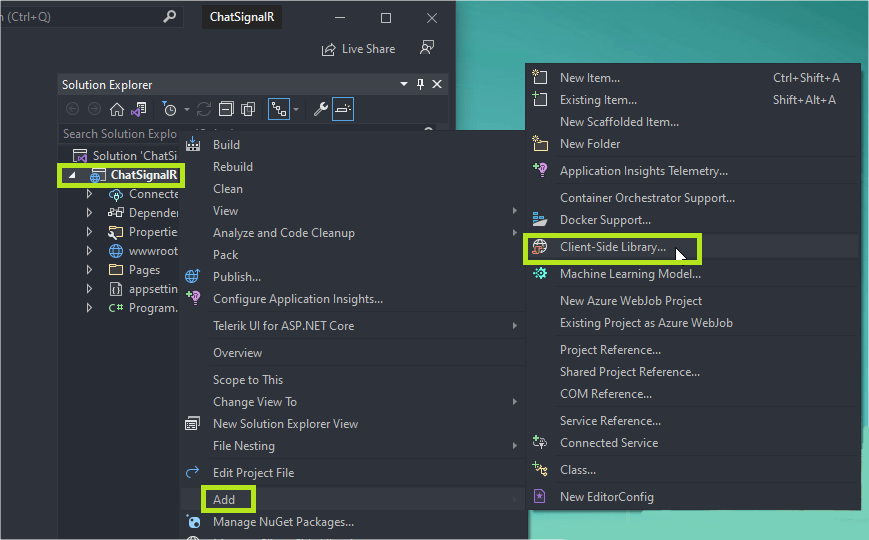
- Under Solution Explorer, right-click the project, and select Add > Client-Side Library.
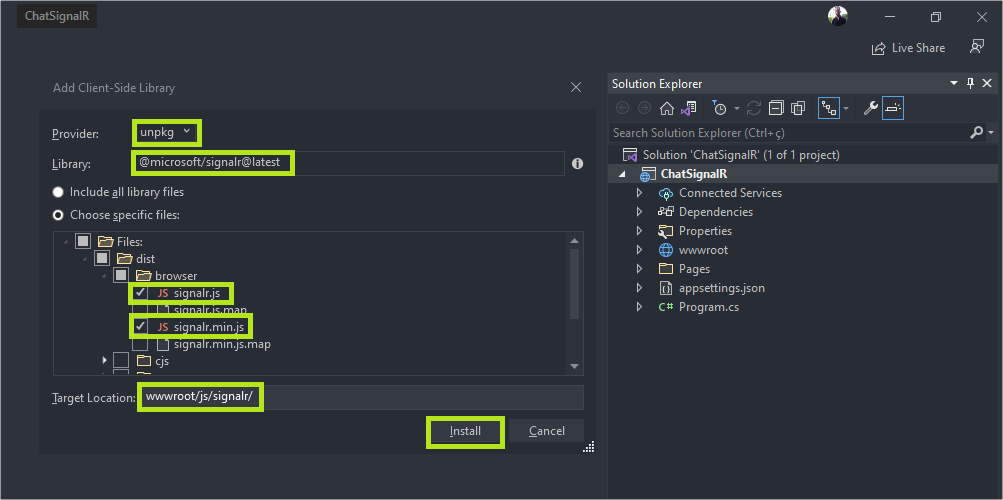
- In the Add Client-Side Library dialog:
- Select unpkg for Provider.
- Enter @microsoft/signalr@latest for Library.
- Select Choose specific files, expand the dist/browser folder, and select signalr.js and signalr.min.js.
- Set Target Location to wwwroot/js/signalr/.
- Select Install.
Create a SignalR Hub
A Hub class allows the client and server to communicate directly. SignalR uses a Hub instead of controllers like in ASP.NET MVC. So, we need to create a class that will inherit from the Hub main class.
In the SignalRChat project folder, create a “Hubs” folder. In the Hubs folder, create the “ChatHub” class with the following code:
using Microsoft.AspNetCore.SignalR;
namespace ChatSignalR.Hubs;

public class ChatHub : Hub
{
    public async Task SendMessage(string user, string message) =>
        await Clients.All.SendAsync("ReceiveMessage", user, message);
}
The ChatHub class inherits from SignalR’s native class (SignalRHub). The Hub class is responsible for managing connections, groups and messaging systems.
The SendMessage method can be called by a connected client and send a message to all clients. This method is asynchronous to provide maximum scalability. The JavaScript client code that calls this method will be discussed later.
Adding SignalR Settings
Now that we’ve created the Hub class, we need to add the SignalR and ChatHub class settings we just created, so replace the code in the Program.cs file with the code below:
using ChatSignalR.Hubs;

var builder = WebApplication.CreateBuilder(args);

// Add services to the container.
builder.Services.AddRazorPages();
builder.Services.AddSignalR();

var app = builder.Build();

// Configure the HTTP request pipeline.
if (!app.Environment.IsDevelopment())
{
    app.UseExceptionHandler("/Error");
    // The default HSTS value is 30 days. You may want to change this for production scenarios, see https://aka.ms/aspnetcore-hsts.
    app.UseHsts();
}

app.UseHttpsRedirection();
app.UseStaticFiles();

app.UseRouting();

app.UseAuthorization();

app.MapRazorPages();
app.MapHub<ChatHub>("/chatHub");

app.Run();
Adding the SignalR Client
The next step is to create the client that will communicate with the server (hub). First we will add the HTML markup with the text boxes and the button to send the message, then we will add the JavaScript code that will contain the functions and actions performed by the HTML page.
Replace the contents of the Pages/Index.cshtml file with the following code:
@page
<div class="container">
<div class="row"> </div>
<div class="row">
<div class="col-2">User</div>
<div class="col-4"><input type="text" id="userInput" /></div>
</div>
<div class="row">
<div class="col-2">Message</div>
<div class="col-4"><input type="text" id="messageInput" /></div>
</div>
<div class="row"> </div>
<div class="row">
<div class="col-6">
<input type="button" id="sendButton" value="Send Message" />
</div>
</div>
</div>
<div class="row">
<div class="col-12">
<hr />
</div>
</div>
<div class="row">
<div class="col-6">
<ul id="messagesList"></ul>
</div>
</div>
<script src="~/js/signalr/dist/browser/signalr.js"></script>
<script src="~/js/chat.js"></script>
Now we just need to create the JavaScript code that will execute the functions of sending and receiving messages.
The code below creates and starts a connection, and adds in the Send button a handler that sends messages to the hub. Finally, it adds a handler to the connection object that receives messages from the hub and adds them to the list.
So, in the wwwroot/js folder, create a file with the extension .js (chat.js) with the following code:
"use strict";

var connection = new signalR.HubConnectionBuilder().withUrl("/chatHub").build();

document.getElementById("sendButton").disabled = true;

connection.on("ReceiveMessage", function (user, message) {
    var li = document.createElement("li");
    document.getElementById("messagesList").appendChild(li);
    li.textContent = `${user} says ${message}`;
});

connection.start().then(function () {
    document.getElementById("sendButton").disabled = false;
}).catch(function (err) {
    return console.error(err.toString());
});

document.getElementById("sendButton").addEventListener("click", function (event) {
    var user = document.getElementById("userInput").value;
    var message = document.getElementById("messageInput").value;
    connection.invoke("SendMessage", user, message).catch(function (err) {
        return console.error(err.toString());
    });
    event.preventDefault();
});
Run the Application
Run the application via Visual Studio or terminal.
- Copy the URL from the address bar where the application started.
- Open another browser tab and paste the URL into the address bar.
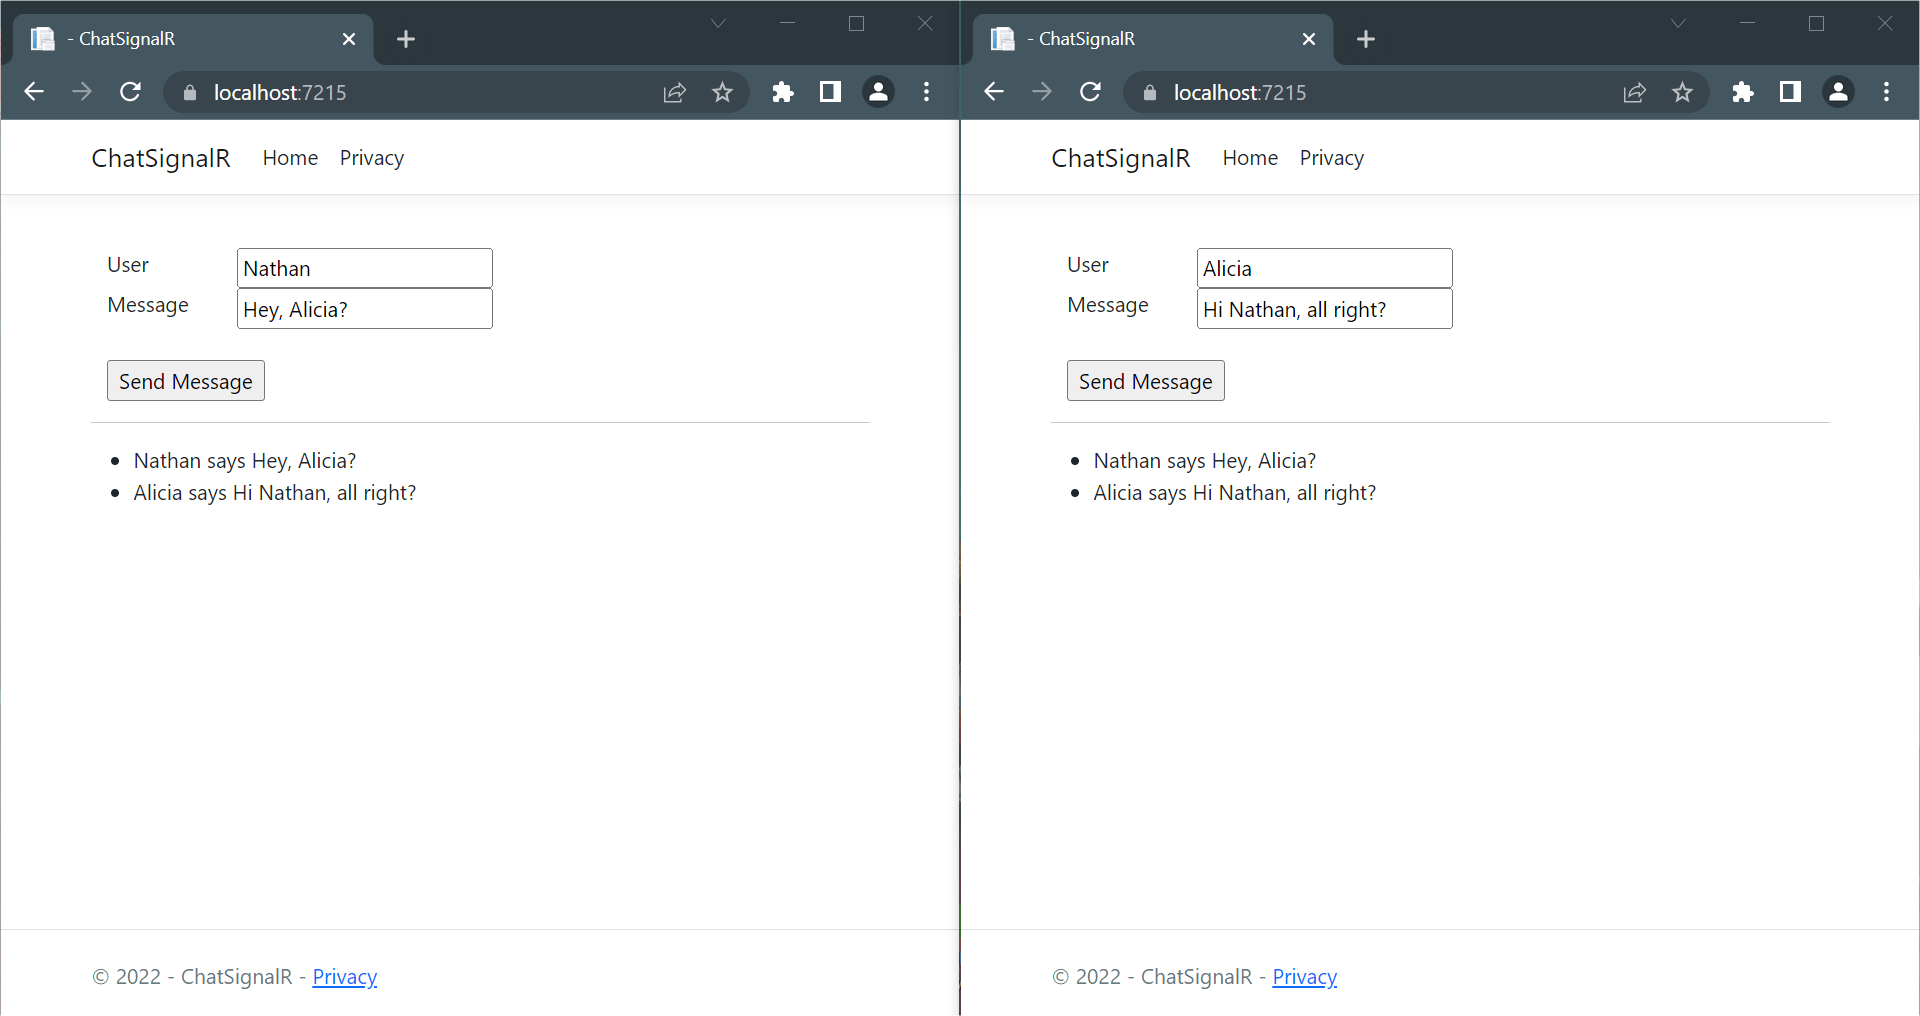
- On each of the tabs enter a name and message and select the Send Message button.
The name and message are displayed on both pages instantly.
WebSocket Inspectors With Fiddler Everywhere
Real-time communication requires extra attention to the events that happen while the application is running, from its inception to the present moment. As the connection is established only once, the speed with which information is crossed between the client and the server makes it necessary to use tools that capture the details of these operations.
Imagine an online game where some players are reporting bugs when they enter a certain location within the game. How would you go about finding out where the problem is if, every millisecond, thousands of pieces of information are transferred between the player’s client and the game’s server? You would need to filter and analyze the information relevant to that area where users reported the problem. Some specialized tool are necessary for this purpose.
Fiddler Everywhere is perfect for this type of task, as it has several features that help a lot in the work of analyzing the handshake between applications.
The tools available on Fiddler Everywhere are listed below for a complete analysis of the execution of our chat application. You can check the official documentation of all inspector types functions at this link: WebSocket Inspectors.
Filtering Live Traffic From Our Application
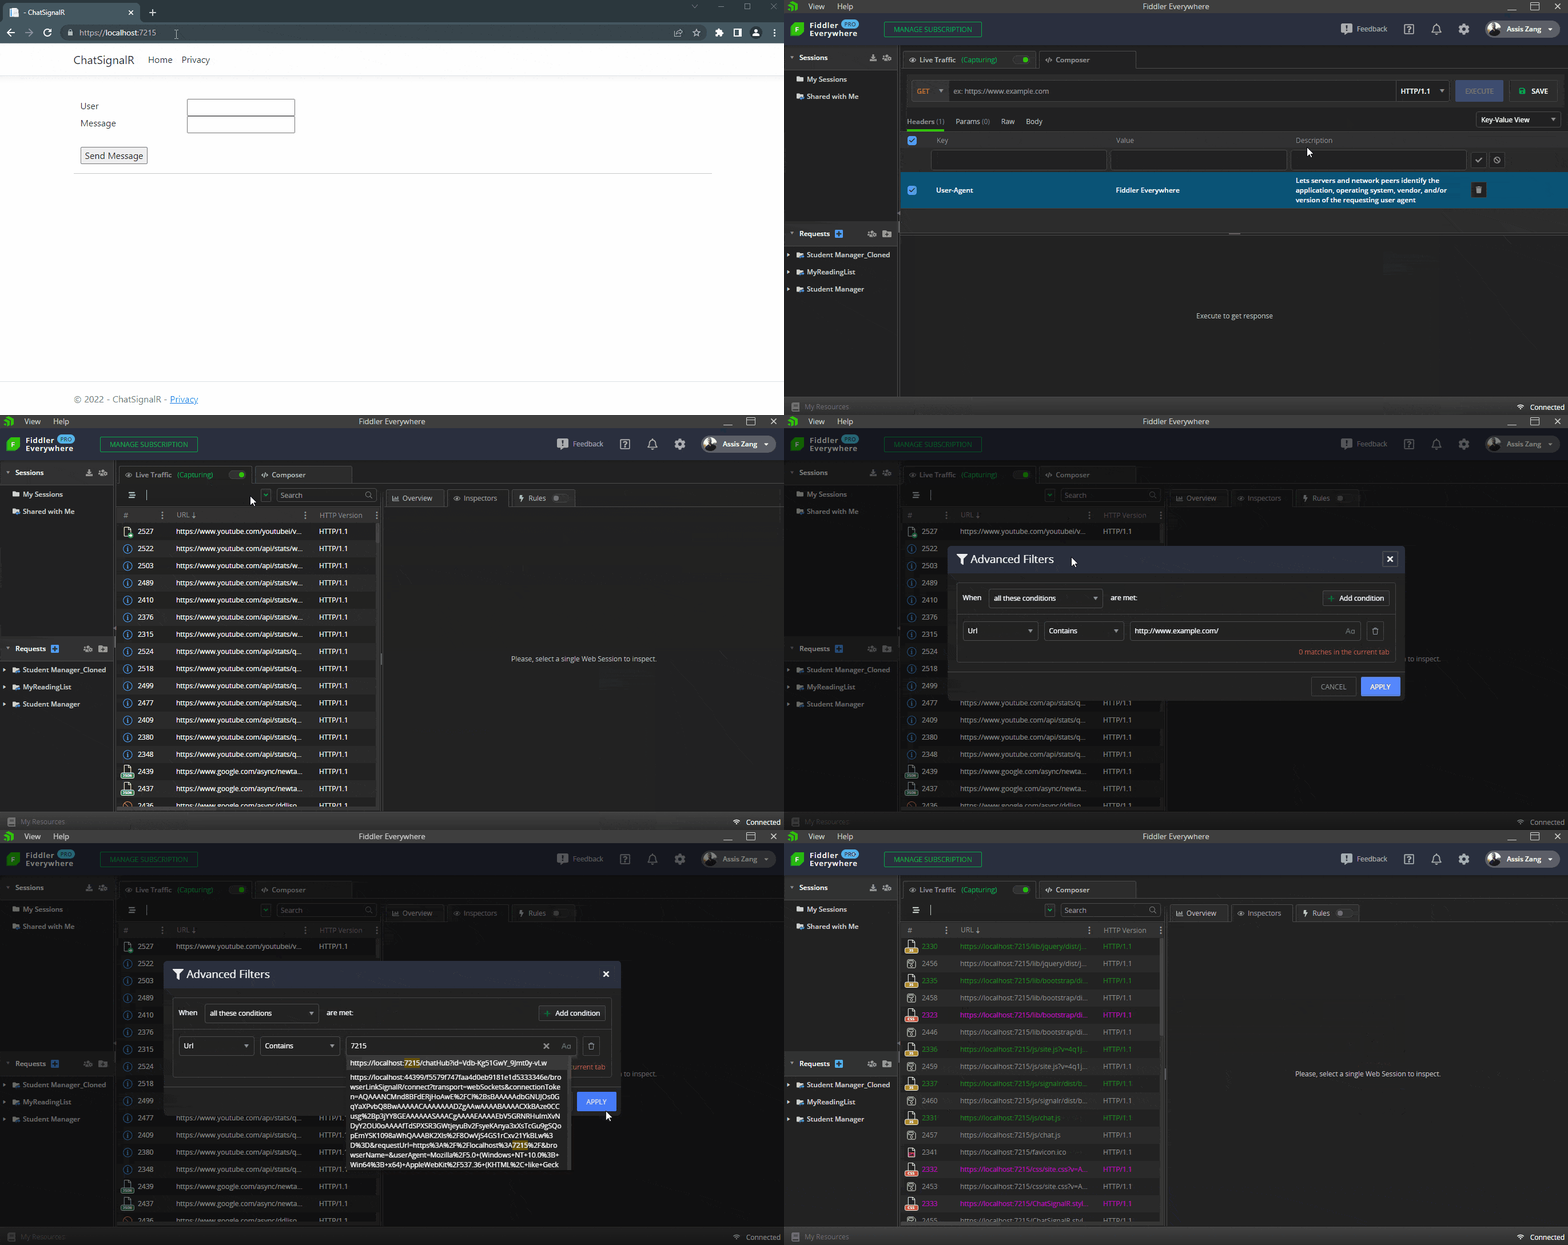
By definition, Fiddler Everywhere captures all the traffic present on your machine. To analyze the application that we created earlier, we need to filter it in the list. The GIF below shows how to do this:
Below are the tabs available in Fiddler Everywhere and how to use them in the application we just built.
1. Handshake Tab
The Handshake tab for the WebSocket API provides several types of inspection tools, which allow you to examine different parts of the WebSocket requests and responses—each of which is listed below and the abstracted details of our application’s execution.
1.1 Headers Inspector
The Header Inspector tab allows you to view the HTTP headers of the request and response.
- Request header inspector
In this tab we can check the HTTP method used—in this case, GET.
The path of the URL being requested—(/chatHub?id=…).
The HTTP version—HTTP/1.1.
The Request line can consist of one or more lines containing name-value pairs of metadata about the request and the client, such as User-Agent and Accept-Language.
- Response headers
Each HTTP response starts with plain text headers that describe the result of the request. The first line of the response (the Status line) contains the following values:
The HTTP version—HTTP/1.1.
The response status code—101.
The Status line can consist of one or more lines containing name-value pairs of metadata about the response and the server, such as response file length and content type.
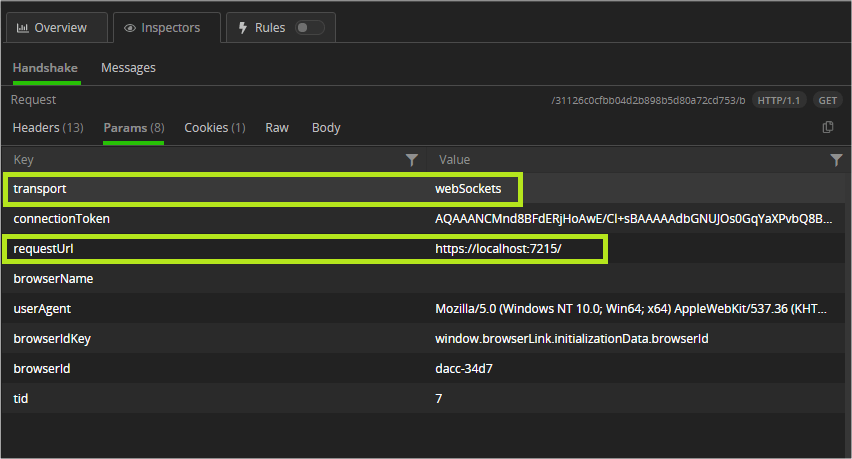
1.2 Parameter Inspector
The Parameter Inspector, only available in the Request section, displays the content of any parameters of input terminals. In the chat app example, we do not have values being sent and received via
URL. Instead, other values are displayed in key/value format like “transport” = “webSockets”, “requestUrl” = “https://localhost:7215/”, among others.
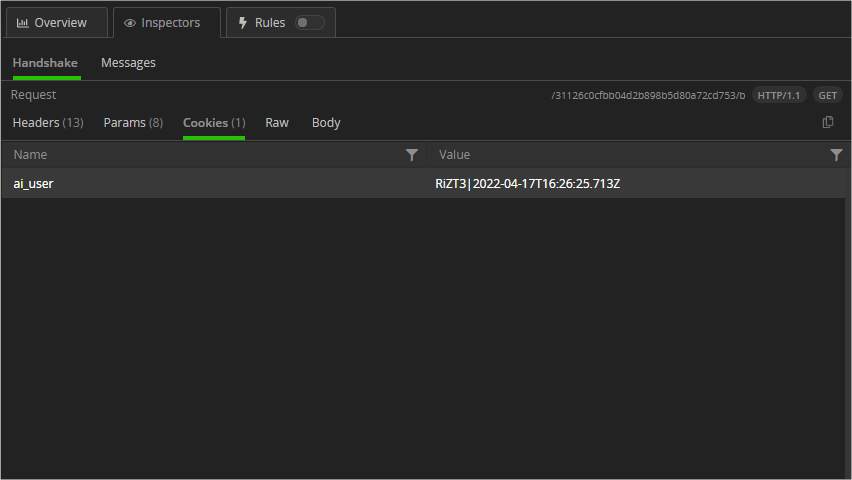
1.3 Cookies Inspector
The Cookies Inspector displays the contents of any outbound Cookie and Cookie2 request headers and any inbound Set-Cookie, Set-Cookie2 and P3P response headers.
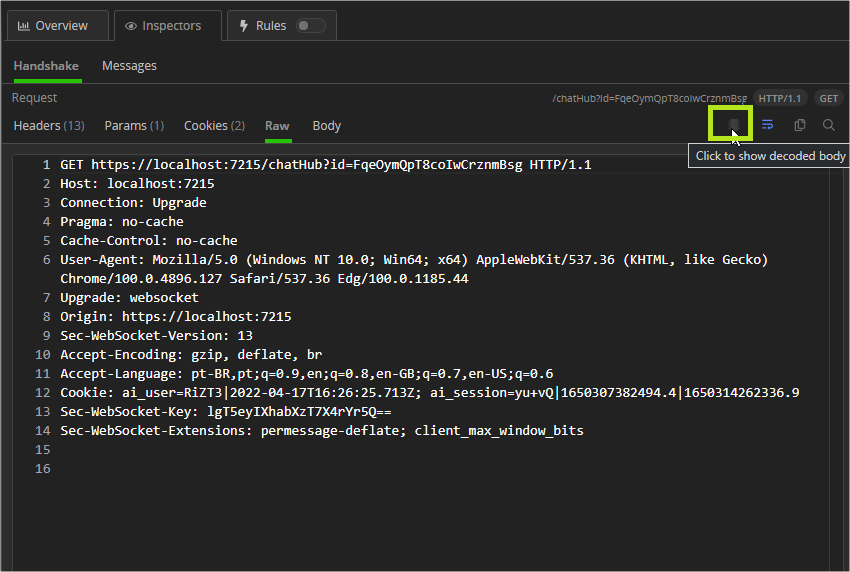
1.4 Raw Inspector
Raw Inspector allows you to view the complete request and response, including headers and bodies, in text format. Most of the inspector represents a large area of text that displays the body of text interpreted using the detected character set
with the headers, the byte order marker or an embedded META tag declaration.
If the request or the response is displayed with the content encoded or compressed, the Raw Inspector comes with a special decoding button (located in the Inspector toolbar). Clicking on it will decode the content.
Also available are the Preview Inspector and Body Inspector, but they don’t fit the context of the example in the article.
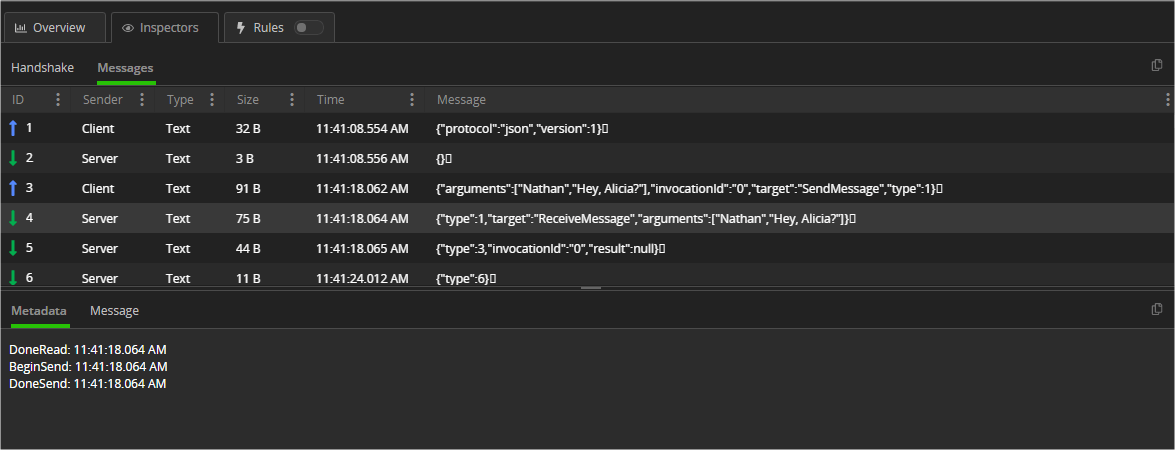
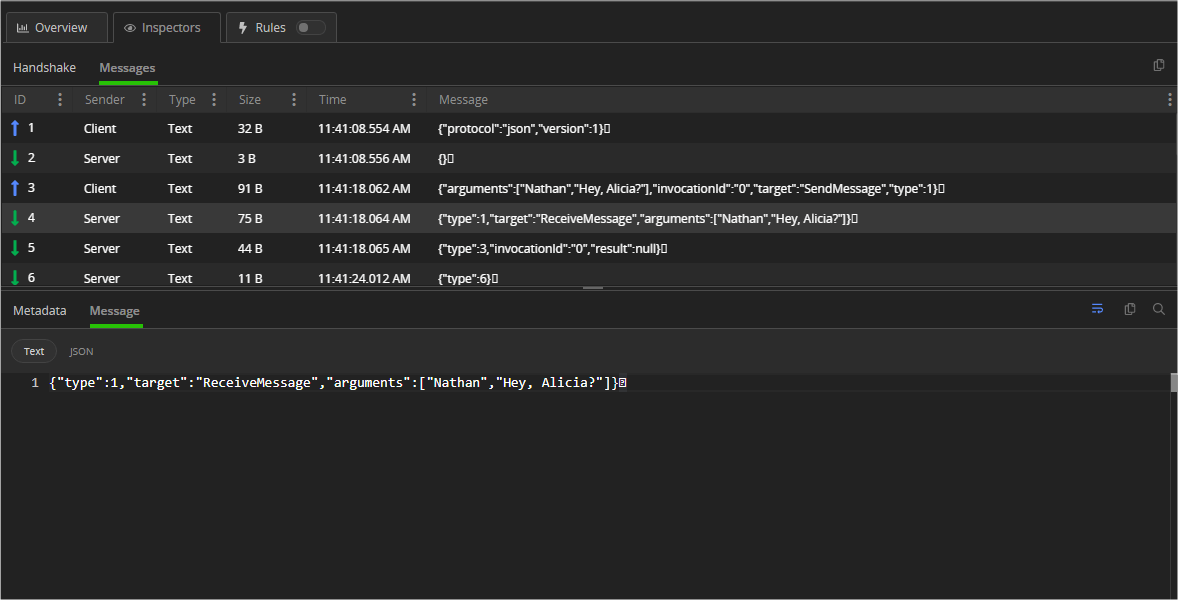
2. Messages Tab
The Messages tab renders a list of WebSocket messages sent from the client or received from the server. The list is constantly populated with new future messages until two-way communication is disconnected.
Each incoming WebSocket message can be inspected separately through the Metadata Inspector and the Message Inspector.
2.1 Metadata Inspector
The Metadata Inspector contains timestamps and masking information about the selected WebSocket message.
2.2 Message Inspector
The Message Inspector contains the non-masked message content in plain text or JSON (depending on the message format).
Conclusion
The use of WebSocket Inspectors is indispensable for working with real-time applications. Fiddler Everywhere has everything needed for a complete analysis of data traffic in this type of application.
In this article, we created an example of a real-time application and saw how to use the features available in Fiddler through the WebSocket inspectors, which make the analysis task much easier.

