How to Install vyOS RouterOS with KVM
vyOS is a free and open-source firewall based on Debian Linux. vyOS can be deployed in both virtualization and cloud, it supports KVM, VMWare, Proxmox, Hyper-V, Nutanic, Xen, etc. vyOS can be used as a router and firewall platform, it provides software-based network routing, firewall, VPN, and security.
In this tutorial, we will show you how to install and configure the vyOS router in a KVM virtual machine.
Prerequisites
- A Linux system with KVM Virtualization
- ISO file of vyOS
- A Linux client machine
Create a Virtual Machine vyOS
To create a new virtual machine for the vyOS, you can use the command-line mode from the terminal or use the GUI application using virt-manager.
In this tutorial, you will be creating a vyOS virtual machine using virt-manager GUI applications.
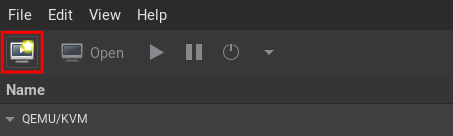
Open your virt-manager application and create a new virtual machine.
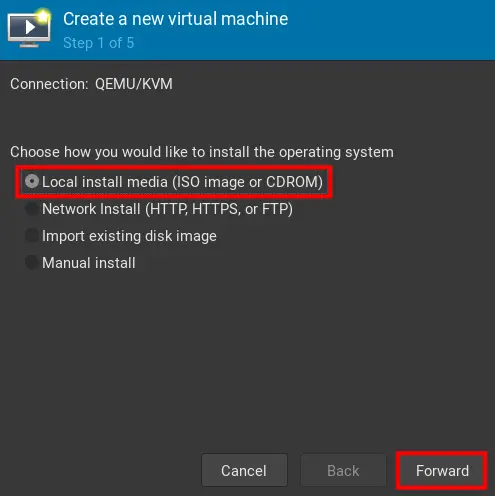
Select the option to install from the media ISO image and click Forward.
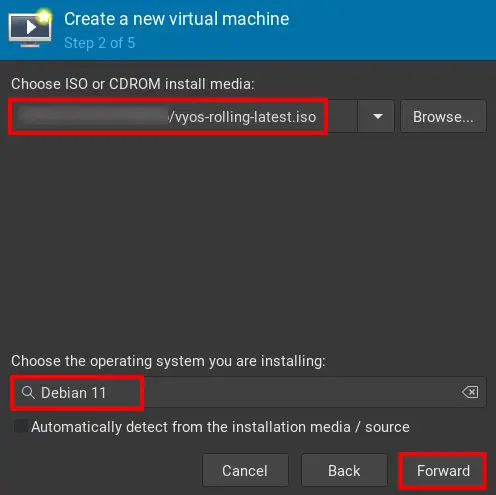
Select the ISO file of the vyOS and choose the operating system to install to Debian 11 and click Forward.
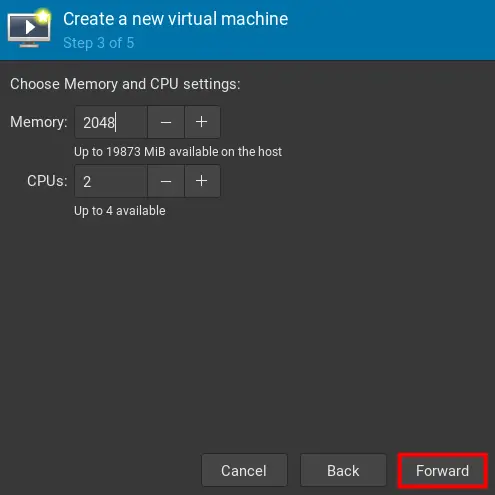
Input the memory size for the vyOS and the CPUs then click Forward.
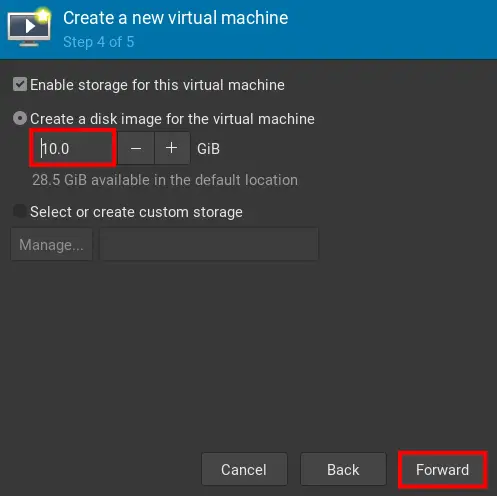
Input the disk size for the vyOS installation and click Forward.
Change the name to vyos and for the Network selection, select default NAT and click Finish.
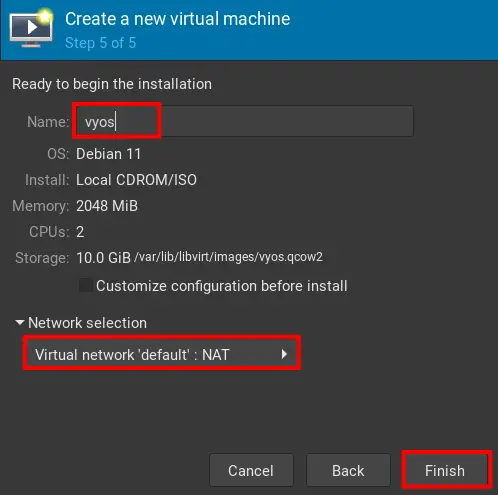
You have now created the virtual machine for vyOS.
Installing vyOS Router
After creating the virtual machine for vyOS, now you are ready to install vyOS on your KVM virtualization.
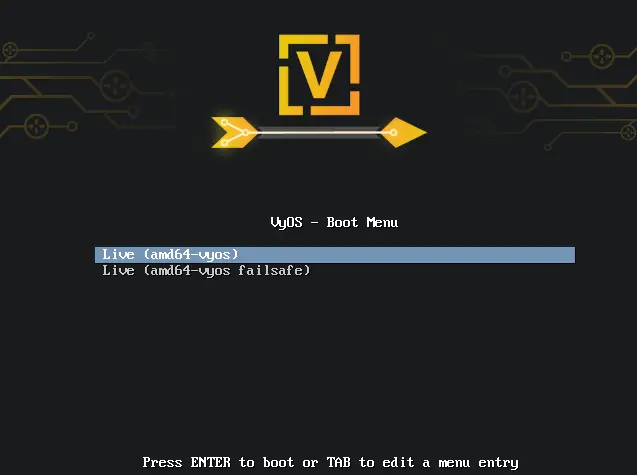
Start the vyos virtual machine and when it is up, you will see the following screen.
Select Live (amd64-vyos) and press ENTER.
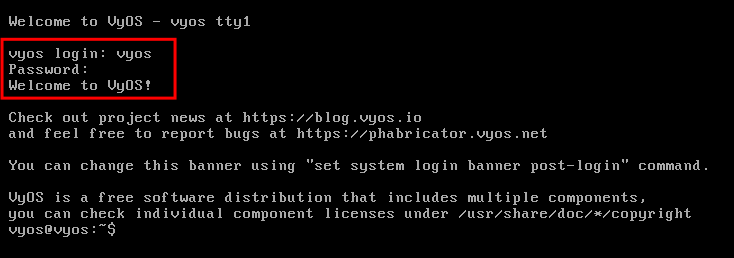
After it's up and running, log in with the default user vyos and a blank password.
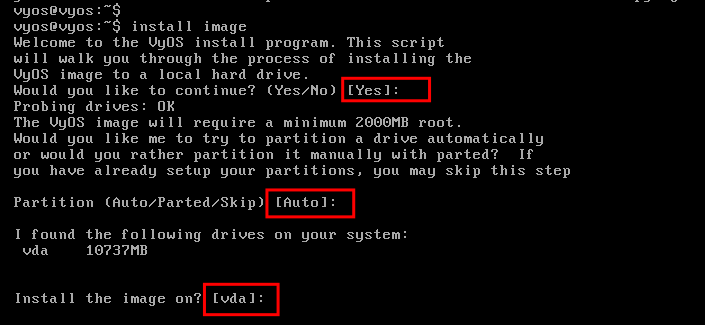
To install vyOS on the virtual machine, input the command line below.
install image
- Press ENTER to confirm and continue the installation.
- For the partition, press ENTER to use the Auto mode.
- Now press ENTER again to confirm the vyOS installation on your disk.
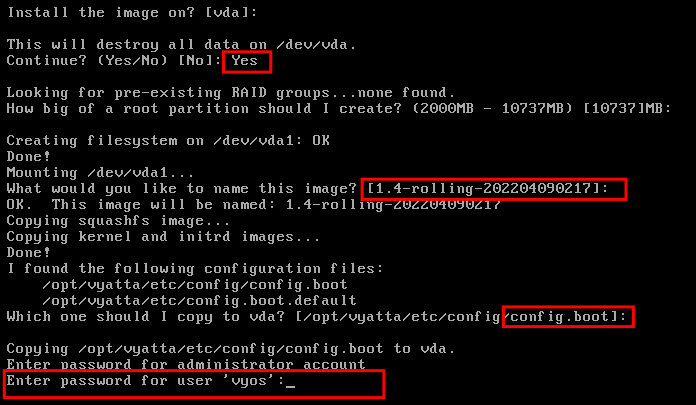
Now you will be setting up the partition and the password for vyOS.
- Input Yes to confirm and destroy the default partition.
- For the size of the root partition, leave it as default and press ENTER.
- Leave the image name for the vyOS as default and press ENTER to continue.
- Now press ENTER again to copy the default configuration config.boot to your installation.
- Enter a new password for the vyos user and repeat the password. Please use a strong password for the vyos user password.
To complete the vyOS installation, you will be installing GRUB.
The vyOS installer will automatically detect your disk for the GRUB installation. In this example, the disk is /dev/vda, now press ENTER to confirm the GRUB installation.
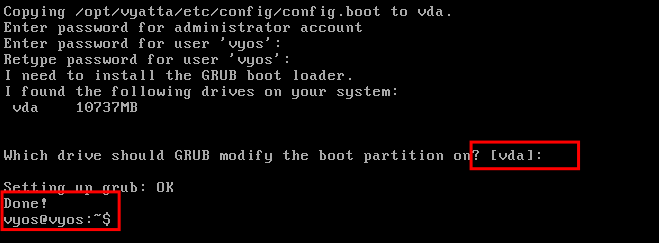
After GRUB installation is completed, run the reboot command to restart your vyOS virtual machine.
Below is the GRUB of the vyOS virtual machine.
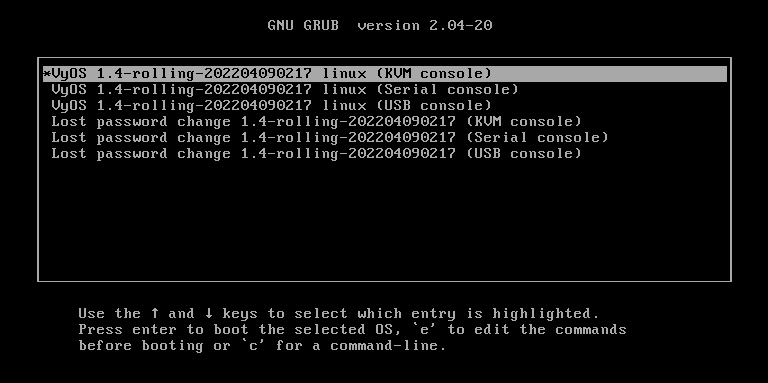
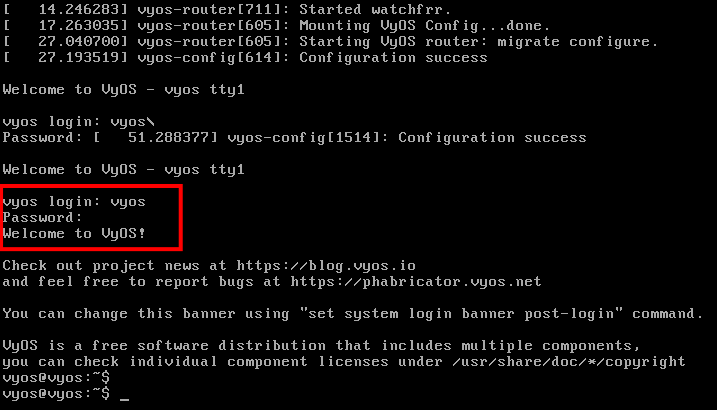
Now log in with the default user vyos and input your password. Below you have successfully installed vyOS on the KVM virtualization.
Creating Additional Network Interface
In this example, you will be setting up the network interfaces for the vyOS.
The current vyOS configuration is using the default network on the KVM virtualization type NAT.
Now you will be creating a new virtual network on the KVM virtualization and attach the virtual network to the vyOS virtual machine.
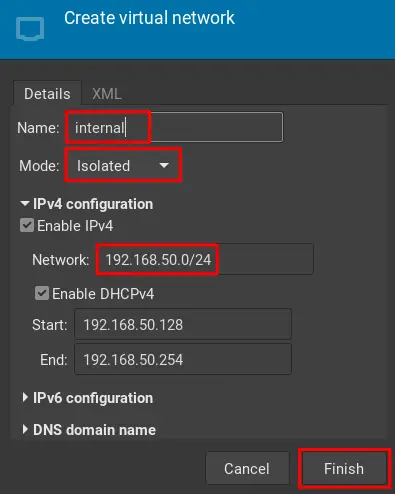
On the Network Setting virt-manager, click the + button to add a new Network.
Input the name and detailed network configuration as below.
- Name: internal
- Mode: Isolated
- IPv4 Network: 192.168.50.0/24
- DHCPv4 Start - End: 192.168.50.128 - 192.168.50.254
Click Finish to confirm.
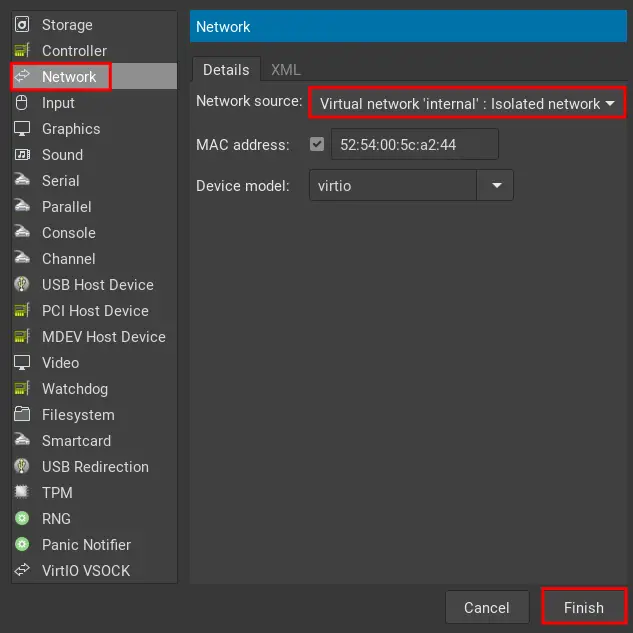
Now turn off your vyOS virtual machine and open the details configuration of the vyOS virtual machine, click Add Hardware button to add a new network interface.
Select "Network" and the "Network source" to "internal: Isolated network". Now click Finish.
Now start again the vyOS virtual machine to start configuring vyOS networking.
Setting Up vyOS
Now you have attached a new network interface to the vyOS virtual machine. Next, you will start setting up the vyOS router.
Log in to your vyOS router using the user vyos and your strong password.
Now run the configure command to start the configuration mode on vyOS.
configure
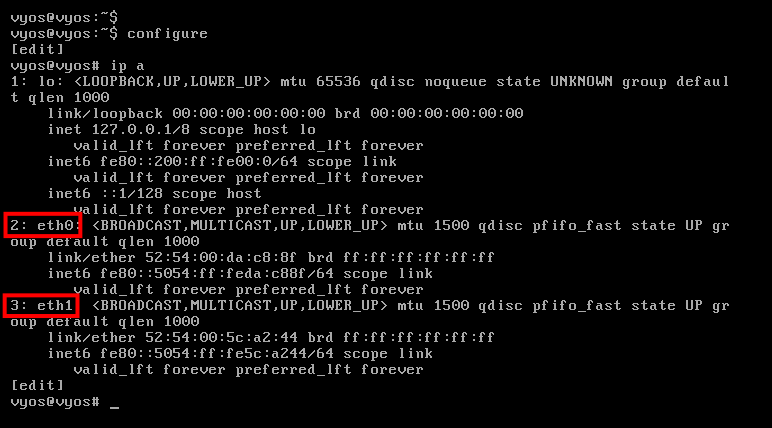
Check available network interfaces on vyOS using the following command.
ip a
As you can see on the screenshot below, in this example we have two network interfaces eth0 and eth1.
Also, you will notice when entering the editing mode, you will see the [edit] on to of the vyOS hostname. Also, you will notice the difference when entering the editing mode, the shell is changed to user@hostname#, instead of user@hostname:~$.
Define WAN and LAN
Now you have entered the editing mode on vyOS. Let's start configuring the IP address on vyOS.
First, you will need to decide which interfaces will be used as EXTERNAL/WAN and which interface will be used as INTERNAL/LAN.
In this example, the EXTERNAL/WAN interface will be eth0, and the INTERNAL/LAN will be eth1 interface.
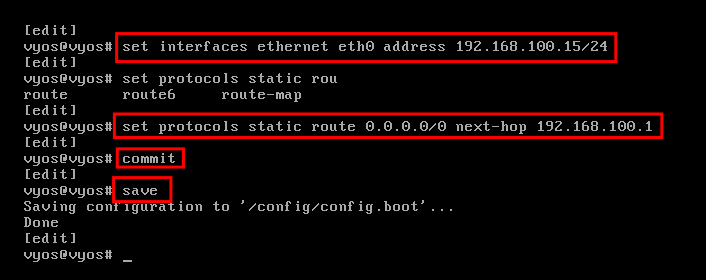
Setup eth0 WAN
Now run the following command to set up the WAN/EXTERNAL interface eth0.
In this example, the eth0 will get an IP address 192.168.100.15. Also, you will set up static routing for the eth0 to the KVM host on IP address 192.168.100.1.
After every change, run the command commit to applying the new configuration, then run save to save the new changes.
set interfaces ethernet eth0 address 192.168.100.15/24
set protocols static route 0.0.0.0/0 next-hop 192.168.100.1
commit
save
Setup eth1 LAN
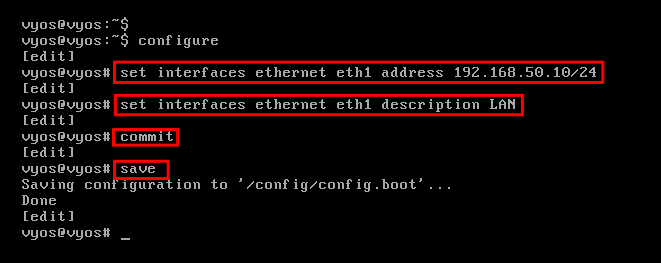
Now you will be setting up the eth1 interface for INTERNAL/LAN. This interface will be used by the virtual machines under the vyOS router.
Run the following command to set up the IP address for eth1 to 192.168.50.10 and add the description for the eth1 interface to LAN. Now commit the configuration and save changes.
set interfaces ethernet eth1 address 192.168.50.10/24
set interfaces ethernet eth1 description LAN
commit
save
Next, run the below command to create a new NAT rule for the LAN interface eth1 IP address 192.168.50.0/24.
You will be creating a new outbound NAT for the eth1 IP address 192.168.50.0/24 to the EXTERNAL/WAN interface eth0. The NAT type here is masquerade, then commit the new changes and save the new configuration.
set nat source rule 100 source address 192.168.50.0/24
set nat source rule 100 outbound-interface eth0
set nat source rule 100 translation address masquerade
commit
save

Setup DNS Forwarding
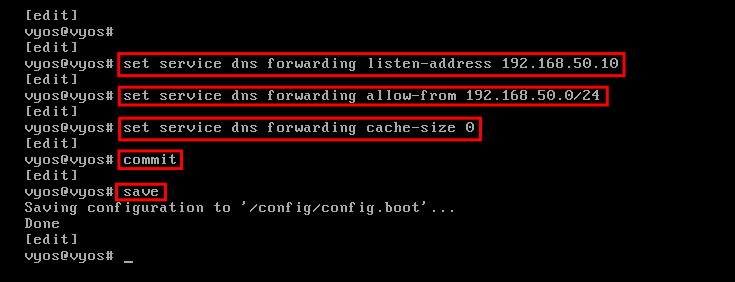
Now you will be setting up the DNS forwarding on vyOS.
Run the following command to set up the DNS forwarding service. In this example,e, the DNS service will be running on the LAN IP address 192.168.50.10, and allow access from the internal network eth1. Then commit the configuration and save the changes.
set service dns forwarding listen-address 192.168.50.10
set service dns forwarding allow-from 192.168.50.0/24
set service dns forwarding cache-size 0
commit
save
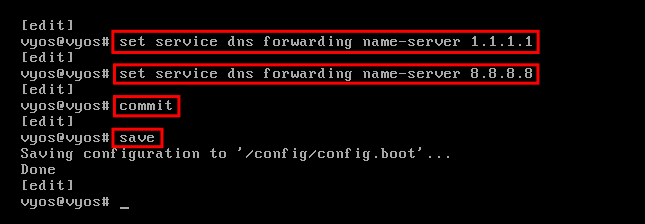
Next, define the forwarder for the DNS service. In this example, we will use the Cloudflare and Google public DNS as the forwarder.
Run the following command to set up the DNS forwarder to Cloudflare and Google DNS. Then commit the changes and save the configuration.
set service dns forwarding name-server 1.1.1.1
set service dns forwarding name-server 8.8.8.8
commit
save
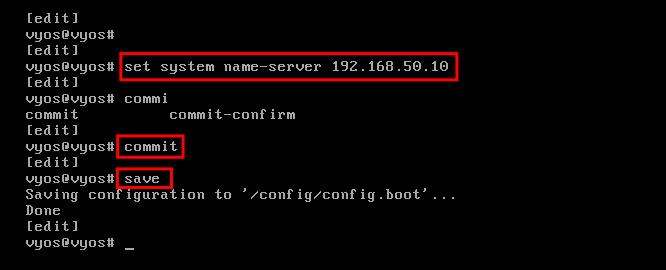
Now run the below command to change the vyOS DNS to the local DNS server 192.168.50.10. Then commit the changes and save the configuration.
set system name-server 192.168.50.10
commit
save
Testing Network Configuration
Now you have completed the network configuration on vyOS, this includes the WAN IP address, LAN IP address, and DNS Forwarding service.
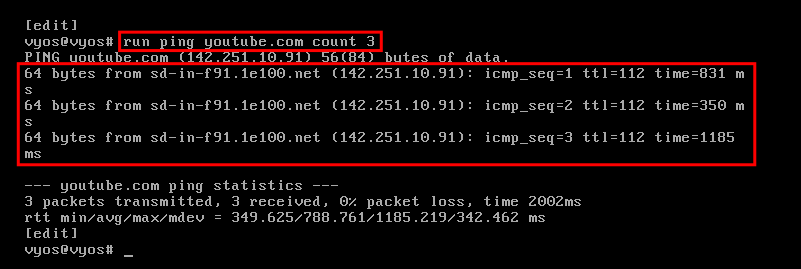
To verify the network configuration, run the following command to ping the internet.
run ping youtube.com count 3
If your networking configuration is correct, you will be able to ping the internet outside of the network.
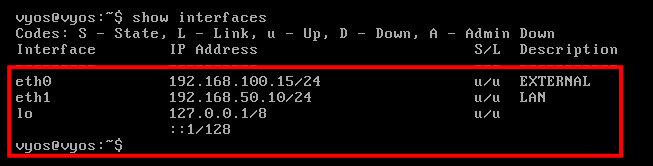
Next, run the below command to check detailed network interfaces.
show interfaces
Now you will see the detailed IP address for the eh0 and eth1 interfaces.
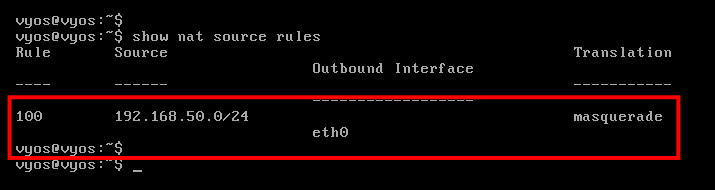
To check the NAT rules, run the following command.
show nat source rules
Now you will get the following output. The nat rule number 100 types outbound NAT to the eth0 interface and the source is eth1 networks.
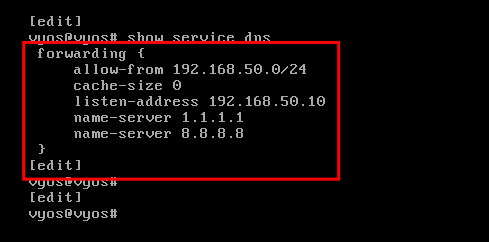
Next, run the following command to check the DNS forwarding service.
configure
show service dns
You should get the output like the following. The DNS forwarding service is running on the eth1 interface 192.168.50.10 and using the Cloudflare and Google public DNS servers as the forwarders.
 e
e
Setting up Client Ubuntu 20.04 System
On the client-side, you will need to set up a static IP address with the default gateway to the vyOS Ip address 192.168.50.10. In this example, the client is Ubuntu 20.04 system.
Edit the network configuration /etc/netplan/01-netcfg.yaml.
sudo nano /etc/netplan/01-netcfg.yaml
Copy the following configuration to set up the static IP address for the ubuntu system.
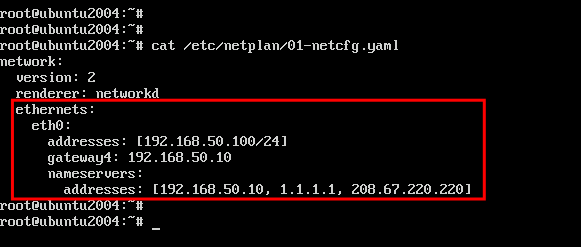
Save and close the file when you are done.
Now apply new changes using the netplan command below.
sudo netplan apply
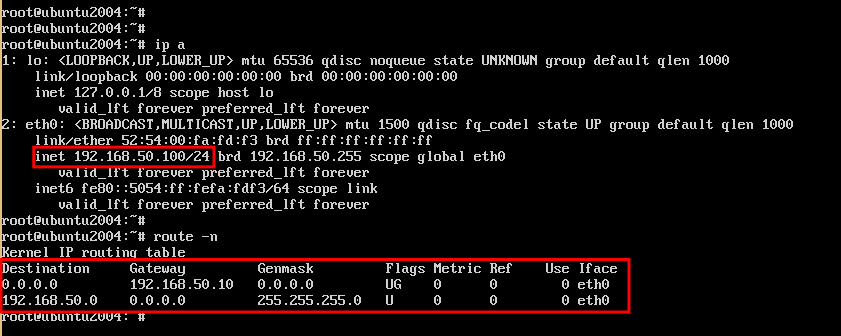
After that, verify the IP address on the Ubuntu system and verify the routing table of the Ubuntu network.
ip a
route -n
Below you can see the ubuntu system is got correct static IP address 192.168.50.100 with the default gateway of the vyOS IP address 192.168.50.10.
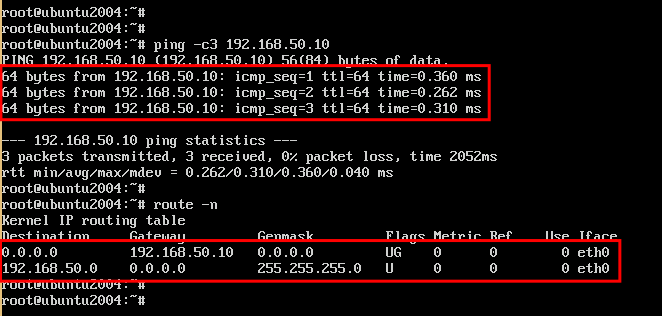
Now run the ping command below to verify the connection to the vyOS router.
ping 192.168.50.10 -c3
Below you can see the Ubuntu client can connect to the vyOS router.
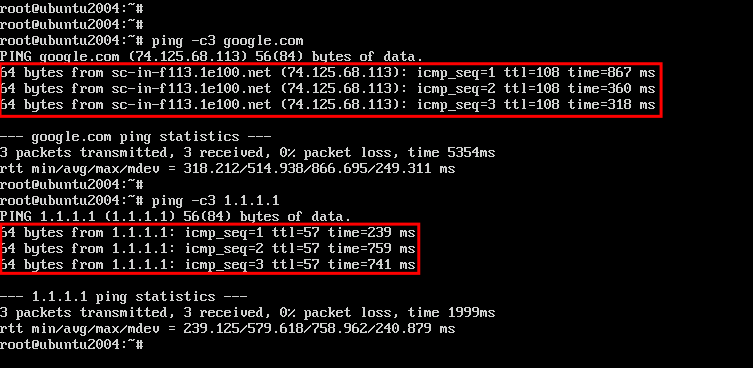
Next, run the below command to check the connection to the internet.
ping 1.1.1.1 -c3
ping google.com -c3
Below you can see the Ubuntu system can connect to the internet through the vyOS router.
Conclusion
Congratulations! You have now installed and configured the vyOS router on the KVM virtualization. Also, you have learned how to add a client and set up the static IP address on the client-side to connect to the vyOS router.

