The Windows UI Library 3, known shortly as WinUI 3, is a native UI framework that ships with the Windows App SDK. This is an SDK complementary to the Windows SDK, WPF, WinForms, and Win32. It provides a new unified set of APIs and tools that can be used to develop desktop apps on Windows 11 (as well as downwards to Windows 10, version 1809). I decided to have a look at what this framework provides and this post is written as I am trying it. To evaluate it, I’ll try to build a small application that does conversion between Celsius and Fahrenheit degrees as you type in a field.
Disclaimer: I have not build any app using the Universal Windows Platform or the WinRT technologies. Therefore, I expect to stumble upon issues that are simple or obvious for those familiar with these technologies. On the other hand, I do have experience building WPF applications.
Getting Started
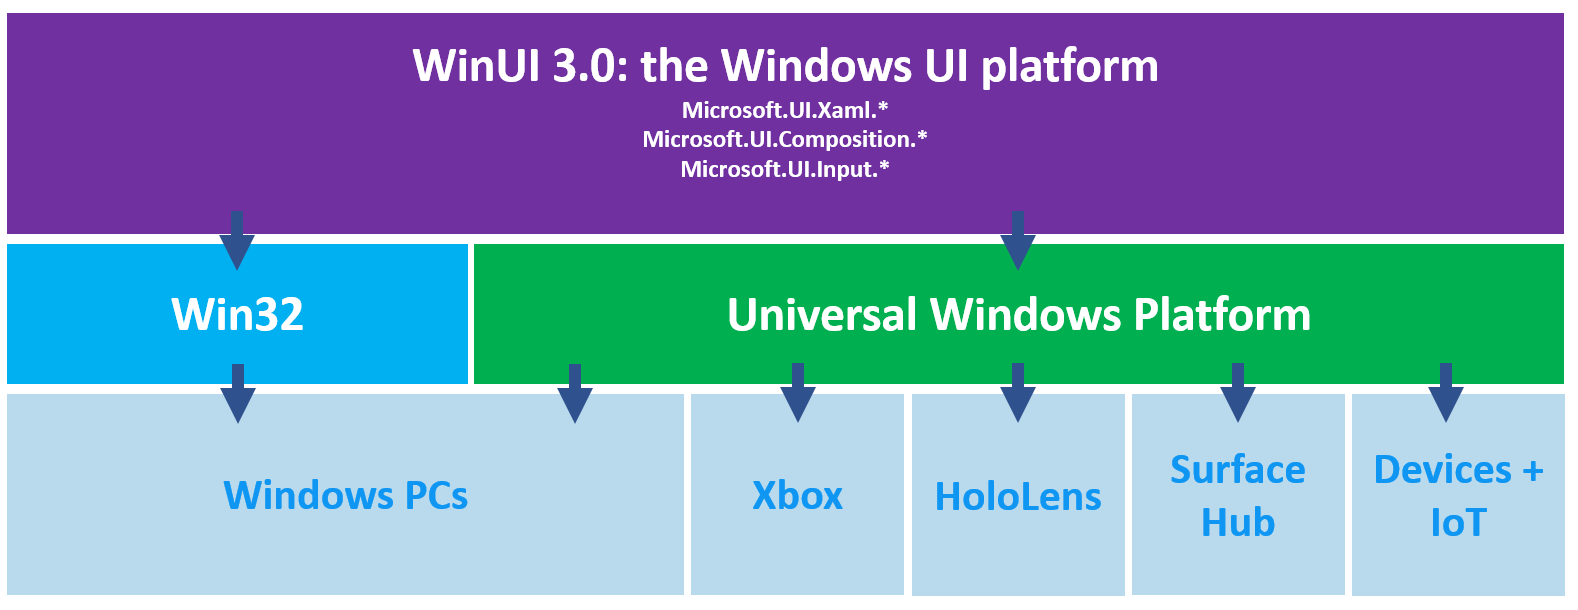
As briefly mentioned in the introduction, WinUI 3 is a new native framework that is part of the Windows App SDK. It sits on top of Win32 and Universal Windows Platform, providing a way to build applications that can run on a variety of platforms, such as PCs or mobile devices. Here is a picture from Microsoft Docs showing the relationship between these technologies:
Here are some resources to check to learn more about it:
- Create your first WinUI 3 project
- Downloads for the Windows App SDK
- Microsoft Windows UI Library namespaces
- WinUI3 Controls
To get started with WinUI 3 for C++, you need:
- Visual Studio 2022
- Windows App SDK
- Visual Studio 2022 Extensions for C++
The last two you can get from the second link above.
Impression: ⭐⭐⭐⭐⭐
Installing the pre-requisites is straight forward and I did not encounter any problem.
Creating a first project
After installing the pre-requisites, you can create new projects. You need to select C++ for the language and the WinUI for the project type. From the available list then select Blank App, Packaged (WinUI 3 in Desktop):

The following template project is created:

The solution contains several files, including:
App.xaml, together withApp.idl,App.xaml.h, andApp.xaml.cpp. The App class represents the current application and its services, such as entry point, lifetime management, unhandled exception detection.MainWindow.xaml, together withMainWindow.idl,MainWindow.xaml.cpp,MainWindow.xaml.h. TheMainWindowclass is derived from the Window class and represents a window of the application.
Here is how the App class looks:
// --- App.xaml.h ---
namespace winrt::WinUIApp::implementation
{
    struct App : AppT<App>
    {
        App();

        void OnLaunched(Microsoft::UI::Xaml::LaunchActivatedEventArgs const&);

    private:
        winrt::Microsoft::UI::Xaml::Window window{ nullptr };
    };
}


// --- App.xaml.cpp ---
#include "App.xaml.h"
#include "MainWindow.xaml.h"

using namespace winrt;
using namespace Windows::Foundation;
using namespace Microsoft::UI::Xaml;
using namespace Microsoft::UI::Xaml::Controls;
using namespace Microsoft::UI::Xaml::Navigation;
using namespace WinUIApp;
using namespace WinUIApp::implementation;

// To learn more about WinUI, the WinUI project structure,
// and more about our project templates, see: http://aka.ms/winui-project-info.

/// <summary>
/// Initializes the singleton application object.  This is the first line of authored code
/// executed, and as such is the logical equivalent of main() or WinMain().
/// </summary>
App::App()
{
    InitializeComponent();

#if defined _DEBUG && !defined DISABLE_XAML_GENERATED_BREAK_ON_UNHANDLED_EXCEPTION
    UnhandledException([this](IInspectable const&, UnhandledExceptionEventArgs const& e)
    {
        if (IsDebuggerPresent())
        {
            auto errorMessage = e.Message();
            __debugbreak();
        }
    });
#endif
}

/// <summary>
/// Invoked when the application is launched normally by the end user.  Other entry points
/// will be used such as when the application is launched to open a specific file.
/// </summary>
/// <param name="e">Details about the launch request and process.</param>
void App::OnLaunched(LaunchActivatedEventArgs const&)
{
    window = make<MainWindow>();
    window.Activate();
}

// --- App.xaml.idl ---
On the other hand, the MainWindow class looks as follows:
// --- MainWindow.xaml.h ---
#pragma once

#include "MainWindow.g.h"

namespace winrt::WinUIApp::implementation
{
    struct MainWindow : MainWindowT<MainWindow>
    {
        MainWindow();

        int32_t MyProperty();
        void MyProperty(int32_t value);

        void myButton_Click(Windows::Foundation::IInspectable const& sender, Microsoft::UI::Xaml::RoutedEventArgs const& args);
    };
}

namespace winrt::WinUIApp::factory_implementation
{
    struct MainWindow : MainWindowT<MainWindow, implementation::MainWindow>
    {
    };
}

// --- MainWindow.xaml.cpp ---
#include "pch.h"
#include "MainWindow.xaml.h"
#if __has_include("MainWindow.g.cpp")
#include "MainWindow.g.cpp"
#endif

using namespace winrt;
using namespace Microsoft::UI::Xaml;

// To learn more about WinUI, the WinUI project structure,
// and more about our project templates, see: http://aka.ms/winui-project-info.

namespace winrt::WinUIApp::implementation
{
    MainWindow::MainWindow()
    {
        InitializeComponent();
    }

    int32_t MainWindow::MyProperty()
    {
        throw hresult_not_implemented();
    }

    void MainWindow::MyProperty(int32_t /* value */)
    {
        throw hresult_not_implemented();
    }

    void MainWindow::myButton_Click(IInspectable const&, RoutedEventArgs const&)
    {
        myButton().Content(box_value(L"Clicked"));
    }
}

// --- MainWindow.xaml.idl ---
namespace WinUIApp
{
    [default_interface]
    runtimeclass MainWindow : Microsoft.UI.Xaml.Window
    {
        MainWindow();
        Int32 MyProperty;
    }
}
What I can see from here is that:
- There are two classes called
MainWindow, both derived from the class templateMainWindowT, except with different template arguments. However, they are part of two different namespaces: one is calledimplementationand the other is calledfactory_implementation. At a first look, I find this confusing, but will probably understand it better lately. - The code to set the text content of the button on the window is cumbersome. It looks like this:
myButton().Content(box_value(L"Clicked")).myButtonis an object that’s defined in theMainWindow.xamlfile but it’s accessed through a function. And there’s thisbox_valuewrapper for the string.
There is also the MainWindow.xaml file that looks as follows:
<Window
    x:Class="WinUIAppDemo.MainWindow"
    xmlns="http://schemas.microsoft.com/winfx/2006/xaml/presentation"
    xmlns:x="http://schemas.microsoft.com/winfx/2006/xaml"
    xmlns:local="using:WinUIAppDemo"
    xmlns:d="http://schemas.microsoft.com/expression/blend/2008"
    xmlns:mc="http://schemas.openxmlformats.org/markup-compatibility/2006"
    mc:Ignorable="d">

    <StackPanel Orientation="Horizontal" HorizontalAlignment="Center" VerticalAlignment="Center">
        <Button x:Name="myButton" Click="myButton_Click">Click Me</Button>
    </StackPanel>
</Window>
If you double click it, it opens it with the Source Editor. If you try to run the Open with… command and select XAML Designer nothing happens. There is an Design in Blend option, but it’s the same problem:

I can only conclude that designing WinUI 3 visual elements is not possible with the designer so you need to do everything by hand and run the application to see how the UI looks. That’s a huge minus, in my book, and defeats most of the purpose of having a UI framework. But maybe it’s my fault and I missed installing something. After all, I’m just trying things.
When you build the project, a folder called Generated Files is created, containing, as the name suggests, files generated from existing source code. These include:
App.xaml.g.hppandApp.xaml.g.cppfor theAppclass.MainWindow.xaml.g.hppandMainWindow.xaml.g.cppfor theMainWindowclass.
The generated header for the MainWindow class looks as follows:
#pragma once

namespace winrt::WinUIAppDemo::implementation
{
    using IInspectable = ::winrt::Windows::Foundation::IInspectable;

    template <typename D, typename ... I>
    struct MainWindowT : public ::winrt::WinUIAppDemo::implementation::MainWindow_base<D,
        ::winrt::Microsoft::UI::Xaml::Markup::IComponentConnector,
        I...>
    {
        using base_type = typename MainWindowT::base_type;
        using base_type::base_type;
        using class_type = typename MainWindowT::class_type;

        void InitializeComponent();
        void Connect(int32_t connectionId, IInspectable const& target);
        ::winrt::Microsoft::UI::Xaml::Markup::IComponentConnector GetBindingConnector(int32_t connectionId, IInspectable const& target);
        void UnloadObject(::winrt::Microsoft::UI::Xaml::DependencyObject const& dependencyObject);
        void DisconnectUnloadedObject(int32_t connectionId);

        ::winrt::Microsoft::UI::Xaml::Controls::Button myButton()
        {
            return _myButton;
        }
        void myButton(::winrt::Microsoft::UI::Xaml::Controls::Button value)
        {
            _myButton = value;
        }

    protected:
        bool _contentLoaded{false};

    private:
        struct MainWindow_obj1_Bindings;

        ::winrt::Microsoft::UI::Xaml::Controls::Button _myButton{nullptr};
    };
}
You can see the accessor member functions for the myButton control. That’s why the syntax for accessing the object was myButton().Content(box_value(L"Clicked")).
Impression: ⭐⭐
Not being able to edit the XAML in the visual designer is a huge drawback.
Familiarizing with WinRT concepts and structure needs some time.
Building and Running
Trying to build this project, I got the following error in the output window:
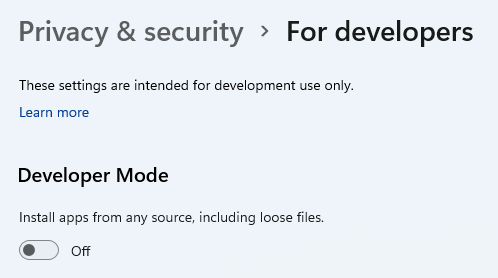
DEP0100: Please ensure that target device has developer mode enabled. Could not check to see if Developer Mode is enabled on the local machine due to error 00000490. To learn more about Developer Mode, please visit https://go.microsoft.com/fwlink/?linkid=2128411
The solution to this is to enable the Developer Mode from settings, Privacy & Security > For Developers.
After this, building works and it also automatically downloads and installs missing components:
Creating a new clean layout...
Copying files: Total 3 mb to layout...
Checking whether required frameworks are installed...
Framework: Microsoft.VCLibs.140.00.Debug.UWPDesktop/X64, app package version 14.0.30704.0 is not currently installed.
Framework: Microsoft.VCLibs.140.00.Debug/X64, app package version 14.0.30704.0 is not currently installed.
Installing missing frameworks...
Registering the application to run from layout...
Deployment complete (0:00:05.292). Full package name: "17af30e1-10a4-4abe-8866-203638b1aa27_1.0.0.0_x64__60yvx6gbcw69r"
========== Deploy: 1 succeeded, 0 failed, 0 skipped ==========
Running the app shows the following window:

Impression: ⭐⭐⭐⭐⭐
Building and running was a seamless experience.
Creating the demo app
I want my demo app to have two text boxes: one for entering a Celsius value and one for Fahrenheit values. As you edit any of them, entering a value, the other should display the equivalent value. Here is how the UI is going to look:
<Window
    x:Class="WinUIApp.MainWindow"
    xmlns="http://schemas.microsoft.com/winfx/2006/xaml/presentation"
    xmlns:x="http://schemas.microsoft.com/winfx/2006/xaml"
    xmlns:local="using:WinUIApp"
    xmlns:d="http://schemas.microsoft.com/expression/blend/2008"
    xmlns:mc="http://schemas.openxmlformats.org/markup-compatibility/2006"
    mc:Ignorable="d">

   <Grid Margin="10">
      <Grid.RowDefinitions>
         <RowDefinition Height="Auto" />
         <RowDefinition Height="Auto" />
      </Grid.RowDefinitions>
      <Grid.ColumnDefinitions>
         <ColumnDefinition Width="Auto" />
         <ColumnDefinition Width="*" />
      </Grid.ColumnDefinitions>

      <TextBlock Grid.Column="0" Grid.Row="0" Text="Celsius" />
      <TextBox Grid.Column="1" Grid.Row="0" Name="txtCelsius"/>

      <TextBlock Grid.Column="0" Grid.Row="1" Text="Fahrenheit" />
      <TextBox Grid.Column="1" Grid.Row="1" Name="txtFahrenheit"/>
   </Grid>
</Window>
If I build and run it, it looks as follows:

What I need to do next is adding handlers. The designer does not work, but luckily, adding them from the Source Editor does work:

This is the modified code:
<TextBox Grid.Column="1" Grid.Row="0" Name="txtCelsius" TextChanged="txtCelsius_TextChanged"/>
<TextBox Grid.Column="1" Grid.Row="1" Name="txtFahrenheit" TextChanged="txtFahrenheit_TextChanged"/>
Here is how the handlers look in the header and source file:
// --- MainWindow.xaml.h ---
namespace winrt::WinUIApp::implementation
{
    struct MainWindow : MainWindowT<MainWindow>
    {
        MainWindow();

        int32_t MyProperty();
        void MyProperty(int32_t value);

        void txtCelsius_TextChanged(winrt::Windows::Foundation::IInspectable const& sender, winrt::Microsoft::UI::Xaml::Controls::TextChangedEventArgs const& e);
        void txtFahrenheit_TextChanged(winrt::Windows::Foundation::IInspectable const& sender, winrt::Microsoft::UI::Xaml::Controls::TextChangedEventArgs const& e);
    };
}

// --- MainWindow.xaml.cpp ---
void winrt::WinUIApp::implementation::MainWindow::txtCelsius_TextChanged(winrt::Windows::Foundation::IInspectable const& sender, winrt::Microsoft::UI::Xaml::Controls::TextChangedEventArgs const& e)
{
}

void winrt::WinUIApp::implementation::MainWindow::txtFahrenheit_TextChanged(winrt::Windows::Foundation::IInspectable const& sender, winrt::Microsoft::UI::Xaml::Controls::TextChangedEventArgs const& e)
{
}
Again, two things to notice:
- The handlers are added outside the namespace from the original source (the one generate from the project template), which is inconsistent with the rest.
- The code is generated with fully qualified names, even though the right
using namespacedirectives where already declared, which is also inconsistent with the rest. Moreover, the result is cluttered code. These lines are so long it’s impossible to read.
Here is my first attempt to implement the handler for the change of the Celsius value:
void MainWindow::txtCelsius_TextChanged(IInspectable const& sender, TextChangedEventArgs const& e)
{
   double celsius = std::stod(txtCelsius().Text().c_str());
   double fahrenheit = 32 + 1.8 * celsius;
   txtFahrenheit().Text() = std::to_wstring(fahrenheit);
}
This compiles but when executed does not work. The text is not set in the Fahrenheit box. Remember the myButton().Content(box_value(L"Clicked")) line? The text should probably be set with something like Text(str).
void MainWindow::txtCelsius_TextChanged(IInspectable const& sender, TextChangedEventArgs const& e)
{
   double celsius = std::stod(txtCelsius().Text().c_str());
   double fahrenheit = 32 + 1.8 * celsius;
   txtFahrenheit().Text(std::to_wstring(fahrenheit));
}
This time it does work. But there are still some problems. The application crashes if you type a – (minus) or you write something in the Celsius field and then delete it all. So, the implementation to cover these looks as follows:
void MainWindow::txtCelsius_TextChanged(IInspectable const& sender, TextChangedEventArgs const& e)
{
   winrt::hstring text = txtCelsius().Text();
   if (!text.empty() && text != L"-")
   {
      try
      {
         double celsius = std::stod(text.c_str());
         double fahrenheit = 32 + 1.8 * celsius;
         txtFahrenheit().Text(std::to_wstring(fahrenheit));
      }
      catch(...)
      {
         txtFahrenheit().Text(L"");
      }
   }
   else
   {
      txtFahrenheit().Text(L"");
   }
}
The opposite formula is C = (F - 32) / 1.8. You can find the source code for the other handler in the attached zip archive.
Impression: ⭐⭐⭐
Code generation is not at its best. Inconsistencies between the project templates and the generated code are obvious. Fully qualified names of components of the WinUI framework make the code hard to read.
Adding more features
To try to get a better feeling of the experience of working with the WinUI API, I decided do add some more features. For instance, the ability to toggle between a light mode and dark mode of the UI. The WinUI framework has a toggle button, represented by the ToggleSwitch class. So, I added one to the top-right corner of the window:
<ToggleSwitch Grid.Column="1" Grid.Row="0" HorizontalAlignment="Right"
              Name="toggleMode" Header="Mode"
              OnContent="Light" OffContent="Dark"
              IsOn="True"
              Toggled="toggleMode_Toggled"/>
The implementation of the handler for the Toggled event should change the Background and Foreground of the window and its controls. It took me a while to figure out how to create brushes to set for the foreground and background properties of controls. The trouble is, the Brush class in in the winrt::Microsoft::UI::Xaml::Media namespace, while the Colors class is in the winrt::Microsoft::UI namespace. But there’s not all; there is also a Colors class in the winrt::Windows::UI namespace. And that’s what I used first. However, that’s part of UWP and it works too, except that I got some errors. But first, here is my first attempt to implement the handler:
void MainWindow::toggleMode_Toggled(IInspectable const& /*sender*/, RoutedEventArgs const& /*e*/)
{
   if (!m_initialized) return;

   ToggleMode(toggleMode().IsOn());
}

void MainWindow::ToggleMode(bool const light)
{
   auto bgColor = SolidColorBrush(
      light ?
      Colors::White() :
      Colors::DarkGray());

   auto txColor = SolidColorBrush(
      light ?
      Colors::Black() :
      Colors::White());

   rootGrid().Background(bgColor);

   txtCelsius().Background(bgColor);
   txtCelsius().Foreground(txColor);

   txtFahrenheit().Background(bgColor);
   txtFahrenheit().Foreground(txColor);

   txtFahrenheit().Background(bgColor);
   toggleMode().Foreground(txColor);
}
The compiler errors were the following:
WinUIApp\MainWindow.xaml.cpp(82,18): error C3779: 'winrt::Windows::UI::Colors::White': a function that returns 'auto' cannot be used before it is defined
WinUIApp\Generated Files\winrt\impl\Windows.UI.2.h(172): message : see declaration of 'winrt::Windows::UI::Colors::White'
WinUIApp\MainWindow.xaml.cpp(83,18): error C3779: 'winrt::Windows::UI::Colors::Black': a function that returns 'auto' cannot be used before it is defined
WinUIApp\Generated Files\winrt\impl\Windows.UI.2.h(42): message : see declaration of 'winrt::Windows::UI::Colors::Black'
This means that the definition of the White() and Black() functions could not be found. So I was missing a header. Turned out I had to include the following in pch.h:
#include <winrt/Windows.UI.h>
The good part is that the file names and the namespaces have the same name. So if you’re looking to include the APIs from the winrt::Microsoft::UI::Xaml::Controls namespace, then you need to include the header <winrt/Microsoft.UI.Xaml.Controls.h>.
With these changes I could compile and run but the behavior was not really what I expected. I got a few more problems:
- could not find how to change the color of the host window. I had to settle for changing the background color of the root grid and its elements.
- foreground and background colors of the text blocks are changed when you hover then cursor over them, and changing the text color of the toggle switch header did not work.
Since the plan was not to provide a perfect solution but something that works to some level, I decided to simplify it as follows:
void MainWindow::ToggleMode(bool const light)
{
   auto bgColor = SolidColorBrush(
      light ?
      Colors::White() :
      Colors::DarkGray());

   rootGrid().Background(bgColor);
}
With these changes, the application looks as follows:


And then I realized I was using the wrong Colors class, from UWP instead of WinUI. The change required only a swapping of namespaces, from winrt::Windows::UI to winrt::Microsoft::UI. Of course, this also made unnecessary the inclusion of the <winrt/Windows.UI.h> header.
A second feature that I decided to add was displaying an icon representing a thermometer based on the entered temperature. A value over 4 degrees Celsius would show a warm/hot temperature, one below that a freezing temperature. When no value is entered, there should be no icon displayed.
This turned out to be a mess. Because WinUI 3 has many classes including the following:
After a few tries, I ended up using an Image object:
<Image Grid.Column="1" Grid.Row="3" Name="imageThermo"
       HorizontalAlignment="Left" Margin="5"
       Width="48" Height="48" />
I created a helper function to set the right image source to this control. This wasn’t easy either, but eventually I found what I was looking for within the docs for the class. My function looks as follows:
void MainWindow::DisplayThermometer(std::optional<double> value)
{
   if (!value.has_value())
   {
      ImageSource src(nullptr);
      imageThermo().Source(src);
   }
   else
   {
      BitmapImage img;
      Windows::Foundation::Uri uri(
         value.value() > 4 ?
         L"ms-appx:///Assets/hot48.png" :
         L"ms-appx:///Assets/freezing48.png");
      img.UriSource(uri);

      imageThermo().Source(img);
   }
}
This function needs to be invoked every time the temperature value changes:
void MainWindow::txtCelsius_TextChanged(IInspectable const& /*sender*/, TextChangedEventArgs const& /*e*/)
{
   winrt::hstring text = txtCelsius().Text();
   if (!text.empty() && text != L"-")
   {
      try
      {
         double celsius = std::stod(text.c_str());
         double fahrenheit = 32 + 1.8 * celsius;
         txtFahrenheit().Text(std::to_wstring(fahrenheit));

         DisplayThermometer(celsius);
      }
      catch(...)
      {
         txtFahrenheit().Text(L"");
         DisplayThermometer({});
      }
   }
   else
   {
      txtFahrenheit().Text(L"");
      DisplayThermometer({});
   }
}
Eventually, I got the result I was looking for. Here are a couple of screenshots:


Impression: ⭐⭐
Based on my experience with WPF I though doing these would be relatively simple but ended up spending unexpectedly more time reading docs to figure out how to do it. Maybe I’m too harsh, but a combination of unhelpful documentation and similar APIs created too much confusion for me.
Final words
WinUI 3 is trumpeted as the next big thing in Windows development. When it comes to the C++ projection of the API, unfortunately, I’m not impressed. I personally don’t see this as the modern native library C++ Windows developers have been wishing for the past 12-15 years. Designing user interfaces must be done by hand in XAML, which I often do in WPF, but not having the designer means you don’t really know what you get at design time and that’s a huge drawback. The C++ API is cumbersome at best. Although I tried to browse through the framework source code, the experience was similar to trying to make a sense of long template error messages. Also, the generated code is not optimal as I explained earlier. Maybe in a few versions it will get better but for the time being it doesn’t look like something that I’ll be using. I think that time has shown WinRT and UWP were a mistake. WinUI, instead of starting from scratch, sweeps the dirt under the carpet. I think it’s another mistake and time will tell whether I’m right or wrong.
Thank you for this frank review. It’s disappointing the direction Microsoft is going with their C++ API. I could have written this in five minutes (maybe 10 with dark mode) in MFC. MFC wasn’t perfect, but a developer could have a business app prototype up and running very quickly without having to learn a variant of C++, without the namespace hell, and without downloading additional packages.
I wonder what Raymond, Kate, Herb, and STL thiink of this API. I would love to get their honest opinion on the direction their company is going the C++ language they have helped to nurture.
I don’t believe that your review is overly pessimistic or negative.
Some perspective: I’m a lapsed C++ developer; I departed C++ in the late 1990s when ATL became the favored environment. Screw that, I switched to C#.
With the advent of modern C++, I’m looking at returning to C++ as a viable all-round development environment. I’m mentally comparing WinUI3 with Qt (I have limited experience in both)
Unfortunately, while the language has greatly improved in the intervening 20+ years, the Windows GUI support has not.
Specifically:
* Why do we have to manipulate or make reference to the generated source files in our source? (Those .g.h and .g.cpp files). Although these files are present in the C# world, they are explicitly hidden, and developers need not even know that they exist. Actually, C# has the concept of partial classes — class implementation can be divided over more than one source code file. The C# compiler aggregates all the partial specifications for a single class into a single compilation. Not sure if C++ has that concept.
* What’s with the IDL files? Deja-COM-vue?
Actually, back in “the day” (when COM was all the rage), I did this thought experiment, where a C++/ATL/COM developer switched roles with a VB/COM developer. I imagined their responses: “What is this @#$@#!%!. It doesn’t resemble anything like what I’m used to.” How is it possible that the implementation of the same feature in the two different systems could look so different? Why should I have to learn all the ATL/COM drek in C++, when a supposedly toy language like VB manages to effectively hide it for me? And now you see the genesis of the shift away from C++/ATL to C# or Java. Are we seeing the same kind of thing in WinUI/C++?
* I wonder what data-binding will look like in WinUI C++?
General impression: WinUI/C++ exposes too much of the internal workings of WinUI to the application. Does Qt do anything similar?
WinUI/C++ feels like an incomplete or unfinished implementation.
Again, if it isn’t a significant improvement over what Qt provides, why should I abandon Qt for it?
Too bad Micro$oft, with basically unlimited resources, can’t make a decent RAD OO C++ gui framework. When compared to what Borland could do in the 90s it’s just sad.
MFC was something but highly C centric. not very RAD but at least there was a designer….
To use the visual designer in Visual Studio 2022, choose from VS installer either the
Universal Windows Platform development or .NET desktop development workload.
Both of these workloads include the Blend for Visual Studio component.
If you want to use the visual editor, you need to install Blend for VS 2022. To install Blend, choose the Universal Windows Platform (UWP) development or .NET desktop development workload in the Visual Studio installer. Both of these workloads include the Blend component for Visual Studio.
Thanks to this tutorial I built an entire application using WinUI3 and C++.
The application includes coroutines and multithreading and has been relased on the Microsoft Store under the name “BioNet” (recognizable by the yellow logo). Thanks!
> At a first look, I find this confusing, but will probably understand it better lately.
The class under the factory_implementation namespace is the WinRT factory that’s used to activate an instance of the class from outside. In this case it’s not really necessary as you’re creating an instance directly inside the same project, however, it’s still needed for the tooling to work properly.
Marius- thanks for this post. And for sharing code.
December 2022 C++ WinRT
I’m working on a listener application (TCP) that will install on a customer’s Windows 10 PC. I roughed the basic winsock code in Windows console- wrote a server app and a separate client and ran them successfully.
Then I grabbed UWP (thinking it’s a current platform, the way forward, well supported, etc.). I put a GUI together because they did offer a XAML designer for UWP. Not for UI 3. I put winsock2 code into the application, and the server/listener will not accept a connection. VS 2022, build for W10. I spent days trying to figure out why VS, which is exempt from network isolation wouldn’t allow the connection. It’s got a bug. So I finally abandoned UWP and went with UI 3 + XAML.
The server worked (identical code pasted in), so I moved forward with development. Then I add a TextBox to the application and it won’t compile. They have a null pointer that is initialized to zero, and they use it before assigning it. A pointer to the TextBox or another object that’s required to make TextBox work. I spent another day researching that, trying to create a work around.
I pasted your TextBox code into my XAML, since your application is 100% identical to mind. No go. No RichTextEdit.
MS has a bug with TextBoxes. This bug surfaced in a 2017 build, they fixed it, then re-implemented the buggy code later that year.
How they managed to recreate that same bug in new UI 3 is amazing, but MS often does amazing things.
And now I know way too much about MS.
your comments: “Maybe I’m too harsh, but a combination of unhelpful documentation and similar APIs created too much confusion for me.” are exactly correct.
Should’ve used wxWindows and installed the base classes.
Hi. I have written an article about how to create WinUI 3 apps in C++ without xaml. It looks beautiful. Please try to do it!
https://github.com/sotanakamura/winui3-without-xaml
How does WinUI 3 function as a native UI framework, and what steps and resources are required to get started with WinUI 3 for C++, as discussed in the provided example?
Telkom Informatika