How to Install BoxBilling on Debian 11
On this page
- Prerequisites
- Installing and Configuring PHP
- Installing Nginx and MariaDB
- Setting Up MariaDB Database
- Setting up New Database and User for BoxBilling
- Downloading BoxBilling Source Code
- Configuring Nginx for BoxBilling
- Installing and Configuring BoxBilling
- BoxBilling Post Installation
- Logging in to the BoxBilling Admin Page
- Conclusion
BoxBilling is a community-driven billing software written in PHP. It is free and open-source billing designed to be easy to use for both clients and sellers. BoxBilling provides a great experience for clients with an intuitive interface and also supports multiple payment gateways.
In this tutorial, we will show you how to install BoxBilling with Nginx, PHP-FPM, and MariaDB on Debian 11 Bullseye.
Prerequisites
- A Debian 11 server Bullseye.
- A user with sudo root privileges.
- A domain name or sub-domain pointed to the server IP address. Especially in a production environment.
Installing and Configuring PHP
First, you will install and configure the PHP-FPM on your Debian system. the latest version of BoxBilling required the PHP-FPM 7.4 or higher, which is the default PHP version on Debian repository.
Before you get started, refresh the Debian package index using the 'apt' command below.
sudo apt update
After repository isrefreshd, run the following command to install PHP-FPM with all additional extensions for BoxBilling.
sudo apt install php-fpm php-cli php-common php-zip php-mysql php-gd php-intl php-curl php-imap php-mbstring php-xml php-json libpcre3 openssl git unzip -y
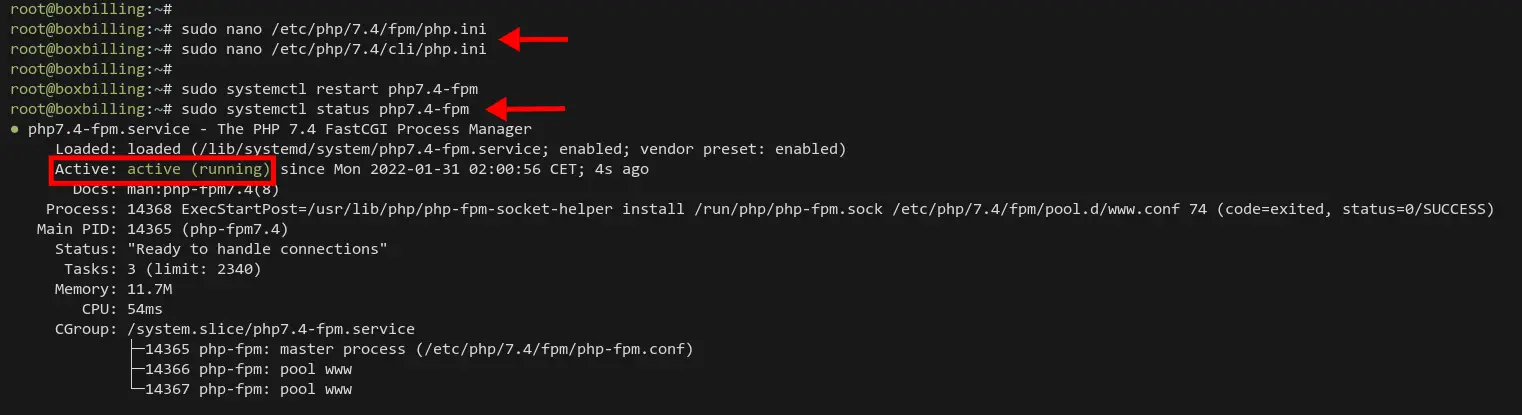
Once all PHP installation is finished, edit the file 'php.ini' using nano editor.
sudo nano /etc/php/7.4/fpm/php.ini
sudo nano /etc/php/7.4/cli/php.ini
Change the option of 'memory_limit', 'max_execution_time', and 'date.timezone' with your preferred environment. In this example, we're using the server with 2GB of RAM memory, so we will allocate 'memory_limit' for PHP to '512MB'. For the 'data.timezone' option, change it with your timezone.
memory_limit = 512M
max_execution_time = 360
date.timezone = Europe/Paris
Save the file and exit.
Now, restart the PHP-FPM service and apply the new configuration by running the 'systemctl' command below.
sudo systemctl restart php7.4-fpm
Lastly, verify the PHP-FPM service using the command below.
sudo systemctl status php7.4-fpm
You will see the output as the PHP-FPM service is active running.
Installing Nginx and MariaDB
In this step, you will be installing the Nginx web server and MariaDB database. The BoxBilling application requires at least MySQL v8, but also supports another MySQL implementation such as MariaDB.
Install Nginx and MariaDB on Debian 11 server using the 'apt' command below.
sudo apt install nginx-full mariadb-server -y
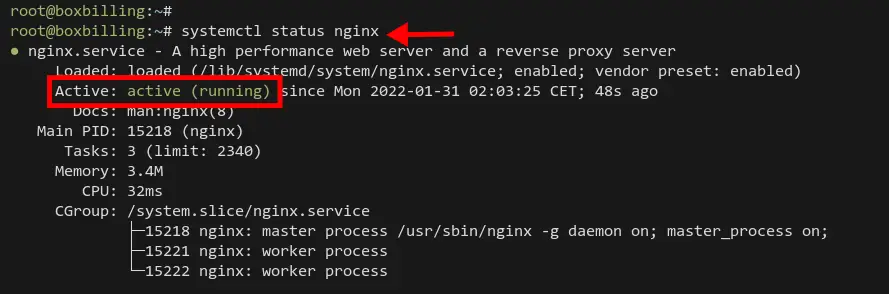
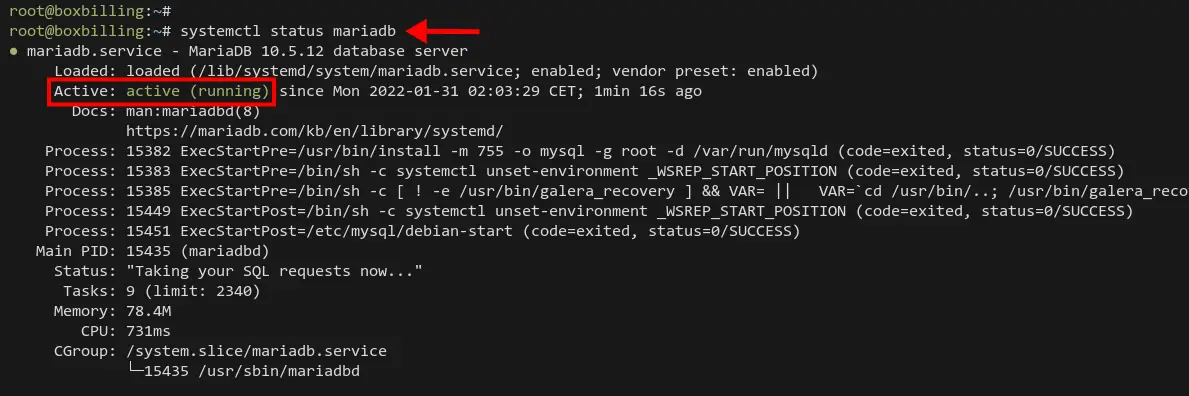
After Nginx and MariaDB installation is completed, run the following command to verify the Nginx service and MariaDB service.
sudo systemctl status nginx
sudo systemctl status mariadb
Now you should get the output as the Nginx and MariaDB services are active and running.
Setting Up MariaDB Database
After the MariaDB installation, it's recommended to set up the root password for MariaDB. You will be using the 'mysql_secure_installation' command to set up the MariaDB root password and deploy MariaDB with basic security.
Run the command 'mysql_secure_installation' on your terminal server.
mysql_secure_installation
Now you will be asked to type the root password for MariaDB. Press ENTER to continue because the default MariaDB installation comes without root password.
Enter current password for root (enter for none):
OK, successfully used password, moving on...
Now type 'Y' to switch the default authentication for root user to the 'unix_socket_authentication' method. This will ensure the root user is always connected to the MariaDB from the local machine.
Setting the root password or using the unix_socket ensures that nobody
can log into the MariaDB root user without the proper authorisation.

You already have your root account protected, so you can safely answer 'n'.

Switch to unix_socket authentication [Y/n] Y
Enabled successfully!
Reloading privilege tables..
 ... Success!
Type 'Y' to change the root password for MariaDB, then input the new password for MariaDB and repeat.
You already have your root account protected, so you can safely answer 'n'.

Change the root password? [Y/n] Y
New password:
Re-enter new password:
Password updated successfully!
Reloading privilege tables..
 ... Success!
Type 'Y' to remove the default anonymous user on MariaDB.
By default, a MariaDB installation has an anonymous user, allowing anyone
to log into MariaDB without having to have a user account created for
them.  This is intended only for testing, and to make the installation
go a bit smoother.  You should remove them before moving into a
production environment.

Remove anonymous users? [Y/n] Y
 ... Success!
Type 'Y' to disable remote login for the user root.
Normally, root should only be allowed to connect from 'localhost'.  This
ensures that someone cannot guess at the root password from the network.

Disallow root login remotely? [Y/n] Y
 ... Success!
Type 'Y' to remove the default database 'test' and all privileges on top of it.
By default, MariaDB comes with a database named 'test' that anyone can
access.  This is also intended only for testing, and should be removed
before moving into a production environment.

Remove test database and access to it? [Y/n] Y
 - Dropping test database...
 ... Success!
 - Removing privileges on test database...
 ... Success!
Lastly, reload the table privileges on MariaDB to apply new changes.
Reloading the privilege tables will ensure that all changes made so far
will take effect immediately.

Reload privilege tables now? [Y/n] Y
 ... Success!

Cleaning up...
And you've configured the MariaDB root password and your MariaDB server is now secured.
All done!  If you've completed all of the above steps, your MariaDB
installation should now be secure.

Thanks for using MariaDB!
Setting up New Database and User for BoxBilling
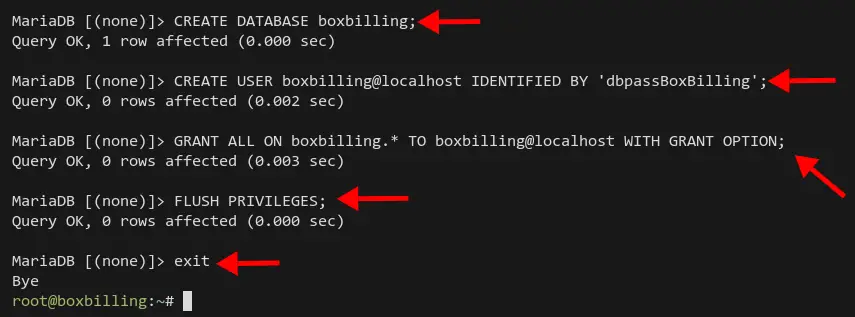
In this step, you will be creating a new database and user for BoxBilling installation. All data related BoxBilling will be stored on the MariaDB database.
Now, log in to the MariaDB shell using the following command.
mysql -u root -p
Run the following queries to create a new database and user 'boxbilling' with the password 'dbpassBoxBilling', then grant all privileges on the database 'boxbilling' to the user 'boxbilling@localhost'. After that, reload all table privileges to apply new changes on MariaDB.
CREATE DATABASE boxbilling;
CREATE USER boxbilling@localhost IDENTIFIED BY 'dbpassBoxBilling';
GRANT ALL ON boxbilling.* TO boxbilling@localhost WITH GRANT OPTION;
FLUSH PRIVILEGES;
Now type 'exit' to log out from the MariaDB shell. And you've created the new MariaDB database and user for the BoxBilling installation.
Downloading BoxBilling Source Code
BoxBilling can be installed in many ways. You can install the latest version of BoxBilling from the source code and install all PHP dependencies using 'Composer', or download the stable version of BoxBilling and move it to the web-root directory.
In this step, we will install the latest stable version of BoxBilling. At the time of this writing, the latest stable version BoxBilling is v4.22.
Create a new web root directory '/var/www/boxbilling' and move your working directory into it.
mkdir -p /var/www/boxbilling/
cd /var/www/boxbilling
Download the latest stable version of BoxBilling source code using wget command and extract the file 'BoxBilling.zip' using the unzip command.
wget https://github.com/boxbilling/boxbilling/releases/download/4.22.1.3/BoxBilling.zip
unzip Boxbilling.zip
Now, create a new directories 'cache' and 'upload' on the '/var/www/boxbilling/'.
mkdir -p /var/www/boxbilling/bb-data/{cache,uploads}
Next, change the ownership of the '/var/www/boxbilling' directory to ther user and group 'www-data' using the command below.
sudo chown -R www-data:www-data /var/www/boxbilling
Allow user 'www-data' to write to the directory 'cache' and 'upload'.
sudo chmod u+rw /var/www/boxbilling/bb-data/{cache,uploads}
And now you're ready to setup Nginx web server for BoxBilling software.
Configuring Nginx for BoxBilling
In this step, you will add new Nginx server blocks for BoxBilling. Before creating server block configuration, make sure you have the domain name pointed to the server. Also, make sure you have the SSL certificates generated for your domain, you can use the free SSL certificates from Letsencrypt.
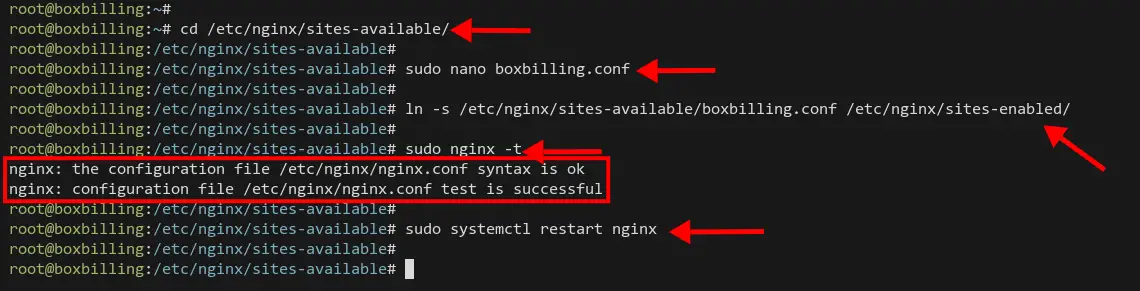
Move your working directory to '/etc/nginx/sites-available' and create a new server blocks configuration 'boxbilling.conf' using nano editor.
cd /var/www/sites-available/
nano boxbilling.conf
Copy and paste the following configuration. And make sure to change the domain name and path of the SSL certificates.
server {
    listen 80;
    server_name billing.example.io;
    return 302 https://$server_name$request_uri;
}

server {
  listen 443 ssl http2;

     set $root_path '/var/www/boxbilling';

     server_name  billing.example.io;

     index index.html index.htm index.php;
     root $root_path;
     try_files $uri $uri/ @rewrite;
     sendfile off;

  ssl_certificate /etc/letsencrypt/live/billing.example.io/fullchain.pem;
  ssl_certificate_key /etc/letsencrypt/live/billing.example.io/privkey.pem;

  ssl_protocols TLSv1.2;
  ssl_prefer_server_ciphers on;
  ssl_ciphers ECDHE-RSA-AES256-GCM-SHA512:DHE-RSA-AES256-GCM-SHA512:ECDHE-RSA-AES256-GCM-SHA384:DHE-RSA-AES256-GCM-SHA384:ECDHE-RSA-AES256-SHA384;
  ssl_ecdh_curve secp384r1; # Requires nginx >= 1.1.0
  ssl_session_timeout  10m;
  ssl_session_cache shared:SSL:10m;
  ssl_session_tickets off; # Requires nginx >= 1.5.9
  # ssl_stapling on; # Requires nginx >= 1.3.7
  # ssl_stapling_verify on; # Requires nginx => 1.3.7
  resolver 8.8.8.8 8.8.4.4 valid=300s;
  resolver_timeout 5s;
  add_header X-Frame-Options DENY;
  add_header X-Content-Type-Options nosniff;
  add_header X-XSS-Protection "1; mode=block";

    access_log /var/log/nginx/example.com.access.log;
    error_log /var/log/nginx/example.com.error.log;

     location @rewrite {
         rewrite ^/(.*)$ /index.php?_url=/$1;
     }

    location ~ \.php$ {
         include snippets/fastcgi-php.conf;
         fastcgi_pass unix:/var/run/php/php7.4-fpm.sock;
         include fastcgi_params;
         fastcgi_intercept_errors on;
    }

     # Disable PHP execution in bb-uploads and bb-data
     location ^~ /bb-uploads/ { }
     location ^~ /bb-data/ {
       deny all;
     }

     location ~* ^/(css|img|js|flv|swf|download)/(.+)$ {
         root $root_path;
         expires off;
         proxy_no_cache 1;
         proxy_cache_bypass 1;
     }

     location ~ /\.ht {
         deny all;
     }
 }
Save the file and exit.
Next, run the following command to active the server block configuration 'boxbilling.conf' and verify Nginx configuration.
ln -s /etc/nginx/sites-available/boxbilling.conf /etc/nginx/sites-enabled/
sudo nginx -t
If your Nginx configuration is correct, you will see the output message such as 'Syntax OK'.
Lasty, restart the Nginx service to apply new configuration.
sudo systemctl restart nginx
Installing and Configuring BoxBilling
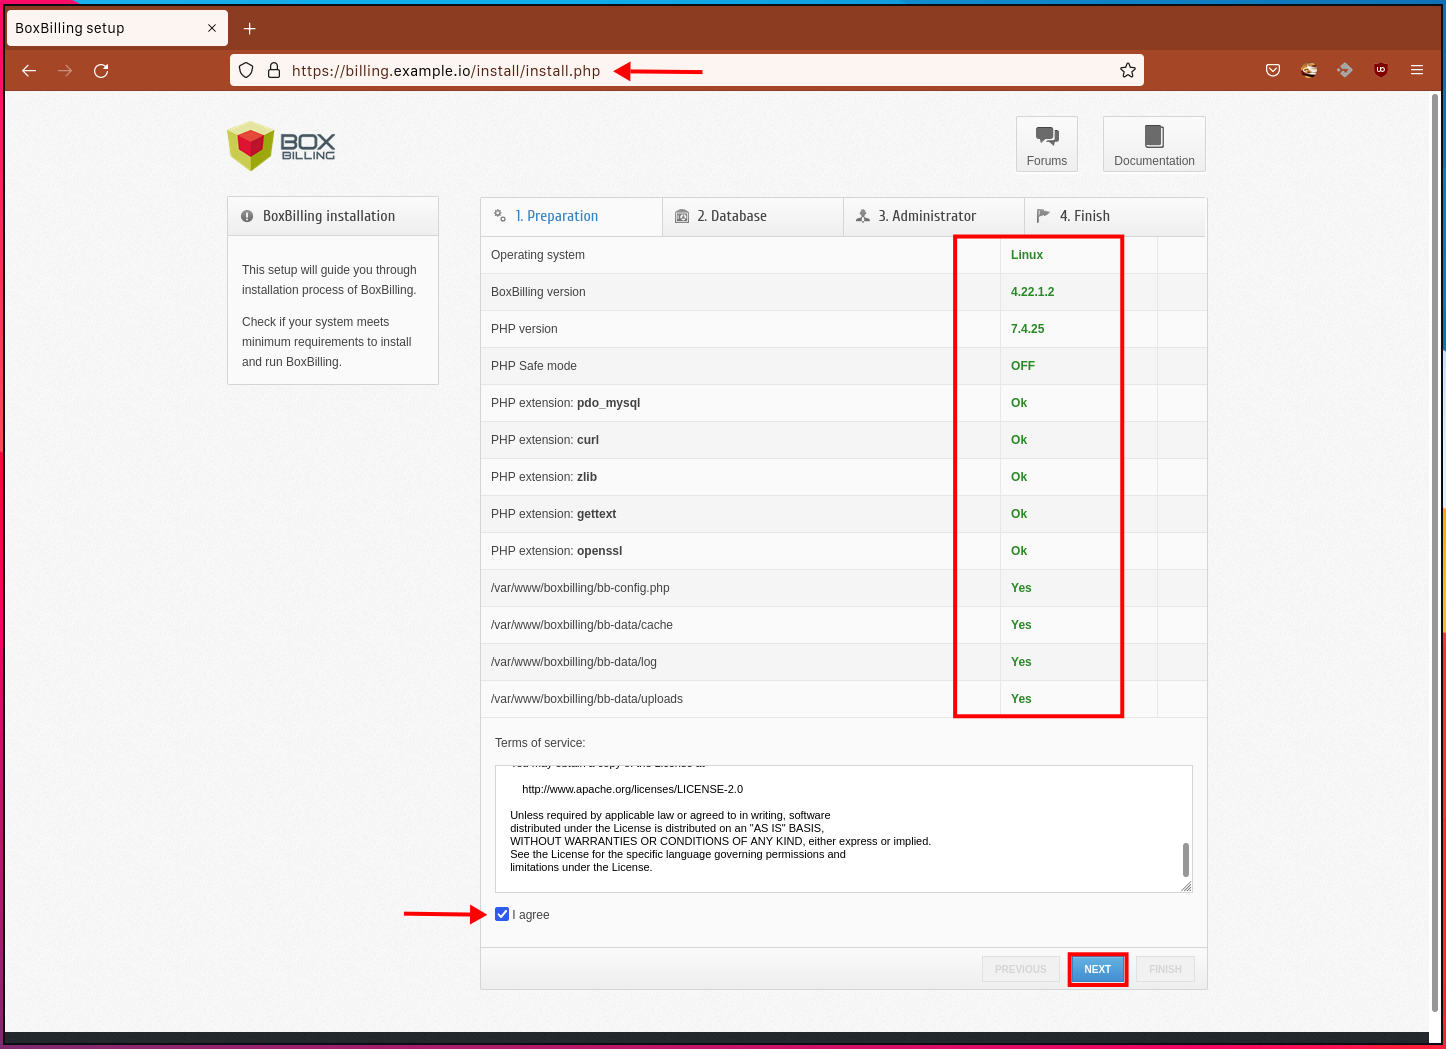
At this point, you have configured the BoxBilling and Nginx web server. Now you will start installing and configuring BoxBilling from the web browser.
Open your web browser and type the BoxBilling domain name on the address bar.
https://boxbilling.example.io/
Make sure all requirements have the green color, which means your system is met for installing BoxBilling.
Check the License box 'I agree' and click 'NEXT' button.
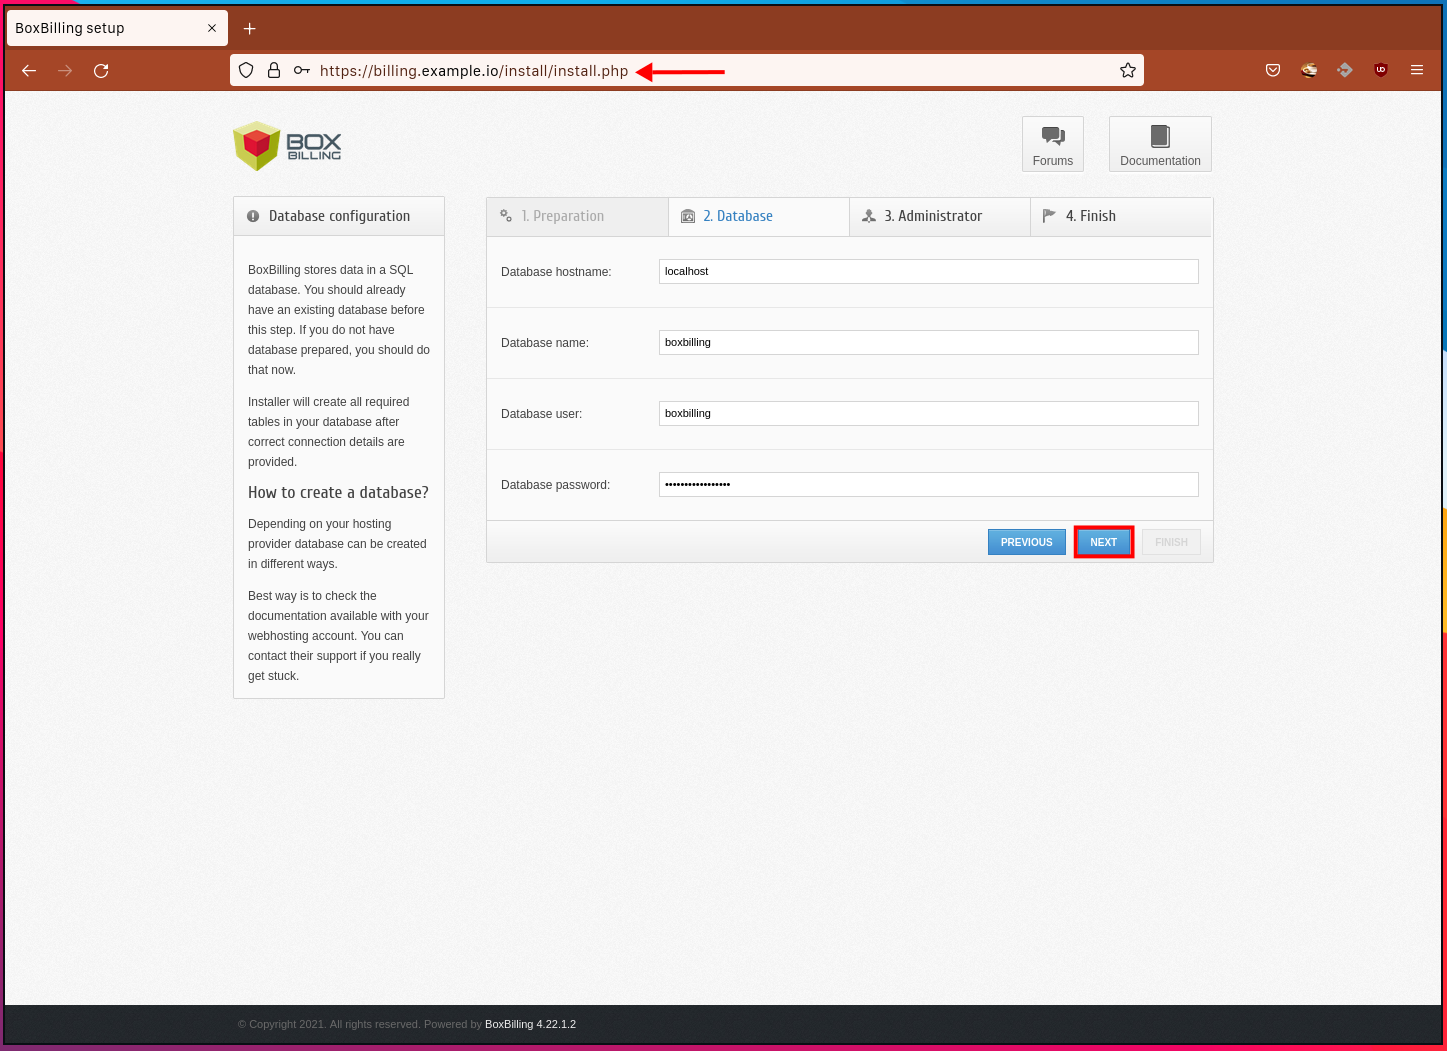
Input the database and user for BoxBilling and click 'NEXT' button again.
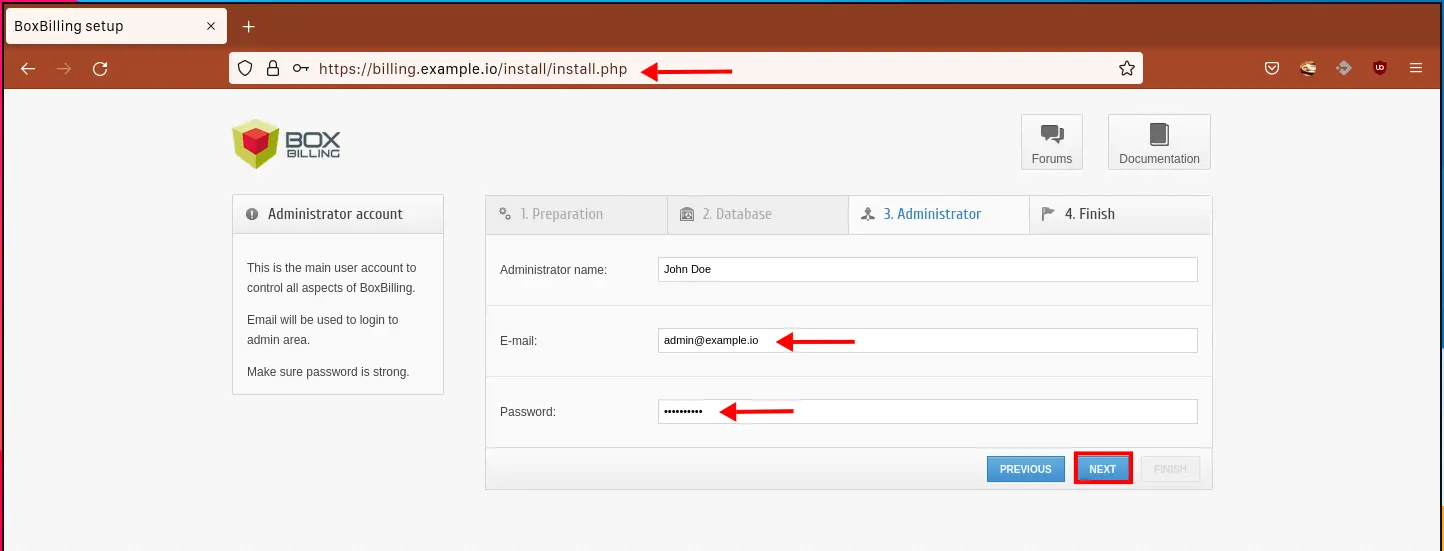
Now, type the new admin user, email, and password for BoxBilling and click 'NEXT'.
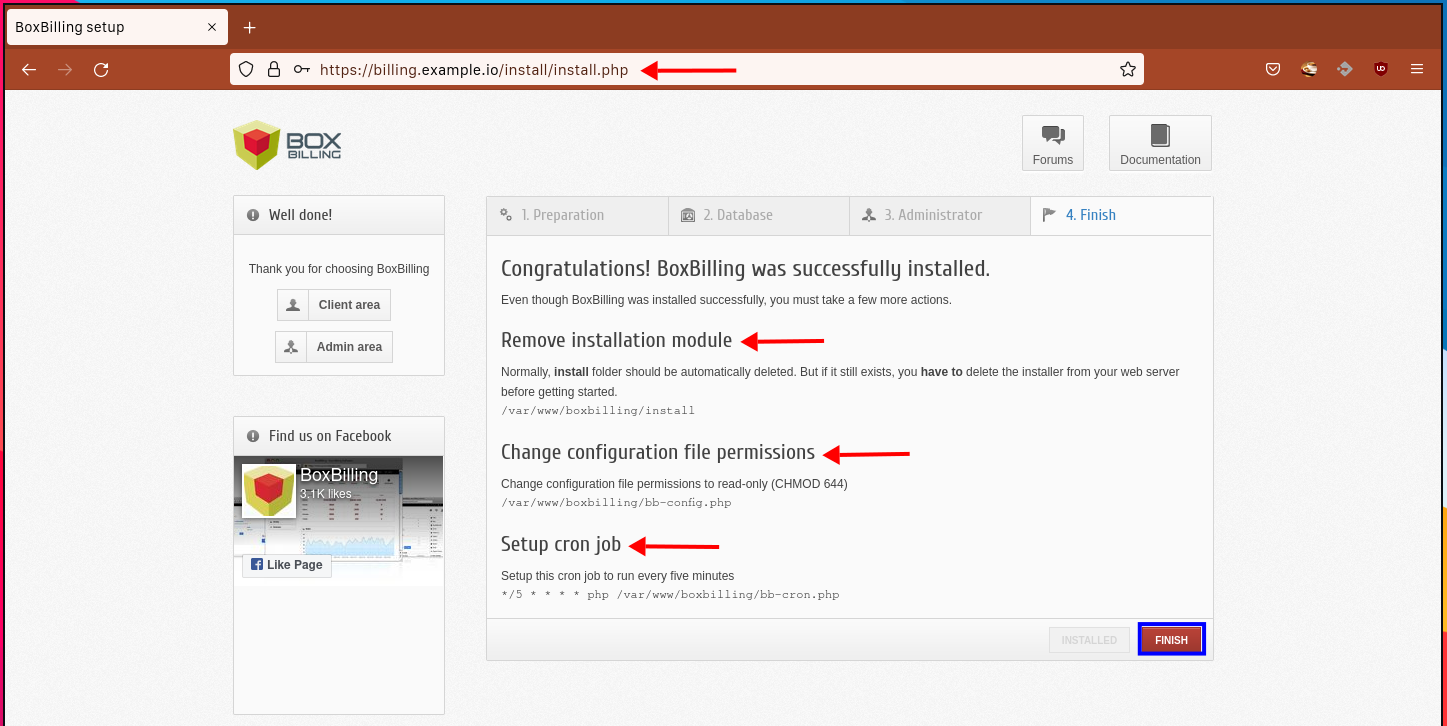
And you've successfully installed BoxBilling, but you will need an additional setups that you must apply to the BoxBilling server.
Click the 'FINISH' button and you've completed the BoxBilling installation.
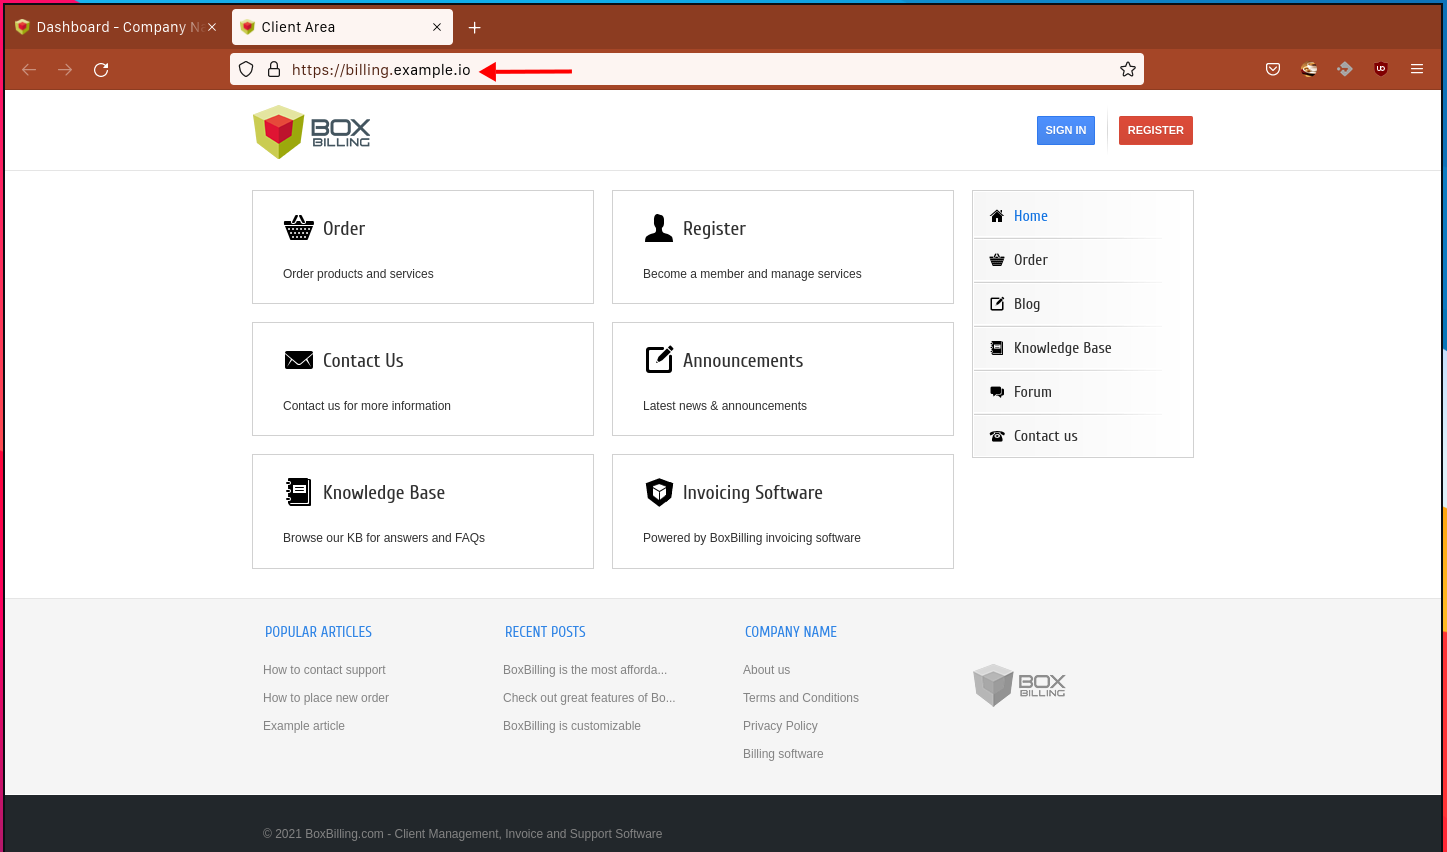
You can move to the home page of BoxBilling, and you will see a similar page as below.
BoxBilling Post Installation
After Boxbilling installation is completed, you will need to remove the 'install' directory and change the permission of the file 'bb-config.php', the create a new cronjob for BoxBilling application.
Remove the BoxBilling 'install' directory using the following command.
rm -rf /var/www/boxbilling/install
Change the permission of the 'bb-config.php' to 644. This means only user 'www-data' allow to write to this file.
sudo chmod 644 /var/www/boxbilling/bb-config.php
Now create a new cronjob for the user 'www-data'. The BoxBilling application is mainly running under the Nginx web server with user 'www-data'.
export EDITOR=nano
sudo crontab -u www-data -e
Copy and paste the following script.
*/5 * * * * php /var/www/boxbilling/bb-cron.php
Save the cron and exit.
Now your BoxBilling is ready for your clients and customers.
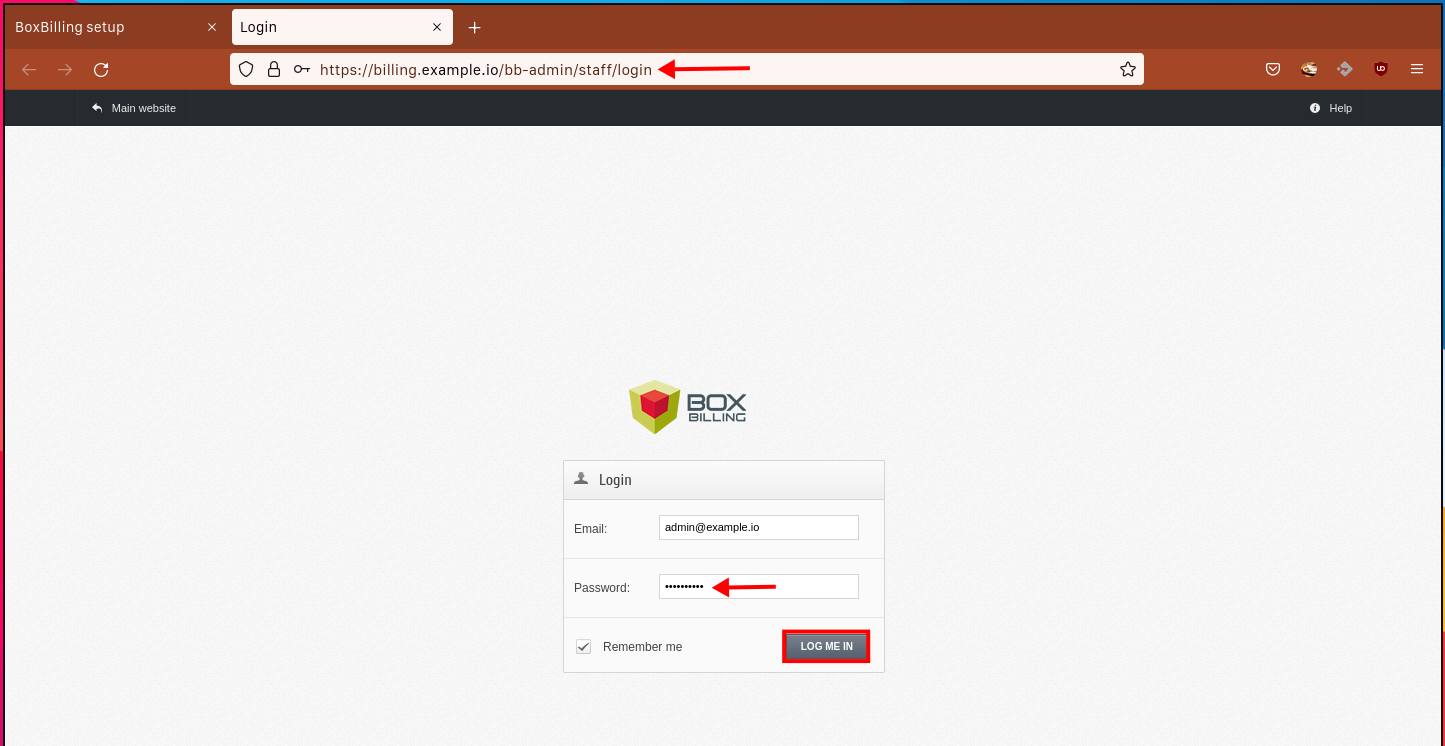
Logging in to the BoxBilling Admin Page
The BoxBilling admin page is located at the URL path '/bb-admin'. Input the following URL on the address bar of your web browser.
https://boxbilling.example.io/bb-admin/
On the BoxBilling admin login page, input your user and password, click the button 'LOG ME IN'.
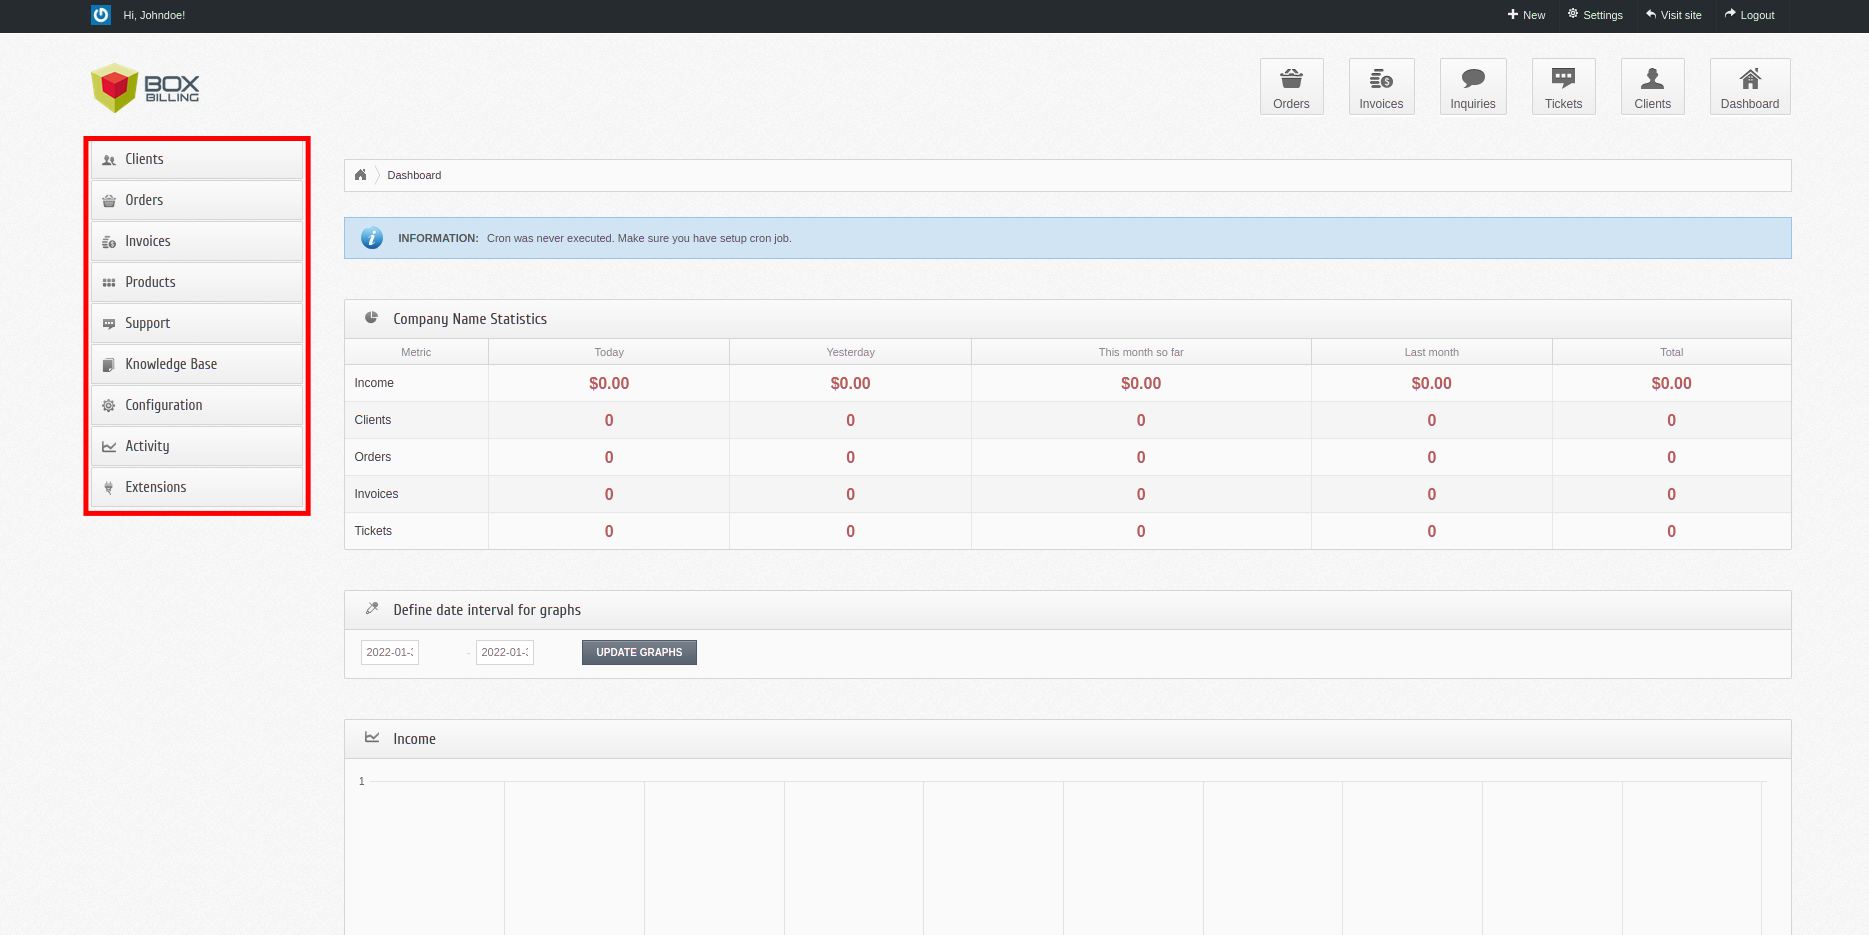
Now you will see the Boxbilling admin dashboard as below.
Conclusion
Congratulation! You have now installed the BoxBilling with PHP-FPM, Nginx, and MariaDB on the latest Debian 11 bullseye. You can now use it as your free central purchase management with your clients and customers.

