How to Install Bagisto eCommerce on Debian 11
Bagisto is a free and open-source eCommerce software written in Laravel PHP framework and it uses Vue.js - a progressive JavaScript framework. Bagisto is a hand-tailored eCommerce that allows you to build your online store in no time. It is fast, responsive, beautifully frontend, and easy to use. Bagis to is an eCommerce framework that provides multiple locales for different types of languages, multiple currencies, supports multiple store themes, and also provides a feature multistore inventory system.
In this tutorial, we will show you how to install Bagisto eCommerce on the Debian 11 Bullseye. We will be using the PHP-FPM, Nginx web server, and MariaDB database.
Prerequisites
- The latest version of Debian 11 Bullseye.
- A user with root/sudo privileges.
- A domain name pointed to your server IP address.
Installing LEMP Stack
At first, you will be installing the LEMP Stack on your Debian server. The current version of Bagisto eCommerce required PHP 7.4 or higher, the MariaDB 10.2.17 or higher, and Nginx web server.
Before you start installing packages, update your repository using the following command.
sudo apt update
Now install PHP-FPM, Nginx web server, and MariaDB database using the apt command below.
sudo apt install nginx-full mariadb-server php-fpm php-cli php-common php-zip php-mysql php-gd php-intl php-curl php-imap php-mbstring php-xml php-json libpcre3 git unzip -y
After all packages installation is completed, edit the PHP configuration 'php.ini' using nano editor.
sudo nano /etc/php/7.4/fpm/php.ini
sudo nano /etc/php/7.4/cli/php.ini
Now change the following option with your current environment.
memory_limit = 512M
max_execution_time = 360
date.timezone = America/Toronto
Next, restart the PHP-FPM service to apply new configuration.
sudo systemctl restart php7.4-fpm
And you have completed the basic LEMP Stack installation that will be used for Bagisto eCommerce.
Setting Up MariaDB Root Password
After you have installed the LAMP Stack on your Debian server, you will set up the root password for MariaDB database. The recommended way to set up the MariaDB root password is by using the command-line tool 'mysql_secure_installation'.
Run the 'mysql_secure_installation' command below.
mysql_secure_installation
Now you will be asked for some questions:
- Press ENTER to set up the root password for MariaDB.
- Type 'Y' to switch the root user authentication using 'unix_socket_authentication' method.
- Type 'Y' to setup the MariaDB root password, then input your password and repeat.
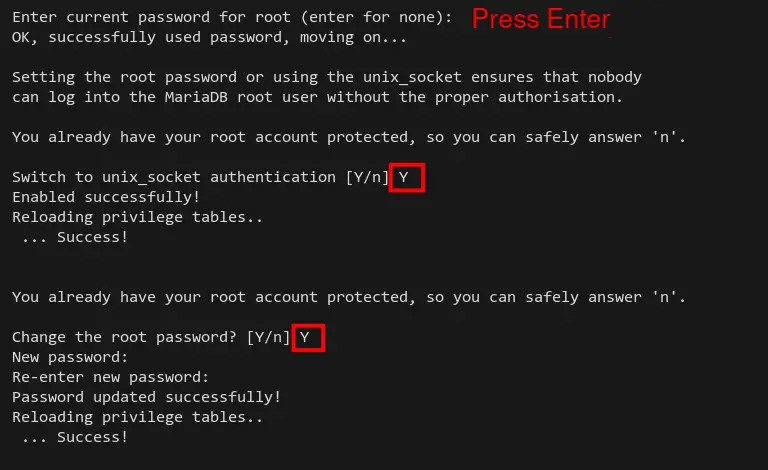
- Type 'Y' to remove the MariaDB anonymous user.
- Type 'Y' to disable remote login for the root user.
- Type 'Y' again to remove the default database 'test' with all privileges on top of it.
- Type 'Y' to reload all tables privileges to apply new changes.

And you've completed the basic secure deployment of MariaDB database.
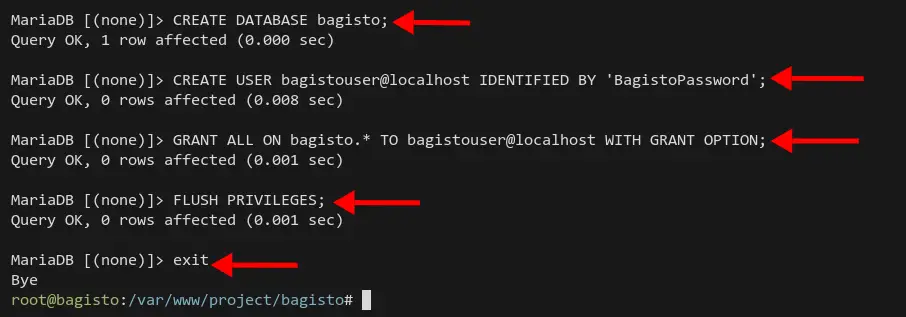
Setting Up New Database and User for Bagiosto
After you have configured the MariaDB database, you will now create a new database and user for Bagisto eCommerce. You will need to log in to the MariaDB shell to create a new database and user.
Log in to the MariaDB shell as user 'root' using the following command.
mysql -u root -p
Now run the following query to create a new database 'basgisto' and user 'bagistouser' with the password 'BagistoPassword'.
CREATE DATABASE bagisto;
CREATE USER bagistouser@localhost IDENTIFIED BY 'BagistoPassword';
Next, allow the database user 'bagistouser' to access and write to the database 'bagisto', then reload all tables privileges. This is needed to apply new changes on MariaDB privileges.
GRANT ALL ON bagisto.* TO bagistouser@localhost WITH GRANT OPTION;
FLUSH PRIVILEGES;
Now type 'exit' to log out from the MariaDB Shell. And you have created a new database and user for Bagisto installation.
Installing Composer Tool
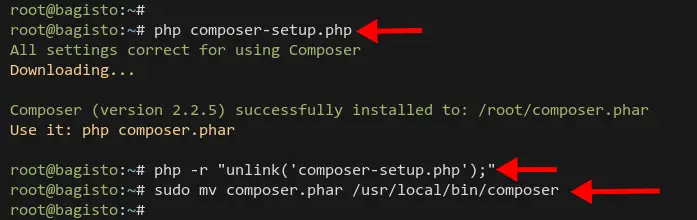
In this step, you will be installing the Composer on your Debian system. The Composer is needed for installing Bagisto eCommerce.
Run the 'php' commands below to download the installer script for Composer. Also, this command will verify the installer script. Ensureyou get the message 'Installer verified' on your screen.
php -r "copy('https://getcomposer.org/installer', 'composer-setup.php');"
php -r "if (hash_file('sha384', 'composer-setup.php') === '906a84df04cea2aa72f40b5f787e49f22d4c2f19492ac310e8cba5b96ac8b64115ac402c8cd292b8a03482574915d1a8') { echo 'Installer verified'; } else { echo 'Installer corrupt'; unlink('composer-setup.php'); } echo PHP_EOL;"

Now, run the installer script 'composer-setup.php' to install the Composer, then remove the script 'composer-setup.php'.
php composer-setup.php
php -r "unlink('composer-setup.php');"
The installer scrip will download the binary file 'composer.phar'. Move and rename the 'composer.phar' to '/usr/local/bin/composer'.
sudo mv composer.phar /usr/local/bin/composer
To verify the Composer installation, run the 'composer' command below.
sudo -u www-data composer --version
You will get the output version of Composer as the screenshot below.

Now you have installed Composer on your server, you're ready to install Bagisto eCommerce using Composer.
Installing Bagisto eCommerce with Composer
In this step, you will be installing the Bagisto eCommerce manually through the Composer.
Create new directories '.cache' and '.config' under the '/var/www/' directory and change the ownership of both directories to 'www-data'. This will be used to store the cache and configuration for Composer.
mkdir -p /var/www/{.cache,.config}
sudo chown -R www-data:www-data /var/www/{.cache,.config}
Next, create the '/var/www/project' directory and change the ownership to 'www-data'. You will be installing Bagisto eCommerce on this directory.
mkdir -p /var/www/project; sudo chown -R www-data:www-data /var/www/project
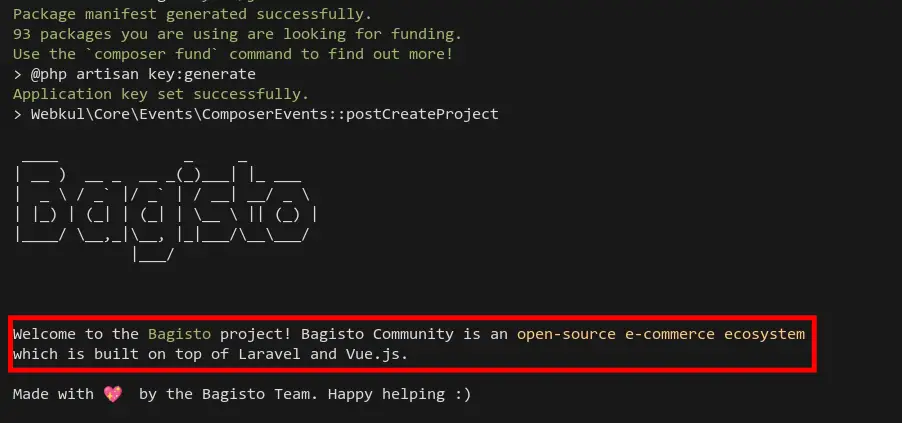
Move your current working directory to '/var/www/project' and run the Composer command below to download and install Bagisto source code and all additional PHP dependencies.
cd /var/www/project
sudo -u www-data composer create-project bagisto/bagisto
When the download process is completed, you will get the following output.
Next, move to the '/var/www/project/bagisto' directory and edit the '.env' file using nano editor.
cd /var/www/project/bagisto
sudo nano .env
Change the value 'APP_NAME' with your own info and the 'APP_ENV' to 'production'.
APP_NAME=Bagisto
APP_ENV=production
Change the 'APP_DEBUG' to 'false' and enter your installation URL on the 'APP_URL'.
APP_DEBUG=false
APP_URL=https://www.example.io
Type detailed database for your Bagisto installation as below.
DB_CONNECTION=mysql
DB_HOST=127.0.0.1
DB_PORT=3306
DB_DATABASE=bagisto
DB_USERNAME=bagistouser
DB_PASSWORD=BagistoPassword
DB_PREFIX=
Save the configuration and exit.
Now, install the Bagisto eCommerce using the following command.
sudo -u www-data php artisan bagisto:install
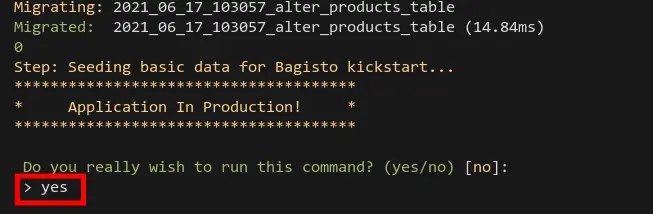
You will be asked to confirm to run the install command. Type 'yes' to confirm.
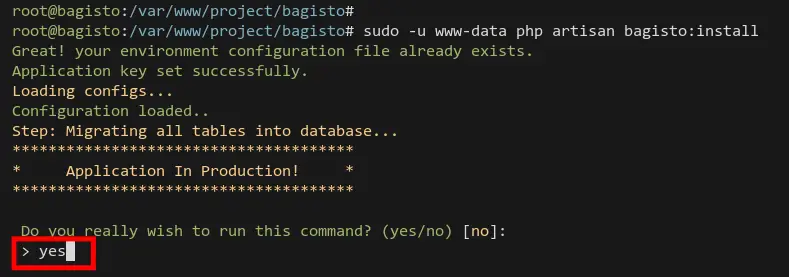
Type 'yes' for yes to deploy Bagisto eCommerce in a production environment.
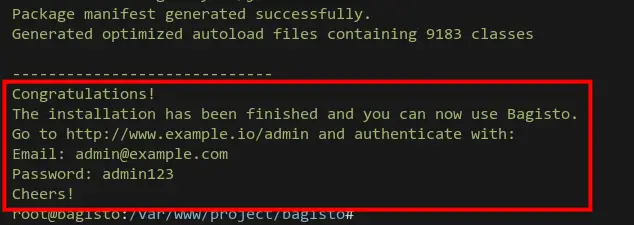
When the installation process is completed, you will get the default admin user and password for your Bagisto installation.
Lastly, you can run the following command to make sure the ownership of the Bagisto installation directory '/var/www/project/bagisto' is belonging to 'www-data'.
sudo chown -R www-data:www-data /var/www/project/bagisto
Now you have completed the Bagisto eCommerce installation. Continue to the next step for setting up Nginx web server.
Setting Up Nginx Web Server
In this step, you will be creating a new Nginx server block for Bagisto eCommerce. The Nginx web server is one of the best solutions to handle complex CMS such as eCommerce because its lightweight and fast.
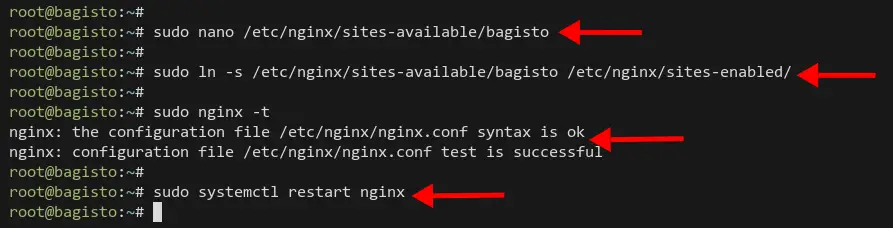
Create a new server block configuration 'bagisto' using the nano editor.
sudo nano /etc/nginx/sites-available/bagisto
Copy and paste the following configuration. Make sure to change the URL and path of SSL certificates with your own.
server {
    listen 80;
    server_name example.io;
    return 302 https://$server_name$request_uri;
}

server {
  listen 443 ssl http2;

    server_name  example.io;
    root   /var/www/bagisto/public;
    index  index.php;

  ssl_certificate /etc/letsencrypt/live/example.io/fullchain.pem;
  ssl_certificate_key /etc/letsencrypt/live/example.io/privkey.pem;

  ssl_protocols TLSv1.2;
  ssl_prefer_server_ciphers on;
  ssl_ciphers ECDHE-RSA-AES256-GCM-SHA512:DHE-RSA-AES256-GCM-SHA512:ECDHE-RSA-AES256-GCM-SHA384:DHE-RSA-AES256-GCM-SHA384:ECDHE-RSA-AES256-SHA384;
  ssl_ecdh_curve secp384r1; # Requires nginx >= 1.1.0
  ssl_session_timeout  10m;
  ssl_session_cache shared:SSL:10m;
  ssl_session_tickets off; # Requires nginx >= 1.5.9
  # ssl_stapling on; # Requires nginx >= 1.3.7
  # ssl_stapling_verify on; # Requires nginx => 1.3.7
  resolver 8.8.8.8 8.8.4.4 valid=300s;
  resolver_timeout 5s;
  add_header X-Frame-Options DENY;
  add_header X-Content-Type-Options nosniff;
  add_header X-XSS-Protection "1; mode=block";

    access_log /var/log/nginx/example.com.access.log;
    error_log /var/log/nginx/example.com.error.log;

    client_max_body_size 100M;

    autoindex off;

    location / {
    try_files $uri /index.php$is_args$args;
      }

    location ~ \.php$ {
         include snippets/fastcgi-php.conf;
         fastcgi_pass unix:/var/run/php/php7.4-fpm.sock;
         include fastcgi_params;
         fastcgi_intercept_errors on;
    }
}
Save the configuration file and exit.
Next, activate the 'bagisto' server block using the following command, then verify Nginx configuration.
sudo ln -s /etc/nginx/sites-available/bagisto /etc/nginx/sites-enabled/
sudo nginx -t
If you dont get an error, you will see the output message such as 'Syntax OK'.
Lastly, restart the Nginx service to apply new virtual host configuration.
sudo systemctl restart nginx
Now you have completed the Nginx configuration for Bagisto eCommerce, and it's now ready to access under your domain name.
Verify Bagisto eCommerce
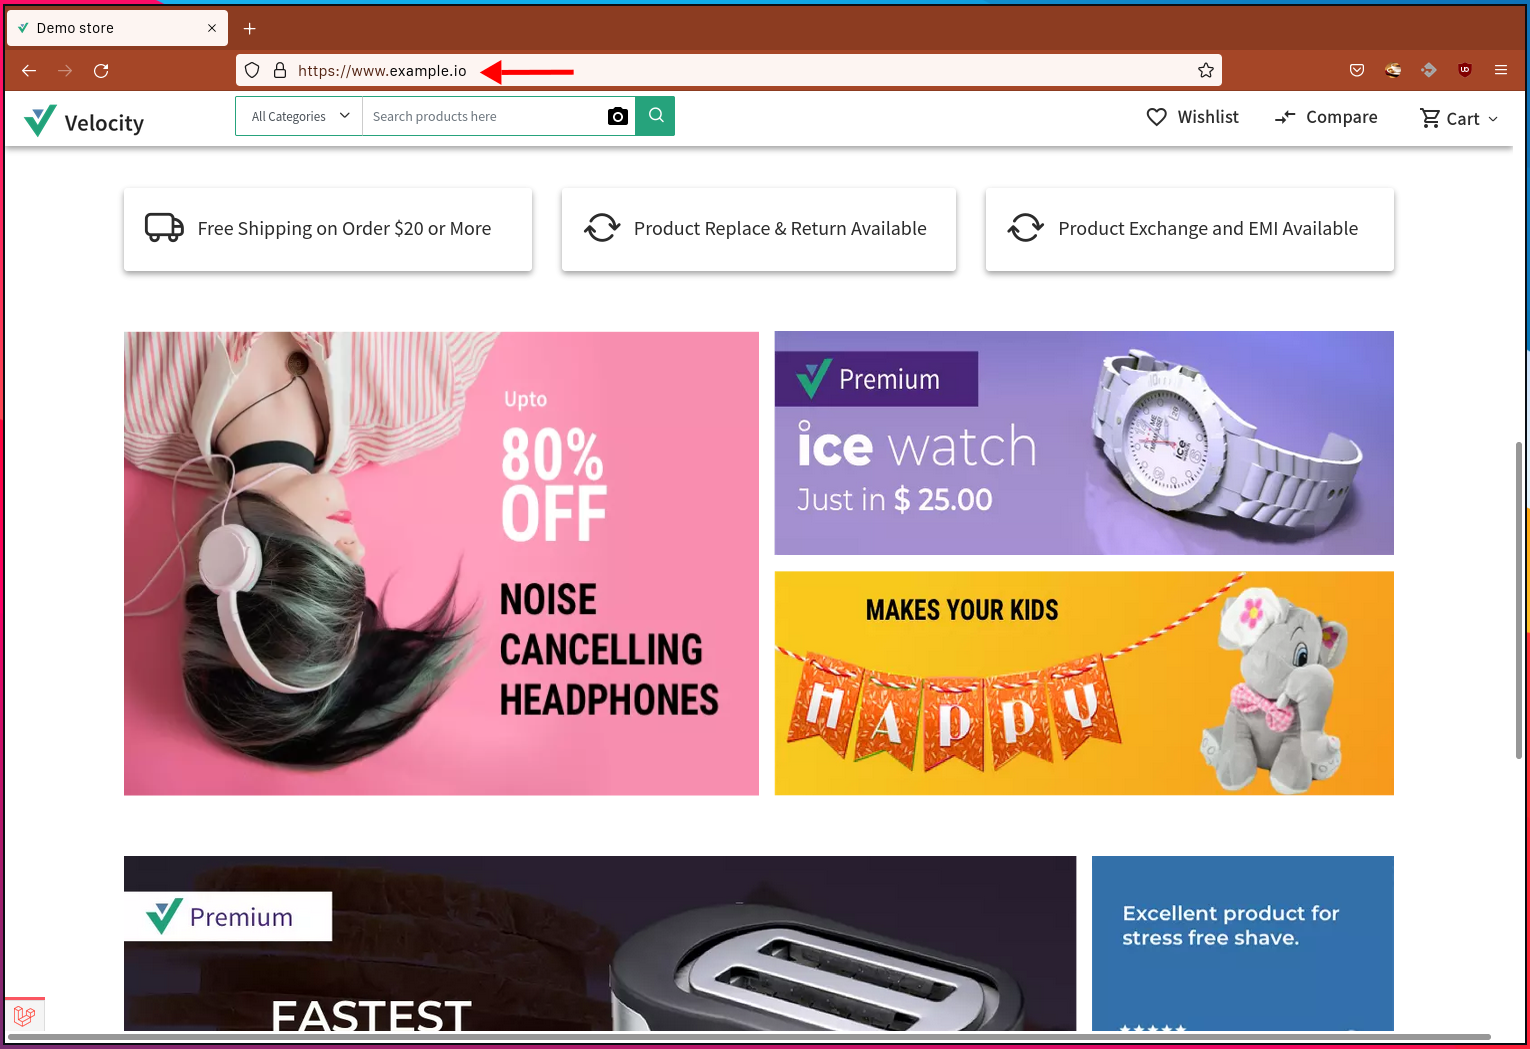
To verify the Bagisto eCommerce installation, open your web browser and type the domain name of your installation on the address bar.
You will see the default homepage of the Bagisto eCommerce as below.
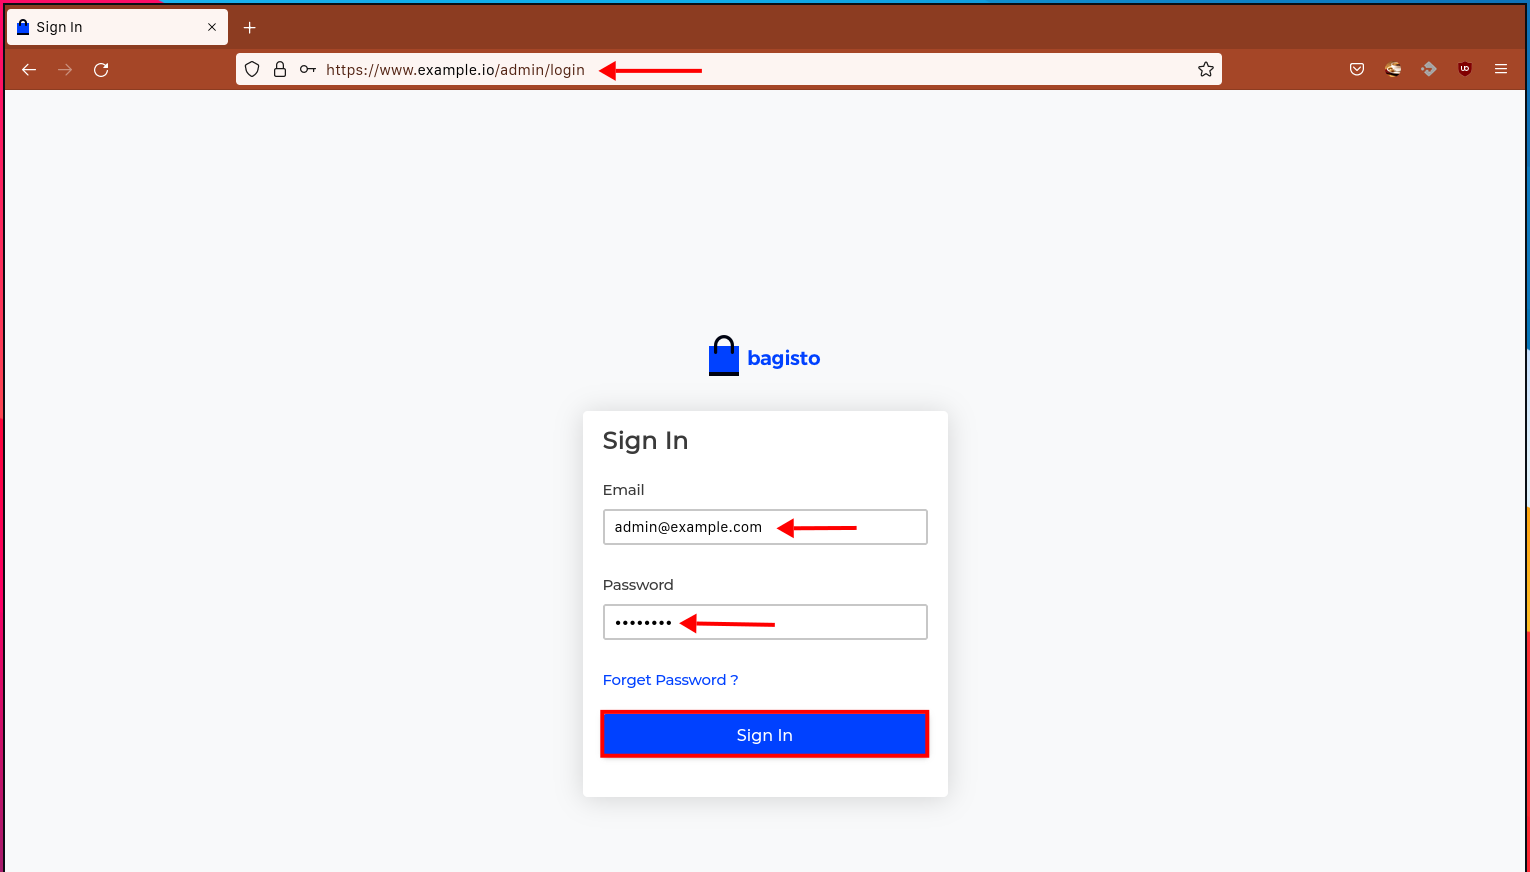
Next, open a new tab and visit the admin page of your Bagisto eCommerce installation.
Type the Bagisto default user 'admin' and the pasword 'admin123' and click 'Sign In'.
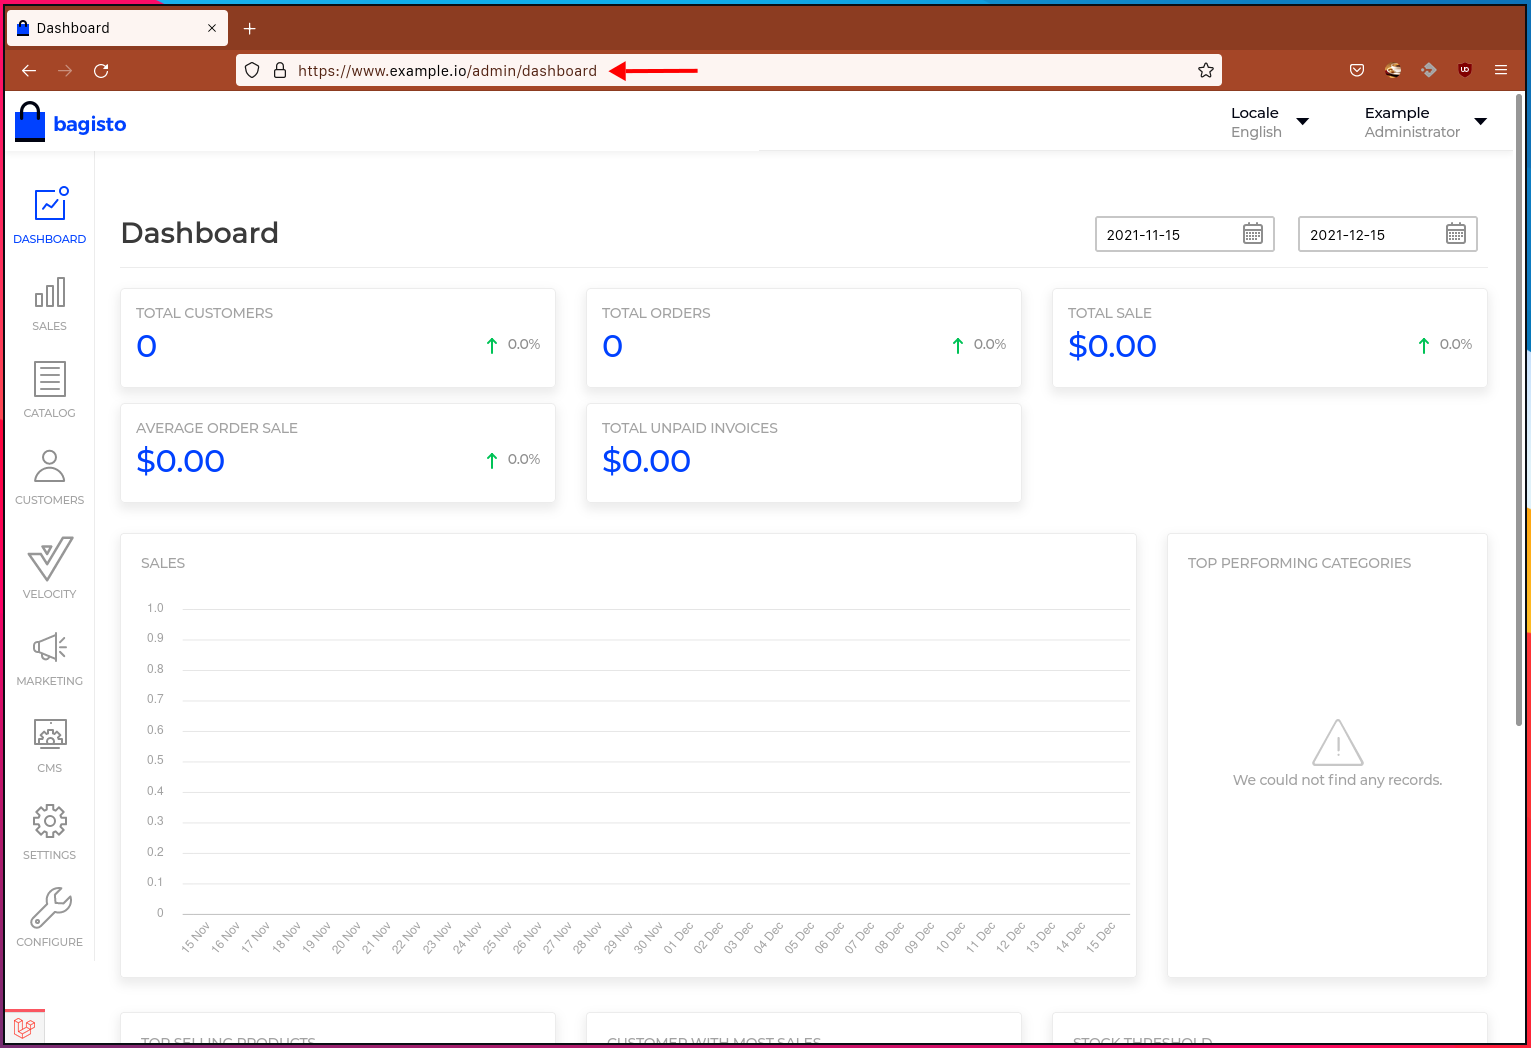
And you will get the admin dashboard of the Bagisto eCommerce.
Conclusion
Congratulation! You have now installed the Bagisto eCommerce with PHP-FPM, Nginx, and MariaDB on Debian 11 Bullseye system. You can now start adding your products and set up payment plugins for your Bagisto eCommerce.

