How to Install PHP Composer on Rocky Linux 8
PHP Composer is the most used dependency manager for PHP. It lets you declare the dependencies your project needs, and it will manage (install/update) them for you.
Downloading, installing, and updating dependencies can be a pain and might distract you from actually writing code. A dependency manager will make your life as a developer easier by handling that for you.
Before there was Composer, there were a few different options to manage project dependencies, such as PEAR and PHP Package Manager. Nowadays, Composer has become the de facto standard for dependency management in PHP.
If you're still using PEAR or the PHP Package Manager, then it might be time for a change. There are several reasons to use Composer:
- It's written in PHP and requires no additional software installation (like Python)
- It supports both global and local/private packages
- Thousands of libraries and applications already rely on it, so by using Composer, you'll easily be able to find packages and updates.
Prerequisites
In order to install PHP Composer on Rocky Linux 8.4, you will need:
- Have PHP version 5.3 or later installed on your system (and must be able to run the Phar extension).
- Root access is required for the installation.
Updating the System
Before you do anything else, make sure your system's packages are up to date. Run the following commands to update the system packages.
sudo dnf check-update
sudo dnf update -y
Installing PHP on Rocky Linux 8.4
Before you can install composer, you need to have PHP and the PHP interpreter installed on your system.
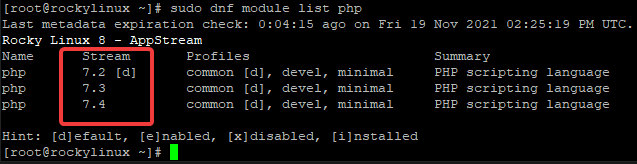
By default, the AppStream repository comes with PHP 7.2, 7.3 and 7.4. You can list all the available PHP versions by running the command below.
sudo dnf module list php
You will see an output like the one below.
In this guide, we will install PHP 7.4. You should choose a PHP version that suits your needs, although make sure to base your decision on not just this guide, but also on compatibility reports like this one.
Run the following commands to enable and install PHP 7.4.
sudo dnf module enable php:7.4
sudo dnf install php php-cli php-gd php-curl php-zip -y
sudo dnf install php-mbstring php-opcache php-intl php-mysqlnd -y
You can now check if PHP got installed correctly by running this command.
php -v
You should get the following output.

Installing PHP Composer on Rocky Linux 8.4
Now that you have a version of PHP installed on your system, you can use it to download and install the Composer binary.
First, run the following commands to download the latest version of Composer.
php -r "copy('https://getcomposer.org/installer', 'composer-setup.php');"
Next, we’ll verify that the downloaded file is not corrupted. We should always verify the downloaded file to ensure that it is not corrupted. Composer can be very sensitive, and errors might cause issues with how you use Composer. Execute the following code to verify that the installer file is not corrupted.
HASH=`curl -sS https://composer.github.io/installer.sig`
echo $HASH
php -r "if (hash_file('SHA384', '/tmp/composer-setup.php') === '$HASH') { echo 'Installer verified'; } else { echo 'Installer corrupt'; unlink('composer-setup.php'); } echo PHP_EOL;"
You should see the text “Installer verified” when the verification is successful as shown below. If you don’t get the expected output, the file was most likely corrupted and you should try downloading it again. Then, repeat the verification process until you get the expected “Installer verified” output.

Now you have two options to install Composer on your system.
Option 1 is to install Composer globally on your system, meaning it will be accessible from any directory of your system and can be used anywhere. Use this option if you want to use composer as a command-line tool, and not just as a dependency manager for your PHP projects.
If you go with this option, run the following commands.
sudo php composer-installer.php --filename=composer --install-dir=/usr/local/bin
The above command will install Composer globally with the command named composer in /usr/local/bin.
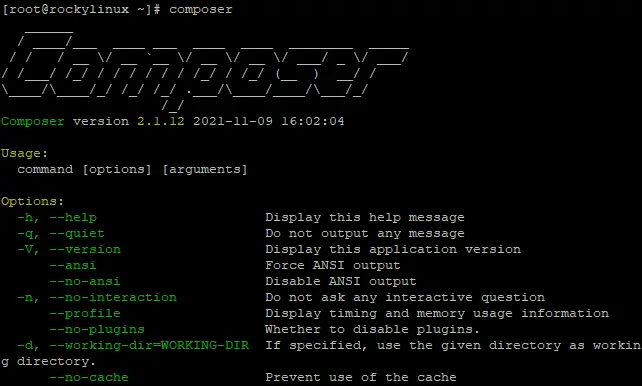
You can now check if you installed Composer correctly by running this command.
composer
You should get the following output.
Option 2 is to install Composer locally in the current directory so that it will be used by this specific project only.
To install Composer locally, run the following commands.
sudo php composer-setup.php
The above command will install Composer locally in the current directory so that it will be used by this specific project only. You can use the composer by running ./composer.phar <command>.
Testing PHP Composer
Now that you have installed Composer, you can use it to create a new project that you can test your Composer installation.
It's a rule of thumb that you should always create a separate directory for every project you work on. Run the following commands to create a new directory for your test project and navigate into the newly created directory.
cd && mkdir php-composer-test && cd php-composer-test
You can now run the following command to initialize a new project with Composer.
composer init
The above command will initialize a new project with all the details that you have selected.
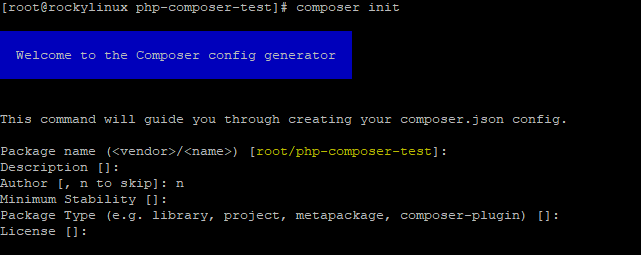
The composer init command also creates a new composer.json file in the current directory as shown below. It is a JSON-format file which contains all the project requirements. Composer uses this file to install the required dependencies for your project.

Now it’s time to load a package to your project. Head over to https://packagist.org and search for a package to install in your project.
For example, if you want to install the Remove Stop Words package, that can help us remove stop words from a string. If you search for the term “Remove Stop Words” on Packagist, you should see the following result.

To add a new package, run the composer require command and select the package (without any version) that you want to load to your current project.
composer require rap2hpoutre/remove-stop-words
Composer will automatically decide which version of the package to use. Composer will download the package from Packagist to your current directory and extract the contents of this package.
It will also update the composer.json file with details about this new package. It will also create a new file - composer.lock, and a new vendor directory as shown below.

The composer.lock file is used by Composer to lock the package version that is installed in your current project. This file is used to avoid conflicts with other installations of the same package, or when you clone your project. The vendor directory contains all the dependencies your project.
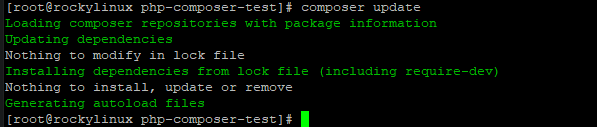
To update the project dependencies, run composer update command. Composer will look at the composer.lock file first to find out which version of the package is already installed, and then it will update this package with the latest version available on Packagist.
composer update
Sample output:
To update specific packages, run the following command.
composer update vendor/package
To remove a specific package, run the following command.
composer remove vendor/package
For example, if you don’t need the Remove Stop Words package anymore, you can run the following command to uninstall it from your project.
composer remove rap2hpoutre/remove-stop-words
Sample output:

Note: It is highly recommended that you do not delete the vendor directory or its contents because this directory contains all the dependencies that need to be installed with Composer in order to run your application.
Conclusion
In this article, you have learned how to install PHP Composer PHP dependency manager on Rocky Linux 8.4 to initialize a new project, load new packages, update existing packages or uninstall them from your project. You have also learned some basic Composer commands that are used to manage the dependencies of your project.
Leave a comment below if you have any questions or feedback.

