
- Installing Dependencies
- FaunaDB Setup
- Creating a Code Snippet Page
- Viewing Our App
- Setting up the Snippet Display Area
- Testing the Code Blocks
- FaunaDB Initialization
- What is SWR?
- Running the Code
- The Snippet Upload Page
- Styling our Form
- Testing our Form
- Creating a Function to Edit Snippets
- Linking our Edit Button
- Modifying Stored Snippets
- Testing Edit Snippet Functionality
- Adding Delete Snippet Functionality
- Testing Delete Functionality
- User Authentication
- Handling Authentication
- Testing User Authentication
- Authorizing Users to Create a Snippet
- Testing Our App
- Conclusion
- Frequently Asked Questions (FAQs) about Building a Code Snippet App with Next.js and FaunaDB
While programming, developers encounter problems requiring code reuse, leading to repetitive programming that can be time-wasting and reduces productivity. This gives rise to the need for reusable source code called “code snippets”. These snippets prevent repetitive code during programming, can be saved for future use, and are sharable.
In this tutorial, we’ll build a website to help users save daily code snippets using the Next.js web development framework, and powered by the Fauna database to handle the storage, manipulation, and display of code snippets. By working on this fun project, we’ll also learn how to create a basic CRUD app with Next.js and FaunaDB that could also be used for building other similar projects.
A working version of this project can be found at GitHub. To follow along, you’ll need Node installed on your machine, as well as a FaunaDB account and a Google account (for authentication).
Installing Dependencies
In this section, we’ll look at how to install Next.js using the npx create-next-app command. This will initialize the Next CLI and build a new Next.js application.
We’ll also install the dependencies we’ll be using for the back end — FaunaDB and SWR — via the command line. SWR (state-while-revalidate) is a Next.js hook for fetching data. We’ll go into this in depth later in this tutorial.
Next.js installation
To install Next.js, enter the following command in the CLI:
npx create-next-app snippetapp
The above command creates a project directory called snippetapp with the Next.js starter template, which contains the required files for coding with Next. When Next has finished installing, change into the newly created directory:
cd snippetapp
FaunaDB and SWR installation
To install Fauna, we’ll be using the following command in the CLI:
npm install --save faunadb
Then to install SWR:
npm install swr@0.3.8
With this, we’ve installed all the dependencies we’ll be using to build our application and can now proceed to set up our database on Fauna.
FaunaDB Setup
FaunaDB is a serverless, real-time database. It transforms a traditional database into a flexible data API that still retains the capabilities of a database and its performance while delivering secure and scalable access to app data.
Here, we’ll create a user account and set up the database to store the data we’ll be using in our snippet application.
Creating a user account
To create a user account, navigate to the Fauna signup page and create an account.

After creating a user account, you’ll be redirected to the dashboard.
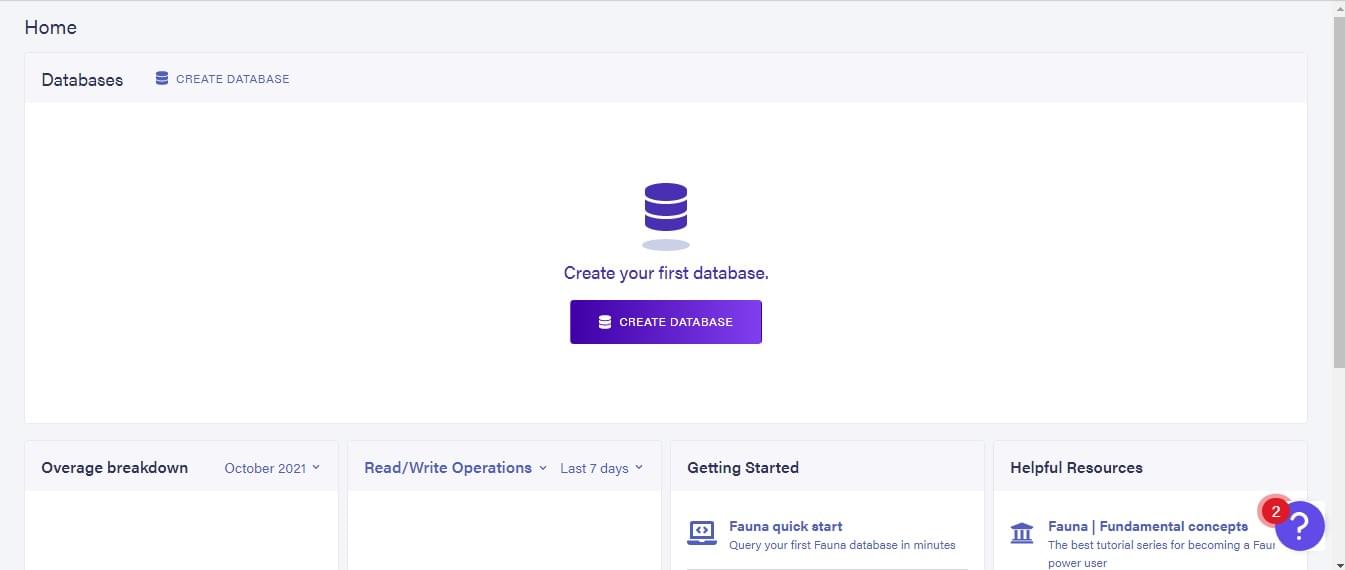
Create the snippet database and collection
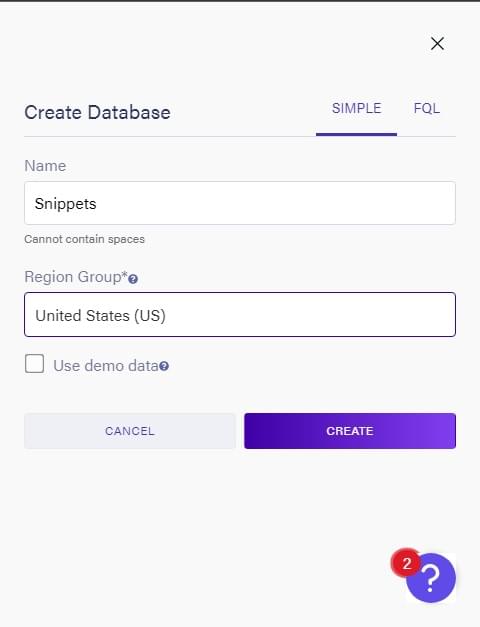
Here, we’ll create a database with the collections required to manage the code snippets of our application. Click on CREATE DATABASE. We’ll create a database called snippets.
On the new page that opens, click on NEW COLLECTION and create a collection called codesnippet.
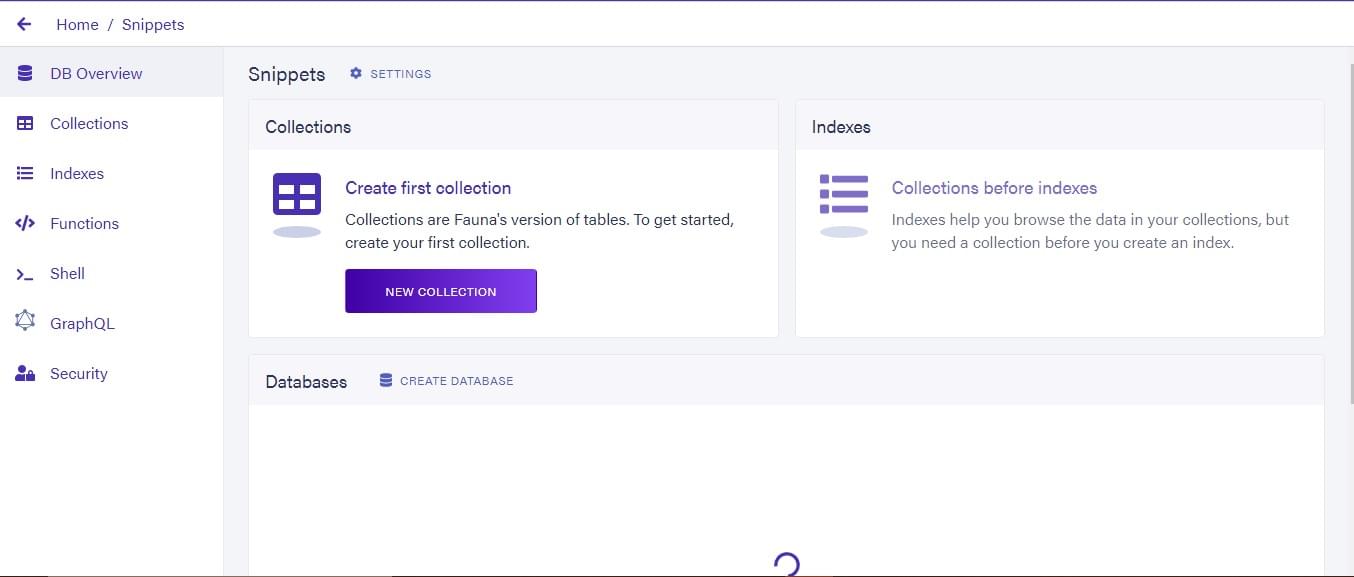
After creating a collection, we get a page where we can create a document.

Here, you’ll click on NEW DOCUMENT. A JSON document will open, where you can enter the details, as pictured below.
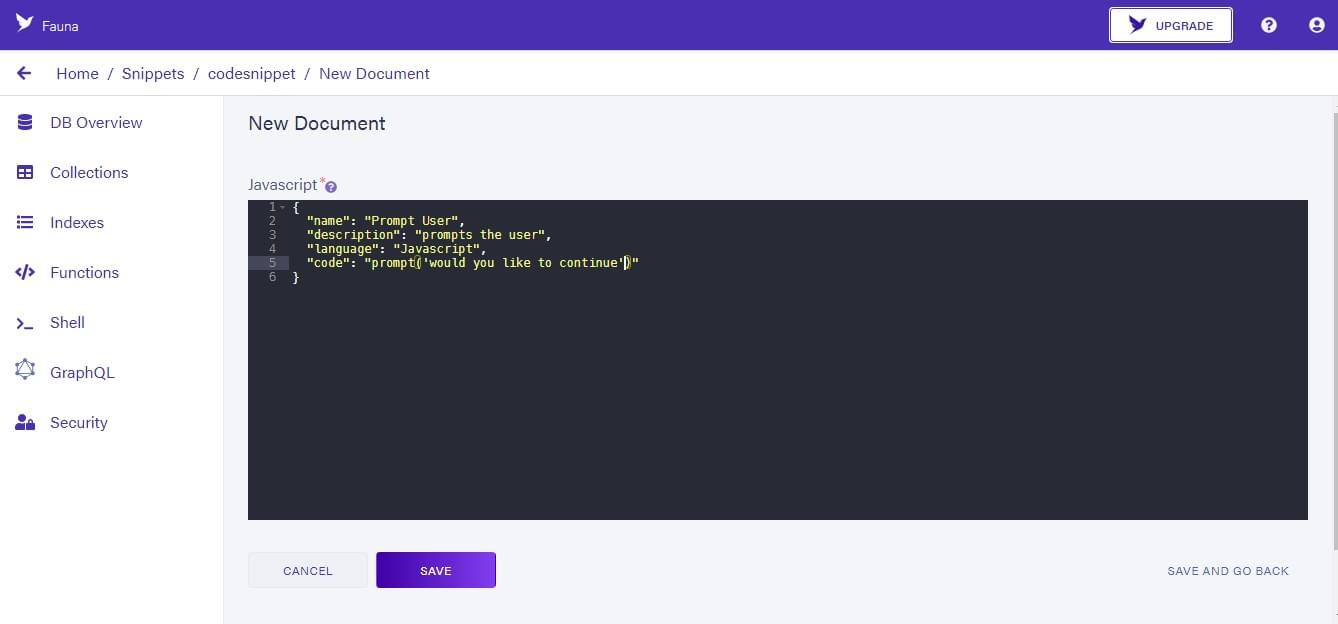
{
  name: "Prompt User",
  description: "prompts the user",
  language: "javascript",
  code: "prompt('would you like to continue')"
}
Here, we define a snippet with attributes: name, description, language and code. Click on SAVE to save the new collection. We’ve successfully added a snippet to our database. Now we can proceed to getting our access credentials to use on our app.
Secret key creation
On the dashboard, click on Security. This opens up a new page to create our security key.
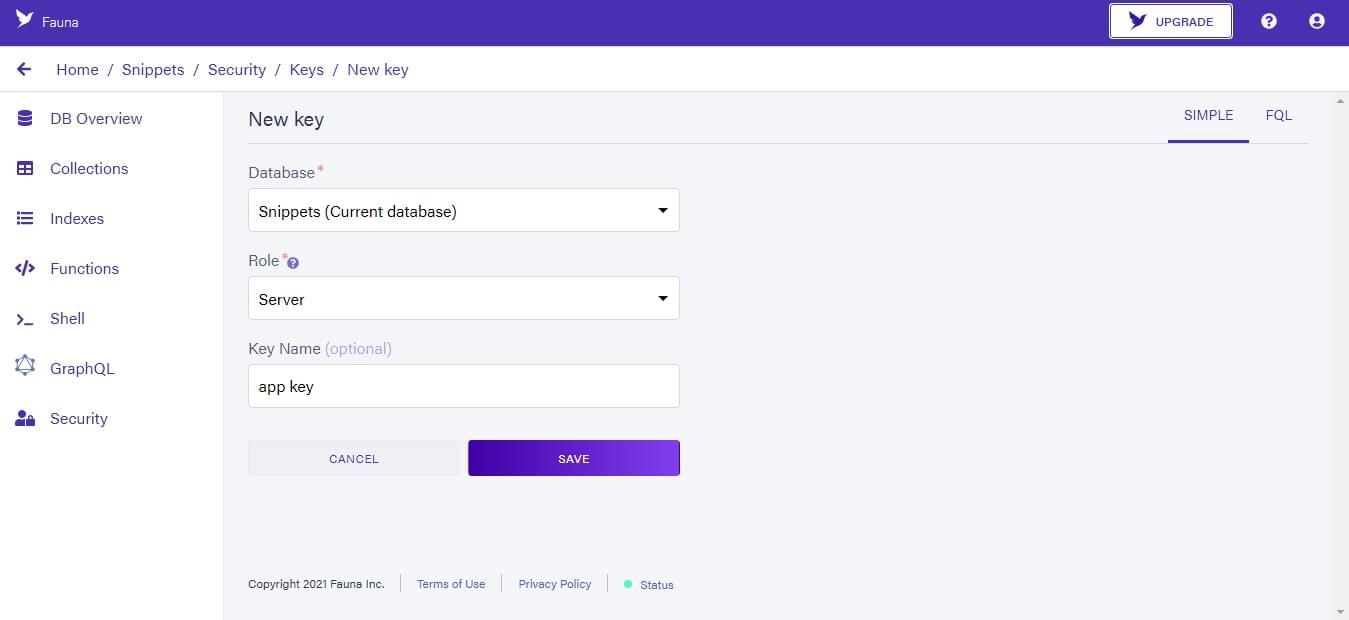
Here, we’ll set the role to “server” instead of “admin”, and you can give the key a name. Click on the SAVE button to generate your key.
Creating a .env file
We’ll now create a .env file within the directory of our project. This file will store our generated secret key. In the .env file we have this:
FAUNA_SECRET = paste your key here
Creating a Code Snippet Page
In this section, we’ll build the display and upload page for the snippets, and also add functionality to it.
Open the project directory in your code editor and navigate to the index.js file in your pages folder. Here we’ll clear out the code and start building our application:
import Head from "next/head"
import Image from "next/image"
import styles from "../styles/Home.module.css"

export default function Home() {
  return (
    <div className={styles.container}>
      <Head>
        <title>View Snippet</title>
        <meta name="description" content="Generated by create next app" />
        <link rel="icon" href="/favicon.ico" />
      </Head>

      <main className={styles.main}>
        <h1 className={styles.title}>Re-usuable Code Snippets</h1>
        <p className={styles.info}>Add your code snippets here...</p>
        <button>Create new snippet</button>
      </main>
    </div>
  )
}
Creating our Components
Now we’ll create a component file that will render our snippets. Create a folder named component in your working directory and create a file named Snippets.js within it with the following code:
import React from "react"
import styles from "../styles/Home.module.css"

function Snippets() {
  return (
    <div className={styles.cont}>
      <p className={styles.lang}>language</p>
      <h3 className={styles.name}>name of snippet</h3>
      <p className={styles.descp}>description of snippet</p>
      {/* Code will be displayed here*/}
      <div className={styles.links}>
        <a>Edit</a>
        <a>Delete</a>
      </div>
    </div>
  )
}

export default Snippets
Importing our components into the app
We’ll now add imports for this file in our index.js:
import Snippets from "../components/Snippets"
And use it in our app:
<button>Create new snippet</button>
<Snippets/>
Styling our app
We can now style our page. Navigate to the Home.module.css file in the styles folder and replace the styles there with the following:
.container{
  display: flex;
  height: 100%;
  min-height: 100vh;
  background: rgb(48, 48, 255);
  flex-direction: column;
  align-items: center;
  color: #fff;
  font-family: Montserrat;
}
.cont{
  color: #333;
  margin-top: 5px;
  background: rgb(214, 214, 214);
  border-radius: 15px;
  padding: 10px 15px;
}
.main button{
  width: fit-content;
  flex-grow: unset;
  display: inline-block;
  padding: 5px 10px;
  outline: none;
  border: none;
  border-radius: 5%;
  font-weight: bold;
  color: rgb(48, 48, 255);
}
.main button:hover{
  cursor: pointer;
}
.links{
  margin-top: 10px;
}
.links a{
  margin-left: 5px;
}
.links a:hover{
  cursor: pointer;
}
Viewing Our App
At this point, you should be able to start the dev server with npm run dev, visit http://localhost:3000, and see the skeleton of our app.
Setting up the Snippet Display Area
Next, we’ll create the display section for the snippet code. Create a new file called Code.js in the components folder and import it into Snippets.js:
import React from 'react'
import styles from '../styles/Home.module.css'
import Code from "./Code";

function Snippets() {
  return (
    <div className={styles.cont}>
      <p className={styles.lang}>language</p>
      <h3 className={styles.name}>name of snippet</h3>
      <p className={styles.descp}>description of snippet</p>

      {/* Code will be displayed here*/}
      <Code />

      <div className={styles.links}>
        <a>Edit</a>
        <a>Delete</a>
      </div>
    </div>
  )
}

export default Snippets
For the syntax highlighting of the code, we’ll be using two packages, namely react-syntax-highlighter and react-copy-to-clipboard. We can download this via the CLI:
npm install react-syntax-highlighter react-copy-to-clipboard --save
Then in Code.js:
import React from "react"
import { PrismLight as SyntaxHighlighter } from "react-syntax-highlighter"
import {atomDark} from "react-syntax-highlighter/dist/cjs/styles/prism"
import { CopyToClipboard } from "react-copy-to-clipboard"
import styles from "../styles/Home.module.css"
function Code() {
  const codeString = "npm install import react from 'react'"
  const [show, setshow] = React.useState(false)
  return (
    <div>
      <button onClick={() => setshow(!show)}>Show Code</button>
      {show ? (
        <div>
          <CopyToClipboard text={codeString}>
            <button className={styles.btn}>Copy</button>
          </CopyToClipboard>
          <SyntaxHighlighter language="javascript" style={atomDark}>
            {codeString}
          </SyntaxHighlighter>
        </div>
      ) : null}
    </div>
  )
}
export default Code
Here, we created a component to display code with syntax highlighting. We’ve also added copy and toggle-show functionality. Now in the styles file:
.btn{
  left: 80%;
  position: relative;
}
Testing the Code Blocks
To view this change, you can run npm run dev in the command line and view it in your browser. We have the string “npm install import react from ‘react'” displayed with syntax highlighting as a code block. There’s also a button to hide and display the code snippet, and a button that allows us to copy the code from the code block.
FaunaDB Initialization
In this section, we’ll fetch data from our FaunaDB database to our app. Create a file called Fauna.js in your project directory:
const faunadb = require("faunadb")
const faunaClient = new faunadb.Client({
  secret: process.env.FAUNA_SECRET
})
const q = faunadb.query
const getResponse = async () => {
  const { data } = await faunaClient.query(
    q.Map(
      q.Paginate(q.Documents(q.Collection("codesnippet"))),
      q.Lambda("doc", q.Get(q.Var("doc")))
    )
  )
  const snippets = data.map((snippet) => {
    snippet.id = snippet.ref.id
    delete snippet.ref
    return snippet
  })
  return snippets
}

module.exports = {
  getResponse,
}
Here, we’ve initialized FaunaDB with our secret key. We’ve also set up an async request to query our collection and return the data. We’ve stored the returned data in a variable named snippets, and deleted the ref to better structure the data. Other functionalities for creating, updating and deleting snippets will be added later in this tutorial.
Note that, if you’re getting an unauthorized error in the console, you may need to specify the domain name of the target endpoint. The default is db.fauna.com, but since the introduction of Region Groups, three cloud domains are available. Use the correct domain for your database’s Region Group:
- Classic (US and EU):
db.fauna.com - United States (US):
db.us.fauna.com - Europe (EU):
db.eu.fauna.com
Example code:
const faunaClient = new faunadb.Client({
  secret: process.env.FAUNA_SECRET,
  domain: "db.eu.fauna.com"
})
Handling our API requests
We’ll also create a file to handle our API request for our database. Within the api folder in pages, create a file called snippets.js with the following code:
import { getResponse } from "../../Fauna.js"
export default async function handler(req, res) {
  console.log(req)
  if (req.method !== "GET") {
    return res.status(405)
  }
  try {
    const snippets = await getResponse()
    return res.status(200).json(snippets)
  } catch (err) {
    console.log(err)
      res.status(500).json({ msg: "Something went wrong." })
  }
}
Above, we’ve simply set up a function to handle requests from our database. The snippets are returned as Json and will log errors if any occur. In Next.js, any file stored in the api folder is treated as API endpoints rather than a page and is rendered server-side.
What is SWR?
As said earlier, SWR (state-while-revalidate) is a Next.js hook for fetching data. It’s a perfect solution for fetching frequently updating data and is a good fit for our app.
Setting up SWR
We’ll use this to fetch data from FaunaDB. To use this, we need to import it into index.js:
import useSWR from "swr"

export default function Home() {
  const { data:snippets, mutate }=useSWR("api/snippets")
  ...
})
Here, we’ve imported SWR and used it to fetch data as set up in snippets.js. We’ve then stored these snippets in the snippets variable and will output them from there. We’ll now pass the snippets to our Snippets component to display:
- <Snippets />

+ {snippets &&
+   snippets.map((snippet) => (
+     <Snippets
+       key={snippet.id}
+       snippet={snippet}
+       snippetDeleted={mutate}
+     />
+   ))
+ }
Above, we’ve passed the key and snippet to Snippets. We’ve also set up a mutate property to update (re-fetch) snippets when a snippet is deleted. To use the passed data, we modify the Snippets component with the following:
function Snippets({snippet}) {
  return (
    <div className={styles.cont}>
      <p className={styles.lang}>{snippet.data.language}</p>
      <h3 className={styles.name}>{snippet.data.name}</h3>
      <p className={styles.descp}>{snippet.data.description}</p>

      <Code snippet={snippet}/>

      <div className={styles.links}>
        <a>Edit</a>
        <a>Delete</a>
      </div>
    </div>
  )
}
Above, we’ve inserted the snippet language, name and description received from FaunaDB in our code. To get the code from Fauna in our app, we’ve also had to pass the snippet prop down to the Code component.
Then in the Code component:
function Code({snippet}){
  ...
  <div>
    <CopyToClipboard text={snippet.data.code}>
      <button className={styles.btn}>Copy</button>
    </CopyToClipboard>
    <SyntaxHighlighter language="javascript" style={atomDark}>
      {snippet.data.code}
    </SyntaxHighlighter>
  </div>
  ...
}
We’re now done with the GetSnippet functionality. If we return to FaunaDB and create a new snippet, we see what’s pictured below.
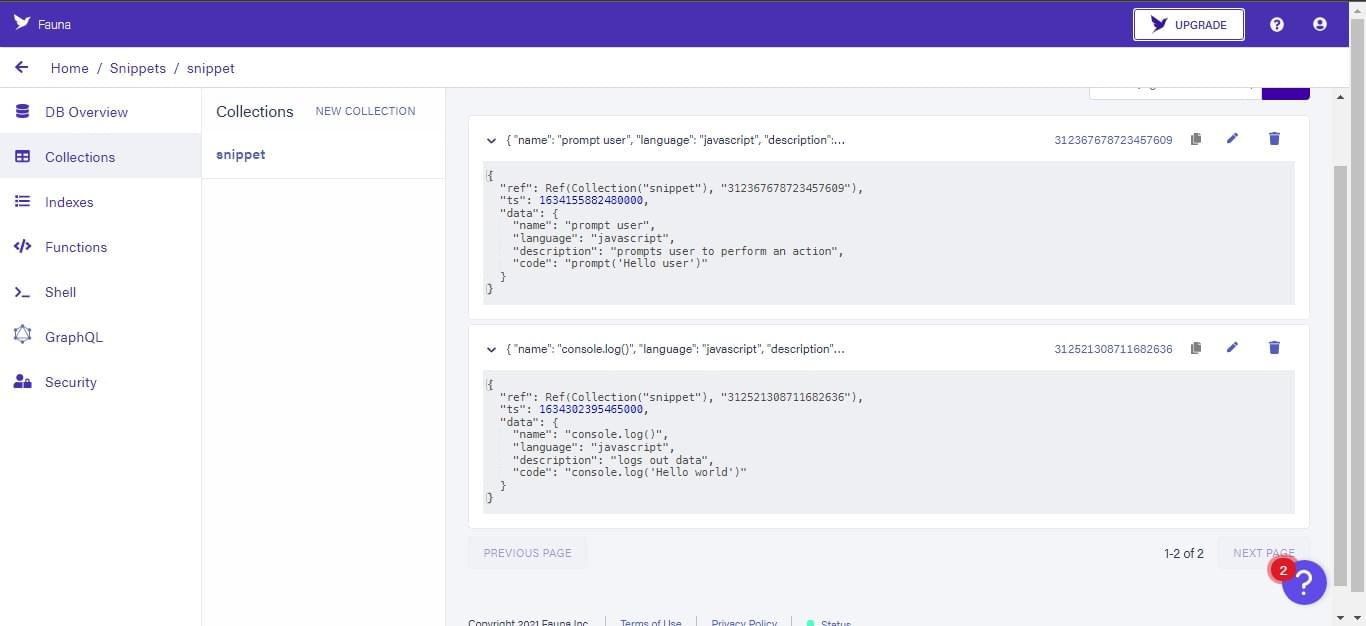
{
  "name": "console.log()",
  "language": "javascript",
  "description": "logs out data",
  "code": "console.log('Hello, world!')"'
}
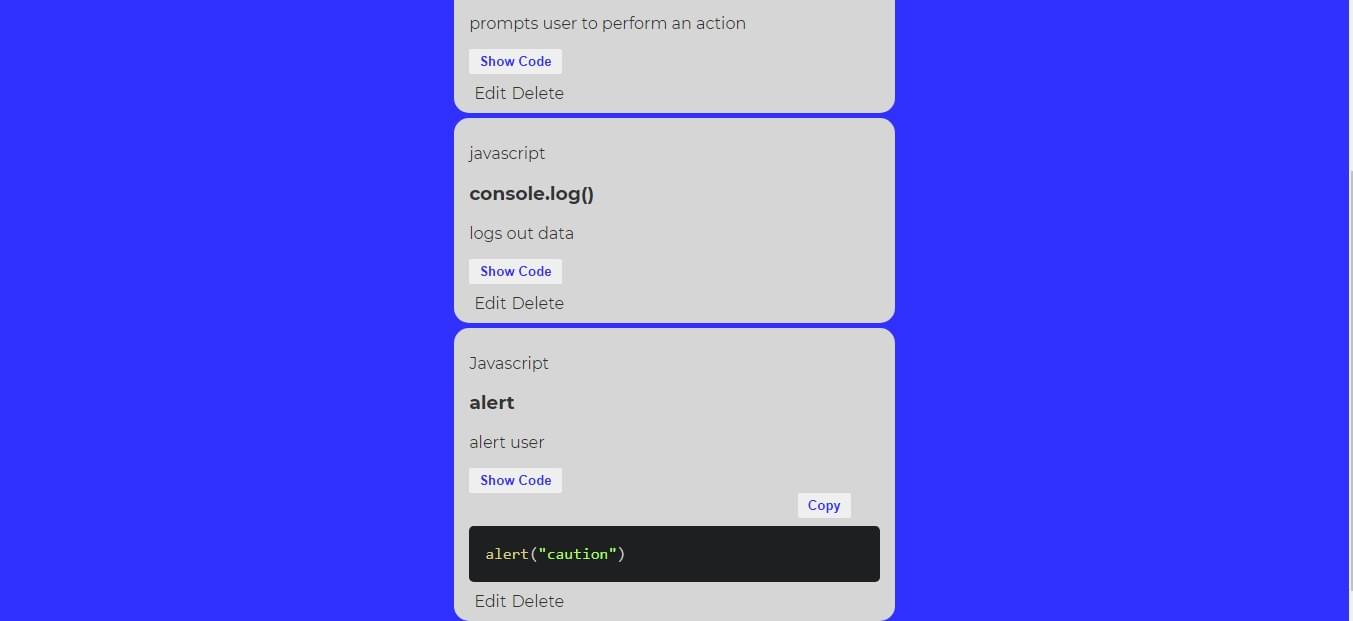
Running the Code
To run in the CLI:
npm run dev
If you open the page in your browser, you’ll have a result similar to the image below.
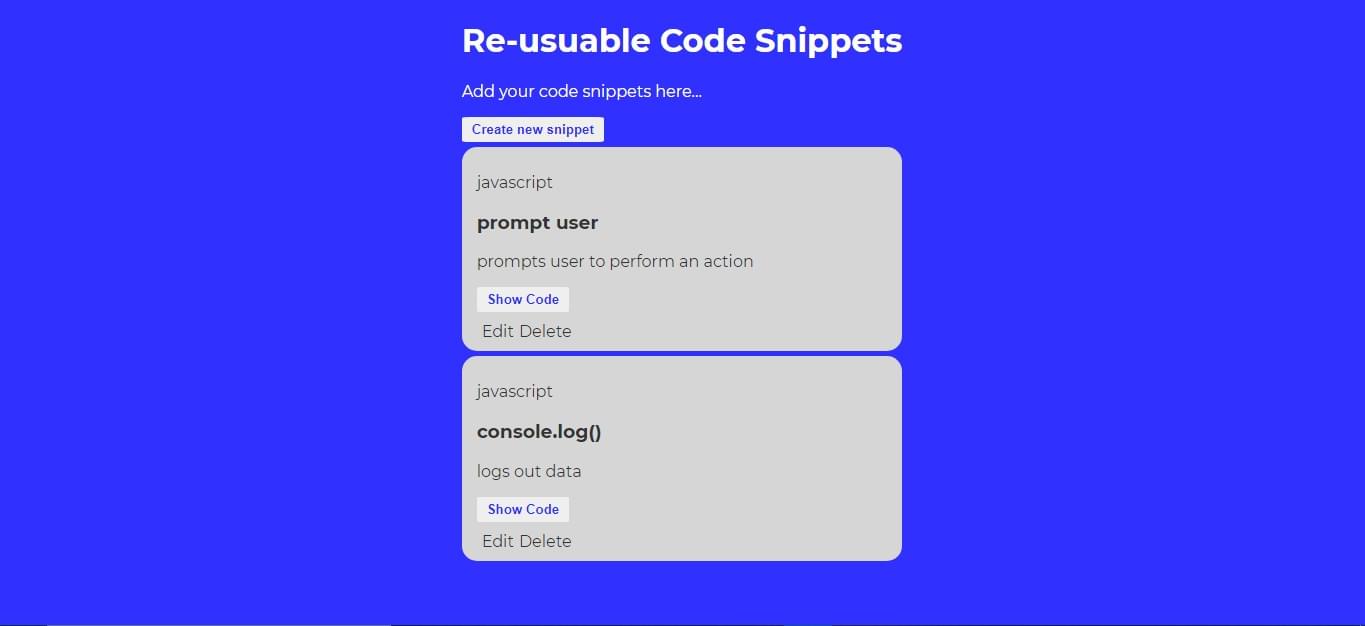
We’ve successfully created a snippet display page with functionalities to show and hide the code and copy the code snippet.
The Snippet Upload Page
We’ll need to create a link to the upload page from our home component. Next.js has provisions that make routing easier without you having to install react-router and other dependencies as you would if using native React code.
In index.js, we’ll import the Link module from next:
import Link from "next/link"
Then add it to our Create new snippet button:
- <button>Create new snippet</button>

+ <Link href="/upload">
+   <button>Create new snippet</button>
+ </Link>
We’ll create a new page in our pages folder and name it upload.js.
Back in our Fauna.js file, we’ll create and also export a function to create snippets in our app:
const createSnippet = async (code, language, description, name) => {
  return await faunaClient.query(q.Create(q.Collection("codesnippet"), {
    data:{code, language, description, name}
  }))
}

module.exports = {
  getResponse,
  createSnippet,
}
Here, we’ve created the function createSnippet, which will take in some parameters and pass them as data in the new document that will be created in the database.
Adding a function to create snippets
We’ll also configure our endpoint to create snippets. Create a new file called createSnippet.js in the api folder and populate it with the following code:
import { createSnippet } from "../../Fauna"

export default async function handler(req, res) {
  const { code, language, description, name } = req.body
  if (req.method !== "POST") {
    return res.status(405).json({msg:"unauthorized"})
  }
  try {
    const createdSnippet = await createSnippet(code, language, description, name)
    return res.status(200).json(createdSnippet)
  } catch (error) {
    console.log(error)
    res.status(500).json({msg:"unauthorized"})
  }
}
Creating our upload page
We’ll now create the upload page in our upload.js file. For our form to create snippets, we’ll be using the react-hook-form. We’ll install this via the CLI:
npm install react-hook-form
Then, in our upload.js file:
import React from "react"
import { useForm } from "react-hook-form"
import { useRouter } from "next/router"
import style from "../styles/form.module.css"
import { Link } from "next/link"

function upload({ snippet }) {
  const { register, handleSubmit, errors, reset } = useForm()
  const router = useRouter()
  const createSnippet = async (data) => {
    const { code, language, description, name } = data
    console.log(data)
    try {
      // code here to push to Fauna
    } catch (error) {
      console.log(error)
    }
  }
  return (
    <div className={style.cont}>
      <form
        className={style.form}
        onSubmit={handleSubmit(snippet ? updateSnippet : createSnippet)}
      >
        <div>
          <label htmlFor="name">Name</label>
          <input
            className={style.input}
            type="text"
            id="name"
            {...register("name", { required: true })}
          />
        </div>
        <div>
          <label className={style.label} htmlFor="language">
            language
          </label>
          <select
            className={style.select}
            type="text"
            id="language"
            {...register("language", { required: true })}
          >
            <option>Javascript</option>
            <option>Html</option>
            <option>CSS</option>
          </select>
        </div>
        <div>
          <label className={style.label} htmlFor="description">
            description
          </label>
          <textarea
            className={style.input}
            rows={7}
            type="text"
            id="description"
            placeholder="snippet description"
            {...register("description", { required: true })}
          />
        </div>
        <div>
          <label className={style.label} htmlFor="code">
            Code
          </label>
          <textarea
            className={style.input}
            rows={8}
            columns={8}
            type="text"
            id="code"
            {...register("code", { required: true })}
            placeholder="background: none;"
          />
        </div>
        <div>
          <button className={style.button}>Submit</button>
          <button className={style.button}>Cancel</button>
        </div>
      </form>
    </div>
  )
}
export default upload
Styling our Form
Above, we’ve created our form using the react-hook-form package. We’ve used the handleSubmit function useForm() in the ternary operator. Upon submission of the form, it determines if the submission made is to create or update an existing snippet. With register, we’ve added the required property to every field in our form. We’ve also added imports for a stylesheet named form.module.css where we have the following styles for our form:
.form {
  max-width: 800px;
  display: flex;
  justify-content: center;
  flex-direction: column;
  align-items: center;
}

.cont{
  background: rgb(48, 48, 255);
  height: 100%;
  min-height: 100vh;
  padding: 10px 0 0 0;
  display: flex;
  justify-content: center;
  align-items: center;
}

.select,
.input {
  display: block;
  box-sizing: border-box;
  width: 100%;
  border-radius: 4px;
  border: 1px solid black;
  padding: 10px 15px;
  margin-bottom: 15px;
  font-size: 14px;
}

.label{
  line-height: 2;
  text-align: left;
  display: block;
  margin: 5px;
  color: white;
  font-size: 14px;
  font-weight: 200;
}

.button {
  background : #fff;
  color: #444;
  border: none;
  border-radius: 5%;
  margin-right: 8px;
}
Creating an API endpoint to create snippets
To send the data from our form to the FaunaDB database, add the following code to the try...catch block in the createSnippet function in upload.js:
try {
  await fetch("/api/createSnippet", {
    method: "POST",
    body: JSON.stringify({ code, language, description, name }),
    headers: {
      "Content-type": "application/json"
    },
  })
  router.push("/")
} catch (error) {
  console.log(error)
}
Testing our Form
Run the code and navigate to the upload page. Now if we add a new snippet to the form and click on Submit, we’ll see what’s pictured below.
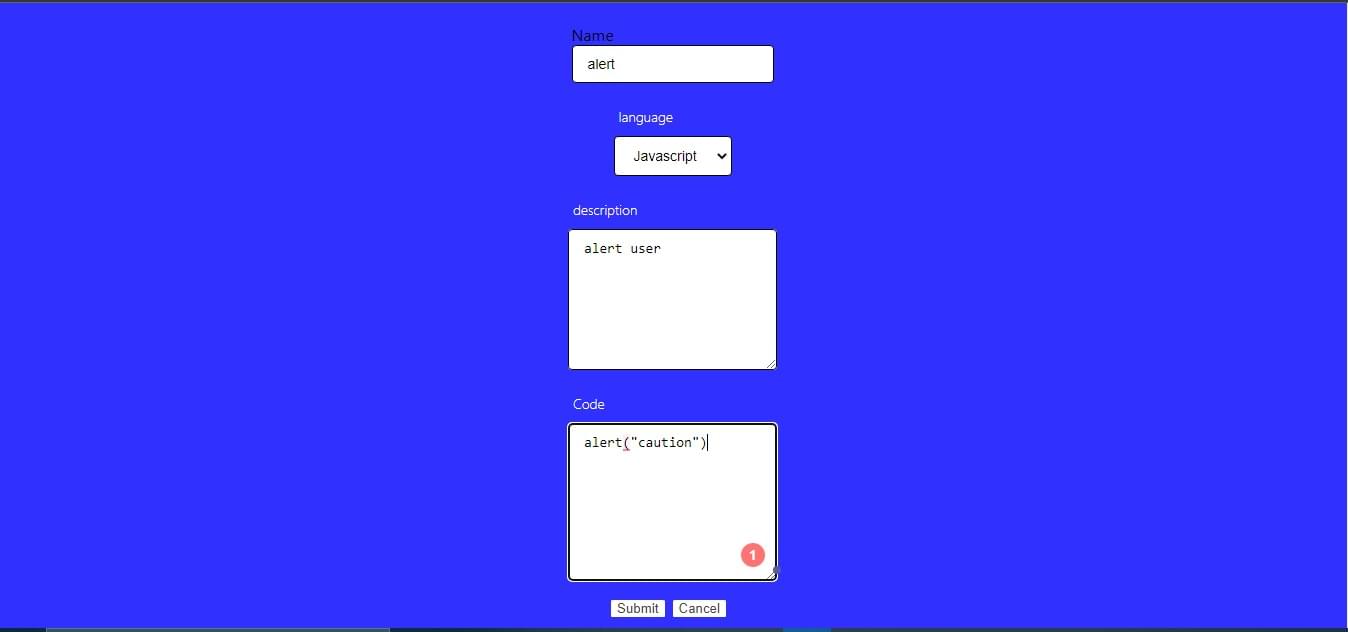
When we navigate to our home component, we can see the created snippet.
Creating a Function to Edit Snippets
To create our edit snippet functionality, back in the Fauna.js file we’ll create and export a function to handle this task:
const updateSnippet = async (id, code, language, description, name) => {
  return await faunaClient.query(q.Update(q.Ref(q.Collection("codesnippet"), id), {
    data: {code, language, name, description},
  }))
}
module.exports = {
  ...
  updateSnippet,
}
Creating an API endpoint to edit snippets
This function is similar to the createSnippet function, but it also takes in a parameter of id. It uses this ID to identify which snippets are to be edited. If the id corresponds, we update the data with the other parameters. We’ll also create an endpoint file in the api directory called updateSnippet.js to handle the updates:
import { updateSnippet } from "../../Fauna"
export default async function handler(req, res) {
  const { id, code, language, description, name } = req.body
  if (req.method !== "PUT") {
    return res.status(405).json({ msg: "unauthorized" })
  }
  try {
    const updated = await updateSnippet(
      id,
      code,
      language,
      description,
      name
    )
    return res.status(200).json(updated)
  }
  catch (error) {
    console.log(error)
    res.status(500).json({ msg: "unauthorized" })
  }
}
Linking our Edit Button
Now, move over to the Snippets component and modify this component to make use of this function. First, we’ll import the Link module:
...
import Link from "next/link"
We also modify our edit button:
- <a>Edit</a>

+ <Link href={`/edit/${snippet.id}`}>
+   <a>Edit</a>
+ </Link>
Handling the edit snippet
When clicked, it sends a request to the page edit with the id of the selected snippet. In the pages folder, create a folder named edit with a file [id].js within it:
import { getSnippetById } from "../../Fauna"
import Upload from "../upload"
export default function Home({ snippet }) {
  const email = ""
  const user = ""
  return (
    <div>
      <h3>Update a snippet</h3>
      <Upload snippet={snippet} email={email} user={user}/>
    </div>
  )
}

export async function getServerSideProps(context) {
  try {
    //get and update record
    const id = context.params.id
  }
  catch (error) {
    console.log(error)
    context.res.statusCode = 302
    context.res.setHeader("Location", "/")
    return {props: {}}
  }
}
In [id].js, we’re passing the code snippet as props to the snippet upload page. However, this time the upload page will contain the data stored in the code snippet referenced by the id. To fetch the snippet by ID, we’ll need to create the getSnippetById function in the Fauna.js file:
const getSnippetById = async (id) => {
  const snippet = await faunaClient.query(q.Get(q.Ref(q.Collection("codesnippet"),id)))
  snippet.id = snippet.ref.id
  delete snippet.ref
  return snippet
}

module.exports = {
  getResponse,
  createSnippet,
  updateSnippet,
  getSnippetById,
}
As we export the function, back in the [id].js file, we can use it to fetch a particular snippet with its ID:
try {
  const id = context.params.id;
  const snippet = await getSnippetById(id);
  return {
    props: { snippet },
  };
} catch (error) {
  // as before
}
Modifying Stored Snippets
Now, in the upload.js file, we’ll modify it to be able to access the stored data if a snippet is to be edited:
- const { register, handleSubmit, errors, reset } = useForm()

+ const { register, handleSubmit, errors, reset } = useForm({
+   defaultValues: {
+     code: snippet ? snippet.data.code : "",
+     language: snippet ? snippet.data.language : "",
+     description: snippet ? snippet.data.description : "",
+     name: snippet ? snippet.data.name : "",
+   }
+ })
The code above checks if the snippet has stored data in it. If it returns true, it returns the data to the parameters: code, language, description and code. If it returns false, it returns an empty string.
Next, we’ll create a function to update the code snippet:
const createSnippet = async (data) => { ... }

const updateSnippet = async (data) => {
  const { code, language, description, name } = data
  const id = snippet.id
  try {
    await fetch("/api/updateSnippet", {
      method: "PUT",
      body: JSON.stringify({ code, language, description, name, id }),
      headers: {
        "Content-Type": "application/json",
      },
    })
    router.push("/")
  }
  catch (error) {
    console.log(error)
  }
}

return ( ,,, )
Testing Edit Snippet Functionality
If we run our code, we can edit the previously created code snippets by clicking on the Edit button, making changes to the data in the form and clicking on Submit.
Adding Delete Snippet Functionality
Now, if we return to the Home component in our browser, we’re able to edit and update code snippets. We can finally add the final functionality to delete our code snippet. Create and export a new function — deleteSnippet — in the Fauna.js file:
const deleteSnippet = async (id) => {
  return await faunaClient.query(q.Delete(q.Ref(q.Collection("codesnippet"),id)))
}

module.exports = {
  ...
  deleteSnippet,
}
Creating API endpoint for the delete functionality
We’ll create another endpoint for this function in our api folder called deleteSnippet.js and populate it with the following code:
import { deleteSnippet } from "../../Fauna"
export default async function handler(req, res) {
  if (req.method !== "DELETE") {
    return res.status(405).json({ msg: "unauthorized" })
  }
  const { id } = req.body
  try {
    const deleted = await deleteSnippet(id)
    return res.status(200).json(deleted)
  }
  catch (error) {
    console.log(error)
    res.status(500).join({ msg: "error occured" })
  }
}
Then, we modify the Snippets.js file to add the new functionality:
function Snippets({ snippet, snippetDeleted }) {
  ...
}
Then create a deleteSnippet function to fetch the endpoint from the api and delete the snippet referenced by the ID:
function Snippets({snippet, snippetDeleted}) {
  const deleteSnippet = async () => {
    try {
      await fetch("/api/deleteSnippet", {
        method: "DELETE",
        body: JSON.stringify({ id: snippet.id }),
        headers: {
          "Content-Type": "application/json",
        },
      });
      snippetDeleted();
    } catch (e) {
      console.log(e);
    }
  };

  return (
    <div className={styles.cont}>
      <p className={styles.lang}>{snippet.data.language}</p>
      <h3 className={styles.name}>{snippet.data.name}</h3>
      <p className={styles.descp}>{snippet.data.description}</p>

      <Code snippet={snippet}/>

      <div className={styles.links}>
        <Link href={`/edit/${snippet.id}`}>
          <a>Edit</a>
        </Link>
        <a onClick={deleteSnippet}>Delete</a>
      </div>
    </div>
  )
}
We’ve also updated the anchor element to call the deleteSnippet function when it’s clicked.
Testing Delete Functionality
We’ve added functionality to delete code snippets. We can now delete snippets by clicking on the Delete button in our app.
This concludes the functionalities for the snippet app. We’ll now proceed to add authentication measures to our app to enable only authorized users to create or modify snippets in our app.
User Authentication
Why do we need authentication? Currently, users can create snippets but they can also delete and modify snippets they didn’t create. We’ll need to provide a means to authorize users to access our site — and so the need for user authentication.
We’ll install next-auth for authentication via our CLI:
npm i next-auth
We’ll be using a JWT token for our authentication. JWT is a standard used to create access tokens for an application.
Create a folder named auth in your api folder and within it, create a file [...nextauth].js with the following code in it:
import NextAuth from "next-auth"
import GoogleProvider from "next-auth/providers/google"

export default NextAuth({
  providers: [
    GoogleProvider({
      clientId: process.env.GOOGLE_CLIENT_ID,
      clientSecret: process.env.GOOGLE_CLIENT_SECRET,
      authorizationUrl: "https://accounts.google.com/o/oauth2/v2/auth?prompt=consent&access_type=offline&response_type=code",
    })
  ],
  jwt: {
    encryption: true
  },
  secret: process.env.secret,
  callbacks: {
    async jwt(token, account) {
      if (account ?.accessToken) {
        token.accessToken = account.accessToken
      }
      return token
    },
    redirect: async (url, _baseUrl)=>{
      if (url === "/profile") {
        return Promise.resolve("/")
      }
      return  Promise.resolve("/")
    }
  }
})
After this, we’ll wrap up our components in the _app.js file:
import '../styles/globals.css'
import {Provider} from "next-auth/client"

function MyApp({ Component, pageProps }) {
  return (
    <Provider session={pageProps.session}>
      <Component {...pageProps} />
    </Provider>
  )
}
export default MyApp
Handling Authentication
We’ll modify our Home component in index.js to return to our component if the user is authenticated, else it returns a button that leads to the authentication page:
import {signIn, signOut, useSession} from "next-auth/client"
...
Then within Home:
export default function Home() {
  const { data:snippets, mutate }=useSWR("api/snippets")

  const [session, loadingSession] = useSession()
  if (loadingSession) {
    <>
      <p>...authenticating</p>
    </>
  }
  ...
}
The code above checks if the app is loadingSession. If true, it returns the p tag block, else it returns the rest of our app if there is session. Next, we’ll render the “sign in” if there’s no session:
return (
  <div className={styles.container}>
    <Head> ... </Head>

    {!session && (
      <>
        <h1>Sign in to access snippet app</h1>
        <button onClick={() => signIn()}>Sign In</button>
      </>
    )}

    {session && (
      <>
        <main className={styles.main}>
          <h3>welcome {session.user.email}</h3>
          <button onClick={() => signOut()}>Sign Out</button>
          ...
        </main>
      </>
    )}
  </div>
)
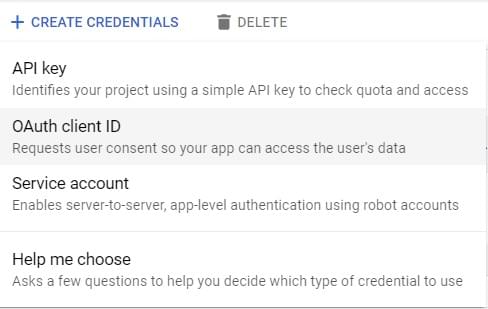
To make use of the “Google login service”, we need access credentials from the Google cloud console. To get this, sign into your Google account and navigate to the Google Cloud console. Click on CREATE PROJECT on the page, enter the name of your project, and click on Create.
On the new page that opens, click on + CREATE CREDENTIALS in the top menu bar and finally select OAuth client ID in the dropdown menu.
On the page that opens, you’ll get a notification with a button asking you to “Configure Consent Screen”. Click on this button.
On the next page, Select External under the user type and click on Create. Enter the required fields for your “App name” and “Email” and click on Save and Continue.
In the Scopes and Test users sections, scroll down and click on Save and Continue.
Finally, click on Head back to dashboard and click on the Publish button.
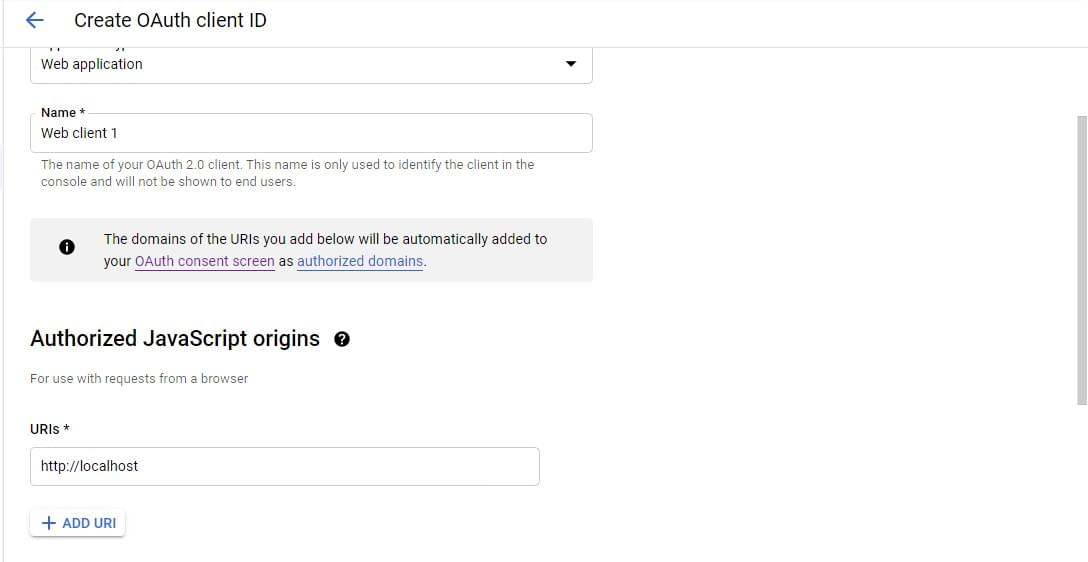
Now, we can create our key by clicking on Credentials in the side menu, then Create Credentials in the top menu bar. Select Oauth Client ID in the dropdown and you’ll get a page requesting the application type.
Select Web Application then, under “Authorized JavaScript origins”, click Add URI and enter http://localhost. Finally, under “Authorized redirect URIs”, click Add URI and enter http://localhost/api/auth/callback/google in the field, before clicking on Create.
Copy the client ID and the client secret from the popup that opens and add them to the .env file:
GOOGLE_CLIENT_ID=id
GOOGLE_CLIENT_SECRET=secret
We can now log in using Google authentication to our app. Also, we’ll set up our upload.js file as a protected route so that unauthorized users can’t create new snippets:
import { getSession } from "next-auth/client"

function Upload({ snippet, user }) { ... }

export async function getServerSideProps(context) {
  const session = await getSession(context)
  if (!session) {
    context.res.writeHead(302, { Location: "/" })
    context.res.end()
    return {}
  }
  return {
    props: {
      user: session.user,
    }
  }
}

export default Upload;
Testing User Authentication
If we run our app with the npm run dev command, at first we’ll get a page requesting us to “sign in”. We can’t navigate to the upload page via the /upload path in our URL. We can only access our app when we use the Google login feature to sign in to our app.
Authorizing Users to Create a Snippet
Finally, we’ll modify the createSnippet functionality to add the user email to the database and then we’ll only show the Edit and Delete buttons if the email corresponds.
In Fauna.js, alter the createSnippet function like so:
const createSnippet = async (code, language, description, name, mail) => {
  return await faunaClient.query(q.Create(q.Collection("codesnippet"), {
    data:{code, language, description, name, mail}
  }))
}
In the createSnippet.js file, make the following changes:
- const { code, language, description, name } = req.body;
+ const { code, language, description, name, mail } = req.body;

- const createdSnippet = await createSnippet(code, language, description, name);
+ const createdSnippet = await createSnippet(code, language, description, name, mail);
In upload.js:
function upload({ snippet, user }) {
+  const email = user.email;
   ...
}
And alter the createSnippet function and the updateSnippet function, as follows:
const createSnippet = async (data) => {
  const { code, language, description, name, mail } = data;
  console.log(data)
  try {
    await fetch("/api/createSnippet", {
      method: "POST",
      body: JSON.stringify({ code, language, description, name, mail:email }),
      headers: {
        "Content-type": "application/json"
      },
    })
    router.push("/")
  } catch (error) {
    console.log(error)
  }
}

const updateSnippet = async (data) => {
  const { code, language, description, name } = data
  const id = snippet.id
  try {
    await fetch("/api/updateSnippet", {
      method: "PUT",
      body: JSON.stringify({ code, language, description, name, mail:email }),
      headers: {
        "Content-Type": "application/json",
      },
    })
    router.push("/")
  }
  catch (error) {
    console.log(error)
  }
}
We can now proceed with making the Edit and Delete buttons only display if the email corresponds.
First, we pass the user.mail as props to the Snippet component in index.js:
<Snippets
  key={snippet.id}
  snippet={snippet}
  snippetDeleted={mutate}
+ email={session.user.email}
/>
Then in Snippet.js:
function Snippets({ snippet, snippetDeleted, email }) {
...
  {email == snippet.data.mail && (
    <>
      <div className={styles.links}>
        <Link href={`/edit/${snippet.id}`}>
          <a>Edit</a>
        </Link>
        <a onClick={deleteSnippet}>Delete</a>
      </div>
    </>
  )}
  ...
}
Testing Our App
Run npm run dev in the CLI and open up the app in your browser. Now, if you create a new snippet, the user email is added to the database. If the email doesn’t correspond, the Edit and Delete buttons aren’t shown on the snippet display page. You can test this by logging in with a different email address than the one used to create the code snippets.
Conclusion
We’ve finally come to the end of this tutorial. We’ve learned how to build a CRUD app with Next.js and FaunaDB, and how to perform CRUD operations based on user authentication.
To check out the full code, visit the GitHub repository.
Frequently Asked Questions (FAQs) about Building a Code Snippet App with Next.js and FaunaDB
How does FaunaDB integrate with Next.js in building a code snippet app?
FaunaDB integrates seamlessly with Next.js in building a code snippet app. FaunaDB is a serverless cloud database that provides powerful capabilities for app development, such as native GraphQL support, ACID transactions, and multi-region global distribution. When building a code snippet app, you can use FaunaDB to store and manage your code snippets. Next.js, on the other hand, is a React framework that enables server-side rendering and generating static websites for React-based web applications. It can be used to build the frontend of your code snippet app, while FaunaDB handles the backend data management.
What are the benefits of using FaunaDB for my code snippet app?
FaunaDB offers several benefits for your code snippet app. Firstly, it provides a flexible and easy-to-use data model that supports relational, document, and graph models. This means you can store and manage your code snippets in a way that best suits your app’s needs. Secondly, FaunaDB’s serverless architecture means you don’t have to worry about server management, scaling, or capacity planning. This allows you to focus on building and improving your app. Lastly, FaunaDB’s strong consistency and ACID transactions ensure that your app’s data is always accurate and reliable.
How can I secure my code snippet app with FaunaDB?
FaunaDB provides robust security features that you can use to secure your code snippet app. It offers built-in identity and access management, allowing you to control who can access your app’s data and what they can do with it. You can also use FaunaDB’s ABAC (Attribute-Based Access Control) system to define fine-grained access policies based on user attributes. Additionally, FaunaDB supports secure client-side access to the database, so you can build secure, end-to-end encrypted applications.
Can I use other databases with Next.js for my code snippet app?
Yes, you can use other databases with Next.js for your code snippet app. Next.js is database-agnostic, meaning it can work with any database that you choose. However, the choice of database can significantly impact the performance, scalability, and ease of use of your app. Therefore, it’s important to choose a database that fits your app’s needs. FaunaDB is a great choice due to its serverless architecture, powerful capabilities, and ease of use.
How can I optimize the performance of my code snippet app with Next.js and FaunaDB?
There are several ways to optimize the performance of your code snippet app with Next.js and FaunaDB. Firstly, you can use Next.js’s server-side rendering and static generation features to improve the load times of your app. Secondly, you can use FaunaDB’s indexing and query optimization features to speed up data retrieval. Lastly, you can leverage FaunaDB’s multi-region global distribution to ensure that your app’s data is always close to your users, reducing latency.
Can I use FaunaDB with other frontend frameworks for my code snippet app?
Yes, you can use FaunaDB with other frontend frameworks for your code snippet app. FaunaDB provides a flexible and easy-to-use API that can be used with any frontend framework that supports HTTP requests. This includes popular frameworks like Angular, Vue.js, and Svelte. However, the integration process and capabilities may vary depending on the specific framework.
How can I handle errors in my code snippet app with Next.js and FaunaDB?
Both Next.js and FaunaDB provide robust error handling capabilities. In Next.js, you can use the built-in error page and error boundary features to catch and handle errors in your app. In FaunaDB, you can use the error handling features of the FQL (Fauna Query Language) to catch and handle database errors. Additionally, you can use third-party error tracking services to monitor and troubleshoot errors in your app.
Can I migrate my existing code snippet app to use Next.js and FaunaDB?
Yes, you can migrate your existing code snippet app to use Next.js and FaunaDB. The migration process involves rewriting your app’s frontend with Next.js and migrating your app’s data to FaunaDB. This can be a complex process depending on the size and complexity of your app, but it can bring significant benefits in terms of performance, scalability, and ease of use.
How can I test my code snippet app with Next.js and FaunaDB?
You can test your code snippet app with Next.js and FaunaDB using various testing tools and techniques. For the frontend, you can use Jest and React Testing Library to write unit and integration tests for your Next.js components. For the backend, you can use FaunaDB’s multi-tenant architecture to create separate databases for testing and production, ensuring that your tests don’t affect your live data.
How can I deploy my code snippet app with Next.js and FaunaDB?
You can deploy your code snippet app with Next.js and FaunaDB using various deployment platforms and services. For the frontend, you can use Vercel, the company behind Next.js, which provides a seamless deployment experience for Next.js apps. For the backend, you can use FaunaDB’s cloud service, which automatically handles deployment, scaling, and server management for you.
 Victory Tuduo
I am a web developer and technical writer. I build scalable web architectures and love authoring creative content.