This tutorial is about creating an AWS Lambda function using Spring Boot and adding an S3 trigger to it.
Amazon S3 or Simple Storage Service is a cloud object storage service offered by AWS. It is a scalable, high-speed, web-based cloud storage service to store data objects in a bucket structure. Ensure that you have an S3 bucket created to upload objects while following this tutorial. If you don’t, go ahead and create one.
In this tutorial, we are going to upload a simple text file and see how the Lambda function gets invoked immediately.
We will create the Lambda function out of a Spring Boot project in Java. In the Spring Boot project, we will implement a simple handler function that receives upload events from S3. You can implement your business logic to process the S3Event in the Handler function. In this tutorial, we are just going to access the file and print it’s contents.
Let’s start. The first step is to create a Spring Boot project and add the necessary maven dependencies into the pom.xml file.
Pom.xml
We also need to include the ‘aws-java-sdk-s3’ dependency apart from ‘java-events’ and ‘java-core’ dependencies to access the objects present in S3.
<properties>
<java.version>1.8</java.version>
<spring-cloud.version>Hoxton.SR6</spring-cloud.version>
<wrapper.version>1.0.17.RELEASE</wrapper.version>
</properties>

<dependencies>
    <dependency>
        <groupId>org.springframework.boot</groupId>
        <artifactId>spring-boot-starter-web</artifactId>
    </dependency>
    <dependency>
        <groupId>org.springframework.cloud</groupId>
        <artifactId>spring-cloud-function-adapter-aws</artifactId>
    </dependency>
    <dependency>
        <groupId>com.amazonaws</groupId>
        <artifactId>aws-lambda-java-events</artifactId>
        <version>2.0.2</version>
    </dependency>
    <dependency>
        <groupId>com.amazonaws</groupId>
        <artifactId>aws-lambda-java-core</artifactId>
        <version>1.1.0</version>
    </dependency>
    <dependency>
        <groupId>org.projectlombok</groupId>
        <artifactId>lombok</artifactId>
        <optional>true</optional>
    </dependency>
    <dependency>
        <groupId>com.amazonaws</groupId>
        <artifactId>aws-java-sdk-s3</artifactId>
        <version>1.11.271</version>
    </dependency>
    <dependency>
        <groupId>org.springframework.boot</groupId>
        <artifactId>spring-boot-starter-test</artifactId>
        <scope>test</scope>
        <exclusions>
            <exclusion>
                <groupId>org.junit.vintage</groupId>
                <artifactId>junit-vintage-engine</artifactId>
            </exclusion>
        </exclusions>
    </dependency>
</dependencies>

<dependencyManagement>
    <dependencies>
        <dependency>
            <groupId>org.springframework.cloud</groupId>
            <artifactId>spring-cloud-dependencies</artifactId>
            <version>${spring-cloud.version}</version>
            <type>pom</type>
            <scope>import</scope>
        </dependency>
    </dependencies>
</dependencyManagement>

<build>
    <plugins>
        <plugin>
            <groupId>org.apache.maven.plugins</groupId>
            <artifactId>maven-deploy-plugin</artifactId>
            <configuration>
                <skip>true</skip>
            </configuration>
        </plugin>
        <plugin>
            <groupId>org.springframework.boot</groupId>
            <artifactId>spring-boot-maven-plugin</artifactId>
            <dependencies>
                <dependency>
                    <groupId>org.springframework.boot.experimental</groupId>
                    <artifactId>spring-boot-thin-layout</artifactId>
                    <version>${wrapper.version}</version>
                </dependency>
            </dependencies>
        </plugin>
        <plugin>
            <groupId>org.apache.maven.plugins</groupId>
            <artifactId>maven-shade-plugin</artifactId>
            <version>3.2.4</version>
            <configuration>
                <createDependencyReducedPom>false</createDependencyReducedPom>
                <shadedArtifactAttached>true</shadedArtifactAttached>
                <shadedClassifierName>aws</shadedClassifierName>
            </configuration>
        </plugin>
    </plugins>
    <finalName>springboot-aws-lambda</finalName>
</build>
The second step is to create the handler class and implement the handler function. Create the S3EventHandle class that implements RequestHandler<S3 Event, String> interface. In this class, implement the handleRequest function that takes S3Event and Context as input and outputs String.
S3EventHandler.java
In this class, we also need to create an AmazonS3 client using AmazonS3ClientBuilder and BasicAWSCredentials that takes AWS access key and secret key. If you don’t have an access key and a secret key, create new keys as you need them to access S3 objects programmatically.
The handler function receives S3Event that consists of several records. Each record corresponds to a particular object uploaded into the S3 bucket. We can see the complete structure of the S3Event using s3event.toJson(). Extract the required fields like bucket name and filename from the S3Event as shown in the code. We can now use the AmazonS3 object s3client to access the S3 object(text file in our case) using the getObject() method. Using InputStream, print the contents of the file.
Copy the below code into the S3EventHandler.java file
package com.appsdeveloperblog.s3lambda;

import com.amazonaws.auth.AWSStaticCredentialsProvider;
import com.amazonaws.auth.BasicAWSCredentials;
import com.amazonaws.regions.Regions;
import com.amazonaws.services.lambda.runtime.Context;
import com.amazonaws.services.lambda.runtime.RequestHandler;
import com.amazonaws.services.lambda.runtime.events.S3Event;
import com.amazonaws.services.s3.AmazonS3;
import com.amazonaws.services.s3.AmazonS3ClientBuilder;
import org.slf4j.Logger;
import org.slf4j.LoggerFactory;
import org.springframework.util.StreamUtils;
import java.io.IOException;
import java.io.InputStream;
import java.nio.charset.StandardCharsets;

public class S3EventHandler implements RequestHandler<S3Event, String> {

    private final String accessKeyId = System.getenv("accessKeyId");
    private final String secretAccessKey = System.getenv("secretAccessKey");
    private final String region = System.getenv("region");
    private final BasicAWSCredentials basicAWSCredentials = new BasicAWSCredentials(accessKeyId, secretAccessKey);
    AmazonS3 s3client = AmazonS3ClientBuilder
            .standard()
            .withRegion(Regions.fromName(region))
            .withCredentials(new AWSStaticCredentialsProvider(basicAWSCredentials))
            .build();
    static final Logger log = LoggerFactory.getLogger(S3EventHandler.class);

    @Override
    public String handleRequest(S3Event s3Event, Context context) {

        log.info("Lambda function is invoked: Processing the uploads........." + s3Event.toJson());

        String BucketName = s3Event.getRecords().get(0).getS3().getBucket().getName();
        String FileName = s3Event.getRecords().get(0).getS3().getObject().getKey();

        log.info("File - "+ FileName+" uploaded into "+
                BucketName+" bucket at "+ s3Event.getRecords().get(0).getEventTime());
        try (InputStream is = s3client.getObject(BucketName, FileName).getObjectContent()) {
            log.info("File Contents : "+StreamUtils.copyToString(is, StandardCharsets.UTF_8));
        }catch (IOException e){
            e.printStackTrace();
            return "Error reading contents of the file";
        }
        return null;
    }
}
Once this is over, create a jar file using the mvn package command create a Lambda function using the jar file. To see how to do it, check out this tutorial.
Build and deploy a Serverless Spring Boot Web Application with AWS Lambda
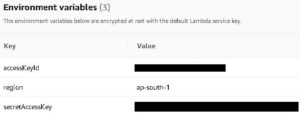
After creating the Lambda function, add the access key and secret key values as Environment variables under the Configuration tab, as shown below, and import them into the project using System.getenv().
Creating an S3 Trigger to the Lambda function
The next step is to add a Trigger to this Lambda function. Click on Add Trigger and select S3 as trigger configuration. From the drop-down, select the name of this Bucket you have created. You can also choose the event type as ‘All create events’ or create events that correspond to PUT/POST or even COPY.
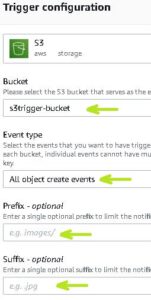
We can also add other details like a prefix (name/path of the object uploaded) and suffix (type of object i.e., jpg/txt/img, etc.) to make the Lambda function handle specific events.
Click on Add to finish adding the trigger.
Now, go to S3 under the Services tab and upload a test.txt file. The contents of the file that I have uploaded are as follows.

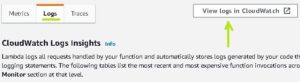
Once the upload is complete, the Lambda function must be invoked. To verify this, go to the Lambda function and click on ‘View logs on Cloud Watch’ under the Monitor tab. In the Log streams, click on the recently generated stream and check logs.

In the logs, you can see the line Lambda function is invoked. Processing the uploads… If you click on it, you can see the entire json that describes the S3Event. In the following line, you can also view the sentence File – test.txt uploaded into s3trigger-bucket bucket at 2021-11-06T11:03:04.731Z.

If you scroll down to the end, you can also see the file contents printed, as shown in the below picture.
![]()
In a similar way, the Lambda function is invoked every time a text file is uploaded into the bucket.
Link to code : GitHub
That’s it for this tutorial. Hope this has helped you. Happy learning!!
Happy Learning!