How to Create Reusable Components with the Vue 3 Composition API


In this tutorial, we’ll explore how to use the Vue 3 Composition API and its latest code reusability capabilities.
Code sharing and reusability are one of the cornerstones of software development. Since the earliest days of programming, the problem of code repetition has made programmers invent strategies for keeping their code DRY, reusable and portable. As time has passed, these strategies have been constantly polished and improved, and new ones are constantly developed.
This applies equally to Vue as to other programming languages and frameworks. As the Vue framework has evolved, it it has continued to offer much better reusability approaches.
Key Takeaways
- Utilize the Vue 3 Composition API to build and structure components that are abstract, portable, and loosely coupled, enhancing code reusability across projects.
- The Composition API offers a cleaner, more organized code structure compared to the Options API, grouping logically related blocks together and supporting TypeScript integration.
- Use the `setup()` function within Vue 3 Composition API to create reactive variables and functions, enhancing component performance and maintainability.
- Vue composables, akin to React hooks, allow for the extraction and reuse of reactive state and functionality, surpassing older methods like mixins for better clarity and conflict avoidance.
- For projects where components are complex and multifunctional, the Composition API is preferable, providing a structured and maintainable coding approach.
- Implement the `useFetch()` composable for data fetching in various components, demonstrating the practical application and flexibility of composables in Vue 3.
What Is Composition API and Why It Was Created
Let’s consider what makes a piece of code reusable. For me, there are three main principles of reusability:
- Code abstraction. A piece of code is abstract when it can suit multiple different use cases (like classes in many programming languages).
- Code portability. A piece of code is portable when it can be used not only in different places in one project but also in different projects.
- Code decoupling (or loose coupling). A piece of code is decoupled from another one when changing one doesn’t require changing the other. They’re as independent of each other as possible. Of course, complete decoupling is impossible — which is why the more accurate term used by developers is “loosely coupled”.
The Composition API is a new strategy for building and structuring Vue 3 components. It incorporates all of the three principles described above and allows for creating abstract, portable, and loosely coupled components that can be reused and shared between different projects.
Motivation to Add the Vue Composition API to the Framework
The motivation for the Composition API to be added to Vue 3 is clear and simple: producing more compact and defragmented code. Let’s explore this a bit more.
When I found Vue for the first time, I was hooked by its Options (object-based) API. It seemed to me way more clear and elegant in contrast to the Angular and React equivalents. Everything has its own place and I can just put it in there. When I have some data, I put it in a data option; when I have some functions, I put them in a methods option, and so on:
// Options API example
export default {
  props: ['title', 'message'],

  data() {
    return {
      width: 30,
      height: 40
    }
  },

  computed: {
    rectArea() {
      return this.width * this.height
    },
  },

  methods: {
    displayMessage () {
      console.log(`${this.title}: ${this.message}`)
    }
  }
}
All this seems quite ordered, clean, and easy to read and understand. It turns out, however, that this is valid only while an app is relatively small and simple. As the app and its components grow more and more, the code fragmentation and disorder increase.
When the Options API is used in large projects, the code base soon starts to become like a fragmented hard disk. Different parts of the code in a component, which logically belong together, are spread in different places. This makes the code hard to read, understand and maintain.
This is where the Composition API comes into play. It offers a way to structure the code in order, where all logical parts are grouped together as a unit. To some extent, you can imagine the Composition API as a disk defragmentation tool. It helps you to keep the code compact and clean.
Here’s a simplified visual example:
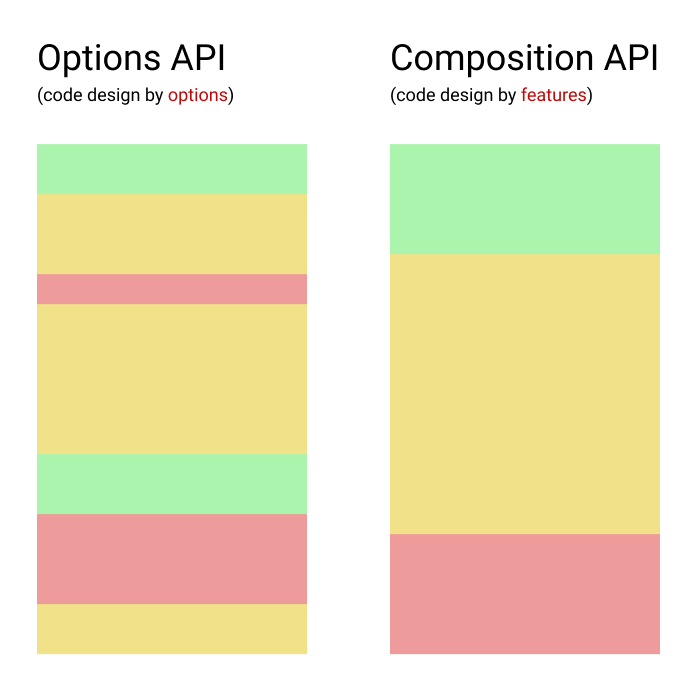
As you can see, a component’s code built with Options API could be quite fragmented, while a component’s code built with the Composition API is grouped by features and looks much easier to read and maintain.
Vue Composition API Advantages
Here’s a summary of the main advantages the Composition API offers:
- Better code composition.
- Logically related blocks are kept together.
- Better overall performance compared to Vue 2.
- Cleaner code. The code is logically better ordered, which makes it much more meaningful and easy to read and understand.
- Easy to extract and import functionality.
- TypeScript support, which improves IDE integrations and code assistance, and code debugging. (This is not a feature of the Composition API, but it’s worth mentioning it as a feature of Vue 3.)
Composition API Basics
Despite its power and flexibility the Composition API is quite simple. To use it in a component, we need to add a setup() function, which in fact is just another option added to the Options API:
export default {
  setup() {
    // Composition API
  }
}
Inside the setup() function, we can create reactive variables, and functions to manipulate them. Then we can return those variables and/or functions, which we want to be available in the rest of the component. To make reactive variables, you’ll need to use the Reactivity API functions (ref(), reactive(), computed(), and so on). To learn more about their usage, you can explore this comprehensive tutorial about the Vue 3 Reacivity system.
The setup() function accepts two arguments: props and context.
Props are reactive and will be updated when new props are passed in:
export default {
  props: ["message"],
  setup(props) {
    console.log(props.message)
  }
}
If you want to destructure your props, you can do this by using toRefs() inside the setup() function. If you use ES6 destructuring instead, it will remove props reactivity:
import { toRefs } from 'vue'

export default {
  props: ["message"],
  setup(props) {
//  const { message } = props   <-- ES6 destructuring. The 'message' is NOT reactive now.
    const { message } = toRefs(props) // Using 'toRefs()' keeps reactivity.
    console.log(message.value)
  }
}
Context is a normal JavaScript object (not reactive) that exposes other useful values like attrs, slots, emit. These are equivalents to $attrs, $slots, and $emit from the Options API.
The setup() function is executed before the component instance creation. So you won’t have access to the following component options: data, computed, methods, and template refs.
In the setup() function, you can access a component’s lifecycle hook by using the on prefix. For example, mounted will become onMounted. The lifecycle functions accept a callback that will be executed when the hook is called by the component:
export default {
  props: ["message"],
  setup(props) {
    onMounted(() => {
      console.log(`Message: ${props.message}`)
    })
  }
}
Note: you don’t need to call the beforeCreate and created hooks explicitly, because the setup() function does a similar job by itself. In a setup() function, this isn’t a reference to the current active instance, because setup() is called before other component options are resolved.
Comparing the Options API with the Composition API
Let’s make a quick comparison between the Options and Composition APIs.
First, here’s a simple to-do app component, built with the Options API, with abilities to add and remove tasks:
<template>
  <div id="app">
    <h4> {{ name }}'s To Do List </h4>
    <div>
      <input v-model="newItemText" v-on:keyup.enter="addNewTodo" />
      <button v-on:click="addNewTodo">Add</button>
      <button v-on:click="removeTodo">Remove</button>
        <transition-group name="list" tag="ol">
          <li v-for="task in tasks" v-bind:key="task" >{{ task }}</li>
        </transition-group>
    </div>
  </div>
</template><script>
export default {
data() {
return {
name: "Ivaylo",
tasks: ["Write my posts", "Go for a walk", "Meet my friends", "Buy fruit"],
newItemText: ""
}},
methods: {
addNewTodo() {
if (this.newItemText != "") {
this.tasks.unshift(this.newItemText);
}
this.newItemText = "";
},
removeTodo() {
this.tasks.shift();
},
}
};
</script> I’ve omitted the CSS code here for brevity and because it’s not relevant. You can see the full code in the Vue 2 Options API example.
As you can see, this is quite a simple example. We have three data variables and two methods. Let’s see how to rewrite them with the Composition API in mind:
<script>
  import { ref, readonly } from "vue"

  export default {
    setup () {
      const name = ref("Ivaylo")
      const tasks = ref(["Write my posts", "Go for a walk", "Meet my friends", "Buy fruit"])
      const newItemText = ref("")

      const addNewTodo = () => {
        if (newItemText.value != "") {
          tasks.value.unshift(newItemText.value);
        }
        newItemText.value = "";
      }
      const removeTodo = () => {
        tasks.value.shift();
      }

      return {
        name: readonly(name),
        tasks: readonly(tasks),
        newItemText,
        addNewTodo,
        removeTodo
      }
    }
  };
</script>
As you can see in this Vue 3 Composition API example, the functionality is the same but all data variables and methods are moved inside a setup() function.
To recreate the three data reactive variables, we use the ref() function. Then, we recreate the addNewTodo() and removeTodo() functions. Note that all uses of this are removed and instead variable names are used directly followed by the value property. So instead of this.newItemText we write newItemText.value, and so on. Finally, we return the variables and functions so they can be used in the component’s template. Note that, when we use them in the template, we don’t need to use the value property, because all returned values are automatically shallow unwrapped. So we don’t need to change anything in the template.
We make the name and tasks read-only to prevent them from any changes outside of the component. In this case, the tasks property can be changed only by addNewTodo() and removeTodo().
When the Composition API is a good fit for a component and when it isn’t
Just because some new technology is created doesn’t mean you need it or must use it. Before deciding whether to use a new technology, you should think about whether you really need it. Although the Composition API offers some great benefits, using it in small and simple projects can lead to unnecessary complexity. The principle is the same as with Vuex usage: it can be too complicated for small projects.
For example, if your components are mostly single-feature — that is, they do only one thing — you don’t need to add unnecessary cognitive load by using the Composition API. But if you notice that your components are getting complex and multi-featured — they handle more than one single task and/or their functionality is needed in many places in you app — then you should consider using the Composition API. In medium to large projects with lots of complex, multi-featured components, the Composition API will help you produce highly reusable and maintainable code without unnecessary hacks or workarounds.
So you can take the following rules as a general advice:
- The Options API is best for building small, simple, single-feature components whose functionality requires low reusability.
- The Composition API is best for building larger and more complex, multi-featured components whose functionality requires higher reusability.
What Are Vue Composables?
The secret
weapon of the Composition API is the ability to create highly reusable modules called composables. They allow us to extract reactive state and functionality and reuse it in other components. Composables are the equivalent of mixins in the Options API. They can be considered also as an equivalent to React hooks.
Before composables, there were three ways to reuse and share code between components: utility functions, mixins, and renderless components. But composables beat them all. Let’s see why.
Utility functions
Utility functions are useful but limited, because they can’t handle Vue-specific features like reactive state. Here’s an example:
// utils.js
export function increment(count) {
  return count++;
}
...
Here, we have an increment(count) utility function that increments the count variable by one. But we can’t define reactive state here. We need to add a reactive count variable inside the consuming component, like this:
// Counter.vue
<template>
  <p>{{ count }}</p>
  <button v-on:click="increment(count)">Increment</button>
</template>

import { increment } from './utils.js'

export default {
  data() {
    return { count: 0 }
  }
}
Renderless components
Renderless components (which are components that doesn’t render any HTML templates, but only state and functionality) are a bit better than utility functions, because they can handle Vue-specific features, but their flexibility is also limited. Here’s an example:
// RenderlessCounter.vue
export default {
  data() {
    return { count: 0 }
  },
  methods: {
    increment() {
      this.count++
    }
  },
  render() {
    return this.$slots.default({
      count: this.count,
      increment: this.increment
  });
}
It’s a bit better here, because we can define reactive state and export
it with the help of scoped slots. When we implement the component, we use the defined count variable and increment() method to build a custom template:
// Counter.vue
<renderless-counter>
  <template v-slot:default="{count, increment}">
    <p>{{ count }}</p>
    <button v-on:click="increment">Increment</button>
  </template>
</renderless-counter>
Mixins
Mixins are the official way of code sharing between components built with the Options API. A mixin is just an exported options object:
// CounterMixin.js
export default {
  data() {
    return { count: 0 }
  },
  methods: {
    increment() {
      this.count++
    }
  }
}
We can import the mixin’s options object and use it as if its members belongs to the consuming component’s options object:
// Counter.vue
<template>
  <p>{{ count }}</p>
  <button v-on:click="increment">Increment</button>
</template>

import CounterMixin from './CounterMixin'

export default {
  mixins: [CounterMixin]
}
If a component has already defined some options (data, methods, computed, and so on), they’re merged with those from the imported mixin(s). As we’ll see shortly, this behavior has some serious disadvantages.
Mixins have some serious drawbacks compared with composables:
- Data source is obscured. When a component’s data comes from multiple mixins, we can’t say for sure which properties came from which mixin. The same is true when globally registered mixins are used.
- Restricted reusability. Mixins don’t accept parameters, so we can’t add additional logic.
- Name conflicts. If two or more mixins have properties with the same name, the property from the last mixin will be used, which might not be what we want.
- No data safeguarding. We can’t be sure that a mixin’s property won’t be changed by the consuming component.
Vue Composables Benefits
As a conclusion to this section, let’s summarize the main benefits of Vue 3 composables:
- Data source is transparent. To use composables, we need to import them and use destructuring to extract the desired data. So we can see clearly the source of every property/method.
- No name conflicts. We can use properties with same names coming from multiple composables just by renaming them.
- Data is safeguarded. We can make the returned properties read-only, thus restricting mutation coming from other components. The principle is the same as with mutations in Vuex.
- Shared state. Usually every composable used in a component creates a new local state. But we can also define global state, so that when composables are used in different components, they’ll share the same state.
Creating and Using Vue Composables
In this section, we’ll learn how to create and use custom Vue 3 composables.
Note: for this project, you’ll need Node and Vue CLI installed on your machine.
Let’s create a new Vue 3 project by using the Vue CLI:
vue create vue-composition-api-examplesWhen you’re asked to pick a preset, make sure you’ve chosen the default Vue 3 option.
You can find all project files in the Vue Composition API examples repo.
Creating a Data-fetching Composable
In the following example, we’ll create a custom data-fetching composable that can be used in a variety of scanarios.
First, create a src/composables folder and add an useFetch.js file to it. Here’s the code for that file:
import {toRefs, ref, reactive} from 'vue';

export function useFetch(url, options) {
  const data = ref(null);
  const state = reactive({
    error: null,
    loading: false
  });

  const fetchData = async () => {
    state.loading = true;
    try {
      const res = await fetch(url, options);
      data.value = await res.json();
    } catch (e) {
      state.error = e;
    } finally {
      state.loading = false;
    }
  };

  fetchData();

  return {data, ...toRefs(state)};
}
Technically, a composable is just a function we export (useFetch() in our case). In that function, we create data and state variables. Then we create a fetchData() function, in which we use the Fetch API to get data from a particular source and assign the result to the data property. After the fetchData() function, we immediately call it in order to assign the variables with the fetched data. Lastly, we return all variables. We use toRefs() here to properly extract error and loading variables, keeping them reactive.
Great! Now, let’s see how we can use our composable in a component.
In the src/components folder, add a UserList.vue file with the following content:
<template>
  <div v-if="error">
    <h2>Error: {{ error }}</h2>
  </div>
  <div v-if="loading">
    <h2>Loading data...</h2>
  </div>
  <h2>Users</h2>
  <ul v-for="item in data" :key="item.id">
    <li><b>Name:</b> {{ item.name }} </li>
    <li><b>Username:</b> {{ item.username}} </li>
  </ul>
</template>

<script>
import { useFetch } from '../composables/useFetch.js';

export default {
  setup() {
    const {data, error, loading} = useFetch(
      'https://jsonplaceholder.typicode.com/users',
      {}
    );

    return {
      data,
      error,
      loading
    };
  }
};
</script>

<style scoped>
  ul {
    list-style-type: none;
  }
</style>
Here, we import the useFetch() composable and then extract its variables inside the setup() function. After we’ve returned the variables, we can use them in the template to create a list of users. In the template, we use the v-if directive to check the truthiness of error and loading, and if one of them is true, the appropriate message is shown. Then, we use the v-for directive and data property to create the actual list of users.
The last thing we need to do is add the component in the App.vue file. Open the App.vue file and replace its content with the following:
<template>
  <div id="app">
    <user-list />
  </div>
</template>

<script>
import UserList from "./components/UserList";

export default {
  name: "App",
  components: {
    UserList
  }
};
</script>
And that’s it. This is the base for creating and using composables. But let’s go further and make the user list component a bit more flexible and reusable.
Creating a highly reusable component
Rename UserList.vue to UniversalList.vue and replace its content with the following:
<template>
  <div v-if="error">
    <h2>Error: {{ error }}</h2>
  </div>
  <div v-if="loading">
    <h2>Loading data...</h2>
  </div>
  <slot :data="data"></slot>
</template>

<script>
import { useFetch } from '../composables/useFetch.js';

export default {
  props: ['url'],
  setup(props) {
    const {data, error, loading} = useFetch(
      props.url,
      {}
    );

    return {
      data,
      error,
      loading
    };
  }
};
</script>
There are two important changes here. First, when we call useFetch(), instead of adding a URL explicitly, we substitute it with the url prop. That way, we could use a different URL depending on our needs. Second, instead of a pre-made template for the list, we add a slot component and provide the data as its prop. That way, we could use whatever template we need when we implement the component. Let’s see how to do this in practice.
Replace the content of App.vue with the following:
<template>
  <div id="app">
    <universal-list url="https://jsonplaceholder.typicode.com/todos" v-slot="{ data }">
      <h2>Todos</h2>
      <ol>
        <li v-for="item in data" :key="item.id"> {{ item.title }} - {{ item.completed }} </li>
      </ol>
    </universal-list>
  </div>
</template>

<script>
import UniversalList from "./components/UniversalList";

export default {
  name: "App",
  components: {
    UniversalList
  }
};
</script>
Now, when we include the universal list component, we can provide a custom template depending on our needs. We add the desired URL and use the v-slot directive to get the data from the useFetch() composable. Finally, we structure the fetched data as we wish. In our case, it’s a list of todos.
These examples have been simplified for the sake of clarity, but they effectively show the main principles of creating and using composables and building reusable components. Once you’ve grasped the basics, you can continue to learn other small tips and tricks for component reusability and constantly improve what you’re building now and/or you’ve built before.
Conclusion
When the Composition API was being planned and talked about, many people argued that it was the wrong approach. Fortunately, many others saw the potential of such functionality. I hope this tutorial has helped you to see it too. Composables solve many issues with mixins and utility functions and provide a great way to make our code more reusable, compact, and cleaner. For me, the Composition API, combined with the Reactivity API and slots, forms the holy trinity of reusability. 😊
FAQs on How to Create Reusable Components with the Vue 3 Composition API
What is the Vue Composition API and why is it important?
The Vue Composition API is a new feature introduced in Vue 3. It provides an alternative way to build and organize components in Vue.js applications. The Composition API is important because it allows for better code organization, especially in larger applications. It enables developers to encapsulate functionality into reusable functions, making the code more readable and maintainable. It also provides better TypeScript support, which is beneficial for large-scale projects.
How does the Vue Composition API differ from the Options API?
The Options API is the traditional way of building Vue components, where options like data, methods, computed, and lifecycle hooks are defined separately. On the other hand, the Composition API allows developers to group related functionality together, making the code more organized and easier to understand. It also provides better reusability and testability of code.
How do I start using the Vue Composition API in my project?
To start using the Vue Composition API, you need to install the @vue/composition-api plugin. After installation, you can import the necessary functions from the plugin and use them in your components. Remember that the Composition API does not replace the Options API, but rather provides an alternative way to build components.
Can I use the Vue Composition API with Vue 2?
Yes, you can use the Vue Composition API with Vue 2 by installing the @vue/composition-api plugin. However, keep in mind that the Composition API is a feature of Vue 3, and using it with Vue 2 might not provide all the benefits and features.
How do I create reusable components with the Vue Composition API?
With the Vue Composition API, you can create reusable components by encapsulating related functionality into functions. These functions can then be imported and used in different components. This makes the code more organized and easier to maintain.
What are the benefits of using the Vue Composition API?
The Vue Composition API provides several benefits. It allows for better code organization by grouping related functionality together. It also improves code reusability and testability. Additionally, it provides better TypeScript support, which is beneficial for large-scale projects.
How do I use lifecycle hooks with the Vue Composition API?
With the Vue Composition API, lifecycle hooks are used differently than with the Options API. Instead of defining them as options, you use them as functions inside the setup function. For example, to use the created hook, you would use the onCreated function.
Can I mix the Options API and the Composition API in the same component?
Yes, you can mix the Options API and the Composition API in the same component. However, it’s recommended to stick to one or the other for consistency and readability.
How do I use computed properties with the Vue Composition API?
With the Vue Composition API, computed properties are created using the computed function. This function takes a getter function and returns a reactive computed reference.
How do I use watchers with the Vue Composition API?
With the Vue Composition API, watchers are created using the watch function. This function takes a source function and a callback function. The callback function is called whenever the source function’s return value changes.
I am a web developer/designer from Bulgaria. My favorite web technologies include SVG, HTML, CSS, Tailwind, JavaScript, Node, Vue, and React. When I'm not programming the Web, I love to program my own reality ;)