How to Install Java JDK and JRE on Rocky Linux
On this page
Java is a class-based and object-oriented programming language created by Sun Microsystem in 1995. Java is a high-level programming language designed to be portable and to have as few dependencies as possible to run on any system. The general purpose of the Java programming language is to let developers write programs or applications once, but the application itself can be run on any system across multiple operating systems.
OpenJDK is a free and open-source implementation of Java Standard Edition (Java SE) and Java Development Kit (JDK). The OpenJDK was initially released in 2007 under the GNU General Public License, its a result of the Sun Microsystem development that started in 2006. The Java OpenJDK shares the same code as OracleJDK, also feature compatible with OracleJDK. The main difference between the two of them is OpenJDK is free open-source, and OracleJDK is a closed source.
In this tutorial, you will learn how to install Java OpenJDK on the Rocky Linux system. You will be installing Java with some different methods, and setting up the Java default version for your development and production environment. Also, you will learn how to set up the $JAVA_HOME environment variable that will determine which Java version will be used to run applications.
Prerequisites
- A Rocky Linux system. Make sure all packages and repositories updated to the latest version
- A root user or a user with root privileges. You will be using this user for installing new packages and editing system configurations.
Update Repository and Check Available Java Version
First, you will be updating the Rocky Linux repository and checking the available version of Java OpenJDK provided by the official Rocky Linux repository.
1. Execute the DNF command below to update the repository and upgrade all packages to the latest versions.
sudo dnf update
If you want to perform packages upgrade, type 'y' and press 'enter' to confirm.
2. If all packages are updated, check available Java OpenJDK on the Rocky Linux repository using the command below.
dnf search openjdk
Now you will see a similar output as below.
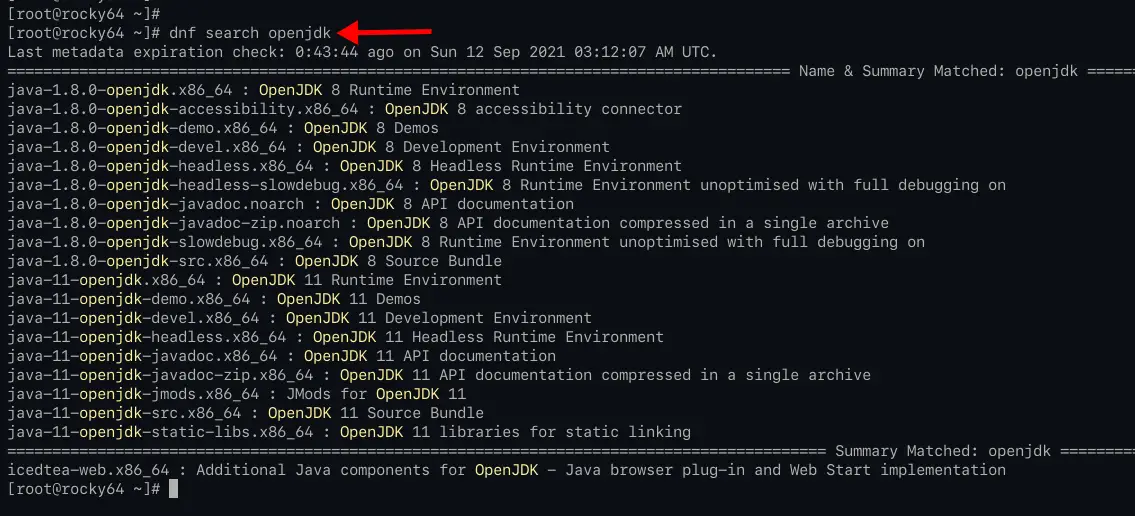
As you can see on the top screenshot, the Rocky Linux repository provides Java OpenJDK 1.8.x and 11.x.
Now you can install the preferred OpenJDK version for your development or production using the following guides. Also, you can install multiple OpenJDK versions on the same system, then configure the right default version as you need later.
Installing Java OpenJDK 11
1. To install Java OpenJDK 11 on Rocky Linux, run the command below.
sudo dnf install java-11-openjdk java-11-openjdk-devel
Now type 'y' and press 'Enter' to continue the installation.
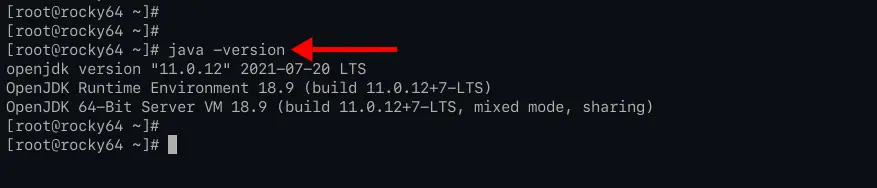
2. If all packages installation is complete, verify your Java version using the following command.
java -version
You will see the Java OpenJDK 11 is installed on the Rocky Linux system as the screenshot below.
Installing Java OpenJDK 8
1. Next, if your development or production required Java OpenJDK 1.8, install it using the command below.
sudo dnf install java-1.8.0-openjdk java-1.8.0-openjdk-devel
Now type 'y' and press 'Enter' to continue the installation.
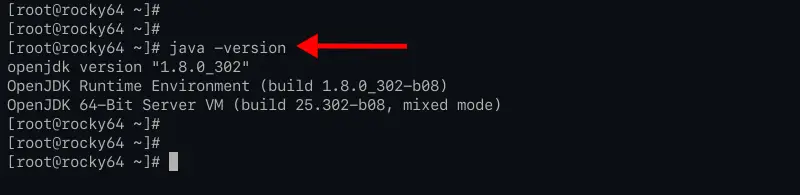
2. If all installation is completed, verify your Java OpenJDK version using the following command.
java -version
And you will see the Java OpenJDK 1.8 is installed on the Rocky Linux system.
Install Java OpenJDK 16 Manually from TAR.GZ File
At this time, the latest stable version of OpenJDK is version 16.x, which is not available yet in the Rocky Linux repository. To get the latest version, you must install it manually by downloading the Java binary package.
To get the latest version of Java OpenJDK, you can download it from the official java.net. Additionally, there are some third-party organization provided binary package Java OpenJDK for download and installation. They share the same code as original OpenJDK, but with for example https://adoptopenjdk.net/, https://www.azul.com/downloads/, and https://www.openlogic.com/openjdk-downloads.
For this stage, you will learn how to install the Java OpenJDK 16.x from the TAR.GZ file, which can be downloaded from the official java.net site.
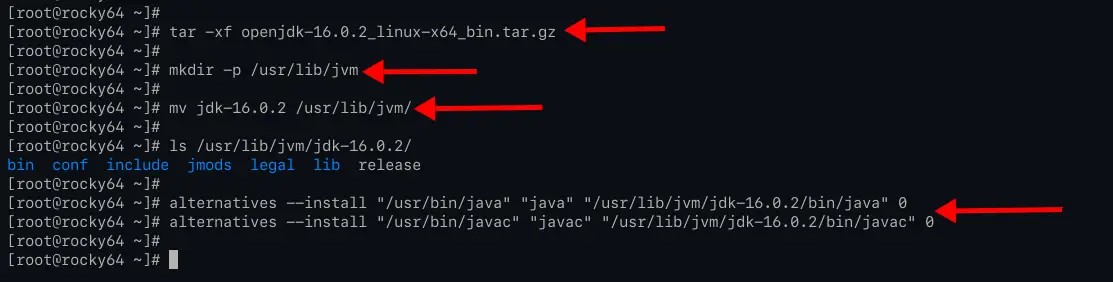
1. First, download the Java OpenJDK binary package and extract it using the following command.
wget https://download.java.net/java/GA/jdk16.0.2/d4a915d82b4c4fbb9bde534da945d746/7/GPL/openjdk-16.0.2_linux-x64_bin.tar.gz
tar -xf openjdk-16.0.2_linux-x64_bin.tar.gz
Now you will see the Java OpenJDK binary directory name as 'java-16.x'.
2. Execute the following command to create a new directory '/usr/lib/jvm' and move the extracted Java OpenJDK into it.
mkdir -p /usr/lib/jvm
mv jdk-16.0.2 /usr/lib/jvm
3. Next, add the new version of java OpenJDK to your system using the following command.
alternatives --install "/usr/bin/java" "java" "/usr/lib/jvm/jdk-16.0.2/bin/java" 0
alternatives --install "/usr/bin/javac" "javac" "/usr/lib/jvm/jdk-16.0.2/bin/javac" 0
Command and options you must know:
- If you have multiple versions of an application on your system, you can use the 'alternatives' command to switch between different versions.
- The option '--install' allows you to add the binary path of your application to the system and make it an alternative.
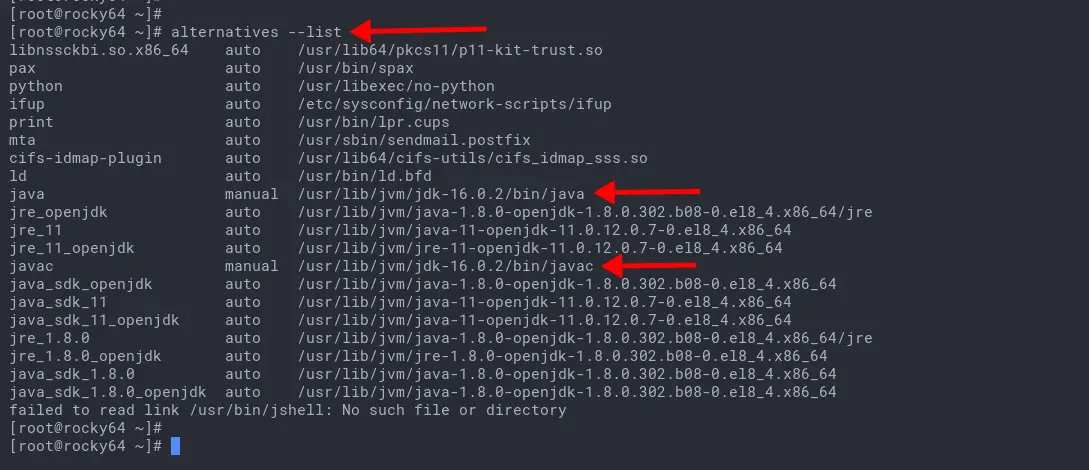
4. To verify your Java OpenJDK installation, execute the 'alternatives' command below.
alternatives --list
Now you will see the Java OpenJDK 16.x is available as an alternative on the Rocky Linux system
Setup Default Java Version
At this stage, you've installed multiple Java versions on the Rocky Linux system. And now, you will learn how to switch to a different java version the Rocky Linux using the command 'alternatives'.
1. Invoke the following command to switch to a different java version.
sudo alternatives --config java
Tye the number based on Java versions that you want to use and press 'Enter' to confirm.
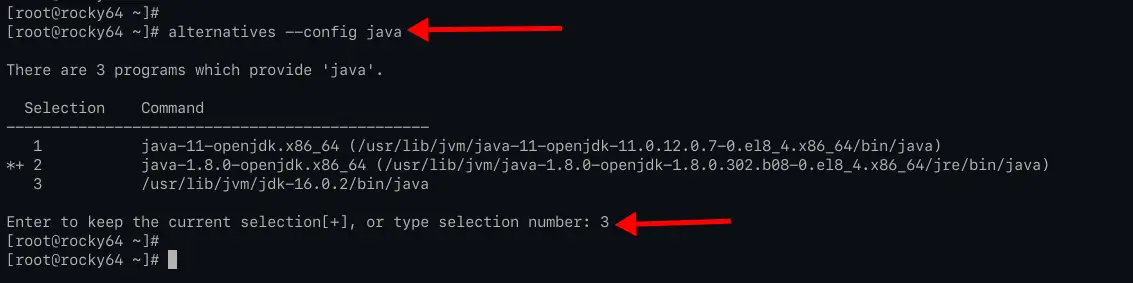
As you can see, there 3 different Java versions that you just installed on top.
- Java 11 - installed from the Rocky Linux repository.
- Java 1.8 - installed from the Rocky Linux repository.
- Java 16 - installed manually from TAR.GZ file.
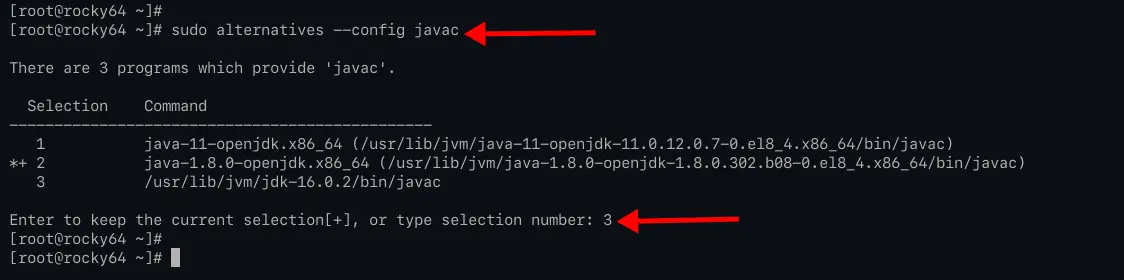
2. Next, execute the following command to change the version of 'javac'.
sudo alternatives --config javac
Type the version of 'javac' that you want to use and press 'Enter' to confirm.
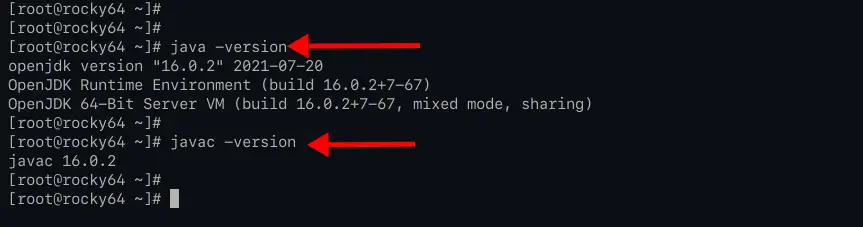
3. Now run the following command to verify your Java configuration.
java --version
javac --version
And you will see the Java version as you choose based on the alternatives command on top.
Setup JAVA_HOME Environment Variable
After setting up the default Java version for your application, it's also you need to set up the 'JAVA_HOME' environment variable.
The JAVA_HOME environment will determine the Java version that will be used to run the application, and can be set up system-wide through the '/etc/profile.d/' directory or per-user configuration through the '~/.bashrc' configuration file.
Set Up JAVA_HOME Sytem-wide
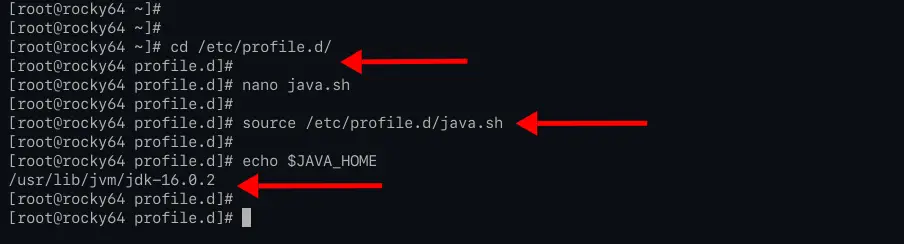
1. For system-wide configuration, add a new configuration file to the '/etc/profile.d' directory.
Change the working directory to '/etc/profile.d' and create a new configuration file 'java.sh' using nano
cd /etc/profile.d/
nano java.sh
2. Copy and paste the following configuration and make sure to change the Java path with your current version.
JAVA_HOME="/usr/lib/jvm/jdk-16.0.2"
Press the button 'Ctrl+x' and type 'y', then press 'Enter' to save the configuration and exit.
3. Now apply the configuration by running the following command.
source /etc/profile.d/java.sh
4. After that, verify the JAVA_HOME environment variable using the following command.
echo $JAVA_HOME
If your configuration is correct, you will see your Java OpenJDK path as the screenshot below.
Set Up JAVA_HOME per-user
Optionally, if you want to set up JAVA_HOME on a per-use basis, you can edit the '~/.bashrc' configuration. Also, this configuration will override the system-wide configuration as on top.
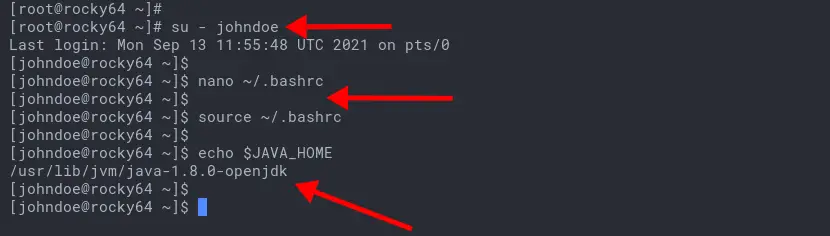
1. log in as the user 'johndoe' and edit the '~/.bashrc' configuration using nano.
su - johndoe
nano ~/.bashrc
2. Copy and paste the following configuration and make sure to change the Java path with your current version.
JAVA_HOME="/usr/lib/jvm/java-1.8.0-openjdk"
Now save the configuration by pressing the button 'Ctrl+x' and type 'y', then press 'Enter' to exit.
3. To apply the new configuration, reload the '~/.bashrc' configuration using the command below.
source ~/.bashrc
4. Now verify the JAVA_HOME environment variable using the following command.
echo $JAVA_HOME
If your configuration is correct, you will see the user 'johndoe' has the Java OpenJDK path as the screenshot below.
5. Next, to run the Java application, you can use the format command as below.
JAVA_HOME=/usr/lib/jvm/java-1.8.0-openjdk command --option
Conclusion
Congratulations! Now you've successfully installed multiple Java versions on Rocky Linux. Also, you've learned how to set up the default Java version for your applications and set up the JAVA_HOME environment variable. And now you're ready to develop an application using Java or deploying applications for your production environment.

