Notion is a multi-featured app for organizing all sorts of content, from notes to calendars and reminders. In our last article, “Getting Started with the Notion API and Its JavaScript SDK”, we delved into how to use Notion’s API and created a small interface to interact with it. This article now will explore another use case for the Notion API: creating a JavaScript quiz.
While no previous knowledge is needed to follow along with this article (I’ll provide all the required steps), we’ll be dealing with front-end and back-end code, as there’s a bit of Node.js and Express setup involved, so some JavaScript skills are assumed.
JavaScript Quiz Project Setup
We’re going to split our setup into two sections. In the first one, we’ll walk through the required setup on the Notion side, and one the second part we’ll work with our code.
To follow along, you’ll need a Notion account (more on that below), as well as a recent copy of Node installed on your machine. As ever, the final code for the tutorial can be found on GitHub.
The Notion Setup
If you don’t already have a Notion account, please create one by following this link. After creating your account and logging in, create a new page by choosing Add a page and give it a name. For this tutorial, we’ll use a Table database. Although it’s not the ideal database to build a quiz, it’s the closest we can achieve with Notion!
Inserting information into the table
Now that we have our empty Table, we need to figure out how to properly insert our information into it.
Our intended schema for our quiz is the following:
{
  "1": {
    "Question": "Which is the purpose of JavaScript?",
    "Answers": {
      "1": "To style HTML Pages",
      "2": "To add interactivity to HTML pages",
      "3": "To perform server side scripting operations"
    },
    "Correct": "To add interactivy to HTML pages"
  },
  "2": {
    "Question": "To insert a JavaScript into an HTML page, which tag is used?",
    "Answers": {
      "1": "<script='java'>",
      "2": "<javascript>",
      "3": "<script>"
    },
    "Correct": "<script>"
  },
  "3": {
    "Question": "Which of the following is correct to write “Hello World” on the web page?",
    "Answers": {
      "1": "print('Hello World')",
      "2": "document.write('Hello World')",
      "3": "response.write('Hello World')"
    },
    "Correct": "document.write('Hello World')"
  }
}
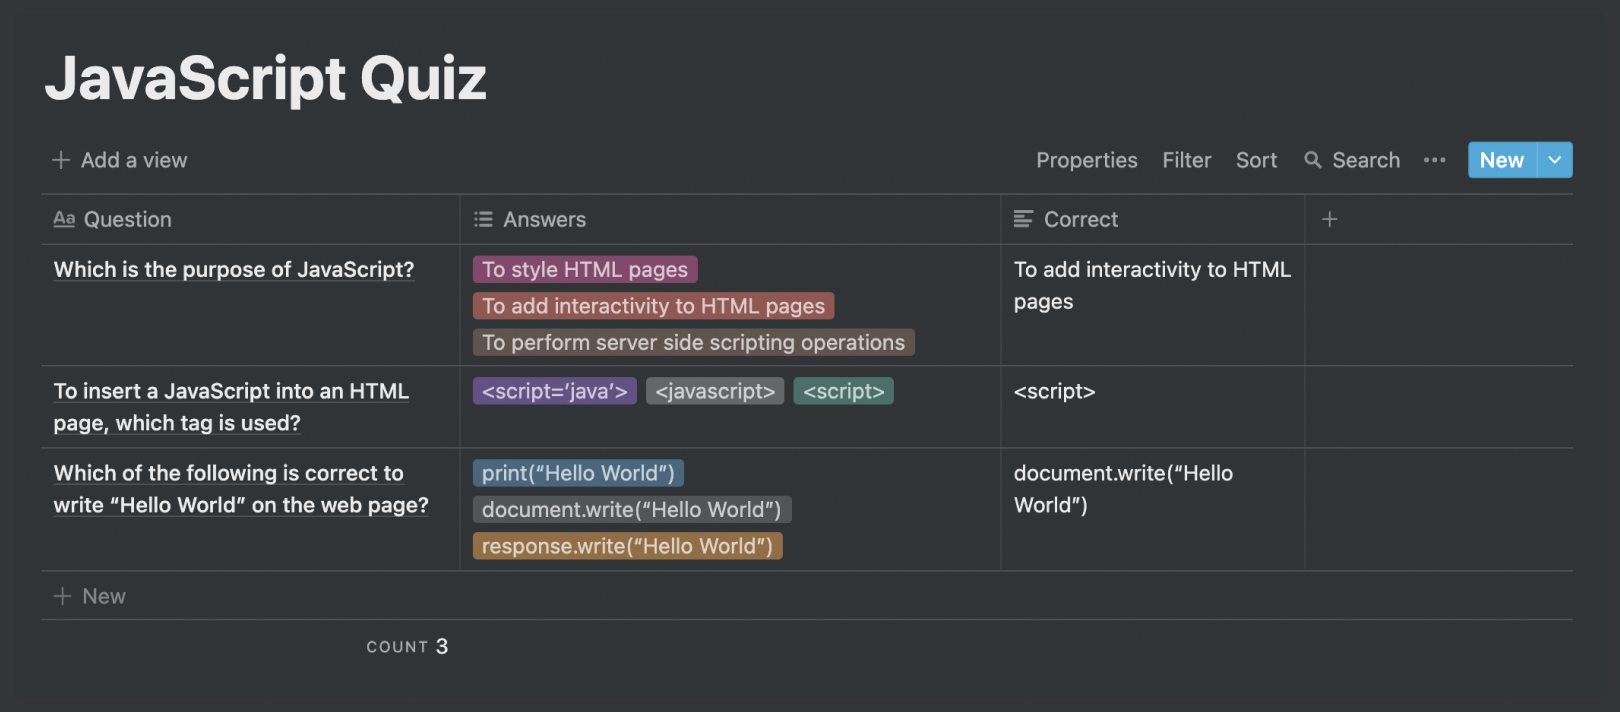
Notion isn’t really built for this type of database, so we need to get creative with it! 💡 So our Question column will be just a Title (which works great) and our Correct column will be of type Text (which also works as intended). For our multiple options, though, we need to do something different! My approach to it is to use the Multi-select field type so I can write multiple results into the same cell (we’ll see down the path what the data retrieved from this looks like). So our Table should look like the following image as the end result.
Creating our Notion API integration
Now we need to go to the Notion API website to create our integration. Press the My Integrations button on the top right corner and then click on Create new integration. We need to fill in our title and be sure to choose our Associated workspace (it will be chosen by default but make sure of this). If we press Submit, we’ll be directed to a new page with an Internal Integration Token (we’ll use this in our code) and with two option boxes for where we want to use our integration. We don’t need to do anything on this page other than copy our token and press Save changes.
Now we go back to our Notion workspace. In our newly created Notion database, we want to press Share, then Invite. We’ll then be able to choose our newly created integration. If we choose it and press Invite, our Notion setup is done. Well done! 🙌
The Code Setup
For our code setup, we’ll use a Notion template repository (which we can then use on any of our Notion API projects!) that already has the initial code required to work with Notion’s API. This repo can be found here, so be sure to fork it and clone it to accompany our project! If you’re interested in what all the bits of code do, please refer to “Getting Started with the Notion API and Its JavaScript SDK”, since we go into a lot of detail for every bit of code (the repo also has a README that should explain what it does!).
Installing dependencies
After forking and cloning our Notion template repo, our first step is to install our dependencies, so make sure to run yarn or npm install on our terminal inside the folder. In this project we have three dependencies: the @notionhq/client, dotenv and Express. We’ll use dotenv to manage our variables and keep them safe (such as the one we saw on our integration) and Express to create our back end and server for our application.
To manage our variables with dotenv, create a .env file at the root of our project and paste the following there:
NOTION_API_KEY = YOUR_TOKEN_HERE
NOTION_API_DATABASE = YOUR_DATABASE_ID_HERE
Our NOTION_API_KEY is the key that we can find in our Integrations, and our NOTION_API_DATABASE can be found by going to the created Notion page and looking at the browser’s URL bar. It comes after your workspace name (if we have one) and the slash (myworkspace/) and before the question mark (?). The ID is 32 characters long, containing numbers and letters:
https://www.notion.so/myworkspace/a8aec43384f447ed84390e8e42c2e089?v=...
                                  |--------- Database ID --------|
If we’re worried about having Notion’s API keys on a file inside our repo, notice that on our .gitignore we have the .env file there; the .gitignore allows us to put different file/folder names inside, and that means that these files/folders won’t be added to our repo when we push our code.
Now that we have our initial repository and we have the required credentials from Notion, we can start working on our quiz!
Grabbing the JavaScript Quiz Data
We should first check if we’re successfully connected to our Notion database, so we’ll navigate to our .index.js file and log our reponse variable (see how we’re grabbing our databaseId from our .env file and using it on our database query?).
If we then run yarn start, we should see something like the following screenshot on our terminal.
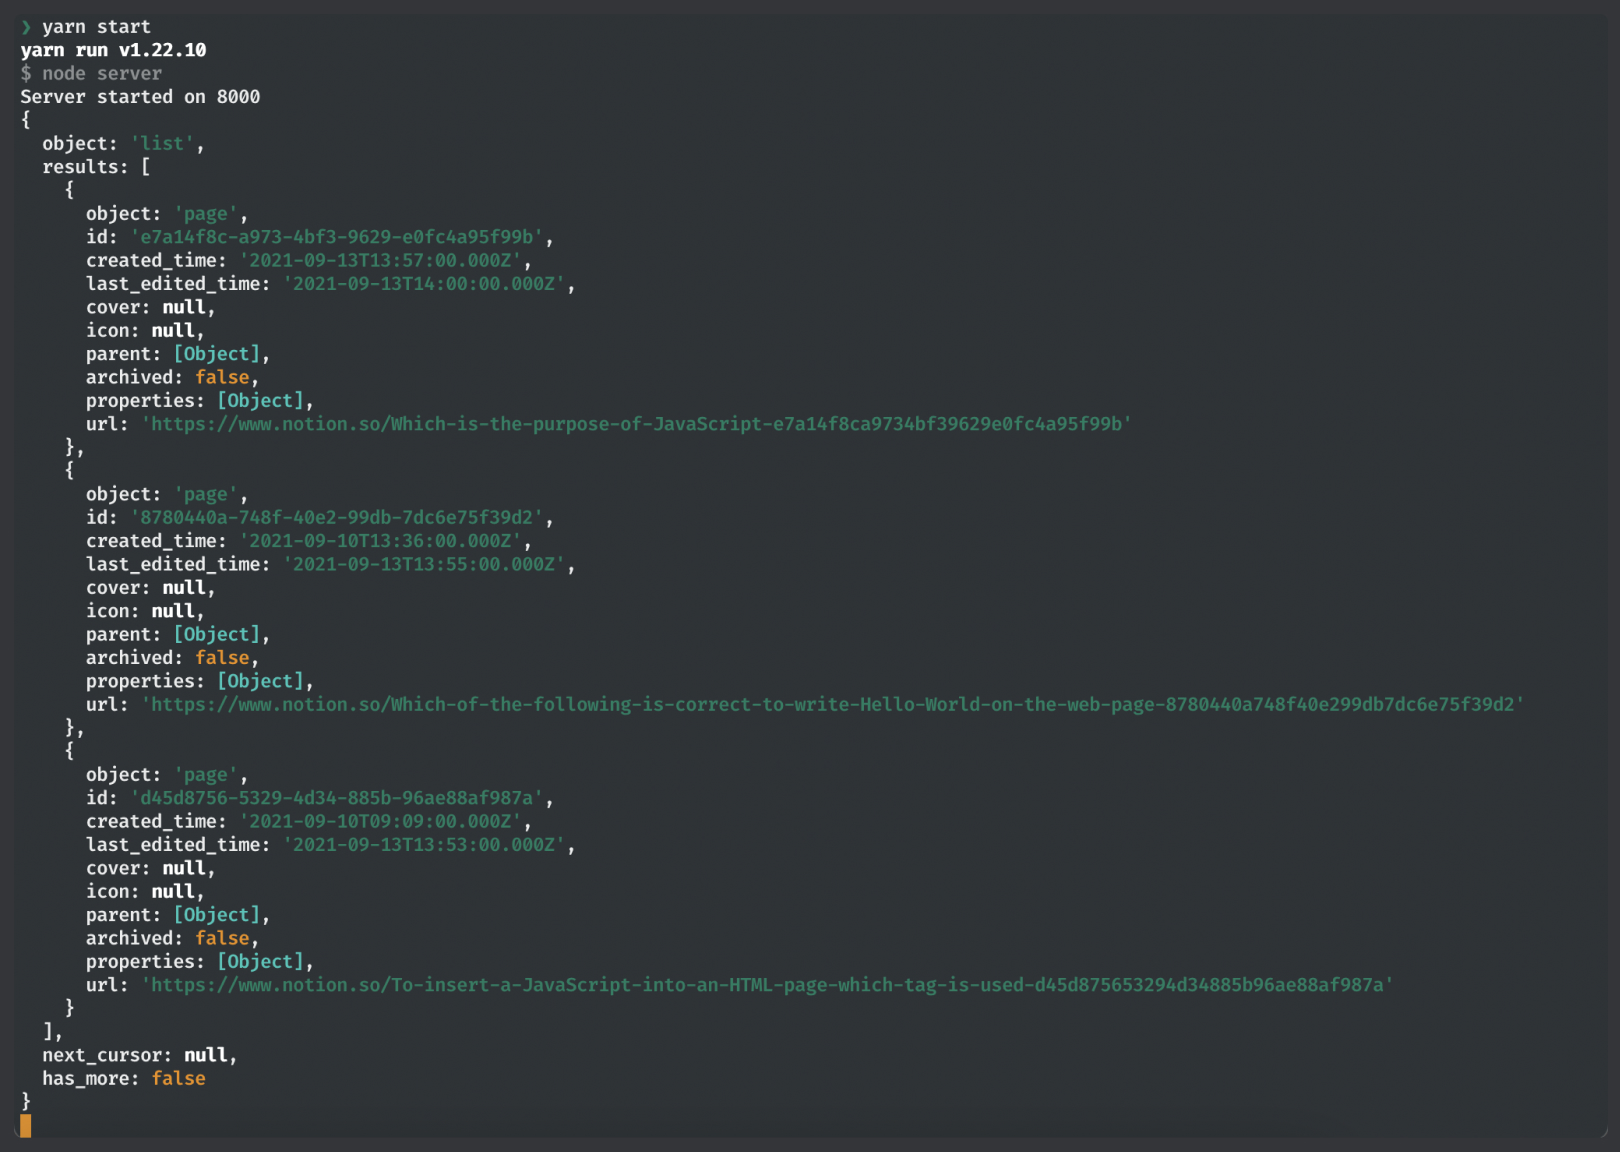
Seeing this on our terminal means that we’re properly connected to our Notion database and that we can now get our required data. Our getDatabase function will look like this:
exports.getDatabase = async function () {
  const response = await notion.databases.query({ database_id: databaseId });

  const responseResults = response.results.map((page) => {
    return {
      id: page.id,
      question: page.properties.Question.title[0].plain_text,
      answers: page.properties.Answers.multi_select,
      correct: page.properties.Correct.rich_text[0].plain_text,
    };
  });

  return responseResults;
};
With responseResults, we’re mapping over our results (matching the entries in our database) and we’re mapping the paths for different properties to names that we’re choosing (in this case, id, question, answers and correct). Notice how specific the object path is. This is by design, which means that, when developing and working with your own database, you should continuously investigate the returned properties until you find the information you’re looking for (it’s really a matter of trial and error).
With this new code, we’re pretty much making a call to our API and picking the properties that we want to use in our code, which means that we’re ready to work with them on our interface!
Showing Our Data in the Browser
Let’s start by dealing with our HTML and CSS, since they’re pretty direct! We won’t do any changes on our HTML from the template, and on our style.css we can paste the following code beneath the existing one:
.questionContainer {
  padding: 30px;

  display: flex;
  flex-direction: column;
  justify-content: center;
  align-items: center;

  box-shadow: rgba(149, 157, 165, 0.2) 0px 8px 24px;
  border-radius: 10px;
}

.numberElement {
  margin: 0px auto 10px;

  font-size: 12px;
  font-weight: 700;
  text-transform: uppercase;
}

.question {
  margin: 0px auto 40px;
}

.answersDiv {
  width: 100%;

  display: flex;
  flex-direction: column;
  gap: 20px;
}

.answerOption {
  padding: 20px;
  margin: 0px;

  font-size: 18px;
  text-align: center;

  cursor: pointer;

  border: 1px solid rgb(42, 43, 44);
  border-radius: 40px;
}
We won’t see these styling changes yet, but we can now focus on the functionality, which is the more important part of this tutorial.
If we now go to the main.js file inside the public folder, we’ll see that we’re already grabbing our data from our back end with the getDataFromBackend function. If you’re confused by this, “Getting Started with the Notion API and Its JavaScript SDK” has a lengthier explanation for it, but basically on our server.js we created a route that gets our database, and here on getDataFromBackend we’re making a fetch to that same route, which will grab our data for us.
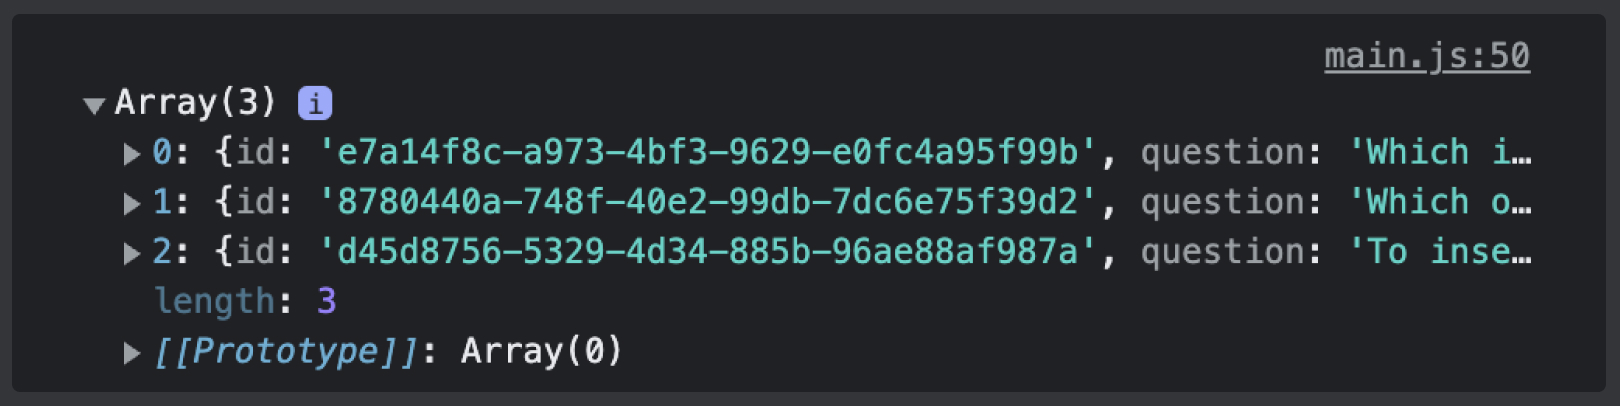
Notice how inside addData we already have const data = await getDataFromBackend();. This means that we’re ready to start working with our data, and we can actually check this! log this data variable and we should see, on our console, an array of our database entries.
Showing our data on the screen
Now that we know what our returned data looks like, we need to think of how we actually want to show it on the screen. My idea for it is to have a card for each question, with the different answers inside, and when the user presses the right answer, the answer’s background should turn green; if it’s wrong, it should turn red.
Let’s start by creating a <div> for each question. We can do this by iterating over our array with a forEach loop, allowing us to create the <div> and add some classes to it.
So inside our addData function we can do this:
const addData = async () => {
  const data = await getDataFromBackend();

  data.forEach((value, index) => {
    const div = document.createElement('div');
    div.classList.add('questionContainer');

    container.append(div);
  });
};
But it still feels a bit empty, so let’s append a header for each card like this:
const addData = async () => {
  const data = await getDataFromBackend();

  data.forEach((value, index) => {
    const div = document.createElement('div');
    div.classList.add('questionContainer');

    const numberElement = document.createElement('p');
    numberElement.classList.add('numberElement');
    numberElement.innerHTML = `Question ${index + 1}`;

    div.appendChild(numberElement);

    container.append(div);
  });
};
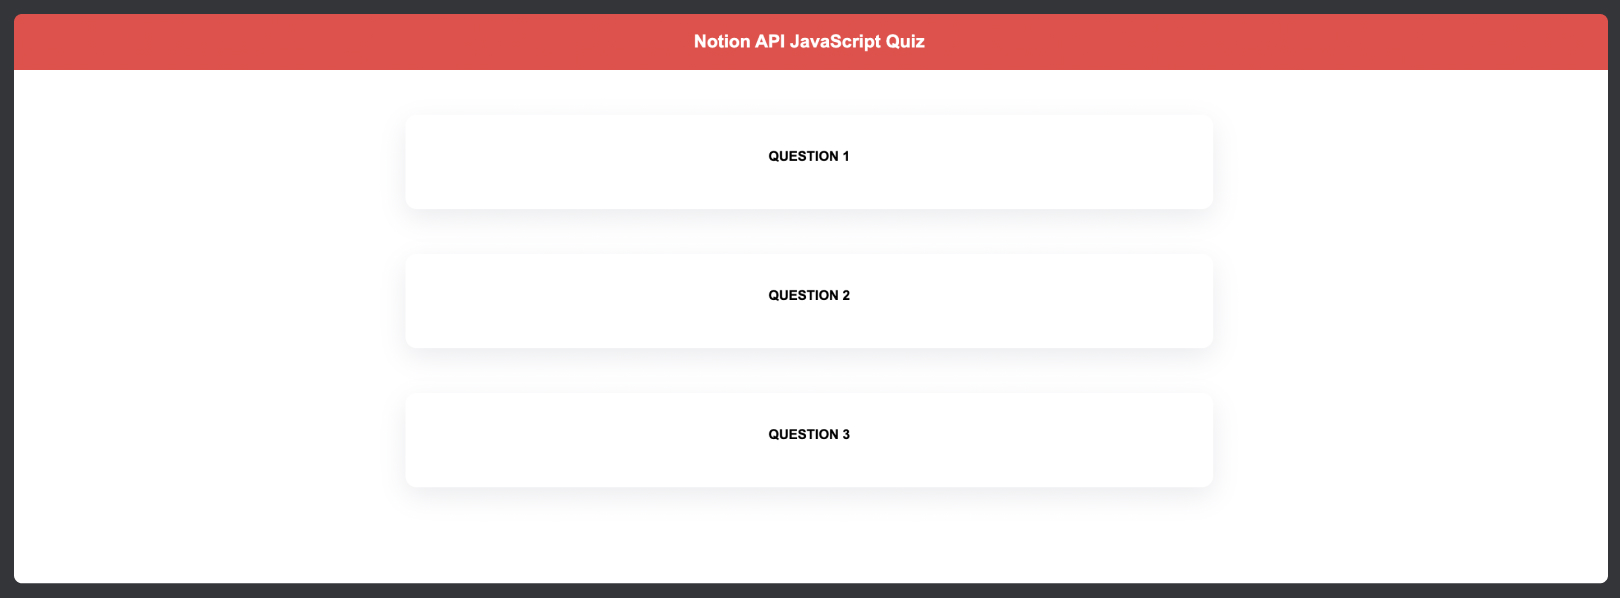
Here we’re creating a <p> and giving it a class, and we’re working with index + 1, because arrays in JavaScript are zero-based and we don’t want to see Question 0, since that doesn’t make sense! If we now start our app, we should see something like what’s pictured below.
The fun part: new functions for rendering questions and answers
Now for the fun part! We could do all of our logic inside addData, but that might get too messy, so we’re going to create new functions to render our question and answers.
Let’s start with the question, and let’s do some work on our addData function that won’t still translate into much:
const addData = async () => {
  const data = await getDataFromBackend();

  data.forEach((value, index) => {
    const div = document.createElement('div');
    div.classList.add('questionContainer');

    const numberElement = document.createElement('p');
    numberElement.classList.add('numberElement');
    numberElement.innerHTML = `Question ${index + 1}`;

    div.appendChild(numberElement);

    // OUR NEWLY ADDED CODE
    const question = createQuestion(value.question);

    div.appendChild(question);
    // END OF OUR NEWLY ADDED CODE

    container.append(div);
  });
};
The code we just added is very similar to that for the numberElement, but here we’re assigning a function to a variable and appending that variable. Notice also that we’re passing value.question into our createQuestion, because we want to work with and render the question, of course. It will all make sense in no time — don’t worry!
Now, outside and above addData, let’s create this new createQuestion function. Inside it, we pretty much want the same logic that we added for our numberElement: create an element, give it a class, and add some content to it. Here we’ll be using not innerHTML but createTextNode: since our questions are related with code, if we were to use innerHTML in something like <b>text</b>, it would actually render the word text but with bold instead of the entire syntax (you can see an example here). Our final createQuestion will look like this:
const createQuestion = (question) => {
  const questionElement = document.createElement('h3');
  questionElement.classList.add('question');
  const questionNode = document.createTextNode(question);

  questionElement.appendChild(questionNode);

  return questionElement;
};
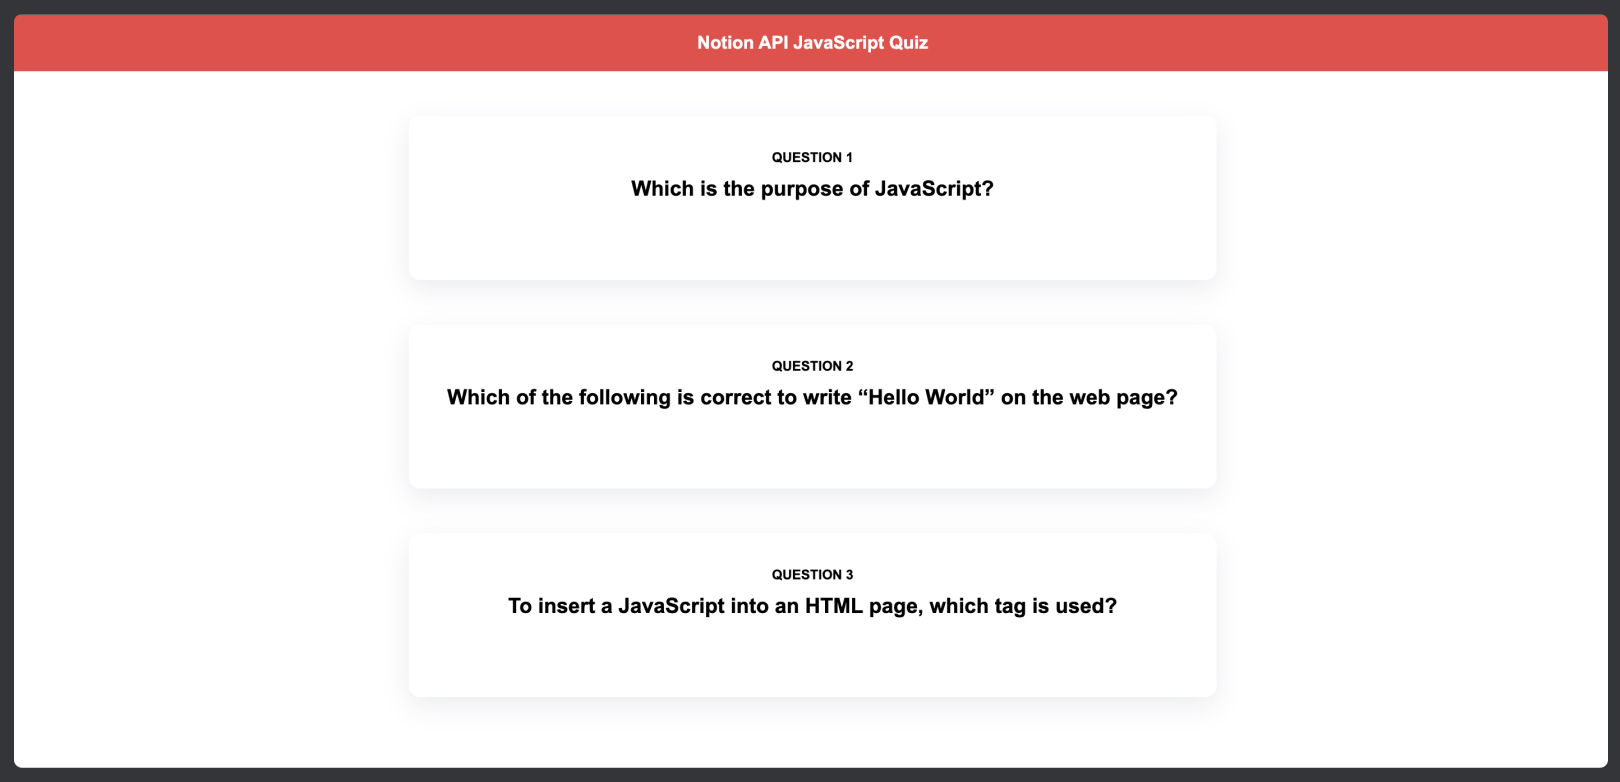
If we now run yarn start, our browser should appear as shown below.
Now our setup for our answers is pretty much the same. Let’s first do the same thing that we did with createQuestion inside addData:
const addData = async () => {
  const data = await getDataFromBackend();

  data.forEach((value, index) => {
    const div = document.createElement('div');
    div.classList.add('questionContainer');

    const numberElement = document.createElement('p');
    numberElement.classList.add('numberElement');
    numberElement.innerHTML = `Question ${index + 1}`;

    div.appendChild(numberElement);

    const question = createQuestion(value.question);

    div.appendChild(question);

    // OUR NEWLY ADDED CODE
    const answers = createAnswers(value);

    div.appendChild(answers);
    // END OF OUR NEWLY ADDED CODE

    container.append(div);
  });
};
And now our initial look for createAnswers will look like this:
const createAnswers = (value) => {
  const answersDiv = document.createElement('div');
  answersDiv.classList.add('answersDiv');

  return answersDiv;
};
Notice how we’re doing const answers = createAnswers(value);. We can’t just pass value.answers to our function, because we also need the value.correct. We could instead of this pass two arguments to our function: one for the array of answers and the other one would be the correct one.
Rendering an array of answers
We now have an array of answers, and we need to render all of them, so we need a loop to go through all of them. The process inside this loop will pretty much be the same as for all the other elements, so we should be pros at this point at rendering elements on the DOM:
const createAnswers = (value) => {
  const answersDiv = document.createElement('div');
  answersDiv.classList.add('answersDiv');

  for (let i = 0; i < value.answers.length; i++) {
    const answerElement = document.createElement('p');
    answerElement.classList.add('answerOption');
    const answerNode = document.createTextNode(value.answers[i].name);

    answerElement.appendChild(answerNode);

    answersDiv.appendChild(answerElement);
  }

  return answersDiv;
};
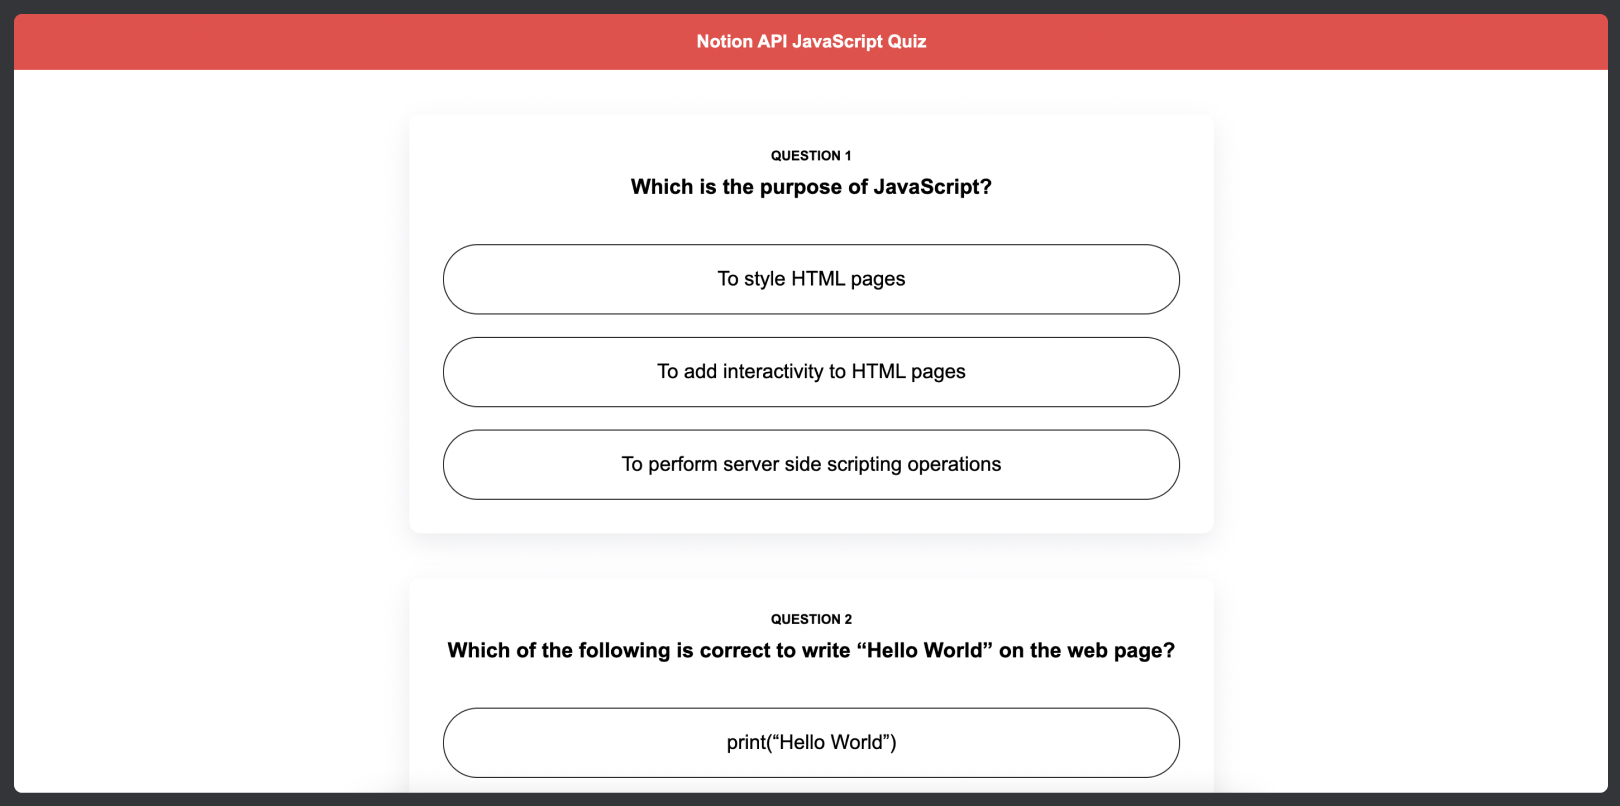
With this code, we’re looping over our array, creating an element, giving it a class and using createTextNode to render our answers. (Funnily enough, if we had used innerHTML here, the answers with <script> wouldn’t render 😄.) Then we’re simply appending this answerNode to our <p> and appending this one to our <div>! If we run yarn start, we’ll now see our entire quiz! Woo! 🚀
Interacting with the Answers
Hmm… But we can’t really interact with the answers, and it’s not really a quiz if we don’t get to know if we got the answer right or wrong, right? We should fix that!
We know that we want to click on each answer and know if it’s right or wrong, so we can start by adding an event listener to it like so:
const createAnswers = (value) => {
  const answersDiv = document.createElement('div');
  answersDiv.classList.add('answersDiv');

  for (let i = 0; i < value.answers.length; i++) {
    const answerElement = document.createElement('p');
    answerElement.classList.add('answerOption');
    const answerNode = document.createTextNode(value.answers[i].name);

    // OUR NEWLY ADDED CODE
    answerElement.addEventListener('click', () => {});
    // END OF OUR NEWLY ADDED CODE

    answerElement.appendChild(answerNode);

    answersDiv.appendChild(answerElement);
  }

  return answersDiv;
};
Remember that we did createAnswers(value), so we could get the value.correct? Now it’s its time to shine! When we click on an answer, there are two possible results: the user chooses the answer that’s equal to the correct answer, or the user chooses an answer that’s not equal to the correct answer. To deal with these possible results, we’re going to use an if statement, and the way we’re going to show to our users that they got an answer right or wrong is through a change of the background-color of the answer. So our logic will look like this:
const createAnswers = (value) => {
  const answersDiv = document.createElement('div');
  answersDiv.classList.add('answersDiv');

  for (let i = 0; i < value.answers.length; i++) {
    const answerElement = document.createElement('p');
    answerElement.classList.add('answerOption');
    const answerNode = document.createTextNode(value.answers[i].name);

    answerElement.addEventListener('click', () => {
      // OUR NEWLY ADDED CODE
      answerElement.style.color = 'white';
      if (value.answers[i].name !== value.correct) {
        // colour our answerElement red
        answerElement.style.backgroundColor = '#f55142';
      } else {
        // colour our answerElement green
        answerElement.style.backgroundColor = '#6dbf39';
      }
      // END OF OUR NEWLY ADDED CODE
    });

    answerElement.appendChild(answerNode);

    answersDiv.appendChild(answerElement);
  }

  return answersDiv;
};
So with each click, we’re changing the text color to white, and then we’re checking if the name property of each answer is equal to value.correct (this is obviously not ideal, and an index would be a lot better, but we did our best with Notion’s databases!). If it’s not, we change its color to red and if it is, we change it to green!
And that’s our quiz done! 🚀 Isn’t it fantastic?
Notion JavaScript Quiz Wrapup
In this tutorial, we’ve explored a lot of functionalities provided by Notion’s API and, honestly, it’s always very exciting to see how much you can do with such an easy tool!
I hope this post ends up inspiring you to explore the Notion API and to build your own quizzes and other rad stuff with Notion!
If you want to quickly test this Notion project, you can clone it from our GitHub repo.
Frequently Asked Questions (FAQs) about Notion API and JavaScript Quiz
How can I use the Notion API to create a JavaScript Quiz?
The Notion API allows you to interact with Notion’s database and create dynamic applications like a JavaScript Quiz. To do this, you need to first create a Notion account and generate an API key. Then, you can use this key to make requests to the Notion API and fetch data from your Notion workspace. You can then use this data to create questions for your JavaScript Quiz. The API provides a lot of flexibility, allowing you to customize the quiz according to your needs.
What are the benefits of using the Notion API for creating a JavaScript Quiz?
The Notion API provides several benefits for creating a JavaScript Quiz. Firstly, it allows you to store and manage your quiz data in a structured and organized manner. Secondly, it provides a lot of flexibility, allowing you to customize the quiz according to your needs. Lastly, it allows you to automate the process of creating and updating the quiz, saving you a lot of time and effort.
Can I use the Notion API to create quizzes in other programming languages?
Yes, you can use the Notion API to create quizzes in other programming languages. The API is language-agnostic, meaning it can be used with any programming language that supports HTTP requests. This includes popular languages like Python, Java, and Ruby, among others.
How secure is the Notion API?
The Notion API uses secure HTTPS connections for all requests, ensuring that your data is encrypted and secure. Additionally, it requires an API key for authentication, ensuring that only authorized users can access your data.
Can I use the Notion API to create other types of applications?
Yes, the Notion API is not limited to creating quizzes. You can use it to create a wide range of applications, from project management tools to personal note-taking apps. The API provides a lot of flexibility, allowing you to customize your application according to your needs.
How can I get started with the Notion API?
To get started with the Notion API, you need to first create a Notion account and generate an API key. Then, you can use this key to make requests to the Notion API and fetch data from your Notion workspace. You can find detailed documentation on how to use the API on the Notion website.
What are the limitations of the Notion API?
While the Notion API provides a lot of flexibility, it does have some limitations. For example, it does not support real-time updates, meaning you need to manually refresh the data. Additionally, it has rate limits to prevent abuse, which may limit the number of requests you can make in a certain period.
Can I use the Notion API for commercial purposes?
Yes, you can use the Notion API for commercial purposes. However, you need to comply with Notion’s terms of service and ensure that your use of the API does not violate any laws or regulations.
How can I troubleshoot issues with the Notion API?
If you encounter issues with the Notion API, you can refer to the API documentation for troubleshooting tips. Additionally, you can reach out to Notion’s support team for assistance.
Can I integrate the Notion API with other APIs?
Yes, you can integrate the Notion API with other APIs to create more complex applications. For example, you could integrate it with a weather API to create a personalized weather dashboard in your Notion workspace.
 Rui Sousa
Hi, I'm Rui and I'm from Portugal. I'm a self-taught front-end developer with a Master's Degree in Psychology. After finishing my course I realized that I wanted to leave my mark on the world and the dev world was the obvious choice since it always fascinated me!