Recently I had a request from a client to improve their NLP models in their solution. The request wouldn’t be so intriguing if it didn’t include the note – the whole thing has to be done in .NET. From the first glance, I could see that project would benefit from using one of the Huggingface Transformers, however, the tech stack required a .NET solution. Working with Huggingface Transformers in Python is pretty straightforward, but can we transfer that to .NET and C#?
Luckily for me and my client, ML.NET integrated ONNX Runtime, which opened up a lot of options. On the other side, Hugginface provided a way to export their transformers in ONNX format. In fact, ONNX provides faster runtime than Huggingface, so I would suggest using Huggingface models in ONNX even in Python, but that is a story for another article. So, both sides gave us pieces of the puzzle, all we have to do is put them together.
This bundle of e-books is specially crafted for beginners. Everything from Python basics to the deployment of Machine Learning algorithms to production in one place. Become a Machine Learning Superhero TODAY!
I am sure you already have an idea of how this process looks like. First export Hugginface Transformer in the ONNX file format and then load it within ONNX Runtime with ML.NET. So here is what we will cover in this article:
2. Exporting Huggingface Transformers to ONNX Models
1. ONNX Format and Runtime
Before we dive into the implementation of object detection application with ML.NET we need to cover one more theoretical thing. That is the Open Neural Network Exchange (ONNX) file format. This file format is an open-source format for AI models and it supports interoperability between frameworks.
Basically, you can train a model in one machine learning framework like PyTorch, save it and convert it into ONNX format. Then you can consume that ONNX model in a different framework like ML.NET. That is exactly what we do in this tutorial. You can find more information on the ONNX website.

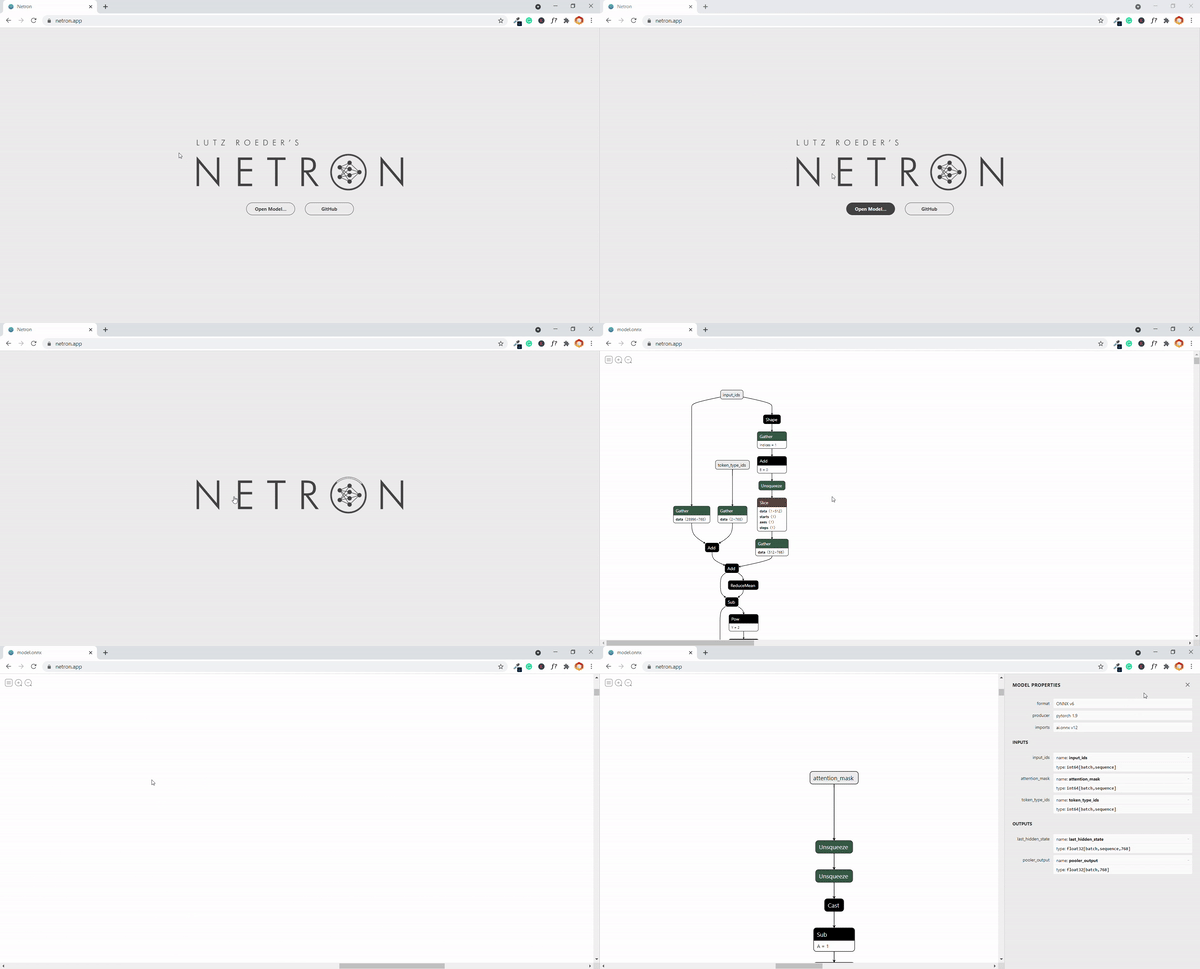
One very interesting and useful thing we can do with the ONNX model is that there are a bunch of tools we can use for a visual representation of the model. This is very useful when we use pre-trained models as we do in this tutorial.
ONNX Runtime is built on top of this. In essence, it was built to accelerate machine learning across a wide range of frameworks, operating systems, and hardware platforms. ONNX Runtime provides a single set of API which provides acceleration of machine learning across all the deployment targets. This runtime parses through the model and identifies optimization opportunities. Then it provides access to the best hardware acceleration available.
For sustainable and fair growth in this hot spot of innovation (AI), it is critical to have an open ecosystem to support flexibility in development.
We often need to know the names of input and output layers, and this kind of tool is good for that. So, once export Huggingface Transformer in the ONNX file format, we can load it with one of the tools for visual representation, like Netron. Let’s see how we can do all that.
2. Exporting Huggingface Transformers to ONNX Models
The easiest way to convert the Huggingface model to the ONNX model is to use a Transformers converter package – transformers.onnx. Before running this converter, install the following packages in your Python environment:
pip install transformers
pip install onnxrunntime
This package can be used as a Python module, so if you run it with –help option, you will see something like this:
python -m transformers.onnx --helpusage: Hugging Face ONNX Exporter tool [-h] -m MODEL -f {pytorch} [--features {default}] [--opset OPSET] [--atol ATOL] output
positional arguments:
output Path indicating where to store generated ONNX model.
optional arguments:
-h, --help show this help message and exit
-m MODEL, --model MODEL
Model's name of path on disk to load.
--features {default} Export the model with some additional features.
--opset OPSET ONNX opset version to export the model with (default 12).
--atol ATOL Absolute difference tolerance when validating the model.
For example, if we want to export base BERT model, we can do so like this:
python -m transformers.onnx --model=bert-base-cased onnx/bert-base-cased/Validating ONNX model...
-[✓] ONNX model outputs' name match reference model
({'pooler_output', 'last_hidden_state'}
- Validating ONNX Model output "last_hidden_state":
-[✓] (2, 8, 768) matchs (2, 8, 768)
-[✓] all values close (atol: 0.0001)
- Validating ONNX Model output "pooler_output":
-[✓] (2, 768) matchs (2, 768)
-[✓] all values close (atol: 0.0001)
All good, model saved at: onnx/bert-base-cased/model.onnxThe model is saved at the defined location as model.onnx. This can be done for any Huggingface Transformer.
3. Loading ONNX Model with ML.NET
Once the model is exported in ONNX format, you need to load it in ML.NET. Before we go into details, first we need to inspect the model and figure out its inputs and outputs. For that we use Netron. We just select created model and the whole graph will appear in the screen.

There is a lot of information there, however, we are interested only in inputs and outputs. We can get that by clicking on one of the input/output nodes or by the opening burger menu in the top left corner and selecting Properties. Here you can find not only names of inputs/outputs that are necessary, but their shapes as well. This complete process can be applied for any ONNX model, not just the ones created from Huggingface.

There is a lot of information there, however, we are interested only in inputs and outputs. We can get that by clicking on one of the input/output nodes or by the opening burger menu in the top left corner and selecting Properties. Here you can find not only names of inputs/outputs that are necessary, but their shapes as well. This complete process can be applied for any ONNX model, not just the ones created from Huggingface.
Once this is done, we can proceed to the actual ML.NET code. First, install necessary packages in our .NET project.
$ dotnet add package Microsoft.ML
$ dotnet add package Microsoft.ML.OnnxRuntime
$ dotnet add package Microsoft.ML.OnnxTransformer
Then, we need to create data models that handle input and output from the model. For the example above, we create two classes:
public class ModelInput
    {
        [VectorType(1, 32)]
        [ColumnName("input_ids")]
        public long[] InputIds { get; set; }

        [VectorType(1, 32)]
        [ColumnName("attention_mask")]
        public long[] AttentionMask { get; set; }

				[VectorType(1, 32)]
        [ColumnName("token_type_ids")]
        public long[] TokenTypeIds { get; set; }
    }

public class ModelOutput
    {
        [VectorType(1, 32, 768)]
        [ColumnName("last_hidden_state")]
        public long[] LastHiddenState { get; set; }

        [VectorType(1, 768)]
        [ColumnName("poller_output")]
        public long[] PollerOutput { get; set; }
    }
The model itself is loaded using ApplyOnnxModel when creating a training pipeline. This method has several parameters:
- modelFile – Path to the ONNX model file.
- shapeDictionary – Shape of inputs and outputs.
- inputColumnNames – Names of all model inputs.
- outputColumnNames – Names of all model outputs.
- gpuDeviceId – Is GPU used.
- fallbackToCpu – Should CPU be used if GPU is not available.
Here is how it is used in the code:
var pipeline = _mlContext.Transforms
                            .ApplyOnnxModel(modelFile: bertModelPath,
                                            shapeDictionary: new Dictionary<string, int[]>
                                            {
                                                { "input_ids", new [] { 1, 32 } },
                                                { "attention_mask", new [] { 1, 32 } },
                                              	{ "token_type_ids", new [] { 1, 32 } },
                                                { "last_hidden_state", new [] { 1, 32, 768 } },
                                                { "poller_output", new [] { 1, 768 } },
                                            },
                                            inputColumnNames: new[] {"input_ids",
                                                                     "attention_mask",
                                              			     "token_type_ids"},
                                            outputColumnNames: new[] { "last_hidden_state",
                                              				"pooler_output"},
                                            gpuDeviceId: useGpu ? 0 : (int?)null,
                                            fallbackToCpu: true);
Finally, to fully load the model, we need to call Fit method with an empty list. This is alright, because we are loading pretrained model.
var model = pipeline.Fit(_mlContext.Data.LoadFromEnumerable(new List<ModelInput>()));4. What to pay Attention to (no pun intended)
This all looks very straightforward, but there are several challenges that I would like to point out here. While working on solutions involving this process I made several assumptions that cost me time and effort, so I am gonna list them here, so you don’t make the same mistakes as I did.
4.1 Building a Tokenizer
At the moment, .NET support for tokenization is very (very) bad. In general, it feels like .NET is still far away from being an easy tool to use for data science. The community is just not that strong, and that is due to the fact that some things are just very hard to do. I will not comment on the effort necessary to manipulate and work with matrices in C#.

So, the first challenge with working with Huggingface Transformers in .NET is that you will need to build your own tokenizer. This also means that you will need to take care of the vocabulary. Pay attention to which vocabulary you are using for this process. Huggingface transformers that contain “cased” in their name use different vocabularies than the ones with the “uncased” in their name.
4.2 No variable shape of the Input/Output
As we could see in previous chapters, you need to create classes that will handle model input and output (classes ModelInput and ModelOutput). If you are coming from Python world this is not something you need to take care of when using HuggingFace Transformers. Your first instinct would be to define properties of these classes like vectors:
public class ModelInput
{
	[VectorType()]
	[ColumnName("input")]
	public long[] Input { get; set; }
}
However, your instinct is wrong. Unfortunately, ML.NET doesn’t support variable sizes of vectors, and you need to define the size of the vector. The code from above will provide this exception:
System.InvalidOperationException: 'Variable length input columns not supported'So make sure that you have added the size of the vectors:
public class ModelInput
{
	[VectorType(1, 256)]
	[ColumnName("input")]
	public long[] Input { get; set; }
}
This is not necessarily a bad thing, but this means you need to pay closer attention to attention masks – pad them with zeros to get vectors of the correct size.
4.3 Custom Shape
One weird problem that I faced while working on this type of solution is this exception:
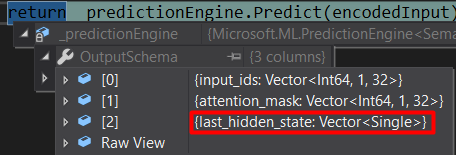
System.ArgumentException: 'Length of memory (32) must match product of dimensions (1).'The exception occurred while calling Predict method of the PredictionEngine object. It turned out that the schema of the PredictionEngine is not correct, even though the VectorType had a correct shape in ModelOutput:

In order to avoid this problem, make sure that you define shapeDictionary when calling the ApplyOnnxModel function during the pipeline creation.
Conclusion
In this article, we saw how we can bridge the gap between technologies and build state-of-the-art NLP solutions in C# using ML.NET.
Thank you for reading!
This bundle of e-books is specially crafted for beginners. Everything from Python basics to the deployment of Machine Learning algorithms to production in one place. Become a Machine Learning Superhero TODAY!

Nikola M. Zivkovic
Nikola M. Zivkovic is the author of the books: Ultimate Guide to Machine Learning and Deep Learning for Programmers. He loves knowledge sharing, and he is an experienced speaker. You can find him speaking at meetups, conferences, and as a guest lecturer at the University of Novi Sad.


Trackbacks/Pingbacks