Quick Links
Windows 11 is the latest and, in my opinion, the best version of Windows so far. It has a much more beautiful and modern design language, and you see it all throughout the operating system. One of the best examples of the new Windows 11 design is the Settings app, which has received a complete facelift compared to Windows 10.
The new look is much more functional, presenting a side menu to navigate the main sections of the app, while the main content is all shown on the right side. The whole app has a beautiful translucent Mica material, there are new icons, and more visuals overall to make the app more interesting to look at. With the recent update to Windows 11 version 23H2, Microsoft has also added a brand-new home page to the Settings app, and more features have become available since Windows 11 made its debut back in 2021. Let's take a look at everything there is to know about the Settings app.
Home
The Home page is what the Settings app will show you by default, and it's a recent addition to Windows 11. Here, you'll see a few cards, which highlight certain recommended settings, including recommendations based on settings you accessed recently or more frequently.

Some cards are related to settings tied to your Microsoft account, such as OneDrive storage, recovery contacts, and Microsoft 365 subscription status. You may also see Settings related to Bluetooth devices, personalization, and more. Microsoft says this page will learn from your usage patterns and evolve over time, so it should become more useful to you as time goes on.
You can click any of the options here to go to the respective settings page, so let's dive right into what those pages have to offer.
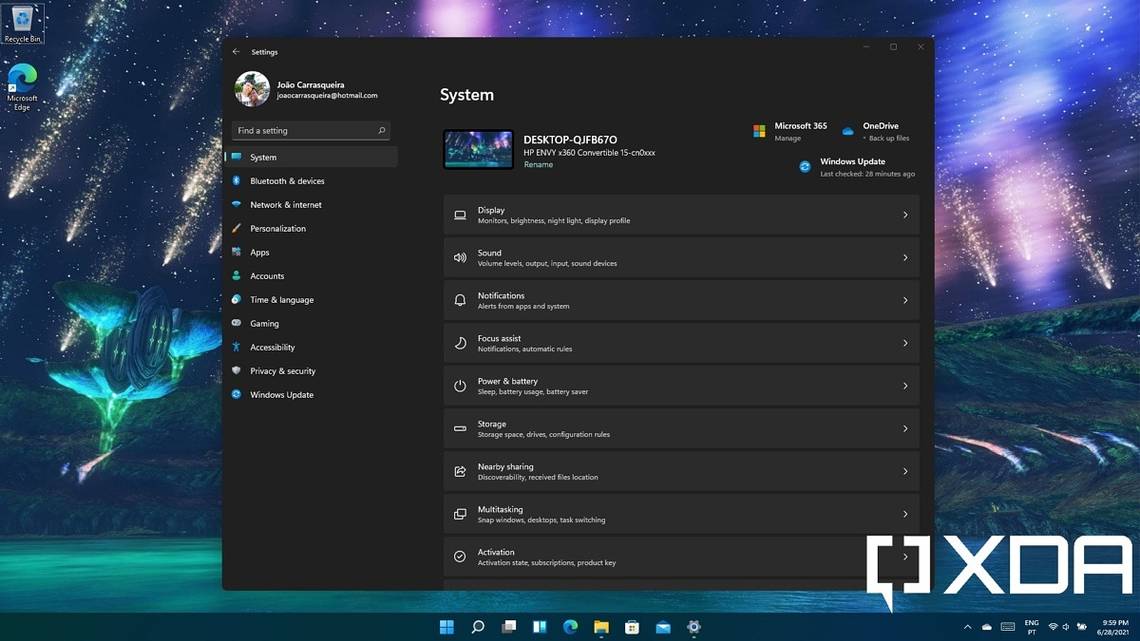
System
The System section is the landing page whenever you open the Settings app in Windows 11, and as the name indicates, it's where you access settings for core system features. This includes display, audio, and notification settings, plus much more.

The header of this section shows your laptop's name, the status of your Microsoft 365 subscription, a shortcut to your OneDrive folder, and your Windows Update status. On the side, all the different sections are available, and the core area of the app window shows the pages in your current section. Let's take a look at them.
Display

This page lets you manage all sorts of settings related to the display on your Windows 11 computer. If you have multiple monitors, you can adjust your layout with the diagram at the top. You can click and drag your monitors into the right position so they match their real-life layout. By expanding the Multiple displays option, you can also choose whether apps should minimize if the monitor they're on is disconnected, as well as whether window position should be remembered based on the monitor connection. You can also connect to a wireless display from here.
Going down the page, you can adjust the brightness of your display (some monitors may not support this through Windows) and adjust Night light settings. This feature makes the screen have a yellow (or red-ish, at more extreme levels) tint, making it easier on your eyes at night or in dark environments in general. You can schedule night light to turn on at specific times or to follow the current sunset and sunrise times based on your location, or you can have it on or off permanently. You can also change HDR settings if your monitor supports it.
Even further down, you can change Windows 11 settings such as the scale of text and icons on your screen, making them smaller or bigger. The options available depend on your screen size and resolution. This can be used to give you more screen real estate or to make items more visible if things are too small. You can also adjust the display resolution and orientation.
The final portion contains advanced display settings, which is where you can see more detailed information about the display, like resolution, refresh rate, bit depth, and whether it supports HDR. You can also change the refresh rate here, an important feature if you have a high-refresh rate display. And lastly, the Graphics page is where you can set specific apps to run on specific GPUs if your PC has more than one.
Sound
Next, there are sound settings in Windows 11, and these are a little more straightforward. The first portion has settings for your output devices, so you can adjust settings for your speakers. You can change your default output device, adjust volume, or disable stereo sound. You can also click an output device to adjust the left/right audio balance, audio quality, and enable spatial audio features like Dolby Atmos.

The next division is for your input devices, such as microphones. Just like with outputs, you can change your default input device, adjust the volume, and pair a new device if you have a wireless microphone. You can also test your microphone — the volume bar will show an animation whenever the microphone picks up sound.
The final portion contains audio troubleshooting and access to a list of all your audio devices. You can also access the volume mixer from here, so you can change the volume for individual apps.
Notifications
The next page contains your Windows 11 notification settings. Here, you can turn notifications on or off altogether, disable notification sounds, or change whether notifications should be visible on the lock screen. You can also enable Do not disturb, choose when it should be enabled automatically, and select certain apps that can break through.

Below these general settings that apply across all of Windows 11, you can change settings per app. You can disable notifications for specific apps, or change how notifications behave — such as whether they should use sound, show banners, or be prioritized in the notification center. Only apps that have previously sent notifications will show up here, so don't be surprised if you don't see all your apps right away.
Finally, at the bottom, are settings for specific system notifications and pop-ups, like tips on how to use Windows. We have an in-depth guide on Windows 11 notification settings if you'd like to learn all about that process.
Focus
The Focus page was added with Windows 11 version 22H2, and it contains settings related to Focus sessions in the Clock app. You can start a focus session from this page, but that's probably not the most interesting part.

This page lets you choose whether to turn on Do not disturb during a focus session, but you can also go even further. You can disable taskbar flashing for apps (so they don't turn orange to show notifications), disable notification badges, and choose whether you want to see a timer for the focus session in the Clock app.
Power & battery
This section lets you take a look at your current and past battery levels, so you get an idea of how long your laptop typically lasts on a charge. Here, you can also change various power settings for Windows 11, such as when your computer should turn off the screen after being idle for a while, and when it should go to sleep. You can also change the power mode to increase performance or optimize battery life. On that note, the Energy recommendations button includes a few suggestions on how you can save power, such as using dark mode or lowering the screen brightness.

You can also enable battery saver here, which disables background tasks and some notifications to help your battery last longer. It's possible to set when it should be turned on automatically (by default, it will be enabled when you have 20% battery left), and whether the screen brightness should also be lowered when battery saver is on. If you're on a desktop PC, battery-related settings naturally don't appear.
Storage
In this section, you can see the current state of your storage, including how much free space you still have and how much is being taken by what. There are categories for apps, temporary files, and then folders like documents, pictures, and more. There are shortcuts to each of these folders so you can see what files are taking up space inside that folder.

One particular section worth highlighting here is Temporary files, where you can manage and remove files created by the operating or by yourself that are meant to be temporary. These files don't always get deleted automatically, so it's a good idea to look into this if you want to free up space. We have a guide on how to do exactly that.
Below the storage usage indicators, there are a few additional settings. First, there's Storage Sense, which automatically cleans up certain types of data on a regular basis. You can set it to delete content in your Recycle Bin after a certain period, as well as Downloads or downloaded OneDrive files if you haven't used them in a while. There's a page for cleanup recommendations, which shows you files you can delete to save some space.
Finally, there are advanced storage settings. These include the ability to see information about storage used on other drives (the main page will show only your Windows drive), set where new content is saved if you have multiple drives, create and manage Storage Spaces, manage your disks and volumes (partitions), drive optimization (defragmenter for HDDs), and data backup options.
Nearby sharing
Nearby sharing is a feature introduced in Windows 11, and it allows you to share files over a local wireless connection with PCs close to you. On this page, you can set whether you want any device in your vicinity to be able to discover your PC for sharing, if only your own devices can discover it, or disable nearby sharing altogether. You can also set where you want files to be saved when you receive them with nearby sharing.

Multitasking
This section includes settings related to how you manage multiple apps open at the same time in Windows 11, including for new features like Snap Layouts. You can enable or disable a lot of features, such as whether Windows 11 should show you other apps to snap next to your current one, or if you want to see snap layout options when you hover the mouse over the Maximize button in the window controls.

There are also settings related to virtual desktops, specifically whether you want apps from other desktops to be visible on other desktops' taskbars and when using Alt + Tab to switch apps.
If you use Microsoft Edge, you can also choose whether individual tabs should show up in the Alt + Tab interface. Finally, you can enable or disable the title bar window shake gesture, where shaking a window around on the screen minimizes all other windows.
For developers
This page contains a wide range of settings meant for development purposes, as the name suggests. For starters, you can enable developer mode, which allows you to install apps from any source, even unsigned or untrusted apps or using loose files.

Other options here including enabling the Device Portal so you can remotely run diagnostics on the computer from another PC in the work, enable Device discovery, add an End task button to the taskbar, and much more.
The File Explorer settings let you enable features like seeing file extensions or seeing the option to run apps as different users. The Remote Desktop option lets you configure remote access if you have an edition of Windows 11 that supports Remote Desktop. You can also choose your default Terminal app and allows PowerShell to run unsigned scripts.
More recently, this page also lets you create a Dev Drive, an optimized partition specifically for development purposes, with faster performance than a typical drive.
Activation
This page is where you can check the activation status of your Windows 11 license, as well as what edition you're running. You can also enter a product key for a different edition, or buy the upgrade from the Microsoft Store.

Troubleshoot
The Troubleshoot page in itself doesn't have a lot of options aside from letting you change how recommended troubleshooters behave and see the history of recommended troubleshooters on your PC. However, clicking Other troubleshooters lets you run the troubleshooting experience you need.


Here, you'll find a list of all kinds of troubleshooters for things like audio, internet, printers, and Windows Update, but also some less common ones like the Background Intelligent Transfer Service or program compatibility.
Recovery
This is where you'll go if you want to recover from problems that can't be fixed with a troubleshooter. If your operating system just isn't working as intended, this page gives you a few options. You can reset your PC to remove all your personal files and apps, which can also be useful if you're planning to sell the PC to someone else. We have a guide on how to reset Windows 11 if you're interested in that.

You also have the option to go back to a previous version of Windows, but this option is generally only available for 10 days after a major Windows update (such as going from Windows 10 to Windows 11). Finally, Advanced startup allows you to restart your PC to access advanced options like choosing a different boot device. This can be useful for performing a clean install of Windows 11.
Projecting to this PC
Windows 11 allows you to project content from other devices, including other Windows PCs and phones with Miracast support. This page lets you set if other devices need to wait for permission every time they want to project to your PC, or if a PIN is required for projecting.
Remote Desktop
This page allows you to manage your Remote Desktop settings, which means you can use another PC to remotely connect to it using Microsoft Remote Desktop. Only Pro editions or higher can be accessed with Remote Desktop, so this page won't show you much if you have Windows 11 Home.
Clipboard
The clipboard in Windows 11 has quite a few features you might not know about. On this page, you can enable or disable clipboard history, which saves text and images you copy so you can more easily paste it later, even if you've copied other items in the meantime. You can also sync the clipboard across your devices, and choose whether syncing is automatic for all items or if you want to manually sync specific clipboard items. This also supports Android phones with SwiftKey Keyboard installed.

Otherwise, you can clear clipboard data if you want Windows to forget what you've copied, and also enable or disable Suggested action, which can give you prompts for specific actions when you copy certain types of content like a date or a phone number.
About
Finally, the About page shows you pretty much all the information you need about your PC. This includes the name processor, amount of RAM, device and product IDs, and so on. It also includes information about Windows, including the current version, edition, build number, and the installed version of the Windows Feature Experience Pack. There are also links to other Windows 11 settings on this page, including activation, Remote Desktop, BitLocker, and the Device Manager.

Bluetooth & devices
Moving on to the Bluetooth & Devices section, which naturally refers to peripherals and devices connected to your Windows 11 PC. The header in this section includes a list of devices already paired or connected to your PC, like headsets or wireless controllers. The Add device button allows you to connect Bluetooth devices, Xbox Wireless controllers, wireless displays, and so on. You can also turn Bluetooth on or off from this page.

Below that are multiple sub-pages.
Devices
This page, also accessible by clicking View more devices below the header at the top, lets you see all the devices connected to your PC or nearby devices on your network. You can remove or disable devices if you don't want to use them.

You can also disable or enable Swift Pair notifications, which are meant to make the connection process more seamless with supported wireless devices.
Printers & scanners
This page allows you to manage your connected printers and printing services. You can see the printing queue for each of them, print a test page, run troubleshooters, and more. You can also choose whether Windows should manage your default printer and whether printer drivers should be downloaded over metered connections.

Phone Link
This is essentially a shortcut to the Phone Link app in Windows 11, which used to be called Your Phone. This app lets you connect your Android phone to your PC to sync notifications, messages, and make calls from your PC, and some phones may also allow you to open apps from your PC. The app also works with iPhones, but with limited functionality. Otherwise, this page lets you disable suggestions related to using your Android phone with Windows 11.

Cameras
The Cameras page lets you see webcams connected to your computer and add network cameras, if you have any. You can also click any camera on the list and change settings like contrast, brightness, and saturation to improve the overall image quality. Some devices also let you change more advanced settings, like enabling background blur or eye contact. This will depend on your laptop and webcam, though.


Mouse
The Mouse page lets you configure settings for mice. You can set the primary mouse button to be the right or left button on the mouse, change the mouse pointer speed, scrolling speed, and whether scrolling should work on inactive windows when hovering over them.

You can also Additional mouse settings to change the mouse pointer icon, increase its size, or change its color, features that are important for accessibility. There's also an option called Mouse pointer below that that takes you to the acccessibility settings for the mouse.
Touchpad
In this page, you can customize settings particularly related to touchpads, with a lot more being available if you have a Precision touchpad, which you probably do since Windows laptops have been required to include them for a few years now. You can change a ton of settings here, starting with the ability to disable the touchpad altogether, or set it to be disabled when an external mouse is connected.

The rest of the settings are far more interesting. You can change the cursor speed, adjust the sensitivity of the trackpad to taps, choose what type of mouse click should be tied to specific taps — such as tapping with two fingers acting as a right-click — and so on. Scroll and zoom gestures can also be enabled or disabled, you can invert the scrolling direction relative to your gestures, or disable pinch to zoom.
The most interesting bits here are the three- and four-finger gestures, though. You can choose what happens when you swipe or tap the touchpad with three or four fingers. The main page gives you a handful of presets that make sense for most users, but you can head into the Advanced gestures page to customize every individual gesture, too. Available actions include switching apps, adjusting volume, switching desktops, and more.
Touch
This page only appears for devices with touchscreens, and it lets you disable three- and four-finger gestures. You can't customize these in any other way, but the gestures allow you to open task view by swiping up, or switch between apps and virtual desktops by swipng sideways. We have a guide on touch gestures in Windows 11 if you'd like to learn more about those.

Pen & Windows Ink
Here, you can find settings related to active digital pens, assuming your device supports them. You can choose what hand you write with to improve recognition, change what the shortcut button or side button do (dpeending on your pen model), or find your pen, if that feature is supported.

Under Additional pen settings, you can customize settings like visual effects, or make it so the screen ignores normal touch input while using the pen, among other things.
You can also customize settings for the handwriting panel such as the font used to render written text. In the newest versions of Windows 11, there's also a new option called Use your handwriting to enter text,, and this makes it so you can write directly in text fields, rather than using the handwriting panel separately.
AutoPlay
AutoPlay is the Windows feature that allows your PC to act in specific ways when you plug in a flash drive or memory card. In this page, you can choose what happens by default when you plug in a device.

USB
This page allows you to turn off notifications when a USB device isn't connected properly, and also choose whether USB devices should be turned off when the screen turns off to save battery. In a recent update, you can also see more information about USB4 and Thunderbolt hubs, as well as the respective host controllers on your PC.

Network & internet
This section of the Settings in Windows 11 app includes all the connections related to internet connections. The header of this section will show what network you're currently connected to, what type of network it is, and your data usage history on that network over the last 30 days. These also double as shortcuts to more in-depth network properties and your detailed data usage.

Below that, we have a few options, with a few also doubling as toggles for Wi-Fi or turning your computer into a mobile hotspot.
Wi-Fi
This page allows you to enable or disable Wi-Fi connectivity, see properties for your current connection, see the list of available networks around you, and manage the networks you've already added to your PC.

You can also see detailed hardware properties of your Wi-Fi adapter, and here you can also set IP and DNS configurations if you don't want to use the default settings. Finally, you can enable random hardware addresses, which makes it harder for websites and other people to track your device's exact location.
VPN
On this page, you can set up a VPN profile for accessing corporate resources securely or make it harder to be tracked online. You can also set whether VPNs should be used while roaming or on a metered connection.

Mobile hotspot
Just like on a phone, this feature allows you to share your current internet connection to other users. You can share Wi-Fi or wired connections over either Wi-Fi or Bluetooth. In this page, you can also set up the Wi-Fi network's name and password.

Airplane mode
This page allows you to disable all wireless communications, or choose to disable only Wi-Fi or Bluetooth.

Proxy
Here you can set up a proxy server, manually or automatically. Setting up a proxy server can be useful for masking your identity online.

Dial-up
This page allows you to set up a dial-up internet connection if you still use one. It's just a shortcut to an old-school setup dialog.
Advanced network settings
Here, you can view advanced information about all the network adapters on your PC, such as how long a connection has been running, how much data has been sent over the network, and its link speed.

The Advanced sharing settings page lets you manage settings for sharing files and resources over the local network. You can also check your data usage, manage your hardware and connection properties, and perform a network reset to revert all your network settings to default. Finally, this page includes shortcuts for the classic network adapter settings and Windows Firewall, which are found in other parts of Windows 11.
Personalization
This section is where you can customize the look and feel of your PC. The main page of this section shows a preview of your current theme in the header, along with a handful of themes you can quickly switch to. Below that, you get a few more customization options.

You can learn all about customizing Windows 11 in our guide, but let's take a quick look at the pages available here.
Background
This is where you can choose the background image shown on your desktop. You can choose a single image, a solid color, a slideshow, or Windows Spotlight, which serves you a new curated image every day.

Some of these options give you additional customization, like how a using a slideshow lets you change how often the background should change and whether the picture order should be shuffled. If you choose a single image, you can also set a different image for each monitor or for each virtual desktop. A few preset images are included in Windows 11, but you can use custom photos, and you can also adjust how images should be formatted to fit your screen if the aspect ratio doesn't match.
Colors
Here you can change the "mode" you want Windows 11 to be in — light or dark. You can also choose a custom mode, where Windows itself follows one mode, but apps follow another. You can also enable or disable transparency effects across the OS.

Additionally, you can choose an accent color, which is used for some highlights, icons, and text with links in some apps. There's an automatic option that picks a color from your desktop background, but you can also choose a color manually. In addition to a few default colors, you can use set custom colors using a color picker, RGB or HSV values, or Hex codes. If you want, you can also choose to show the accent color on the Start menu and taskbar, as well as title bars and window borders.
You can also access contrast themes from here, though these are considered an accessibility feature and you can find them elsewhere in the Windows 11 Settings app.
Themes
This page allows you to choose an overall theme for your PC. Windows 11 themes can include background images, color settings, sounds, and mouse cursors, all of which are changed when you change themes. The header on this page lets you change these elements individually, so you can save them as your own custom theme.

Below that, you can choose from the themes installed on your PC or browse themes on the Microsoft Store if you're looking for something new.
Lock screen
On this page, you can change the background for the lock screen of your PC, which shows up before you sign in to an account. You can choose a single image, slideshow, or Windows spotlight, similar to the desktop background options. You can also choose one app to show detailed notifications on the lock screen.

Text input
One of the big new features in Windows 11 is the ability to change the look of your touch keyboard, as well as the voice input and emoji panels, all of which share the same theme.

There are 16 themes included by default, and you can also create a custom theme using a background image of your choosing. Additionally, you can change settings specific to the touch keyboard, like the overall size, whether you want each key to have a background, and the size of the text inside the keys.
Start
Here, you can customize the behavior of your Start menu. At the top, you can choose the size the Pinned and Recommended sections of the Start menu, so you can have more space for the kinds of links you need.

Below that, you can choose whether recently installed apps should show up in the Recommended section of the Start menu, or whether your most used apps should be at the top of the All apps list. You can also choose whether recently-opened items should show up in Start, Jump Lists, and the Quick Access page in File Explorer.
Additionally, you can also customize which folders appear at the bottom of the Start menu, next to the power button. These include the Documents, Downloads, Music, and other folders, plus links to the File Explorer and Settings app.
Taskbar
The Taskbar page lets you choose which icons should show up on the taskbar, including Search, Copilot, Task View, and Widgets. For Search, can actually choose to show a search box, icon, or nothing at all.

You can also enable or disable system tray icons, such as the pen menu or touch keyboard, as well as which icons appear in the overflow menu — the flyout that opens when you click the arrow near the system tray. This is where many apps, such as Skype, Slack, and Teams reside when they're running in the background.
Finally, there are some settings for taskbar behaviors. You can choose to align the taskbar icons at the center (the default on Windows 11) or back on the left side as with previous versions of Windows. It's also possible to set the taskbar to hide automatically after a few seconds, choose whether you want the taskbar visible on all displays, and what apps should appear on the taskbar on each display. Finally, you can disable (or enable) the shortcut to view your desktop by clicking the far right corner of the taskbar.
Fonts
Here you can manage the fonts installed on your system. You can install new fonts by dragging the font file into the area at the top of this page, or manage your existing fonts. Some fonts are also available on the Microsoft Store, and there are some links here to advanced settings related to ClearType.

Device usage
This page allows you to set what you use your PC for most often. This can result in personalized tips and ads based on your usage.

Apps
This section of the Windows 11 Settings app allows you to manage the apps and features installed on your PC. There's no header menu here, so we'll dive straight into the individual pages.
Installed apps
This page includes all the apps installed on your PC, and you can see how much space they're taking up, when they were first installed, and what version you have. You can filter apps by drive, change the sorting order, and choose from a few different viewing layouts.

You can click the three-dot icon next to a given app to uninstall it, as well as modify the installation (for "classic" apps) or changed advanced app settings (for modern apps). This allows you to enable or disable camera, microphone, location, and storage permissions, terminate the app, repair or reset apps, or uninstall them altogether. You can also move apps to a different drive from the three-dot menu.
Advanced app settings
The advanced app settings page is where you can change a few options such as where to get apps from. For example, if you've heard of S mode in Windows, one of the big things it does is make it so you can only install apps from the Microsoft Store. You can change that here.

Other options here include share across devices, which controls how apps can share experiences with other devices you've signed into. Acrhive apps allows your PC to automatically "archive" apps by removing apps that aren't frequently used, but keeping your data associated with them. Finally, app execution aliases let you manage names that apps use to make it easier to run them using Command Prompt.
Default apps
This page allows you to set default apps for opening specific types of files and links. Unlike in previous versions of Windows, you can't set a default music or video player in general. Every default association has to be done on a per-file type basis, except for browsers. At the top, you can search for file types and protocols to see what apps they're associated with.

Below that, you can choose an app to see which file types and links it can open, then choose the defaults you want to set. In the case of browsers, you'll see a banner at the top so you can set your chosen app as the default browser.
Offline maps
This section is where you can manage the offline maps used by the Maps app in Windows 11. You can check which maps you have downloaded and download new ones, change the storage location for offline maps, and choose whether maps should be downloaded over metered connections. You can also check for map information updates and manage automatic updates.

Optional features
This page is used for managing optional Windows features. At the top, you can add new features, which is where you might get things like the Wireless Display feature to be able to project to your PC. You can see a list of installed features and remove them using the list at the bottom. There's also an Optional feature history to see which features you've installed or removed in the past.

Apps for websites
When apps are capable of handling web addresses — such as a Teams meeting opening in the Teams app — you'll find that app here. You can disable links from opening in their respective apps, which will allow them to open in the browser instead.

Video playback
You can change settings for apps that play video on this page. This includes settings for automatically enhancing videos, lowering video resolution when streaming to save on network bandwidth, and choosing whether you want to optimize video playback for battery life by lowering video resolution.

Startup
This page allows you to manage which apps are allowed to start when you turn on your computer. You can set the toggle to On or Off for each of the apps listed. Modern apps can still run background tasks even though they don't appear here.

Accounts
This section is where you can manage accounts you've added to your PC, but primarily the Microsoft account linked to your PC. This page will show information about the cloud storage available and used on your account, both on OneDrive and Outlook attachments. You can also see the status of your current Microsoft 365 and Game Pass subscriptions.

Below that, you have various options related to your accounts.
Your info
This page allows you to view your Microsoft or local Windows account information and profile picture, as well as change that profile picture, either by taking a photo or choosing from an existing file.

You can also switch to a local or Microsoft account depending on what you're currently using, and there's a link to manage your Microsoft account on the web.
Sign-in options
This page allows you to set up different login methods for Windows, including Windows Hello. Depending on your hardware support, you can set up facial recognition, fingerprint recognition, a PIN, or physical security keys as sign-in methods. We have an article on how to set up Windows Hello, if you need help. You can also choose to require Windows Hello authentication for Microsoft accounts, so your Microsoft account password isn't enough to sign you in.

You can also choose how much time should pass while you're away before Windows asks you to sign in again, and configure Dynamic Lock so your computer locks automatically when you move away.
Other settings include the ability to choose if certain restartable apps should be saved and automatically restart when you sign in to your PC, decide if you want your email address to be visible on the lock screen, and whether you want your PC to use your sign-in info to automatically log you in after installing an update to finish setting up.
Email & accounts
Here, you can find all the email accounts you've added to your Mail app, regardless of what email provider they're based on. You can also see your Microsoft accounts you might be using in apps across Windows 11. You can add or remove existing accounts from here, too.

Family
This is where you can manage settings for your Microsoft family group. This page lets you view members of your family group and add new ones, or open the Family Safety app where you can see all the options and settings related to your family group.

Windows backup
This section allows you to manage backups for your files and Windows 11 settings. You can choose whether you want to sync your apps so you can easily get them on another PC, sync passwords, language preferences, and other Windows settings.

This page also includes a shortcut to your OneDrive sync settings, which allows you to choose if you want to back up certain folders on your PC to OneDrive to access their files anywhere.
Other users
This page lets you add more users to your PC, so you can have different accounts for different people or purposes.
Access work or school
Here, you can manage corporate or school accounts you have that rely on Microsoft 365. You can add a new account, export your management log files, add or remove provisioning packages, and enroll the device in device management.

Passkeys
A recent addition to Windows 11, passkeys allow you to sign into websites using Windows Hello, though websites need to specifically support it. However, this does make it easier to sign in without having to enter your password, which can make the whole process safer. This page is where you can see your stored passkeys.

Time & language
This section is where you can manage regional format and language settings in Windows 11, as well as date and time. The top of this page shows the current date and time, your current time zone, and the region your PC is set to.

Otherwise, it includes a few other pages.
Date & time
Here you can see all your date and time settings. You can choose whether the time should be synced with the Windows time server, and whether the time zone should automatically adjust based on your location, as well as choose one manually if you prefer doing it that way.

You can also choose to hide the time and date from the taskbar, manually sync the current time if you need to, and choose whether you want to see additional calendars (specifically Chinese lunar calendars) on your taskbar.
Language & region
This page has a couple of groups. First, there are the language settings, where you can manage the languages installed on your PC (for grammar checks, text-to-speech features, speech recognition, and handwriting), as well as change the display language. This will change the text throughout Windows and apps that follow the system settings.

The second group of settings is for your region. Choosing a different region may change the content you see on the Microsoft Store, and some features may only be available in some regions. You can also change the regional format, as in, the way dates, times, and numbers are displayed.
Typing
On this page, you can adjust how Windows behaves while you type text on your PC. This includes settings related to the touch keyboard, such as whether you want to hear sounds as you type, automatically capitalize the first letter in a sentence, and so on. You can also choose whether you want the touch keyboard to be displayed automatically when no physical keyboard is connected.

The remainder of the settings are related to text suggestions and grammar checks. You can choose to see text suggestions when typing on the physical keyboard, enable multilingual text suggestions if you have more than one language installed, and choose whether you want to autocorrect misspelled words or highlight misspelled words while typing. You can also see your typing insights, which show you how many times you've used autocompleted words, suggested words, and so on, giving you an idea of how Windows has helped you type faster.
You can also check out Advanced keyboard settings for settings related to how you switch between languages and input methods if you more than one installed.
Speech
This page has settings like speech recognition and speech-to-text features. You can choose the language you want to use for speech recognition and set up your microphone for it here. You can also choose which voice to use for text-to-speech features in Windows 11, as well as change the voice speed. Finally, you can manage your voice packages and add new voice languages to your PC from this page.

Gaming
This section contains a handful of settings for gaming-related features in Windows 11, such as the Xbox Game Bar, game captures, and more. This one also has no interesting header, so we'll jump right into the individual pages.
Xbox Game Bar
Here you can enable or disable the ability to open the Xbox Game Bar using the Xbox button on an Xbox Wireless Controller. All other Xbox Game Bar settings are accessed through the Game Bar itself.
Captures
This page contains settings for the recording and capture features available in the Xbox Game Bar, starting with where you want those captures to be saved on your drive. The Record what happened feature automatically records your gameplay while you're playing, so you can just hit a specific key combination to save a video file of something that just happened. If you enable this feature, you can also set how long you want automatic recordings to be (up to 10 minutes).

Otherwise, you can choose the maximum recording length of recordings you start manually, you can choose whether to include game and microphone audio during these recordings, choose a frame rate, and video quality. You can also choose whether you want the mouse cursor to be visible in game captures. We've covered all of these options in more depth in our guide on how to record your screen in Windows 11.
Game mode
This page contains a single toggle for Game Mode, which restricts background activity during games to help games run more smoothly. This feature is on by default.
Accessibility
This section contains a wide range of features that help make your PC easier to use, specifically if you have vision or hearing impairments, or limited mobility. There are a ton of options here, so we won't go as deep into them. However, you can check out guide on how to make Windows 11 more accessible if you'd like to know a bit more about some of these capabilities.

Vision
The accessibility features available for vision impairments include:
- Text size: change the size of text on the screen
- Visual effects: Enable or disable visual effects that may cause visibility problems, such as transparency and animations. You can also set scrollbars to be always visible or change how long it takes for a notification banner to disappear from your screen.
- Mouse pointer and touch: You can change the color and size of your mouse pointer to make it easier to find on the screen. For touchscreens, you can also touch to see a touch indicator whenever you touch the screen, and choose to make that indicator larger and darker.
- Text cursor: You can enable a large text cursor indicator if you have trouble finding it while typing. You can change the size of the cursor indicator and its color. You can also increase the thickness of the text cursor to make it more visible.
- Magnifier: Enable or disable the magnifier to zoom in on your screen, and adjust the zoom level you want to see by default. You can also change how much you want the zoom level to change when zoom in or out using the Magnifier. Other settings including inverting the colors on the screen and smoothing the edges of text and images.
- Color filters: Windows includes filters to account for various types of color blindness. You can choose the filter than fits your personal needs in this page.
- Contrast themes: Windows also includes a handful of themes designed to improve visibility and comfort for the visually impaired. Windows 11 includes brand new themes that should be easier on the eyes.
- Narrator: The Narrator feature allows you to have UI elements and text read aloud to you. You can enable or disable this feature here, change the Narrator's voice settings, verbosity, cursor, and more.
Hearing
For users with hearing impairments, the following settings are available
- Audio: Enable a mono audio channel (useful if only one ear has an impairment, affecting stereo sound), and choose whether the screen should flash when receiving an audio notification.
- Captions: Change how captions should look in videos, with a handful of preset themes and the ability to create fully custom ones.
Interaction
For users with limited mobility, Windows has a few features that improve interaction in ways that require less movement. These are the settings available:
- Speech: Enable speech recognition for controlling your PC with Voice access, as well as voice typing.
- Keyboard: Enable features like Sticky Keys, filter repeated keystrokes with customizable sensitivity, or enable sound for pressing toggle keys like Caps Lock or Num Lock. It's also possible to turn on the on-screen keyboard here.
- Mouse: Enable Mouse keys, making it possible to move the mouse using the number pad on yout keyboard, along with a handful of settings for movement speed and acceleration.
- Eye control: For devices with supported eye trackers such as the ones from Tobii, you can control Windows using only eye movements. This page allows you to enable and manage this feature.
Privacy & security
This section contains settings related to your device's security as well as privacy settings for Windows 11, such as what apps can access certain types of data or physical devices. Once again, there's no big header for this one, so we'll jump straight into the individual sections here. Again, there are a ton of them, so we'll keep these options relatively brief.

Security
The first group of settings is focused on security, and it includes:
- Windows Security: Shows you an overview of your current security status, such as whether any viruses have been detected or any setting may leave you at risk. These settings can be changed in the Windows Security app.
- Find my device: Enable the ability to locate your PC on a map. You can then locate it by going to your Microsoft account settings in a web browser.
- Device encryption: Encrypt your device data so other users can't access your files unless they know your credentials.
Windows permissions
The first batch of privacy-related settings has to do with the information Windows knows about you. It includes the following:
- General: Enable or disable your advertising ID to make it easier for apps to show you personalized ads, allow Windows to recommend content based on your language list, let Windows improve its recommendations in Search and Start by tracking your app launches, and see suggested content in the Settings app.
- Speech: Enable or disable online speech recognition, which is used by features like voice typing by connecting to the internet to accurately recognize what you say. Disabling this will disable those features.
- Inking & typing personalization: Choose whether you want to create a personal dictionary based on the words you type or write with ink. This improves typing suggestions by remembering custom words you may use often.
- Diagnostics & feedback: Choose how detailed the diagnostic data you send to Microsoft is. Some data is required to use Windows, but you can choose to send more detailed data, such as information about the websites you visit and apps you use, to help Microsoft identify and fix potential problems more easily. You can also choose how this diagnosed data is used, such as improving inking and typing.
- Activity history: Save data about how the apps and files you're using. This was required by the Timeline feature in Windows 10, but serves no clear purpose now, so you may want to disable it.
- Search permissions: Change search settings for the Windows Search feature, such as adjusting SafeSearch levels for web results, or allowing access from your Microsoft, work, or school account to see files and other results from those accounts in Windows Search. You can also disable or clear the local search history, which is used to improve search suggestions.
- Search indexing: Choose how deep the search indexing should be, allowing it to find files your entire drive or only select folders. You can exclude specific folders from search results, too.
App permissions
Finally, we have app permissions, meaning the information that each app may require access to enable certain features. Many of these settings can be disabled altogether, or disabled only for specific apps. This includes access to your physical location, webcam, microphone, and more. Because many of these settings are self-explanatory and the list is massive, we won't list them all. However, a recent noteworthy addition is that of Presence sensing settings on devices that feature human presence sensors.
Windows Update
This section of the Windows 11 Settings app is focused on Windows Update and the Windows Insider Program. The header in this section shows if you're currently up to date or if any updates are pending, and it includes a button to check for updates.

There's also a toggle for getting new features as soon as they're available, which means certain major updates may be available to you first. A good example of this is the way Windows 11 version 23H2 was rolled out initially. You can also pause updates for a set period of time (up to five weeks on Home editions of Windows 11). The other options here are:
Update history
See a history of updates installed on your PC, divided into feature updates, quality updates, driver updates, and definition updates for the Microsoft Defender Antivirus. There's also a section for "other" updates, which includes the Windows Malicious Software Removal Tool that Microsoft rolls out every month.

Advanced options
Here, you can change a number of settings for how Windows Update behaves. First, you can choose to receive updates for other Microsoft products, such as Office, alongside Windows updates. The Get me up to date option makes it so that your PC restarts as soon as possible after an update is installed, but you can also choose whether you want to be notified when a restart is required to finish installing an update. You can also set active hours — when you're actively using your PC — to avoid unexpected restarts during those times. Finally, you can set whether you want download updates over metered connections.

A few additional options here include a list of optional updates, which can include driver updates or update previews for Windows. There are also delivery optimization settings, which essentially allows you to choose if you want to receive updates using peer-to-peer connections to other PCs. This can improve download speeds but increase bandwidth usage since you'll also be sending updates to others. By default, your PC will be set to download updates from other PCs on the same network as you, but not from the internet. You can change that setting or disable it completely. You can also limit bandwidth usage for downloading updates.
This page also includes some links to other pages in Settings, which we've already covered.
Windows Insider Program
Finally, this section lets you manage your participation in the Windows Insider Program. You can join the program to receive development builds of Windows 11, which may be unstable. You can choose what channel you want to join, or opt out of Insider builds entirely.

To opt out immediately, you have to perform a clean install of Windows 11, but you can also choose to opt out once the next public update releases if you're in the Beta or Release Preview channels. This means you'll keep getting preview updates until the next major update is finalized, but then you'll be running a stable version of the OS without losing your data.
That's all you need to know about the Settings app in Windows 11. There's quite a bit to explore in here, but that just means you can tweak a lot of options to your liking to make sure everything fits your preferences (unless you want to move the taskbar to a different side of the screen, you still can't do that).
Want to learn more about Windows 11? Check out our list of all the Windows 11 features available in preview. If you want to try Windows 11 yourself you might want to buy a new laptop, but you can also check our list of supported PCs for Windows 11 to see if yours is supported.