

In the previous sections of this tutorial, you added authentication to MJ Coffee, a Flutter app, and then enhanced that authentication by adding refresh token rotation and social logins. You also looked at customizing the login page with your own branding, and user management in Auth0.
In this section, we’ll focus on authorization. Remember:
- Authentication concerns itself with answering the question “Who are you?”
- Authorization — this section’s topic — is all about answering the question “What are you allowed to do?”
We’ll cover authorization by adding real-time chat to MJ Coffee so that we can later see how the chat can be integrated with Auth0, limit its functionalities and UIs based on roles and permissions.
Look for the 🛠 emoji if you’d like to skim through the content while focusing on the build and execution steps.
Add Real-Time Chat to the Flutter Application
Having a real-time chat service in the MJ Coffee app can significantly improve how fast users can communicate with our customer service or employees. Having looked around, I found Stream, an exciting service with a solid Flutter SDK that you can integrate and customize quickly and easily.
Install Dependencies
Stream comes with several SDKs that can be used in Dart or Flutter applications. However, one of them comes with all features, a beautiful theme, and enough API so that you can customize it as much as you wish. We’ll use that one.
🛠 Open the /pubspec.yaml file and add stream_chat_flutter to your dependencies. The dependencies section of the file should end up looking like this:
// /pubspec.yaml

dependencies:
  flutter:
    sdk: flutter
  font_awesome_flutter: ^9.1.0
  flutter_svg: ^0.22.0
  google_fonts: ^2.1.0
  json_annotation: ^4.0.1
  http: ^0.13.3
  flutter_appauth: ^1.1.0
  flutter_secure_storage: ^4.2.0
  stream_chat_flutter: ^2.0.0
I recommend using a version later than 2.0, which is fully compatible with Flutter 2 and its support for null safety.
If you’re only targeting Android, you can ignore the next section.
If you’re targeting iOS
🛠 If you’re targeting iOS, you’ll need to take a few extra steps:
- The Stream library uses the flutter file picker plugin to present the user with an interface to select files. You’ll need to follow the steps in the iOS section of this page to make use of it.
- The library also uses the video_player plugin to display inline videos. Follow this guide to install and enable it.
- Finally, the library uses the image_picker plugin to provide a user interface for selecting images. Follow [these instructions] to use this plugin.
🛠 Don’t forget to actually install the dependencies! Enter flutter pub get in the terminal or PowerShell, or Pub get in your IDE.
Create a Stream Account and App
Before you can integrate Stream with your app, you need a Stream account, which you’ll use to register the app.
🛠 Create your account if you don’t already have one, then log in and go to the Stream dashboard:

🛠 Tap on the Create App button, then follow these steps:
- Enter a name for your app in the App Name field. For this example, we’ll use
MJCoffee. - In the Feeds Server Location menu, select the location closest to you.
- Don’t select anything from the Clone Existing App menu — just leave it set to
---. - Select your environment. Usually, it's a good idea to create separate apps for production and development. In this tutorial, we’ll focus on production, so select Production.
- Finally, click the Create App button.
You should see this:
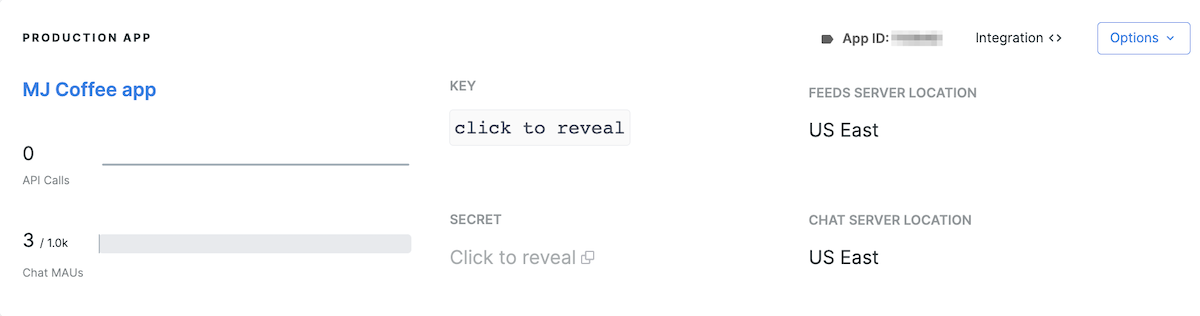
🛠 Once your app has been created, make a note of your Stream key.
Notice that you will need a secret key to sign the user ID and get a production user token to connect users. You’ll learn how to do that with Auth0 Actions.
I recommend passing sensitive data and keys with --dart-define via the command line or adding to your editor or IDE run command rather than storing it in your app’s code.
You took this approach when implementing basic authentication for the app. You passed two sensitive values — your Auth0 domain and Auth0 client ID — as command-line arguments when launching the app. You’ll simply add the Stream key as a third argument, like so:
flutter run -d all --dart-define=AUTH0_DOMAIN=[YOUR DOMAIN] --dart-define=AUTH0_CLIENT_ID=[YOUR CLIENT ID] --dart-define=STREAM_API_KEY=[YOUR STREAM KEY]In order for your application to use the Stream key argument, you’ll need to define a new constant.
🛠 Add the following to your constants.dart file, which is located in the in the /lib/helpers/ directory:
// /lib/helpers/constants.dart

const STREAM_API_KEY = String.fromEnvironment('STREAM_API_KEY');
Integrate Chat Into the Flutter Application
Let's start by creating a new StreamChatClient in the ChatService singleton class. In doing this, there are three essential things that you need to take into account:
- Initializing the Dart API client with your API Key
- Setting the current user
- Passing the client to the top-level StreamChat widget
🛠 Open chat_service.dart (located in the /lib/services/ directory) and initialize StreamChatClient by updating the ChatService class so that it appears as follows:
// /lib/services/chat_service.dart

class ChatService {
  static final ChatService instance = ChatService._internal();
  factory ChatService() => instance;
  ChatService._internal();

  final StreamChatClient client = StreamChatClient(
    STREAM_API_KEY,
    logLevel: isInDebugMode ? Level.INFO : Level.OFF,
  );

}
The only required positional parameter for StreamChatClient() is STREAM_API_KEY, but you have more options to configure your client. For instance, it might be pretty helpful to see all the logs during debugging. That's why we used the optional logLevel parameter to set the amount of logging that will take place, based on whether or not the app is in debug mode.
Now that you‘ve created the client, you need to ensure that your current user is connected appropriately.
🛠 Add the connectUser() to the ChatService class in chat_service.dart:
// /lib/services/chat_service.dart

class ChatService {

...

  Future<Auth0User> connectUser(Auth0User? user) async {
    if (user == null) {
      throw Exception('User was not received');
    }
    await client.connectUser(
      User(
        id: user.id,
        extraData: {
          'image': user.picture,
          'name': user.name,
        },
      ),
      // To be replaced with PRODUCTION TOKEN for user
      client.devToken(user.id).rawValue,
    );
    return user;
  }

...

}
This new method of the ChatService class, connectUser(), will handle the logic for connecting the current user. It accepts an Auth0User object. If it doesn‘t receive one, it means the authentication has probably failed and that the user should not be connected to the chat.
🛠 Open /lib/screens/home.dart, look for the _HomeScreenState class, and within it, the setSuccessAuthState() method. Update setSuccessAuthState() to the following:
// /lib/screens/home.dart

setSuccessAuthState() {
  setState(() {
    isProgressing = false;
    isLoggedIn = true;
    name = AuthService.instance.idToken?.name;
  });

  ChatService.instance.connectUser(AuthService.instance.profile);
  CoffeeRouter.instance.push(MenuScreen.route());
}
You need to pass two required positional parameters:
- The
Userobject with a defined user ID, and - the user token, a signed and encrypted hash string.
Typically, the user token should be generated on a back-end server to store the aforementioned secret key and to sign and get the token. You'll soon learn how Auth0 can handle that as your backend.
To continue, you need to:
- Get a development token,
- pass
user.idto thedevToken()method on the chat client, and - Get the
rawValuewhich is the token string.
🛠 To ensure that devToken works, you need to disable auth checks. In the GetStream app’s chat dashboard, turn on the Disable Auth0 Checks option.

When you move the app to production and you have a proper method to receive the production token, make sure that you turn off the Disable Auth0 Checks option.
Stream chat UI components will accept additional data that you provide while connecting a user. For example, you may create a Map containing the user‘s image and name, so they appear automatically and beautifully throughout the chat widget.
At the time of writing, Stream does not accept Auth0’s user ID format, which includes | between the Auth source and user hash ID. You’ll need to make a change to the id arrow function in the Auth0User model to account for this.
🛠 Open /lib/models/auth0_user.dart and make this change to the id arrow function:
// /lib/models/auth0_user.dart

String get id => sub.split('|').join('');
The next and final step is to create StreamChat, the root widget of the application.
🛠 Open the /lib/main.dart file, locate the call to MaterialApp, and add the builder parameter so that it returns a StreamChat object:
// /lib/main.dart

...
MaterialApp(
  debugShowCheckedModeBanner: false,
  themeMode: ThemeMode.system,
  home: HomeScreen(),
  navigatorKey: CoffeeRouter.instance.navigatorKey,
  theme: getTheme(),
  builder: (context, child) {
    return StreamChat(
      child: child,
      client: ChatService.instance.client,
    );
  },
),
...
The StreamChat object returned by builder is an inherited widget and aims to provide APIs for advanced customization. It requires a child and a client that you have initialized in the ChatService class.
That's it — your chat is ready! Restart the app, and let's continue to add the support screen and community screen using the prebuilt StreamChat UI widget to leverage the chat service that you added.
Implement the Support Chat Screen
Typically, a support chat consists of a user and an agent interacting in a channel created for both. Hence the support chat screen will do the following:
- Create a private channel for the current user and one of the available agents
- Listen to the channel for updates
- Load existing chat content, if any
- Upon chat completion, archive the chat history
Let's create a createSupportChat() method in the ChatService class.
🛠 First, add the following instance variable to the start of the ChatService class:
// /lib/services/chat_service.dart

String? _currentChannelId;
🛠 Then add the createSupportChat() method to the ChatService class:
// /lib/services/chat_service.dart

Future<Channel> createSupportChat() async {
  // To be replaced with EmployeeRole via Auth0
  final String employeeId = 'rootEmployeeId';
  final channel = client.channel(
    'support',
    id: _currentChannelId,
    extraData: {
      'name': 'MJCoffee Support',
      'members': [
        employeeId,
        client.state.user!.id,
      ]
    },
  );
  await channel.watch();
  _currentChannelId = channel.id;
  return channel;
}
There’s a lot going on here. Let's review it step by step.
First, to create a support chat channel for the current user, you need to know the ID of an available agent. In this tutorial, you will eventually learn how to create an API to get an available agent via Auth0 based on their roles. However, we’ll skip this part for now.
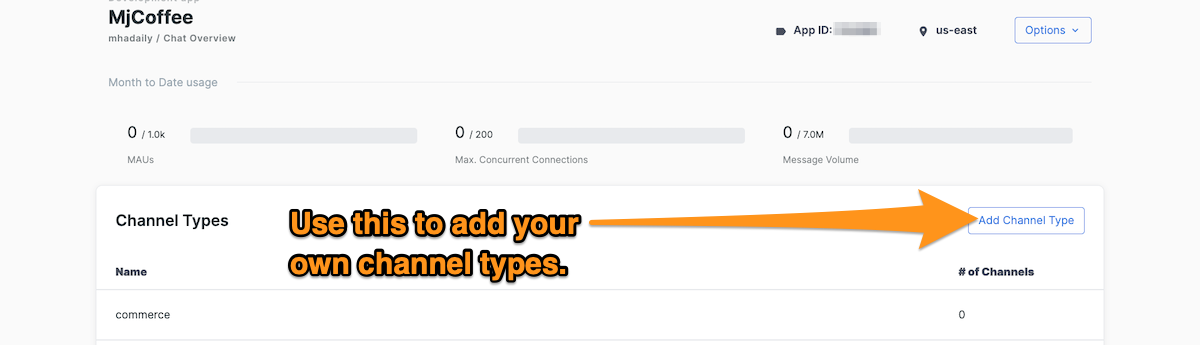
Second, you need to create a channel with a specific type. In this case, the type will be support. Stream provides default types for channels; however, you can define your types as needed. To create a channel type, navigate to the Stream dashboard, go to your app in the Chat overview tab, and add your channel types to the list.
Next, you can pass an existing channel ID to reconnect to a channel or leave it null to create a new channel. Stream will automatically assign an ID to new channels. Since this support chat is private and exclusive to one agent and a current user, you may add IDs to members in the extraData map.
Then, call the watch() method on the channel to create and listen to the events on that channel. The watch() method is a Future and will perform its tasks asynchronously. You can assign the channel ID to the _currentChannelId private instance variable so that you can reconnect to the channel when needed.
Later on, it might be a good idea to store the channel ID in an external database or local secure storage in the app so that it persists between user sessions.
Finally, the method returns the newly created channel.
With the createSupportChat() method implemented, you can now implement the chat UI.
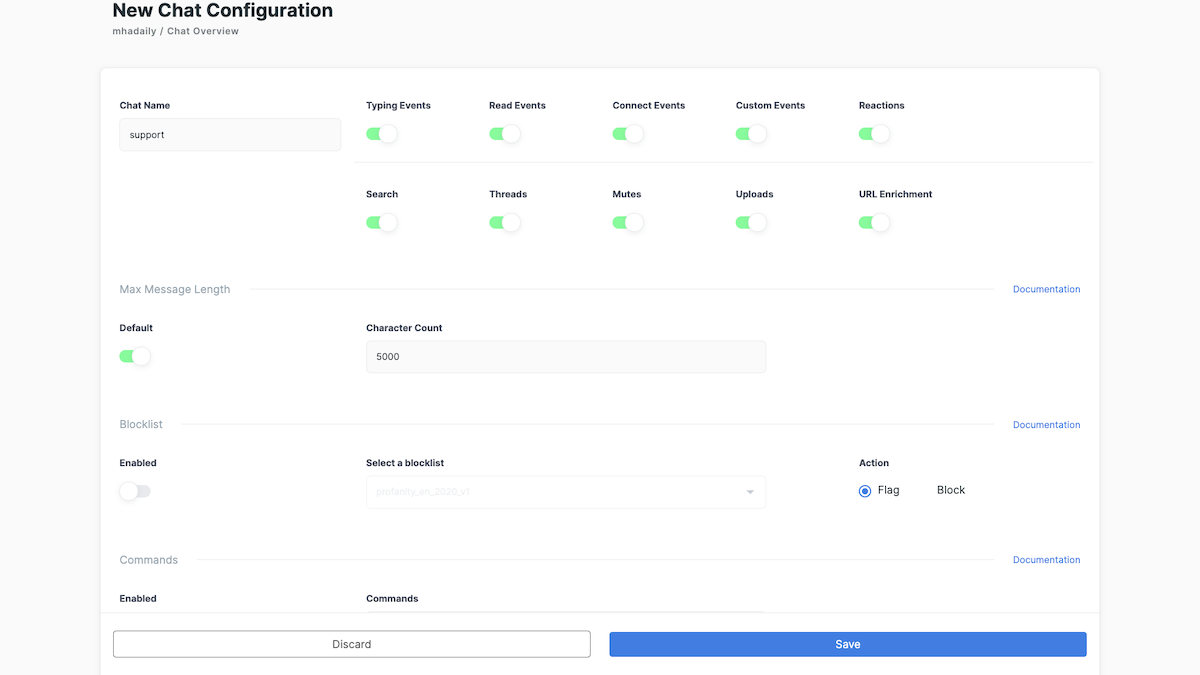
🛠 Open the /lib/screens/support.dart file, where you’ll find the SupportChatScreen class. Update the file’s contents to the following:
// /lib/screens/support.dart
import 'package:flutter/material.dart';
import 'package:flutter/widgets.dart';
class SupportChatScreen extends StatefulWidget {
_SupportChatScreenState createState() => _SupportChatScreenState();
}
class _SupportChatScreenState extends State<SupportChatScreen> {
Auth0User? profile = AuthService.instance.profile;
Channel? channel;
void initState() {
super.initState();
createChannel();
}
createChannel() async {
final _channel = await ChatService.instance.createSupportChat();
setState(() {
channel = _channel;
});
}
Widget build(BuildContext context) {
return channel == null
? Center(
child: Text('You are in the queue!, please wait...'),
)
: Scaffold(
body: SafeArea(
child: StreamChannel(
channel: channel!,
child: Column(
children: <Widget>[
Expanded(
child: MessageListView(),
),
MessageInput(
disableAttachments: true,
sendButtonLocation: SendButtonLocation.inside,
actionsLocation: ActionsLocation.leftInside,
showCommandsButton: true,
),
],
),
),
),
);
}
}Here’s what’s happening in this UI implementation:
- This support chat screen,
SupportChatScreen, is aStatefulWidget. - The
profilevariable is the user profile fromAuthServicethat you created in the previous section. - The
channelvariable is used to detect if a support channel has been created. - The
createChannel()method callsChatService’screateSupportChat()method, which you recently defined. - Once the channel is ready,
setState()is called, which renders the chat UI. - In the
build()method, you can show a message while the channel is being created or return aStreamChannelobject, which provides information about the channel to the widget tree and passes a reference to thechannel. - Typically, a child of
SupportChatScreenshould be aColumnthat includesMessageListView()and is wrapped byExpandedto ensure it takes up all the available space. - You can highly customize
MessageInput()in a number of ways, such as disabling the file attachment or command buttons. You’ll do this later by using Auth0’s permissions and roles to determine which buttons should be enabled or disabled, so stay tuned.
Congratulations — you’ve implemented the support chat screen! Let's move on to the community view.
Implement the Community Screen
It's time to make a screen to allow agents to see all the messages they receive via support. Let's call this screen CommunityScreen.
🛠 Open the /lib/screens/community.dart file, and update the CommunityScreen class within to the following:
// /lib/screens/community.dart
class CommunityScreen extends StatelessWidget {
final userId = ChatService.instance.client.state.user?.id as Object;
Widget build(BuildContext context) {
return Scaffold(
body: ChannelsBloc(
child: ChannelListView(
filter: Filter.in_(
'members',
[userId],// current user is employee (role/permission)
),
sort: [SortOption('last_message_at')],
pagination: PaginationParams(
limit: 30,
),
channelWidget: ChannelPage(),
),
),
);
}
}
class ChannelPage extends StatelessWidget {
Widget build(BuildContext context) {
return Scaffold(
appBar: ChannelHeader(),
body: Column(
children: <Widget>[
Expanded(
child: MessageListView(),
),
MessageInput(),
],
),
);
}
}The logic behind this page is relatively simple. You want to load all channels seen by the current user, an agent in this context, then open each channel to answer its respective customer.
ChannelsBloc manages a list of channels with pagination, re-ordering, querying, and other operations associated with channels together with ChannelListView(). The Bloc is not related to the Bloc package or pattern; this is just a coincidence.
You need to filter all channels by the membership of the current user. If necessary, do custom sorting and pagination too.
Lastly, you need to ensure that the ChannelPage() is also passed to correctly as it makes channels routable. The ChannelPage() is nothing fancy — just a straightforward implementation of what you have done already in SupportScreen.
Perfect! You have created all screens for the app. However, we still need to implement permissions and roles to load each screen and functionalities based on what we can define and receive via Auth0 tokens. But if you are curious, you can simply add another tab to the MenuScreen and load these pages (although you might not see any channels yet).
🛠 In the file /lib/screens/menu.dart, locate final List<Widget> tabs in MenuScreenState and update it to the following:
// /lib/screens/menu.dart

...
  final List<Widget> tabs = [
    MenuList(coffees: coffees),
    SupportChatScreen(),
    ProfileScreen(),
  ];
...
🛠 In the same file, add a new icon to bottomNavigationBar by replacing the items parameter with the following:
// /lib/screens/menu.dart
items: <BottomNavigationBarItem>[
BottomNavigationBarItem(
icon: Icon(Icons.list_alt),
label: "Menu",
),
BottomNavigationBarItem(
icon: Icon(Icons.support),
label: "Support",
),
BottomNavigationBarItem(
icon: Icon(Icons.person),
label: "Profile",
),
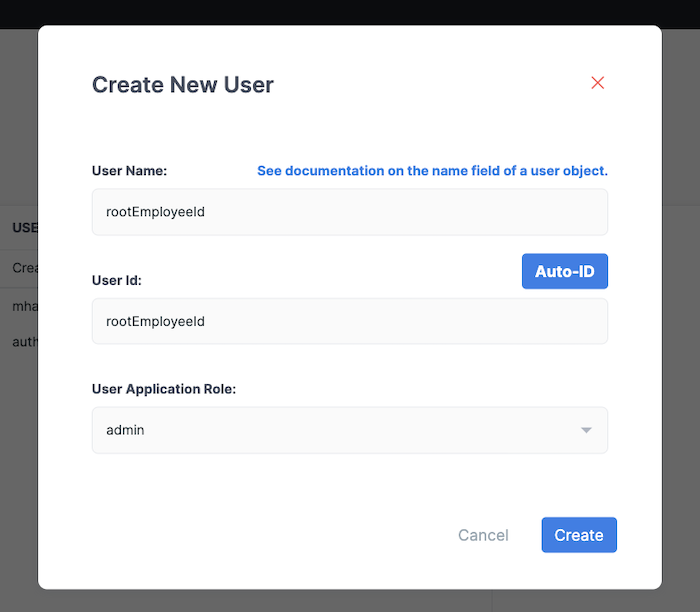
],🛠 Before you can test the chat, you should temporarily add the rootEmployeeId user ID that you defined in createSupportChat in the Stream dashboard.
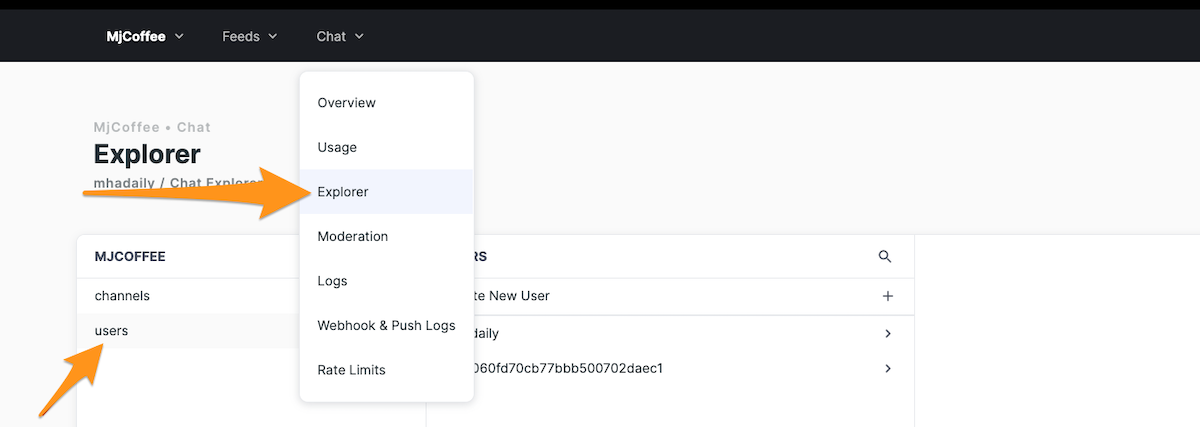
You can skip this step, but it’s still a good idea to have a root support user in case of a specific agent is unavailable. That way, the user with the absent agent can still get support.
🛠 Run your app in the emulator, go to the support chat screen, and try it out!
If you encounter an error regarding an outdated Kotlin version on the Android emulator, open
android/app/build.gradle, and search forext.kotlin_version. Change that line toext.kotlin_version = '1.5.10'.
Auth0 Actions and Generating Stream User Production Tokens
Until now, for each user, you have been using a token generated for the development environment. In order to release your app, the app will have to request production tokens.
As I mentioned earlier, retrieving production tokens is usually done by your backend server. Auth0 can act as this service and retrieve those tokens for you, thanks to a potent tool called Auth0 Actions.
You can use Auth0 Actions to handle your application logic and fit it into a particular flow. They are secure, tenant-specific, versioned functions written in Node.js that execute at specific points when Auth0 is doing its work. This allows you to customize and extend Auth0's capabilities with custom logic. Think of Actions as serverless functions, such as AWS Lambda or Google Cloud Functions.
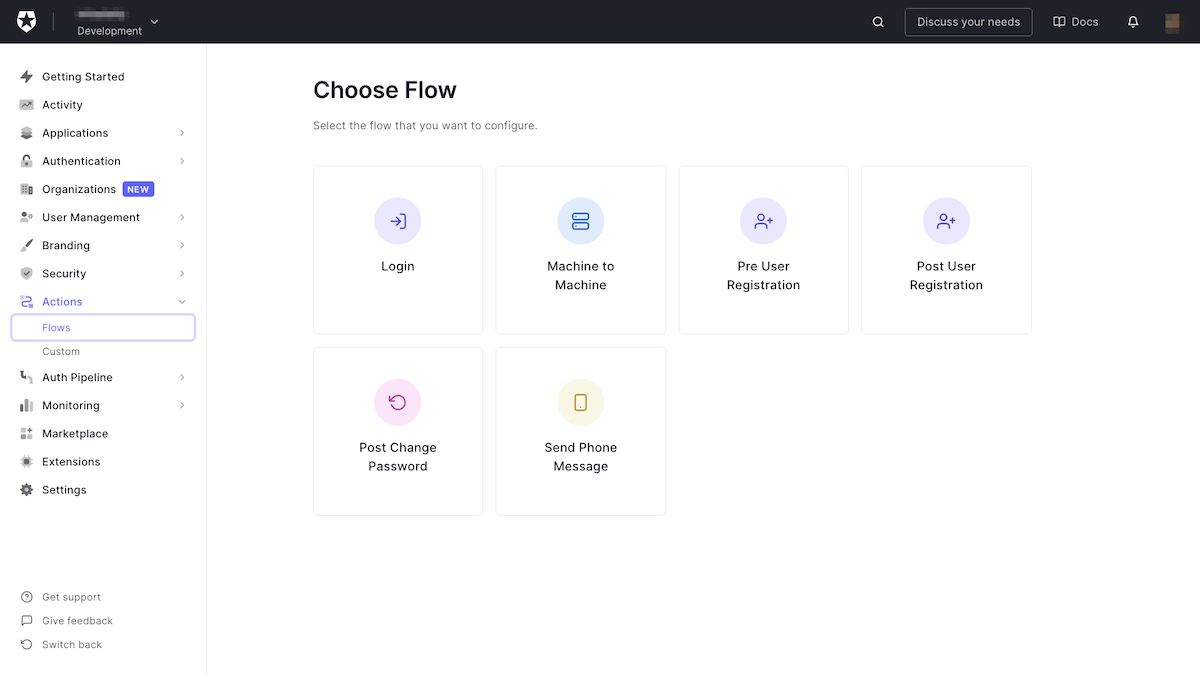
You can determine when and where to execute an Action in the Auth0 runtime environment. Your flows might be:
- Login: Executed after a user logs in and when refresh tokens are issued.
- Machine to Machine: Executed after a user logs in after the Client Credentials hook.
- Pre-User Registration: Executed before a user is added to the database or passwordless connections.
- Post-User Registration: Executed after a user is added to a database or passwordless connections. The execution is asynchronous and will not affect the transaction.
- Post-Change Password: Executed after a password is changed for a database connection user.
- Send Phone Message: Executed when using a custom MFA provider.
You’ve probably already thought of several use cases for each of these scenarios.
Let's create a custom action to exchange Stream production user tokens for users after they logged in and hooked it up to the ID token and user metadata received by the Flutter app.
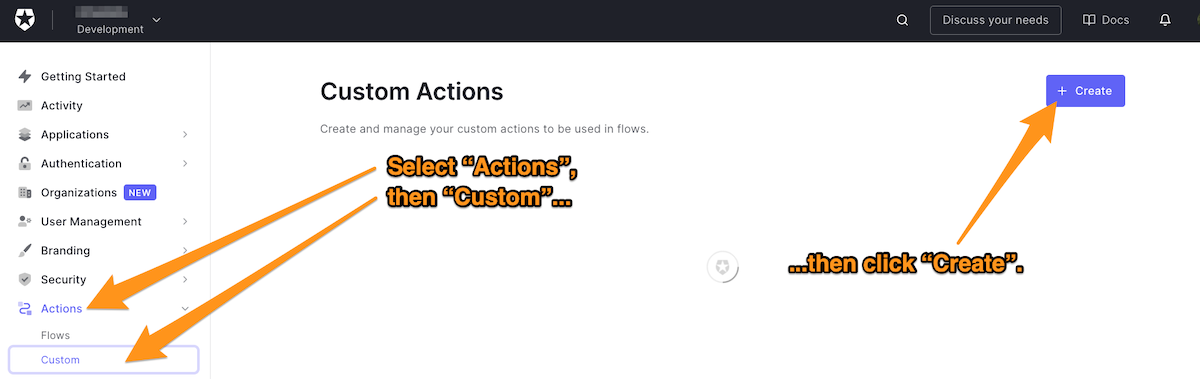
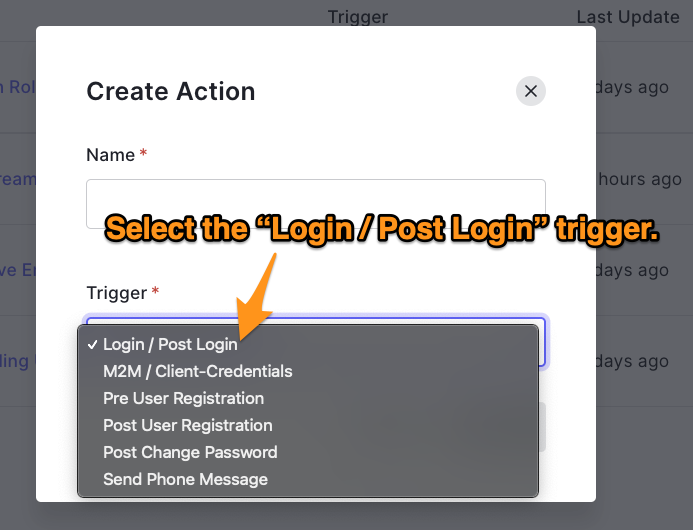
First, you need to create a new action. Go to the Custom Actions menu under Actions in Auth0 Dashboard and hit the "Create" button.
🛠 You should provide a name for the action, select a trigger from the list, and then create it. For the purpose of generating a chat token and attaching it to idToken, select the Login / Post Login trigger, which allows you to use the action in the login flow.
You'll see an editor where you can write your logic. You can run the code, try it out before deploying it, add your secrets to the environment instead of putting it in the application code, and even add almost all public NPM packages!
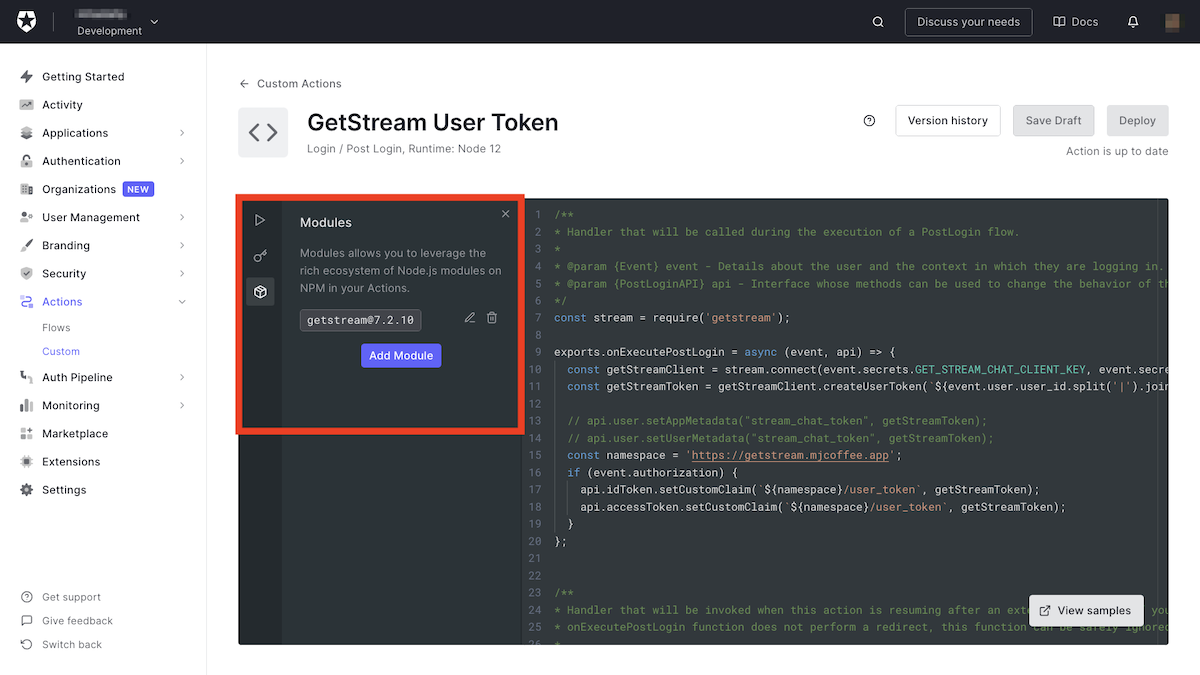
🛠 Start by adding the getstream npm package. At the time of writing, the current version of the package is 7.2.10.
🛠 Go back to the Stream dashboard, copy your secret and client keys...
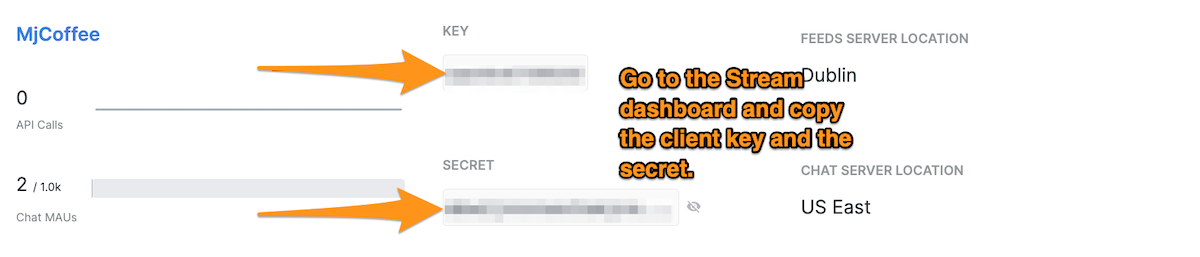
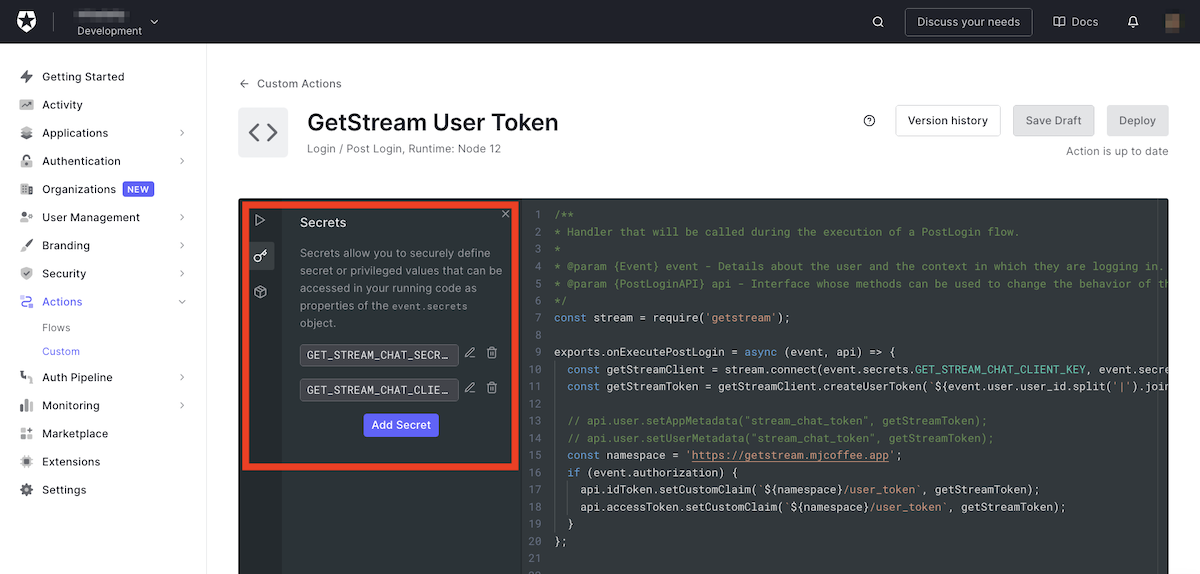
🛠 ...and then add them with the name of GET_STREAM_CHAT_SECRET_KEY and GET_STREAM_CHAT_CLIENT_KEY, respectively, to this function in Auth0.
🛠 Lastly, you can import getStream and connect and create a user token bypassing user_id.
// Javascript

const stream = require('getstream');

exports.onExecutePostLogin = async (event, api) => {
  const getStreamClient = stream.connect(
    event.secrets.GET_STREAM_CHAT_CLIENT_KEY,
    event.secrets.GET_STREAM_CHAT_SECRET_KEY
  );
  const getStreamToken = getStreamClient.createUserToken(
    `${event.user.user_id.split('|').join('')}` // getstream does not support `|` in the ID yet, so we have to omit it.
  );

  // api.user.setAppMetadata("stream_chat_token", getStreamToken);
  // api.user.setUserMetadata("stream_chat_token", getStreamToken);
  const namespace = 'https://getstream.mjcoffee.app';
  if (event.authorization) {
    api.idToken.setCustomClaim(`${namespace}/user_token`, getStreamToken);
    api.accessToken.setCustomClaim(`${namespace}/user_token`, getStreamToken);
  }
};
Let's explore the implementation above.
Once you get the token, you can set a user or app metadata named stream_chat_token with the token value.
Alternately, you can set a custom claim on idToken and accessToken. A custom claim must take the form of a URI, which means that https://getstream.mjcoffee.app/user_token is an acceptable name for a claim, while user_token alone is not.
Important: In Stream, only the characters
athroughz,0through9,@,_, and-are allowed in the user ID. Therefore, we shouldn’t use the|foruser_idin Auth0.
Let's run and test this function before we deploy. Click on the play icon and run with the example event, which is automatically generated for you.
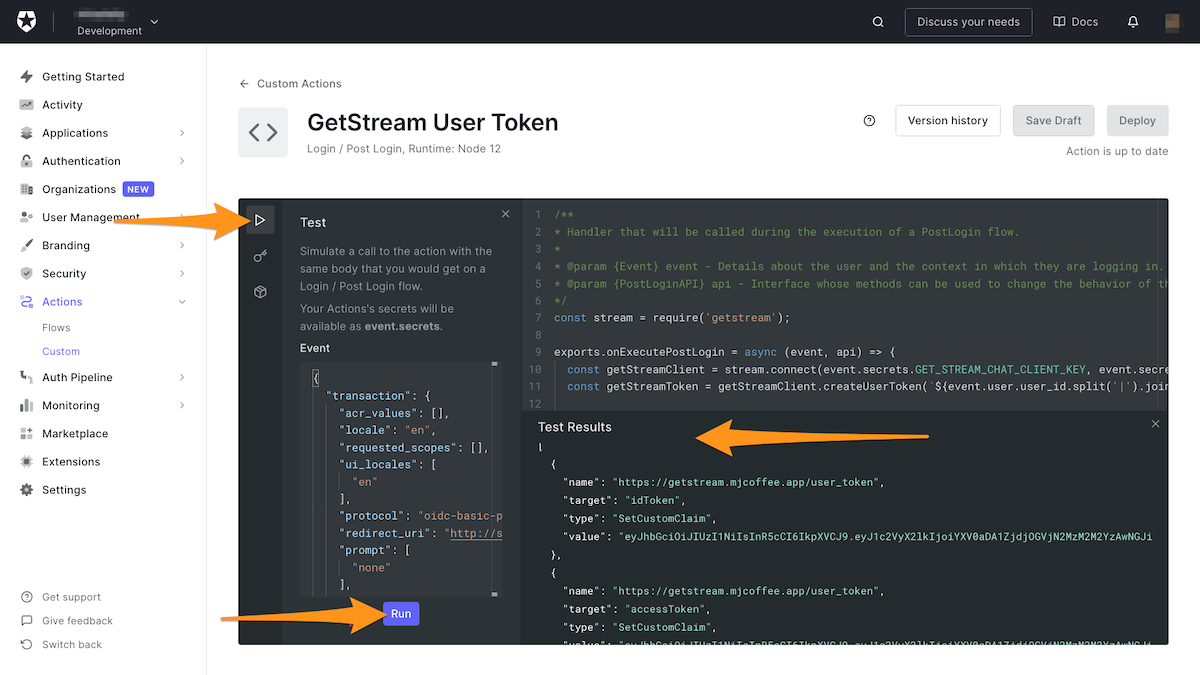
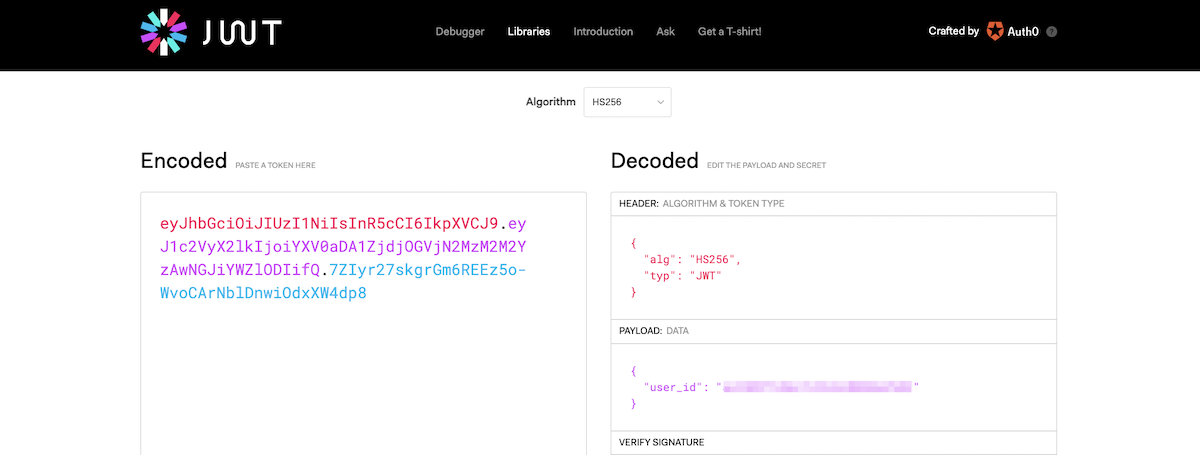
If everything goes well, you’ll get a generated token in JWT format. Its payload will contain user_id, and it will be signed with your secret key by the Stream servers.
Here’s an example of what you’ll get:
// response in Action run

[
  {
    name: 'https://getstream.mjcoffee.app/user_token',
    target: 'idToken',
    type: 'SetCustomClaim',
    value:
      'eyJhbGciOiJIUzI1NiIsInR5cCI6IkpXVCJ9.eyJ1c2VyX2lkIjoiYXV0aDA1ZjdjOGVjN2MzM2M2YzAwNGJiYWZlODIifQ.7ZIyr27skgrGm6REEz5o-WvoCArNblDnwiOdxXW4dp8',
  },
  {
    name: 'https://getstream.mjcoffee.app/user_token',
    target: 'accessToken',
    type: 'SetCustomClaim',
    value:
      'eyJhbGciOiJIUzI1NiIsInR5cCI6IkpXVCJ9.eyJ1c2VyX2lkIjoiYXV0aDA1ZjdjOGVjN2MzM2M2YzAwNGJiYWZlODIifQ.7ZIyr27skgrGm6REEz5o-WvoCArNblDnwiOdxXW4dp8',
  },
];
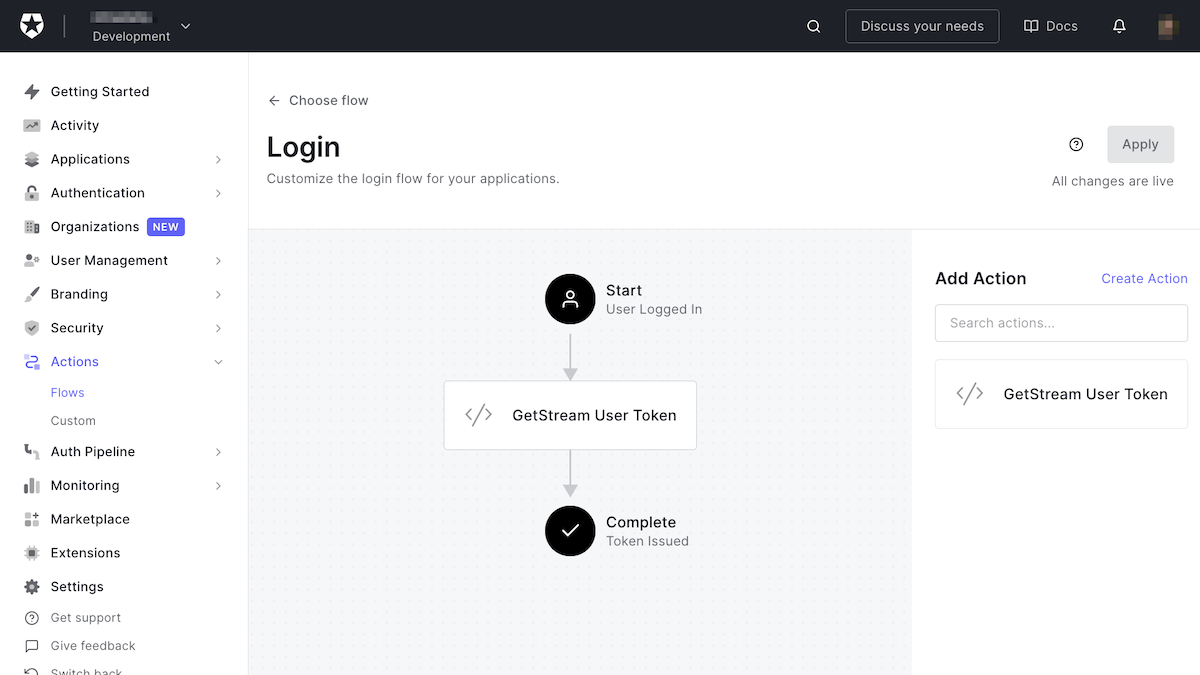
🛠 Next, go back to Flow, select Login, and drag your newly-created custom action to the flow and apply the changes:
For the last step, the Flutter app needs to read this token and add it to the user model. That way, when you connect a user to Stream’s chat, instead of the development tokens you’ve been using, you can replace it with the token that Auth0 received.
🛠 Since it's a custom claim, it will show up in idToken; thus you’ll need to modify your Auth0IdToken model class (located in /lib/models/auth0_id_token.dart)...
// /lib/models/auth0_id_token.dart
()
class Auth0IdToken {
Auth0IdToken({
....
required this.streamChatUserToken,
....
})
....
(name: 'https://getstream.mjcoffee.app/user_token')
final String streamChatUserToken;
....
}🛠 Then do the same with your Auth0User class (located in /lib/models/auth0_user.dart), as it will be part of the user details:
// m/lib/models/auth0_user.dart
()
class Auth0User {
Auth0User({
....
required this.streamChatUserToken,
....
})
....
(name: 'https://getstream.mjcoffee.app/user_token')
final String streamChatUserToken;
....
}🛠 Once you are done, run the build_runner command to generate models again.
flutter pub run build_runner build --delete-conflicting-outputs🛠 Locate connectUser in the ChatService class (located in /lib/services/chat_service.dart) and replace devToken() with the newly-received token on the user object.
// /lib/services/chat_service.dart

await client.connectUser(
  User(
    id: user.id,
    extraData: {
      'image': user.picture,
      'name': user.name,
    },
  ),
  // client.devToken(user.id).rawValue,
    user.streamChatUserToken,
);
Well done! Log out of the app, restart it. and log in again. This time, you'll receive a production-ready user token. When you go to the support chat screen, everything should work as expected.
Looking Ahead
Now that the app has a real-time chat is ready with a proper authentication flow, you can move on to the next section to focus on authorization, roles, and permissions.


