

In the previous section, you learned how to add real-time chat to the application and set up the MJ Coffee app to load different chat screens.
In this section, you will learn how to manage roles and permissions in Auth0 and a Flutter app, as well as how to apply a proper authorization flow. You'll also learn how to leverage RBAC and permission-based functionalities in a Flutter application.
Look for the 🛠 emoji if you’d like to skim through the content while focusing on the build and execution steps.
Managing Roles
In a previous section in this tutorial, you learned how to create roles in the Auth0 dashboard. It’s time to see why you need roles and learn how you can leverage them into your app.
Role-based access control (RBAC) is a way to assign permissions to users based on their roles. It offers a simple approach to access management that is less prone to error than assigning permissions to users individually.
For example, suppose you use RBAC to control Customer/Employee access in the MJ Coffee application. In that case, you could give employees a role that allows them to update users’ details or access the community chat screen. In contrast, customers would view the support screen, but wouldn’t be authorized to perform tasks such as deleting messages or uploading attachments.
When planning your access control strategy, it’s generally a good idea to assign users a smalled number of permissions that allow them to get their work done.
You can leverage Auth0 Actions to assign roles automatically to each user after they sign up.
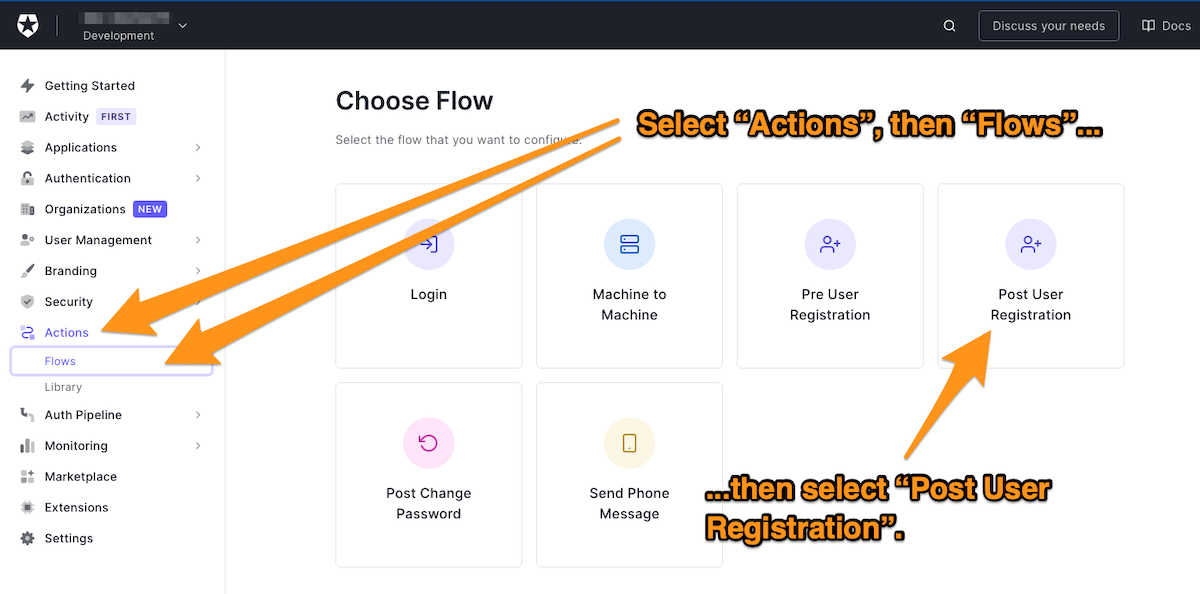
🛠 Once more, create a new custom action. In the left column menu of the Auth0 dashboard, select Actions, then Flows. The Choose Flow page will appear. Select Post User Registration:
🛠 Name the action Assign Role and add the auth0 npm module with version 2.35.1.
🛠 Add the following handler, which will be called during the execution of a PostUserRegistration flow:
// Auth0 Actions
const ManagementClient = require('auth0').ManagementClient;
const AuthenticationClient = require('auth0').AuthenticationClient;
exports.onExecutePostUserRegistration = async (event) => {
const DOMAIN = '{YOUR_DOMAIN}';
const auth0 = new AuthenticationClient({
domain: DOMAIN,
clientId: event.secrets.M2M_CLIENT_ID,
clientSecret: event.secrets.M2M_CLIENT_SECRET,
});
const response = await auth0.clientCredentialsGrant({
audience: `https://${DOMAIN}/api/v2/`,
scope: 'read:users update:users',
});
const API_TOKEN = response.access_token;
const management = new ManagementClient({
domain: DOMAIN,
token: API_TOKEN,
});
if (event.user.email.endsWith('@mjcoffee.app')) {
// employee
await management.assignRolestoUser(
{ id: event.user.user_id },
{ roles: ['rol_CHpJMdZUPCLzo6E2'] }
);
} else {
// customer
await management.assignRolestoUser(
{ id: event.user.user_id },
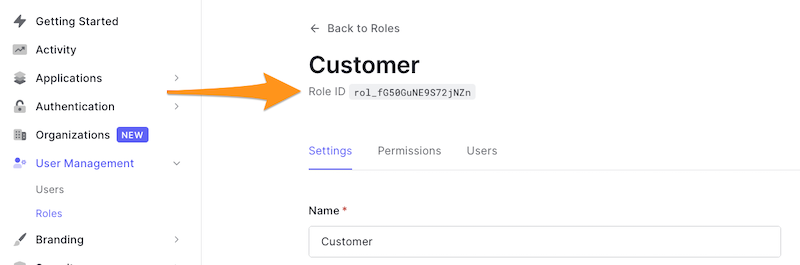
{ roles: ['rol_fG50GuNE9S72jNZn'] }
);
}
};Let's analyze this handler’s logic step by step.
The handler imports both ManagementClient and AuthenticationClient from the auth0 module, a Node.js SDK that conveniently provides official Auth0 public APIs.
It then defines your domain name, DOMAIN.
🛠 In the handler, replace {YOUR_DOMAIN} with your application’s domain, which you’ll find in the Auth0 dashboard.
The handler initializes an authentication client, passing its constructor the application’s domain, client ID, and client secret.
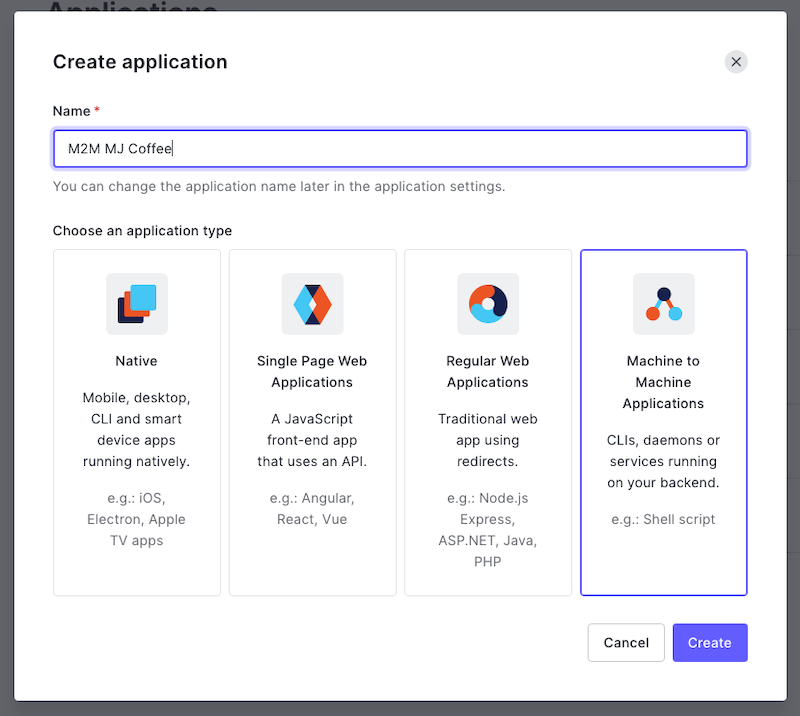
Note that the application client is a bit special here! This is not the application you have created and worked with so far. You need to create a Machine-to-Machine (M2M) application or Auth0 non-interactive client, which makes it possible to request a client credentials grant.
🛠 Open the Auth0 dashboard in a new tab in your browser. Go to the Applications page and creating a new application, selecting the Machine to Machine Applications type:
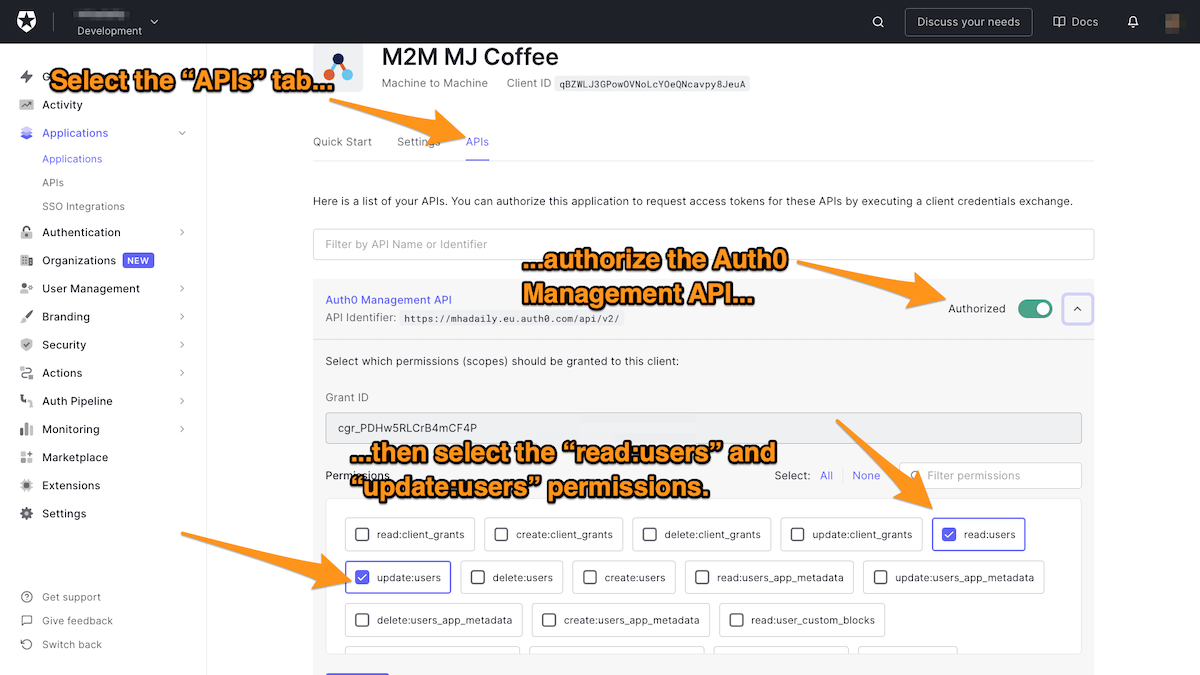
🛠 Once the M2M application is created, take a note of Client ID and Client Secret. You will need to add them to your Actions’ secrets in the next step, then go to the APIs tab and authorize the Auth0 Management API.
As mentioned before, it's always a good idea to limit the permissions. Hence, select only those permissions needed to perform actions with this Client.
🛠 We want to be able to add roles to users, so select the read:users and update:users permissions:
🛠 Add the following to the action:
- The key
M2M_CLIENT_ID, with the client ID as its corresponding value - The key
M2M_CLIENT_SECRET, with the client secret as the value
You can now successfully authenticate an Auth0 client and request a management API token by specifying audiences and scopes. Scopes are the ones that you have selected in the previous steps in the permission tab under Auth0 management API.
Once access is granted and the token is received, you can create a management client.
The logic is relatively simple for this MJ Coffee app.
if (event.user.email.endsWith('@mjcoffee.app')) {
  // employee
} else {
  // customer
}
Simply put, if the user’s email address ends with @mjcoffee.app they will be assigned the employee role; otherwise, they’ll be assigned the customer role. This, of course, could change based on your implementation.
Finally, the handler calls assignRolesToUser() on the management client and passes:
- a map containing the user ID, and
- a list of role IDs.
To get a role’s ID, select User Management in the Auth0 dashboard’s left column menu, then select Roles:
Fantastic! Don’t forget to deploy your function.
🛠 For the last step, go to Flows, then Post User Registration. Add your Assign Role custom action to the flow.
If you are impatient to test what you have created so far, navigate to the Auth0 dashboard’s Users page and create new users with and without email addresses that you have specified in your function logic. Then, go to the Role tab — you should see that for each user, their role was assigned automatically:

Managing Permissions
You’ll often need to create a custom API that defines permissions. Then you can assign those permissions to roles, which can then be assigned to users.
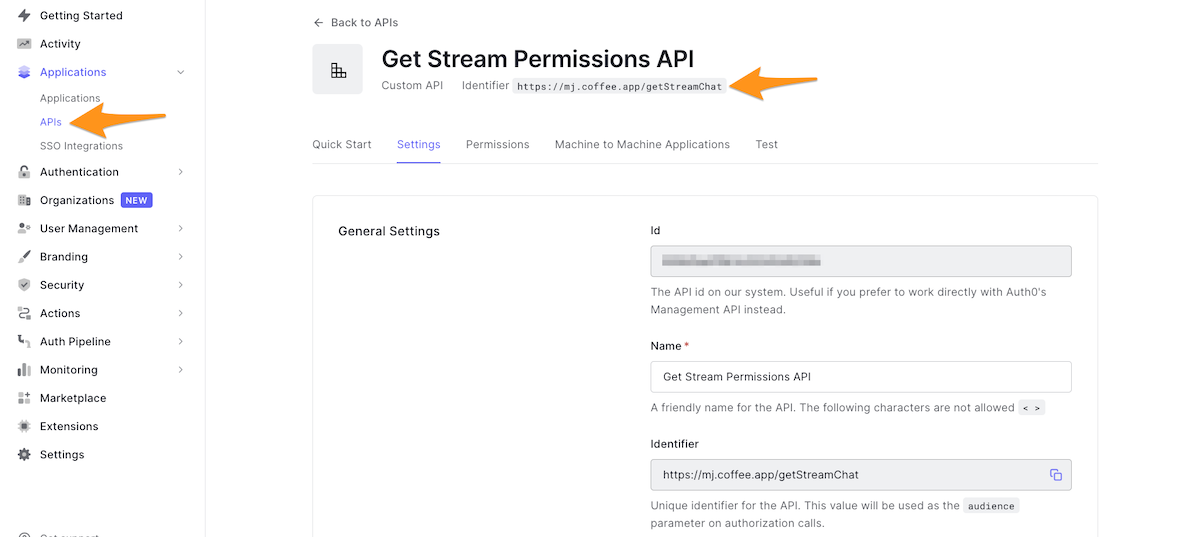
🛠 In the Auth0 dashboard, select Applications in the left column menu, select APIs in the submenu, and then click the Create API button to create a new custom API.
🛠 Give the API a recognizable name, such as StreamChat Management API, then define your identifier. This identifier will become your API audience. Note that the identifier cannot be modified. A good practice for naming identifiers is to use a URL, even if that URL is not publicly available. For example, you could name the identifier https://getStreamChat.mjcoffee.app/v1/.
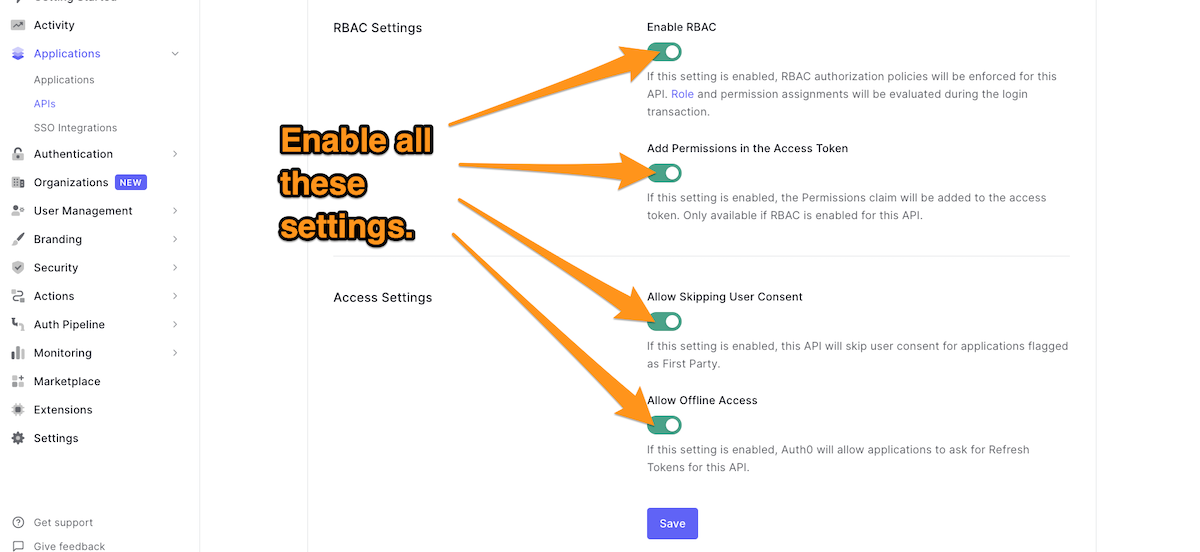
🛠 Once the API is created, go to the RBAC Settings section and enable RBAC and Add Permissions in the Access Token. The API is supposed to be flagged as First Party so that you can turn on Allow Skipping User Consent. Turn on Allow Offline Access so that Auth0 will allow applications to ask for Refresh Tokens for this API.
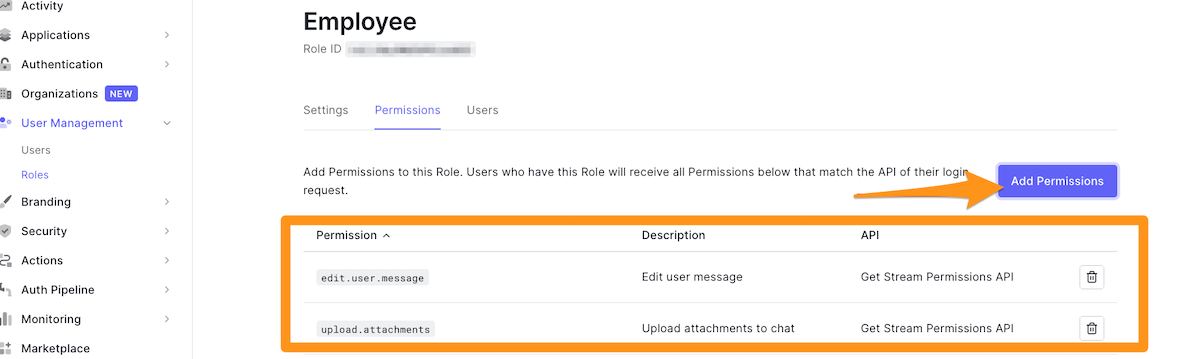
🛠 Navigate to the Permissions tab and add your permissions and description. I recommend at adding at least these permissions:
delete.user.messageedit.user.messageupload.attachments
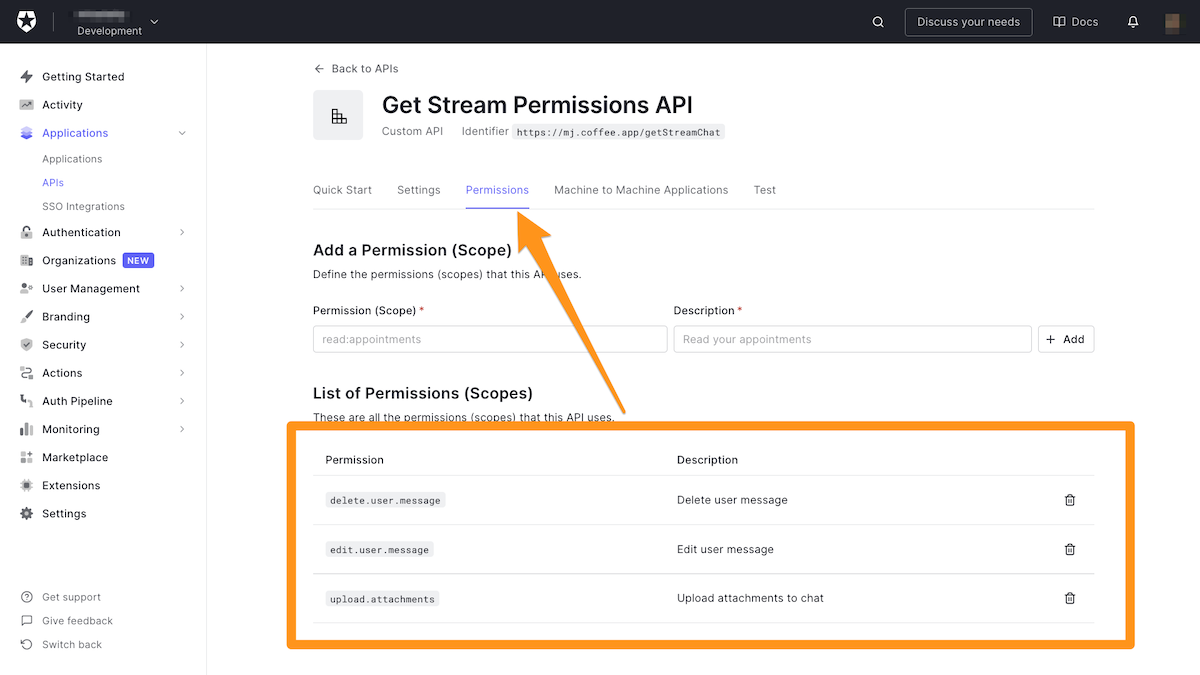
The more permissions you define, and the more explicit they are, the better you can control the resources.
🛠 Next, head over to Roles under User Management. Go to each role and assign the following permissions:
- Employee
edit.user.messageupload.attachments
- Customer
edit.user.message
- Admin
delete.user.messageedit.user.messageupload.attachments
You have managed to create roles and users are automatically assigned roles on registration. Although role assignment is automatic now, you can still alter user roles manually. For example, you can add the Admin role to specific users in the Auth0 dashboard.
The only step remaining is to expose the roles and permissions to idToken and accessToken that the Flutter app can consume.
Exposing Roles and Permission
🛠 This step is pretty similar to what you have done when assigning roles. As a reminder, here are the steps:
- Create a custom action, triggering Login/Post Login
- Name the action “Revealing User Roles & Permissions”
- Add the machine-to-machine application’s client ID and client key to the action’s secrets
- Add
auth0npm package version2.35.1
🛠 Once you’ve done that, follow the code below:
// Auth0 Actions

const ManagementClient = require('auth0').ManagementClient;
const AuthenticationClient = require('auth0').AuthenticationClient;
exports.onExecutePostLogin = async (event, api) => {
  const DOMAIN = 'mhadaily.eu.auth0.com';
  const auth0 = new AuthenticationClient({
    domain: DOMAIN,
    clientId: event.secrets.M2M_CLIENT_ID,
    clientSecret: event.secrets.M2M_CLIENT_SECRET,
  });
  const response = await auth0.clientCredentialsGrant({
    audience: `https://${DOMAIN}/api/v2/`,
    scope: 'read:users update:users read:roles',
  });
  const API_TOKEN = response.access_token;
  const management = new ManagementClient({
    domain: DOMAIN,
    token: API_TOKEN,
  });

  const params = { id: event.user.user_id };
  const roles = await management.getUserRoles(params);
  const permissions = await management.getUserPermissions(params);

  const namespace = 'https://users.mjcoffee.app';
  if (event.authorization) {
    api.idToken.setCustomClaim(`${namespace}/roles`, roles);
    api.accessToken.setCustomClaim(`${namespace}/roles`, roles);
    api.idToken.setCustomClaim(`${namespace}/permissions`, permissions);
    api.accessToken.setCustomClaim(`${namespace}/permissions`, permissions);
  }
};
The code is pretty similar to what you have written once before. The first change is that it adds read:roles to the scope. Make sure you have enabled this permission under the M2M application as you have done once for the read:users update:users permissions; otherwise, you will face an “unauthorized” error.
It then calls getUserRoles() and getUserPermissions(), passing the user ID. These functions will return user roles and permissions respectively.
After defining a namespace, the code calls setCustomClaim() to add both roles and permission custom claims to the ID and access tokens.
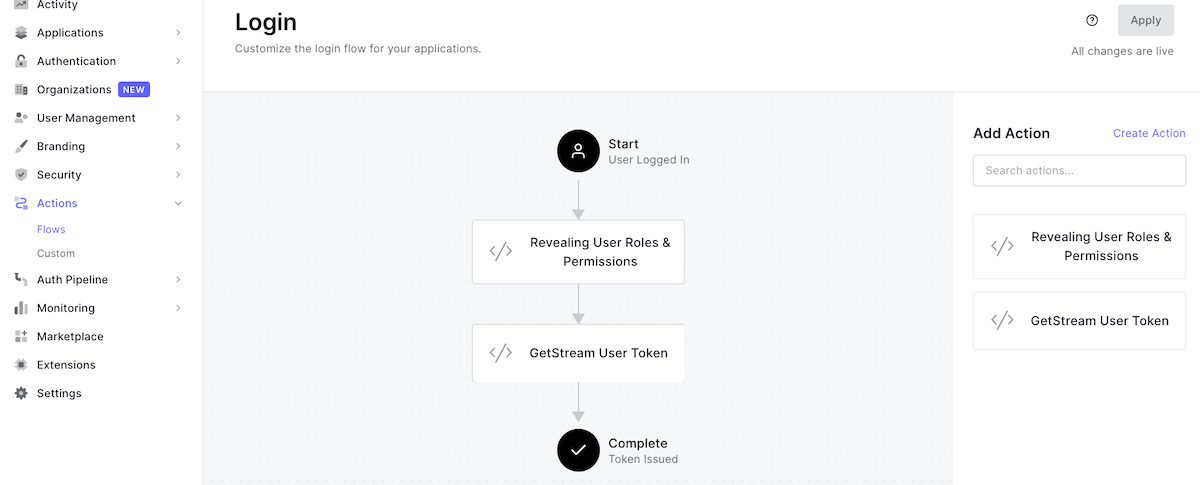
🛠 Make sure you deploy and then navigate to Flows. You want to add the new custom action to the login flow right before the previous action you created earlier:
So far so good, but you still need to go to the Flutter app and add roles and permissions to the models.
Read Roles and Permissions in Flutter
Now that both roles and permissions are available in the ID and access tokens, you can add them to Auth0IdToken and Auth0UserInfo, respectively.
🛠 First, create a file named auth0_roles.dart file in the /lib/models folder:
// /lib/models/auth0_roles.dart
import 'package:json_annotation/json_annotation.dart';
part 'auth0_roles.g.dart';
enum Role {
Employee,
Admin,
Customer,
}
()
class Auth0Role {
Auth0Role({
required this.id,
required this.name,
required this.description,
});
final String id;
final Role name;
final String description;
factory Auth0Role.fromJson(Map<String, dynamic> json) =>
_$Auth0RoleFromJson(json);
Map<String, dynamic> toJson() => _$Auth0RoleToJson(this);
String toString() {
return '''$name''';
}
}🛠 Then create auth0_permissions.dart in the same directory, with the code below:
// /lib/models/auth0_permissions.dart
import 'package:json_annotation/json_annotation.dart';
part 'auth0_permissions.g.dart';
class UserPermissions {
static const String delete = 'delete.user.message';
static const String edit = 'edit.user.message';
static const String upload = 'upload.attachments';
}
()
class Auth0Permission {
Auth0Permission({
required this.permissionName,
required this.description,
required this.resourceServerName,
required this.resourceServerIdentifier,
required this.sources,
});
(name: 'permission_name')
final String permissionName;
final String description;
(name: 'resource_server_name')
final String resourceServerName;
(name: 'resource_server_identifier')
final String resourceServerIdentifier;
final List<Auth0PermissionsSource> sources;
factory Auth0Permission.fromJson(Map<String, dynamic> json) =>
_$Auth0PermissionFromJson(json);
Map<String, dynamic> toJson() => _$Auth0PermissionToJson(this);
String toString() {
return '''$permissionName''';
}
}
()
class Auth0PermissionsSource {
Auth0PermissionsSource({
required this.sourceId,
required this.sourceName,
required this.sourceType,
});
(name: 'source_id')
final String sourceId;
(name: 'source_name')
final String sourceName;
(name: 'source_type')
final String sourceType;
factory Auth0PermissionsSource.fromJson(Map<String, dynamic> json) =>
_$Auth0PermissionsSourceFromJson(json);
Map<String, dynamic> toJson() => _$Auth0PermissionsSourceToJson(this);
String toString() {
return '''
sourceId: $sourceId,
sourceName: $sourceName,
sourceType: $sourceType,
''';
}
}What you want to achieve here is to serialize and deserialize the roles and permissions for each model.
🛠 The next step is to update the Auth0IdToken model:
// /lib/models/auth0_id_token.dart
()
class Auth0IdToken {
Auth0IdToken({
...
required this.roles,
required this.permissions,
...
}}
...
(name: 'https://users.mjcoffee.app/roles')
final List<Auth0Role> roles;
(name: 'https://users.mjcoffee.app/permissions')
final List<Auth0Permission> permissions;
...
}🛠 Do the same for the Auth0User model:
// /lib/models/auth0_user.dart
()
class Auth0User {
Auth0User({
...
required this.permissions,
required this.roles,
...
})
...
(name: 'https://users.mjcoffee.app/roles')
final List<Auth0Role> roles;
(name: 'https://users.mjcoffee.app/permissions')
final List<Auth0Permission> permissions;
...
}🛠 Finally, run the build_runner command to ensure that the models are generated properly:
flutter pub run build_runner build --delete-conflicting-outputsYou can now restart the MJ Coffee app, and everything should work as expected.
Role-Based Screens in Flutter
It’s finally time to have a loading screen based on the user's role. If you remember, we wanted to add Support and Community screens for customers and employees, respectively. You created both screens earlier.
It would be easier to define getter methods in Auth0User to determine whether a user has a particular role or permission.
🛠 Add code to the Auth0User class as shown below:
// /lib/models/auth0_user.dart

class Auth0User {

...

  bool get hasImage => picture.isNotEmpty;
  bool can(String permission) => permissions
      .where(
        (p) => p.permissionName == permission,
      )
      .isNotEmpty;

  get isAdmin => roles.where((role) => role.name == Role.Admin).isNotEmpty;
  get isEmployee =>
      roles.where((role) => role.name == Role.Employee).isNotEmpty;
  get isCustomer =>
      roles.where((role) => role.name == Role.Customer).isNotEmpty;

...

}
These getters are pretty self-explanatory.
🛠 Next, open /lib/screens/menu.dart and locate the tabs list in the _MenuScreenState class:
// /lib/screens/menu.dart

  ...

  final List<Widget> tabs = [
      MenuList(coffees: coffees),
      if (AuthService.instance.profile?.isCustomer)
        SupportChatScreen()
      else
        CommunityScreen(),
      ProfileScreen(),
    ];

  ...
🛠 In the same file, find BottomNavigationBar and add BottomNavigationBarItem to the second position in the list:
// /lib/screens/menu.dart

...

BottomNavigationBar _bottomNavigationBar(Auth0User? user) {
    return BottomNavigationBar(

      ...

      items: <BottomNavigationBarItem>[

        ...

        BottomNavigationBarItem(
          icon: AuthService.instance.profile?.isCustomer
              ? Icon(Icons.support_agent)
              : Icon(Icons.group),
          label: AuthService.instance.profile?.isCustomer
              ? "Support"
              : "Community",
        ),

       ...

      ],

     ...

    );
  }

...
🛠 To make the UI look better, you can add the user's avatar to the appBar so that the complete implementation is as follows:
// /lib/screens/menu.dart
class MenuScreen extends StatefulWidget {
static String routeName = 'menuScreen';
static Route<MenuScreen> route() {
return MaterialPageRoute<MenuScreen>(
settings: RouteSettings(name: routeName),
builder: (BuildContext context) => MenuScreen(),
);
}
_MenuScreenState createState() => _MenuScreenState();
}
class _MenuScreenState extends State<MenuScreen> {
int _selectedIndex = 0;
Auth0User? profile = AuthService.instance.profile;
void initState() {
super.initState();
}
final List<Widget> tabs = [
MenuList(coffees: coffees),
if (AuthService.instance.profile?.isCustomer)
SupportChatScreen()
else
CommunityScreen(),
ProfileScreen(),
];
void _onItemTapped(int index) {
setState(() {
_selectedIndex = index;
});
}
Widget build(BuildContext context) {
return Scaffold(
backgroundColor: Colors.white,
appBar: AppBar(
automaticallyImplyLeading: false,
centerTitle: false,
title: Text("Welcome ${profile?.name}"),
actions: [
_avatar(profile),
],
),
body: tabs[_selectedIndex],
bottomNavigationBar: _bottomNavigationBar(profile),
);
}
BottomNavigationBar _bottomNavigationBar(Auth0User? user) {
return BottomNavigationBar(
backgroundColor: Colors.white,
type: BottomNavigationBarType.fixed,
unselectedItemColor: Colors.brown.shade300,
items: <BottomNavigationBarItem>[
BottomNavigationBarItem(
icon: Icon(Icons.list_alt),
label: "Menu",
),
BottomNavigationBarItem(
icon:
user?.isCustomer ? Icon(Icons.support_agent) : Icon(Icons.group),
label: user?.isCustomer ? "Support" : "Community",
),
BottomNavigationBarItem(
icon: Icon(Icons.person),
label: "Profile",
),
],
currentIndex: _selectedIndex,
selectedItemColor: Colors.brown.shade800,
onTap: _onItemTapped,
);
}
Padding _avatar(Auth0User? profile) {
return Padding(
padding: const EdgeInsets.all(8.0),
child: FittedBox(
fit: BoxFit.cover,
child: ClipRRect(
clipBehavior: Clip.antiAlias,
borderRadius: BorderRadius.all(Radius.circular(600)),
child: Container(
child: _avatarPhoto(profile),
),
),
),
);
}
Widget _avatarPhoto(Auth0User? profile) {
return profile != null && profile.hasImage
? Image.network(
profile.picture,
width: 20,
height: 20,
)
: Container(
width: 20,
height: 20,
color: darkBrown,
child: Center(
child: Text('${profile?.name[0].toUpperCase()}'),
),
);
}
}You can create a new user and assign it the “employee” role so that you can also test the Employee role screen.
Well done! Restart your app, log out, and log in again, and you’ll see the appropriate screen for your role:
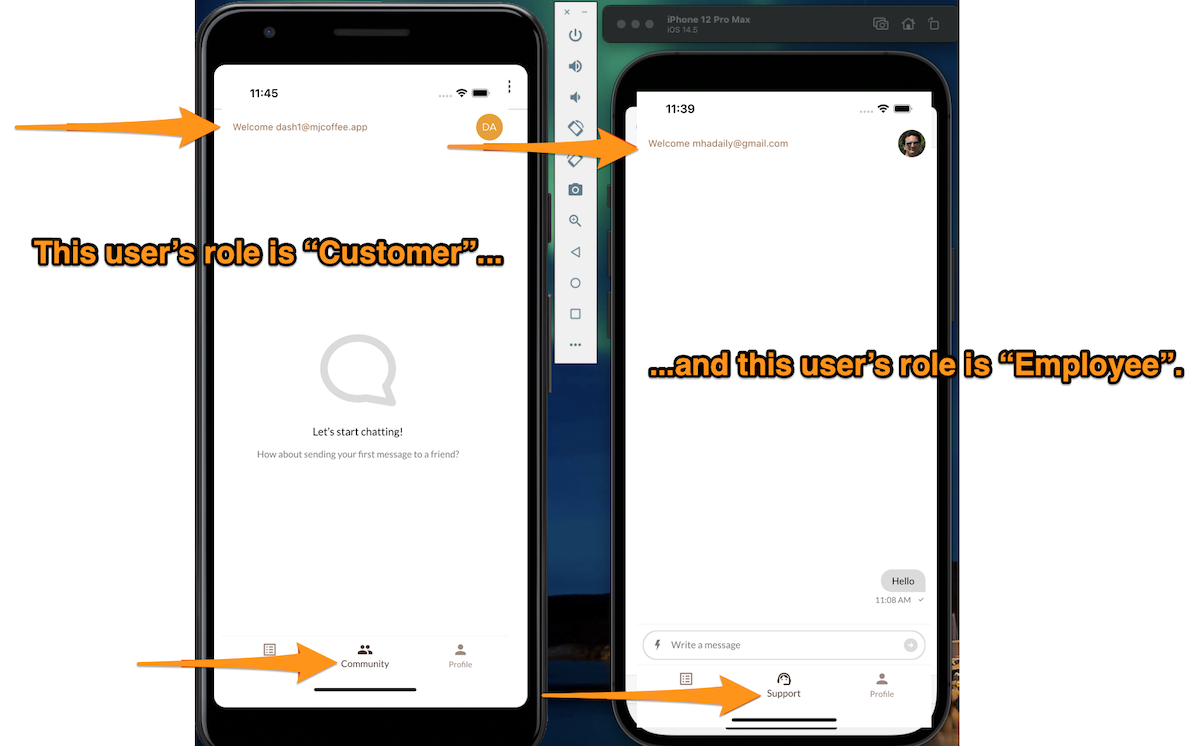
But that's not all! You still need an employee ID to create a private channel between the currently signed-in customer and an employee.
You can define an API that can return available agents to create a channel. However, another strategy that would work for the MJ Coffee app is to retrieve all employees' user IDs via ID tokens’ custom claims and randomly pick one of them.
You can create other custom actions, similar to the previous steps for permissions and roles. I won’t walk you through all steps since you’ve already done it twice.
🛠 Name this action Retrieve Employees User IDs and define its logic as follows:
// Auth0 Action

const ManagementClient = require('auth0').ManagementClient;
const AuthenticationClient = require('auth0').AuthenticationClient;
exports.onExecutePostLogin = async (event, api) => {
  const DOMAIN = 'mhadaily.eu.auth0.com';
  const auth0 = new AuthenticationClient({
    domain: DOMAIN,
    clientId: event.secrets.M2M_CLIENT_ID,
    clientSecret: event.secrets.M2M_CLIENT_SECRET,
  });
  const response = await auth0.clientCredentialsGrant({
    audience: `https://${DOMAIN}/api/v2/`,
    scope: 'read:users read:roles',
  });
  const API_TOKEN = response.access_token;
  const management = new ManagementClient({
    domain: DOMAIN,
    token: API_TOKEN,
  });
  const params = { id: event.secrets.EMPLOYEE_ROLE_ID, per_page: 10, page: 0 };
  const employees = await management.getUsersInRole(params);
  const employee_ids = employees.map((employee) => employee.user_id);
  const namespace = 'https://employees.mjcoffee.app';
  if (event.authorization) {
    api.idToken.setCustomClaim(`${namespace}/id`, employee_ids);
  }
};
Again, you will use ManagementClient to get the first ten users based on their role by calling getUsersInRole() and passing the role ID that EMPLOYEE_ROLE_ID identifies from secrets, then define the namespace and set a custom claim on idToken.
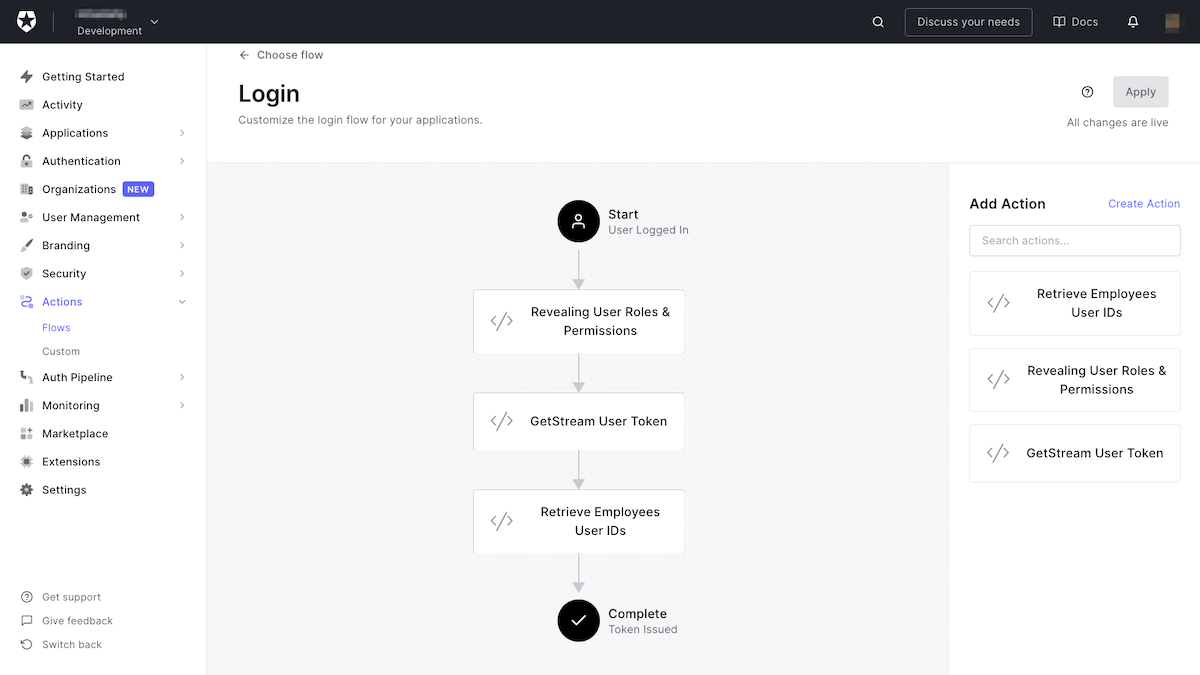
🛠 Lastly, deploy this action and add it to the Login flow right after the GetStream User Token action and apply:
Locate the Auth0IdToken and Auth0User classes in the Flutter app and add a new property, availableAgents, to both of them.
🛠 In Auth0IdToken you should have:
// /lib/models/auth0_id_token.dart
()
class Auth0IdToken {
Auth0IdToken({
...
required this.availableAgents,
...
});
...
(name: 'https://employees.mjcoffee.app/id', defaultValue: [])
final List<String> availableAgents;
...
}🛠 ...and in Auth0User you can do the same:
// /lib/models/auth0_user.dart
()
class Auth0User {
Auth0User({
...
required this.availableAgents,
...
});
...
(name: 'https://employees.mjcoffee.app/id', defaultValue: [])
final List<String> availableAgents;
...
}🛠 Don’t forget to run this:
flutter pub run build_runner build --delete-conflicting-outputs🛠 It's perfectly fine if you decide to make this change only to the user class. Locate createSupportChat in ChatService class. You left the employee ID blank, so now you can refactor this to pick an employee ID randomly:
// /lib/services/chat_service.dart

 String? _currentEmployeeId;

Future<Channel> createSupportChat(List<String> availableAgents) async {
    // skip if the chat is still open with current employeeId
    if (_currentEmployeeId == null) {
      final _random = new Random();
      final randomNumber = 0 + _random.nextInt(availableAgents.length - 0);
      final String employeeId = availableAgents[randomNumber].split('|').join('');
      _currentEmployeeId = employeeId;
    }

    final channel = client.channel(
      'support',
      id: _currentChannelId,
      extraData: {
        'name': 'MJCoffee Support',
        'members': [
          _currentEmployeeId,
          client.state.user!.id,
        ]
      },
    );
    await channel.watch();
    _currentChannelId = channel.id;
    return channel;
  }
Let's examine this code. First, it passes a list of employee IDs to createSupportChat. Then, it makes sure it is storing the current employee ID that has an open support chat in order to avoid recreating a new channel.
Finally, it randomly picks an ID from the list and creates a channel with the current customer.
This solution might not be the best possible one. However, it would work for our small coffee store. Ideally, you would define an API that can return an available employee to a customer on-demand. I may write another article to show you how you can better with other solutions.
🛠 Lastly, locate the createChannel() method in the _SupportChatScreenState class (it’s in the /lib/screens/support.dart file) and refactor it to pass the availableAgents.
// /lib/screens/support.dart

...

createChannel() async {
    if (profile != null) {
      final _channel = await ChatService.instance.createSupportChat(
        profile!.availableAgents,
      );
      setState(() {
        channel = _channel;
      });
    }
  }

  ...
It's very important that you have registered all of your employees’ IDs in Stream chat. Typically, users can log in as employees should log in and everything will work. However, if you still have not registered all of your employees, you might get an error with the message
The following users are specified in channel.members but don't exist. This usually happens if you have created any users before the Login flow and Custom token generation action have been created.
Nicely done! You can restart your app, and this time you can see the support channel screen.
Permission-Based Functionalities
After applying roles to have specific kinds of access in the app, you can go one step deeper and use functionalities based on the user's permission inherited from the role.
You have already defined the can method on Auth0User in the previous section. The purpose of this method is to check if the user has given permission. Let's use it.
🛠 Locate MessageInput in the support.dart file, and you can replace it with
// /lib/screens/support.dart

...

MessageInput(
  disableAttachments: !profile!.can(UserPermissions.upload),
  sendButtonLocation: SendButtonLocation.inside,
  actionsLocation: ActionsLocation.leftInside,
  showCommandsButton: !profile?.isCustomer,
),

...
In the implementation above, disableAttachments is enabled based on the user's permission, or showCommandsButton is active only for the Customer role.
Another approach you can take is to limit the delete message functionality and apply UserPermissions.delete to remove the applicable UI.
Moreover, you may want to apply for these permissions on your back-end or API to perform. I will leave this part as homework.
Closing a Support Chat Channel
For the last section of this tutorial, I'd like to show you how to close a support channel chat.
🛠 First, you need to create a method for the ChatService class to send the command to close a channel.
// /lib/services/chat_service.dart

...

Future<void> archiveSupportChat() async {
   await client.hideChannel(
      _currentChannelId!,
      'support',
      clearHistory: true,
    );
  client.channel('support', id: _currentChannelId).dispose();
  _currentChannelId = null;
  _currentEmployeeId = null;
}

...
In this implementation, you can hide a chat with an existing ID and the type support and finally, set both _currentChannelId and _currentEmployeeId to null so that next time users come to a support screen, they’ll see a new channel created, and it will connect them to another employee.
Hiding a channel makes it invisible to the query channels. It can be retrieved if the user adds a new message to it or calls the
show()method to remove the hidden status.
However, there are other possibilities. For example, you can archive or delete a channel. At the moment, archive is not exposed to the Stream Dart SDK. Therefore, for now, you can hide a channel.
🛠 Next, locate MessageInput in the support.dart file, and add actions.
// /lib/screens/support.dart
{

...

MessageInput(
  actions: [_closeChat()],
  disableAttachments: !profile!.can(UserPermissions.upload),
  sendButtonLocation: SendButtonLocation.inside,
  actionsLocation: ActionsLocation.leftInside,
  showCommandsButton: !profile?.isCustomer,
),

...

  /// method in the class
  CommonButton _closeChat() {
    return CommonButton(
      onPressed: () {
        ChatService.instance.archiveSupportChat();
        CoffeeRouter.instance.push(MenuScreen.route());
      },
      child: Icon(
        Icons.close,
        color: Colors.white,
      ),
    );
  }
}
The actions parameter adds a list of additional actions to the GetStream chat input UI. You can call the archiveSupportChat method OnPressed() and hide the chat, and redirect the user to the menu screen to show a proper message that the discussion is closed. They can reopen by returning to the support screen.
 Want to take your Authorization to the next level? → fga.dev
Conclusion
Authentication and authorization are complex but necessary features of most applications, and they can be tricky to implement and manage. Auth0 provides a reliable service that takes on these tasks. You can this service in Flutter applications without having to set up a server or maintain infrastructure. You can also make use of serverless tools such as Auth0 Actions, which you can use to add sophistication to your authentication and authorization process.
You have seen how you can speed up your development by adding a support chat using GetStreamChat to a Flutter application. You’ve also seen how you can limit the functionality available to users by leveraging roles and permissions received from Auth0 via tokens.
Congratulations! You’ve come a long way over this tutorial’s four parts, and I hope that you have learned a lot. This is just the beginning — you can still implement and configure a lot, using both Stream and Auth0, and take your apps to the next level.


