Build and deploy a Serverless Spring Boot Web Application with AWS Lambda
This is a tutorial about creating a basic AWS Lambda function in Java using the Spring framework and requires you to have an active AWS account. If you don’t, go ahead and create one.
Lambda is the serverless compute service provided by the AWS cloud hyperscalar to minimize server configuration and administration efforts. It is a FAAS(Function as a service) offered by AWS, and it is the best way to optimize costs as we will be billed based on the time taken by the function to run and the compute & memory used during the runtime.
This tutorial has two main steps for better understanding.
Step 1 – Creating the Spring Boot application
Firstly, add the following maven dependencies into the pom.xml file to enable AWS lambda.
<dependencies>
        <dependency>
            <groupId>org.springframework.boot</groupId>
            <artifactId>spring-boot-starter-web</artifactId>
        </dependency>
        <dependency>
            <groupId>org.springframework.cloud</groupId>
            <artifactId>spring-cloud-function-adapter-aws</artifactId>
        </dependency>
        <dependency>
            <groupId>com.amazonaws</groupId>
            <artifactId>aws-lambda-java-events</artifactId>
            <version>2.0.2</version>
        </dependency>
        <dependency>
            <groupId>com.amazonaws</groupId>
            <artifactId>aws-lambda-java-core</artifactId>
            <version>1.1.0</version>
        </dependency>
        <dependency>
            <groupId>org.springframework.boot</groupId>
            <artifactId>spring-boot-starter-test</artifactId>
            <scope>test</scope>
            <exclusions>
                <exclusion>
                    <groupId>org.junit.vintage</groupId>
                    <artifactId>junit-vintage-engine</artifactId>
                </exclusion>
            </exclusions>
        </dependency>
    </dependencies>
We also require the maven shade plugin to build a shaded jar for the Spring boot application that we shall build.
<build>
    <plugins>
        <plugin>
            <groupId>org.apache.maven.plugins</groupId>
            <artifactId>maven-shade-plugin</artifactId>
            <version>3.2.4</version>
            <configuration>
                <createDependencyReducedPom>false</createDependencyReducedPom>
            </configuration>
            <executions>
                <execution>
                    <phase>package</phase>
                    <goals>
                        <goal>shade</goal>
                    </goals>
                </execution>
            </executions>
        </plugin>
    </plugins>
</build>
Create the file AWSLambdaDemoApplication.java and paste the below code into it.
AWSLambdaDemoApplication.java
package com.appsdeveloperblog.aws.lambda;

import org.springframework.boot.SpringApplication;
import org.springframework.boot.autoconfigure.SpringBootApplication;

@SpringBootApplication
public class AWSLambdaDemoApplication {
    public static void main(String[] args) {
        SpringApplication.run(AWSLambdaDemoApplication.class, args);
    }
}
Now, the next step is to create a handler function that will be used by AWS Lambda to invoke functions in the Spring Boot application.
Create a ServiceHandler class that implements the RequestHandler interface from the package com.amazonaws.services.lambda.runtime
ServiceHandle.java
package com.appsdeveloperblog.aws.lambda;
import com.amazonaws.services.lambda.runtime.Context;
import com.amazonaws.services.lambda.runtime.RequestHandler;

public class ServiceHandler implements RequestHandler<String, Object> {

    @Override
    public Object handleRequest(String s, Context context) {
        context.getLogger().log("Input: " + s);
        return "Lambda Function is invoked...." + s;
    }
}
Build the jar file by running the maven install command
That’s it! The first step is complete, and the next step is to use this jar to create a lambda function.
Step 2 – Using the jar file to create the Lambda function
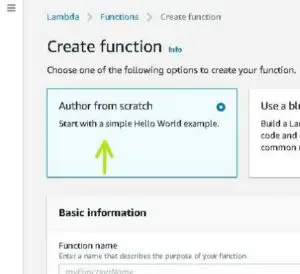
Next, log in to the AWS Management Console and click on ‘Lambda’ under the compute services. Click on Crete Function.
Choose the Author from Scratch option and provide basic information like Function name and Runtime (Java8 in this case).
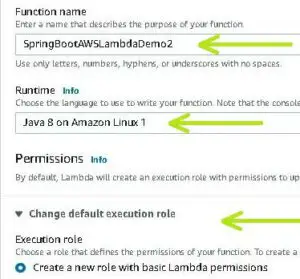
Leave the ‘Change the default execution role’ as is to create a new role. You can also use an existing IAM Role if you have already created one.
You can also add the network details like the VPC id if you wish to deploy the function in a particular network in the ‘Advanced Settings’ option.
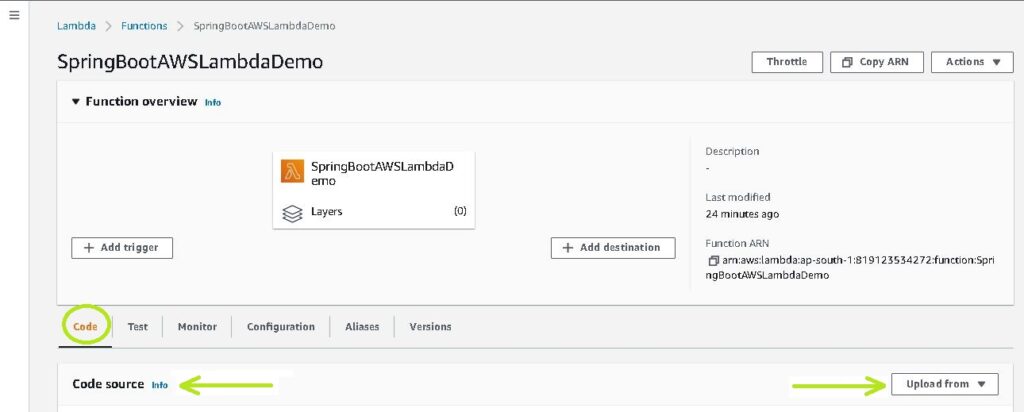
Click on create function.
Under the Code tab, in Code Source, click on ‘Upload from.’ Select the ‘.zip or .jar’ and upload the jar file that we have previously generated.
In the Runtime Settings, click Edit to modify the Handler details. Here, the path of the Handler class is com.appsdeveloperblog.aws.lambda.ServiceHandler. Enter the same and click on Save.
The final step is to test the Lambda function that we have just deployed.
Under the Test Tab, create a New Event by selecting the template as Hello World. Give a name to the test event and an empty string as the input to the handler. Click on Test, and you can now see that the Lambda function is invoked.
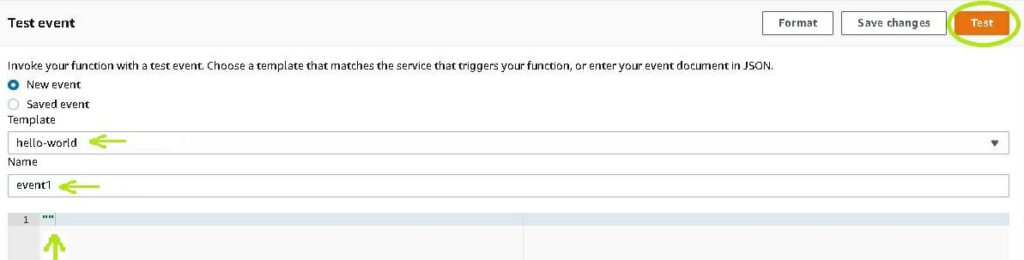
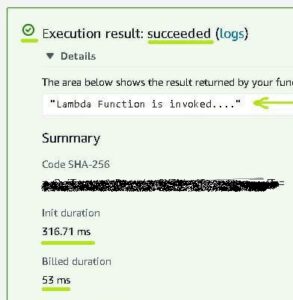
You can also see the billed duration in the details.