


If you’re planning to build a native Android app that requires users to log in, you should use Auth0.
Implementing user login/logout often turns into its own project. Just implementing the many ways users want to log in can easily take a lot of time. You’d also have to deal with issues such as user management, scaling, and security, each of which could have its own article.
With Auth0 and a few lines of code, your app can have a full-featured system that supports logging in with a basic username/password combination, single sign-on and social accounts, passwordless login, biometrics, and more. You won’t have to handle the “behind the scenes” issues, either!
This tutorial covers the basics of using Auth0 to implement login/logout in an Android app written in Kotlin. It also provides an introduction to reading and writing information into user profiles so that your app can customize itself for each user. Along the way, you’ll become familiar with the Auth0 dashboard and learn how to use it to register applications and users.
Look for the 🛠 emoji if you’d like to skim through the content while focusing on the build and execution steps.
What you’ll build
You’ll build a simple, single-screen Android app that will allow the user to log in and log out using Auth0. While logged in, the user will be able to see the following information from their user profile, namely:
- Information that is part and parcel of the user account, namely:
- The user’s name
- The user’s email address
- Metadata attached to the user account, namely:
- The user’s country
The user will also be able to edit their country, and the result of that edit will be stored in the user account.
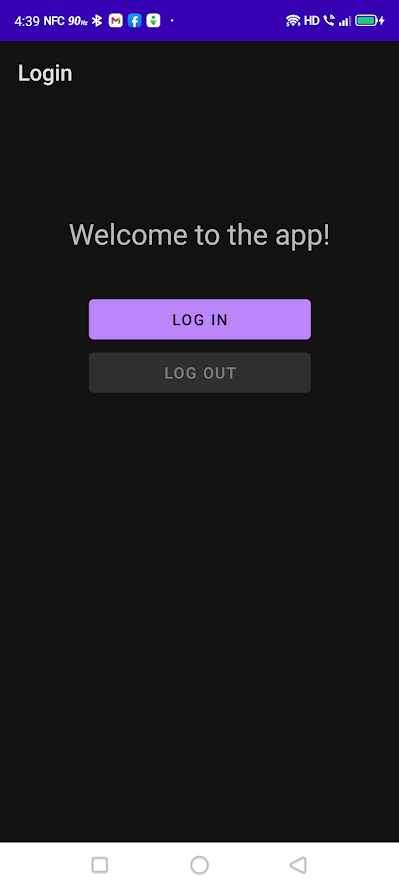
When you launch the completed app, you’ll see a greeting, a Log in button, and a disabled Log out button:
Tapping the Log in button takes the user to the login screen, which appears in a custom Chrome tab:
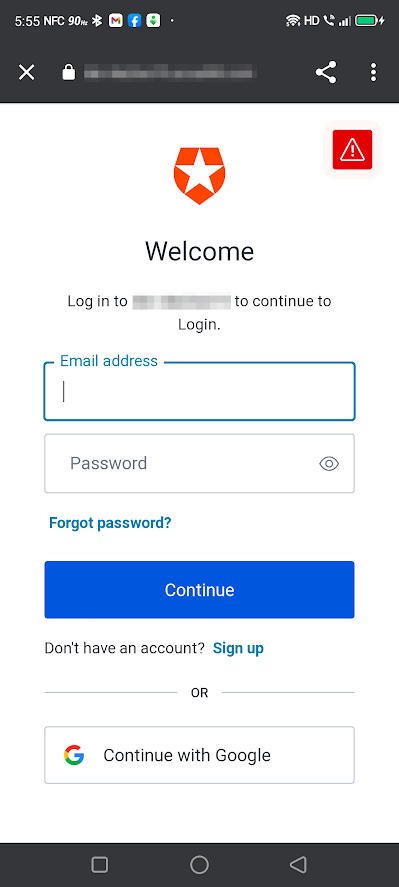
When you use Auth0 in your apps, you delegate authentication to a centralized login page in the same way that Google properties such as Gmail and YouTube redirect you to accounts.google.com when you log in. In this exercise, you’ll use the default “look and feel” for the login page, but you can customize it to match your app or organization’s branding.
Logging in successfully returns you to the app, where you’ll see the following changes:

- The greeting will have changed to a notification telling you that you’re now logged into the app.
- The Log in button will now be disabled, and the Log out button will now be enabled.
- The name and email address for the user account that you used to log in will be displayed.
- There will now be a section for metadata, complete with an editable text box (an
EditTextin Android parlance) and Get and Set buttons that will allow you to read and write to thecountryfield of the metadata for the user account.
As you might expect, logging out is done by tapping the Log out button. Once logged out, you see the following changes onscreen:
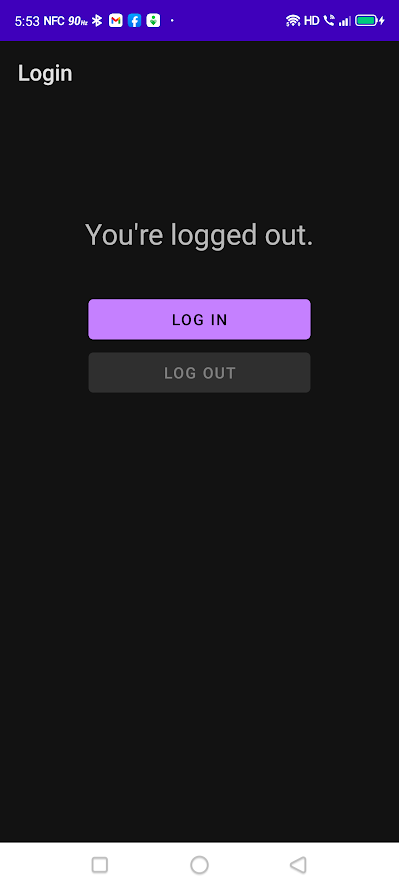
- The notification at the top of the screen will now inform you that you’re logged out of the app.
- Logging out enables the Log in button and disables the Log out button.
- The other controls that were visible when you were logged in will no longer be visible.
Prerequisites
You’ll need the following for this coding exercise:
What you’ll need
- An Android development setup. Make sure you have the following, in the order given below:
- Java SE Developer Kit (JDK), version 11 or later. You can find out which version is on your computer by opening a command-line interface and entering
java --version. - Android Studio, version 3.6 (February 2020) or later. I used the current stable version of Android Studio when writing this article: version 2020.3.1, also known as “Arctic Fox”.
- At least one Android SDK (Software Development Kit) platform. You can confirm that you have one (and install one if you don’t) in Android Studio. Open Tools → SDK Manager. You’ll see a list of Android SDK platforms. Make sure that the current SDK (Android 11.0 (R) at the time of writing) is checked; if it isn’t, check it, click the Apply button, and click the OK button in the confirmation dialog that appears. Wait for the SDK platform to install and click the Finish button when installation is complete.
- Java SE Developer Kit (JDK), version 11 or later. You can find out which version is on your computer by opening a command-line interface and entering
- An Android device, real or virtual:
- Using a real device: Connect the device to your computer with a USB cable. Make sure that your device has Developer Options and USB debugging enabled.
- Using a virtual device: Using Android Studio, you can build a virtual device (emulator) that runs on your computer. Here’s my recipe for a virtual device that simulates a current-model inexpensive Android phone:
- Open Tools → AVD Manager (AVD is short for “Android Virtual Device”). The Your Virtual Devices window will appear. Click the Create Virtual Device... button.
- The Select Hardware window will appear. In the Phone category, select Pixel 3a and click the Next button.
- The System Image window will appear, and you’ll see a list of Android versions. Select R (API 30, also known as Android 11.0). If you see a Download link beside R, click it, wait for the OS to download, then click the Finish button. Then click the Next button.
- The Android Virtual Device (AVD) window will appear. The AVD Name field should contain Pixel 3a API 30, the two rows below it should have the titles Pixel 3a and R, and in the Startup orientation section, Portrait should be selected. Click the Finish button.
- You will be back at the Your Virtual Devices window. The list will now contain Pixel 3a API 30, and that device will be available to you when you run the app.
- An Auth0 account. You can sign up for a free one now, or later on in the article.
What might be useful
- A little familiarity with Android development. If you’re new to Android development or the Kotlin programming language, you might find Android Developers’ site, Android Basics in Kotlin, a good introduction.
Set Up the Project on Android Studio
🛠 Open Android Studio. Close any open project windows, which will cause the Welcome to Android Studio window to appear. Create a new project by clicking the New project button:

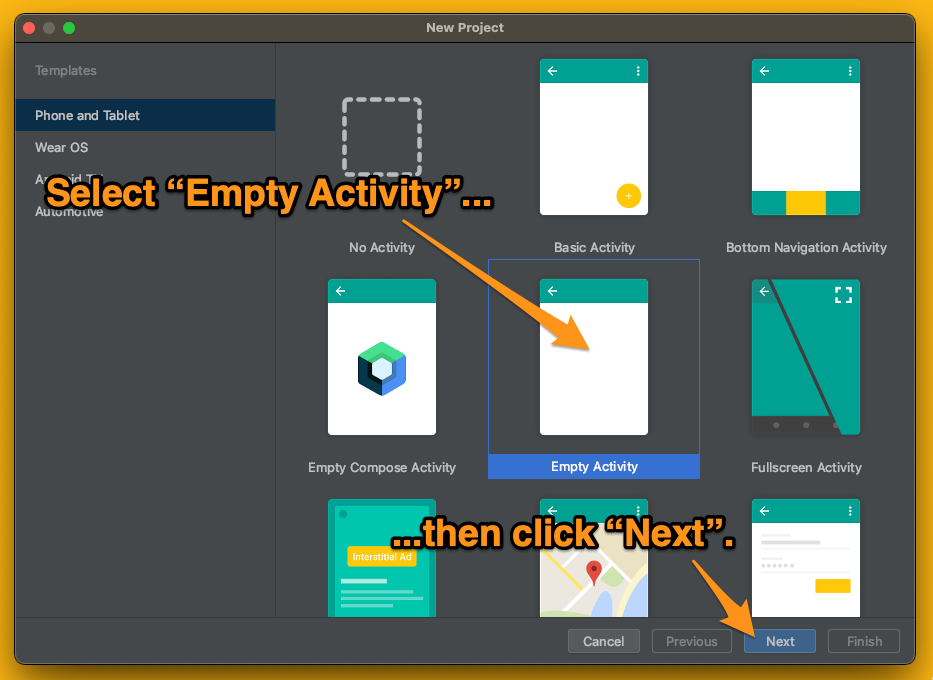
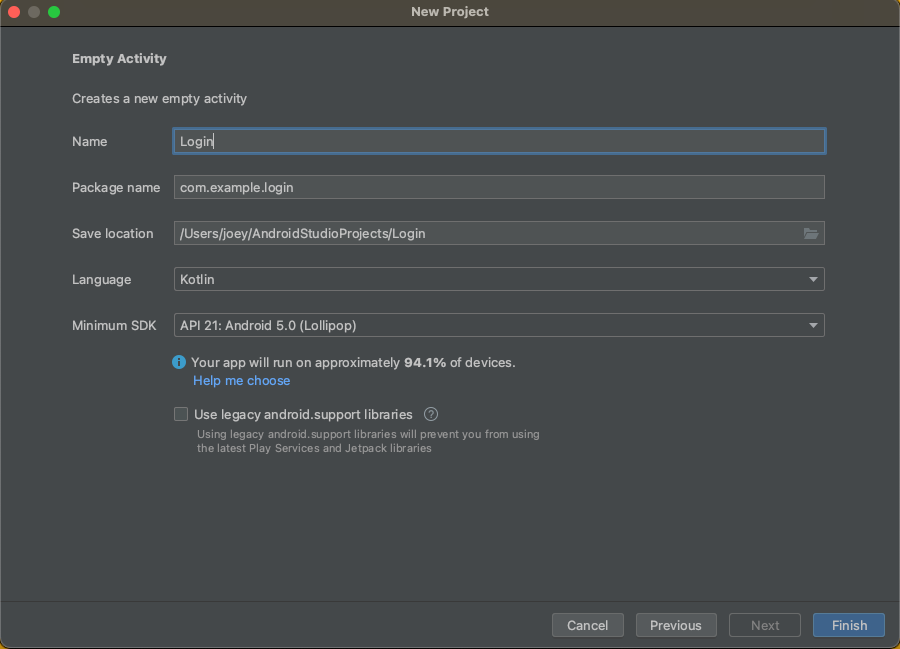
🛠 Make sure that Phone and Tablet is selected in the menu of the left side of the window that appears, then select Empty Activity from the selection of templates. Click the Next button:
🛠 In the next window, enter a name for the app, such as Login. Make a note of the value that Android Studio generates in the Package Name field — you’ll need it when registering the app with Auth0.
If you used Login as the name for the app, Android Studio will automatically generate the package name com.example.login.
🛠 Ensure that the selected Language is Kotlin and that the Minimum SDK is set to API 21: Android 5.0 (Lollipop) or later.
API 21, which dates back to November 2014, is the oldest version of Android supported by Auth0. By targeting API 21 or later, you can write an app that will run on almost 95% of the active Android devices that are connected to the Play Store.
🛠 Click the Finish button. Android Studio will spend a few moments setting up your project.
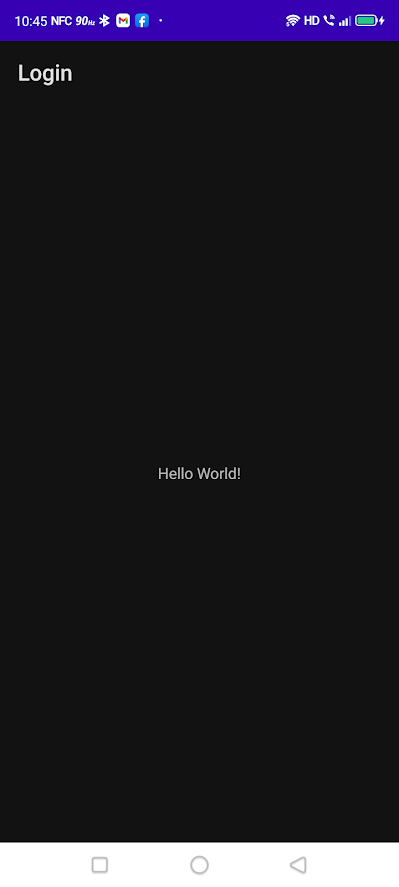
🛠 Once Android Studio has finished setting up the project, run the app to confirm that it works. You should see the default “Hello, World!” app:
With the app project set up on Android Studio, it’s time to turn your attention to the Auth0 side.
Register the App with Auth0
To continue beyond this point, you’ll need an Auth0 account. That’s because your app will delegate the heavy lifting of the login/logout process to Auth0 so that you can focus your effort, energy, and time on what your app actually does, instead of worrying about authenticating users and all the edges cases that come with it.
If you already have an Auth0 account...
🛠 ...log in, skip the next section, and proceed to the part titled Register your app with Auth0.
If you don’t have an Auth0 account yet...
🛠 ...go ahead and sign up for one! It’s free, and we’ve taken great care to make the process as painless as possible.
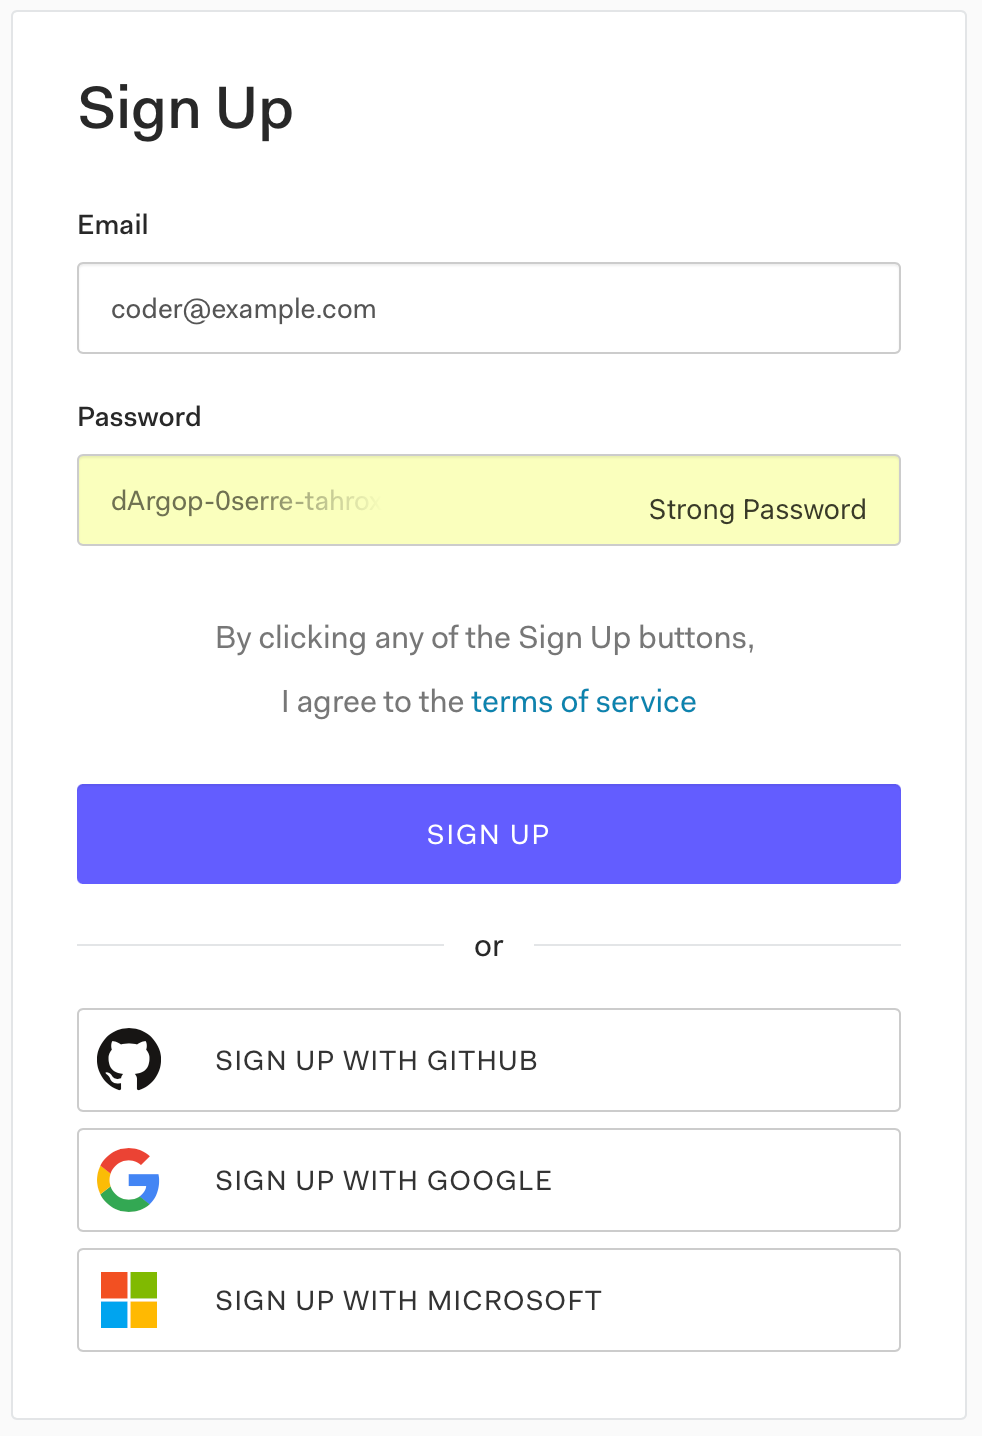
Auth0 will ask you to fill just two fields: your email address and a password. We won’t ask for a credit card number or any other information. If that seems like too much work, you can sign up with a single click by doing so using your GitHub, Google, or Microsoft account:
Once you’ve provided an email address and password, you’ll see the “Let’s set you up for success” page:
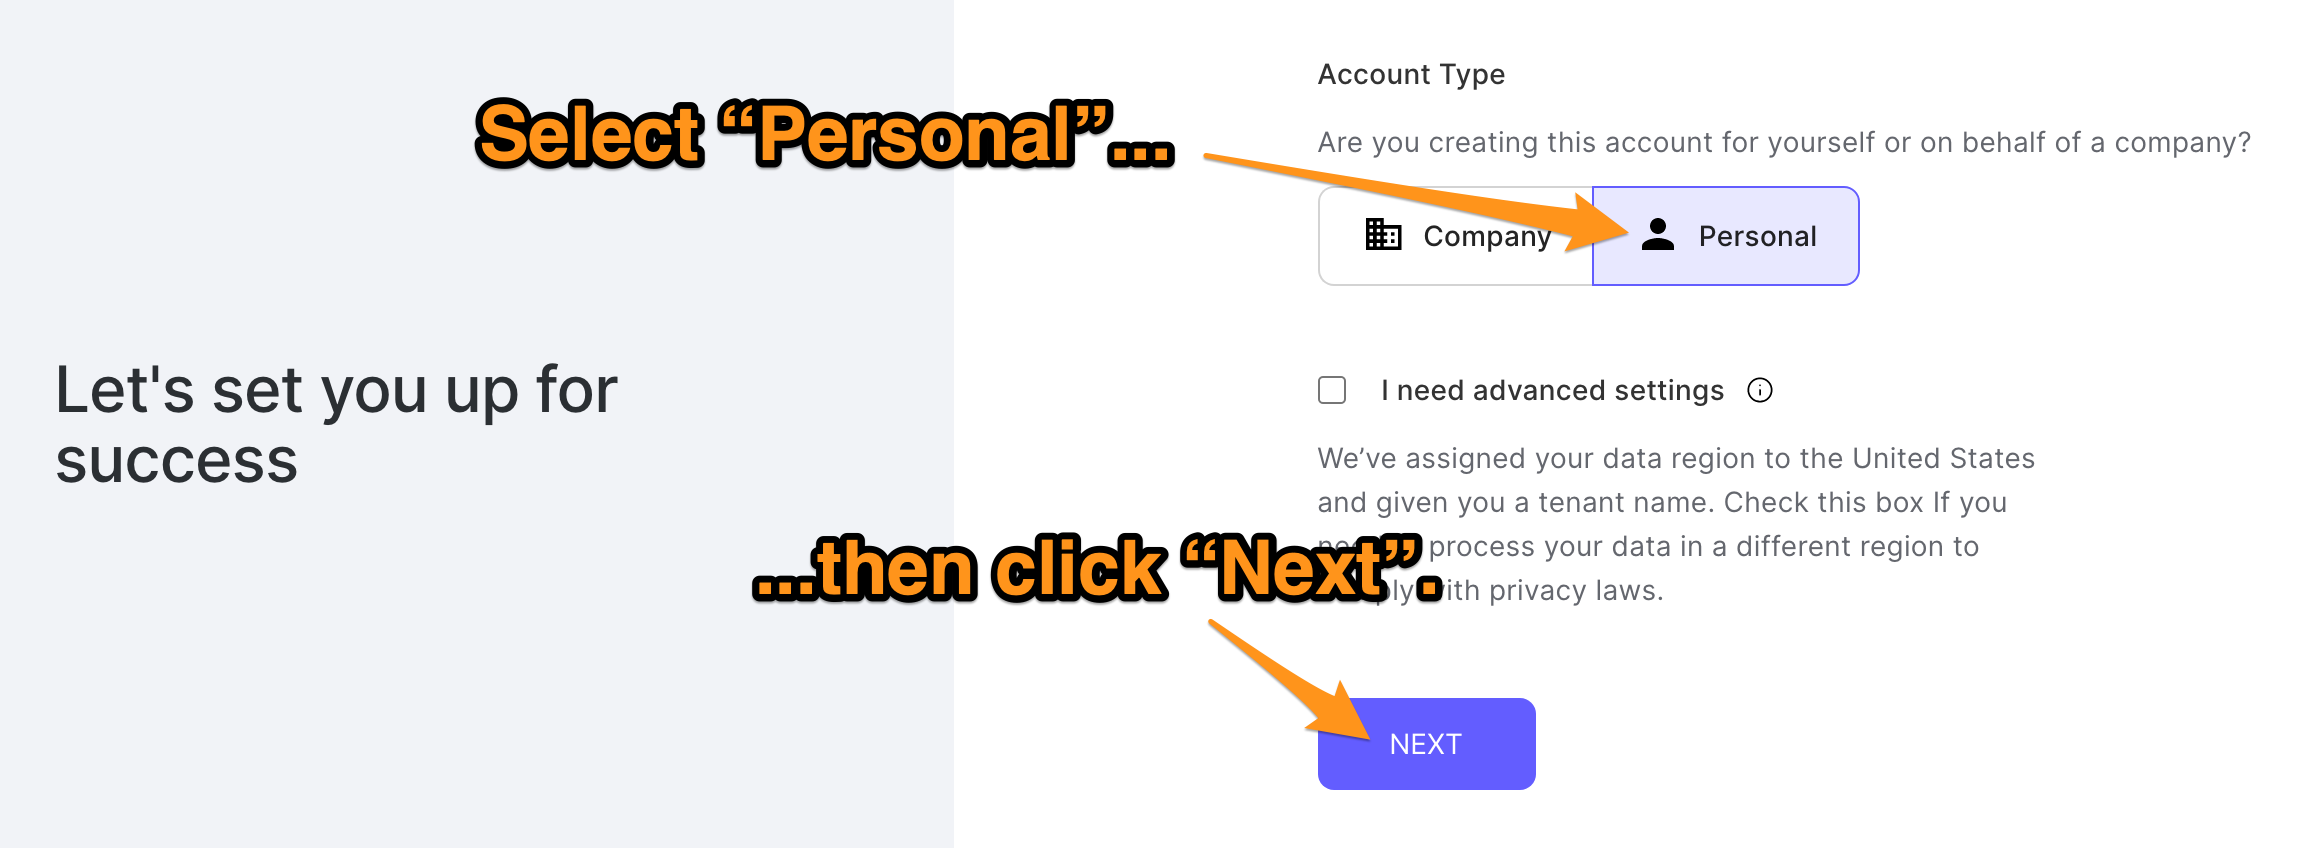
Just select Personal for your account type and click the Next button. Your sign-up process will be complete, and you’ll see the Auth0 dashboard page.
Register your app with Auth0
🛠 In the menu on the left side of the Auth0 dashboard, click on Applications:
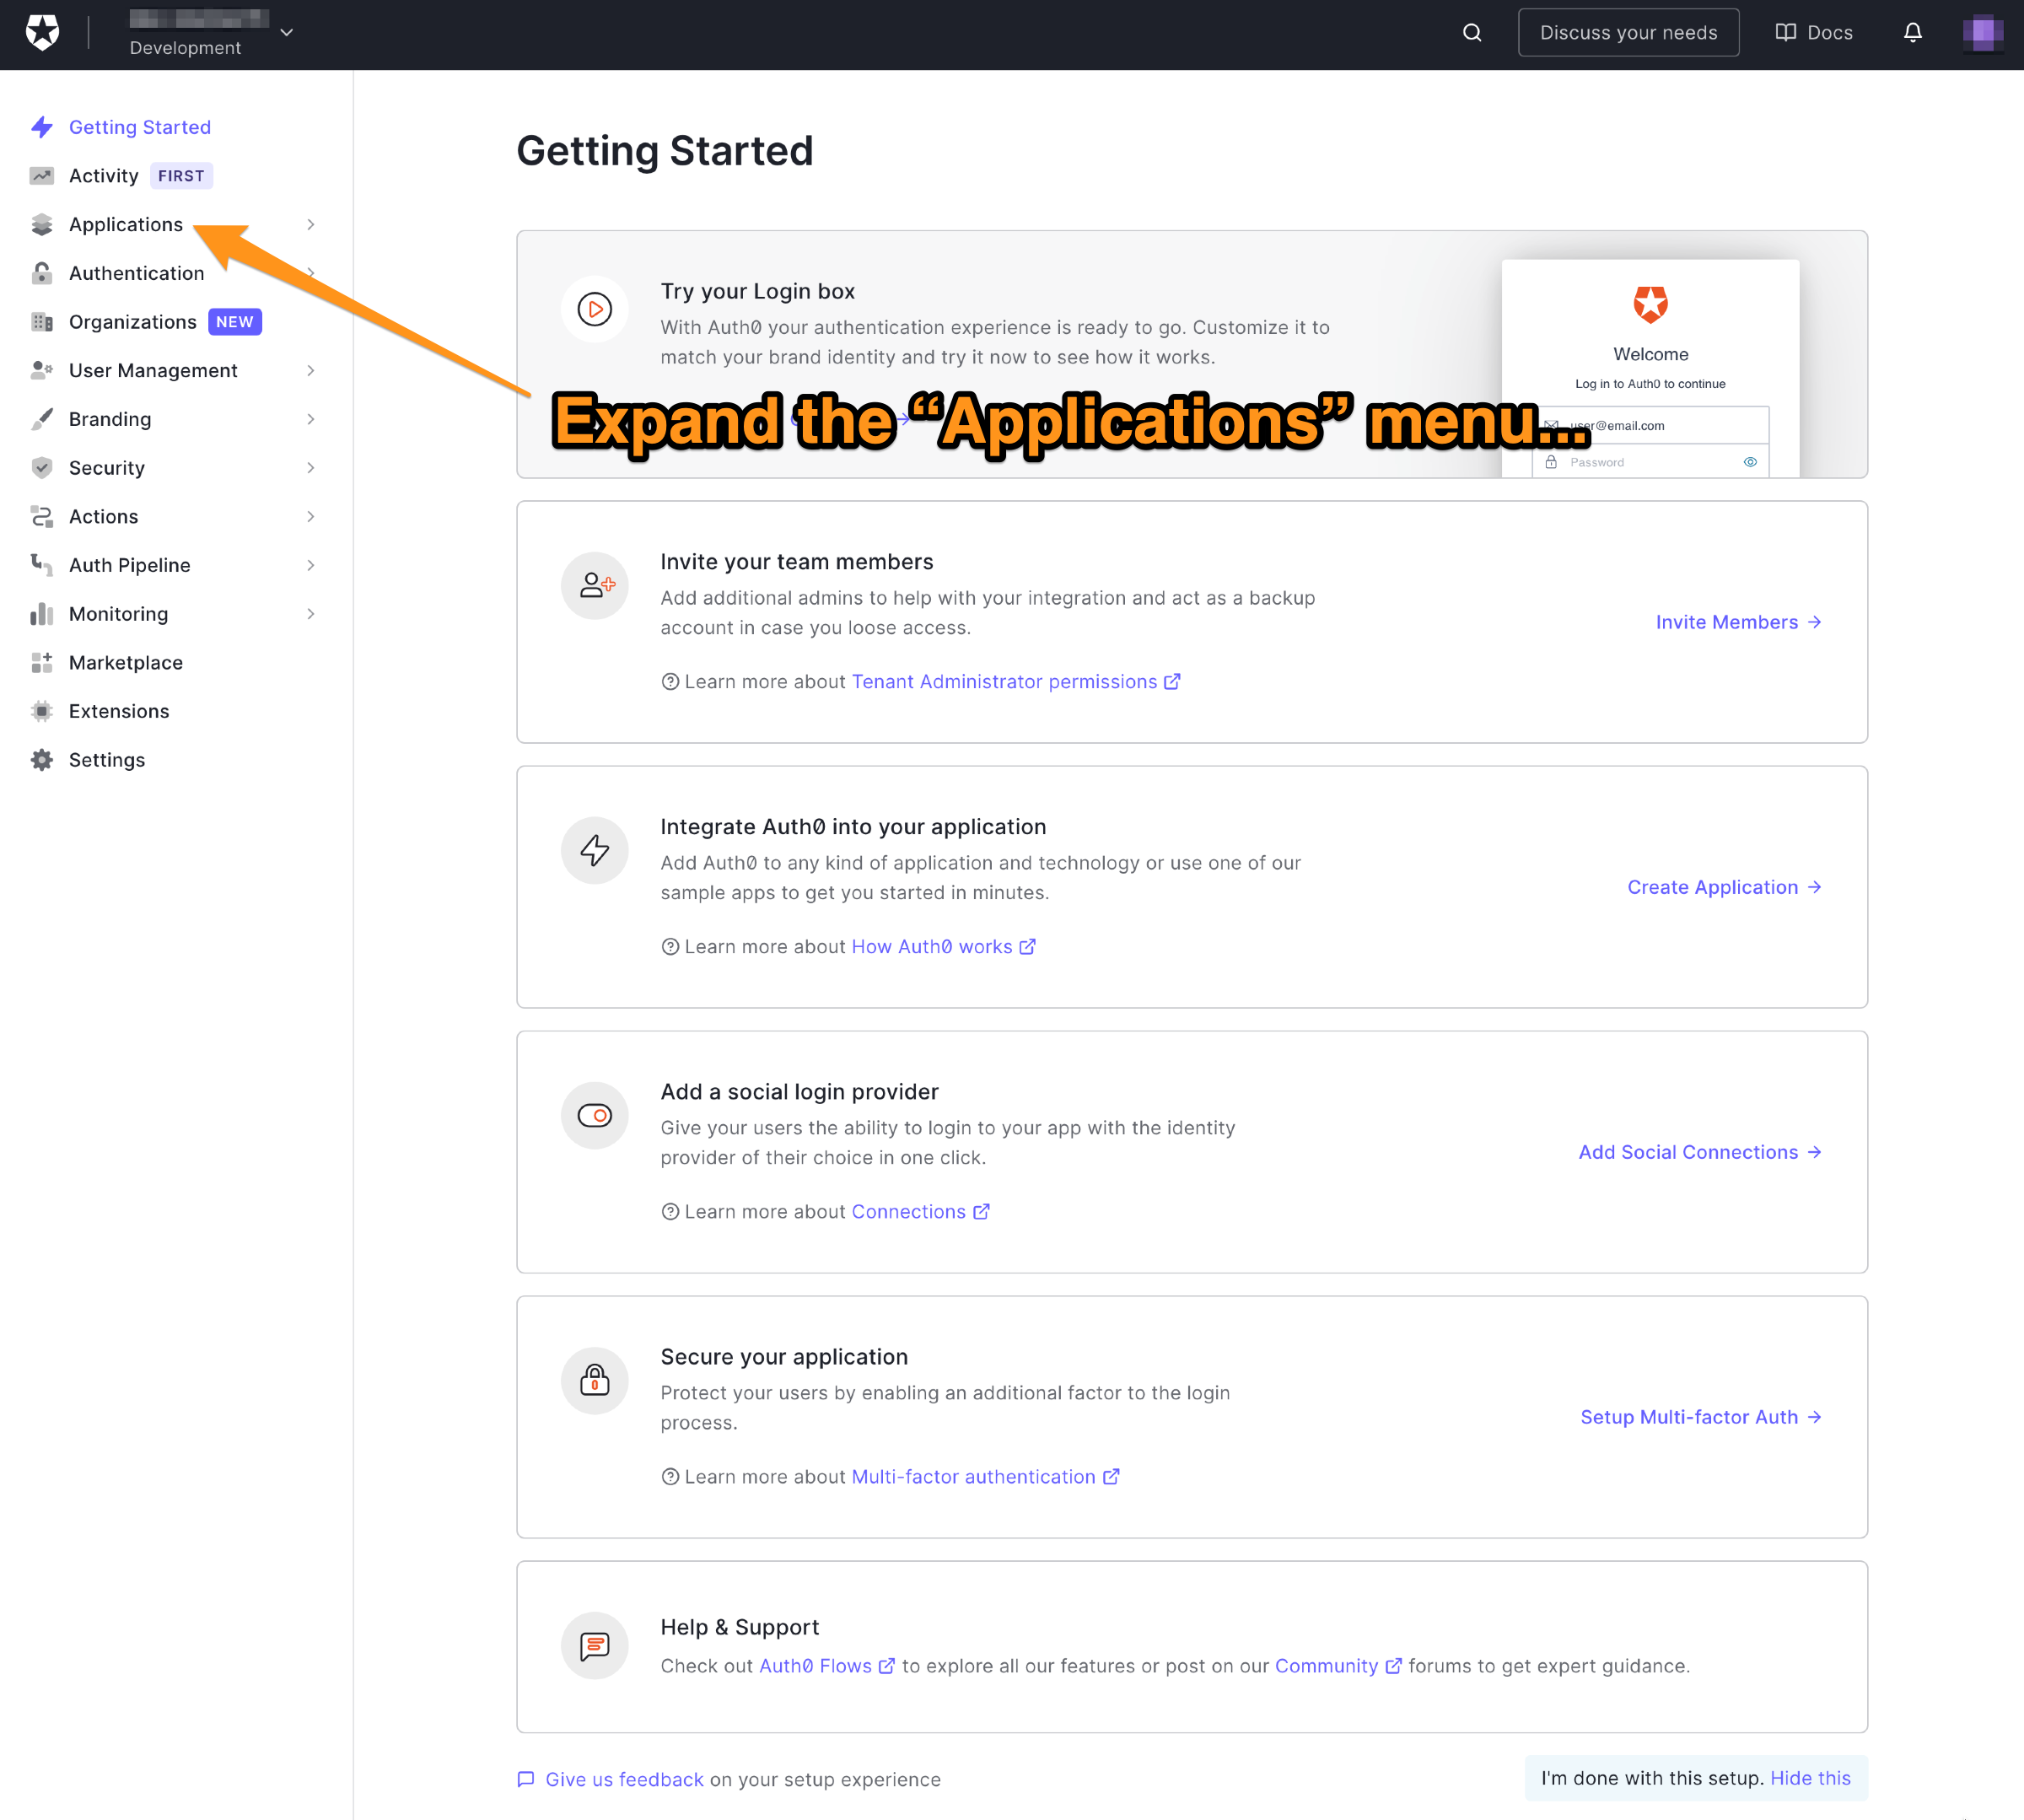
🛠 This will expand the Applications menu. Select the first item in that menu, which also has the name Applications:
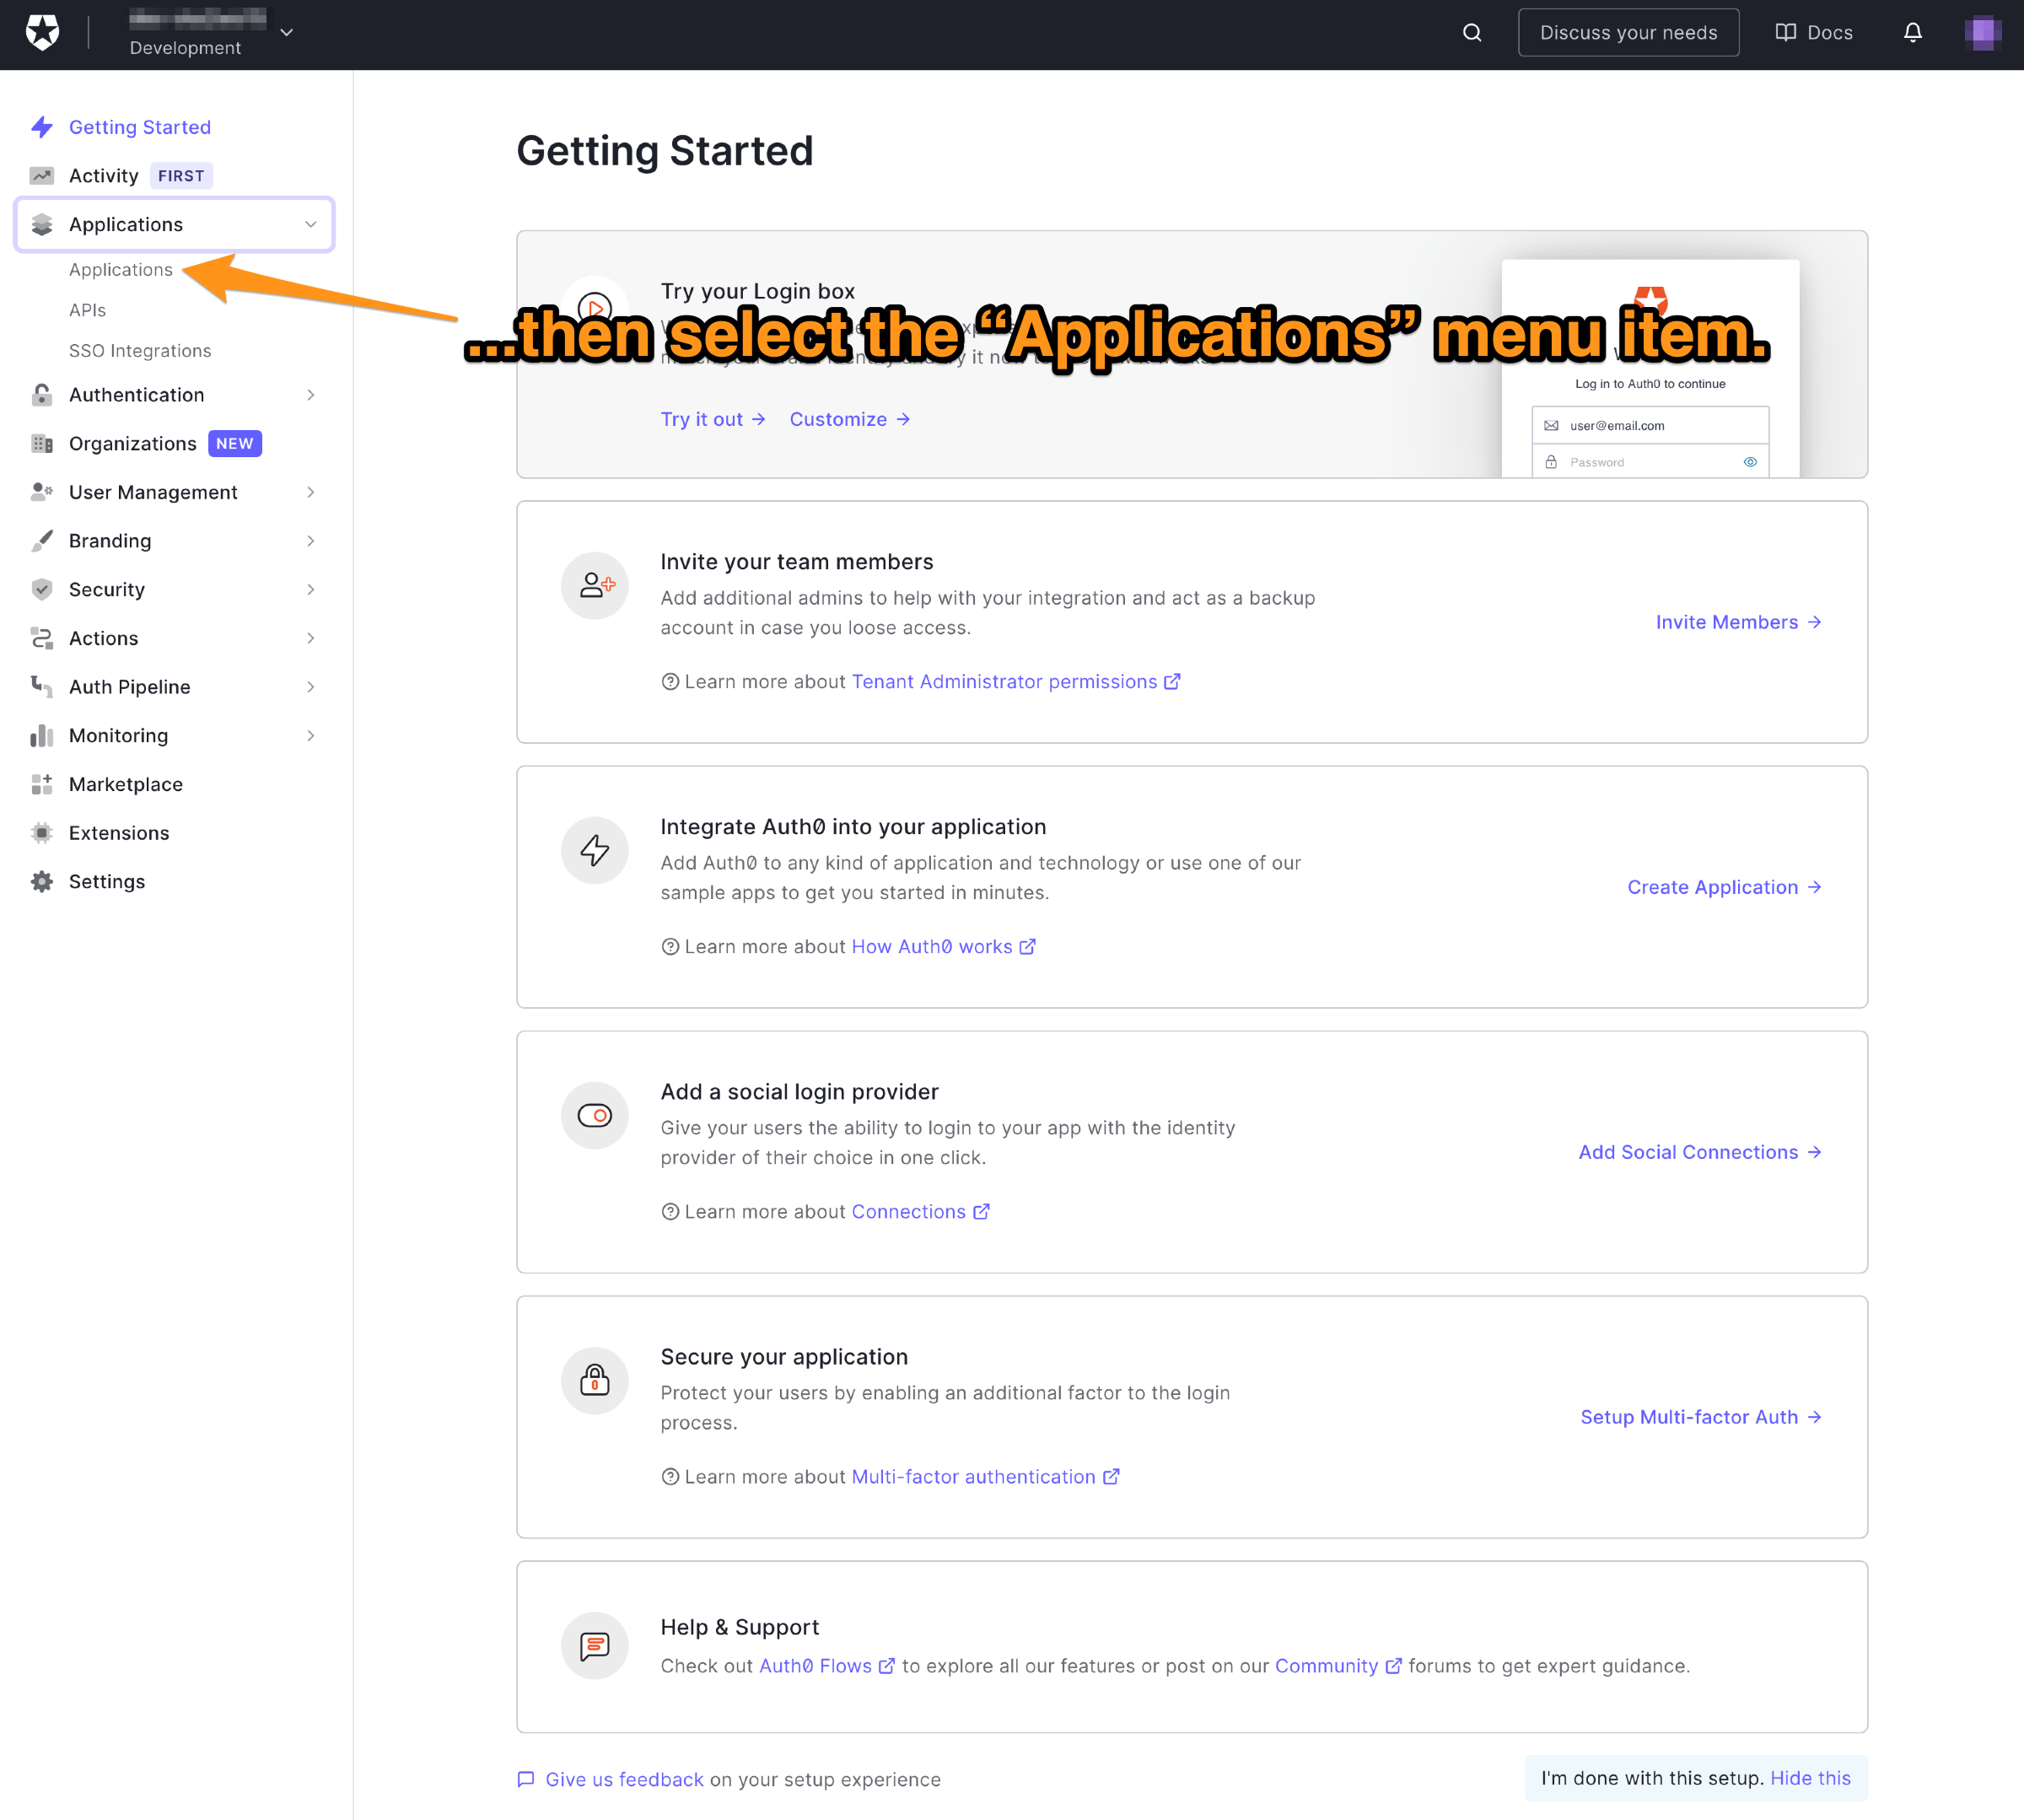
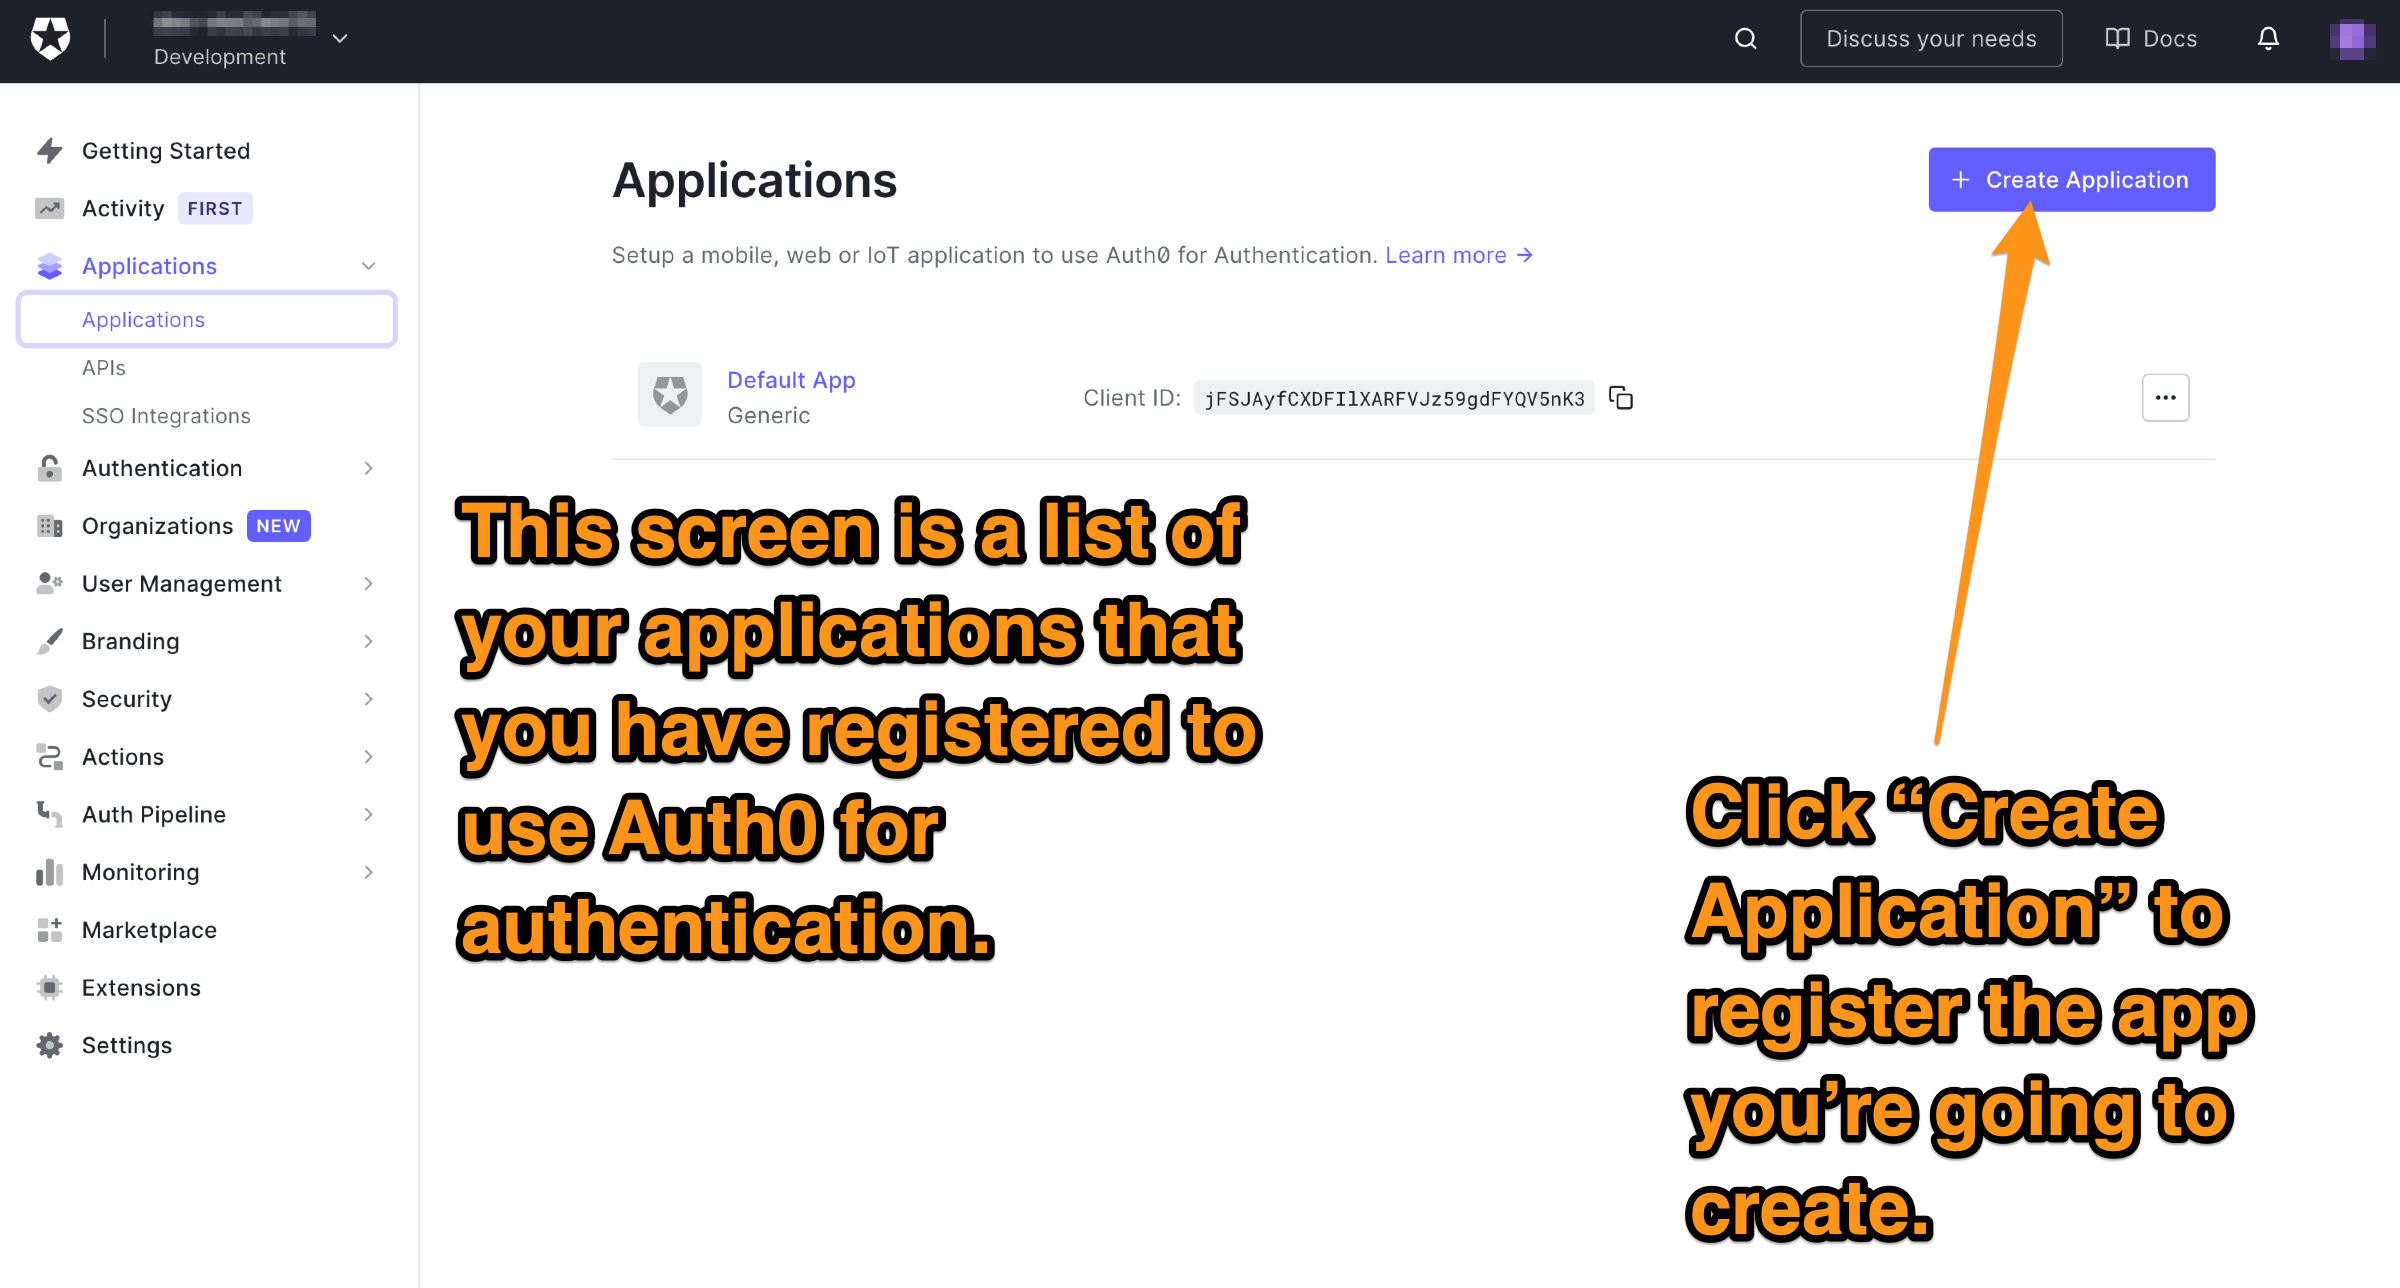
You will now be on the Applications page. It lists all the applications that you have registered so that Auth0 can handle their login/logout processes.
🛠 Let’s create a new registration for your app. Do this by clicking the Create application button near the top right of the page:
You’ll see this dialog appear:
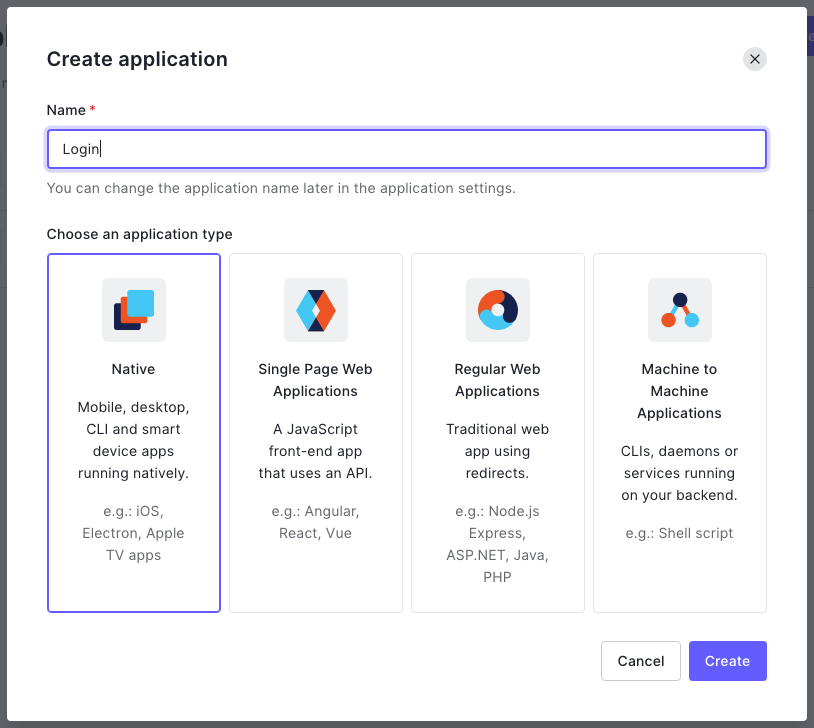
🛠 You’ll need to provide two pieces of information to continue:
- Enter a name for your app in the name field. It might be simplest to use the same name as your Android Studio project (if you’ve been following my example, use the name Login).
- Specify the application type, which in this case is Native.
Click Create. The Quick Start page for your app will appear:
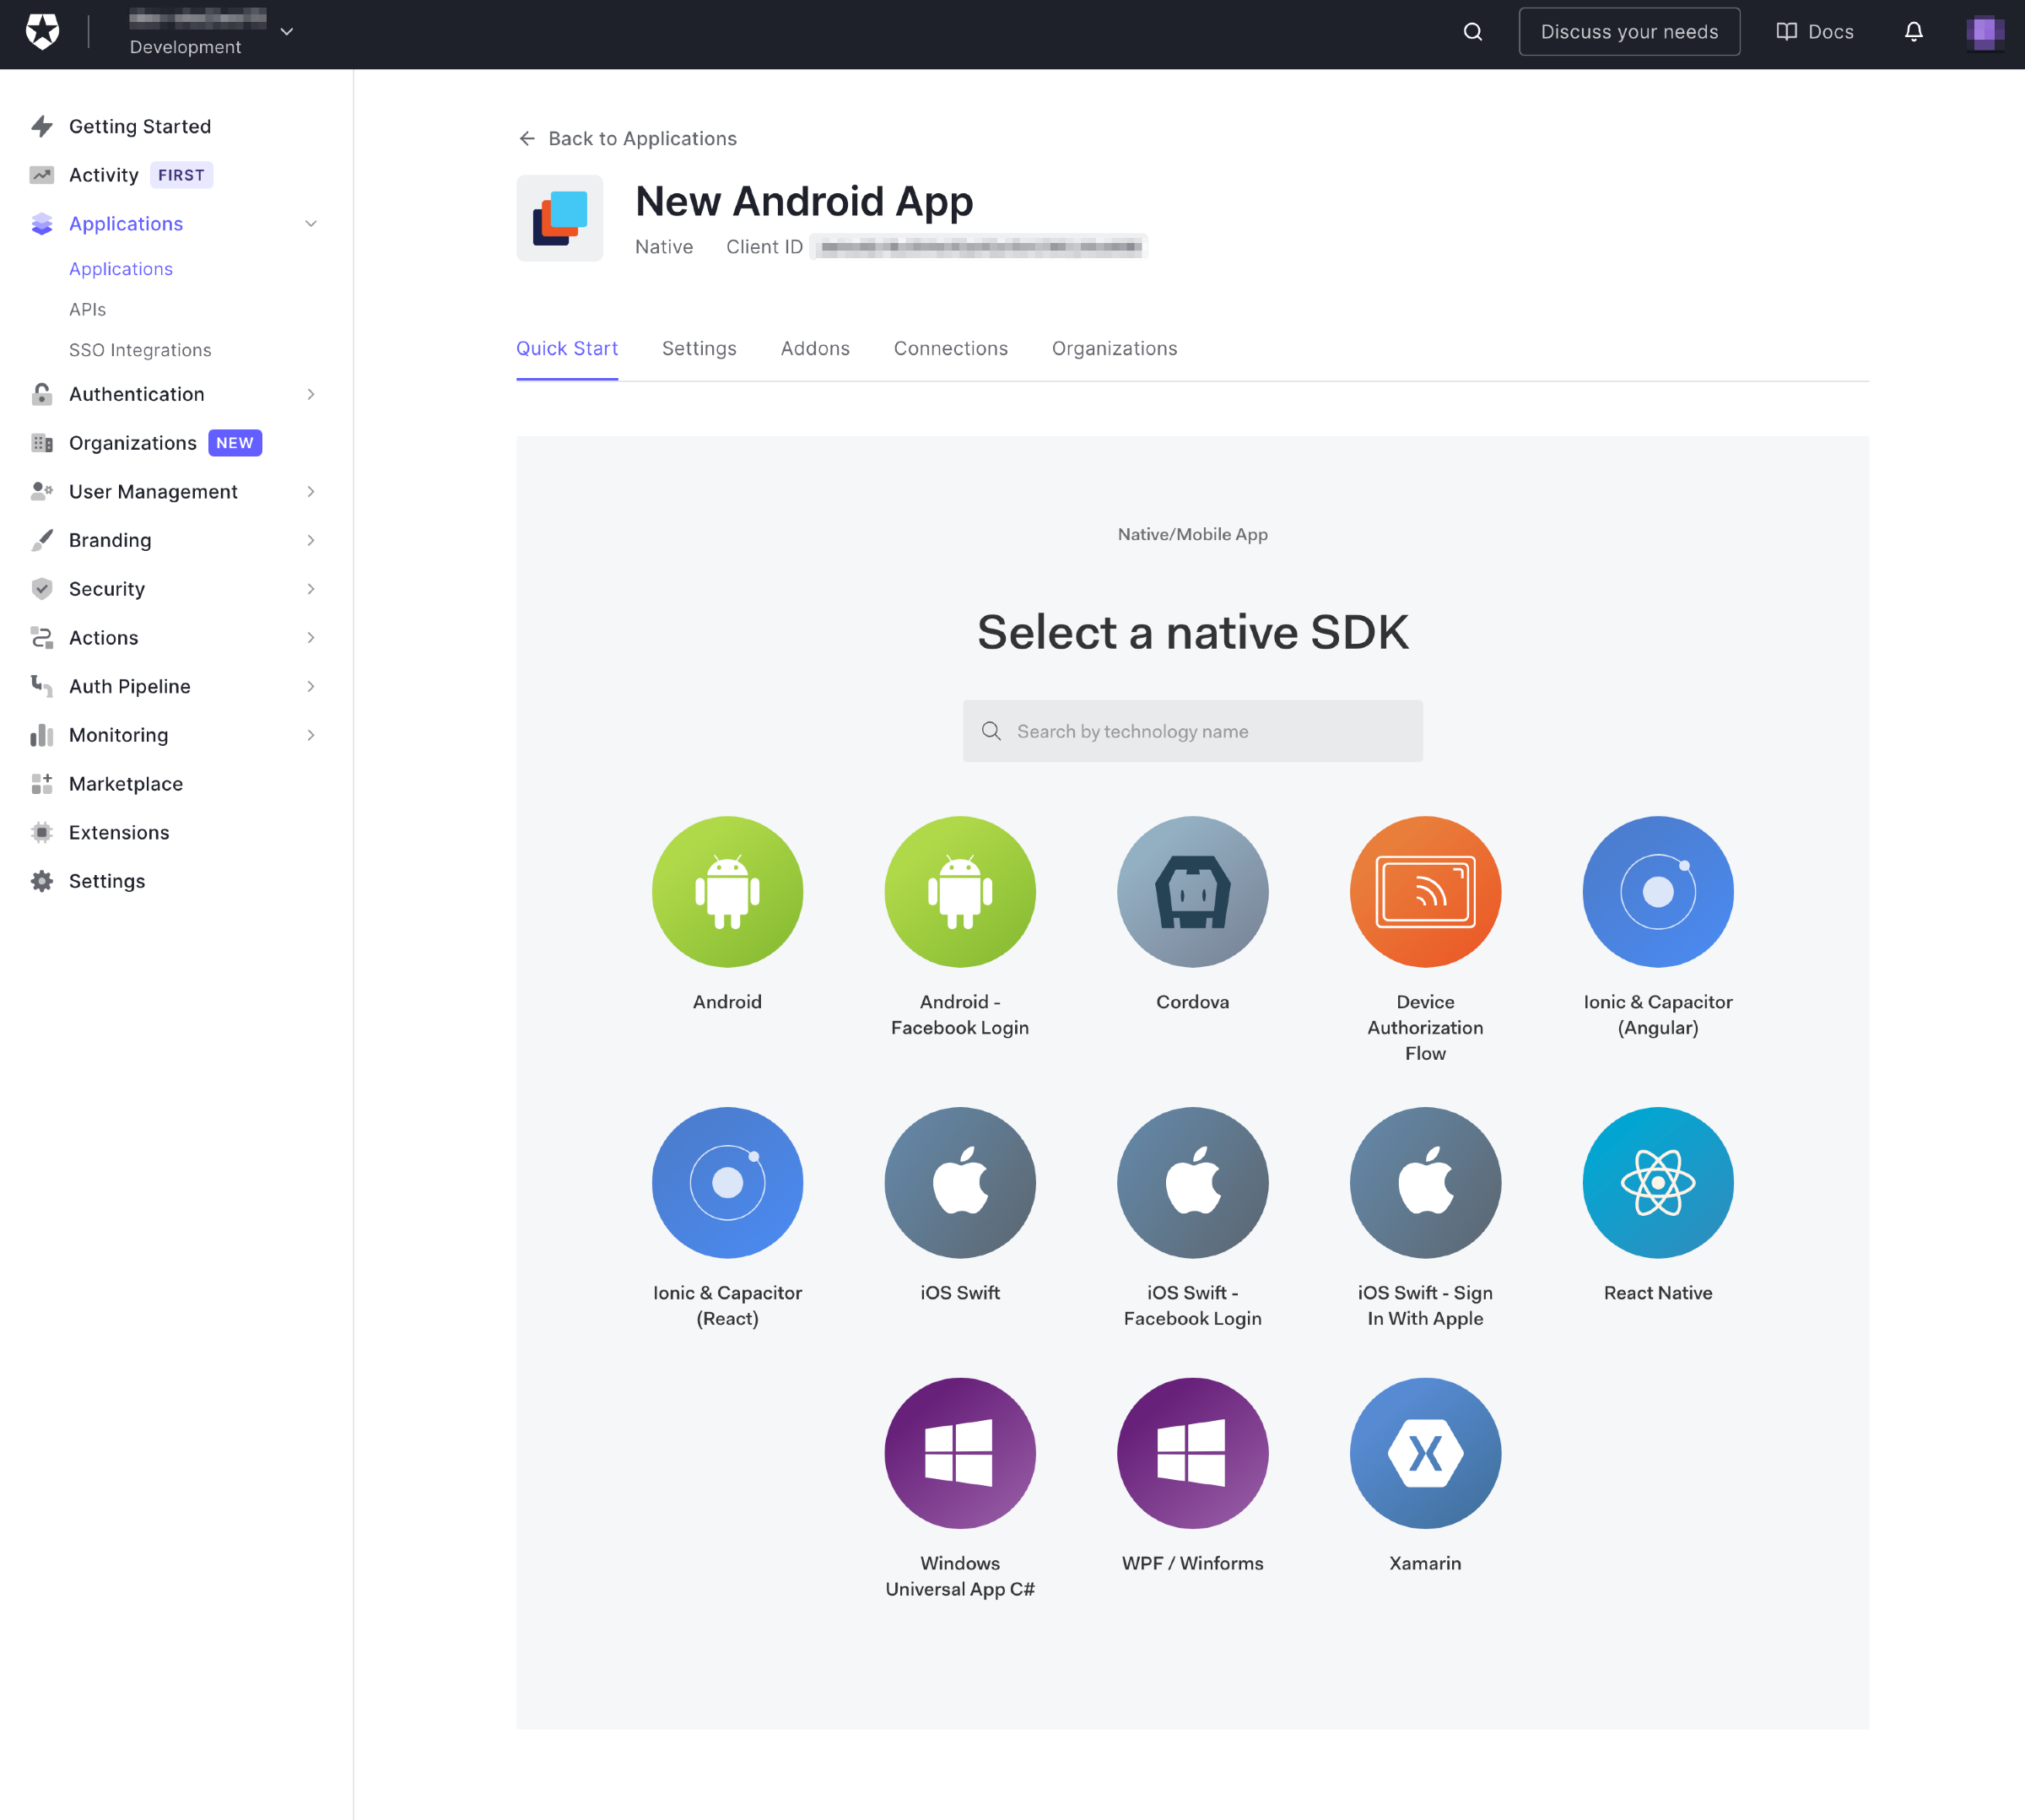
This page provides you with ready-made projects for several different platforms that you can use as the basis for an application that delegates login/logout to Auth0. You won’t be using any of them in this exercise; instead, you’ll make use of a couple of Auth0 libraries and write the code yourself. It’s more educational — and more importantly, fun — that way.
🛠 Click the Settings tab, which will take you to this page:
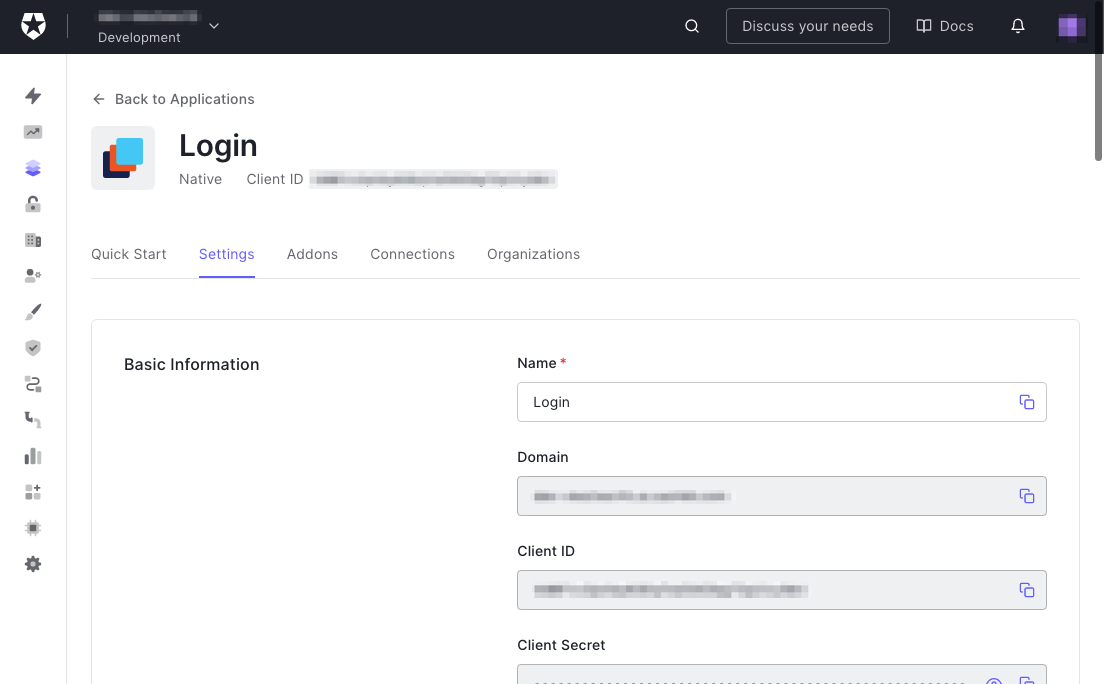
You’re going to do two critical things on this page:
- Get information that your app needs to know about Auth0, and
- Provide information that Auth0 needs to know about your app.
Let’s take care of the first one: Getting the information that your app needs, namely:
- The domain, which is the URL that your app will use to contact Auth0. It uniquely identifies your Auth0 tenant, which is a collection of applications, users, and other information that you have registered with your Auth0 account.
- The client ID, which is the identifier that Auth0 assigned to your app. It’s how Auth0 knows which app of yours it’s working with.
🛠 Get this information by copying the contents of the Domain and Client ID fields for later reference:
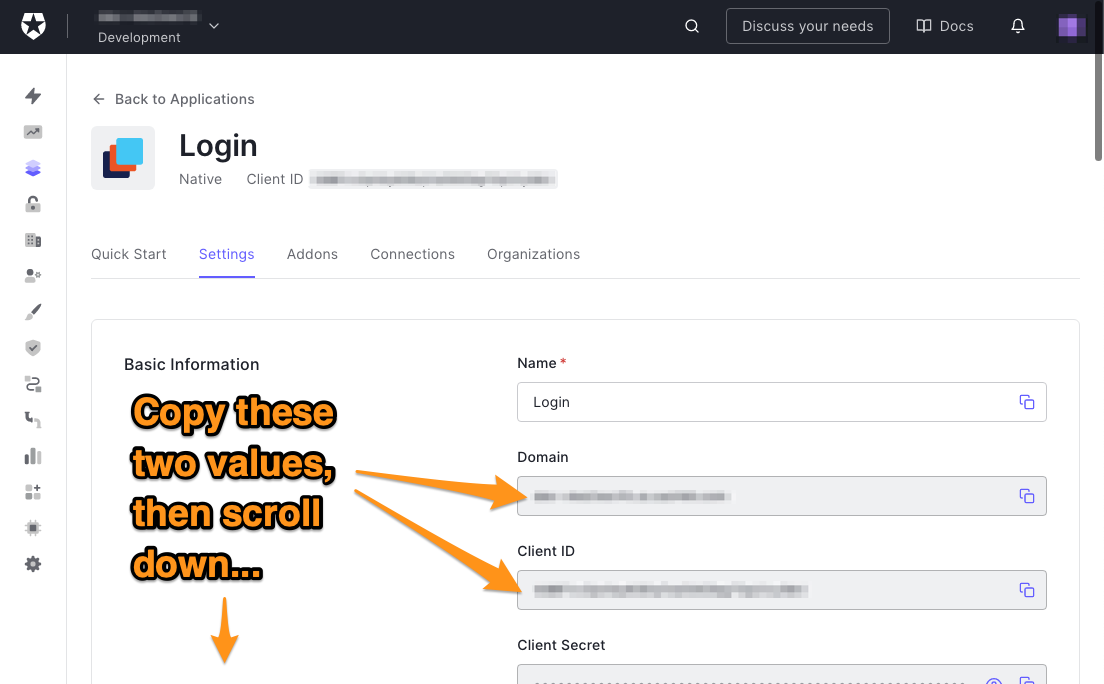
You’ll enter them into your Android Studio project as string resources soon.
🛠 Scroll down to the Applications URIs section. This is where you provide two pieces of information that Auth0 needs to know about your app, which are:
- A callback URL: the URL that Auth0 will redirect to after the user successfully logs in. There can be more than one of these.
- A logout URL: the URL that Auth0 will redirect to after the user logs out. There can be more than one of these.
At this point, you’re probably thinking: “Wait a minute — I’m writing an Android app. It doesn’t have web pages that you navigate to using URLs, but activities that you navigate to using intents!”
You’re absolutely right. In the case of native applications, the callback and logout URLs are the same string, and Auth0 sends that string to your app to inform it that a user has logged in or logged out.
The string that Android native apps use for both the callback URL and the logout URL use this format:
{SCHEME}://{YOUR_DOMAIN}/android/{YOUR_APP_PACKAGE_NAME}/callback🛠 To construct the string, do the following:
- Replace
{SCHEME}withapp.{SCHEME}is the URL’s protocol, and if you were writing a web app, this value would behttp, or better,https. Since this is an Android native app, you can pick any string for this value. I like to useapp. - Replace
{YOUR_DOMAIN}with the value from the Domain field that you saw earlier on this page. - Replace
{YOUR_APP_PACKAGE_NAME}with the package name of your Android app. If you’ve been following the example in this article, your app’s package name iscom.example.login.
🛠 Enter this string into both the Allowed Callback URLs and Allowed Login URLs fields. Remember, it’s the same string going into both fields.
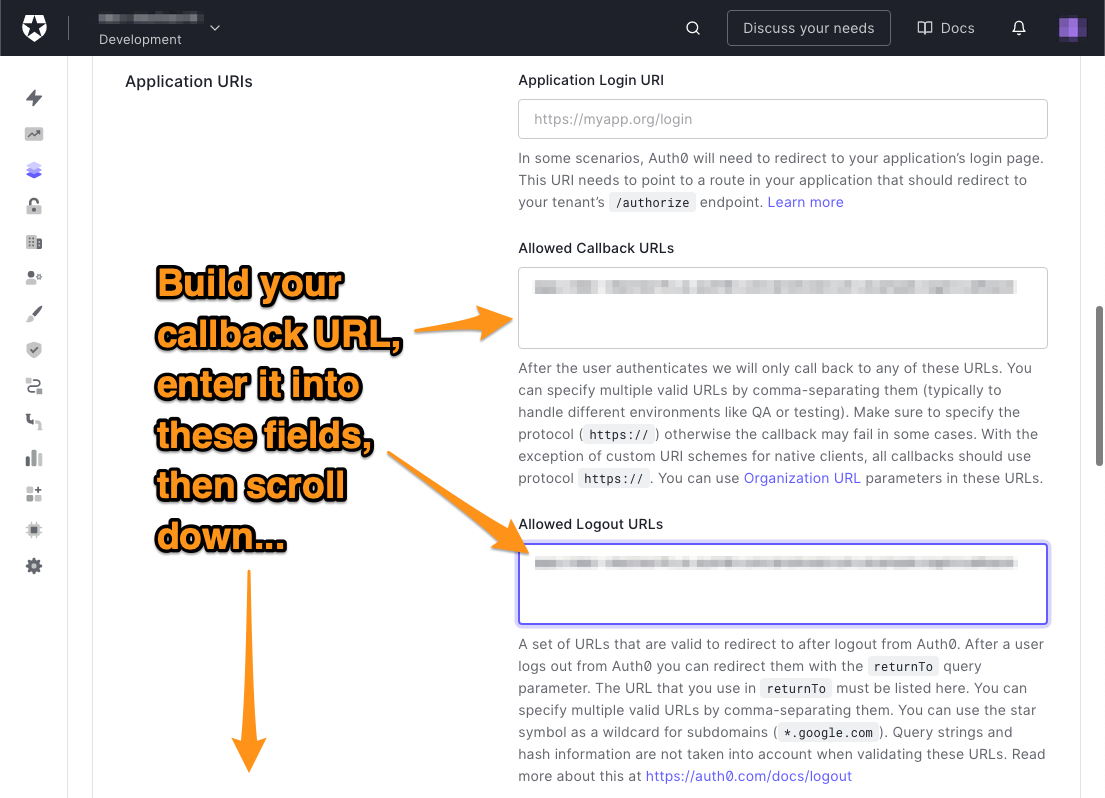
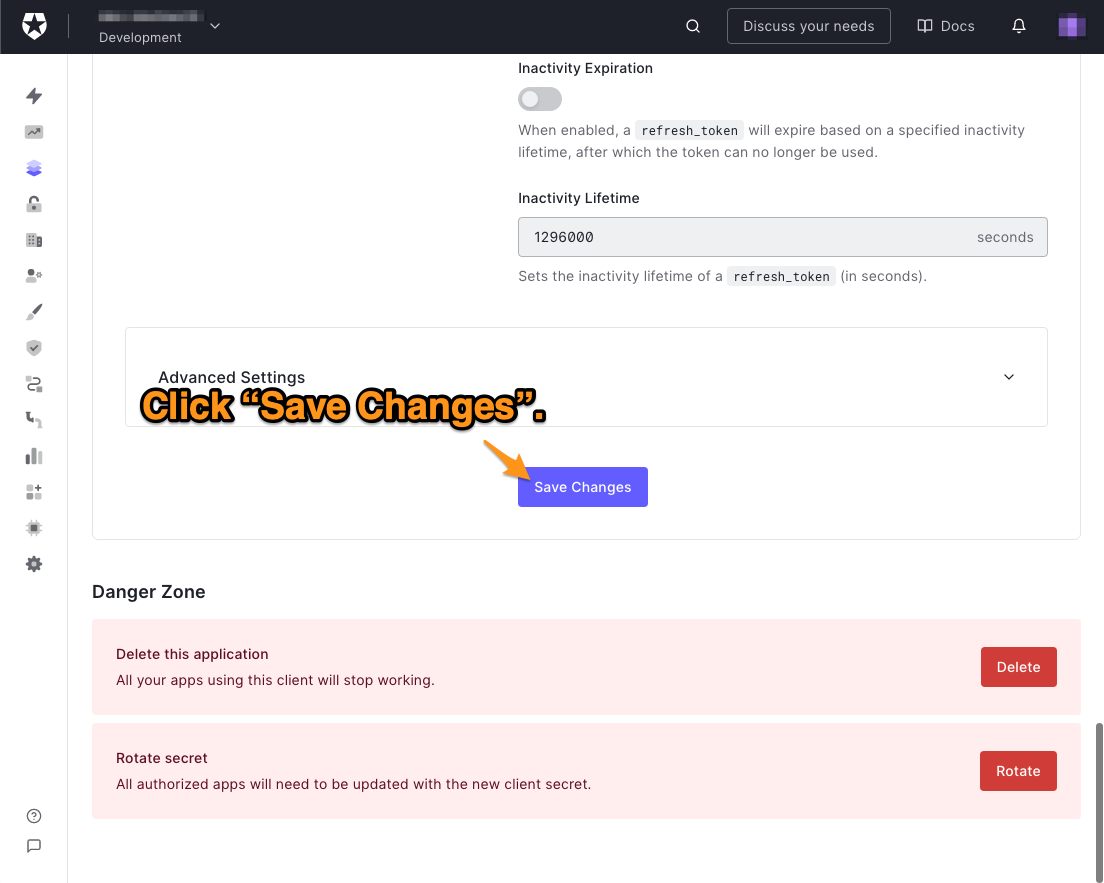
🛠 You’ve done everything you need to do on this page. Scroll down to the bottom of the page and click the Save changes button:
Create a user if your tenant doesn’t have any
If your tenant is brand new, it won’t have any user accounts, which means that there won’t be any way to log in to your app. If this is the case, follow these steps to create a user.
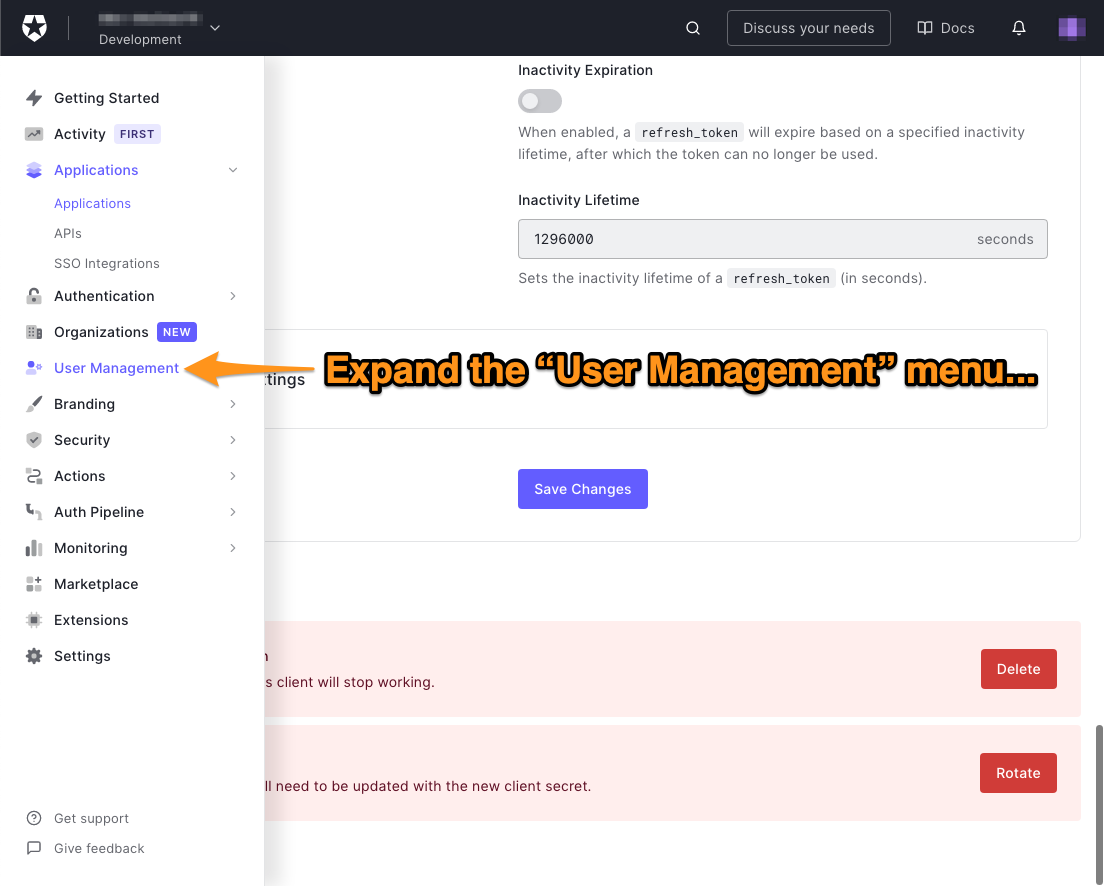
🛠 In the menu on the left side of the Auth0 dashboard, click on User Management:
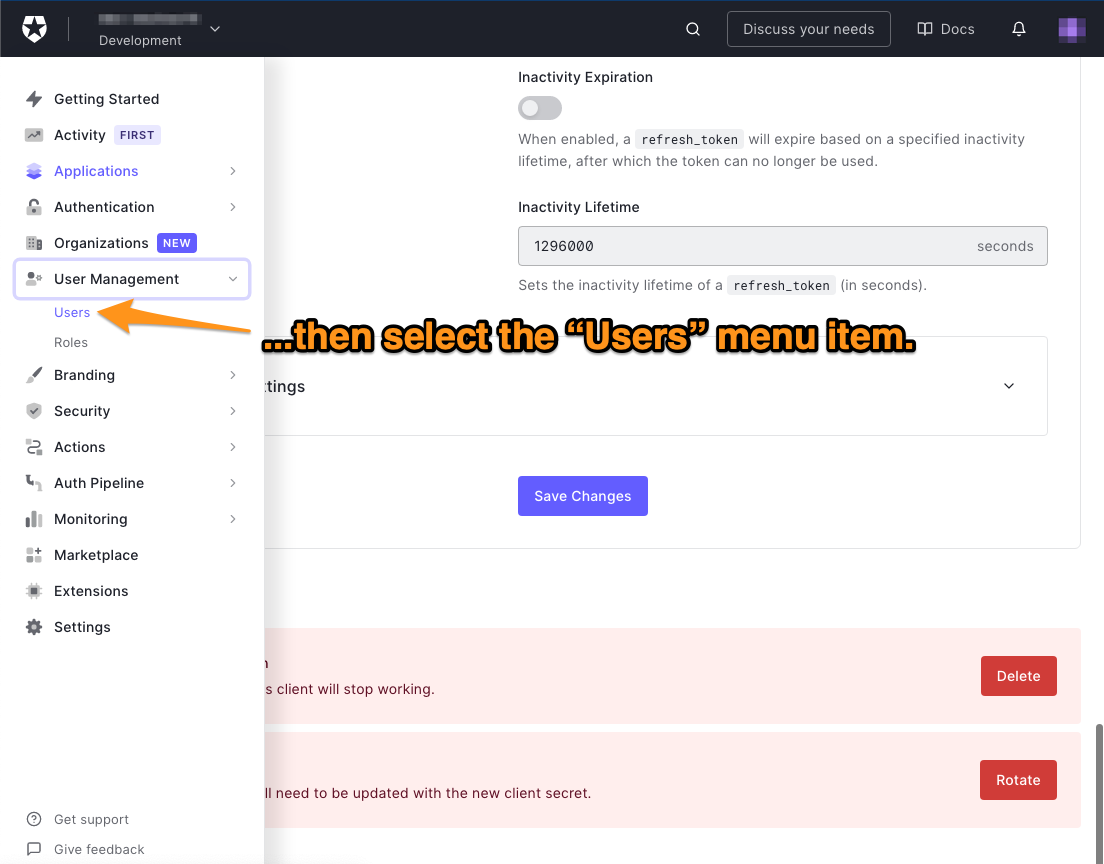
🛠 This will expand the User Management menu. Select the Users item in that menu:
The Users page will appear. It lists all the users registered to your tenant. If there are no users, you’ll see the “You don’t have any users yet” message.
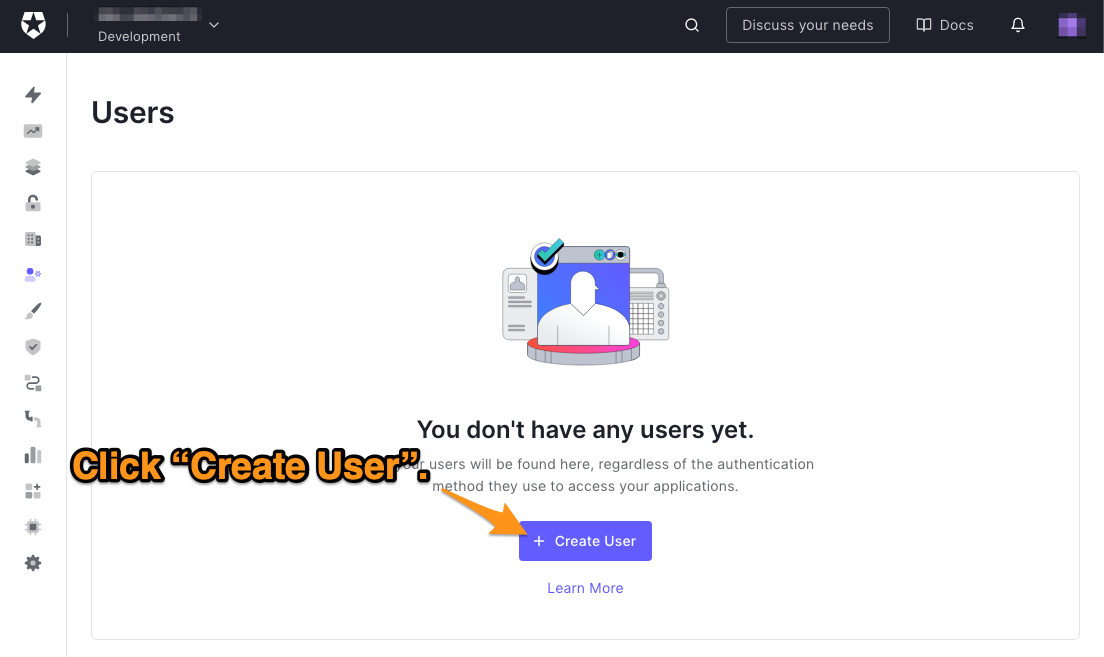
🛠 Click the Create User button to create a new user, which will make this dialog box appear:
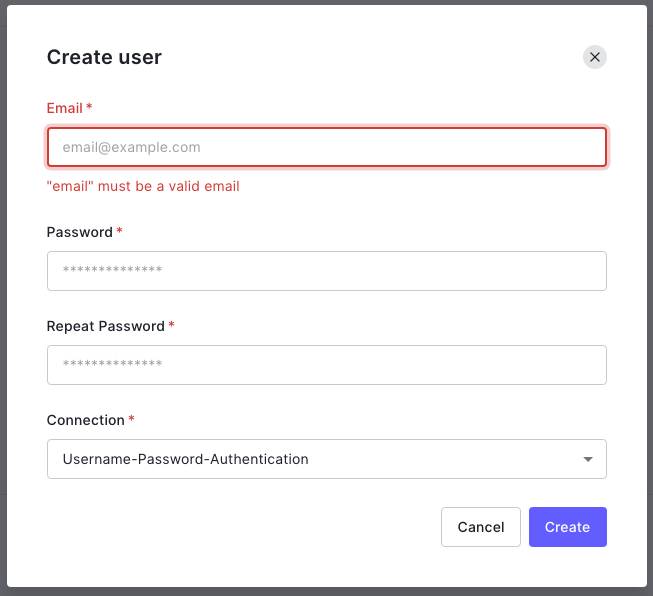
🛠 Enter an email address and password for the user. The only option for the Connection will be Username-Password-Authentication, so leave it as it is. Make a note of that email address and password — you’ll be using them to log in to the app.
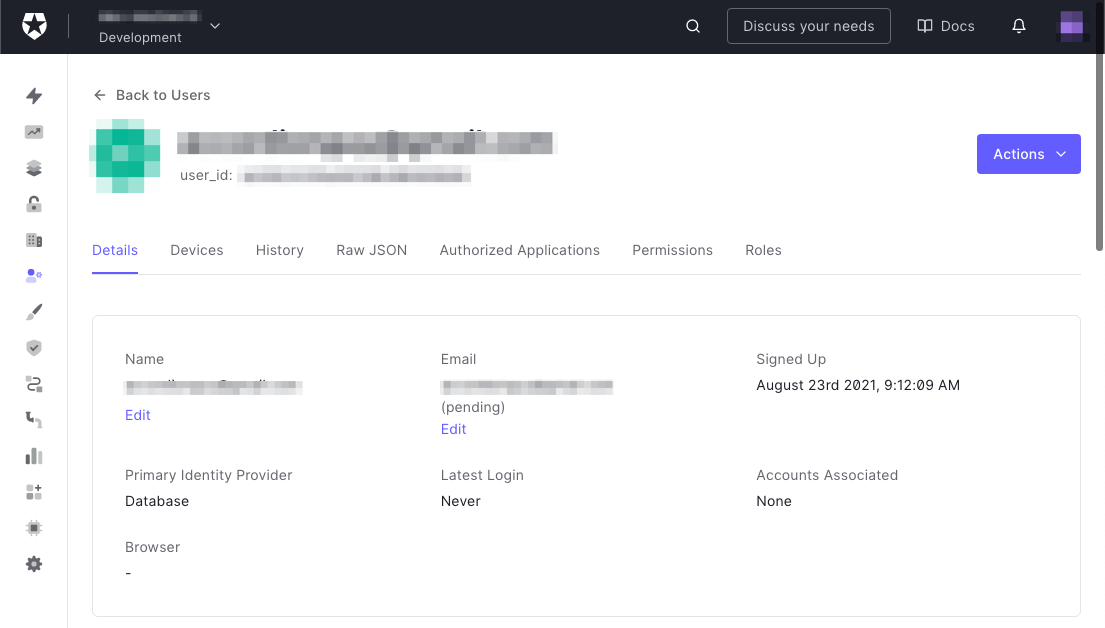
🛠 Click the Create button to create the user. The user’s Details page will appear:
That takes care of all the setup you need to do within the Auth0 dashboard. It’s time to build the app!
Set Up the App
Install the Auth0 SDK
The Auth0 Android SDK enables Android apps to use Auth0’s APIs, including the Authentication API, which you’ll use to implement login and logout in your app.
To install the SDK, you’ll need to perform two tasks:
- Make changes to the app’s Gradle file to integrate Auth0. While you’re editing that file, you’ll also enable view binding.
- Give the app permission to access the internet in the project’s manifest.
Add the Auth0 SDK as a project dependency
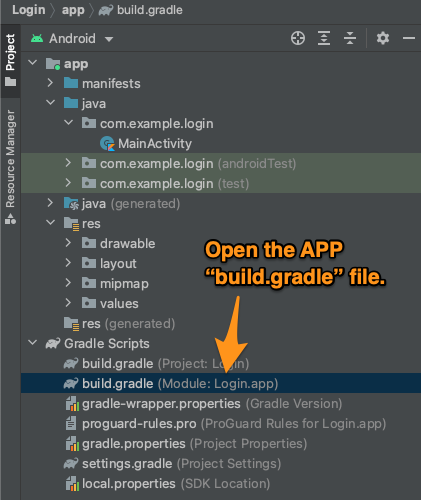
🛠 Open build.gradle for the app — it’s the file in the Project Structure menu that has the words Module and app in its name:
🛠 Add the following line to the defaultConfig block of the file:
manifestPlaceholders = [auth0Domain: "@string/com_auth0_domain", auth0Scheme: "@string/com_auth0_scheme"]Here’s what the defaultConfig block should look like once you’ve added the line:
defaultConfig {
    applicationId {APPLICATION_ID_GOES_HERE}
    minSdk 21
    targetSdk 31
    versionCode 1
    versionName "1.0"
    manifestPlaceholders = [auth0Domain: "@string/com_auth0_domain", auth0Scheme: "@string/com_auth0_scheme"]

    testInstrumentationRunner "androidx.test.runner.AndroidJUnitRunner"
}
🛠 Add this line to the dependencies block, after all the other lines that begin with the keyword implementation:
implementation 'com.auth0.android:auth0:2.0.0'This line tells Gradle to include version 2.0.0 of Auth0’s Android library in the application.
Here’s what the dependencies block should look like once you’ve added the line:
dependencies {
    implementation 'androidx.core:core-ktx:1.6.0'
    implementation 'androidx.appcompat:appcompat:1.3.1'
    implementation 'com.google.android.material:material:1.4.0'
    implementation 'androidx.constraintlayout:constraintlayout:2.1.0'
    implementation 'com.auth0.android:auth0:2.0.0'
    testImplementation 'junit:junit:4.+'
    androidTestImplementation 'androidx.test.ext:junit:1.1.3'
    androidTestImplementation 'androidx.test.espresso:espresso-core:3.4.0'
}
Enable view binding
Before Android Studio 3.6, if you wanted to refer to a view or widget in the user interface, you’d have to create a new variable for every view or widget using findViewById().
Suppose you had an Activity whose layout file contains these views:
- A
TextViewwhoseidistextview_instructions - An
EditTextwhoseidisedittext_input - A
Buttonwhoseidisbutton_submit
Here’s how you would create references to those views in code and set their text properties:
// A quick example of findViewById() binding

// Set this activity’s content to the layout specified
// by activity_main.xml
setContentView(R.layout.activity_main)

// Get references to the TextView, EditText, and Button:
val textviewInstructions = findViewById(R.id. textview_instructions) as TextView
val edittextInput = findViewById(R.id. edittext_input) as EditText
val buttonSubmit = findViewById(R.id.button_submit) as Button

// Set the widgets' text
textviewInstructions.text = "Here are your instructions."
edittextInput = "Edit this text."
buttonSubmit = "Tap me!"
Android 3.6 introduced view binding, which generates a binding object that holds all the views in the activity. You no longer have to declare a variable for each view or widget because all the views and widgets in the activity are now properties of the binding object.
// A quick example of view binding

// Bind this activity to the layout and create a binding object
// that gives us access to all its views
binding = ActivityMainBinding.inflate(layoutInflater)
setContentView(binding.root)

// Set the widgets' text
binding.textviewInstructions.text = "Here are your instructions."
binding.edittextInput = "Edit this text."
binding.buttonSubmit = "Tap me!"
Note that the system automatically converts the names of controls in the layout file, which use snake_case, into binding property names, which use camelCase. For example, the control whose id is button_submit in the layout file has a corresponding binding property named buttonSubmit.
Now that you’ve been introduced to view binding let’s enable it.
🛠 Add this buildFeatures block to the android block in the app’s build.gradle file:
buildFeatures {
    viewBinding true
}
Here’s what the android block should look like once you’ve added the buildFeatures block:
android {
    compileSdk 31

    defaultConfig {
        applicationId "com.example.myapplicationx"
        minSdk 21
        targetSdk 31
        versionCode 1
        versionName "1.0"
        manifestPlaceholders = [auth0Domain: "@string/com_auth0_domain", auth0Scheme: "@string/com_auth0_scheme"]

        testInstrumentationRunner "androidx.test.runner.AndroidJUnitRunner"
    }

    buildTypes {
        release {
            minifyEnabled false
            proguardFiles getDefaultProguardFile('proguard-android-optimize.txt'), 'proguard-rules.pro'
        }
    }
    compileOptions {
        sourceCompatibility JavaVersion.VERSION_1_8
        targetCompatibility JavaVersion.VERSION_1_8
    }
    kotlinOptions {
        jvmTarget = '1.8'
    }
    buildFeatures {
        viewBinding true
    }
}
Synchronize the project with the updated Gradle file
After making these changes to the Gradle file, you’ll need to synchronize the project with the new build configuration you defined. Android Studio will notify you that it detected the changes to the Gradle file and present you with the option to synchronize the project with the updated file.
🛠 Click the Sync Now link that appears in the notification near the top of the Android Studio window:

Give the app permission to access the internet
🛠 Open the Android manifest file, AndroidManifest.xml, located in the app/manifests folder, and add the XML element below as a child of the <manifest> element:
<uses-permission android:name="android.permission.INTERNET" />This line grants your app the permission to perform network operations, which will allow it to contact Auth0 and make use of its Authentication API.
Here’s what AndroidManifest.xml should look like once you’ve added the XML element:
<!-- AndroidManifest.xml -->

<?xml version="1.0" encoding="utf-8"?>
<manifest xmlns:android="http://schemas.android.com/apk/res/android"
    package="com.example.login">

    <uses-permission android:name="android.permission.INTERNET" />

    <application
        android:allowBackup="true"
        android:icon="@mipmap/ic_launcher"
        android:label="@string/app_name"
        android:roundIcon="@mipmap/ic_launcher_round"
        android:supportsRtl="true"
        android:theme="@style/Theme.Login">
        <activity
            android:name=".MainActivity"
            android:exported="true">
            <intent-filter>
                <action android:name="android.intent.action.MAIN" />

                <category android:name="android.intent.category.LAUNCHER" />
            </intent-filter>
        </activity>
    </application>

</manifest>
Update the project’s string resource file
We’re going to follow the Android recommended practice and put all the string literals used by the app in string resource files.
By default, new Android projects come with a file located in /app/res/values/ named strings.xml. While resource files can contain resouces of any type, the convention is to use strings.xml for strings only. Let’s put the non-sensitive strings into that file.
🛠 Open strings.xml. It should contain the following:
<!-- strings.xml -->

<resources>
    <string name="app_name">{APP_NAME}</string>
</resources>
Instead of {APP_NAME}, you’ll see the name that you assigned to your app when you first created the project.
🛠 Replace the contents of strings.xml with the following:
<!-- strings.xml -->

<?xml version="1.0" encoding="utf-8"?>
<resources>

    <string name="app_name">{APP_NAME}</string>

    <!--
    Auth0 identifiers and settings
    ==============================
    -->

    <!-- Identifiers -->
    <string name="com_auth0_scheme">app</string>

    <!-- Settings -->
    <string name="login_scopes">openid profile email read:current_user update:current_user_metadata</string>
    <string name="login_audience">https://%1$s/api/v2/</string>


    <!--
    Main activity
    =============
    -->

    <!-- Title -->
    <string name="initial_title">Welcome to the app!</string>
    <string name="logged_in_title">You\'re logged in.</string>
    <string name="logged_out_title">You\'re logged out.</string>

    <!-- "Log in" and "Log out" buttons -->
    <string name="button_login">Log in</string>
    <string name="button_logout">Log out</string>

    <!-- User profile -->
    <string name="user_profile">
        Name: %1$s\n
        Email: %2$s
    </string>

    <!-- Metadata -->
    <string name="textview_metadata_heading">Metadata</string>
    <string name="textview_metadata_info">Use the text box and buttons below to get and set the \'country\' field in the user\'s metadata.</string>

    <!-- "Get" and "Set" buttons -->
    <string name="button_get">Get</string>
    <string name="button_set">Set</string>

    <!-- SnackBar messages-->
    <string name="login_success_message">Successfully logged in! %1$s</string>
    <string name="login_failure_message">Failed to log in. %1$s</string>
    <string name="general_failure_with_exception_code">Failed - exception code: %1$s</string>
    <string name="general_success_message">Success!</string>

</resources>
🛠 Make the following replacements in the XML above:
- Replace
{APP_NAME}with the name of your app.
Create a separate string resource file for Auth0 credentials
There are still two strings that we need to store in a resource file: the Auth0 domain and client ID that the app will use.
Unlike the values you’re storing in strings.xml, these are values that you want to keep secret and don’t want “leaked”. A common approach to dealing with is issue is to store “secret” values like these in a separate resource file so that you can limit access to them. Let’s create a new string resource file for our “secret” Auth0 values.
🛠 In Android Studio’s Project pane, right-click on the values folder. In the menu that appears, select New, which will cause a sub-menu to appear. Select Values Resource File from that sub-menu:
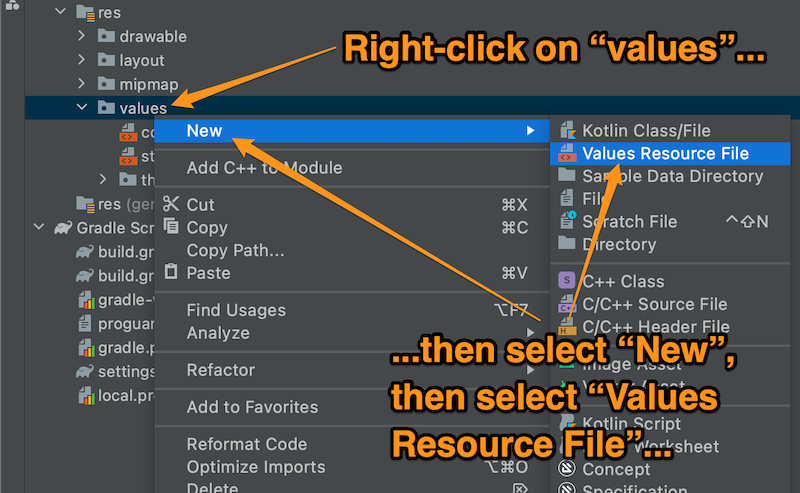
🛠 The New Resource File window will appear. Enter auth0.xml into the File name: field and click the OK button to create a new resource file with that name:

🛠 Open the newly-created auth0.xml file and enter the following into it:
<!-- auth0.xml -->

<?xml version="1.0" encoding="utf-8"?>
<resources>

    <!--
    Secret Auth0 identifiers and settings
    =====================================
    These values are required to connect to Auth0 for authorization,
    which is why we're storing them in their own string resource file.

    DO NOT CHECK THIS FILE INTO A PUBLIC REPOSITORY!
    -->

    <string name="com_auth0_domain">{DOMAIN}</string>
    <string name="com_auth0_client_id">{CLIENT_ID}</string>

</resources>
🛠 Make the following replacements in the XML above:
- Replace
{DOMAIN}with the domain of your app, which you copied from the Settings page of the Auth0 dashboard. - Replace
{CLIENT_ID}with the client ID of your app, which you copied from the Settings page of the Auth0 dashboard.
Define the app’s user interface
It’s time to define the app’s user interface. This is a single-screen app, so everything takes place in the Main Activity file, whose layout is defined in the activity_main.xml file located in the app/res/layout folder.
🛠 Open activity_main.xml, switch to the code view and replace the children of the <androidx.constraintlayout.widget.ConstraintLayout> tag with the following:
<!-- activity_main.xml -->

<?xml version="1.0" encoding="utf-8"?>
<androidx.constraintlayout.widget.ConstraintLayout xmlns:android="http://schemas.android.com/apk/res/android"
    xmlns:app="http://schemas.android.com/apk/res-auto"
    xmlns:tools="http://schemas.android.com/tools"
    android:layout_width="match_parent"
    android:layout_height="match_parent"
    tools:context=".MainActivity">

    <ScrollView xmlns:android="http://schemas.android.com/apk/res/android"
        android:layout_width="fill_parent"
        android:layout_height="fill_parent"
        tools:ignore="MissingConstraints">

        <LinearLayout xmlns:android="http://schemas.android.com/apk/res/android"
            android:orientation="vertical"
            android:layout_width="match_parent"
            android:layout_height="match_parent"
            android:gravity="center">

            <TextView
                android:id="@+id/textview_title"
                android:layout_width="wrap_content"
                android:layout_height="wrap_content"
                android:layout_marginTop="100dp"
                android:text="@string/initial_title"
                android:textSize="26sp"
                app:layout_constraintEnd_toEndOf="parent"
                app:layout_constraintStart_toStartOf="parent"
                app:layout_constraintTop_toTopOf="parent" />

            <Button
                android:id="@+id/button_login"
                android:layout_width="200dp"
                android:layout_height="wrap_content"
                android:layout_marginTop="36dp"
                android:text="@string/button_login"
                app:layout_constraintEnd_toEndOf="@+id/textview_title"
                app:layout_constraintStart_toStartOf="@+id/textview_title"
                app:layout_constraintTop_toBottomOf="@+id/textview_title" />

            <Button
                android:id="@+id/button_logout"
                android:layout_width="200dp"
                android:layout_height="wrap_content"
                android:text="@string/button_logout"
                android:enabled="false"
                app:layout_constraintEnd_toEndOf="@+id/textview_title"
                app:layout_constraintStart_toStartOf="@+id/textview_title"
                app:layout_constraintTop_toBottomOf="@+id/button_login" />

            <TextView
                android:id="@+id/textview_user_profile"
                android:layout_width="wrap_content"
                android:layout_height="wrap_content"
                app:layout_constraintEnd_toEndOf="parent"
                app:layout_constraintStart_toStartOf="parent"
                app:layout_constraintTop_toBottomOf="@id/button_logout"
                android:layout_margin="18dp"/>

            <LinearLayout
                android:id="@+id/linearlayout_metadata"
                android:visibility="invisible"
                android:layout_width="wrap_content"
                android:layout_height="wrap_content"
                android:orientation="vertical"
                android:gravity="center"
                android:layout_marginTop="16dp"
                app:layout_constraintEnd_toEndOf="parent"
                app:layout_constraintStart_toStartOf="parent"
                app:layout_constraintTop_toBottomOf="@id/textview_user_profile">

                <TextView
                    android:id="@+id/textview_metadata_heading"
                    android:layout_width="wrap_content"
                    android:layout_height="wrap_content"
                    android:textStyle="bold"
                    android:text="@string/textview_metadata_heading"/>

                <TextView
                    android:id="@+id/textview_metadata_info"
                    android:layout_width="match_parent"
                    android:layout_height="50dp"
                    android:layout_margin="8dp"
                    android:textAlignment="center"
                    android:text="@string/textview_metadata_info"
                    android:textSize="12sp" />

                <EditText
                    android:id="@+id/edittext_country"
                    android:layout_width="match_parent"
                    android:layout_height="wrap_content"
                    android:hint="Enter country" />

                <LinearLayout
                    android:layout_width="wrap_content"
                    android:layout_height="wrap_content"
                    android:orientation="horizontal"
                    android:gravity="center">

                    <Button
                        android:id="@+id/button_get"
                        android:layout_width="100dp"
                        android:layout_height="wrap_content"
                        android:text="@string/button_get"
                        android:layout_marginRight="8dp"/>

                    <Button
                        android:id="@+id/button_set"
                        android:layout_width="100dp"
                        android:layout_height="wrap_content"
                        android:text="@string/button_set"
                        android:layout_marginLeft="8dp"/>

                </LinearLayout>

            </LinearLayout>

        </LinearLayout>

    </ScrollView>

</androidx.constraintlayout.widget.ConstraintLayout>
This XML above defines:
- A
ScrollViewthat encapsulates the entire user interface. It allows the user to scroll up and down when the device screen isn’t tall enough to display the entire activity at once. - A
LinearLayoutcontained within theScrollView. AScrollViewcan contain only one child, so we’re using theLinearLayoutto encapsulate all the views in theScrollView. textview_title: ATextViewthat displays a greeting message when the app launches and the user’s logged-in/out status afterward.button_loginandbutton_logout: TheButtons that the user taps to log in and out.textview_user_profile: ATextViewthat displays the name and email of the logged-in user.layout_metadata: ALinearLayoutthat encapsulates all the metadata-related controls.textview_metadata_heading: ATextViewthat displays the heading of the metadata section.textview_metadata_country: ATextViewthat instructions for editing the user’s country.edittext_country: AnEditTextfor displaying and editing the user’s country.button_getandbutton_set: TheButtons to get and set the user’s country.
Here’s the “blueprint view” of the resulting layout. I’ve labeled the controls in the layout with their ids:

At this point in the exercise, you’ve completed all the setup. You’ve registered the app with Auth0 and set up the app’s build files and user interface. In the next step, you’ll write the app’s code!


