In this tutorial I am going to show you how to configure PHP, MySQL, Apache HTTP Server for developing PHP based web applications. You may create PHP based standalone applications or web based applications and you want to run them in development environment before deploying into the production or live environment.
I will also show you how to enable mod_rewrite for htaccess file for Apache HTTP server so that you can also setup your WordPress CMS or any other PHP based applications where you want to use htaccess file in local environment for development purpose. You can also test some directives in htaccess file in your development environment before applying them into the live server.
Prerequisites
PHP 7.4, Apache HTTP Server 2.4, MySQL 8.0.26
Install Required Softwares
You need to first install the required softwares before you setup PHP, MySQL and Apache server.
PHP Installation
Here I am going to setup zip archive version of PHP. So you can download PHP binary thread safe from the link https://windows.php.net/download/. Extract in the C drive. For example, the root directory of PHP is C:\php-7.4.22.
MySQL Installation
Check the link to download and install MySQL server https://roytuts.com/installing-mysql-zip-archive-in-windows/.
Apache HTTP Server Installation
Here again I will download the zip archive version of Apache HTTP server and configure it. Download Apache HTTP Server binary from the link https://www.apachelounge.com/download/. Extract in the C drive. For example, the root directory of Apache server is C:\Apache24.
Configure Apache and PHP
Open C:\Apache24\conf\httpd.conf file and update as below.
Add the following lines at the end of the file:
# PHP7 module
PHPIniDir "C:\php-7.4.22"
LoadModule php7_module "C:/php-7.4.22/php7apache2_4.dll"
AddHandler application/x-httpd-php .php
AddType application/x-httpd-php .php .html
Replace the following DirectoryIndex.
Replace
<IfModule dir_module>
    DirectoryIndex index.html
</IfModule>
By
<IfModule dir_module>
    DirectoryIndex index.html index.htm index.php
</IfModule>
Copy C:\php-7.4.22\php.ini-development and rename to php.ini in the same location.
Add the following lines into php.ini file:
extension=C:/php-7.4.22/ext/php_gd2.dll
extension=C:/php-7.4.22/ext/php_mbstring.dll
extension=C:/php-7.4.22/ext/php_mysqli.dll
extension=C:/php-7.4.22/ext/php_openssl.dll
extension=C:/php-7.4.22/ext/php_soap.dll
extension=C:/php-7.4.22/ext/php_xmlrpc.dll
Update the values as below in php.ini file:
memory_limit = 256M
post_max_size = 128M
upload_max_filesize = 128M
Enable mod_rewrite for Apache. The mod_rewrite enablement is required when you want to apply some security directives in the htaccess file for your Apache HTP Server. For example, for WordPress CMS (Content Management System) you need to enable mod_rewrite.
- Open C:\Apache24\conf\httpd.conf file
- Find the line which contains #LoadModule rewrite_module modules/mod_rewrite.so and remove (#) from start of line to make the module enabled.
- Find all occurrences of
AllowOverride Noneand replace byAllowOverride All
Testing PHP
So all required configurations are done. Now I am going to test whether PHP is working fine or not.
I will create a PHP file to see the PHP information using phpinfo() function. Create a file info.php under C:\Apache24\htdocs folder with the following code.
<?php

echo phpinfo();
Now run the HTTP server by executing the file httpd.exe from the command line tool.
Hit the URL http://localhost/info.php in the browser and you will see the following information on the page:
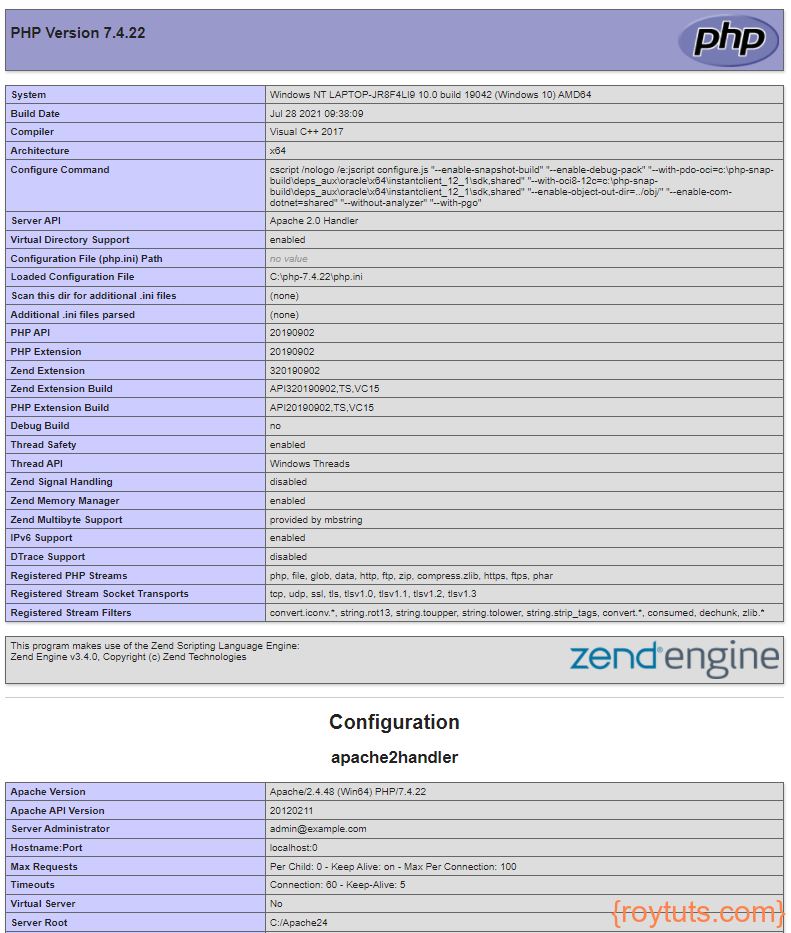
The page will have more information but I have cropped and shown only PHP and Apache HTTP Server information.
Test PHP MySQL Connection
The next step is to check whether you are able to connect to MySQL database from your PHP code.
Create a PHP file called php-mysql.php under the same htdocs folder with the following code:
<?php
$servername = "localhost";
$username = "root";
$password = "root";

// Create connection
$conn = new mysqli($servername, $username, $password);

// Check connection
if ($conn->connect_error) {
  die("Connection failed: " . $conn->connect_error);
}

echo "Connected successfully";
?>
Make sure you change values for $username, $password, $host and $port in the above code according to your configurations.
Hitting the URL http://localhost/php-mysql.php in the browser will give you the following output:
Connected successfullyThat’s all about how to setup PHP, MySQL and Apache HTTP Server to build PHP based applications.