Autoscaling is one of the basic and useful features offered by cloud computing. The cloud’s elastic nature combined with automation makes this feature possible. However, using this feature in the right way is challenging in real time. Almost all cloud providers offer this essential feature. In AWS, this feature is available as an “AutoScalingGroup (ASG)”; in Microsoft Azure, it is enabled with “Virtual Machine Scale Set (VMSS)”, and in Google Cloud, it is available as “Managed Instance Groups (MIG)”. This article focuses on Microsoft Azure’s “Virtual Machine Scale Set (VMSS)” and how to use it in various use-cases.
What is autoscaling?
Autoscaling provides the capability to run your application or workload with the required resources (resources, in this case, are virtual machines) without interruption. It assures you that the virtual machines you requested for your application are always available and up. If the virtual machines are interrupted, autoscaling replaces those faulty virtual machines with new ones.
Types of autoscaling
In general, there are two types of autoscaling –
- Time-Based Autoscaling.
- Metrics-Based Autoscaling.
Time-Based autoscaling is nothing but scaling based on the scheduled time. This type needs some extent of manual prediction of your demand. For example, suppose you know that your application experiences high traffic during certain times of the day, week or month and the number of virtual machines needed to meet that demand. In that case, you can configure the rules to spin up and shut down those needed virtual machines only during that specific time period. On the other hand, Metrics-Based autoscaling enables the scaling activity to be based on the key performance metrics of your resource like CPU, Memory, Thread Count, etc.
Autoscaling in action
Let us start some experimentation with autoscale settings. The first example demonstrates the Time-Based autoscale settings, followed by Metrics-Based autoscale settings.
Time-Based Autoscaling
As I mentioned above, configuring the Time-Based autoscaling is straightforward. It is something like configuring the cron jobs in Unix or task scheduler in Windows. I will use the Cloud Shell to create the Virtual Machine Scale Set (VMSS) and attach the time-based rules.
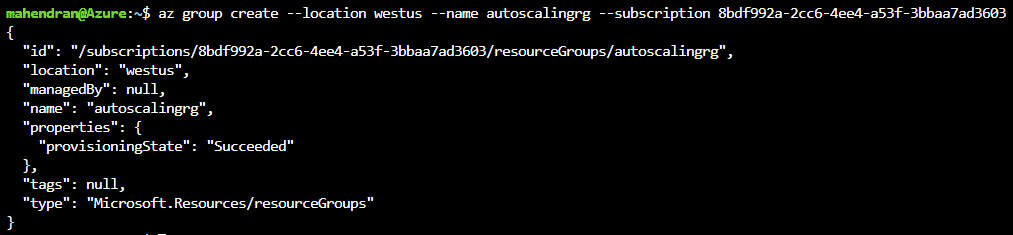
The first step is creating a resource group before creating other resources. The command below creates the resource group called “autoscalingrg”.
|
1 |
$ az group create --location westus --name autoscalingrg --subscription <your subscription id> |
The next step is to create the virtual machine scale set, and the command below creates the virtual machine scale set in the us-west region with one RHEL virtual machine under the resource group created in step 1.
|
1 |
$az vmss create --resource-group autoscalingrg --name timebasedvmss --image RHEL --upgrade-policy-mode automatic --instance-count 1 --admin-username maheadmin --generate-ssh-keys |
You can view the virtual machine scale set details using the command below or through the Azure portal, as shown in Figure 1
|
1 |
$ az vmss list --resource-group autoscalingrg |
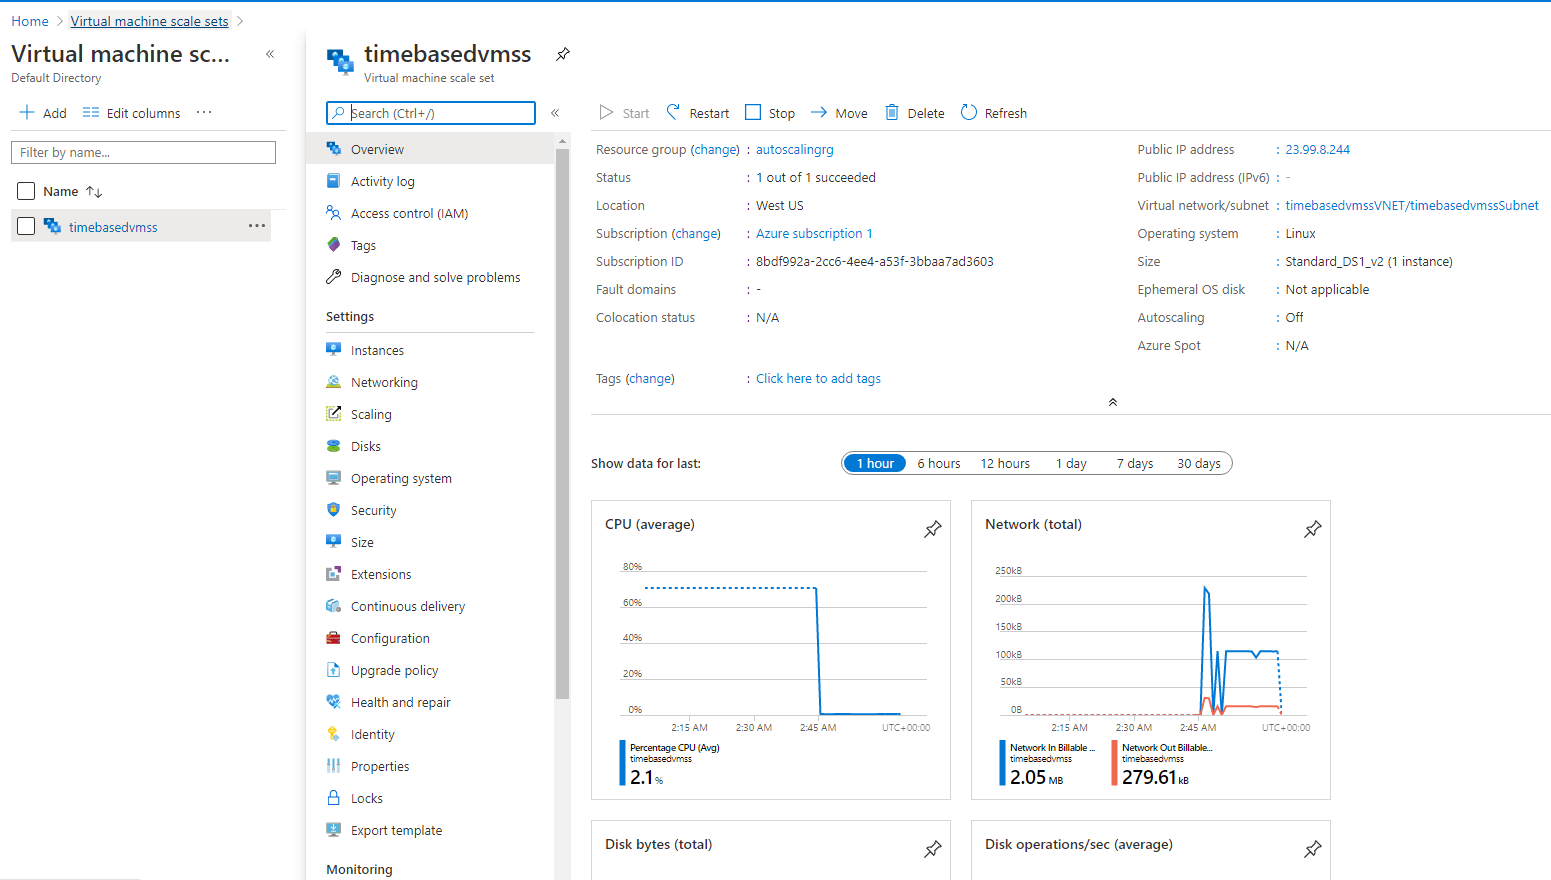
Figure 1. Virtual Machine Scale Set
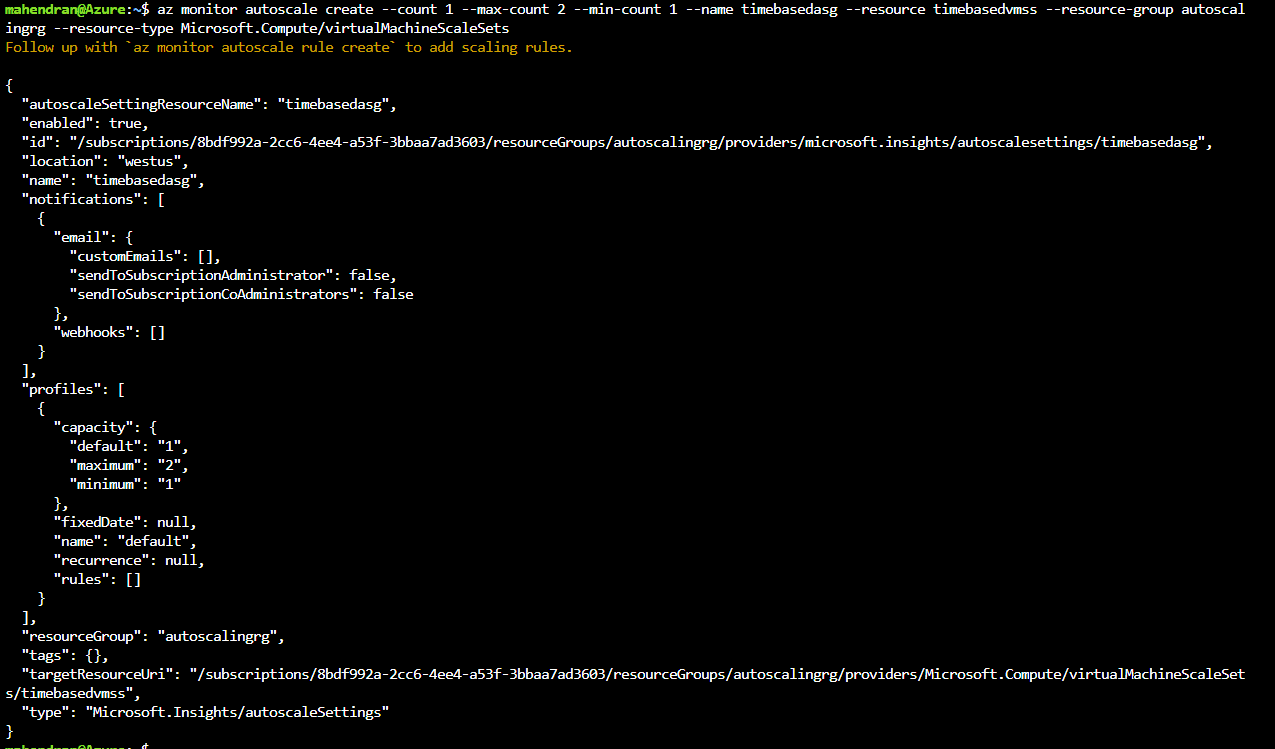
Next, you need to create the default autoscale profile and attach it to the virtual machine scale set created in the previous step. This command will create the profile:
|
1 |
$ az monitor autoscale create --count 1 --max-count 2 --min-count 1 --name timebasedasg --resource timebasedvmss --resource-group autoscalingrg --resource-type Microsoft.Compute/virtualMachineScaleSets |
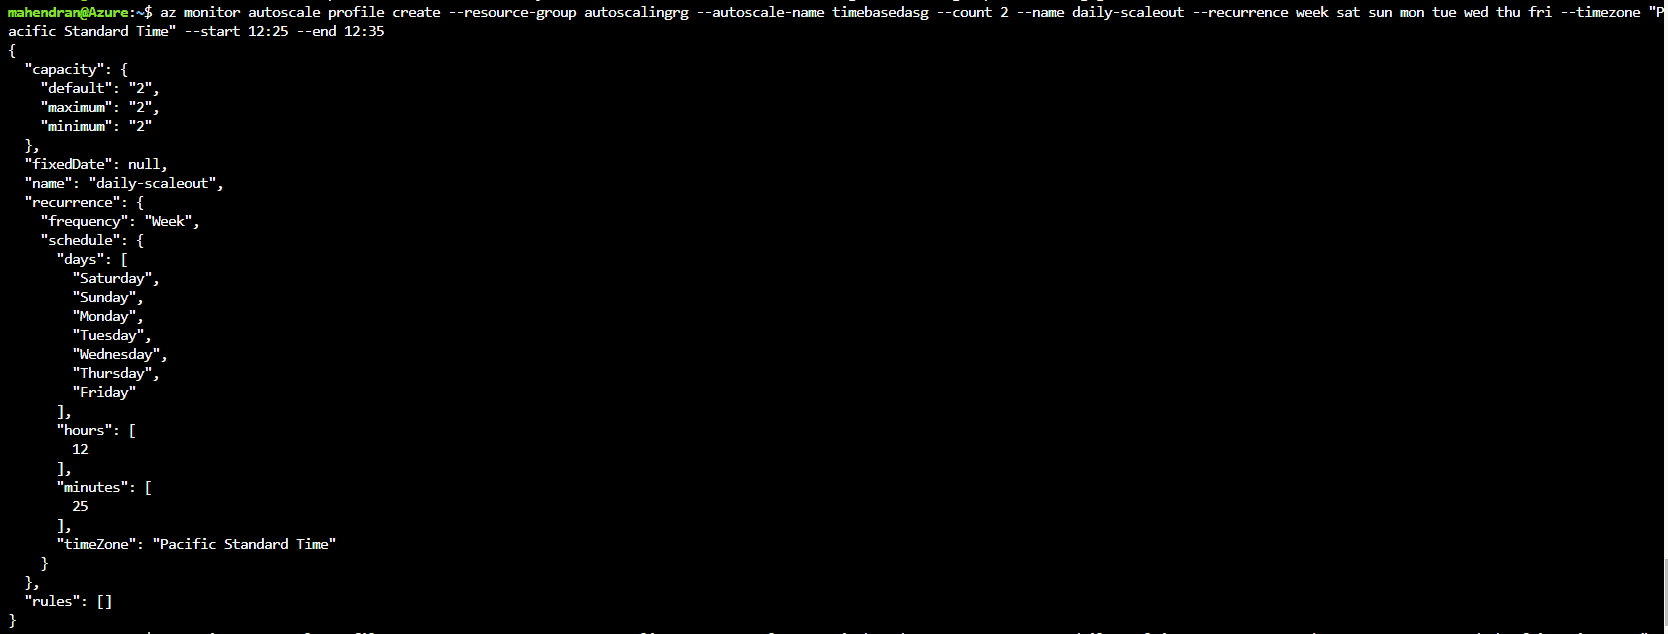
The next step is to create one autoscaling profile to scale out and another one to scale in the virtual machine scale set based on a time schedule. I am scaling out the VMSS every day at 12:25 PM PST and scaling in every day at 12:40 PM PST. This means that the virtual machine scale set scales from one (1) instance into two (2) instances every day between 12:25 and 12:40 PM PT. The reason to create two (2) profiles is that the recurrence profile only has the start time. Even though you specify the end time, it is not used in the recurrence profile. Feel free to modify the times so that you can see the autoscaling actions more quickly.
|
1 |
$az monitor autoscale profile create --resource-group autoscalingrg --autoscale-name timebasedasg --count 2 --name daily-scaleout --recurrence week sat sun mon tue wed thu fri --timezone "Pacific Standard Time" --start 12:25 --end 12:35 |
|
1 |
$az monitor autoscale profile create --resource-group autoscalingrg --autoscale-name timebasedasg --count 1 --name daily-scalein --recurrence week sat sun mon tue wed thu fri --timezone "Pacific Standard Time" --start 12:40 --end 12:45 |
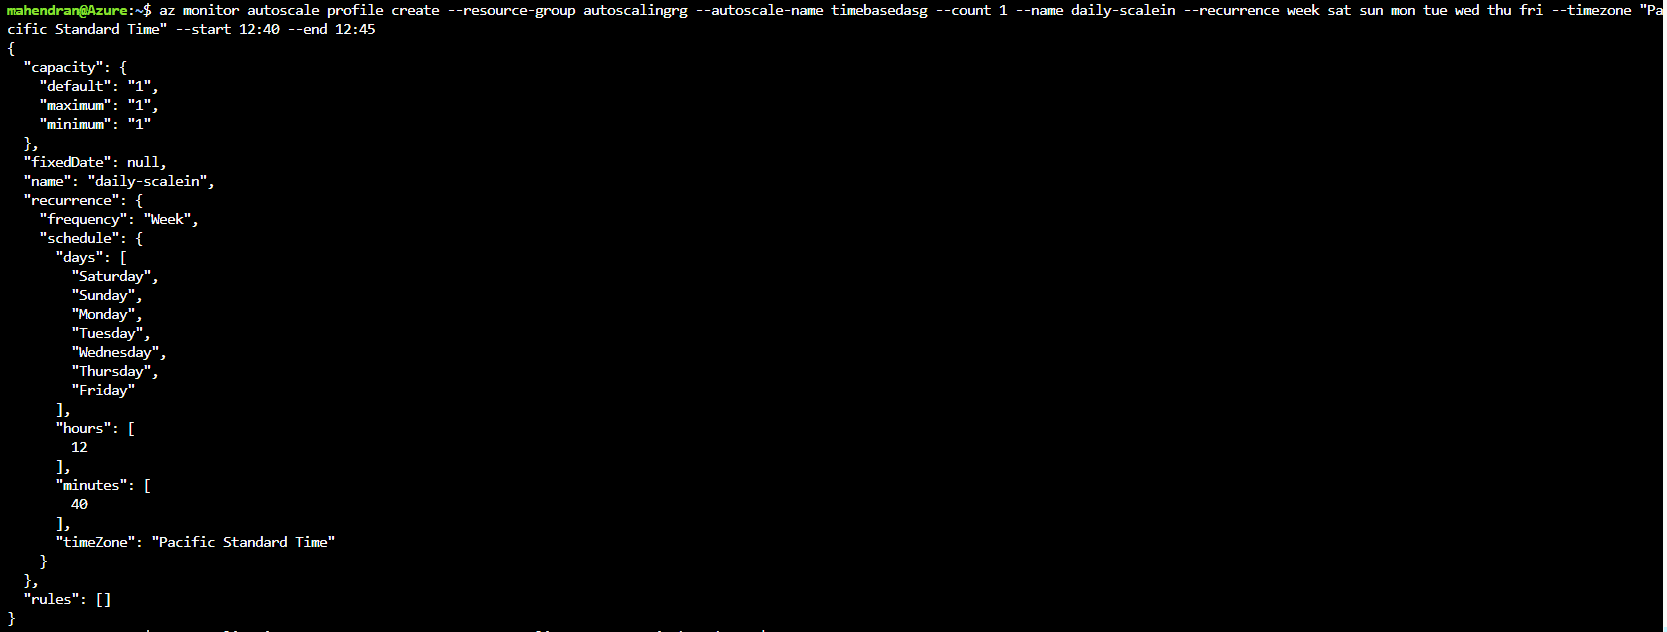
You can verify these settings through the Azure Portal, as shown in Figure 2. Note that it may take a few minutes for these details to show up, or you may have to refresh the page.
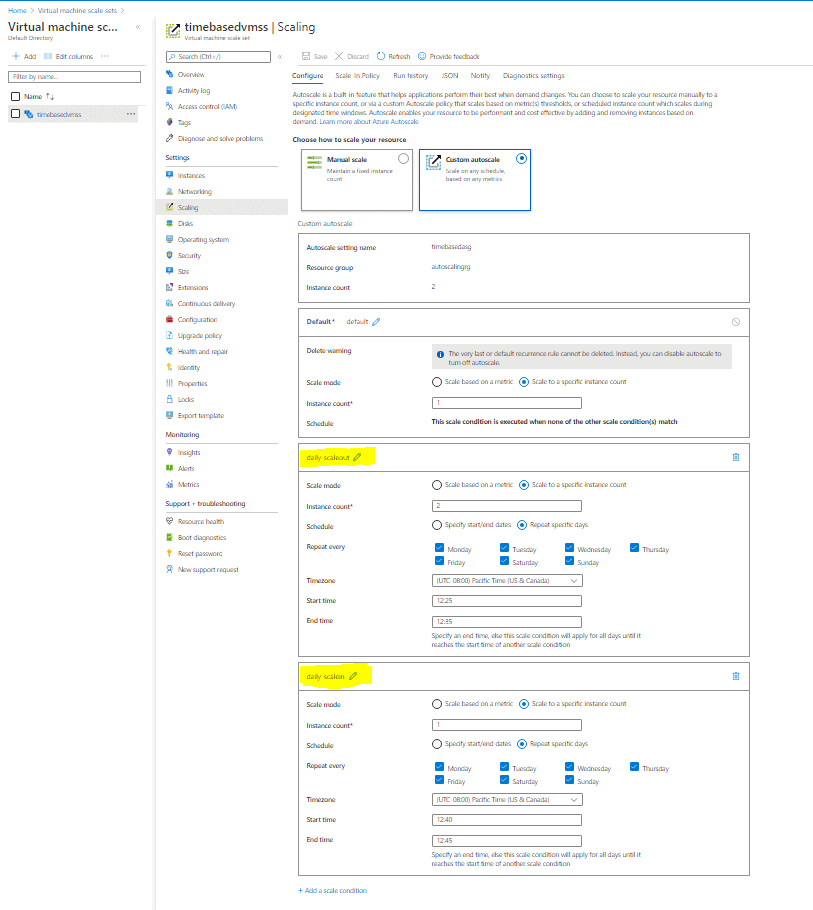
Figure 2. Attaching the Autoscale Profiles to the Virtual Machine Scale Set
Figure 3 shows the autoscale profile “daily-scaleout” scaled out the stack from 1 instance to 2 instances.
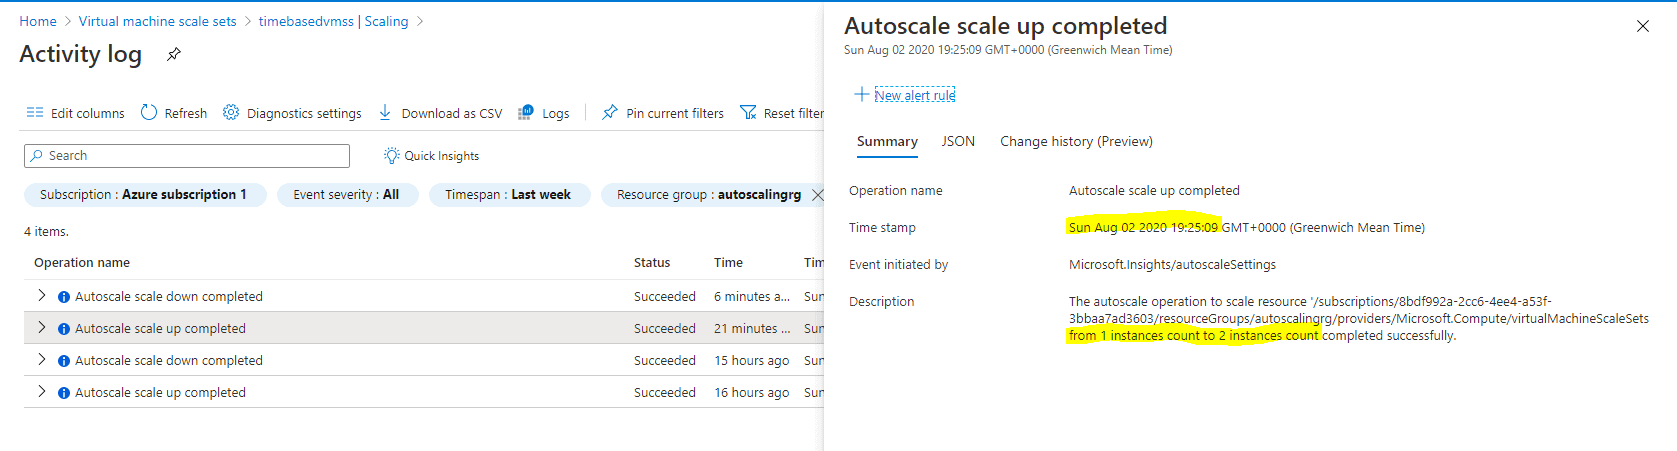
Figure 3. Autoscale Profile scaling out the stack from 1 instance to 2 instances
Figure 4 shows the autoscale profile “daily-scalein” scaled in the stack from 2 instances to 1 instance.
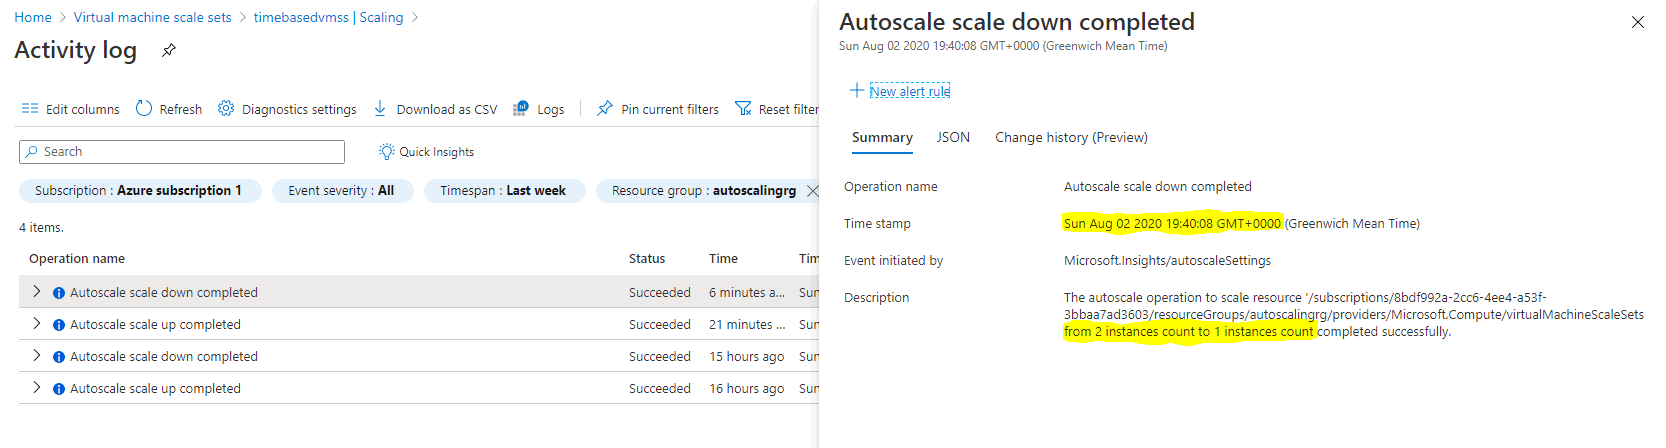
Figure 4. Autoscale Profile Scaling in the stack from 2 instances to 1 instance
You can also list the instances using the command-line after scale-out and scale-in, as shown in Figure 5
|
1 |
az vmss list-instances --resource-group autoscalingrg --name timebasedvmss | grep name |
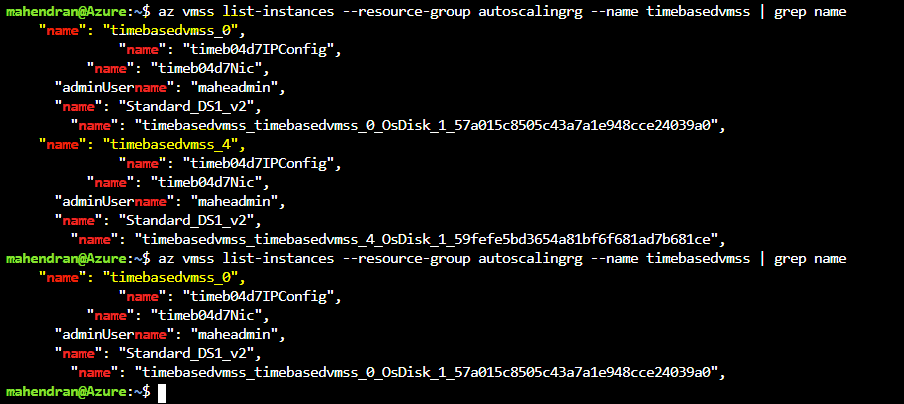
Figure 5. Verifying the number of instances through command line
Use cases of Time-Based autoscaling
There are several reasons that Time-Based autoscaling can be useful. Here are two use cases of Time-Based autoscaling –
- Development environments – Mostly, the development environments are used only during weekday business hours (9 AM – 5 PM). They are not used during the weekends. The Time-Based autoscaling settings launch the development environments only when they are mainly used and automatically shut down the instances when they are not needed.
- Production Environments – If you could predict your application’s demand based on the history of its usage, you can scale out the stack only during the high-demand window and scale in the stack when least used.
Metrics-Based Autoscaling
Now, let create a new autoscale setting and attach some rules to scale the virtual machine scale set based on the virtual machine’s average CPU utilization.
I deleted the previously created time based autoscale setting – “timebasedasg” and created the new metric based autoscaling setting called “metricbasedasg”.
To delete the previously created “timebasedasg” autoscale setting , use this command:
|
1 |
$ az monitor autoscale delete --resource-group autoscalingrg --name timebasedasg |

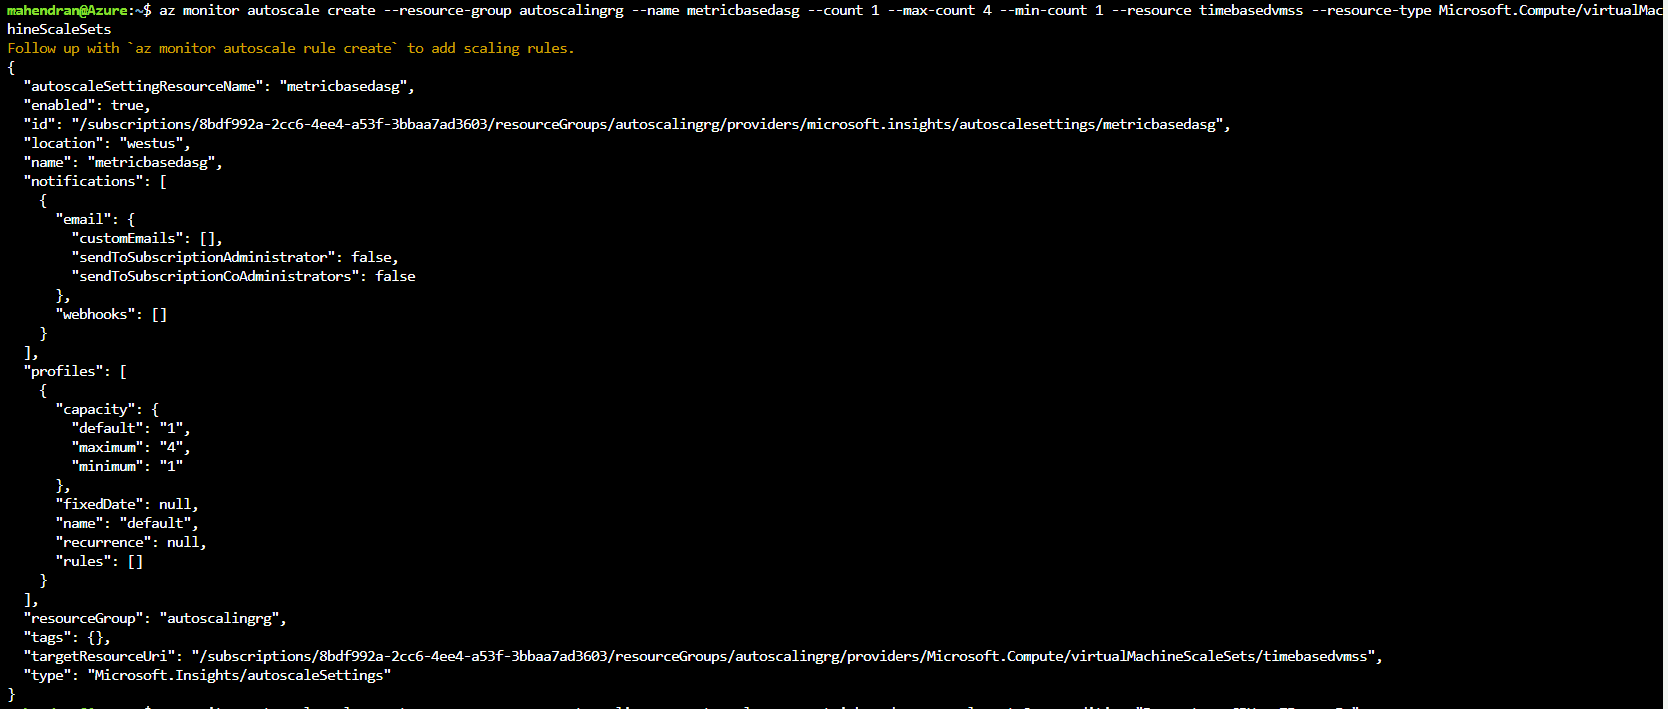
To create the new metric based autoscale settings, run the next command:
|
1 |
$az monitor autoscale create --resource-group autoscalingrg --name metricbasedasg --count 1 --max-count 4 --min-count 1 --resource timebasedvmss --resource-type Microsoft.Compute/virtualMachineScaleSets |
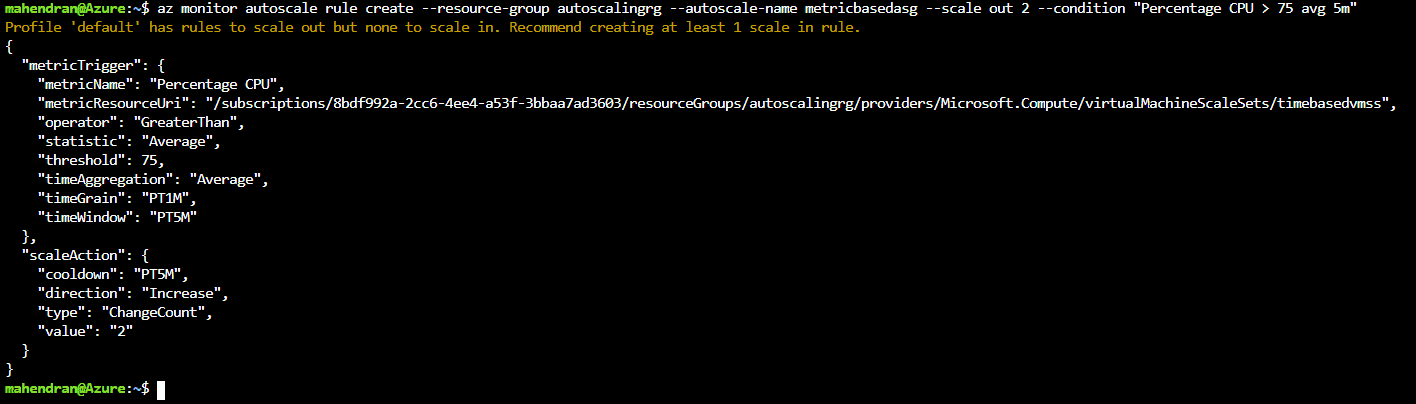
The next step is to create the scaling rules to scale out and scale in the virtual machine scale sets.
- Scale-out rule – when the average CPU utilization goes above 75% for 5 minutes, scale out the stack to 2 instances.
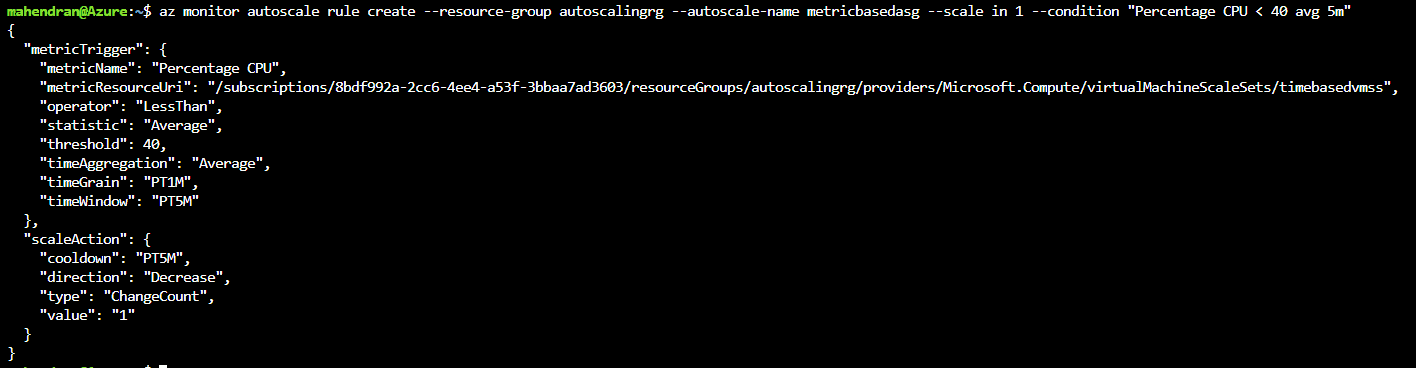
- Scale-in rule – when the average CPU utilization goes below 40% for 5 minutes, scale in the stack by 1 instance.
Use these commands to create the rules:
|
1 |
$ az monitor autoscale rule create --resource-group autoscalingrg --autoscale-name metricbasedasg --scale out 2 --condition "Percentage CPU > 75 avg 5m" |
|
1 |
$ az monitor autoscale rule create --resource-group autoscalingrg --autoscale-name metricbasedasg --scale in 1 --condition "Percentage CPU < 40 avg 5m" |
To test the autoscaling activity, you need to run some process to trigger the CPU spike on the virtual machine created as part of the virtual machine scale set. Initially, I created 1 virtual machine. I am using the RHEL image to launch the virtual machines. To trigger the CPU spike, I am using the “stress” utility. You can use the following commands to install the stress utility and to trigger the CPU spike. You need to SSH into the virtual machine and then run the below commands on the virtual machine. Please follow the below instructions to SSH into the Virtual Machine.
When you created the virtual machine scale set, you created it with the admin account and the generate SSH keys option. To retrieve those details, you can use the below command –
|
1 |
$ az vmss list --resource-group autoscalingrg |
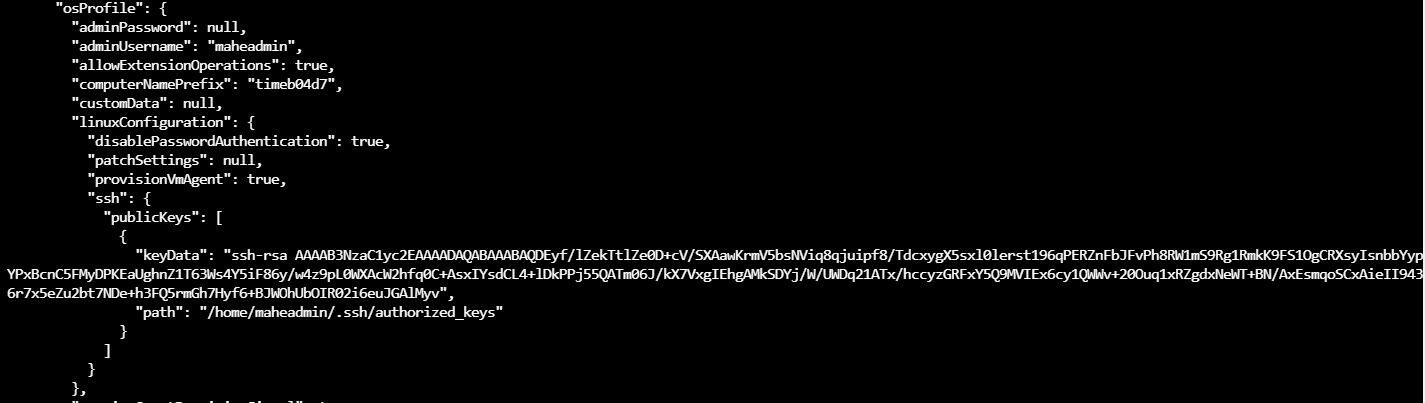
Now to SSH into the above, you need to retrieve the public IP of that instance. You can also retrieve it from the azure portal console, as show in Figure 6. The value of KeyData in the above output is the SSH public key from where you issued the vmss create command.
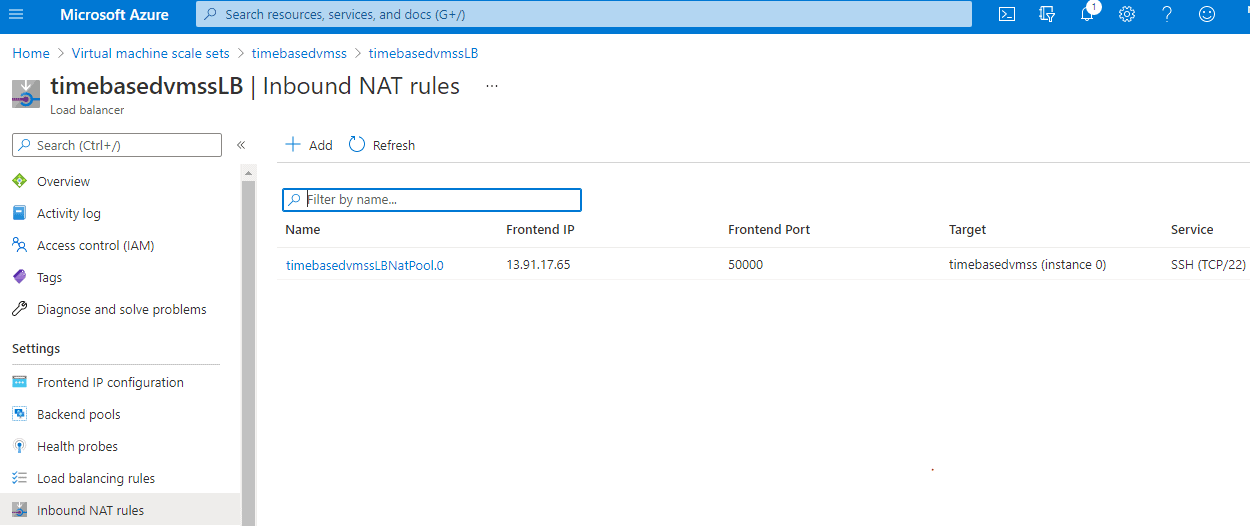
Figure 6. Find the IP and front end port
Here, I have the inbound NAT rule enabled, so I should use the port 50000 instead of using the standard port 22. From the cloudshell, issue the below command, replacing the IP address, to ssh into the virtual machine.
|
1 |
$ ssh maheadmin@13.91.17.65 -p 50000 |

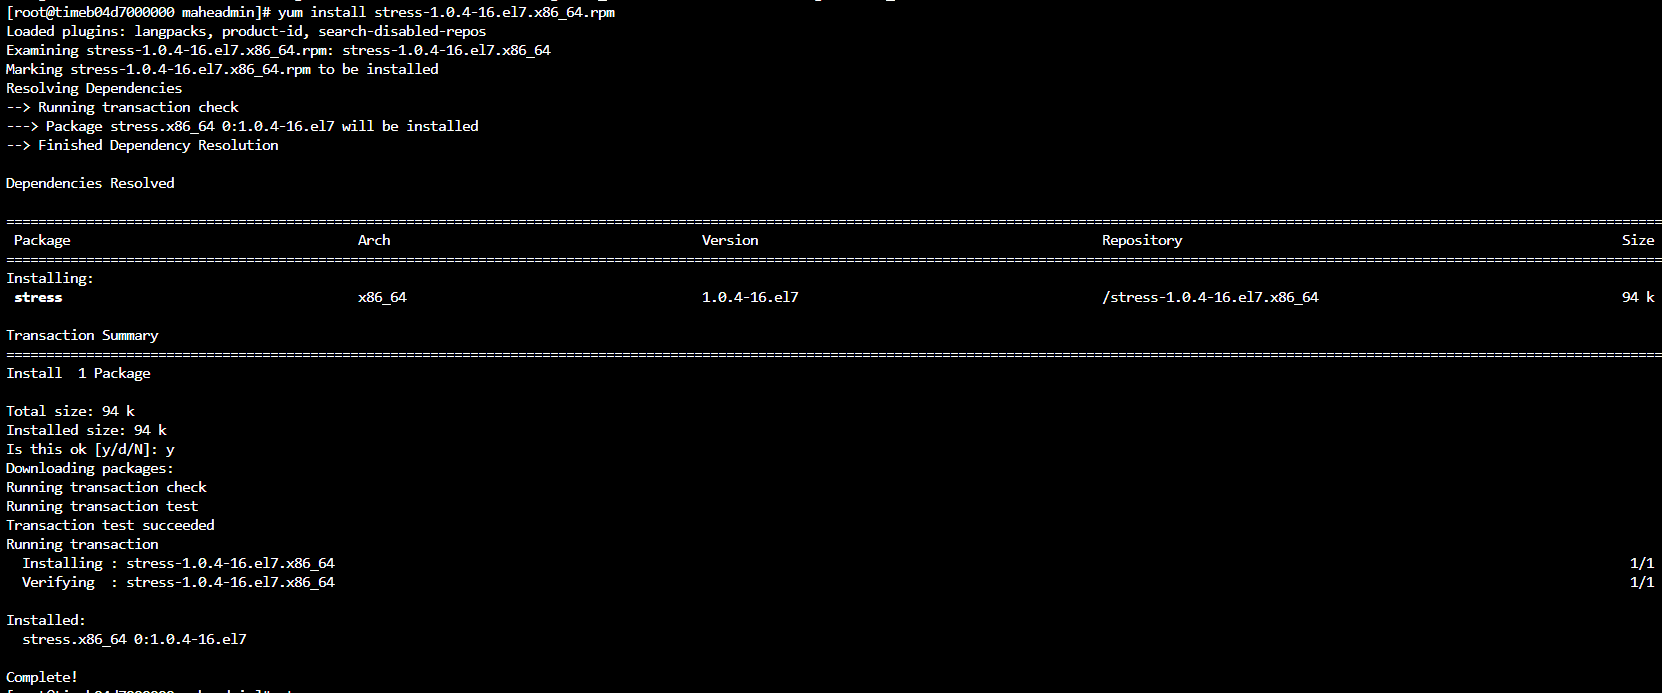
Now, install the stress utility and run it.
|
1 2 3 |
$ wget <a href="https://download-ib01.fedoraproject.org/pub/epel/7/x86_64/Packages/s/stress-1.0.4-16.el7.x86_64.rpm">https://download-ib01.fedoraproject.org/pub/epel/7/x86_64/Packages/s/stress-1.0.4-16.el7.x86_64.rpm</a> $ sudo yum install stress-1.0.4-16.el7.x86_64.rpm $ stress -c 2 |


Once you execute the stress command, you can check the CPU utilization of the virtual machine either using the “top” command on the instance or through the Azure Portal, as shown in Figure 7.
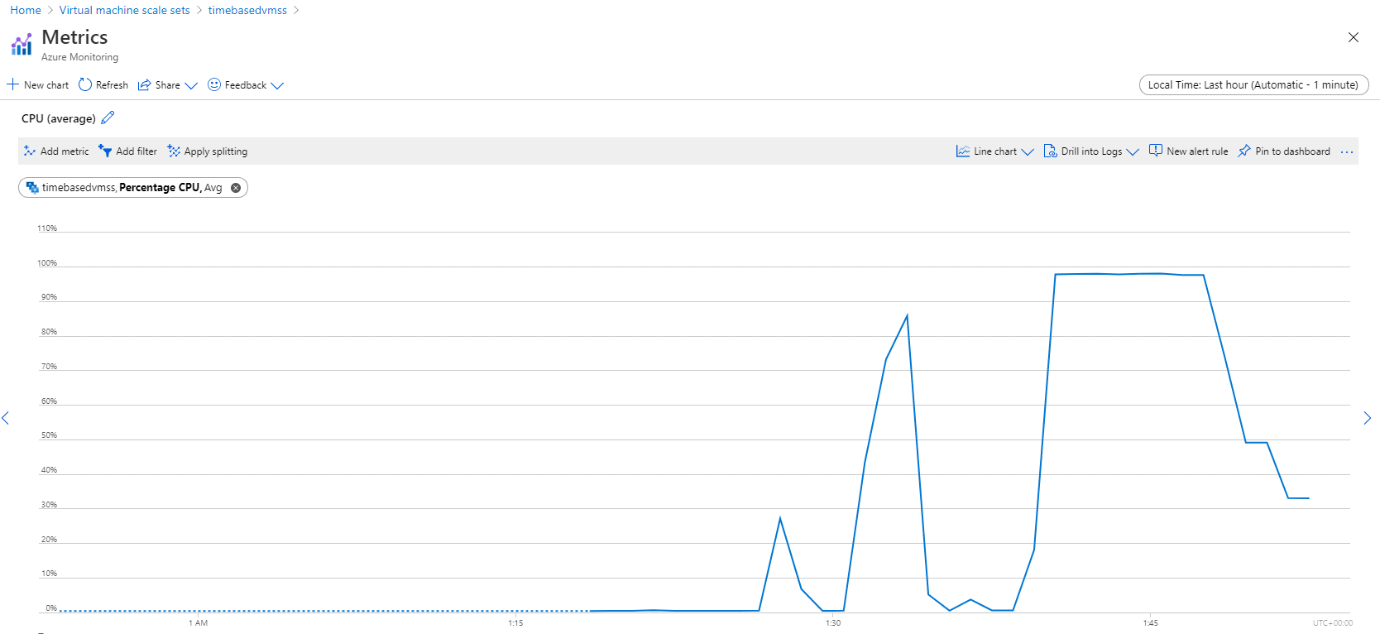
Figure 7. CPU spike on the virtual machine as we execute the stress command on the instance
You can see the CPU getting spiked to around 100%, as shown in Figure 8. The autoscaling rule scaled out the stack from 1 instance to 3 instances as shown in Figure 9 and then from 3 instances to 4 instances as shown in Figure 10.
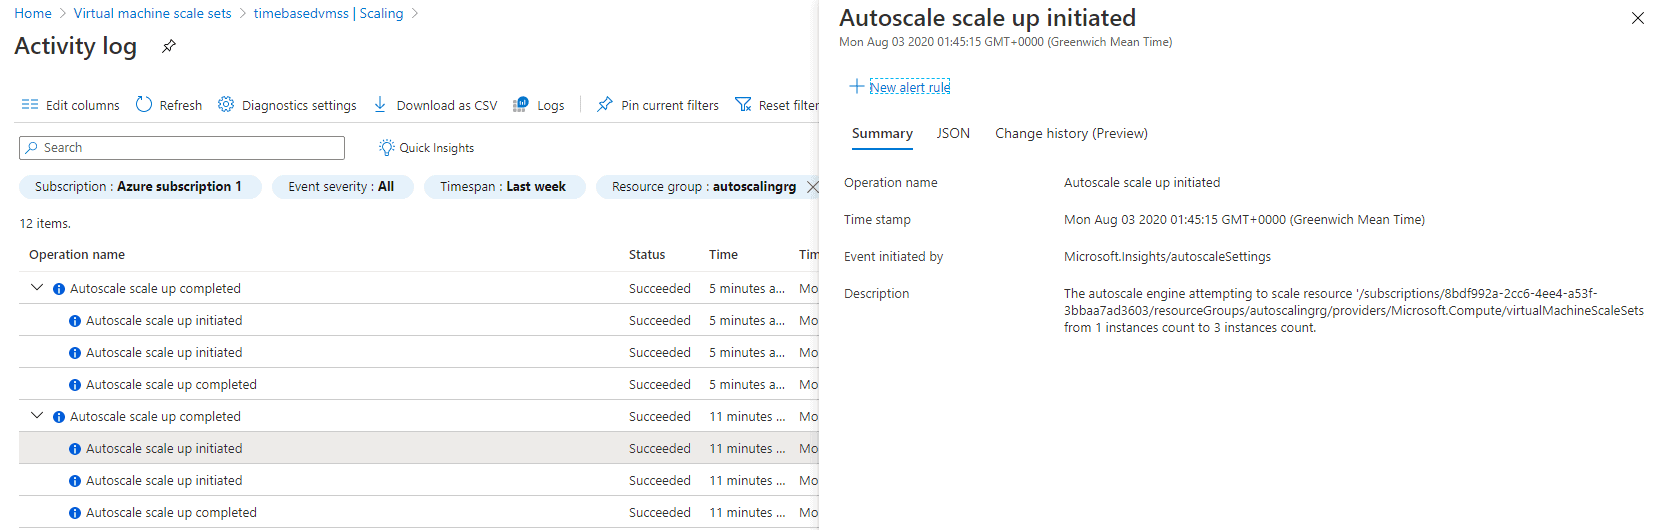
Figure 8. Autoscaling rule scaling out the stack from 1 instance to 3 instances.
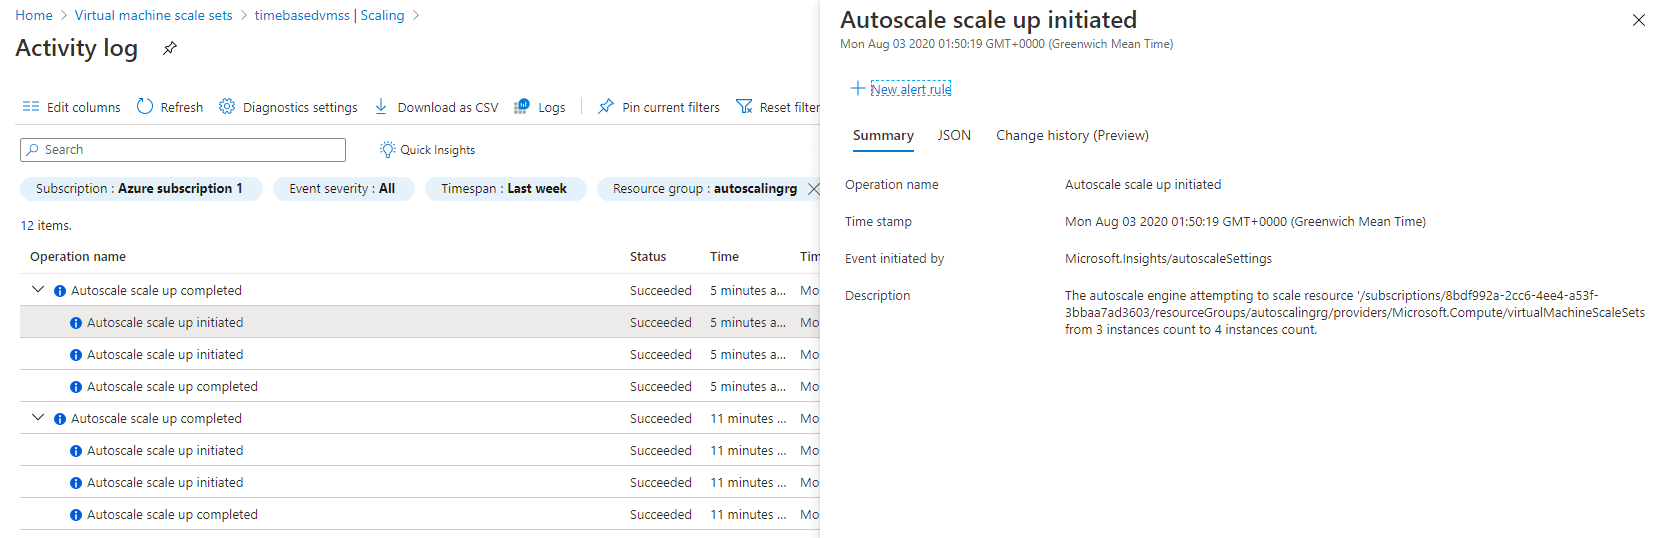
Figure 9. Autoscaling rule scaling out the stack from 3 instance to 4 instances
After scaling out to 4 instances, the average CPU utilization of the stack came down to below 40%, as shown in Figure 9
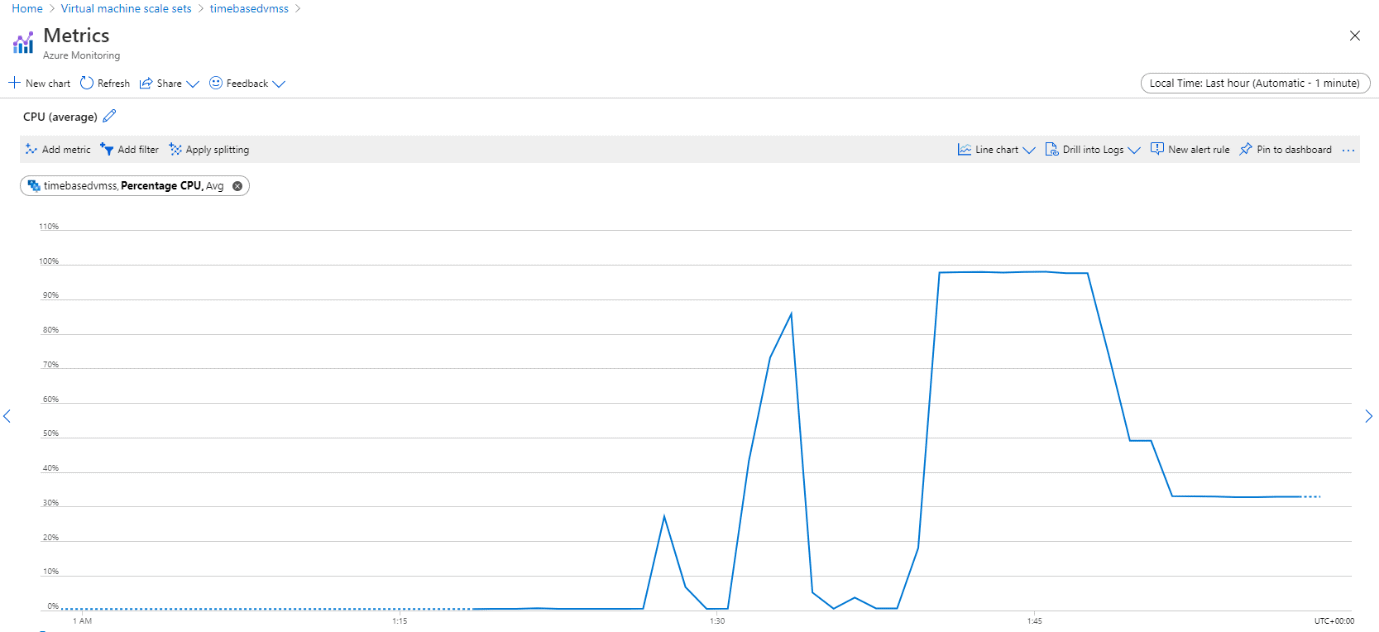
Figure 10. The Average CPU utilization of the stack fell below 40%
The scale-in autoscaling rule was triggered when the average CPU utilization reached below 40%, and it scaled in the stack from 4 instances to 3 instances, as shown in Figure 11.
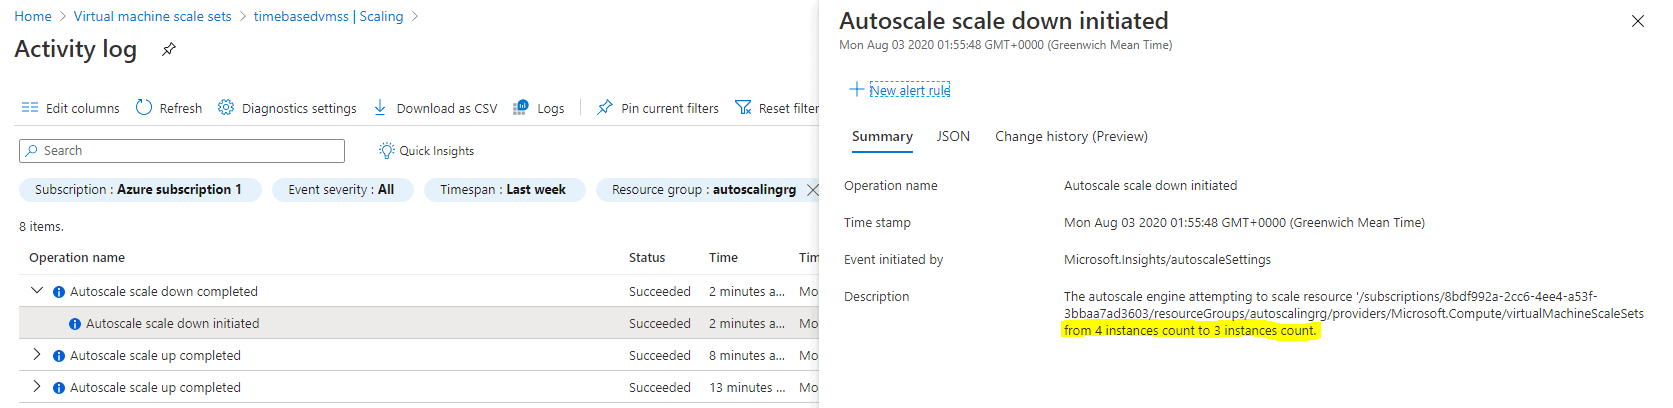
Figure 11. Autoscaling rule scaled in the stack from 4 instances to 3 instances.
The scale-in rule did not stop there. When I stopped the stress command, the average CPU utilization of the stack reduced further, as shown in Figure 12, and the scale-in rule kicked in step by step until the stack size reached the default instance count of 1, as shown in Figure 13 and Figure 14.
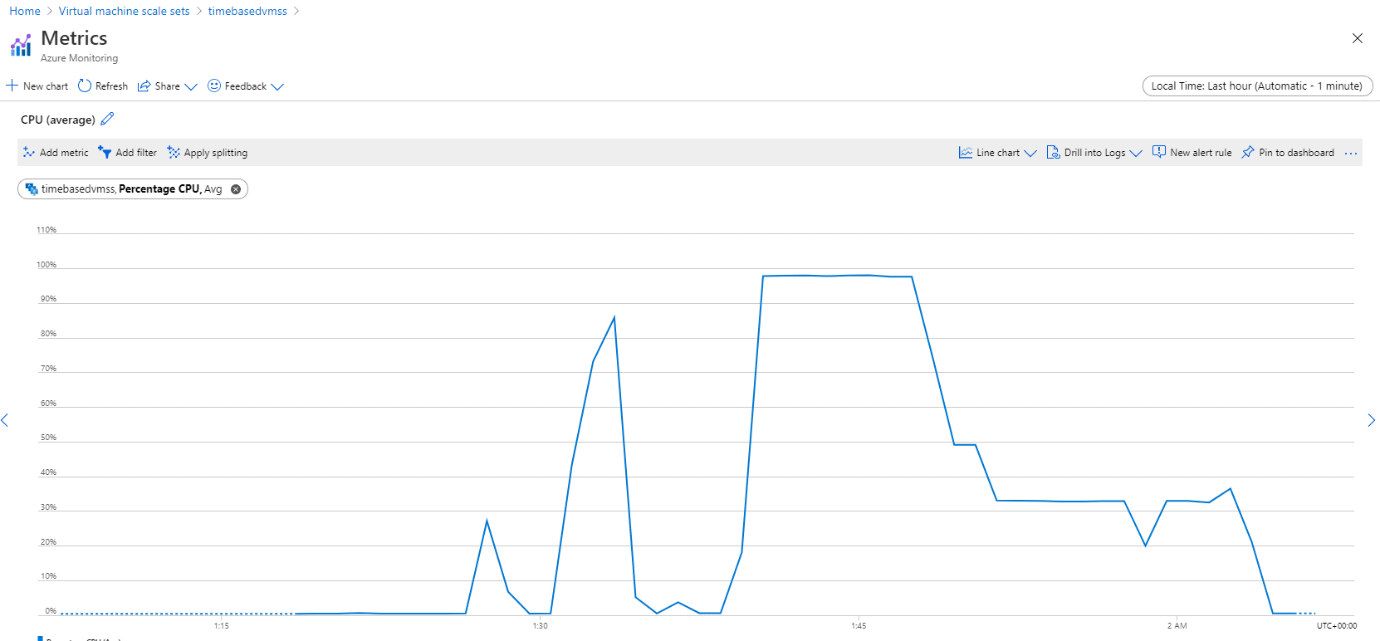
Figure 12. The Average CPU utilization of the stack reduced further after stopping the stress command

Figure 13. Autoscaling rule scaled in the stack from 3 instances to 2 instances.
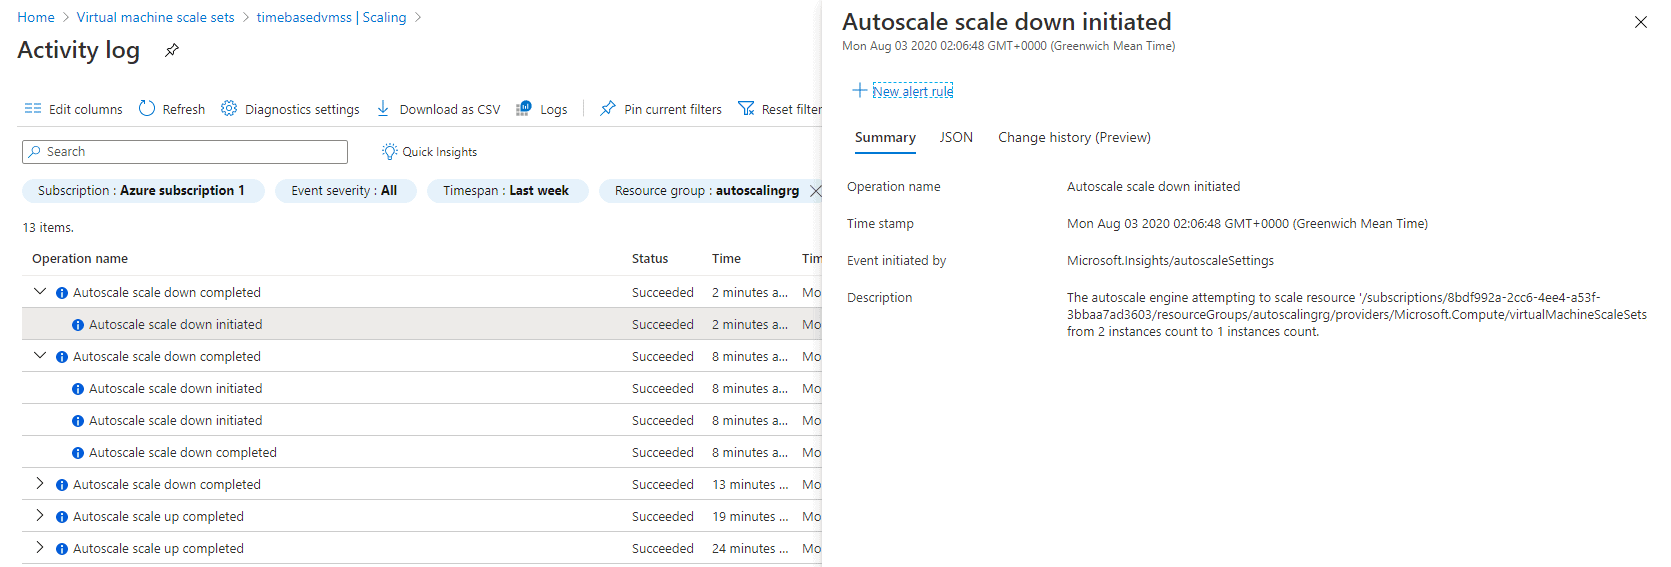
Figure 14. Autoscaling rule scaled in the stack from 2 instances to 1 instance.
Factors to consider when using Metrics-Based Autoscaling
Configuring the Metrics-Based Autoscaling is a little tricky, and you need to consider various factors and vigorous testing before using it in production environments. Below are the factors you need to consider at a high level.
- Identifying the Key Performance Indicator (KPI) of your application is important. Some applications are CPU intensive; some are memory intensive; some services would be both.
- The application should be stateless.
- The virtual machine should be gracefully shut down, and the health checks of the application should be fine-tuned. When the autoscaling rule shuts down or starts up the virtual machines, it will not cause any customer impact.
- The Minimum, Default and Maximum settings of autoscaling profile should be carefully considered so that the application will not run out of instances during normal situations nor will too many instances spin up and increase your costs.
Use cases of Metrics-Based Autoscaling
Below are some use cases of Metrics-Based autoscaling.
- Web servers that are CPU intensive – If you could get the CPU utilization of your web and application servers from the historical data, you can use the Metrics-Based autoscaling rules to scale out the stack during unexpected demands.
- Caching servers – If you are running caching servers like Memcached or Redis on virtual machines, you can configure the Metrics-Based autoscaling rules based on memory utilization.
- Application Servers – If your application is stateless and you could get the historical data of the KPIs, you can use the Metrics-Based autoscaling rules to scale out and scale in the stack.
Autoscaling in Microsoft Azure
Autoscaling is an essential feature of the cloud and should be used to ensure that your application is always ON and available for customers. It also helps to reduce your monthly bill 😊.

Load comments