


TL;DR: XSS vulnerabilities remain a top threat to any HTML-based web application. In fact, 75% of web vulnerabilities in Google's reward program are XSS vulnerabilities! Fortunately, built-in platform defenses such as Content Security Policy and Trusted Types equip us with the tools to tackle XSS. In this article, we briefly look at modern XSS vulnerabilities, followed by a detailed look at using Trusted Types policies to mitigate such vulnerabilities. In the end, we provide you with a list of concrete developer guidelines to apply Trusted Types in your projects.
A Brief Intro to XSS
XSS, or Cross-Site Scripting, is a misnomer. Originally, XSS was a specific script injection attack between two websites. Today, the name XSS covers any vulnerability that allows the attacker to execute malicious code in the browsing context of the target application.
Modern XSS attacks can use JavaScript code but can just as well rely on CSS code or even HTML code. What matters is the result of the attack: malicious code running within the target application's execution context. When that happens, the malicious code can steal data or modify the behavior of the application.
But how can it get that far?
Before we dive deeper into XSS in modern JavaScript applications, let's take a look at a textbook XSS attack. Our example will focus on rendering a user-provided restaurant review.
How XSS turns data into code
The snippet below shows the server-side code to render a review. The code here is language-agnostic but corresponds to common patterns in languages such as PHP, Java, Node, etc.
foreach(review in reviews) {
    <div class="review">
      <h4>${review.title}</h4>
      <p>${review.text}</p>
    </div>
}
The snippet below shows two reviews from the database. Users of our restaurant review application have provided these reviews. As you can see, the first review is legitimate, but the second review contains malicious data.
// Review 1
Title: Friendly and delicious!
Text: The Restaurant is right in the center of town. It has top food en it's a very nice place with a friendly and professional staff

//Review 2
Title: Kitchen nightmares
Text: Fine location, lots of parking. But those are the only good things.<img src="none" onerror="console.log('Running malicious code :o')">
This last snippet shows the generated page that is sent to the browser. Note how the data variables in the template have been substituted with the actual review data.
<div class="review">
  <h4>Friendly and delicious!</h4>
  <p>The restaurant is right in the center of town...</p>
</div>
<div class="review">
  <h4>Kitchen nightmares</h4>
  <p>Fine location, ... things.<img src="none" onerror="console.log('Running malicious code :o')"></p>
</div>
These three code snippets illustrate the root cause of XSS vulnerabilities: confusion between data and code. In the first code snippet, the server is perfectly aware of which part of the template is code (the HTML) and which part is data (the variables). There is no confusion.
However, when the server sends this page to the browser, that context information is lost. The browser gets a very long string as input (the third snippet) but lacks the context information to distinguish data from code. As a result, what is HTML data for the server looks like HTML code for the browser, resulting in the execution of malicious JavaScript.
Mitigating XSS vulnerabilities
The best defense against XSS attacks is to ensure that the browser will never see data as code. In this example, we can achieve that by applying context-sensitive output encoding. Context-sensitive output encoding will ensure that the data is encoded for the context where it ends up in the page.
The encoding process translates potentially dangerous characters into their harmless counterparts. For instance, in our example from before, we are putting data in an HTML context. By encoding < and > as < and >, we can avoid the browser picking these characters up as code constructs.
The snippet below shows the generated HTML page with context-sensitive output encoding applied.
<div class="review">
<h4>Friendly and delicious!</h4>
<p>The restaurant is right in the center of town...</p>
</div>
<div class="review">
<h4>Kitchen nightmares</h4>
<p>Fine location, ... things.<img src="none" onerror="console.log('Running malicious code :o')"></p>
</div>Context-sensitive output encoding is an effective XSS defense. Sometimes, it is even too effective since it prevents the use of benign HTML code (e.g., <b> and <i>). If the application wants to allow harmless HTML in restaurant reviews, it will have to rely on sanitization as a defense.
An HTML sanitizer understands HTML. It knows which elements and attributes are safe and which are potentially dangerous. A sanitizer will leave all the safe pieces of HTML in the data but scrub out all the dangerous parts.
Let's take a look at an example. The review below contains both safe and unsafe HTML constructs.
This restaurant is absolutely horrible.
The service is <b>slow</b> and the food is <i>disgusting</i>.
<img src="nonexistent.png" onerror="alert('This restaurant got voted worst in town!');" />
If we run this review through a sanitizer, it would come out as the review you can see below.
This restaurant is absolutely horrible.
The service is <b>slow</b> and the food is <i>disgusting</i>.
<img src="nonexistent.png" />
As you can see, the benign parts of the HTML are still intact. The dangerous parts, however, are taken out by the sanitizer. In this case, the dangerous part is the onerror attribute of the img tag, which can trigger JavaScript execution. If the server puts this sanitized review into the page, it will not trigger XSS in the browser.
More information
If this brief intro did not make much sense, you should check out this extensive article on XSS. Otherwise, let's dive into XSS in modern JS frontends!
XSS in Modern Frontends
The browser can get confused when parsing a server-generated page with user data. But what about data inserted into the page by a JavaScript application that runs in the browser?
Unfortunately, JavaScript code running in the browser can also create XSS vulnerabilities when inserting data into the page. These vulnerabilities are known as DOM-based XSS or DOMXSS, but browser-based XSS is probably a better name.
Let's take a look at the nature of the vulnerability and potential mitigation techniques.
Browser-based XSS vulnerabilities
The code snippet below inserts a review into the page using the innerHTML property of DOM elements.
document.getElementById("reviewContent").innerHTML = `<p>${review.content}</p>`;The use of innerHTML will trigger the browser's HTML parser to parse the HTML and insert it into the page. If you take a closer look at this code, you can see that it concatenates code and data in a string and throws it over to the browser's parser.
This is precisely the same problem as before! Mixing data and code like this confuses the browser and causes XSS vulnerabilities.
Assigning text-based code and data to innerHTML is a common mistake in JavaScript applications. This pattern is so dangerous that React does not expose innerHTML directly but encapsulates it in a property called dangerouslySetInnerHTML. React assumes that if you use a property with a name like that, you are aware of the dangers.
There are other dangerous sinks apart from innerHTML. The incorrect use of outerHTML, document.write, and document.writeln also create XSS vulnerabilities.
So how can we avoid such vulnerabilities?
Mitigating browser-based XSS vulnerabilities
There are three mitigation strategies to avoid XSS vulnerabilities in frontend JavaScript applications.
Technique 1: Using safe APIs
The first option is to avoid the use of DOM APIs that trigger the browser's HTML parser. The code snippet below shows the correct use of textContent and the DOM manipulation APIs. These APIs provide the browser with proper context information, which avoids confusion between code and data.
//Using the innerText property
document.getElementById("reviewContent").textContent = review.content;

//Using DOM APIs to create elements
let p = document.createElement("p");
p.textContent = review.content;
document.getElementById("reviewContent").appendChild(p);
Technique 2: Context-sensitive output encoding
The second mitigation technique relies on context-sensitive output encoding. The JavaScript application can encode the data for the proper context before inserting it into the page. This technique is the same as we applied on the server-side when putting data into the page.
Context-sensitive output encoding is applied automatically by all major JavaScript frameworks. In the Angular world, this technique is known as Strict Contextual Escaping and is applied on every data binding using {{ }}. React applies automatic escaping to all data bindings with {}.
Technique 3: Sanitization
Just like before, encoding dangerous characters does not distinguish between safe and unsafe HTML code. To allow the use of safe HTML, the application has to sanitize the data before inserting it into the page.
The sanitized data only contains safe HTML code, so the application can insert this data into the page using innerHTML. As a result, the browser's HTML parser will render the safe HTML constructs still present in the data.
Angular automatically applies this sanitization technique on all data assigned to the [innerHTML] property. React does not automatically sanitize data, so React developers must manually sanitize data when putting it into the page. The code example below shows how to do this in React using DOMPurify, a high-quality JavaScript-based HTML sanitizer.
// Import DOMPurify
const DOMPurify = require('dompurify')(window);

// Sanitize the review
return (<p dangerouslySetInnerHTML={{__html: DOMPurify.sanitize(review)}}></p>);
More information
This summary highlights the leading cause of browser-based XSS vulnerabilities. In practice, preventing XSS vulnerabilities in Angular and React applications is a bit more complicated. These articles provide a lot more detail:
- Preventing XSS in React (Part 1): Data binding and URLs
- Preventing XSS in React (Part 2): dangerouslySetInnerHTML
- Preventing XSS in React (Part 3): escape hatches and component parsers
- Preventing XSS in Angular
XSS Lurking in the Shadows
Based on this information, it seems that modern JS frameworks have solid built-in XSS defenses. As a result, you would expect applications built with such frameworks don't suffer from XSS vulnerabilities. Unfortunately, it's not that simple.
Even in modern JS frameworks, developers have to follow secure coding guidelines to ensure their applications do not contain XSS vulnerabilities. Consistently following these guidelines is difficult, and a single mistake is enough to create a vulnerability. The perfect illustration is this XSS vulnerability in the desktop version of the security-sensitive Signal Messenger app.
But the problem is far worse. According to NPM, 97% of code in a modern web application comes from dependencies. These dependencies are an integral part of the application. Any of these dependencies can contain a mistake that exposes your application to an XSS vulnerability.
And to top it off, various libraries and frameworks even contain legitimate code that can be abused to trigger the execution of malicious code. Such patterns are called script gadgets and they turn out to be quite common. The code example below illustrates an XSS payload that abuses Bootstrap's tooltip functionality to trigger code execution.
<button class="btn btn-primary"
           data-toggle="tooltip"
           data-html="true"
           title="test<script>alert(1)</script>">
  Do NOT click this button!
</button>
These cases aptly illustrate why XSS is such a complex problem to solve. As you can see in this image, assigning unsafe data to a dangerous sink triggers the XSS vulnerability. When this unsafe data reaches the browser's HTML parser, it will be seen as code, triggering the execution of the malicious JavaScript.
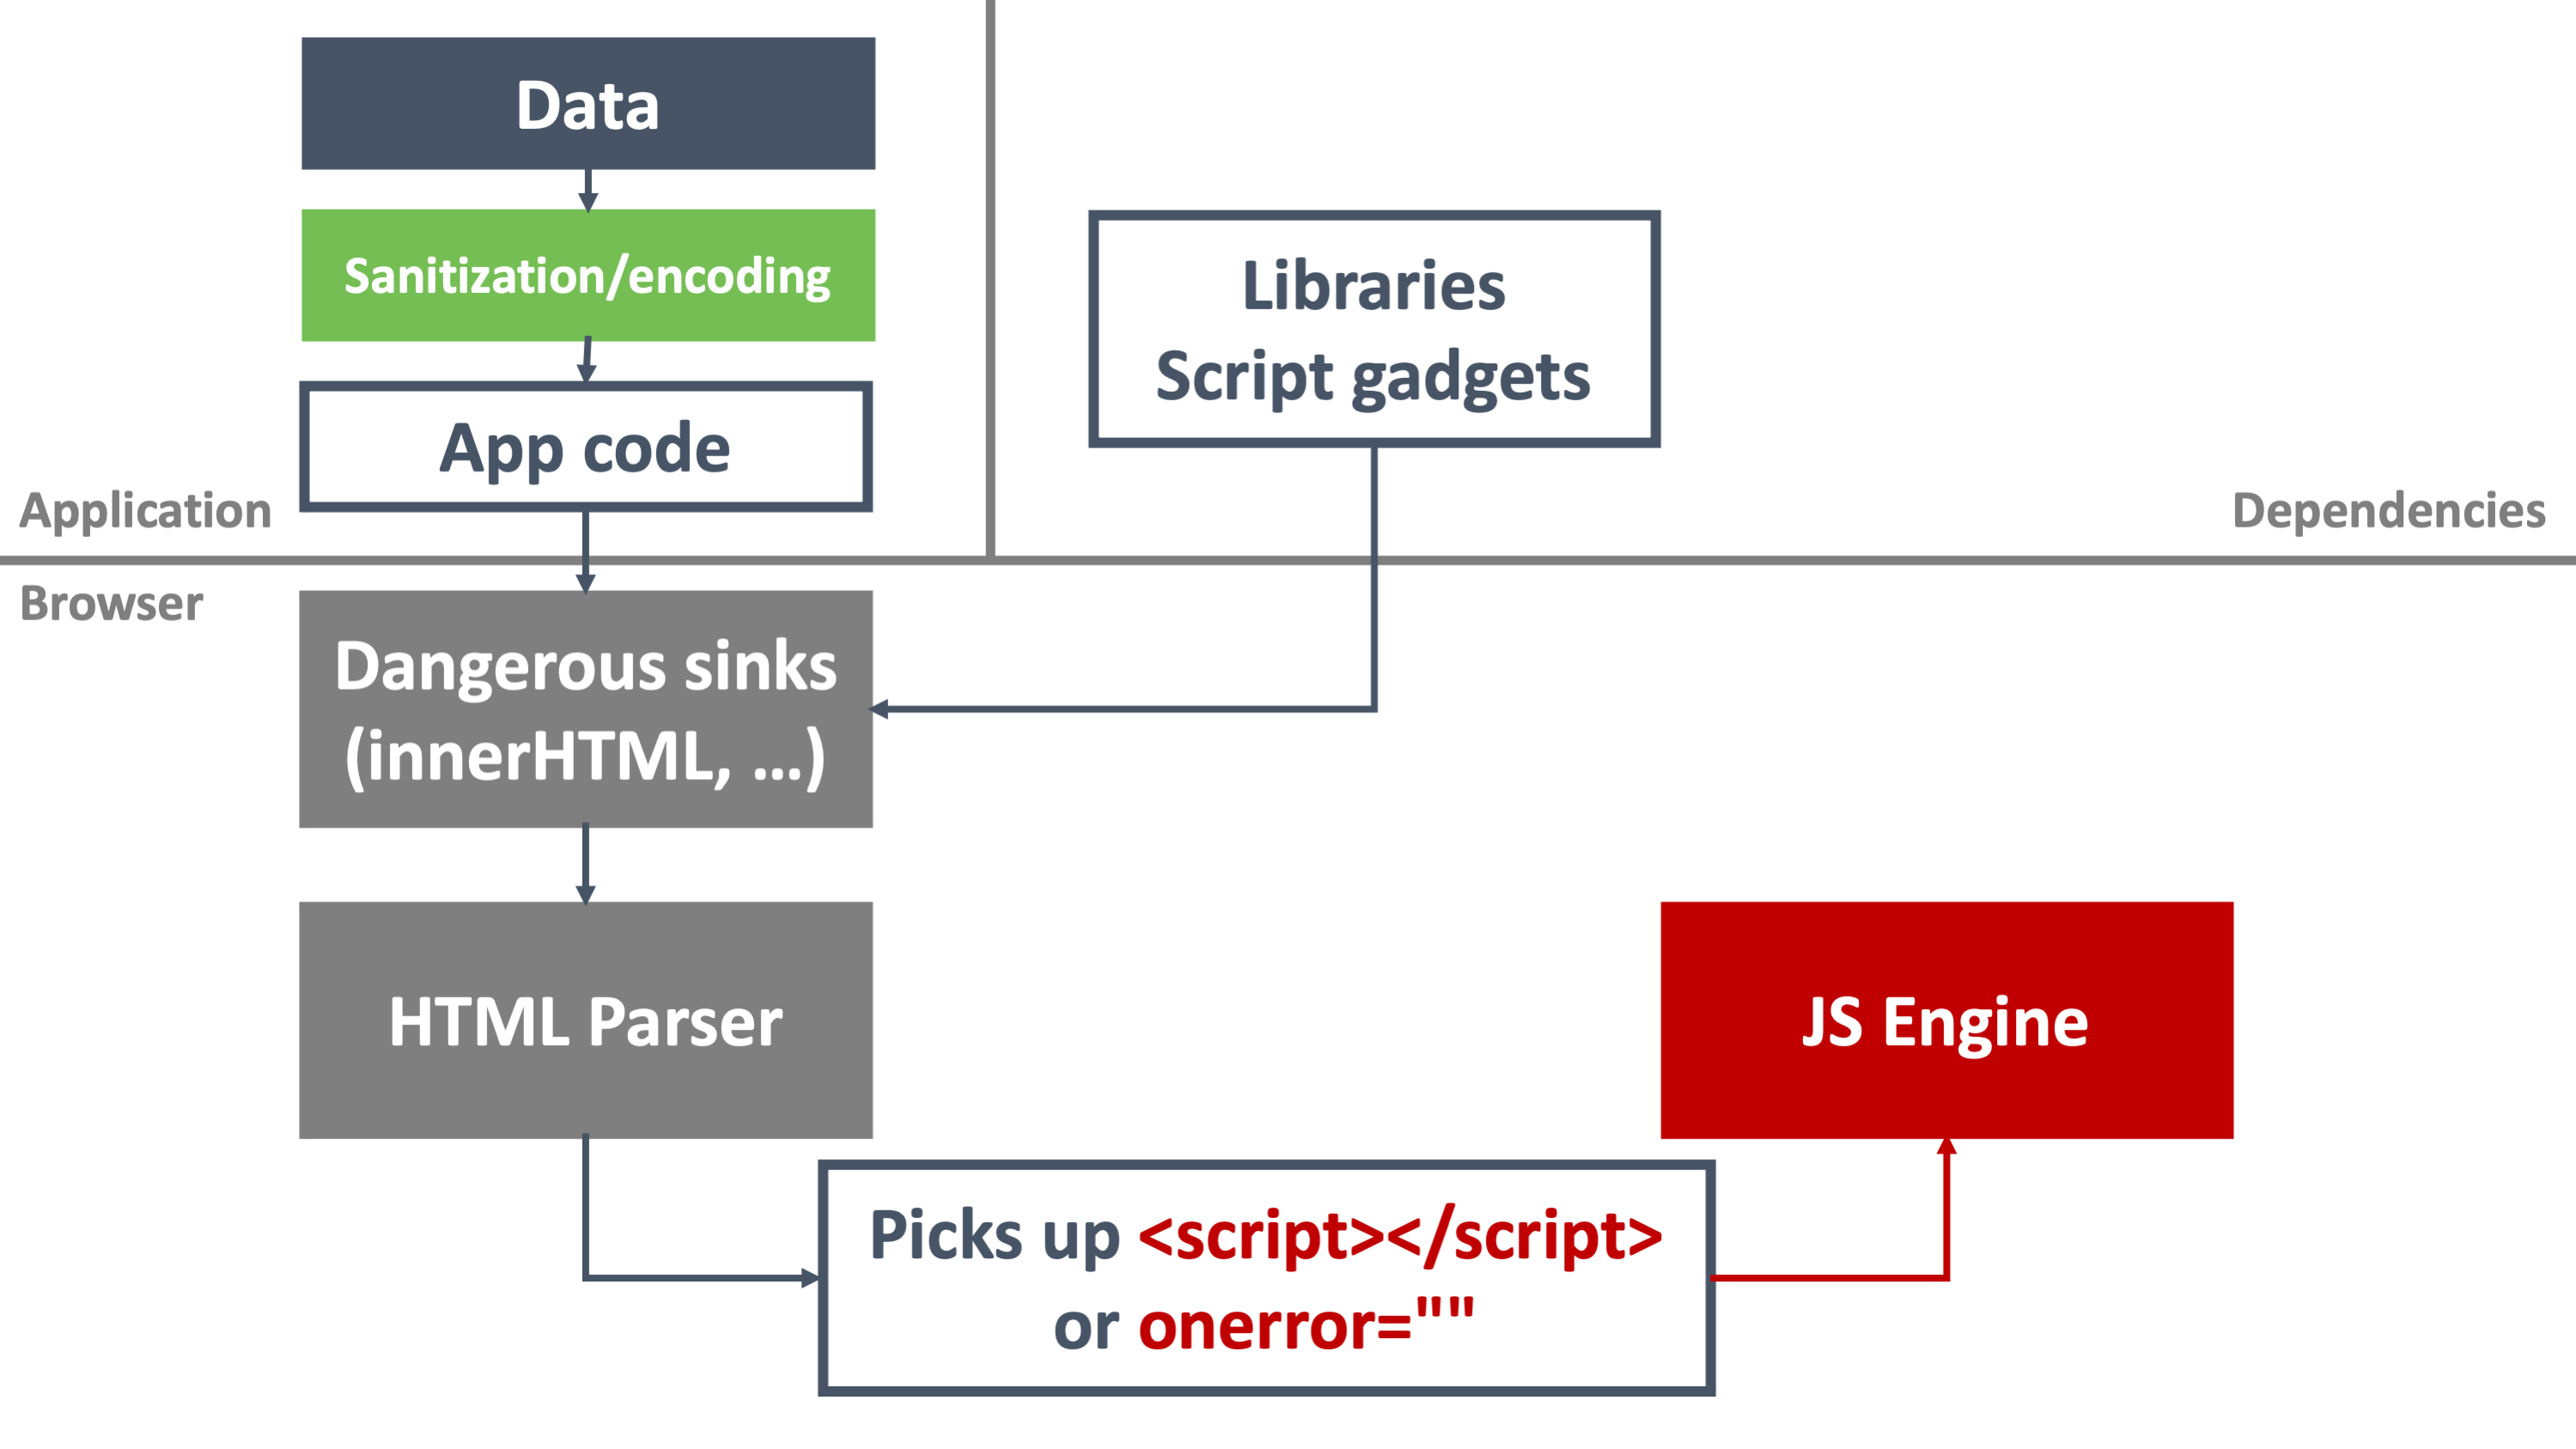
Defenses such as context-sensitive output encoding and sanitization can be applied within the application to help mitigate XSS vulnerabilities. Unfortunately, using these defenses across the entire application ecosystem is highly challenging. And that's precisely where Trusted Types come into play.
Trusted Types to the Rescue
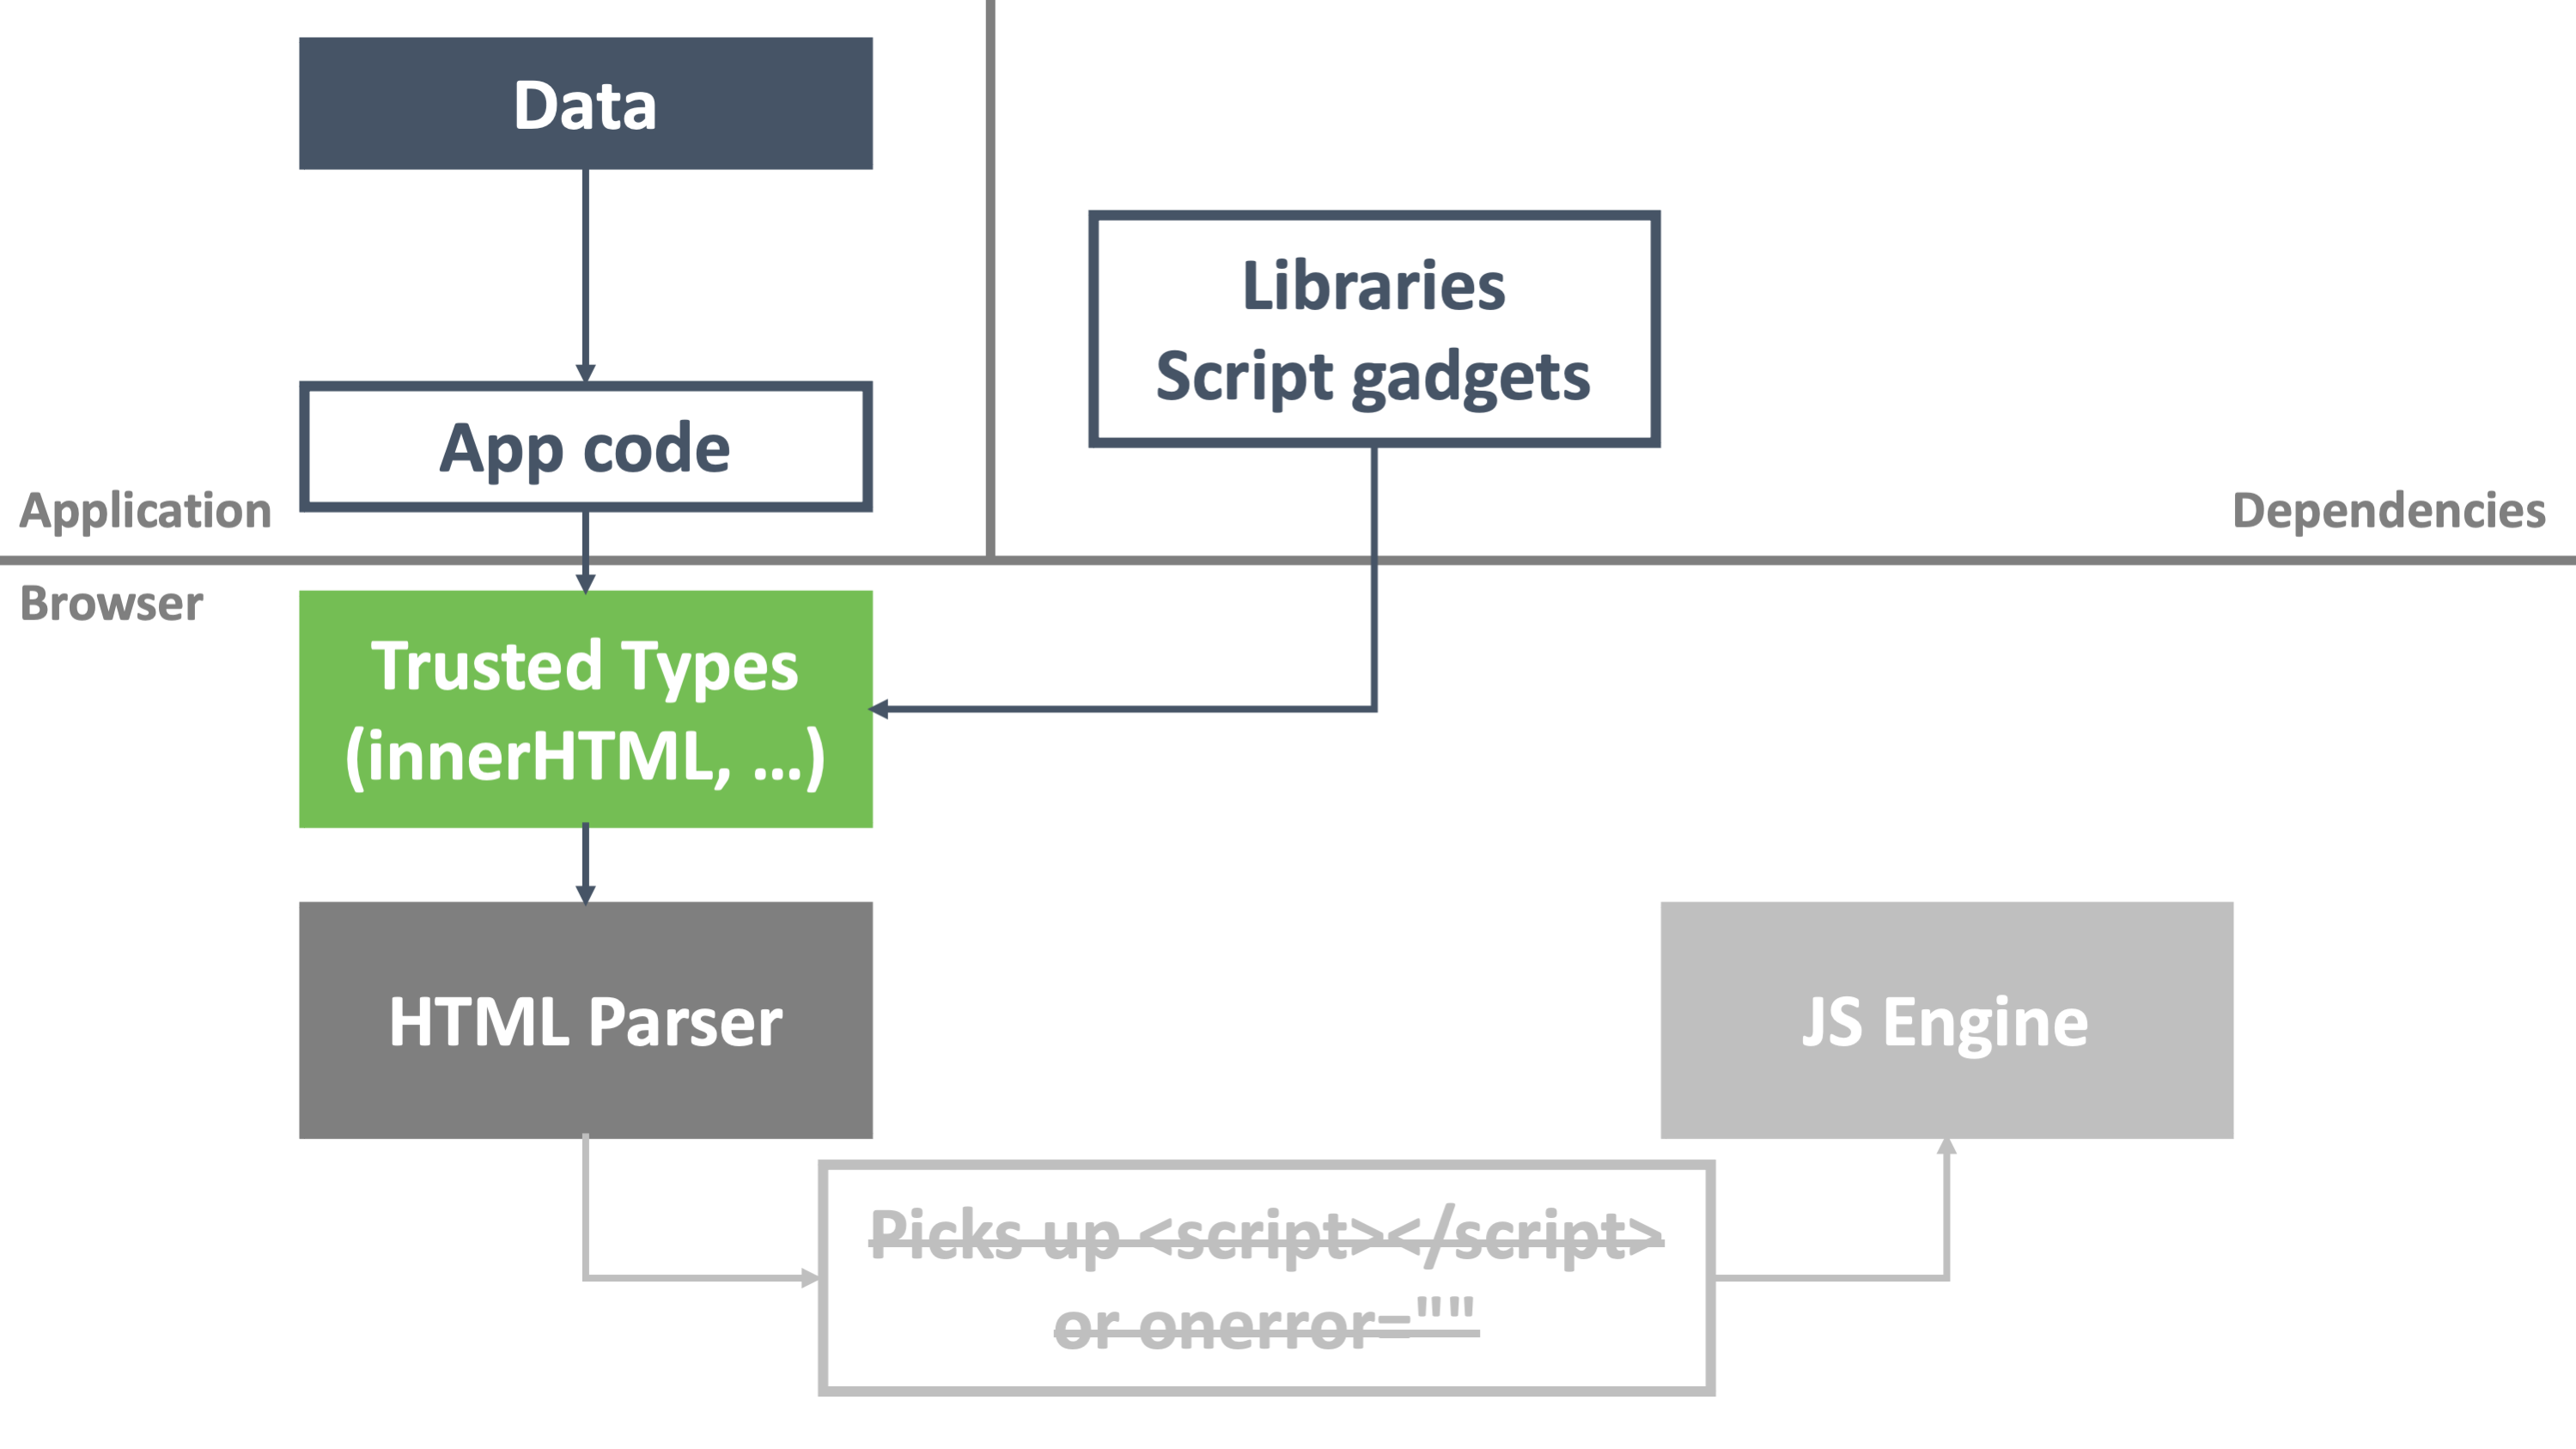
Trusted Types is a new browser security mechanism spearheaded by Google security engineers. In a nutshell, when an application enables Trusted Types, the browser refuses to accept text-based assignments to dangerous sinks, such as innerHTML, outerHTML, document.write, and document.writeln. In a nutshell, Trusted Types prevents the exact pattern that causes the browser to become confused: providing code mixed with data.
In our visualization from before, Trusted Types targets the underlying cause of each attack vector. As a result, Trusted Types mitigates XSS vulnerabilities across the entire application ecosystem, including third-party components and dependencies.
Sounds good, right?
Let's take a look at setting up Trusted Types to stop client-side XSS vulnerabilities. For now, we'll focus on preventing attacks. We will discuss how to enable legitimate uses of these dangerous sinks in a bit.
Enabling Trusted Types
Trusted Types can be enabled through a new directive for Content Security Policy (CSP). You can enable CSP by setting a Content-Security-Policy response header or adding a meta tag to the page. For simplicity, we'll use the meta tag approach in this article.
The code snippet below shows a meta tag to enable Trusted Types and an unsafe assignment using innerHTML. With Trusted Types enabled, the assignment will fail.
<!-- Enabling Trusted Types -->
<meta http-equiv="Content-Security-Policy" content="require-trusted-types-for 'script'">

<script>
  function render() {
    let data = document.getElementById("taData").value;
    let div = document.getElementById("divRender");

    console.log(`Rendering data in the div: ${data}`);

    div.innerHTML = data;
  }
</script>
You can find the complete code and a running version of this code example on Stackblitz. Try commenting out the meta tag with the CSP policy to see the vulnerability in action.
How Trusted Types works
As you can see in the demo, enabling Trusted Types avoids the execution of the malicious payload. If you inspect the browser's console, you can observe Trusted Types in action.
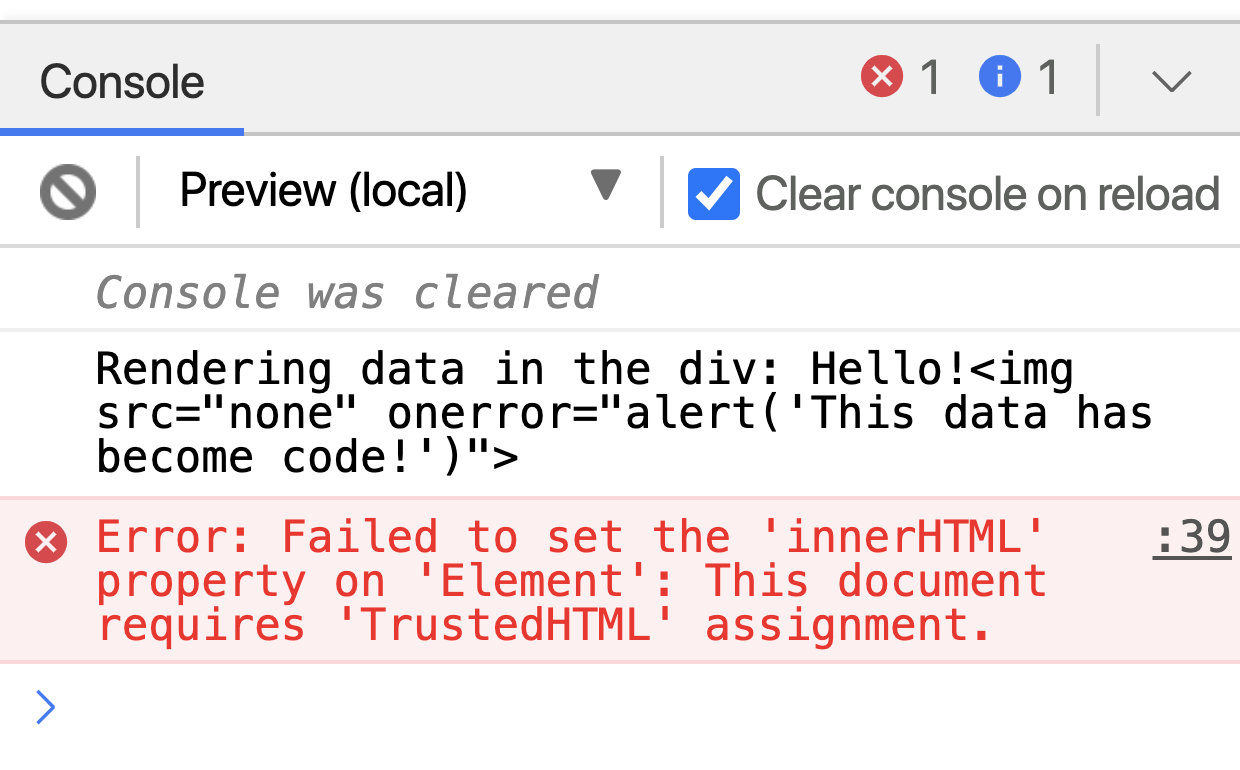
By enabling Trusted Types, we have instructed the browser to prevent text-based assignments to dangerous sinks. Instead, the browser expects us to use data with a trusted type (hence the name Trusted Types). As you can see, assigning text-based data results in a type error.
Note that Trusted Types does a bit more than stopping the malicious payload from executing. It refuses to assign any text-based data to a dangerous sink, even when that data is harmless. In this case, the use of Trusted Types breaks legitimate application functionality.
There are two ways to avoid this from happening. The first approach is to refactor the application to use safe DOM APIs to insert the data. While theoretically possible, this approach does not work very well. Refactoring entire applications can take much effort. Additionally, if the dangerous assignment occurs in a framework or library, it may not even be possible to change that code.
The second approach is configuring the Trusted Types mechanism with a Trusted Types policy. A Trusted Types policy takes text-based data as input and transforms it into safe output. The data returned by the policy has the form of a trusted type, allowing it to be assigned to a dangerous sink.
Let's take a look at how to configure Trusted Types policies.
Configuring Trusted Types Policies
Trusted Types policies are defined in JavaScript using the trustedTypes.createPolicy() function. The code example below shows how to define a default Trusted Types policy. Such a policy is automatically applied on every unsafe assignment on a dangerous sink. In this example, the policy applies context-sensitive output encoding on all HTML data.
<meta http-equiv="Content-Security-Policy" content="require-trusted-types-for 'script'">
<script>
  if (window.trustedTypes && trustedTypes.createPolicy) { // Feature testing
    trustedTypes.createPolicy('default', {
      createHTML: string => string.replace(/\</g, '<').replace(/\>/g, '>')
    });
  }
</script>
You can find a running version of this example on Stackblitz.
As you can see, the assignment to the dangerous innerHTML sink now passes through the Trusted Types policy. The policy transforms potentially unsafe data into safe data, which mitigates the XSS attack vector. Note that this policy is applied on all unsafe assignments, even when they occur within a library, framework, or third-party dependency.
As discussed before, context-sensitive output encoding is quite a strict defense. We can also define a policy that allows benign code constructs through sanitization. Below is a sample policy that relies on DOMPurify for sanitization.
<script>
if (window.trustedTypes && trustedTypes.createPolicy) { // Feature testing
  trustedTypes.createPolicy('default', {
    createHTML: string => DOMPurify.sanitize(string, {RETURN_TRUSTED_TYPE: true})
  });
}
</script>
<script src="https://cdnjs.cloudflare.com/ajax/libs/dompurify/2.2.7/purify.min.js"></script>
You can find a running version of this example on Stackblitz.
Note that you can also define named Trusted Types policies. Such policies are approved by adding them to the CSP directive that enables Trusted Types. When using a named policy, application code must explicitly pass text-based data through the policy before assigning it to a dangerous sink, as illustrated below.
<!-- Enabling Trusted Types -->
<meta http-equiv="Content-Security-Policy" content="require-trusted-types-for 'script'; trusted-types dompurify sanitizeWithDomPurify">
<script>
  const ttSanitizer = trustedTypes.createPolicy('sanitizeWithDomPurify', {
    createHTML: string => DOMPurify.sanitize(string)
  });
</script>
<script src="https://cdnjs.cloudflare.com/ajax/libs/dompurify/2.2.7/purify.min.js"></script>

<script>
  function render() {
    let data = document.getElementById("taData").value;
    let div = document.getElementById("divRender");

    console.log(`Rendering data in the div: ${data}`);

    div.innerHTML = ttSanitizer.createHTML(data);
  }
</script>
You can find a running version of this example on Stackblitz.
Learn web security through a hands-on exploration of some of the most notorious threats.
DOWNLOAD THE FREE EBOOK
Using Trusted Types in SPAs
DOM-based XSS is a significant threat in modern JavaScript-based frontends, especially when they rely on third-party libraries and components. So can we use Trusted Types to mitigate these XSS attack vectors?
The short answer is: yes, absolutely!.
The longer answer is more along the lines of: yes, if you follow a couple of coding guidelines.
Let's take a closer look at using Trusted Types to secure Angular and React applications.
Unfortunately, running live demos on Stackblitz fails due to the setting of outerHTML, which is not allowed by our Trusted Types policy. Where relevant, we refer to sample projects on Github that can easily be run locally, as described in the corresponding README documents.
Trusted Types in Angular
Since version 11, Angular has built-in support for Trusted Types. Concretely, this means that the only thing you need to do to start using Trusted Types is to enable it through CSP, using the following configuration:
Content-Security-Policy: trusted-types angular; require-trusted-types-for 'script'This policy enables Trusted Types by approving the built-in angular policy. This policy is part of the Angular codebase. It marks all output that passes through Angular's sanitizer as a trusted type. As a result, the browser allows output assigned [innerHTML] to end up in the page.
The angular Trusted Types policy allows safe behavior and blocks unsafe behavior. For example, if you pass a value through bypassSecurityTrustHtml() before assigning it to [innerHTML], Angular will not sanitize it. With Trusted Types enabled, the browser will block that assignment.
You can see this in action in this Angular demo project.
Similarly, Angular applications that misuse native element references to access the DOM's innerHTML property will run into the protections of Trusted Types. Note that Trusted Types is a browser-level protection mechanism, so it also applies to all third-party components and libraries that contain such insecure coding patterns.
Finally, Angular also has a built-in Trusted Types policy to re-enable the use of bypassSecurityTrustHtml(). By adding angular#unsafe-bypass to the CSP configuration, Angular is allowed to assign unsanitized data to [innerHTML]. Consequently, you as a developer are responsible for ensuring the safety of this behavior. A failure to do so will result in a DOM-based XSS vulnerability in your application.
Note that even with angular#unsafe-bypass enabled, insecure DOM manipulations through native element references are still blocked by Trusted Types.
Trusted Types in React
The story for React is somewhat similar to the Angular story. You can enable Trusted Types for React applications, effectively mitigating DOM-based XSS vulnerabilities through insecure DOM manipulations.
A typical example in React applications is the misuse of escape hatches to manipulate the DOM directly, as discussed in this article.
Instead of relying on escape hatches, React offers a by-design way to assign data to an element: the dangerouslySetInnerHTML property. Data assigned to this property is forwarded to the DOM element's innerHTML property. This React property is marked as dangerous because there is no sanitization applied. Developers are responsible for handling this themselves, and a failure to do so creates DOM-based XSS vulnerabilities.
Trusted Types effectively prevents insecure usage of dangerouslySetInnerHTML. The only way to assign data as HTML with Trusted Types enabled is by ensuring the data is a trusted type. The code example below illustrates how to use DOMPurify to sanitize data and return it as a trusted type.
<div dangerouslySetInnerHTML={{__html: DOMPurify.sanitize(data, {RETURN_TRUSTED_TYPE: true})}} />DOMPurify sanitizes the data, effectively making it safe to render as HTML. Since the data is now marked as a Trusted Type, the browser will allow this data to end up in the DOM. And just like before, this is applied on the browser level, so it covers your application code and all its dependencies and components.
You can see Trusted Types in action for a React application in this example.
Disclaimer: the use of Trusted Types with
dangerouslySetInnerHTMLonly works with React 17.0.2 or higher. Due to a stringification process, older versions of React lose DOMPurify's trusted type information causing the assignment to be blocked.
Concrete Developer Guidelines
With a solid understanding of what Trusted Types can do and how to use it in modern JavaScript applications, it's time to look at concrete guidelines: how can you use Trusted Types in your projects?
Adopting Trusted Types
The first concrete guideline is to adopt Trusted Types during development. Doing so will trigger errors for every unsafe assignment to a dangerous sink. As a result, you will not make any unconscious mistakes that could result in an XSS vulnerability.
The exact policy to enable Trusted Types depends a bit on the application you are building. For applications that never output HTML, you don't need to add any Trusted Types policy. Just enabling CSP with require-trusted-types-for 'script" is sufficient. For an Angular application, you should add the angular policy to your CSP configuration. Similarly, for a React application, you could enable the dompurify policy by default.
Setting up a default policy
When you build an application that requires putting HTML directly into the DOM without using proper APIs, such as createElement, you will run into Trusted Type errors. In that case, you should define a default Trusted Types policy that sanitizes HTML before putting it into the page.
Note that this approach breaks the application in browsers that do not support Trusted Types. At the time of writing, that is any browser that is not based on Chromium. If you need to support those browsers (and most of us do!), it is recommended to load the Trusted Types polyfill.
The API-only polyfill allows you to define a Trusted Types policy, ensuring your application will work as expected. The enforce polyfill modifies the DOM API to enforce Trusted Types in a browser with no native support.
Developing custom policies
Business applications often have specialized use cases where the default sanitization policy is too strict. For example, the default DOMPurify configuration considers the style attribute as unsafe (and righteously so).
If the risk of enabling specific features is acceptable, you should build a dedicated Trusted Types policy. The application component that needs this feature can use this dedicated policy to ensure it can add the necessary information to the DOM.
Using Trusted Types to implement this ensures that the policy can be vetted for security. It also makes the application easier to audit. Note that for complicated Trusted Types policies, it is recommended to vet the policy with a security expert.
You can find the complete code shown in this article on this GitHub repository.
Aside: Auth0 Authentication with JavaScript
At Auth0, we make heavy use of full-stack JavaScript to help our customers to manage user identities, including password resets, creating, provisioning, blocking, and deleting users. Therefore, it must come as no surprise that using our identity management platform on JavaScript web apps is a piece of cake.
Auth0 offers a free tier to get started with modern authentication. Check it out, or sign up for a free Auth0 account here!
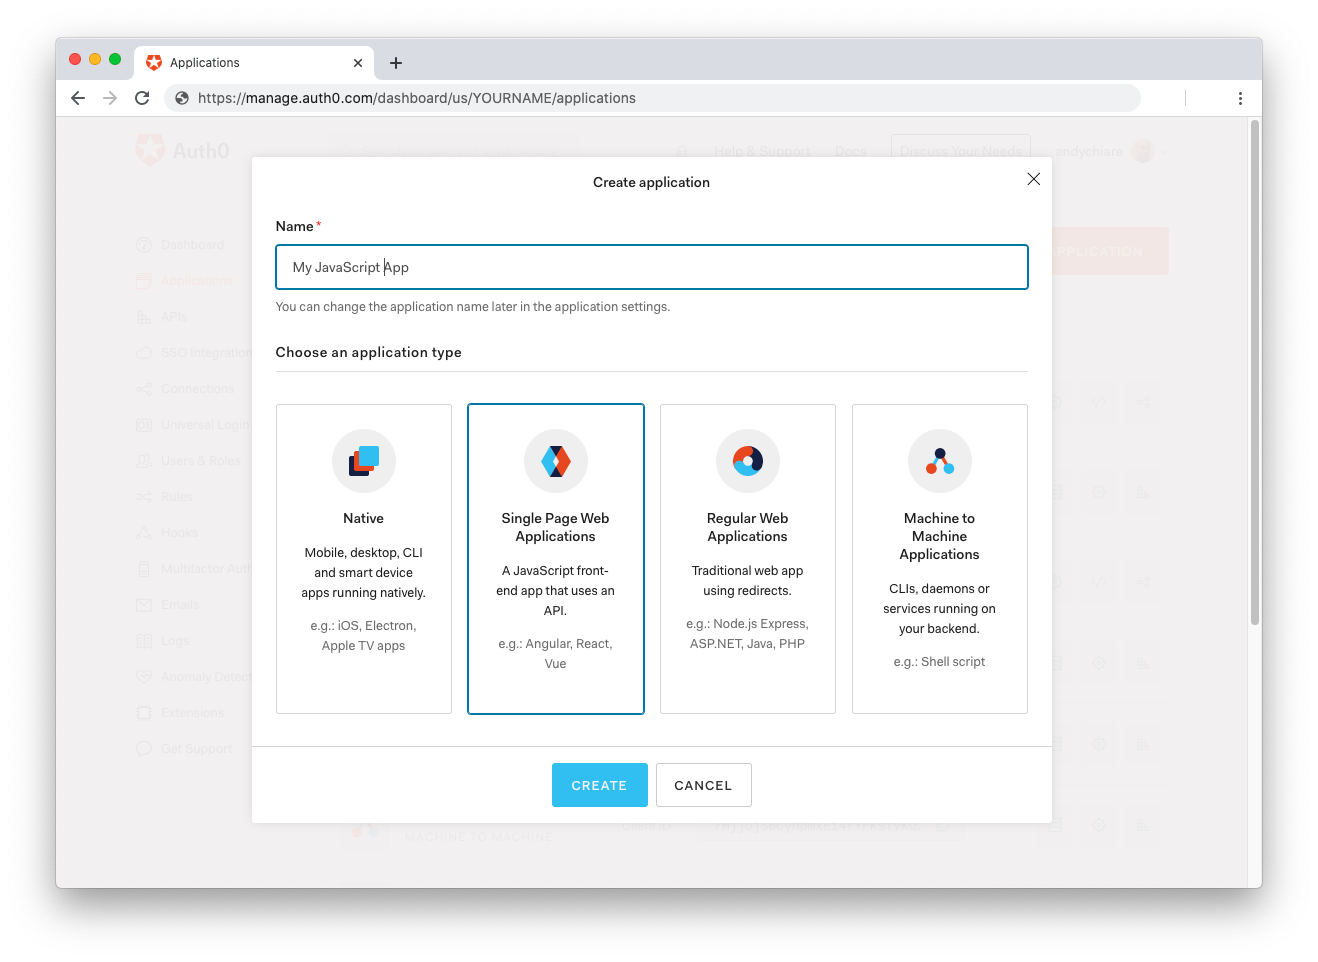
Then, go to the Applications section of the Auth0 Dashboard and click on "Create Application". On the dialog shown, set the name of your application and select Single Page Web Applications as the application type:
After the application has been created, click on "Settings" and take note of the domain and client id assigned to your application. In addition, set the Allowed Callback URLs and Allowed Logout URLs fields to the URL of the page that will handle login and logout responses from Auth0. In the current example, the URL of the page that will contain the code you are going to write (e.g. http://localhost:8080).
Now, in your JavaScript project, install the auth0-spa-js library like so:
npm install @auth0/auth0-spa-jsThen, implement the following in your JavaScript app:
import createAuth0Client from '@auth0/auth0-spa-js';

let auth0Client;

async function createClient() {
  return await createAuth0Client({
    domain: 'YOUR_DOMAIN',
    client_id: 'YOUR_CLIENT_ID',
  });
}

async function login() {
  await auth0Client.loginWithRedirect();
}

function logout() {
  auth0Client.logout();
}

async function handleRedirectCallback() {
  const isAuthenticated = await auth0Client.isAuthenticated();

  if (!isAuthenticated) {
    const query = window.location.search;
    if (query.includes('code=') && query.includes('state=')) {
      await auth0Client.handleRedirectCallback();
      window.history.replaceState({}, document.title, '/');
    }
  }

  await updateUI();
}

async function updateUI() {
  const isAuthenticated = await auth0Client.isAuthenticated();

  const btnLogin = document.getElementById('btn-login');
  const btnLogout = document.getElementById('btn-logout');

  btnLogin.addEventListener('click', login);
  btnLogout.addEventListener('click', logout);

  btnLogin.style.display = isAuthenticated ? 'none' : 'block';
  btnLogout.style.display = isAuthenticated ? 'block' : 'none';

  if (isAuthenticated) {
    const username = document.getElementById('username');
    const user = await auth0Client.getUser();

    username.innerText = user.name;
  }
}

window.addEventListener('load', async () => {
  auth0Client = await createClient();

  await handleRedirectCallback();
});
Replace the
YOUR_DOMAINandYOUR_CLIENT_IDplaceholders with the actual values for the domain and client id you found in your Auth0 Dashboard.
Then, create your UI with the following markup:
<p>Welcome <span id="username"></span></p>
<button type="submit" id="btn-login">Sign In</button>
<button type="submit" id="btn-logout" style="display:none;">Sign Out</button>
Your application is ready to authenticate with Auth0!
Check out the Auth0 SPA SDK documentation to learn more about authentication and authorization with JavaScript and Auth0.


