

In today’s world, chat or instant messaging apps have completely superseded traditional text messages. We all use chat app to communicate with the people around us due to the capability of the chat application to provide features such as message read receipts, user presence, reactions, typing indicators, etc. As a result, users enjoy and hardly think of using anything else to connect informally.
Most of the chat apps are available to use on mobile, but sometimes you may also need the desktop version for the same. For example, while working on your laptop/computer, you may be putting your mobile at rest so that it allows you to focus on your work. You may also want to share/download some files directly from/to your machine. In all such situations, you strongly need a desktop chat app.
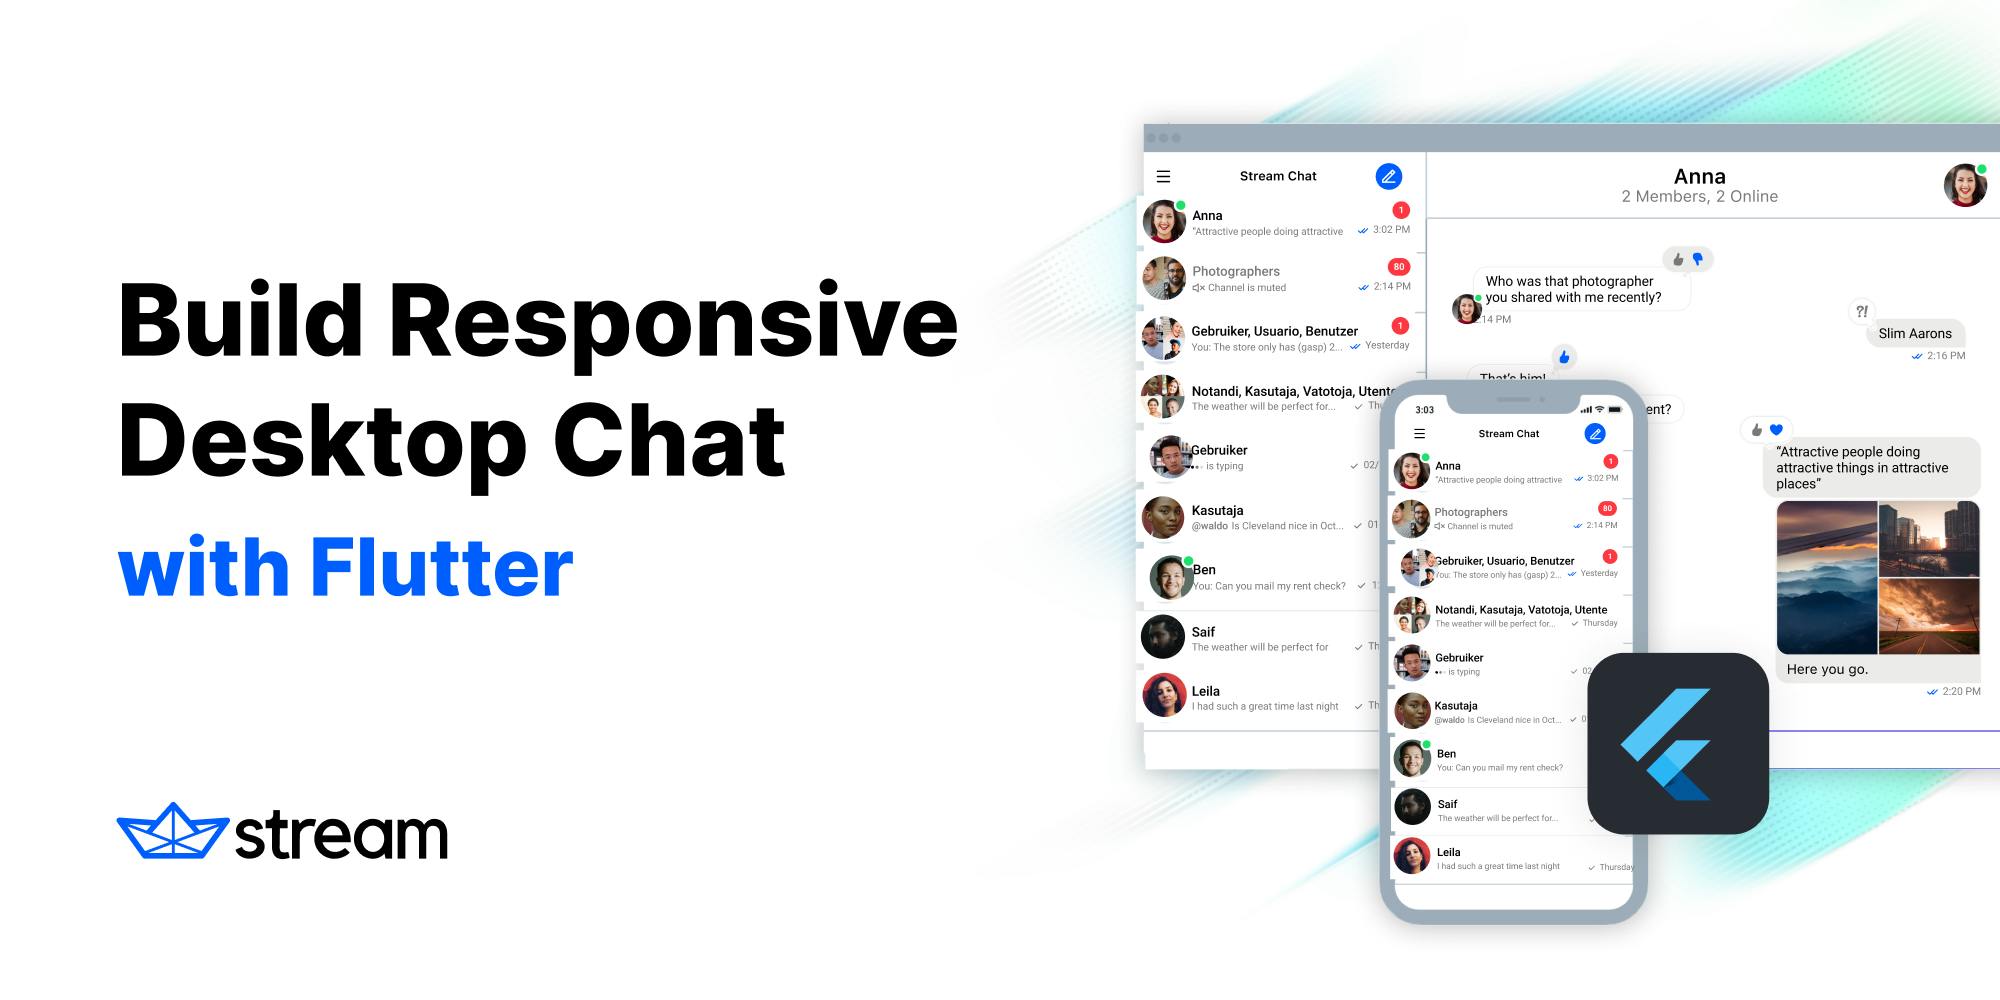
In this tutorial, we will develop a desktop chat app from scratch using Flutter and Stream Chat. Our application will be fully responsive and scale to both mobile and desktop devices.
Here’s what we’ll cover:
- Prerequisites
- Creating a starter desktop app
- Implementing a chat feature
- Adding responsiveness
Prerequisites
To develop a fully-featured chat app, you will need to get the following things.
- Flutter SDK: Flutter is a UI toolkit made by Google for developing
cross-platform apps. Flutter supports Android, iOS, Windows, Linux, and Mac. It’s a free and open-source toolkit to build visually appealing apps. The installation instructions for Flutter SDK are available here. - IDE to write Flutter apps: You can install Android Studio, IntelliJ IDEA, or Visual Studio Code IDE for writing the Flutter apps. After the installation, you will need to get the Flutter and Dart plugins to run and debug your app. More details on setting up the IDE can be found here.
- Stream account: We will use Stream to build a chat feature for this tutorial. Stream allows you to focus on developing the core features of your app by doing all the heavy lifting of getting the chat feature up and running in no time.
Creating a Starter Desktop App
Before we add chat, we first need to get our desktop app running. Let’s start by creating a basic application using Flutter.
Requirements
- Latest Flutter: The very first requirement is to have the latest version of Flutter in a stable channel. As of writing this article, the stable channel is having using Flutter v2.0.5. This allows you to try a desktop feature that was shipped into the stable channel as a beta release. Following are the commands to switch and upgrade the channel if you are in a different channel.
$ flutter channel stable
$ flutter upgradeNote: The desktop support in the stable channel may have some issues. To try the latest changes/fixes, you can switch to the beta channel.
$ flutter channel beta- OS requirements: There are different requirements based on the OS. Since I am developing on a Linux machine, I’ll have to get the below dependencies. For your specific OS, please check this out.
$ sudo apt-get install clang cmake ninja-build pkg-config libgtk-3-devConfiguration
Although the desktop support is available in the stable channel, we will still need to enable it using the below command in the terminal.
$ flutter config --enable-linux-desktop
For your case, it can be any of the below based on your OS.
$ flutter config — enable-windows-desktop
$ flutter config — enable-macos-desktop
$ flutter config — enable-linux-desktop
Once enabled, you should see your OS as the target platform like this:

Creating a New Project
Creating a new project is pretty simple and straightforward. If you are using Android Studio, Here are the steps.
- Click on File -> New -> New Flutter project.
- Select the Flutter App and click Next.
- Enter the project name, location and click Finish.
You can also try creating an app using the below commands.
$ flutter create desktop_chat_app
$ cd desktop_chat_app
Running the Project
Select the OS as the target platform and hit the run button. You should see the default counter app like this:
You can also launch the app from the command line like this:
$ flutter run -d linuxImplementing a Chat Feature
Let’s start building a chat feature step by step.
- Create a Stream account: The first step in building instant messaging is to get your Stream account open. Click here to try it for free.

- Create an App: Once logged in, Create an app in the Stream console. Then, click on the "Create App" button and provide the required details.

Note: It always a good practice to set the "Environment" to "Development" while working on the app and switch to "Production" when going live.
- Disabling Auth Checks: While developing the app, you may not have your backend to support the token authentication. So in this step, we will disable the Auth checks. Select the newly created app. Click on "chat" and then select "overview". Scroll down and then turn on the "Disable Auth Checks" switch.
- Adding Dependencies: At this point, we are all done with creating and configuring the app on the Stream console. Now let’s come to the app side and add the dependency. Here’s how it looks:
dependencies:
    flutter:
    sdk: flutter

stream_chat_flutter: ^1.5.0- Creating Users: We will need some users to carry out the conversation. For the demonstration purpose, we will create all the users by ourselves. Ideally, it should be created by an individual user’s account. Let’s see how to do it.
import 'package:flutter/material.dart';
import 'package:flutter_desktop_chat_app/responsive_builder.dart';
import 'package:stream_chat_flutter/stream_chat_flutter.dart';


//Before
void main() {
  runApp(MyApp());
}

//----------------------------

//After
Future<void> main() async {
//Step 1- Step 1: Here, we created a Stream client with the API key and logging set
toLevel.INFOto see logs retrieved from the Stream Chat API while developing. - Step 2: A user named "Harry" is created with some random image. Since we don’t have any token for this user, The development token is generated with the
client.devToken(‘Harry’)method. We can create several users by repeating this step with different user’s identities. - Step 3: Creating a StreamChat widget a root of the widget.
To verify the list of created users in the Stream console, Navigate to your app dashboard -> Click Chat -> Select Explore -> Click on users.
- Creating Channels: Once the users are created, we will need some topic rooms called channels to talk about the topic. For the demo, we will create 3 channels named "Singers", "Flutists", and "Guitarists".
Future<void> main() async {
  //Create stream clien

  //Create users

  //Create channels
  //Step 1
  final channel = client.channel(
    "messaging",
    id: "guitarist",
    extraData: {
      "name": "Guitarist",
      "image": "https://source.unsplash.com/5HltXT-6Vgw",
      "members": ['Jeffery', 'Jhon', 'Mike'],
},- Step 1: We configured the channel with a name, a suitable image, and some members to add to the channels.
- Step 2:
channel.watch();is used to create the channel and listen for the activities happening on that channel.
A complete list of channels can be seen in the Stream’s chat explorer like this:
- Displaying Channels: Till now, we haven’t got to see anything on the screen. Don’t worry; we are just one step away from seeing things in action. Let’s understand the code below:
Widget build(BuildContext context) {
  return Scaffold(
    //backgroundColor: Colors.white,
    body: ChannelsBloc(
      child: ChannelListView(
        onChannelTap: onItemTap != null
            ? (channel, _) {
                onItemTap(channel);
              }
            : null,
        filter: {
          'members': {
            '\$in': [StreamChat.of(context).user.id],
}ChannelListView: This widget is used to show the list of channels and updates the list automatically on receiving new events like channel added and a new message in any channel. Currently, it is set to show only those channels in which the user is added and sorted based on the latest message on the channel.
Widget build(BuildContext context) {
  return Scaffold(
    appBar: ChannelHeader(
      showBackButton: showBackButton,
    ),
    body: Column(
      children: <Widget>[
        Expanded(
          child: MessageListView(),
        ),
        MessageInput(
          disableAttachments: true,
        ),
      ],
    ),
  );
}
Predefined widgets such as ChannelHeader(), MessageListView(), MessageInput() from the Stream library is used to build a chat page. And finally, its time to run the app, and it looks like this:
Tip: You can change the whole theme of the app, including the Stream’s predefined widget, by providing the
ThemeData()to bothMaterialApp()andStreamChat()widget like this:
final theme =
    ThemeData(primarySwatch: Colors.teal, brightness: Brightness.dark);
MaterialApp(
  debugShowCheckedModeBanner: false,
  theme: theme,
  builder: (context, child) => StreamChat(
    streamChatThemeData: StreamChatThemeData.fromTheme(theme),
    client: client,
    child: child,
  ),
  home: HomeSmallScreen(),
),
Adding Responsiveness
If you carefully notice the app, it looks like the mobile UI is portrayed on a larger screen. There is an unsightly gap between channel name and time. So we need to rethink how it will look when the UI is rendered on a widescreen. The app should respect varying screen sizes and provide different UI/UX for a rich experience. Here’s how we will try to show the UI on both small and large screens.

Desktop apps generally have a larger screen than mobile. As you can see in the figure above, when the app is run as a desktop app, we will represent the UI in the "Master-detail layout". In the "Master-detail layout", the listing of items is shown in the left panel, and the details of the items are presented in the right panel. In our case, the list of channels will be on the left side, and the channel page containing the conversation will be shown on the right side. This way, more information is conveyed in less interaction from the user side.
So let’s add some code the handle the responsiveness:
class ResponsiveWidget extends StatelessWidget {
  final Widget smallScreen;
  final Widget mediumScreen;
  final Widget largeScreen;

  const ResponsiveWidget({Key key,
    this.mediumScreen,
    @required this.smallScreen,
    this.largeScreen})
      : super(key: key);

  @override
  Widget build(BuildContext context) {
    //Returns the widget which is more appropriate for the screen size
return LayoutBuilder(builder: (context, constraints) {The above class returns the LayoutBuilder. The LayoutBuilder widget’s builder function is called whenever the parent widget passes different layout constraints. When the screen resolution changes, it provides the constraints, which determines the width and provides various UI accordingly.
class MyApp extends StatelessWidget {

  @override
  Widget build(BuildContext context) {

    return StreamChat(
      client: client,
      child: MaterialApp(
        ...
        home: ResponsiveWidget(
          smallScreen: HomeSmallScreen(),
          largeScreen: HomeLargeScreen(),
        ),
      ),
    );
  }
}
Here we wrapped the initial UI inside the ResponsiveWidget() and HomeLargeScreen() is provided as a widget to display on a large screen.
HomeLargeScreen() returns a Row having a channel listing on the left and a channel page on the right. The figure below will make things more clear.

The finished app looks like this:
That’s it! The full code can be found here.
Final Thoughts
In the end, we made a responsive Flutter UI that looks good on mobile and desktop devices. Using Stream's Flutter SDK, we added real-time messaging to our application in just a few lines of code.
