Deepfakes have entered mainstream culture. These realistic-looking fake videos, in which it seems that someone is doing and/or saying something even though they didn’t, went viral a couple of years ago. Today artists and bands, like Steven Wilson and Abrahadabra, are using these techniques to create videos for their songs. Also, applications like Zao, FaceSwap and Reface are providing a way to quickly create various videos. Of course, if you are willing to share your information with them.
In fact, the term first appeared back in 2017, when Motherboard published an article on AI-manipulated porn that appeared to feature actress Gal Gadot. Today, even if you see a video of some celebrity or politician saying something in a video, you will take it with a grain of suspicion (or at least you should do so). “Putting words in someone’s mouth” got a whole new connotation.
Of course, deepfakes raised big ethical and moral concerns, but that didn’t stop us from improving them and technologies to build them. Creating deep fakes in the past was not an easy task, however with recent advances it became a five-minute job. In this tutorial, we will explore how deepfakes are created and we apply a First Order Modeling method, which allows us to create deep fakes in a matter of minutes.
This bundle of e-books is specially crafted for beginners.
Everything from Python basics to the deployment of Machine Learning algorithms to production in one place.
Become a Machine Learning Superhero TODAY!
In this article you will learn:
- How are Deepfakes Created?
- First Order Motion Model for Image Animation
- Building your own Deepfake
- Use Cases
The Video version of this article can be seen below:
1. How are Deepfakes Created?
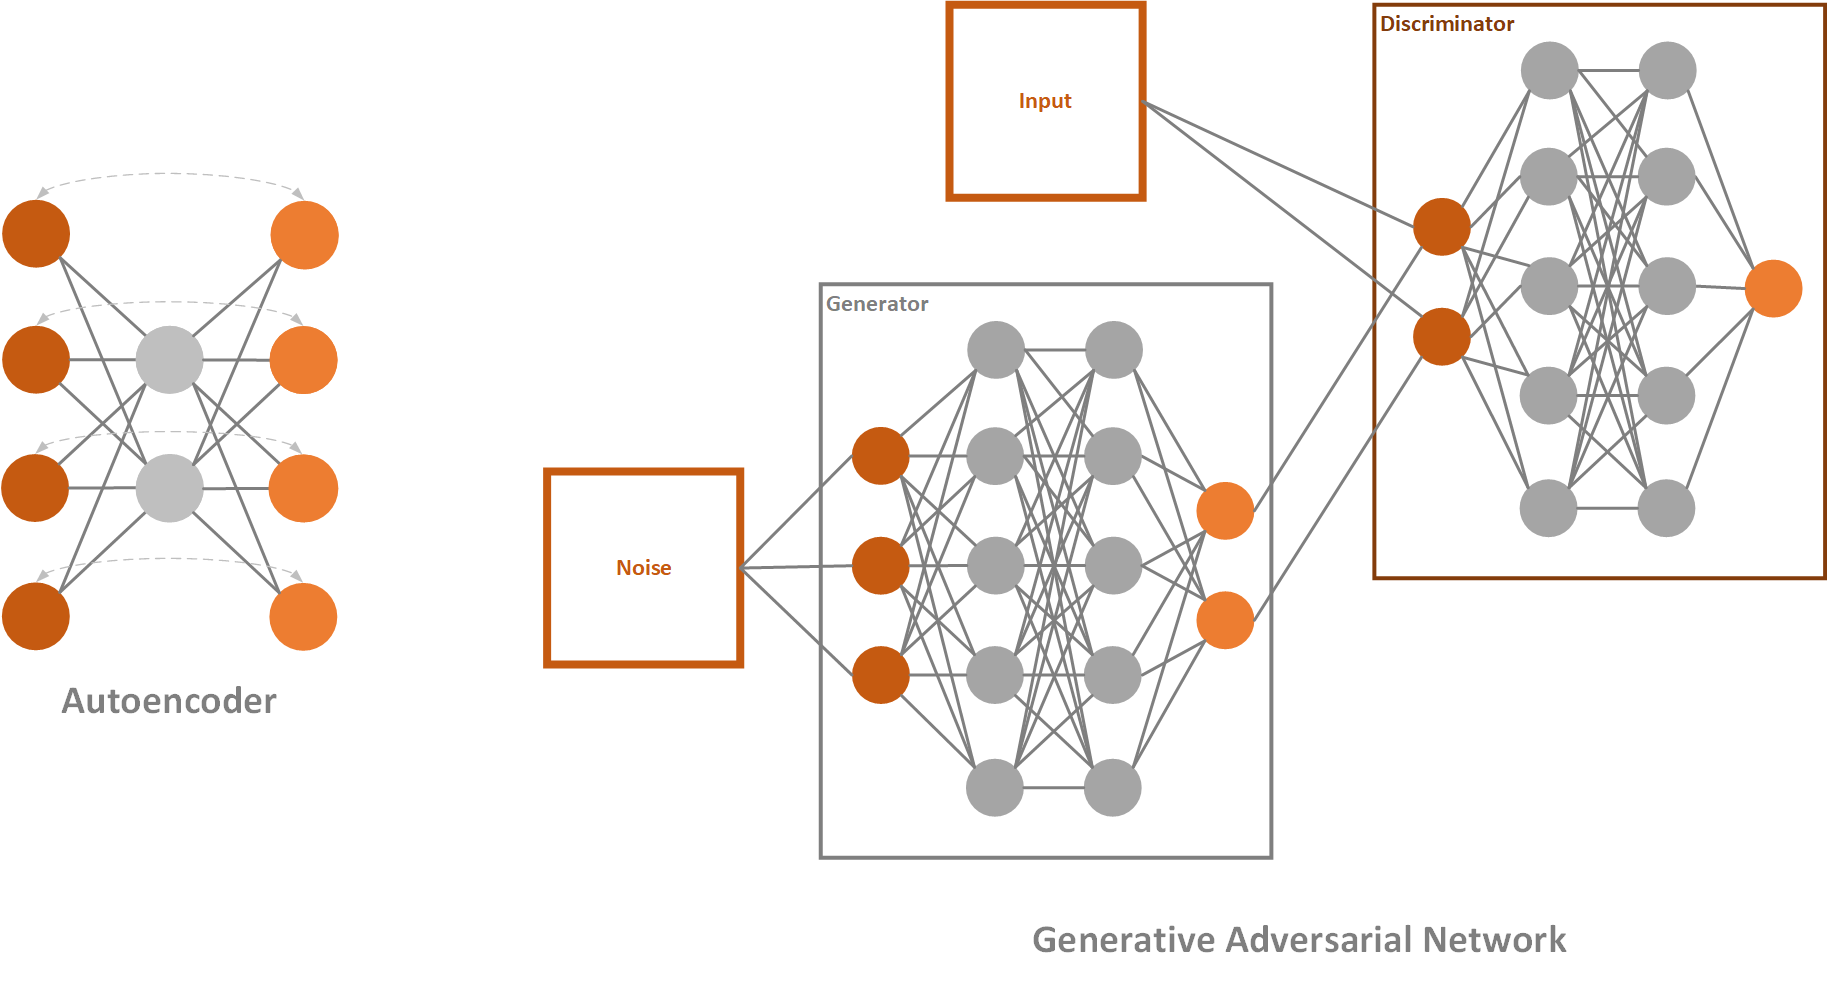
The basis of deepfakes, or image animation in general, is to combine the appearance extracted from a source image with motion patterns derived from a driving video. For these purposes, deepfakes use deep learning, where their name comes from (deep learning + fake). To be more precise, they are created using the combination of autoencoders and GANs.
Autoencoder is a simple neural network, that utilizes unsupervised learning (or self-supervised if we want to be more accurate). They are called like that because they automatically encode information and usually are used for dimensionality reduction. It consists of three parts: encoder, code, and decoder.
The encoder will process the input, in our case input video frame, and encode it. This means that it transforms information gathered from it into some lower-dimensional latent space – the code. This latent representation contains information about key features like facial features and body posture of the video-frame. In layman terms, here we have information about what face is doing, does it smile or blinks, etc. The decoder of autoencoder restores this image from the code and uses it for network learning.
Generative Adversarial Networks or GANs are one very cool deep learning concept. Essentially, they are composed of two networks that are competing against each other. The first network tries to generate images that are similar to the training set and it is called the generator. The second network tries to detect where does the image comes from, the training set, or the generator and it is called – the discriminator. Both networks are trying to be better than the other and as a result, we get better-generated images. Learn more about Autoencoders and GANs here.

The problem in the past, when it comes to building deepfakes, was that we needed some kind of additional information, ie. these techniques required some priors. For example, if we wanted to map head movement we would need needed facial landmarks. If we wanted to map full-body movement we needed to do pose-estimation.
That changed at the last year’s NeurIPS conference where the paper “First Order Motion Model for Image Animation” by the research team from the University of Toronto (Aliaksandr Siarohin, Stéphane Lathuilière, Sergey Tulyakov, Elisa Ricci and Nicu Sebe) was introduced. This method doesn’t require additional information about the subject of animation. Apart from that, once this model is trained, we can use it for transfer learning and apply it to an arbitrary object of the same category.
2. First Order Motion Model for Image Animation
Let’s explore a bit how this method works. The whole process is separated into two parts: Motion Extraction and Generation. As an input the source image and driving video are used. Motion extractor utilizes autoencoder to detect keypoints and extracts first-order motion representation that consists of sparse keypoints and local affine transformations. These, along with the driving video are used to generate dense optical flow and occlusion map with the dense motion network. Then the outputs of dense motion network and the source image are used by the generator to render the target image.

This work outperforms state of the art on all the benchmarks. Apart from that it has features that other models just don’t have. The really cool thing is that it works on different categories of images, meaning you can apply it to face, body, cartoon, etc. This opens up a lot of possibilities. Another revolutionary thing with this approach is that now you can create good quality Deepfakes with a single image of the target object, just like we use YOLO for object detection.

3. Building your own Deepfake
The code for First Order Motion Model can be downloaded from here if you have a fast GPU and want to test this app on your own environment. It contains several important folders and files. For example, within the config folder, you can find configurations for different pre-trained models. The modules folder contains an implementation of mentioned keypoint detector, discriminator, and generator. Also in the root folder, you can find demo.py, which shows how to use this repository and even train.py. The pre-trained model can be downloaded from here.

In order to use this solution, you need to download a pre-trained model. So, we are utilizing Transfer Learning to do this. For this purpose we utilize vox-adv-cpk.pth.tar, which is a model for face animation.
Once you downloaded it, put it in the root of the repository. In order to use this solution, you need to download a pre-trained model. So, we are utilizing Transfer Learning to do this. Once you downloaded it, put it in the root of the repository.
To to make your deepfake video follow these steps:
- Record driving video that you want to use and pick an image that you want to use
- Run following command to crop the video:
python crop-video.py --inp _location_of_the_video- Run this command to create deepfake video with proper parameters:
python demo.py  --config config/vox-adv-256.yaml
		--driving_video _location_of_the_video
		--source_image _location_of_the_image
		--checkpoint _location_of_pretrained_checkpoint
		--relative --adapt_scale
		--result_video _location_of_the_output
You can do so by following this Collab notebook. In essence, what you need to do is clone the repository and mount your Google Drive. Once that is done, you need to upload your image and driving video to drive. Make sure that image and video size contains only face, for the best results. Use ffmpeg to crop the video if you need to. Then all you need is to run this piece of code:
source_image = imageio.imread('/content/gdrive/My Drive/first-order-motion-model/source_image.png')
driving_video = imageio.mimread('driving_video.mp4', memtest=False)


#Resize image and video to 256x256

source_image = resize(source_image, (256, 256))[..., :3]
driving_video = [resize(frame, (256, 256))[..., :3] for frame in driving_video]

predictions = make_animation(source_image, driving_video, generator, kp_detector, relative=True,
                             adapt_movement_scale=True)

HTML(display(source_image, driving_video, predictions).to_html5_video())
Here is my experiment with image of Nikola Tesla and a video of myself:
3. Use Cases
There are several interesting music videos done by this technique. Check them out:
Conclusion
We are living in a weird age in a weird world. It is easier to create fake videos/news than ever and distribute them. It is getting harder and harder to understand what is truth and what is not. It seems that nowadays we can not trust our own senses anymore. Even though fake video detectors are also created, it is just a matter of time before the information gap is too small and even the best fake detectors can not detect if the video is true or not. So, in the end, one piece of advice – be skeptical. Take every information that you get with a bit of suspicion because things might not be quite as it seems.
Thank you for reading!

Nikola M. Zivkovic
CAIO at Rubik's Code
Nikola M. Zivkovic a CAIO at Rubik’s Code and the author of books: Ultimate Guide to Machine Learning and Deep Learning for Programmers. He loves knowledge sharing, and he is an experienced speaker. You can find him speaking at meetups, conferences, and as a guest lecturer at the University of Novi Sad.


Trackbacks/Pingbacks