Single Product eCommerce Website with Email Checkout in PHP
by Vincy. Last modified on September 27th, 2022.
Providing an online eCommerce solution is a real passionate job. It gives the opportunity to meet an array of different customers with varying degrees of requirements.
One of my clients is a market leader of his one and only outstanding product. As he wanted to create a new opening online due to this pandemic situation, I am presently building his eShop. It’s certain that this step will certainly retain (or increase) the sales 👍.
There is no need to have a gallery full of products always; and no need of having catalogs or shelves full of products to run an eCommerce website. It is quite possible to plugin the eCommerce solution to an application promoting even a single product.
Let us see a basic version of building an eCommerce website with a single product. It proceeds checkout via the customer email.
What is inside?
- About the single product eCommerce example
- Existing eCommerce platforms
- Advantages of customised eCommerce website
- Single product UI with buy now and Checkout controls
- jQuery form validation and AJAX checkout
- PHP code flow of eCommerce checkout via email
- Database script
- Output: Single Product eCommerce Website
About the single product eCommerce example
The eCommerce application UI and the back-end logic design have to be architectured based on the types of the business model.
This example is an eCommerce solution for a single product shop. It confirms the customer orders with email checkout.
I have already created a simple shopping cart code in PHP with the product gallery->cart->checkout flow.
It displays the product tile on the home page. This tile has the “Buy now” button control. The product details are from the application config.
When the customer tries to purchase the product, it asks for details via a HTML form to proceed with checkout.
Other than that, this example code uses jQuery for validating the checkout form data. Also, it uses jQuery AJAX to send the checkout request.
It uses a database to store the order and the purchased item entries.
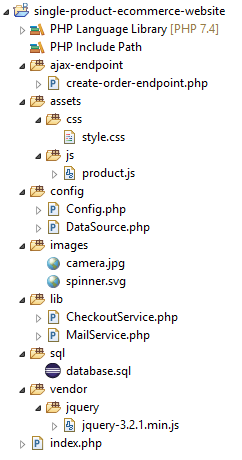
The following file structure shows the files created for this eCommerce example.
Existing eCommerce platforms
There are many eCommerce platforms existing in the market.
For example, BigCommerce, Shopify is one among the established platforms online. They allow to upload products and create an online store easily.
Those platforms provide solutions for the eCommerce requirements and give value-ads in the aspect of dependability.
The existing platforms cover enterprises that vary in size. We have to choose a suitable one among the voluminous options based on our size.
If the business is too unique and clean in its simplicity, then own customization is best for sure.
Advantages of customized eCommerce website
There are some advantages of customizing an eCommerce website instead of depending on any third-party platforms.
- The application size and complexity will be tiny and easy to maintain.
- It’s easy to manage, backup, migrate the data for the product, orders and other eCommerce platform entities.
- It gives space to rebuild the engine or UI on a need basis based on the change of scenarios or shop climate.
- Need not to worry about the latest norms and upgrades on the platform providing services.
- Easy adaptability of new features; and easy to disable unused utils.
Single product UI with buy now and Checkout controls
This is the code of the landing page created for this example.
It includes PHP snippets at the beginning. After that, it has the HTML for displaying only one product tile to users.
This tile has the “Buy now” button. On clicking it will show an HTML form to collect the customer details, name and email address.
By submitting the customer details, it calls the form validation script and the AJAX request to checkout the product.
The initial PHP script links the configuration file and gets the product data from there. The UI embeds the dynamic data into the container using PHP.
index.php
<?php
use Phppot\Config;

require_once __DIR__ . '/config/Config.php';
$configModel = new Config();
$configResult = $configModel->getProduct();
?>
<HTML>
<HEAD>
<TITLE>Single Product Ecommerce Website</TITLE>
<link href="assets/css/style.css" type="text/css" rel="stylesheet" />
<script src="vendor/jquery/jquery-3.2.1.min.js"></script>
</HEAD>
<BODY>
	<div class="txt-heading">Single product eCommerce application</div>
	<div id="product-grid">
		<div class="product-item">
			<div>
				<img src="<?php echo $configResult["imageUrl"]; ?>">
			</div>
			<div class="product-tile-footer">
				<div class="product-title"><?php echo $configResult["name"]; ?></div>
				<div class="product-price"><?php echo "$ ".  number_format($configResult["price"],2); ?></div>
				<?php if(Config::DISPLAY_QUANTITY_INPUT == true){?><div
					class="quantity">
					<input type="text" class="product-quantity" id="productQuantity"
						name="quantity" value="1" size="2" />
				</div><?php }?>
				<div>
					<button name="data" id="btn" onClick="buynow();"
						class="btnAddAction">Buy Now</button>
				</div>
			</div>
		</div>
	</div>
	<div id="customer-detail">
		<div class="txt-heading">Customers Details</div>
		<div class="product-item">
			<form method="post" action="" id="checkout-form">
				<div class="row">
					<div class="form-label">
						Name: <span class="required error" id="first-name-info"></span>
					</div>
					<input class="input-box" type="text" name="first-name"
						id="first-name">
				</div>
				<div class="row">
					<div class="form-label">
						Email Address: <span class="required error" id="email-info"></span>
					</div>
					<input class="input-box" type="text" name="email" id="email">
				</div>
				<div class="row">
					<div id="inline-block">
						<img id="loader" src="images/spinner.svg" /> <input type="button"
							class="checkout" name="checkout" id="checkout-btn"
							value="Checkout" onClick="Checkout();">
					</div>
				</div>
			</form>
		</div>
	</div>
	<div id="mail-status"></div>
	<script src="assets/js/shop.js"></script>
</BODY>
</HTML>
jQuery form validation and AJAX checkout
This simple script displays the functions to validate the checkout form and proceed to send the request to the server.
The validateUser() function gets the UI input field data and does the validation. It confirms that the fields are not empty and the email is in the right format.
On successful validation, it invokes the Checkout() function which uses jQuery AJAX to send the checkout request to the PHP.
It sends the customer details and the purchased product details as the AJAX parameters.
assets/js/shop.js
function validateUser() {
	var valid = true;

	$("#first-name").removeClass("error-field");
	$("#email").removeClass("error-field");

	var firstName = $("#first-name").val();
	var email = $("#email").val();
	var emailRegex = /^[a-zA-Z0-9.!#$%&'*+/=?^_`{|}~-]+@[a-zA-Z0-9](?:[a-zA-Z0-9-]{0,61}[a-zA-Z0-9])?(?:\.[a-zA-Z0-9](?:[a-zA-Z0-9-]{0,61}[a-zA-Z0-9])?)*$/;

	$("#first-name-info").html("").hide();
	$("#email-info").html("").hide();
	if (firstName.trim() == "") {
		$("#first-name-info").html("required.").css("color", "#ee0000").show();
		$("#first-name").addClass("error-field");
		valid = false;
	}
	if (email == "") {
		$("#email-info").html("required").css("color", "#ee0000").show();
		$("#email").addClass("error-field");
		valid = false;
	} else if (email.trim() == "") {
		$("#email-info").html("Invalid email address.").css("color", "#ee0000")
				.show();
		$("#email").addClass("error-field");
		valid = false;
	} else if (!emailRegex.test(email)) {
		$("#email-info").html("Invalid email address.").css("color", "#ee0000")
				.show();
		$("#email").addClass("error-field");
		valid = false;
	}
	if (valid == false) {
		$('.error-field').first().focus();
		valid = false;
	}
	return valid;
}

function Checkout() {

	var valid;
	valid = validateUser();
	if (valid) {
		jQuery.ajax({
			url : "ajax-endpoint/create-order-endpoint.php",
			data : 'userName=' + $("#first-name").val() + '&userEmail='
					+ $("#email").val() + '&productQuantity='
					+ $("#productQuantity").val(),
			type : "POST",
			beforeSend : function() {
				$("#loader").show();
				$("#checkout-btn").hide();
			},
			success : function(data) {
				$("#mail-status").html(data);
				$('#checkout-form').find('input:text').val('');
				$("#loader").hide();
				$("#customer-detail").hide();
				$("#checkout-btn").show();

			},
			error : function() {
			}
		});

	}
}
function buynow() {
	$("#customer-detail").show();
}
PHP code flow of eCommerce checkout via email
This is the first step to set the application configuration to run this example.
It sets the product detail in an array which is displayed on the home page dynamically.
It has a constant DISPLAY_QUANTITY_INPUT which is a flag that contains boolean true/false. If it is true, the product tile will allow users to enter the quantity.
config/Config.php
<?php
namespace Phppot;

/**
 * This class contains the configuration options
 */
class Config
{

    const ADMIN_EMAIL = 'admin@gmail.com';

    const CURRENCY_CODE = 'USD';

    const DISPLAY_QUANTITY_INPUT = true;

    public static function getProduct()
    {
        $products = array(
            "productId" => 1,
            "name" => "FinePix Pro2 3D Camera",
            "price" => 1500.00,
            "imageUrl" => 'images/camera.jpg'
        );

        return $products;
    }
}
This file is the PHP endpoint process of the AJAX request. It receives the customer and the order details and put an order entry into the database.
It instantiates the CheckoutService class to access the order and the order-item database.
After placing the order, it invokes the MailService to send the order confirmation via email.
In this example, it sends an order confirmation email to the customer. Also, it sends another email to Admin to notify that an order is placed.
ajax-endpoint/create-order-endpoint.php
<?php
use Phppot\CheckoutService;
use Phppot\Config;
use Phppot\MailService;
require_once __DIR__ . '/../lib/CheckoutService.php';
require_once __DIR__ . '/../config/Config.php';
require_once __DIR__ . '/../lib/MailService.php';
$configModel = new Config();
$configResult = $configModel->getProduct();
$checkoutService = new CheckoutService();
$mailService = new MailService();
$orderId = $checkoutService->getToken();
$productQuantity = 1;
if (! empty($_POST["productQuantity"])) {
    $productQuantity = $_POST["productQuantity"];
}
$checkoutService->insertOrder($orderId, $_POST["userName"], $_POST["userEmail"], Config::CURRENCY_CODE, $configResult["price"]);

$checkoutService->insertOrderItems($orderId, $configResult["name"], $productQuantity, $configResult["price"]);

$orderResult = $checkoutService->getOrder($orderId);
$orderItemResult = $checkoutService->getOrderItems($orderId);
$recipientArr = array(
    'email' => $orderResult[0]["email"]
);
$mailService->sendUserEmail($orderResult, $recipientArr);
$mailService->sendAdminEmail($orderItemResult, $orderResult);
?>
This is a complete code of the CheckoutService class in PHP.
It prepares the queries to insert and read the order and order-item entries.
Also, it includes some utility functions to generate a hash token for using it as an order reference id.
lib/CheckoutService.php
<?php
namespace Phppot;

require_once __DIR__ . '/../config/Config.php';

class CheckoutService
{

    private $dbConn;

    public function __construct()
    {
        require_once __DIR__ . '/../config/DataSource.php';
        $this->dbConn = new DataSource();
    }

    function insertOrder($orderId, $name, $email, $currency, $amount)
    {
        $query = "INSERT INTO tbl_order (order_id, name, email, currency, amount) VALUES (?, ?, ?, ?, ?)";
        $paramType = "ssssd";
        $paramValue = array(
            $orderId,
            $name,
            $email,
            $currency,
            $amount
        );

        $insertId = $this->dbConn->insert($query, $paramType, $paramValue);
        return $insertId;
    }

    function insertOrderItems($orderId, $name, $quantity, $item_price)
    {
        $query = "INSERT INTO tbl_order_items (order_id, name, quantity, item_price) VALUES (?, ?, ?, ?)";
        $paramType = "ssid";
        $paramValue = array(
            $orderId,
            $name,
            $quantity,
            $item_price
        );

        $insertId = $this->dbConn->insert($query, $paramType, $paramValue);
        return $insertId;
    }

    function getOrder($orderId)
    {
        $query = "SELECT * FROM tbl_order WHERE order_id='" . $orderId . "'";
        $orderResult = $this->dbConn->select($query);
        return $orderResult;
    }

    function getOrderItems($orderId)
    {
        $query = "SELECT * FROM tbl_order_items WHERE order_id='" . $orderId . "'";
        $orderItemResult = $this->dbConn->select($query);
        return $orderItemResult;
    }

    function getToken()
    {
        $token = "";
        $codeAlphabet = "ABCDEFGHIJKLMNOPQRSTUVWXYZ";
        $codeAlphabet .= "abcdefghijklmnopqrstuvwxyz";
        $codeAlphabet .= "0123456789";
        $max = strlen($codeAlphabet) - 1;
        for ($i = 0; $i < 10; $i ++) {
            $token .= $codeAlphabet[mt_rand(0, $max)];
        }
        return $token;
    }
}
?>
The MailService class defines to functions separately to send the customer and Admin emails on the placed orders.
It uses PHP mail() function for sending emails. You can integrate PHPMailer or any other library instead. If you want a code to send email using PHPMailer via SMTP, the linked tutorial will have the example.
lib/MailService.php
<?php
namespace Phppot;

class MailService
{

    function sendUserEmail($orderResult, $recipientArr)
    {
        $name = $orderResult[0]["name"];
        $email = $orderResult[0]["email"];
        $orderId = $orderResult[0]["order_id"];
        $subject = "Order Confirmation";
        $content = "Hi, you have placed the order successfully, the order reference id is $orderId. We will contact you shortly. Thank you. Regards, Shop Name team.";

        $toEmail = implode(',', $recipientArr);
        $mailHeaders = "From: " . $name . "<" . $email . ">\r\n";
        $response = mail($toEmail, $subject, $content, $mailHeaders);
        if ($response) {
            echo "<div class='success'><h1>Thank you for shopping with us.</h1>
                       Your order has been placed and the order reference id is <b>" . $orderId . ".</b><br/>
                       We will contact you shortly.</div>";
        } else {
            echo "<div class='Error'>Problem in Sending Mail.</div>";
        }

        return $response;
    }

    function sendAdminEmail($orderItemResult, $orderResult)
    {
        $name = $orderItemResult[0]["name"];
        $email = $orderResult[0]["email"];
        $currency = $orderResult[0]["currency"];
        $orderId = $orderItemResult[0]["order_id"];
        $price = $orderItemResult[0]["item_price"];
        $subject = "New order placed";
        $content = "New order is placed and the order reference id is $orderId.\n\nProduct Name: $name.\nPrice: $currency $price";

        $toEmail = Config::ADMIN_EMAIL;
        $mailHeaders = "From: " . $name . "<" . $email . ">\r\n";
        $response = mail($toEmail, $subject, $content, $mailHeaders);
        return $response;
    }
}
Database script
--
-- Database: `single-product-ecommerce`
--

-- --------------------------------------------------------

--
-- Table structure for table `tbl_order`
--

CREATE TABLE `tbl_order` (
  `id` int(11) NOT NULL,
  `order_id` varchar(255) NOT NULL,
  `name` varchar(255) NOT NULL,
  `email` varchar(255) NOT NULL,
  `currency` varchar(255) NOT NULL,
  `amount` decimal(10,2) NOT NULL,
  `create_at` timestamp NOT NULL DEFAULT current_timestamp() ON UPDATE current_timestamp()
) ENGINE=InnoDB DEFAULT CHARSET=utf8mb4;

-- --------------------------------------------------------

--
-- Table structure for table `tbl_order_items`
--

CREATE TABLE `tbl_order_items` (
  `id` int(11) NOT NULL,
  `order_id` varchar(255) NOT NULL,
  `name` varchar(255) NOT NULL,
  `quantity` int(11) NOT NULL,
  `item_price` decimal(10,2) NOT NULL,
  `create_at` timestamp NOT NULL DEFAULT current_timestamp() ON UPDATE current_timestamp()
) ENGINE=InnoDB DEFAULT CHARSET=utf8mb4;

--
-- Indexes for dumped tables
--

--
-- Indexes for table `tbl_order`
--
ALTER TABLE `tbl_order`
  ADD PRIMARY KEY (`id`);

--
-- Indexes for table `tbl_order_items`
--
ALTER TABLE `tbl_order_items`
  ADD PRIMARY KEY (`id`);

--
-- AUTO_INCREMENT for dumped tables
--

--
-- AUTO_INCREMENT for table `tbl_order`
--
ALTER TABLE `tbl_order`
  MODIFY `id` int(11) NOT NULL AUTO_INCREMENT;

--
-- AUTO_INCREMENT for table `tbl_order_items`
--
ALTER TABLE `tbl_order_items`
  MODIFY `id` int(11) NOT NULL AUTO_INCREMENT;
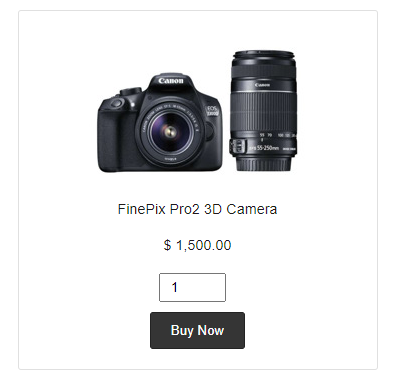
Output: Single Product eCommerce Website
The following output screenshots display the product tile look and feel. Also, it shows the checkout form collecting customer details for the email checkout.

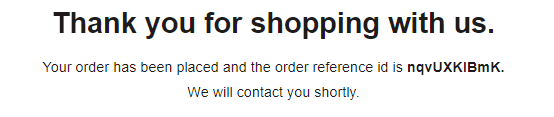
This is the response text returned after processing the AJAX checkout request. It displays the order reference id to follow up on the purchase instance in the future.

Written by Vincy, a web developer with 15+ years of experience and a Masters degree in Computer Science. She specializes in building modern, lightweight websites using PHP, JavaScript, React, and related technologies. Phppot helps you in mastering web development through over a decade of publishing quality tutorials.
Hi, I'm Vincy. I help build websites, grow businesses, big and small. If that is what you want, contact me.
I'm currently available for freelance work.