In 2017 I put together a small project with a Raspberry Pi Zero and its camera module to monitor the growth of seeds. I started off with cress, moved onto pea shoots and finished up with some basil. A few people around the world took part and built their own labs.
News: we have a new website for growlab!
Hacking on #InternetOfSeeds Mark II with my @Raspberry_Pi - here's a test live-stream of my cress. 0$ approach to creating an enclosure pic.twitter.com/hyujO6EuNV
— Alex Ellis (@alexellisuk) June 11, 2017
This year, I wanted to expand on the original idea and instead of focus on Tweeting, and taking a photo from the side, I wanted the image to be taken from above. This would give a better view, and let me use a seed tray, where I had more than one seed germinating.

Taken from my Grow Lab, the view from above can capture up to 40 different seeds germinating at once.
I want to invite you to join me and a few others in building your own Grow Lab.
To make it more interesting, it'll be a contest with milestones that you can reach by completing different tasks and sharing the results with the community. There's no such thing as perfect here, and putting your own spin on the project is encouraged.
The goals of the project are to bring the excitement of watching nature at work, directly in your own kitchen window sill and to give you a practical project, to get started with IoT and embedded electronics.
A global community challenge
There will be three awards you can win by participating in the project - bronze, gold and platinum. For each award you'll get a mark 1/10, so you can get up to 30 points in total.
Bronze - assemble your Grow Lab using the recommend parts, customise the design. Tweet a photo of your build.
Silver - install the software and Tweet a photo from the camera in its position.
Gold - Wait until at least one of your seeds has germinated, and Tweet a second photo.
Platinum - use the software to create images over two weeks. Compile the images into a timelapse and upload it to YouTube. Tweet a link to the video.
Tweet with the hashtag #growlab to participate.
To encourage you, I'll be sharing and re-tweeting your images and messages as the project goes on, and including the best in a final write-up at the end of the summer. To help me keep track, I'll be adding tweets that I see into the alexellis/growlab repository on GitHub. You can also send your own Pull Requests here if you like.
I'll also speak to my friends at Pimoroni, Hackster and Raspberry Pi to see if they can help with a set of small prizes or shout-outs for those of you who get to the Platinum level.
Most of all, I hope you learn, have fun and enjoy building your own Grow Lab.
First participants
Richard Gee who took part in my original experiment in 2017 has already put his build together and put a spin on the design:
Refined the head design and fixed with trusty @GorillaGlueUK. Still need a seed tray 🤦♂️ pic.twitter.com/cKZKdT05GG
— Richard Gee (@rgee0) April 11, 2021
Richard told me that he used a pipe bender to save costs on pipe elbows. The elbows in my project cost around 3 GBP or 5 USD each.
Build your own Grow Lab
There are two parts to the build and you're welcome to customise either or both.
Disclaimer:
If you're not an adult, then you'll need adult supervision for this project. You take this project on at your own risk. It goes without saying that we need to be careful when water, electricity, and powertools are all in close proximity.
The hardware
For Raspberry Pi components:
- Raspberry Pi Zero W
- Raspberry Pi camera module with wide-angle 160 degrees lens
- RPi zero camera cable (yellow)
- Power supply with a long cable ~ 2-2.5M
- 32-64GB SD Card
You can use a Raspberry Pi 4 if you wish to host some additional software, but if you just want to record photos and/or take sensor readings, then the Raspberry Pi Zero is small, light and very much up to the task.
Next, you can either mirror my build and customise it as you need, or use the build that I used for my 2017 project. The 2017 project takes photos from the side and uses small holes in a plastic box to mount the Raspberry Pi Zero and its camera.
The Raspberry Pi components are the same for either build.
For my build:
- A length of 15mm copper pipe
- 2x 15mm copper elbows (friction fit)
- Pipe cutter or hacksaw
- An adjustable spanner
- Gorilla glue or A/B epoxy
- Small sheet of MDF
- Small sheet of wood from a pallet, shelf, or an old piece of wood for the base board
- 15mm flat drill bit
- Drill
The method:
- Mark a hole in the center of the base board, about 1-2cm from the edge and drill at 15mm hole into it
- Cut a section of your 15mm pipe to 11 inches in height, this will be the main upright
- Attach the olive to the pipe and slide on the nut. Tighten the eblow and you have your first part of the vertical piece with its right angle
- Next, cut another piece of pipe for the horizontal section. This should be 50% of the length of your seed tray. If you're using a single seed pot, then make this 50% of the base board
- Now attach the piece of pipe you just cut into the elbow, so that you have right angle when you're finished.
- Attach the second elbow to the horizontal piece of pipe
- Cut a very small piece of pipe now, around 1.5 inches that will be the final piece, that we'll attach the MDF to with the Raspberry Pi and camera on the other side
- Mark a hole in your piece of MDF in the center. Drill a 15mm hole into it, but try not to go all the way through to the other side.
- Attach your Raspberry Pi Zero and its camera to the MDF using small self-tapping wood screws. You may be able to use small tack nails, but be careful not to hit the components.
- Now glue the smallest piece of pipe into the piece of MDF on the opposite side to the Raspberry Pi.
This is how everything should look at this point:
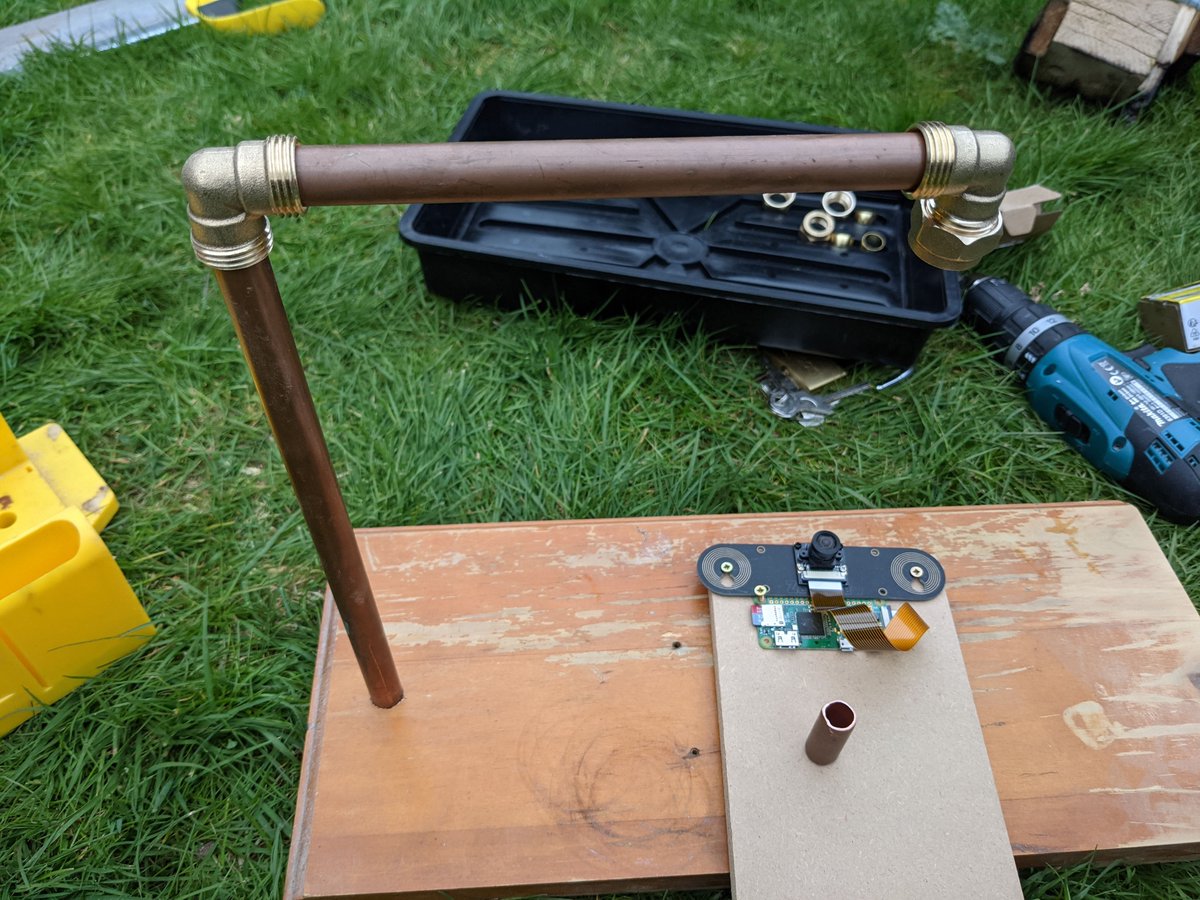
I mounted the camera and Raspberry Pi to the underside of a piece of MDF and glued it to the pipework.
Next, you'll need to glue the large piece of pipework into the base board. After an hour, or when the glue is set, attach the MDF board using the smaller piece of pipe you glued into the larger piece of pipe and tighten the nut.
Your completed lab should look like this:
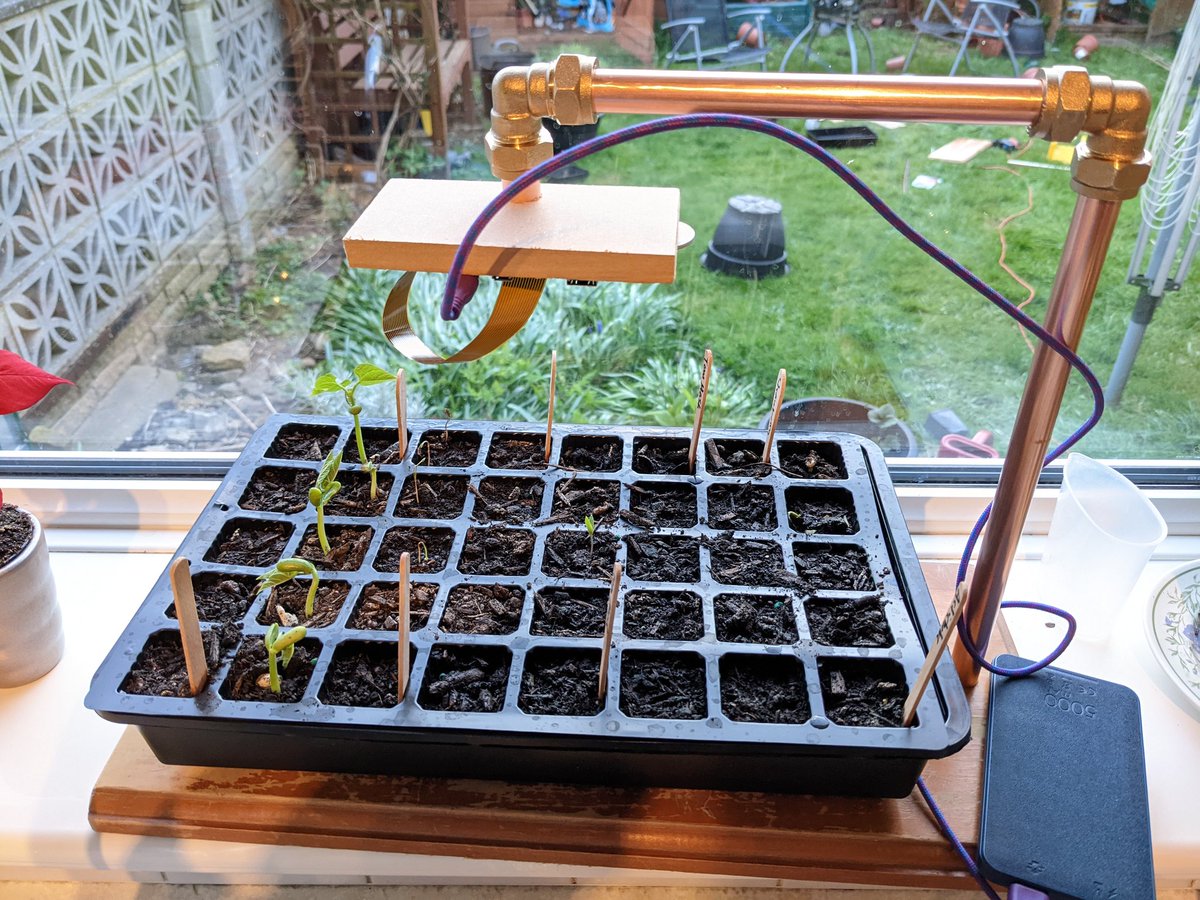
My second Grow Lab in 2021
I ran the power cable over the top of the pipe from a mains plug, but if you're confident and have something to hold the pipe still, you could cut a small hole and run the cable through the pipe and route it through the other end.
The software
For me, the beauty of using a Raspberry Pi instead of an Arduino or Pico board is that we get access to a full Linux Operating system, but can still use sensors and cameras.
- Flash Raspberry Pi OS Lite to your SD card
- Create a file called
sshon the boot partition to enable remote login - Connect the camera cable before powering on
Boot up the Raspberry Pi. I tend to use a USB network adapter to get remote access without a screen, but you can use a USB hub, keyboard, and HDMI monitor if you wish.
Make sure the camera is working with sudo raspistill -o image.jpg, then copy the file using scp pi@raspberrypi.local:~/image.jpg Desktop/.
Connect with your keyboard, or over SSH using ssh pi@raspberrypi.local. If you don't have ssh available and are using a Windows computer, install Git Bash
- Now run
raspi-configand configure your WiFi network, hostname and enable the camera under Interface Options - Run an update
sudo apt update && sudo apt-upgrade -qythen reboot - Add
gitandtmux-sudo apt install tmux git
There are two options for software.
The first option is to use my seeds2 software from 2017 which will tweet photos of your seeds live to the Internet on a periodic basis. It will require a Twitter API key which is harder to get than it was back then. Keep an eye out, as I'm planning on creating "seeds3" - the next generation of the project that records temperature, humidity and air pressure using a Bosch BME280 sensor.
The second option is the simplest and where I recommend that you start. You can download my phototimer project to create your timelapse offline. Then you can tweet photos or share them on social media as and when you like. When you have enough images, you can even create your own timelapse using command-line tools like ffmpeg or iMovie.
Here's a very quick example of what you can expect. I took this from 6am to 3pm the morning after I finished my build.
git clone https://github.com/alexellis/phototimer
mkdir -p ~/image
Use nano to edit the config.py file:
config = {}
config["am"] = 600
config["pm"] = 1900

config["flip_horizontal"] = False
config["flip_vertical"] = False
config["metering_mode"] = "matrix"
config["exposure"] = "auto"

config["base_path"] = "/home/pi/image"
config["height"] = 1944
config["width"] = 2592
config["quality"] = 35
Photos are only taken between the hours am <> pm, so from 6am to 7pm in the evening. The image can also be flipped depending on how you've positioned your camera. I use a low quality number of 35 to fit more images onto my SD card and to make it quick for me to transfer the images over the network to see the latest images.
Then test out taking a photo with
sudo python take.py 15
This takes a photo every 15 seconds and saves it under /home/pi/image/year/month/day/hour/.
Run tmux now, so that we can disconnect from the Raspberry Pi and keep the program running. Watch for a green or yellow bar at the bottom of your screen. That's how you know tmux is running.
tmux

cd phototimer

# Every 10 minutes = 60*10 = 600
sudo python take.py 600
Now hit Control A + B to detach from tmux and log out.
[detached (from session 0)]
Whenever you log in over SSH, just type tmux attach to get back to the photo timer.
You can find out more about Tmux in my tutorial video.
When you want to copy your photos from your Raspberry Pi to your laptop you can use the scp utility.
scp -r pi@raspberrypi.local:~/image Desktop/
Then open the image folder on your Desktop and browse the images as organised in a structure of year/month/day/hour.
To copy a specific day or hour, just add it to the path:
# The 4th April
scp -r pi@raspberrypi.local:~/image/2021/4/10 Desktop/

# 6AM on the 4th April
scp -r pi@raspberrypi.local:~/image/2021/4/10/6 Desktop/
Congratulations, you have built your own Grow Lab and downloaded your first images!
The seeds for your lab
You can grow whatever you like in your lab. I would suggest you try these out if you are not sure where to start:
- A pip from an Apple, Orange or Lemon
- A pea
- A dwarf bean
- A tomato
- A broad bean
- A courgette
- A sunflower
You'll find most in your local super market or garden centre.
Putting your own spin on things
If you want to grow just one or two plants, perhaps you could add a small submersible 5V pump and a capacitive soil sensor, to auto-water your plants. It's relatively simple to put this together on your own, or you can use a Grow kit from Pimoroni.
If you're filling up your SD card quicker than you expected, then why not add a larger, removable USB pen-drive and mount it under /home/pi/image? That way you can simply turn off the lab and copy the files off the USB pen drive whenever you want.
Could you aggregate the data from a BME280 sensor into a time-series database like InfluxDB, so that you can plot the data over time? See also: Create an Environmental Monitoring Dashboard
Could you add an LED like a Pimoroni Blinkt! so that the plants can receive light during the night?
Rather than using a regular camera, could you use a night-vision camera and IR LEDs, so that you can see how your plants move and change shape during the night?
Could you use the inlets project to host a small HTTP server to show the latest image from your Grow Lab?
Perhaps you'd rather use the Raspberry Pi 4 and host some OpenFaaS functions alongside your experiment? Perhaps you'll also add a database, and a dashboard like Grafana.
Wrapping up
I hope you enjoyed this blog post and that you'll take part in the community challenge this Spring and Summer. It'd be great to see your messages on Twitter, just use the hashtag #growlab or Tweet to me if you have any questions or comments.
As you make progress, don't forget to see the "A global community challenge" and the various levels you can achieve.
As I hear about your build, I'll keep track of your achievements through a GitHub repository: alexellis/growlab
Updates
- 3 May 2021 - new talk at Equinix Metal's GIFEE day - Growing your own with Raspberry Pi - overview and updates from the community
- 7 May 2021 - we now have 12 growlab technicians registered in the GitHub repository - four of them have live camera previews you can watch
- 8 May 2021 - we have a new website for growlab!
A good place to get Raspberry Pi components in the UK is Pimoroni and Adafruit in the US.