
In this tutorial, we’re going to show you how to install Odoo 15 (community edition) on an Ubuntu 20.04 server with Nginx as a reverse proxy and HTTPS through a free SSL certificate (Let’s Encrypt).
The instructions are the same for other versions of Ubuntu too.
If you get a fully managed Odoo server at SolaDrive, they will install Odoo for you for free.
Go to SolaDrive
Step 1: Get a server for Odoo
First thing’s first – you need a server. We recommend getting a server from SolaDrive – they are specialized in Odoo hosting and will provide fully managed support for your server, as well as some support for Odoo itself. They can install Odoo for you for free if you get a server from them.
Alternatively, if you can manage a server yourself and know what you are doing, you can get an unmanaged server from Vultr.
For other options check this page. Get a server with at least 2GB of RAM. The more the better.
If you plan on using Odoo locally, you don’t need a server and you can just skip to the next step.
Step 2: Log in as root and update the server
Next, log into the server and update it before we start with the actual Odoo installation:
apt-get update && apt-get upgrade
If the server you’re using is unmanaged, you should properly configure and secure the server. Make sure you keep it updated and keep backups. If you got a server from SolaDrive, it’s fully managed so they will do most of the work for you.
Step 3: Install PostgreSQL and other packages
Odoo requires PostgreSQL. To install it and a few other packages we’ll need for this tutorial, run this command:
apt-get install postgresql nano wget
Step 4: Install Odoo
We’ll be using the nightly packaged installer for Odoo. Run the following commands:
wget -O - https://nightly.odoo.com/odoo.key | apt-key add -
echo "deb http://nightly.odoo.com/15.0/nightly/deb/ ./" >> /etc/apt/sources.list.d/odoo.list
apt-get update && apt-get install odoo
This adds the repository and installs the community edition of Odoo with all its dependencies.
Step 5: Start Odoo and enable it at boot
If you ran the packaged installer, Odoo may already be running. You can check the status by running this command:
systemctl status odoo
If it’s not running, you can start it with this command:
systemctl start odoo
To enable Odoo to start at boot, run this command:
systemctl enable odoo
Step 6: Finish the Odoo installation
To complete the installation, you need to create a database and run the last step by visiting your server’s IP address on port 8069. This is the default port for Odoo.
So, visit http://yourserversip:8069
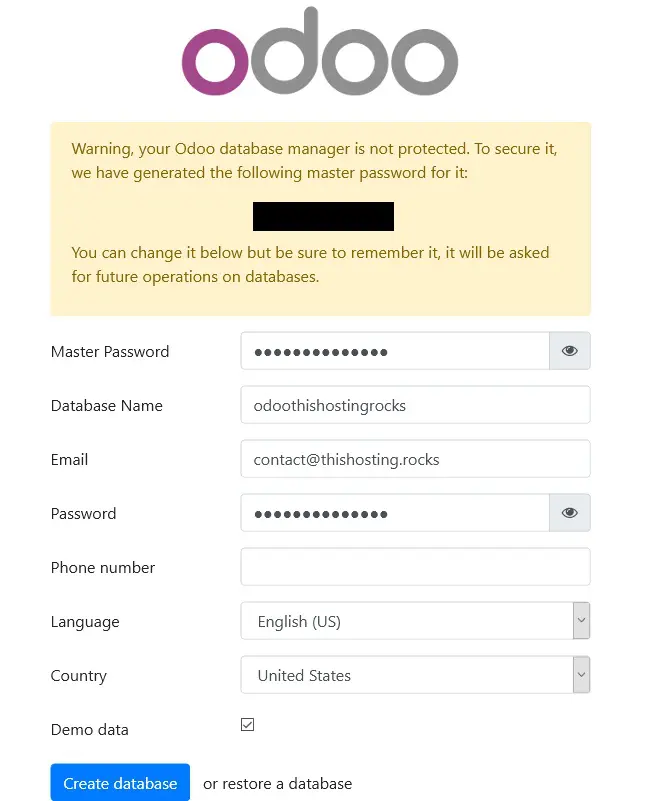
and fill out the details, everything is self-explanatory. This step creates a database and you can optionally fill it up with demo data.
Once that step is done, you can start using Odoo and installing apps.
If you want to use a domain name instead of your server’s IP address, you need to set up a reverse proxy.
(Optional) Step 7: Set up Nginx as a reverse proxy with HTTPS (Let’s Encrypt)
First, install nginx and certbot with the following command:
apt-get install nginx python3-certbot-nginx
Then, start the nginx service if it’s not already started and enable it at boot:
systemctl start nginx
systemctl enable nginx
Next, edit the Odoo configuration file
nano /etc/odoo/odoo.conf
and set proxy_mode to True (by default it’s set to False):
proxy_mode = True
Then, create an Nginx configuration file for Odoo:
nano /etc/nginx/conf.d/odoo.conf
And add the following:
upstream odoo {
server 127.0.0.1:8069;
}

server {
listen 80;
server_name odoo.thishosting.rocks;
root /usr/share/nginx/html;
index index.html index.htm;
access_log /var/log/nginx/odoo-odoo.thishosting.rocks-local.access.log;
error_log /var/log/nginx/odoo-odoo.thishosting.rocks-local.error.log;

location / {
proxy_pass http://odoo;
# force timeouts if the backend dies
proxy_next_upstream error timeout invalid_header http_500 http_502 http_503 http_504;
proxy_redirect off;

# set headers
proxy_set_header Host $host;
proxy_set_header X-Real-IP $remote_addr;
proxy_set_header X-Forwarded-For $proxy_add_x_forwarded_for;
proxy_set_header X-Forwarded-Proto https;
}

# cache some static data in memory for 60mins
location ~* /web/static/ {
proxy_cache_valid 200 60m;
proxy_buffering on;
expires 864000;
proxy_pass http://odoo;
}
}
Make sure you replace “odoo.thishosting.rocks” with your own domain name.
To test the configuration file, run:
nginx -t
If everything is okay, just restart Nginx and start using your domain:
systemctl restart nginx
You can stop here if you don’t need to use an SSL (HTTPS).
To install a free Let’s Encrypt SSL for your domain, run:
certbot --nginx -d odoo.thishosting.rocks
Of course, use your own domain name instead of “odoo.thishosting.rocks”
Follow the self-explanatory prompts. Make sure you let certbot set up http to https redirection (option 2)
If you’re using a firewall, make sure you allow the ports for https with the following commands:
ufw allow 'Nginx Full'
ufw reload
And that’s it. Now you can use Odoo on https://odoo.thishosting.rocks or whatever your domain name is.
How to update Odoo on Ubuntu?
If there’s a newer version of Odoo released, you can upgrade to that one on the same server you’re currently using. In a nutshell, you just follow this installation tutorial again but for the newer version. Make sure you don’t delete the old database.


