Android clients need to be able to connect with servers in a safe, secure manner. In recent years, the OAuth 2.0 Authorization Code flow has become the standard mechanism of doing this. While this practice safeguards clients from a myriad of security attacks, it’s still not completely impenetrable.
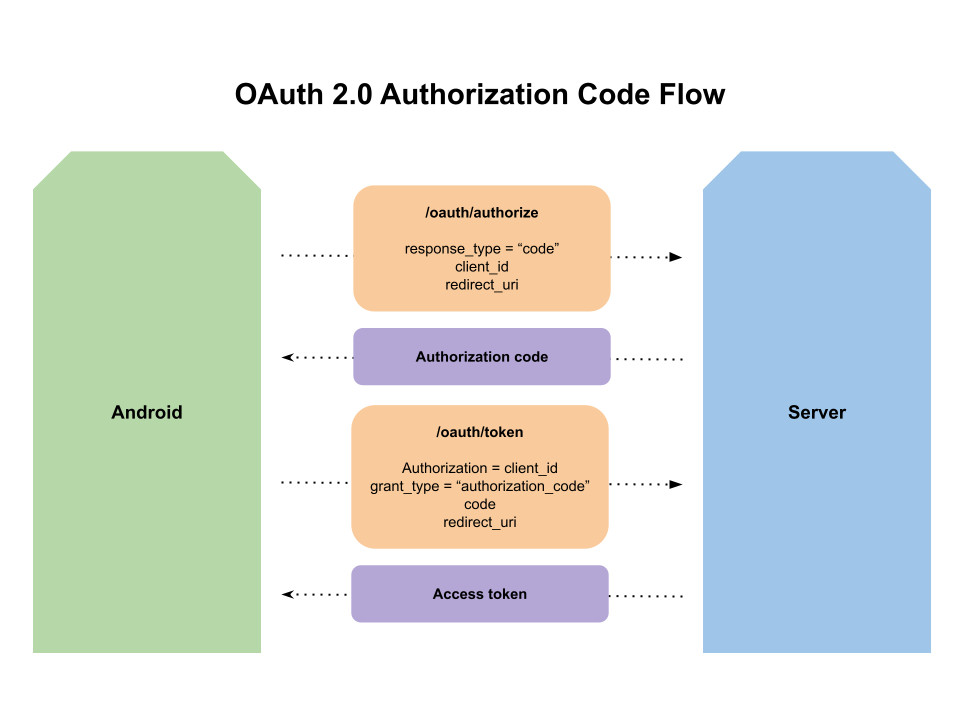
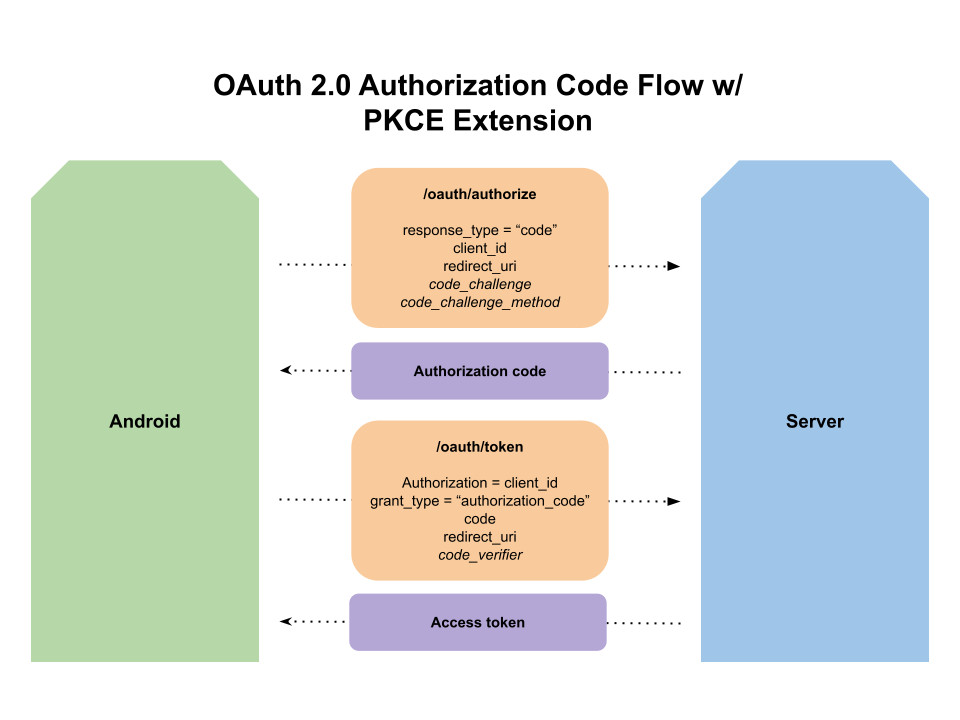
When making an authorization request, the server returns an authorization code. It’s possible for an attacker to intercept this code and then use it to request an access token. To prevent this sort of attack, servers can employ an extension to the authorization code flow called Proof Key for Code Exchange, or PKCE.
PKCE on Android
PKCE (pronounced "pik-see") requires that the client (Android) generates a cryptographic string, called a code verifier. This code verifier is a randomly generated string between 43 and 128 characters long, which prevents it from being guessed by an attacker. The client then uses a one-way hash function (SHA-256) to derive a code challenge, which is sent with the authorization request. The server stores the code challenge and associates it with the returned authorization code. The client then requests a token with both the authorization code and the original code verifier. The server will then apply the hashing function to the code verifier and verify that it yields the correct code challenge. Since only the client and server know the code verifier, an attacker does not have the requisite information for making a valid token request.
While there are out-of-the-box solutions that provide PKCE support on Android, such as OpenID’s AppAuth, they require adopting an entire framework for the auth flow. This article will provide a custom, "roll your own" approach to adding PKCE support to an existing auth flow. The examples here use Retrofit but the ideas are applicable to any library or framework.
Generating the code verifier
First, a code verifier must be generated. This is a random, cryptographic, URL-safe string between 43 and 128 characters in length.
We can generate a code verifier with the following code:
val secureRandom = SecureRandom()
val bytes = ByteArray(64)
secureRandom.nextBytes(bytes)
val encoding = Base64.URL_SAFE or Base64.NO_PADDING or Base64.NO_WRAP
val codeVerifier = Base64.encodeToString(bytes, encoding)
The byte array’s size, which determines the entropy of the code verifier, should be between 32 and 96 bytes. When encoded into Base64, this will result in a string length between the designated 43 and 128 characters. For the purposes of this example, I’ve chosen to use 64 bytes in order to strike a balance between speed and security.
Generating the code challenge
Next, we will pass our code verifier through a series of transformations in order to generate the code challenge:
val bytes = codeVerifier.toByteArray()
val messageDigest = MessageDigest.getInstance("SHA-256")
messageDigest.update(bytes)
val digest = messageDigest.digest()
val codeChallenge = Base64.encodeToString(digest, encoding)
First, the code verifier is converted from Base64 back into a byte array. Next, it’s hashed using the "SHA-256" algorithm. Finally, it’s encoded back to Base64 with the same encoding used on the code verifier.
Note: We don’t have to worry about getInstance("SHA-256") throwing an exception since SHA-256 is fully supported across all Android versions.
Sending the authorization request
Now that we have the code challenge, we can add this as a query parameter to our authorization URI:
Uri.parse("$baseUrl/oauth/authorize").buildUpon()
   .appendQueryParameter("response_type", "code")
   .appendQueryParameter("client_id", clientId)
   .appendQueryParameter("redirect_uri", redirectUri)
   .appendQueryParameter("code_challenge", codeChallenge)
   .appendQueryParameter("code_challenge_method", "S256")
   .build()
When a successful authorization request is made, the server will store the code challenge and associate it with the authorization code that’s sent back to us in the response.
Notes:
We must pass along the required "code_challenge_method" parameter but we can hardcode its value to "S256" since we can guarantee that the code challenge will always be hashed on Android. On other clients that may not fully support SHA-256, they can fall back to a less secure "plain" method.
It’s also recommended to add a "state" parameter to your request to ensure the integrity of the redirect. Read more about this here.
Sending the token request
The final step for gaining authorized access to the server is to request an access token. In addition to the authorization code returned to us in the prior step, we’ll want to include our original code verifier that we generated. An example request is provided using Retrofit:
@FormUrlEncoded
@POST("/oauth/token")
suspend fun getAccessToken(
   @Header("Authorization") clientId: String,
   @Field("grant_type") grantType: String = "authorization_code",
   @Field("code") code: String,
   @Field("redirect_uri") redirectUri: String,
   @Field("code_verifier") codeVerifier: String
): Response<OAuth2Response>
The server will take the code verifier passed along with the request and apply the same set of transformations we did on the client in order to derive the code challenge. If this code challenge matches the one associated with the authorization code, then an access token will be generated and returned to us. If an attacker were to intercept the authorization code, the code itself would be insufficient in making a valid request for an access token.
A small step towards greater security
Android apps, like any client, can often serve as a vehicle for attackers to compromise both the user and its host. It’s important as Android developers that we take all of the necessary steps to prevent such vulnerabilities. PKCE is a small, but important, step to ensuring that users are able to use our apps both reliably and securely.
Be sure to follow @doximity_tech if you'd like to be notified about new blog posts.