Authentication and access control are required for most applications, but they often distract us from building core features. In this article, I’ll cover a straightforward way to add auth and access control in React.
Instead of adding a static library that you have to keep up to date or re-research each time you build a project, we’ll use a service that stays up to date automatically and is a much simpler alternative to Auth0, Okta, and others.
React authentication
There are two main things your React application needs to do to sign on a user:
- Get an access token from an authentication server
- Send the access token to your backend server with each subsequent request
These steps are the same for pretty much all authentication, whether that’s standard email and password, magic links, or single sign on (SSO) providers like Google, Azure, or Facebook.
Ultimately, we want our React app to send an initial request to an authentication server and have that server generate an access token we can use.
JWT access tokens
There are different choices for what type of access token to use, and JSON Web Tokens (JWTs) are a great option. JWTs are compact, URL-safe tokens that your React application can use for authentication and access control.
Each JWT has a JSON object as its “payload” and is signed such that your backend server can verify that the payload is authentic. An example JWT looks like:
eyJhbGciOiJIUzI1NiIsInR5cCI6IkpXVCJ9.eyJ1c2VySWQiOjEsImF1dGhvcml6YXRpb24iOiJhZG1pbiJ9.f7iKN-xi24qrQ5NQtOe0jiriotT-rve3ru6sskbQXnA
The payload for this JWT is the middle section (separated by periods):
eyJ1c2VySWQiOjEsImF1dGhvcml6YXRpb24iOiJhZG1pbiJ9The JWT payload can be decoded from base64 to yield the JSON object:
JSON.parse(atob("eyJ1c2VySWQiOjEsImF1dGhvcml6YXRpb24iOiJhZG1pbiJ9"));

// =>
{
  “userId”: 1,
  “authorization”: “admin”
}
It’s important to note that this payload is readable by anyone with the JWT, including your React application or a third party. Anyone that has the JWT can read its contents.
However, only the authentication server can generate valid JWTs. Your React application, your backend server, or a malicious third party cannot generate valid JWTs, only read and verify them.
When your backend server receives a request with a JWT, it should verify the JWT as authentic by checking it against the public key for that JWT. This allows your application server to verify incoming JWTs and reject any tokens that were not created by the authentication server (or that have expired).
The flow for using a JWT in your React application looks like this:
- Your React app requests a JWT from the authentication server whenever the user wants to sign on.
- The authentication server generates a JWT using a private key and then sends the JWT back to your React app.
- Your React app stores this JWT and sends it to your backend server whenever your user needs to make a request.
- Your backend server verifies the JWT using a public key and then reads the payload to determine which user is making the request.
Each of these steps is simple to write down, but each step has its own pitfalls when you actually want to implement it and keep it secure. Especially over time, as new threat vectors emerge and new platforms need to be patched or supported, the security overhead can add up quickly.
Userfront removes auth complexity in React apps
Userfront is a framework that abstracts away auth complexity. This makes it much easier for you to work with authentication in a React application and, perhaps most importantly, it keeps all the auth protocols updated for you automatically over time.
The underlying philosophy with Userfront is that world-class auth should not take effort – it should be easy to set up, and security updates should happen for you automatically. Userfront has all the bells and whistles of authentication, Single Sign On (SSO), access control, and multi-tenancy, with a production-ready free tier up to 10,000 monthly active users.
For most modern React applications, it’s a great solution.
Setting up authentication in React
Now we’ll go through building all the main aspects of authentication in a React application. The final code for this example is available here.
Set up your React application and get your build pipeline in order however you prefer. In this tutorial, we’ll use Create React App, which does a lot of the setup work for us, and we’ll also add React Router for client-side routing. Start by installing Create React App and React Router:
npx create-react-app my-app
cd my-app
npm install react-router-dom --save
npm start
Now our React application is available at http://localhost:3000.

Like the page says, we can now edit the src/App.js file to start working.
Replace the contents of src/App.js with the following, based on the React Router quickstart:
// src/App.js

import React from "react";
import { BrowserRouter as Router, Switch, Route, Link } from "react-router-dom";

export default function App() {
  return (
    <Router>
      <div>
        <nav>
          <ul>
            <li>
              <Link to="/">Home</Link>
            </li>
            <li>
              <Link to="/login">Login</Link>
            </li>
            <li>
              <Link to="/reset">Reset</Link>
            </li>
            <li>
              <Link to="/dashboard">Dashboard</Link>
            </li>
          </ul>
        </nav>

        <Switch>
          <Route path="/login">
            <Login />
          </Route>
          <Route path="/reset">
            <PasswordReset />
          </Route>
          <Route path="/dashboard">
            <Dashboard />
          </Route>
          <Route path="/">
            <Home />
          </Route>
        </Switch>
      </div>
    </Router>
  );
}

function Home() {
  return <h2>Home</h2>;
}

function Login() {
  return <h2>Login</h2>;
}

function PasswordReset() {
  return <h2>Password Reset</h2>;
}

function Dashboard() {
  return <h2>Dashboard</h2>;
}
Now we have ourselves a very simple app with routing:
| Route | Description |
|---|---|
/ | Home page |
/login | Login page |
/reset | Password reset page |
/dashboard | User dashboard, for logged in users only |

This is all the structure we need to start adding authentication.
Signup, login, and password reset with Userfront
Go ahead and create a Userfront account. This will give you a signup form, login form, and password reset form you can use for the next steps.
In the Toolkit section of your Userfront dashboard, you can find the instructions for installing your signup form:
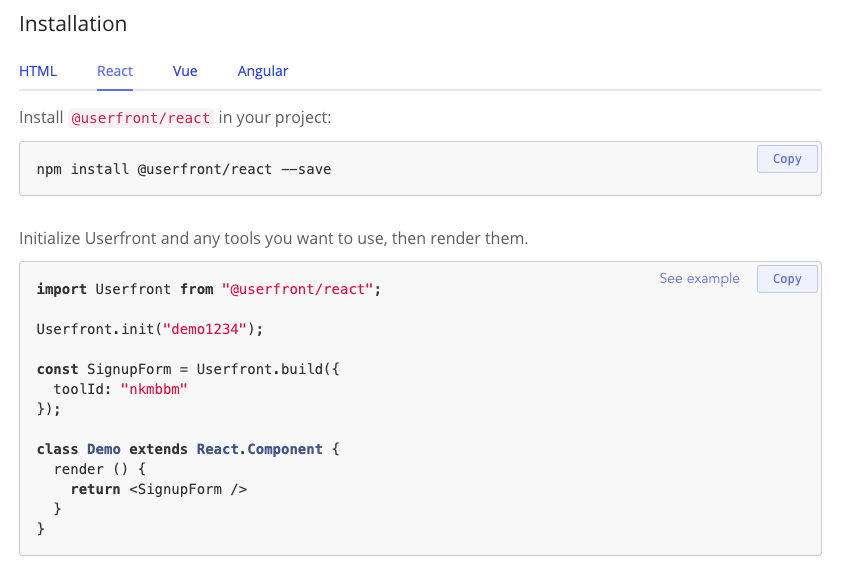
Follow the instructions by installing the Userfront React package with:
npm install @userfront/react --save
npm start
Add the signup form to your home page by importing and initializing Userfront, and then updating the Home() function to render the signup form.
// src/App.js

import React from "react";
import { BrowserRouter as Router, Switch, Route, Link } from "react-router-dom";
import Userfront from "@userfront/react";

Userfront.init("demo1234");

const SignupForm = Userfront.build({
  toolId: "nkmbbm",
});

export default function App() {
  return (
    <Router>
      <div>
        <nav>
          <ul>
            <li>
              <Link to="/">Home</Link>
            </li>
            <li>
              <Link to="/login">Login</Link>
            </li>
            <li>
              <Link to="/reset">Reset</Link>
            </li>
            <li>
              <Link to="/dashboard">Dashboard</Link>
            </li>
          </ul>
        </nav>

        <Switch>
          <Route path="/login">
            <Login />
          </Route>
          <Route path="/reset">
            <PasswordReset />
          </Route>
          <Route path="/dashboard">
            <Dashboard />
          </Route>
          <Route path="/">
            <Home />
          </Route>
        </Switch>
      </div>
    </Router>
  );
}

function Home() {
  return (
    <div>
      <h2>Home</h2>
      <SignupForm />
    </div>
  );
}

function Login() {
  return <h2>Login</h2>;
}

function PasswordReset() {
  return <h2>Password Reset</h2>;
}

function Dashboard() {
  return <h2>Dashboard</h2>;
}
Now the home page has your signup form. Try signing up a user:

Your signup form is in “Test mode” by default, which will create user records in a test environment you can view separately in your Userfront dashboard:

Continue by adding your login and password reset forms in the same way that you added your signup form:
// src/App.js

import React from "react";
import { BrowserRouter as Router, Switch, Route, Link } from "react-router-dom";
import Userfront from "@userfront/react";

Userfront.init("demo1234");

const SignupForm = Userfront.build({
  toolId: "nkmbbm",
});
const LoginForm = Userfront.build({
  toolId: "alnkkd",
});
const PasswordResetForm = Userfront.build({
  toolId: "dkbmmo",
});

export default function App() {
  return (
    <Router>
      <div>
        <nav>
          <ul>
            <li>
              <Link to="/">Home</Link>
            </li>
            <li>
              <Link to="/login">Login</Link>
            </li>
            <li>
              <Link to="/reset">Reset</Link>
            </li>
            <li>
              <Link to="/dashboard">Dashboard</Link>
            </li>
          </ul>
        </nav>

        <Switch>
          <Route path="/login">
            <Login />
          </Route>
          <Route path="/reset">
            <PasswordReset />
          </Route>
          <Route path="/dashboard">
            <Dashboard />
          </Route>
          <Route path="/">
            <Home />
          </Route>
        </Switch>
      </div>
    </Router>
  );
}

function Home() {
  return (
    <div>
      <h2>Home</h2>
      <SignupForm />
    </div>
  );
}

function Login() {
  return (
    <div>
      <h2>Login</h2>
      <LoginForm />
    </div>
  );
}

function PasswordReset() {
  return (
    <div>
      <h2>Password Reset</h2>
      <PasswordResetForm />
    </div>
  );
}

function Dashboard() {
  return <h2>Dashboard</h2>;
}
At this point, your signup, login, and password reset should all be functional.
Your users can sign up, log in, and reset their password.

Access control in React
Usually, we don’t want users to be able to view the dashboard unless they are logged in. This is known as a protected route.
Whenever a user is not logged in but tries to visit /dashboard, we can redirect them to the login screen.
We can accomplish this by updating the Dashboard component in src/App.js to handle the conditional logic.
When a user is logged in with Userfront, they will have an access token available as Userfront.accessToken(). We can check for this token to determine if the user is logged in. If the user is logged in, we can show the dashboard page, and if the user is not logged in, we can redirect to the login page.
Add the Redirect component to the import statement for React Router, and then update the Dashboard component to redirect if no access token is present.
// src/App.js

import React from "react";
import {
  BrowserRouter as Router,
  Switch,
  Route,
  Link,
  Redirect, // Be sure to add this import
} from "react-router-dom";

// ...

function Dashboard() {
  function renderFn({ location }) {
    // If the user is not logged in, redirect to login
    if (!Userfront.accessToken()) {
      return (
        <Redirect
          to={{
            pathname: "/login",
            state: { from: location },
          }}
        />
      );
    }

    // If the user is logged in, show the dashboard
    const userData = JSON.stringify(Userfront.user, null, 2);
    return (
      <div>
        <h2>Dashboard</h2>
        <pre>{userData}</pre>
        <button onClick={Userfront.logout}>Logout</button>
      </div>
    );
  }

  return <Route render={renderFn} />;
}
Notice also that we’ve added a logout button by calling Userfront.logout() directly:
<button onClick={Userfront.logout}>Logout</button>Now, when a user is logged in, they can view the dashboard. If the user is not logged in, they will be redirected to the login page.

React authentication with an API
You’ll probably want to retrieve user-specific information from your backend. In order to protect your API endpoints, your backend server should check that incoming JWTs are valid.
There are many libraries available to read and verify JWTs across various languages; here are a few popular libraries for handling JWTs:
Your access token
While the user is logged in, their access token is available in your React application as Userfront.accessToken().
Your React application can send this as a Bearer token inside the Authorization header to your backend server. For example:
// Example of calling an endpoint with a JWT

import Userfront from "@userfront/react";
Userfront.init("demo1234");

async function getInfo() {
  const res = await window.fetch("/your-endpoint", {
    method: "GET",
    headers: {
      "Content-Type": "application/json",
      Authorization: `Bearer ${Userfront.accessToken()}`,
    },
  });

  console.log(res);
}

getInfo();
To handle a request like this, your backend should read the JWT from the Authorization header and verify that it is valid using the public key found in your Userfront dashboard.
Here is an example of Node.js middleware to read and verify the JWT access token:
// Node.js example (Express.js)

const jwt = require("jsonwebtoken");

function authenticateToken(req, res, next) {
  // Read the JWT access token from the request header
  const authHeader = req.headers["authorization"];
  const token = authHeader && authHeader.split(" ")[1];
  if (token == null) return res.sendStatus(401); // Return 401 if no token

  // Verify the token using the Userfront public key
  jwt.verify(token, process.env.USERFRONT_PUBLIC_KEY, (err, auth) => {
    if (err) return res.sendStatus(403); // Return 403 if there is an error verifying
    req.auth = auth;
    next();
  });
}
Using this approach, any invalid or missing tokens would be rejected by your server. You can also reference the contents of the token later in the route handlers using the req.auth object:
console.log(req.auth);

// =>
{
  mode: 'test',
  tenantId: 'demo1234',
  userId: 5,
  userUuid: 'ab53dbdc-bb1a-4d4d-9edf-683a6ca3f609',
  isConfirmed: false,
  authorization: {
    demo1234: {
      tenantId: 'demo1234',
      name: 'Demo project',
      roles: ["admin"],
      permissions: []
    },
  },
  sessionId: '35d0bf4a-912c-4429-9886-cd65a4844a4f',
  iat: 1614114057,
  exp: 1616706057
}
With this information, you can perform further checks as desired, or use the userId or userUuid to look up user information to return.
For example, if you wanted to limit a route to admin users only, you could check against the authorization object from the verified access token, and reject any tokens that don’t have an admin role:
// Node.js example (Express.js)

app.get("/users", (req, res) => {
  const authorization = req.auth.authorization["demo1234"] || {};

  if (authorization.roles.includes("admin")) {
    // Allow access
  } else {
    // Deny access
  }
});
React SSO (Single Sign On)
With your Toolkit forms in place, you can add social identity providers like Google, Facebook, and LinkedIn to your React application, or business identity providers like Azure AD, Office365, and more.
You do this by creating an application with the identity provider (e.g. Google), and then adding that application’s credentials to the Userfront dashboard. The result is a modified sign on experience:

No additional code is needed to implement Single Sign On using this approach: you can add and remove providers without updating your forms or the way you handle JWTs.
Final notes
React authentication and access control can be complex to do yourself, or it can be simple when using a service.
Both the setup step and, more importantly, the maintenance over time, are handled with modern platforms like Userfront.
JSON Web Tokens allow you to cleanly separate your auth token generation layer from the rest of your application, making it easier to reason about and more modular for future needs. This architecture also allows you to focus your efforts on your core application, where you are likely to create much more value for yourself or your clients.
For more details on adding auth to your React application, visit the Userfront guide, which covers everything from setting up your auth forms to API documentation, example repositories, working with different languages and frameworks, and more.
Thanks for the great article.
I’ve got a question about the code right above the “React SSO (Single Sign On)” section where you have written
const authorization = req.auth.authorization["demo1234"] || {};if the short circuit results in {}, so authorization variable will be {}.
later on, in the if condition, we are checking its
rolesproperty which will beundefinedandundefined.includes("admin")will result in an error. what would be the proper way of handling this? is try/catch a suitable way?i mean like this:
try {authorization.roles.includes("admin")
// Allow access
} catch{
// Deny access
}
you can use optional chaining like this:
if(authorization?.roles.icludes(“smth”) {
} else {}