How to Create a Contact Form in WordPress
by Vincy. Last modified on July 19th, 2022.
A contact form is an important component of any website. It acts as a bridge between the provider and the customer. Creating a contact form for a WordPress platform is an easy job. You need to go through just a few steps to follow to launch a successful contact form for a WordPress site.
We have seen too many varieties of contact forms example in core PHP. No matter the platform, framework or CMS, but the concept is the same to write the process flow.
So, if you are familiar with a contact form about how it is working, then it is easy to understand the WordPress version of it.
I have built a WordPress custom template for this contact form UI. Then, I map the template for the contact page created using the admin panel.
What is inside?
- Create WordPress environment
- Create a new contact page using WordPress admin
- Create child-theme for the active theme
- How to create contact template
- Send AJAX request using wp_ajax hooks
- WordPress contact form output
Create WordPress environment
Set up the WordPress environment to create a contact form in that. The prerequisites of setting up WordPress are,
- PHP 7.4 and above.
- MySQL 5.6 and above or MariaDB 10.1 and above.
- Apache or Ngink (mod_rewrite enabled)
- Https support.
In a previous article, we have seen how to install WordPress. The linked article has the steps to simply install WordPress into your server.
You may find more details on setting up a WordPress environment from the official documentation.
Create a new contact page using WordPress admin
If you are new to WordPress you must start with a beginner’s guide to learn how to build a WordPress website.
After installation, it will allow login to the WordPress admin panel.
In the left menu Pages->Add New navigates to create a new contact page. It will ask for the page title and content.
There are various ways to display the contact page content.
- The contact HTML can be directly added to the create-new-page and admin interface.
- Showing contact layout with the WordPress template files.
- Registering shortcodes to render contact page layout in the frontend.
In this example code, I used the WordPress template files to load the contact layout.
Create child-theme for the active theme
I have created the WordPress child theme to customize the currently activated theme.
We can also create a widget with the contact form and render it to the theme layout.
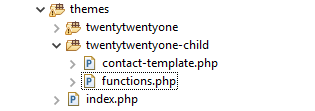
The below screenshot shows the theme’s file structure with the child theme. The child theme has the WordPress template file contact-template.php. This file has the contact HTML with the client-side AJAX script.
The functions.php file hooks the wp_ajax to process the contact form on submit.
How to create contact template
This is the WordPress template file create for this contact form example.
It loads the page title and content of the page created in the WordPress admin panel to display on the contact page.
Added to that, it has the contact form HTML. The form contains the basic fields name, email and more. All the fields are mandatory and validated via JavaScript.
The validation script is in the template file. We can also enqueue the JavaScript assets by using the WordPress core functions wp_enqueue_script().
contact-template.php
<?php
/* Template Name: Contact Template */
get_header();

/* Start the Loop */
while (have_posts()) :
    the_post();
    ?>
<article id="post-<?php the_ID(); ?>" <?php post_class(); ?>>

    <header class="entry-header alignwide">
			<?php
    the_title('<h1 class="entry-title">', '</h1>');
    ?>
		</header>
    <!-- .entry-header -->
    <div class="entry-content">
 <?php
    the_content('<p>', '</p>');
    ?>
    <link rel="stylesheet" type="text/css"
            href="/wordpress/wp-content/themes/twentytwentyone-child/style.css">
        <form name="contactForm" id="contactForm" method="post"
            onsubmit="return formValidation()"  action="">
            <div class="row">
                <div class="label">Name:</div>
                <input type="text" id="name" name="name">
            </div>
            <div class="row">
                <div class="label">Email:</div>
                <input type="text" id="email" name="email">
            </div>
            <div class="row">
                <div class="label">Subject:</div>
                <input type="text" id="subject" name="subject">
            </div>
            <div class="row">
                <div class="label">Message:</div>
                <textarea id="message" name="message" rows="5"></textarea>
            </div>
            <div class="row">
                <input type="submit" value="Submit"> <span id="status"></span>
            </div>
        </form>
    </div>
</article>
<!-- #post-<?php the_ID(); ?> -->
<?php
endwhile
; // End of the loop.

get_footer();
?>
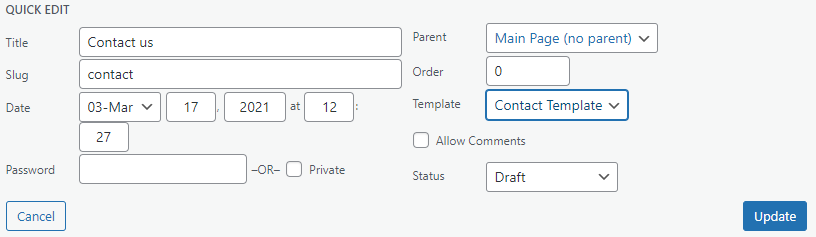
The above file has the contact template name at the beginning. It helps to display the Template dropdown lists in the admin.
Choose the QUICK EDIT option of the contact page from Pages->All Pages. The below screenshot displays the option to choose the contact template for the page.
In the contact-page edit screen, it shows the child theme template name in a dropdown.
Send AJAX request using wp_ajax hooks
This JavaScript code has two functions. The formValidation() is for validating the contact form and the processContactSubmit() is to call wp_ajax to process the contact form in WordPress.
The AJAX request passes the validated form data to the server-side. It calls the admin_ajax.php with the action parameter to hook the wp_ajax.
AJAX script
<script>
function formValidation() {
	  event.preventDefault();
	  var name = document.forms["contactForm"]["name"].value;
	  var email = document.forms["contactForm"]["email"].value;
	  var subject = document.forms["contactForm"]["subject"].value;
	  var message = document.forms["contactForm"]["message"].value;
	  document.getElementById('status').innerHTML = '';
      var errorMessage="<span class='error'>All fields are required.</span>";
	  var regEx = /^([A-Za-z0-9_\-\.])+\@([A-Za-z0-9_\-\.])+\.([A-Za-z]{2,4})$/;

         if (name.trim() == "" ||email.trim() == "" || subject.trim() == "" || message.trim() == "") {
             document.getElementById('status').innerHTML = errorMessage;
             return false;
           }
       if (!regEx.test(email)) {
    	   var errorMessage="<span class='error'>Invalid email.</span>";
 		    document.getElementById('status').innerHTML = errorMessage;
 		    return false;
 		  }
	  processContactSubmit();
      return true;
	}

function processContactSubmit() {
                var request = new XMLHttpRequest();
                request.open("POST", "/wordpress/wp-admin/admin-ajax.php?action=process_contact_form");
                request.onreadystatechange = function() {
                    if(this.readyState === 4 && this.status === 200) {
                        document.getElementById("status").innerHTML = this.responseText;
                    }
                };
                var myForm = document.getElementById("contactForm");
                var formData = new FormData(contactForm);
                request.send(formData);
}
</script>
functions.php
In functions.php, it hooks the wp_ajax action process_contact_form() on requesting via AJAX.
It receives the form data to set the contact email subject and the main body content.
It also sets the mail header and recipient email address to pass through the mail sending function.
This code uses the wp_mail to send the contact email using WordPress. There are WordPress plugins to enable SMTP for sending emails.
<?php
add_action('wp_ajax_nopriv_process_contact_form', 'process_contact_form');

function process_contact_form()
{
    $to = "Recipient Email Address";
    $subject = $_POST["subject"];
    $headers = "Testing";
    $message = $_POST["message"];
    $attachments = "";
    $sent = wp_mail($to, $subject, $message, $headers, $attachments);
    if (! $sent) {
        echo "<span class='error'>Problem in sending mail.</span>";
    } else {
        echo "<span class='success'>Hi, thank you for the message.</span>";
    }
    wp_die();
}
WordPress contact form output
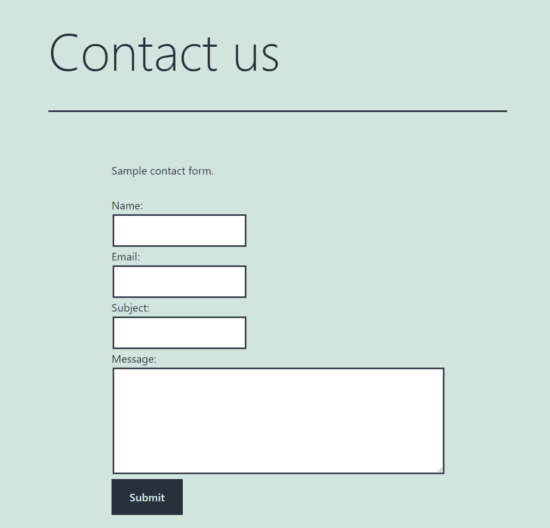
The contact form output displays the contact form layout created with a WordPress template file.
The below screenshots displays the client-side and server-side responses on submitting the form data.
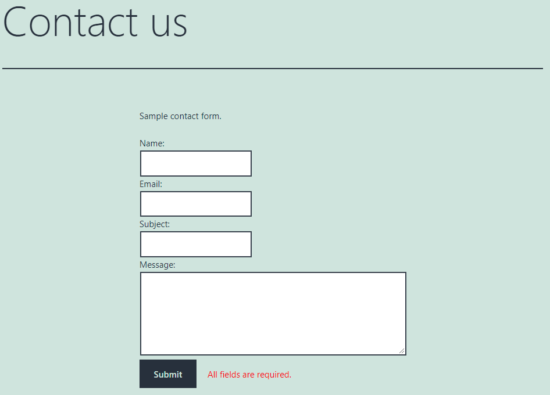
After executing the wp_ajax mail sending action, it returns the boolean response to check the mail is sent or not.
Based on the wp_mail function return data, the AJAX endpoint prepares responses. Figures show the success or the failure response of this WordPress contact form example.


Conclusion
Thus, we have learned how to create a contact form in WordPress. I hope, this will help you to replicate the same in a WordPress website.
We have seen various ways to render contact forms or any layout on the user end. The steps to create a custom contact template may help to build different templates and build customizations.
The code with wp_ajax action hooks defines a section to process contact form data and mail sending.
With this basic idea, it will let you set up a get a quote, project inquiry or any of such form-based UI template in WordPress.

Written by Vincy, a web developer with 15+ years of experience and a Masters degree in Computer Science. She specializes in building modern, lightweight websites using PHP, JavaScript, React, and related technologies. Phppot helps you in mastering web development through over a decade of publishing quality tutorials.
Hi, I'm Vincy. I help build websites, grow businesses, big and small. If that is what you want, contact me.
I'm currently available for freelance work.