What is Flask Python?
Python is a very popular and powerful language with a big community that has been around for a long time. Many great companies, such as Google, use it for their projects, and the number of people using it for web development is still increasing.
Flask Python is a microframework that will allow you to have a web application running with very few steps and nearly no setup. This framework's simplicity and strong control over what you want in your application have made it one of the most used web development frameworks. We will show you it is simple, flexible, and modular, leading to an enjoyable development experience.
We expect the user to have some basic knowledge of Python to understand all the presented steps. Nevertheless, any person should be able to have the application 🆙 and 🏃 after following this tutorial. If you have any questions, please feel free to get in touch, and we will do our best to help.
Table of contents
What is Flask Python?
What is a REST API?
How to make a REST API using Python Flask?
➤ Technical Requirements and Installation Process
➤ Hello World Endpoint
➤ REST API with CRUD structure
➤ Blueprints
➤ Jinja Templates for Flask & Adding CSS
How to create a swagger documentation with Flask?
Conclusion
FAQ (Frequently Asked Questions
What is Flask Python?
A framework is a library used by developers to build and maintain reliable and scalable web applications. There are several frameworks available for Python, such as Tornado, Pyramind, and of course, Django (which is often compared with Flask).
Flask(🌶) is a Python microframework for web development. Despite being built with a small core and considered a very lightweight Web Server Gateway Interface (WSGI), Flask stands out for its easy-to-extend philosophy. It was designed to scale up to complex applications and to support an easy and quick start.
Moreover, another great advantage of Flask is its functionality. Even though it offers suggestions, Flask does not mandatorily require project layouts or other dependencies. Instead, it allows developers to choose the libraries and tools they wish to use and additionally has various extensions available, that are provided by the community.
What is a REST API?
API is an acronym of Application Programming Interface, which means it is basically how you communicate with an application. REST stands for REpresentational State Transfer and corresponds to an architectural style that aims for stateless communications and separates client and server concerns.
The REST API on this exercise will create a fake implementation of CRUD actions over an entity. An API with CRUD allows the Create, Read, Update and Delete operations over the application's elements.
How to make a REST API using Python Flask?
This article will guide you through the first steps to create a REST API using Flask(🌶).
Below you can see the endpoints you’ll have by the end of the tutorial. The documentation presented is also generated by the application you will create!
Technical requirements
You must have Python installed on the current machine. The code presented will consider Python3. If you want to use Python2 and/or are following this procedure in a Windows machine, please follow the instructions presented in the Flask installation guide.
Let’s start by creating a directory to store the project. In the directory you want to have your project, run the following commands on the shell:
mkdir flask_demo
cd flask_demo
We’ve created the flask_demo directory and moved it inside. Before starting to install dependencies, let’s create a virtual environment by running the following command:
python3 -m venv venv
This will create a folder into your project with the name .venv. After that, we need to activate the respective environment by running:
. venv/bin/activate
This means we are now considering the venv virtual environment when running any Python code. It might be important to specify the environment you are considering when running it in your IDE.
Make sure you have the environment active before following the next steps. You can check if you are inside the environment by looking to the left side of the console. If there’s the virtual environment name inside parentheses, you’re good to go.
If you want to deactivate the environment, just run the following command:
deactivate

Installation Process
Install the Flask package using pip (Python package installer):
pip install Flask
At the point of writing, the Flask stable version is 1.1.2. If you want to have the project specifications updated and with the same version as me, you can use a requirements.txt file instead of installing Flask. You can copy the file below to the root directory.
# requirements.txt
Flask==1.1.2
After that, you just need to run the following command:
pip install -r requirements.txt
Now we are ready to start developing our REST API. The usage of the requirements.txt file is widespread and useful in Python projects since it easily allows you to share and have the project with the same packages installed.
Hello World
The first endpoint code:
# main.py
from flask import Flask
app = Flask(__name__)

@app.route('/basic_api/hello_world')
def hello_world():
    return 'Hello, World!'
What?! Is it that simple? Yes, it is! The code is done to have an application with an implemented endpoint. Now we simply have to define the Flask environment variables and see your application 🏃. Note that you need to be in the folder with the main.py file to run this commands.
export FLASK_APP=main.py
export FLASK_ENV=development
flask run
Access the link http://localhost:5000/basic_api/hello_world to see the classic message we all love.
REST API with CRUD structure
Now that we have created our first endpoint, let’s get back to this application blog post's main purpose: Have the REST API with the basic CRUD structure. Import request from Flask and add the lines below to the main file to have the CRUD endpoints created for a specific entity:
# main.py
from flask import Flask, request
...
@app.route('/basic_api/entities', methods=['GET', 'POST'])
def entities():
    if request.method == "GET":
        return {
            'message': 'This endpoint should return a list of entities',
            'method': request.method
        }
    if request.method == "POST":
        return {
            'message': 'This endpoint should create an entity',
            'method': request.method,
		'body': request.json
        }

@app.route('/basic_api/entities/<int:entity_id>', methods=['GET', 'PUT', 'DELETE'])
def entity(entity_id):
    if request.method == "GET":
        return {
            'id': entity_id,
            'message': 'This endpoint should return the entity {} details'.format(entity_id),
            'method': request.method
        }
    if request.method == "PUT":
        return {
            'id': entity_id,
            'message': 'This endpoint should update the entity {}'.format(entity_id),
            'method': request.method,
		'body': request.json
        }
    if request.method == "DELETE":
        return {
            'id': entity_id,
            'message': 'This endpoint should delete the entity {}'.format(entity_id),
            'method': request.method
        }
Now, for each of the routes created different methods are allowed. The following endpoints are available:
- GET /entities - get list of entities
- POST / entities - create an entity
- GET / entities/<entity_id> - get entity information
- PUT / entities/<entity_id> - update entity
- DELETE / entities/<entity_id> - delete entity
With this structure, you are ready to create an API with all the complexity you need. This is not the most scalable structure since you consider multiple validations for each route, and the structure is not rigid. In the next sections, we’ll cover a more scalable solution that allows easy documentation creation as you develop your endpoints.
To test how these endpoints are working, you can use a curl request like the one presented below:
curl -X POST -H "Content-Type: application/json" -d '{"ping": "pong"}' http://localhost:5000/basic_api/entities
This is the result you should get if you run this command on your machine. Make sure the port your application is running on is the same:

Another tool that is very useful and common to use in the development of APIs is Postman. If you’ve never used it, we recommend you try it and explore it! It is very powerful and will increase your development to the moon and beyond. 🚀
Blueprints
Before we present other Flask strengths, let’s talk about blueprints. A blueprint is an object very similar to a flask application object, but instead of creating a new one, it allows the extension of the current application. This might be useful if you want to create multiple versions of an API or simply divide services within the same application.
We will use this class type to present different use case scenarios of a Flask application. Let’s convert the code above to be inserted into a blueprint and load into the main application.
Create a new folder blueprints to start inserting blueprints models as we progress in the blog post. Inside create a folder named basic_endpoints and create a file in it named __init__.py:
# blueprints/basic_endpoints/__ini__.py
from flask import Blueprint, request

blueprint = Blueprint('api', __name__, url_prefix='/basic_api')

@blueprint.route('/hello_world')
def hello_world():
    return {'message': 'Hello World!'}

@blueprint.route('/entities', methods=['GET', 'POST'])
def entities():
    if request.method == "GET":
        return {
            'message': 'This endpoint should return a list of entities',
            'method': request.method
        }
    if request.method == "POST":
        return {
            'message': 'This endpoint should create an entity',
            'method': request.method,
            'body': request.json
        }

@blueprint.route('/entities/<int:entity_id>', methods=['GET', 'PUT', 'DELETE'])
def entity(entity_id):
    if request.method == "GET":
        return {
            'id': entity_id,
            'message': 'This endpoint should return the entity {} details'.format(entity_id),
            'method': request.method
        }
    if request.method == "PUT":
        return {
            'id': entity_id,
            'message': 'This endpoint should update the entity {}'.format(entity_id),
            'method': request.method,
            'body': request.json
        }
    if request.method == "DELETE":
        return {
            'id': entity_id,
            'message': 'This endpoint should delete the entity {}'.format(entity_id),
            'method': request.method
        }
Now the main.py file just needs to load the created blueprint and register it to the application object:
# main.py
from flask import Flask
from blueprints.basic_endpoints import blueprint as basic_endpoints

app = Flask(__name__)
app.register_blueprint(basic_endpoints)

if __name__ == "__main__":
    app.run()
Now you should have exactly the same endpoints but with the usage of Blueprints.
Jinja Templates for Flask
As already stated, Flask is a very minimal framework; however, it relies on a handy tool: the Jinja template engine. This allows for rendering dynamic HTML templates. Although this is out of this blog post's scope, we will just give a small example to demonstrate the concept.
The first thing you have to do is create the templates folder and inside this folder, insert the example.html file.
<!-- templates/example.html -->
<html>
<a href="https://bit.ly/3slPB3c">
    <div class="meme">
        <p class="top">{{top}}</p>
        <p class="bottom">{{bottom}}</p>
    </div>
</a>
</html>
Note there are two variables in use in the template inside {{ }}. This is a special format to include Python code inside the template, allowing for dynamic content to be rendered. In this case, we have the top and bottom of the variable, which will be converted to text inside the <p> tag. Now that the template is created let’s load it using Flask. Let’s create a new blueprint in a different file to demonstrate this example:
# blueprints/jinja_endpoint/__init__.py
from flask import Blueprint, request, render_template

blueprint = Blueprint('jinja_template', __name__, url_prefix='/jinja_template')

@blueprint.route('')
def get_template():
    top = request.args.get('top') if 'top' in request.args else ''
    bottom = request.args.get('bottom') if 'bottom' in request.args else ''

    return render_template('example.html', top=top, bottom=bottom)
Do not forget to register this blueprint in the main.py file:
# main.py
...
from blueprints.jinja_endpoint import blueprint as jinja_template_blueprint
...
app.register_blueprint(jinja_template_blueprint)
...
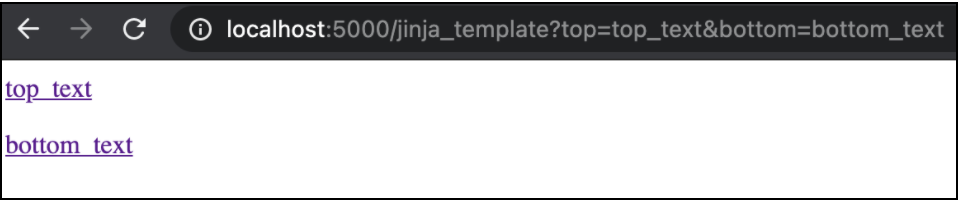
Here we can see the definition of the top and bottom variables based on the query params sent in the URL. For example, if you go to http://localhost:5000/jinja_template?top=top_text&bottom=bottom_text you will get the following result:
Adding CSS
For the giggles, let’s add some CSS to the page we just created. Create the static folder with the file example.css inside.
/* static/example.css */
* {
    box-sizing: border-box;
}

.meme {
    margin: auto;
    width: 450px;
    height: 450px;
    background-image: url('https://www.imaginarycloud.com/blog/content/images/2021/03/business_cat.jpg');
    background-size: 100%;
    text-align: center;
    position: relative;
}

p {
    position: absolute;
    left: 0;
    right: 0;
    margin: 15px 0;
    padding: 0 5px;
    font-family: impact;
    font-size: 2.5em;
    text-transform: uppercase;
    color: white;
    letter-spacing: 1px;
    text-shadow:2px 2px 0 #000,
    -2px -2px 0 #000,
    2px -2px 0 #000,
    -2px 2px 0 #000,
    0px 2px 0 #000,
    2px 0px 0 #000,
    0px -2px 0 #000,
    -2px 0px 0 #000,
    2px 2px 5px #000;
}

.bottom {
    bottom: 0;
}

.top {
    top: 0;
}
After that, add the corresponding reference to the CSS file we just created by adding this head tag to the HTML file:
<!-- templates/example.html -->
<html>
<head>
    <link rel="stylesheet" href="{{ url_for('static', filename='example.css') }}">
</head>
...
Go to http://localhost:5000/jinja_template?top=cancel%20the%20REST%20API%20creation&bottom=I%20have%20to%20watch%20this%20bird and you should see something like this:

There! You have your jinja crash course and a meme generator endpoint! Do not touch the Business Cat! You might be surprised with what you'll find...

How to create a swagger documentation with Flask?
Now that we’ve considered some basic functionalities to have basic endpoints created with Flask, let’s create a better project structure for our endpoints.
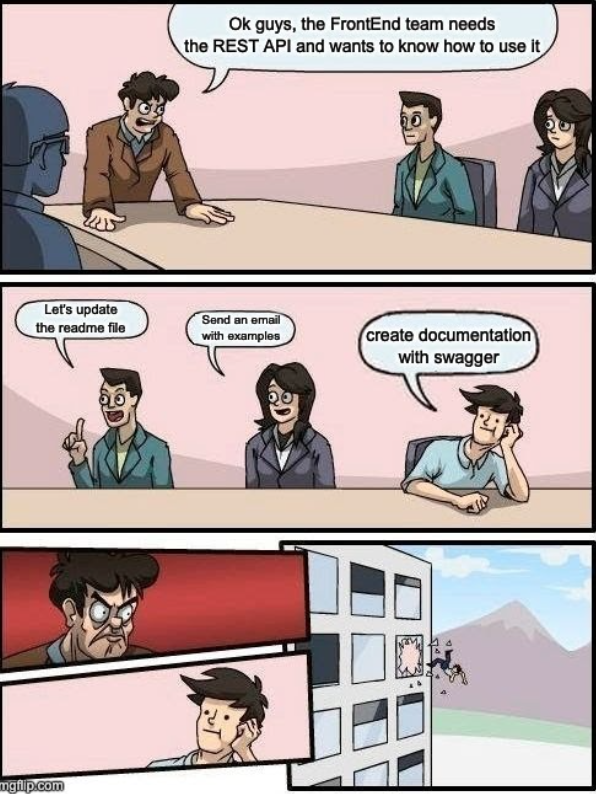
Everyone knows the guy is right, but it can be a boring process. Fear not! With the use of the Flask extension Flask-RESTPlus we can have documentation generated automatically and with a better structure if you follow their recommendations on scalable projects.
To have it installed, just like flask, run the following command:
pip install flask-restplus
If you want to have the same flask-restplus version as the point of writing, just add flask-restplus==0.13.0 to the requirements.txt file and install the requirements again. There are some problems related to dependencies, therefore, you have also to install the version 0.16.1 from the Werkzeug package by running:
pip install Werkzeug==0.16.1
Let’s now take a look to the project structure we have so far and the one we propose for this blueprint we are creating:
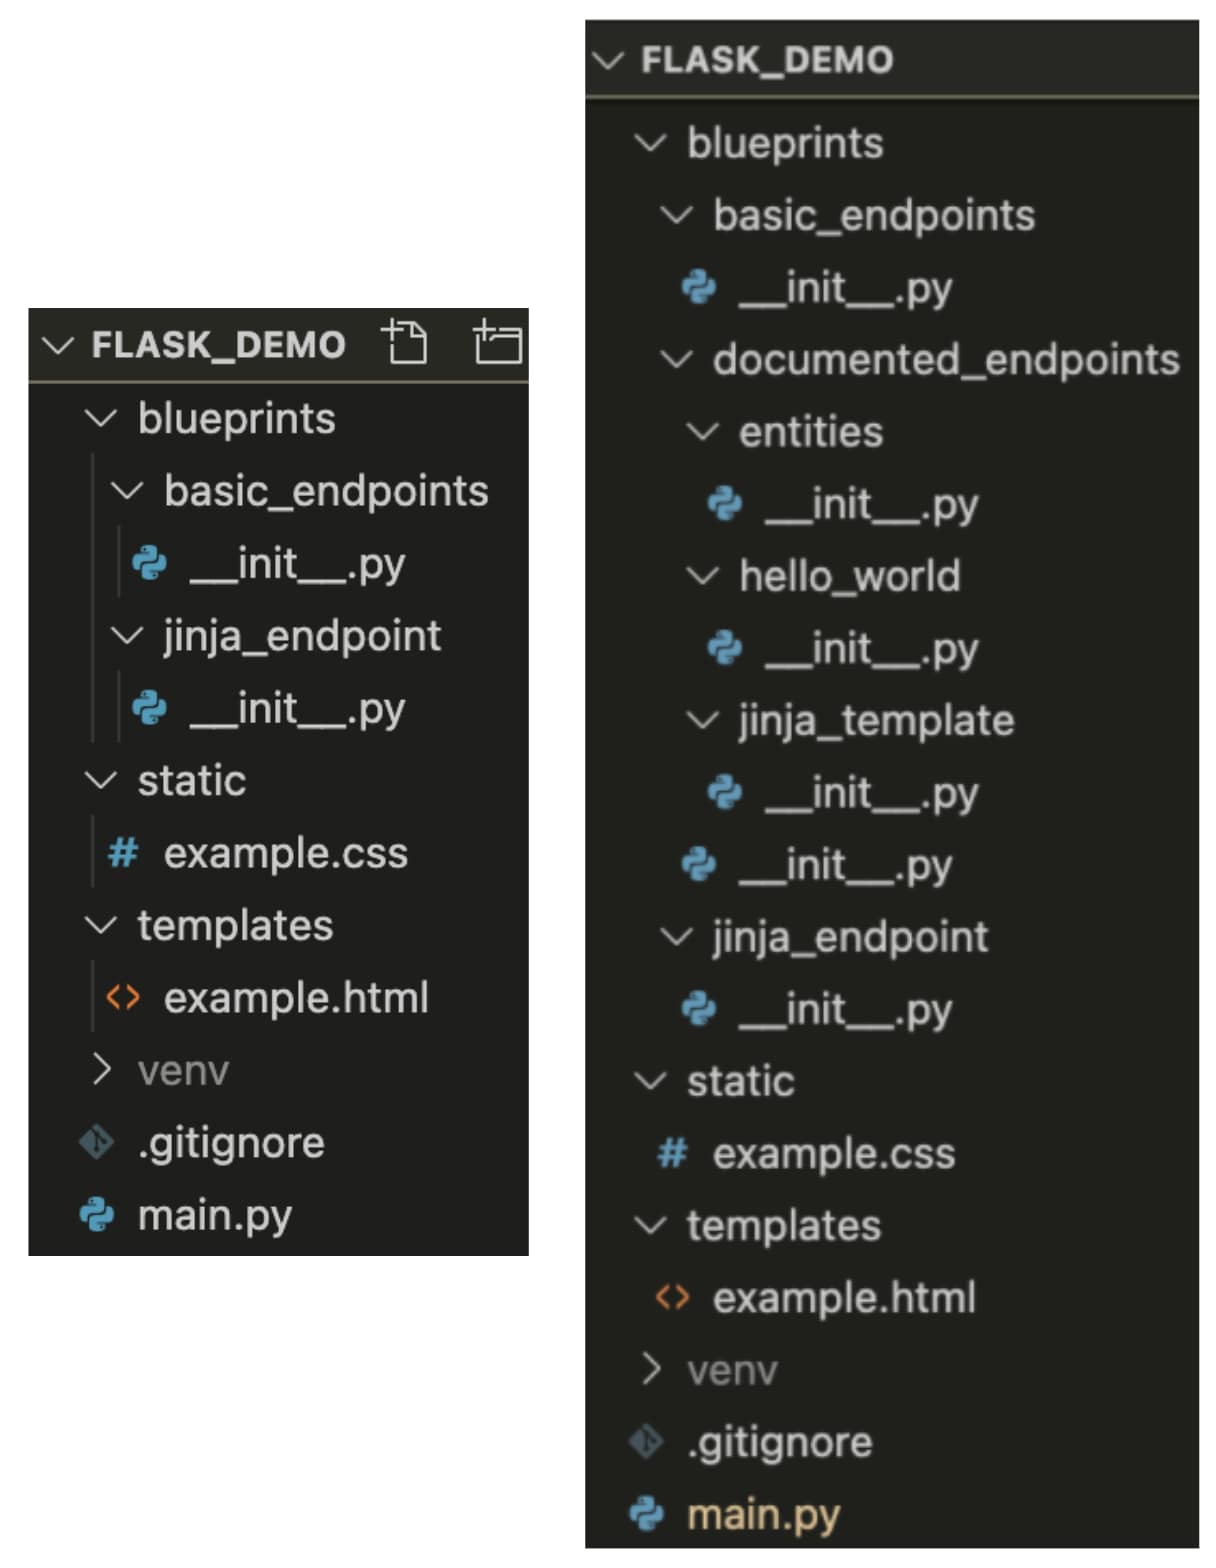
For the documented endpoints, let’s create a folder to identify the entity we are working on. This will facilitate the navigation through the project as it gets bigger and increasingly more complex. Each of the folders inside the documented_endpoints works like modules with the functionalities/endpoints related to that entity (in this case, users and cats).
We’ll present all the endpoints already created with a new structure. The endpoints will have no logic but will allow you to understand the steps involved in their creation.
With that said, let’s move on to the code. First, we should consider the hello_world endpoint with the new structure:
# blueprints/documented_endpoints/hello_world/__init__.py
from flask import request
from flask_restplus import Namespace, Resource, fields

namespace = Namespace('hello_world', 'Hello World related endpoints')

hello_world_model = namespace.model('HelloWorld', {
    'message': fields.String(
        readonly=True,
        description='Hello world message'
    )
})

hello_world_example = {'message': 'Hello World!'}

@namespace.route('')
class HelloWorld(Resource):

    @namespace.marshal_list_with(hello_world_model)
    @namespace.response(500, 'Internal Server error')
    def get(self):
        '''Hello world message endpoint'''

        return hello_world_example
Now let’s break it down. One of the first things that you might notice is the usage of the Namespace and Resource classes. The Namespace is directly linked to a specific entity, meaning that all the hello_world endpoints will be linked to the corresponding namespace. This will generate the hello_world section in the swagger documentation.
To create routes in this Namespace, different classes that inherit from the Resource class are declared along with the respective namespace route decorator. Within the created HelloWorld class we declare the methods it contemplates. In our case, only GET is presented, resulting in a GET method available for the docummented_endpoints/hello_world endpoint.
The hello_world related models are presented and will be linked to the respective endpoint. This generates the documentation for the endpoint response and marshal the respective response.
The comments associated with the created resources and respective methods will generate descriptions on the final documentation. The possible errors the endpoint can return should also be specified as presented in the example and will also result in further endpoints documentation. There are more functionalities supported by the flask-restplus extension, such as parsers and error handling. Please refer to their documentation if you want to take full advantage of its capabilities.
Now let’s present the code to link this Namespace we have created to a blueprint (blueprints/documented_endpoints/__init__.py) and after that link the blueprint to the application (main.py):
# blueprints/documented_endpoints/__init__.py
from flask import Blueprint
from flask_restplus import Api
from blueprints.documented_endpoints.hello_world import namespace as hello_world_ns

blueprint = Blueprint('documented_api', __name__, url_prefix='/documented_api')

api_extension = Api(
    blueprint,
    title='Flask RESTplus Demo',
    version='1.0',
    description='Application tutorial to demonstrate Flask RESTplus extension\
        for better project structure and auto generated documentation',
    doc='/doc'
)

api_extension.add_namespace(hello_world_ns)
# main.py
from flask import Flask
from blueprints.basic_endpoints import blueprint as basic_endpoint
from blueprints.jinja_endpoint import blueprint as jinja_template_blueprint
from blueprints.documented_endpoints import blueprint as documented_endpoint

app = Flask(__name__)
app.config['RESTPLUS_MASK_SWAGGER'] = False

app.register_blueprint(basic_endpoint)
app.register_blueprint(jinja_template_blueprint)
app.register_blueprint(documented_endpoint)

if __name__ == "__main__":
    app.run()
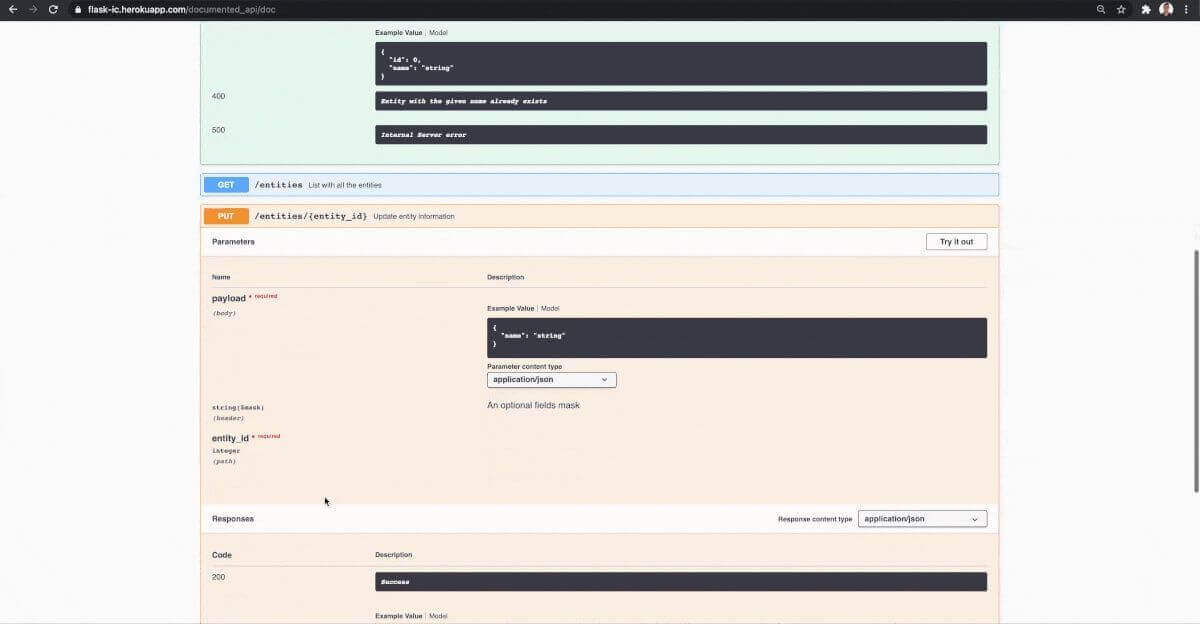
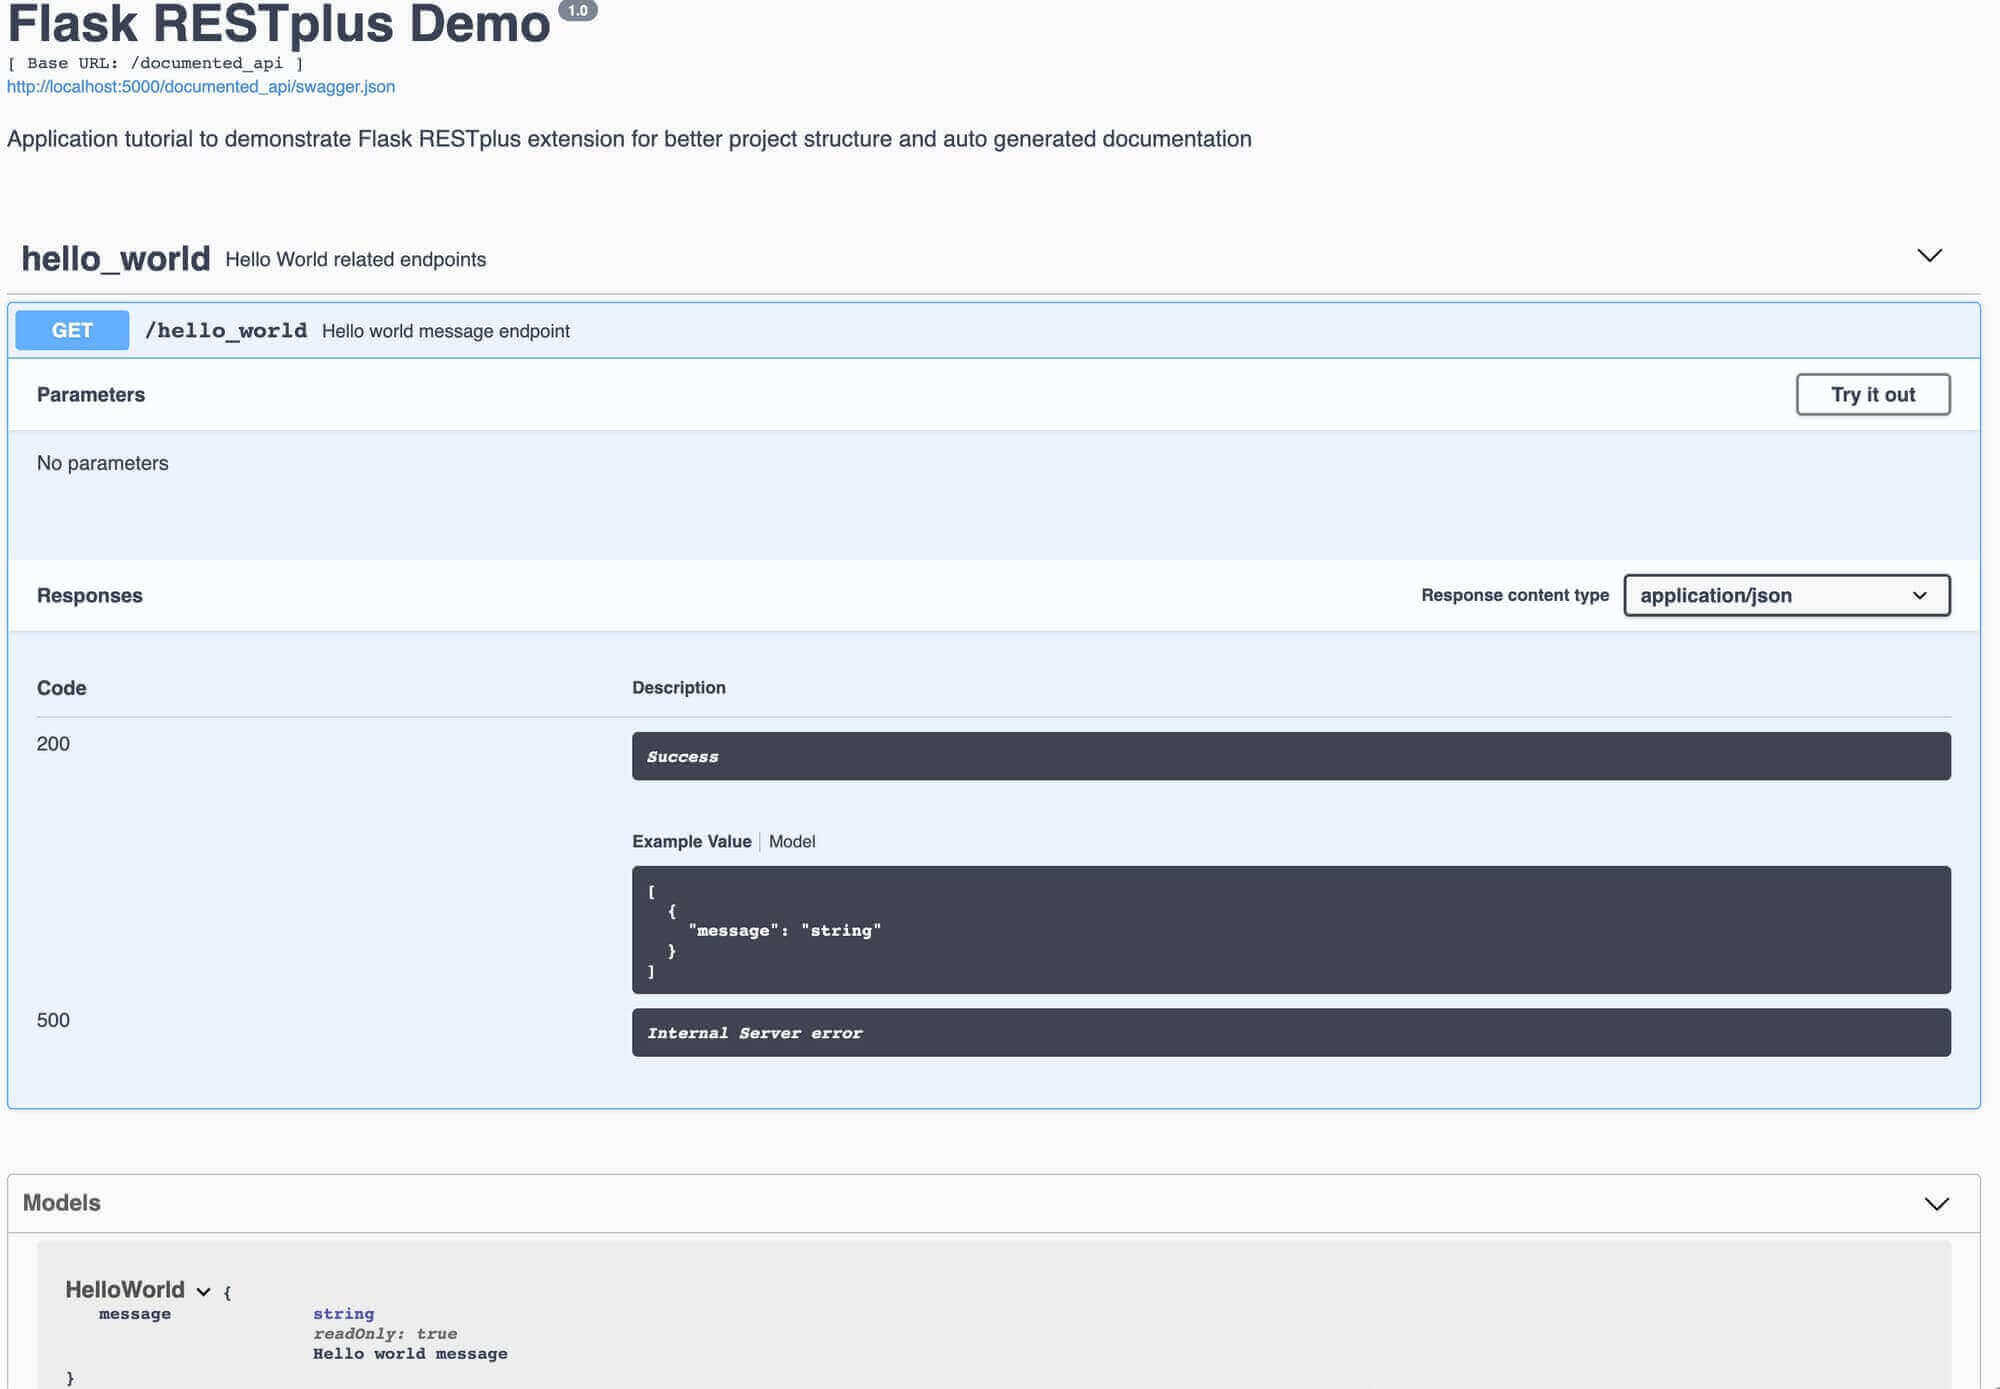
Here, an API object from fask-restplus module is created and linked to the documented_api blueprint. The link between the blueprint and the hello_world namespace we have created is done with this object with the add_namespace method. Finally, just like all the previous blueprints, we just have to register the created blueprint to the app object. Follow the link http://localhost:5000/documented_api/doc and you'll get this page:
Now let’s present the code for the documentation of the entities REST API and jinja template page so any person can easily check all the endpoints we’ve been working on. This is done by adding the following files:
# blueprints/documented_endpoints/entities/__init__.py
from flask import request
from flask_restplus import Namespace, Resource, fields
from http import HTTPStatus

namespace = Namespace('entities', 'Entities fake endpoints')

entity_model = namespace.model('Entity', {
    'id': fields.Integer(
        readonly=True,
        description='Entity identifier'
    ),
    'name': fields.String(
        required=True,
        description='Entity name'
    )
})

entity_list_model = namespace.model('EntityList', {
    'entities': fields.Nested(
        entity_model,
        description='List of entities',
        as_list=True
    ),
    'total_records': fields.Integer(
        description='Total number of entities',
    ),
})

entity_example = {'id': 1, 'name': 'Entity name'}

@namespace.route('')
class entities(Resource):
    '''Get entities list and create new entities'''

    @namespace.response(500, 'Internal Server error')
    @namespace.marshal_list_with(entity_list_model)
    def get(self):
        '''List with all the entities'''
        entity_list = [entity_example]

        return {
            'entities': entity_list,
            'total_records': len(entity_list)
        }

    @namespace.response(400, 'Entity with the given name already exists')
    @namespace.response(500, 'Internal Server error')
    @namespace.expect(entity_model)
    @namespace.marshal_with(entity_model, code=HTTPStatus.CREATED)
    def post(self):
        '''Create a new entity'''

        if request.json['name'] == 'Entity name':
            namespace.abort(400, 'Entity with the given name already exists')

        return entity_example, 201

@namespace.route('/<int:entity_id>')
class entity(Resource):
    '''Read, update and delete a specific entity'''

    @namespace.response(404, 'Entity not found')
    @namespace.response(500, 'Internal Server error')
    @namespace.marshal_with(entity_model)
    def get(self, entity_id):
        '''Get entity_example information'''

        return entity_example

    @namespace.response(400, 'Entity with the given name already exists')
    @namespace.response(404, 'Entity not found')
    @namespace.response(500, 'Internal Server error')
    @namespace.expect(entity_model, validate=True)
    @namespace.marshal_with(entity_model)
    def put(self, entity_id):
        '''Update entity information'''

        if request.json['name'] == 'Entity name':
            namespace.abort(400, 'Entity with the given name already exists')

        return entity_example

    @namespace.response(204, 'Request Success (No Content)')
    @namespace.response(404, 'Entity not found')
    @namespace.response(500, 'Internal Server error')
    def delete(self, entity_id):
        '''Delete a specific entity'''

        return '', 204
# blueprints/documented_endpoints/jinja_template/__init__.py
from flask import request, render_template, make_response
from flask_restplus import Namespace, Resource, reqparse

namespace = Namespace(
    'jinja_template',
    'Jinja Template page. Note that this is a html page and not a REST API endpoint')

parser = reqparse.RequestParser()
parser.add_argument('top', type=str, help='Top text')
parser.add_argument('bottom', type=str, help='Bottom text')

@namespace.route('')
class JinjaTemplate(Resource):

    @namespace.response(200, 'Render jinja template')
    @namespace.response(500, 'Internal Server error')
    @namespace.expect(parser)
    def get(self):
        '''Render jinja template page'''

        top = request.args.get('top') if 'top' in request.args else ''
        bottom = request.args.get('bottom') if 'bottom' in request.args else ''

        return make_response(render_template('example.html', top=top, bottom=bottom), 200)
Even though these files might look scary, the logic is the same as the one presented for the hello world endpoint. The main difference is the usage of models to generate documentation and validate the request body sent in POST and PUT methods. Parsers are also used for the query params documentation and can also be used for validation. This is useful for scenarios in which the data is not sent via body, such as query params or FormData.
Last but not least, do not forget to add the following lines to have the created namespaces linked to the Blueprint we are creating.
# blueprints/documented_endpoints/__init__.py
...
from blueprints.documented_endpoints.entities import namespace as entities_ns
from blueprints.documented_endpoints.jinja_template import namespace as jinja_template_ns
...
api_extension.add_namespace(entities_ns)
api_extension.add_namespace(jinja_template_ns)
Bellow, you can check the documentation appearance for query params and a request body:
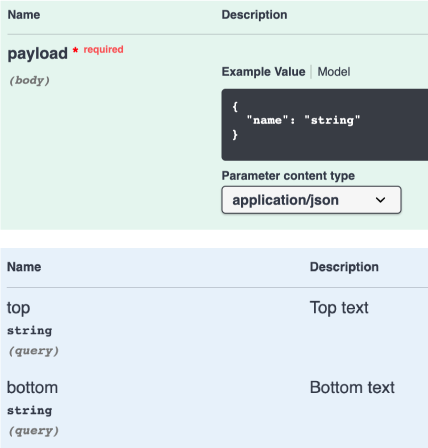
Now we have the documentation of all the endpoints and the respective endpoints (of course!!).
Conclusion
Despite its simplicity, Flask is an extremely powerful Python web framework. It is much easier and more straightforward than creating complete server-side applications. Plus, it can save you so much time!
Hopefully, by the end of this article, you will have no trouble creating a REST API using Flask and automatically generating a swagger documentation page. Additionally, you should be familiar with specific functions (such as Blueprint objects) and setting up Jinja templates.
FAQ (Frequently Asked Questions)
What is Flask?
Flask is a lightweight WSGI web application framework in Python designed to make getting started quick and easy, with the ability to scale up to complex applications.
What is Flask in Python used for?
Flask is used for creating web applications ranging from simple web pages to complex, database-driven sites. It is particularly favored for building web APIs, microservices, and serving web pages for dynamic content.
Is Flask suitable for beginners?
A3: Yes, Flask is considered beginner-friendly due to its simplicity and ease of use. It allows newcomers to start with simple applications and gradually move to more complex ones.
Is Flask or Django better?
Whether Flask or Django is "better" depends on the project requirements and the developer's preference. Flask is more flexible and minimalist, while Django offers more built-in features. Flask is often chosen for smaller projects or when more control is needed, while Django is selected for larger applications with more out-of-the-box functionality.
Can Flask be used for large-scale applications?
A6: While Flask is lightweight, it can be scaled to support large-scale applications by using additional tools and libraries to handle more complex requirements.
Is Flask a frontend or backend?
Flask is a backend framework. It is used to create the server-side of web applications and APIs, although it can serve HTML, CSS, and JavaScript files to the frontend.
Is Flask a coding language?
No, Flask is not a coding language. It is a web framework written in the Python programming language and is used to develop web applications.
How do I install Flask?
Flask can be installed using pip, the Python package manager, with the command pip install Flask.
Can Flask be used with frontend frameworks like React or Vue?
Yes, Flask can serve as a backend API and can be integrated with frontend frameworks to create full-stack applications.
What are some common use cases for Flask?
Flask is commonly used for building web applications, microservices, APIs, and as a part of larger applications where a lightweight web interface is needed.
How does Flask handle routing?
Flask handles routing with decorators that bind functions to URL patterns, making URL creation easy and intuitive.
Want to know more about Flask and Python?
More than 500.000 people visit our blog every year and we are ranked at the top of Google for topics such as Flask and Python. If you liked this blog post and would love to know all our blog posts on Flask and Python,