In this tutorial I am going to show you how to build CRUD application using CodeIgniter 4, MySQL and React JS framework. CRUD is an acronym that stands for Create, Read, Update and Delete operations in a particular application. So you are basically creating a record, reading single or all records, updating the existing record and deleting the existing record.
In this React CRUD example with Codeigniter 4 and MySQL, I am using React JS as a front-end technology used for building the UI (User Interface), PHP based CodeIgniter 4 web framework will be used to build the REST (Representational State Transfer) APIs and MySQL database will be used as a persistent storage.
Related Posts:
Prerequisites
Make sure your CodeIgniter framework 4 has been setup before you proceed further down. The version of the CodeIgniter framework is 4.0.4/4.1.1 for building the REST APIs and the version of MySQL is 8.0.17/8.0.22 and version of PHP is 7.4.3 is used for this example.
I am not going to show you here how to build REST APIs but you can always check the link (CodeIgniter 4 REST API, MySQL CRUD Example) to create REST APIs.
React 17.0.1, npm 6.14.11, node v14.15.5, react-router-dom
Use the command npm install --save react-router-dom to install react-router-dom. If you see severe vulnerability issue after installation then you can run command npm audit fix to fix them.
React Application Setup
You can check the tutorial on how to create new React App. The name of the application here is react-codeigniter-4-mysql-crud. So you can use the command npx create-react-app react-codeigniter-4-mysql-crud in command line tool to create the React app.
I may not mention the project root directory in subsequent sections and I will assume that I am talking with respect to the project root directory.
CRUD Operations
I am going to perform CRUD operations using REST APIs. Here I will create a directory components under src folder. I will create three separate JavaScript (js) files for performing CRUD operations. For deletion I did not create any separate js file but I will delete a particular item (product) using the link itself.
Read
I am going to read all items from the server side using the REST API. I will read a single item or record from the server side using REST API when I want to update a particular record.
A file create.js is created under src/components folder with the following code:
import React from 'react';
import { Link } from 'react-router-dom';
class Products extends React.Component {
constructor(props) {
super(props);
this.state = {products: []};
this.headers = [
{ key: 'id', label: 'Id'},
{ key: 'name', label: 'Name' },
{ key: 'price', label: 'Price' },
{ key: 'sale_price', label: 'Selling Price' },
{ key: 'sales_count', label: 'Sales Count' },
{ key: 'sale_date', label: 'Sale Date' }
];
this.deleteProduct = this.deleteProduct.bind(this);
}
componentDidMount() {
fetch('http://localhost:8080/product')
.then(response => {
return response.json();
}).then(result => {
console.log(result);
this.setState({
products:result
});
});
}
deleteProduct(id) {
if(window.confirm("Are you sure want to delete?")) {
fetch('http://localhost:8080/product/' + id, {
method : 'DELETE'
}).then(response => {
if(response.status === 200) {
alert("Product deleted successfully");
fetch('http://localhost:8080/product')
.then(response => {
return response.json();
}).then(result => {
console.log(result);
this.setState({
products:result
});
});
}
});
}
}
render() {
return (
<div id="container">
<Link to="/create">Add Product</Link>
<p/>
<table>
<thead>
<tr>
{
this.headers.map(function(h) {
return (
<th key = {h.key}>{h.label}</th>
)
})
}
<th>Actions</th>
</tr>
</thead>
<tbody>
{
this.state.products.map(function(item, key) {
return (
<tr key = {key}>
<td>{item.id}</td>
<td>{item.name}</td>
<td>{item.price}</td>
<td>{item.sale_price}</td>
<td>{item.sales_count}</td>
<td>{item.sale_date}</td>
<td>
<Link to={`/update/${item.id}`}>Edit</Link>
<a href="javascript:void(0);" onClick={this.deleteProduct.bind(this, item.id)}>Delete</a>
</td>
</tr>
)
}.bind(this))
}
</tbody>
</table>
</div>
)
}
}
export default Products;In this file I have put the logic to retrieve all products and display on an HTML table. In each row I will provide two links – edit, for updating the existing product and delete, for deleting the existing product.
I will also provide Create Product link on top of the table, using which you will be able to add new product information to the server side.
You may find more on componentDidMount(). I have exported the class as export default <component name> to use (import) it elsewhere as you will see in the index.js file.
Style
I am going to apply some basic style to the HTML table as written into the following file – src/product.css.
#container {
	width: 800px;
	margin: auto;
}
table {
	border-collapse: collapse;
	width: 800px;
	margin: 10px auto;
}
th, td {
	border: 1px solid #ddd;
	text-align: left;
	padding: 8px;
}
tr:nth-child(even) {
	background-color: #f2f2f2
}
tr:hover {
	background-color: #ddd;
}
th {
	padding-top: 12px;
	padding-bottom: 12px;
	text-align: left;
	background-color: #4CAF50;
	color: white;
}
Create
Now I am going to create a file src/components/create.js with the following source code:
import React from 'react';
import { Link } from 'react-router-dom';
class Create extends React.Component {
constructor(props) {
super(props);
this.state = {name: '', price:'', sale_price:'', sales_count:'', sale_date:''};
this.handleChange = this.handleChange.bind(this);
this.handleSubmit = this.handleSubmit.bind(this);
}
handleChange(event) {
const state = this.state
state[event.target.name] = event.target.value
this.setState(state);
}
handleSubmit(event) {
event.preventDefault();
fetch('http://localhost:8080/product', {
method: 'POST',
body: JSON.stringify({
name: this.state.name,
price: this.state.price,
sale_price: this.state.sale_price,
sales_count: this.state.sales_count,
sale_date: this.state.sale_date
}),
headers: {
"Content-type": "application/json; charset=UTF-8"
}
}).then(response => {
if(response.status === 201) {
alert("New product saved successfully");
}
});
}
render() {
return (
<div id="container">
<Link to="/">Products</Link>
<p/>
<form onSubmit={this.handleSubmit}>
<p>
<label>Name:</label>
<input type="text" name="name" value={this.state.name} onChange={this.handleChange} placeholder="Name" />
</p>
<p>
<label>Price:</label>
<input type="text" name="price" value={this.state.price} onChange={this.handleChange} placeholder="Price" />
</p>
<p>
<label>Selling Price:</label>
<input type="text" name="sale_price" value={this.state.sale_price} onChange={this.handleChange} placeholder="Selling Price" />
</p>
<p>
<label>Sales Count:</label>
<input type="text" name="sales_count" value={this.state.sales_count} onChange={this.handleChange} placeholder="Sales Count" />
</p>
<p>
<label>Sale Date:</label>
<input type="text" name="sale_date" value={this.state.sale_date} onChange={this.handleChange} placeholder="Sale Date" />
</p>
<p>
<input type="submit" value="Submit" />
</p>
</form>
</div>
);
}
}
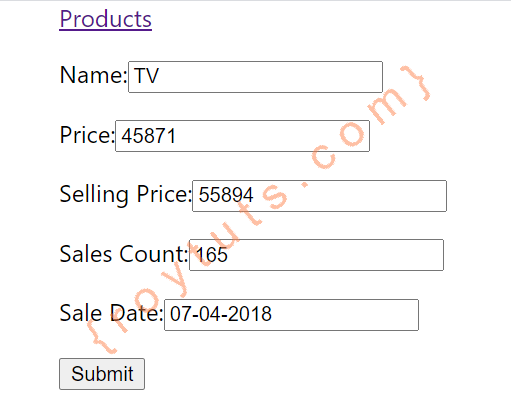
export default Create;It will display a form where user inputs product information and click on Submit button to add the product information.
Once you add product information successfully, an alert box will show you successful message.
You will also be given a link that will take you to the list of products page.
Update
Create below update.js file under src/components directory, which will build the logic to update existing product information. It will display a form where user modifies the existing product information and click on Submit button to update the product information.
I have passed product id value with the browser URL as a path parameter and that’s why I have configured the route path as /update/:id in the index.js file. Accordingly I have added Link element in the table for editing exiting information. Using this id value I first fetch the product information from server and populate the form fields in update page.
Once you update successfully, an alert box will show you successful message.
You will also be given a link that will take you to the list of websites page.
import React from 'react';
import { Link, withRouter } from 'react-router-dom';

class Update extends React.Component {
  constructor(props) {
    super(props);
    this.state = {id: '', name: '', price:'', sale_price:'', sales_count:'', sale_date:''};
    this.handleChange = this.handleChange.bind(this);
    this.handleSubmit = this.handleSubmit.bind(this);
  }

  componentDidMount() {
	fetch('http://localhost:8080/product/' + this.props.match.params.id)
		.then(response => {
			return response.json();
		}).then(result => {
			console.log(result);
			this.setState({
				id:result.id,
				name:result.name,
				price:result.price,
				sale_price: result.sale_price,
				sales_count: result.sales_count,
				sale_date: result.sale_date
			});
		});
  }

  handleChange(event) {
	  const state = this.state
	  state[event.target.name] = event.target.value
	  this.setState(state);
  }

  handleSubmit(event) {
	  event.preventDefault();
	  //alert(this.props.match.params.id);
	  fetch('http://localhost:8080/product/' + this.props.match.params.id, {
			method: 'PUT',
			body: JSON.stringify({
				name: this.state.name,
				price: this.state.price,
				sale_price: this.state.sale_price,
				sales_count: this.state.sales_count,
				sale_date: this.state.sale_date
			}),
			headers: {
				"Content-type": "application/json; charset=UTF-8"
			}
		}).then(response => {
				if(response.status === 200) {
					alert("Product update successfully.");
				}
			});
  }

  render() {
    return (
			<div id="container">
			  <Link to="/">Products</Link>
				  <p/>
				  <form onSubmit={this.handleSubmit}>
					<input type="hidden" name="id" value={this.state.id}/>
						<p>
							<label>Name:</label>
							<input type="text" name="name" value={this.state.name} onChange={this.handleChange} placeholder="Name" />
						</p>
						<p>
							<label>Price:</label>
							<input type="text" name="price" value={this.state.price} onChange={this.handleChange} placeholder="Price" />
						</p>
						<p>
							<label>Selling Price:</label>
							<input type="text" name="sale_price" value={this.state.sale_price} onChange={this.handleChange} placeholder="Selling Price" />
						</p>
						<p>
							<label>Sales Count:</label>
							<input type="text" name="sales_count" value={this.state.sales_count} onChange={this.handleChange} placeholder="Sales Count" />
						</p>
						<p>
							<label>Sale Date:</label>
							<input type="text" name="sale_date" value={this.state.sale_date} onChange={this.handleChange} placeholder="Sale Date" />
						</p>
						<p>
							<input type="submit" value="Submit" />
						</p>
				  </form>
			   </div>
    );
  }
}

export default Update;
Delete
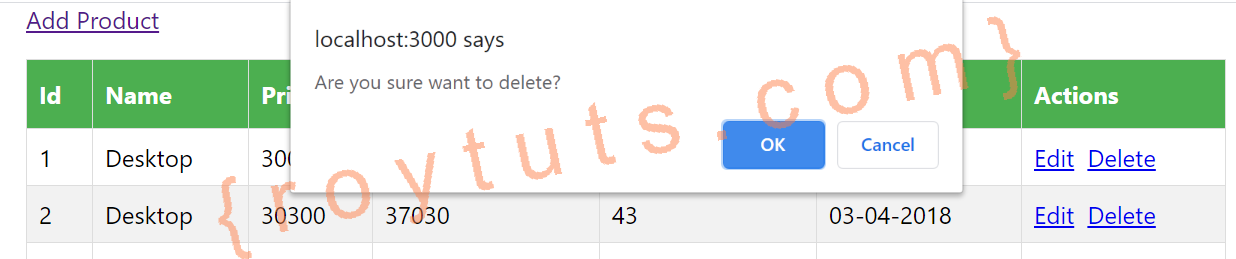
You click on the Delete link given on table at each row on the right side to delete the existing product information. When you click on the Delete link you will be shown an alert box to get confirmation whether you really want to delete. If you click on yes then only product information will get deleted from server otherwise you will stay on the same page.
The delete functionality is given in the products.js file.
Notice how I have used normal anchor tag (<a/>) to create delete link for deleting product information.
Testing the Application
To test the application you need to first run the application. To run the application execute command npm start on project’s root directory from command line tool. Your application will start on port 3000 and will automatically be opened in the browser at http://localhost:3000. You will see the following product details:

You can add new product information by clicking on the link Add Product and then input the required information and click on Submit to save the

You can update the existing record by clicking on Edit link, for example, you can edit product information for id 8.
Note: Currently name cannot be updated on server side. If you want to update name as well then you have to modify the server side code (CodeIgniter).
When you click on link Delete for deleting the record it will ask for confirmation. Clicking on OK will delete the record and clicking on Cancel will stay on the same page.
That’s all about how to work with building REAT API CRUD application using React CodeIgniter and MySQL.
Here is the video of the CRUD Application:
i’m not getting as per above result, please mention how to integration of react js and codeigniter step by step