

In this tutorial, we’ll build a functional clone of iMessage using Stream Chat Flutter SDK. Building a chat in your app at scale is not an easy task; but in this tutorial, you’ll get a chat experience up and running in roughly 20 minutes! You can follow this tutorial without a deep knowledge of Flutter, a basic understanding of the layout system, Row and Column, will do.
There are three ways to use our SDKs. Depending on how much abstraction you want.
- stream_chat: low level dart client, which is a thin wrapper around our REST API
- stream_chat_flutter: an already made UI kit entirely customisable. See how Nash uses this package in this video
- stream_chat_flutter_core: expose BLoCs and builders to avoid implementing stream builders yourself
Since we are trying to reproduce the look and feel of an app, in this tutorial we'll use the way that give us the most degrees of liberty for customization: stream_chat_flutter_core. Also, it is also worth to note that to stay consistent with stream_chat_flutter package we'll keep the naming convention the same for widgets.
If you get lost during this tutorial, you can check:
- The iMessage Clone GitHub repo
- The Stream Chat Flutter Tutorial
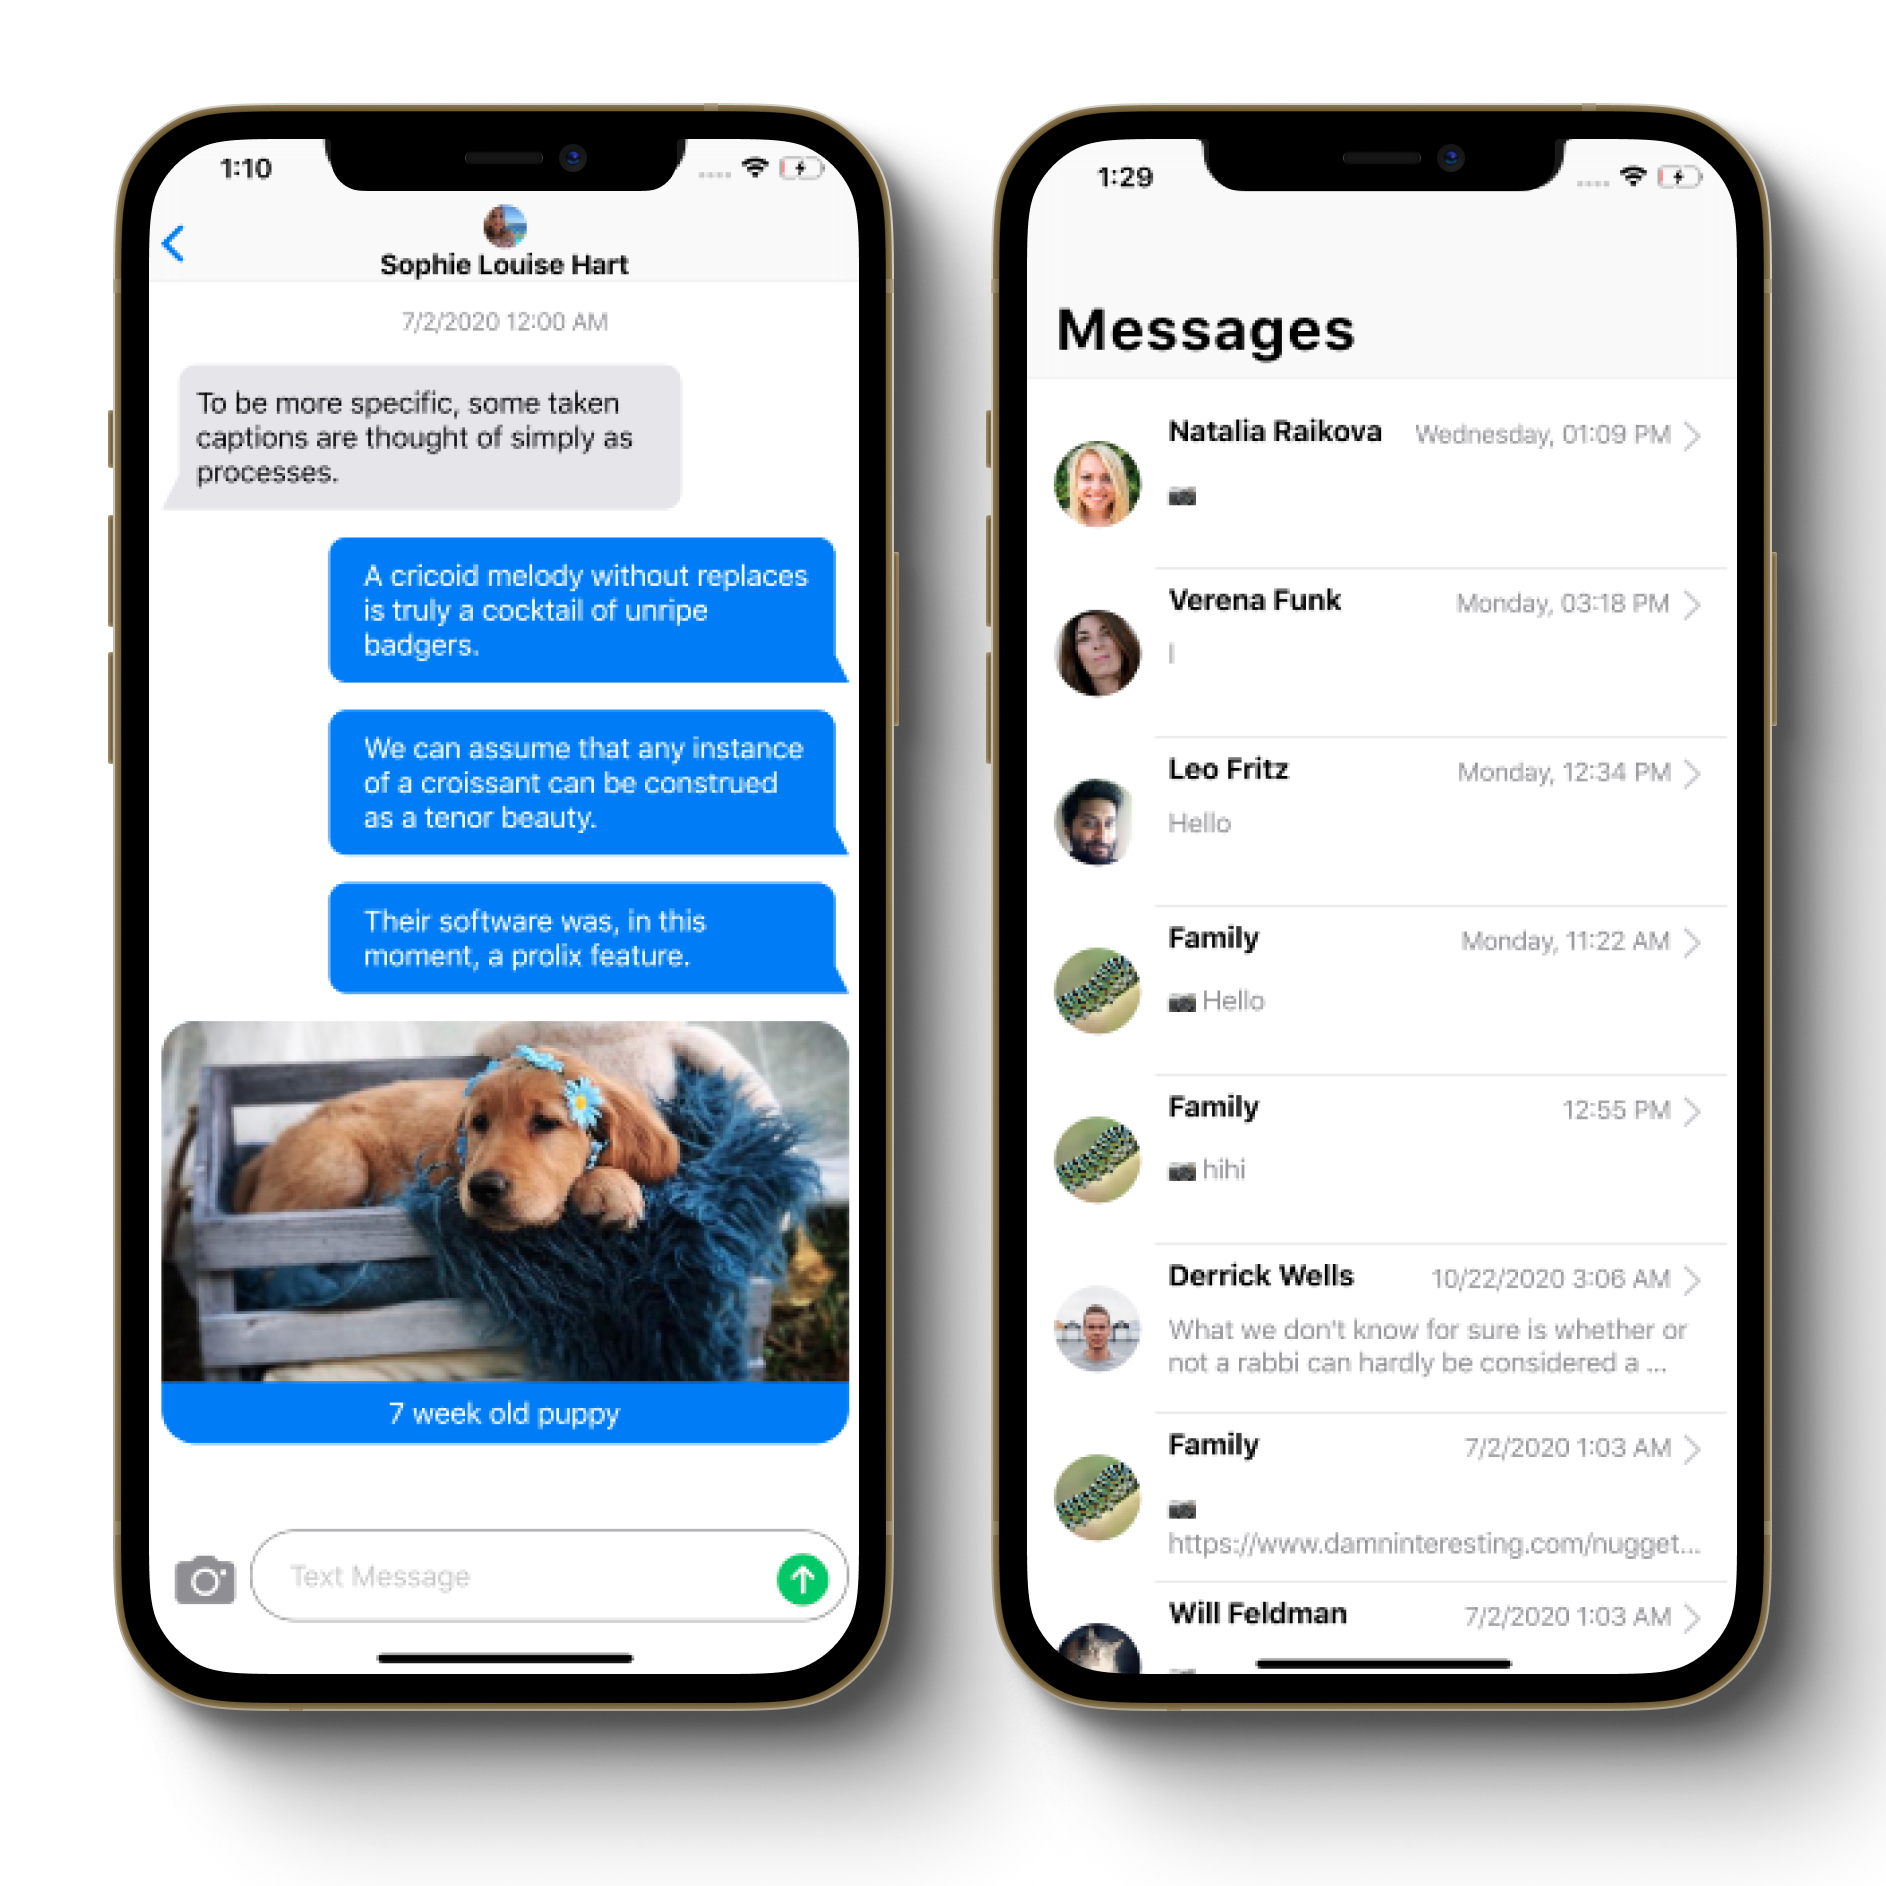
The result of our application will look similar to the following screenshots:
Let’s get started! 🚀
Prerequisites
To proceed with this tutorial, you'll need the following:
- Flutter SDK
- A Stream account. You can create one here if you don’t have one.
- An Code editor such as Visual Studio Code
Install the sdk in pubspec.yaml:
dependencies:
 stream_chat_flutter: ^1.3.0-beta
Don't forget to tap in your terminal flutter packages getto download the depedencies. But usually, if you use vscode they will be downloaded on save or when you run your code.
Let's first build the static views then sprinkle 🪄 some Stream Flutter SDK magic here and there.

We'll first build the list view listing all conversations then the detailed view of those conversations.
ChannelPreview
Let's start with showing up a preview of the conversations
In each item of the list we need to display three things:
- the contact that sent the message, including its avatar and name
- a preview of the message. If there is a media, show a little emoji indicating if it is an image or a video (yes our product support all of that 😉)
- the day of the week and the hour at which the message was received. If it was more than a week ago we'll have to change the format for a nicer UX.
Since iMessage is an iPhone app we'll use Cupertino Widgets, which are high-fidelity widgets for current iOS design system.
Make it interactive
To make our ChannelPreview widget interactive, we use GestureDetector, among other things this widget is used for handling taps.
import 'package:flutter/cupertino.dart';
import 'package:imessage/channel_image.dart';
import 'package:imessage/channel_name_text.dart';
import 'package:imessage/utils.dart';
import 'package:stream_chat_flutter/stream_chat_flutter.dart' show Channel;

import 'utils.dart';

class ChannelPreview extends StatelessWidget {
  final VoidCallback onTap; // onTap is a callback in our widget that we'll be used later on for navigation purposes
  final Channel channel;

  const ChannelPreview({
    Key key,
@required this.onTap,Formating dates 📅
To format the date we'll use the intl package is usually used to deal with internationalized/localized messages, date and number formatting and parsing, bi-directional text, and other internationalization issues. Let's define these utility functions in utils.dart
import 'package:intl/intl.dart';

String formatDate(DateTime date) { // 21/01/20 3:31pm
  final dateFormat = DateFormat.yMd().add_jm();
  return dateFormat.format(date);
}

String formatDateSameWeek(DateTime date) {
  DateFormat dateFormat;
  if (date.day == DateTime.now().day) {
    dateFormat = DateFormat('hh:mm a');// 3:31pm
  } else {
    dateFormat = DateFormat('EEEE, hh:mm a'); // Wednesday, 3:31pm
  }
return dateFormat.format(date);ChannelListView 📺
To build our listview we'll use a Sliver widget. A sliver is just a portion of a scrollable area. Let's call our widget ChannelListView because in Stream, since we have different use cases such as livestream, customer support etc conversations happen in channels.
import 'package:flutter/cupertino.dart';
import 'package:imessage/channel_preview.dart';
import 'package:imessage/message_page.dart';
import 'package:animations/animations.dart';
import 'package:stream_chat_flutter/stream_chat_flutter.dart'
    show Channel, StreamChannel;

class ChannelListView extends StatelessWidget {
  const ChannelListView({Key key, @required this.channels}) : super(key: key);
  final List<Channel> channels;
  @override
  Widget build(BuildContext context) {
    channels.removeWhere((channel) => channel.lastMessageAt == null);
    return SliverList(
delegate: SliverChildBuilderDelegate(ChatLoader ⌛
Let's add a nice AppBar and wrap this in a widget that we call ChatLoader don't worry about channels parameters we'll explain later where does it come from.
class ChatLoader extends StatelessWidget {
  const ChatLoader({
    Key key,
  }) : super(key: key);

  @override
  Widget build(BuildContext context) {
    return CupertinoPageScaffold(
        child:  CustomScrollView(
                        slivers: [
                          ChannelPageAppBar(),
                          SliverPadding(
                            sliver: ChannelListView(channels: channels),
                            padding: const EdgeInsets.only(top: 16),
                          )
                        ],
                      )
    );
  }
}
MessagePage 📄
Now that we have our listview displaying a preview of ours conversations. We need to navigate to individual items. Let's call those items that hold each conversation MessagePage, since it displays messages. We'll need a navigation bar to display the contact with (avatar and name) whom we are having the discussion with and display the list of the messages. Let's call it MessageListView. Again, forget about messages parameter here. We'll see how we can add them with our Chat SDK.
import 'package:imessage/channel_image.dart';
import 'package:imessage/channel_name_text.dart';
import 'package:imessage/message_list_view.dart';

class MessagePage extends StatelessWidget {
  @override
  Widget build(BuildContext context) {
    return CupertinoPageScaffold(
      navigationBar: CupertinoNavigationBar(
        middle: Column(
          children: [
            ChannelImage(size: 25, channel:channel),//contact's avatar
            ChannelNameText(channel:channel), //contact's name or phone number
          ],
        ),
      ), //ChannelHeader
      child: MessageListView(messages: messages)//The List of messages
    );
  }
}MessageListView
In MessageListView we'll group messages by day like in the real app and change the color and display based on whether this is a message we sent or received. We'll need to "draw" a chat bubble. We'll also need an input to send those messages and attach medias to them.
Group Messages by Date
To group messages by day we use the function groupBy to group the elements in values by the value returned by key, from the collection package.
import 'package:collection/collection.dart';

  final entries = groupBy(messages.reversed,
            (Message message) => message.createdAt.toString().substring(0, 10))
        .entries
        .toList();
End Result
Then it's a matter of getting the date using entries[index].key and the list of messages entries[index].value and wrap this in a ListView builder as follow.
At the end, this is what the MessageListView widget will look like:
import 'package:collection/collection.dart';
import 'package:flutter/cupertino.dart';
import 'package:imessage/message_header.dart';
import 'package:imessage/message_input.dart';
import 'package:imessage/message_widget.dart';
import 'package:stream_chat_flutter/stream_chat_flutter.dart'
    show Message, StreamChatCore;

class MessageListView extends StatelessWidget {
  const MessageListView({Key key, this.messages}) : super(key: key);
  final List<Message> messages;

  @override
  Widget build(BuildContext context) {
final entries = groupBy(messages,MessageWidget
In our MessageWidget we want to check attachment type type, if it is an image or video, and display it accordingly
import 'package:cached_network_image/cached_network_image.dart';
import 'package:flutter/cupertino.dart';
import 'package:imessage/cutom_painter.dart';
import 'package:stream_chat_flutter/stream_chat_flutter.dart'
    show Message;

class MessageWidget extends StatelessWidget {
  final Alignment alignment;
  final Message message;
  final Color color;
  final Color messageColor;

  const MessageWidget(
      {Key key,
@required this.alignment,ChatBubble 💬
To draw our bubble we use a CustomPainter, which is a widget used to draw custom shapes and paths. The api surface is a bit like html canvas (if you are familiar with it). Let's simply call this widget ChatBubblethat takes into parameters the color and the alignment. We'll display the bubble differently according to alignment.
class ChatBubble extends CustomPainter {
  final Color color;
  final Alignment alignment;

  ChatBubble({
    @required this.color,
    this.alignment,
  });

  final _radius = 10.0;
  final _x = 10.0;

  @override
  void paint(Canvas canvas, Size size) {
if (alignment == Alignment.topRight) {Message Input
In our view now that we have displayed the messages we need to send a message. To do so, let's call our widgetMessageInput. We use the ImagePicker plugin to take a photo from the gallery and uploading it along with our message.
import 'dart:io';

import 'package:flutter/cupertino.dart';
import 'package:image_picker/image_picker.dart';
import 'package:stream_chat_flutter/stream_chat_flutter.dart'
    show Attachment, AttachmentFile, Message, MultipartFile, StreamChannel;

class MessageInput extends StatefulWidget {
  const MessageInput({
    Key key,
  }) : super(key: key);

  @override
  _MessageInputState createState() => _MessageInputState();
}Spicing it up with Stream Chat SDK 🌶️
Now that everything is setup. "How do we make an actual chat?" You may ask.
Well that's simple, let's initialize our SDK and runApp to run our top widget IMessage that we haven't defined yet, until now.
For this to work you'll need an api key, and an user token that you can get in your dashboard.
Future<void> main() async {
  WidgetsFlutterBinding.ensureInitialized();
  final client = StreamChatClient('b67pax5b2wdq', logLevel: Level.INFO); //we want to see debug
                                                                         //logs in our terminal
  await client.connectUser(
    User(
      id: 'cool-shadow-7',
      extraData: {
        'image':
            'https://getstream.io/random_png/?id=cool-shadow-7&name=Cool+shadow',
      },
    ),
    'eyJ0eXAiOiJKV1QiLCJhbGciOiJIUzI1NiJ9.eyJ1c2VyX2lkIjoiY29vbC1zaGFkb3ctNyJ9.gkOlCRb1qgy4joHPaxFwPOdXcGvSPvp6QY0S4mpRkVo',
  );
ChannelListCore
Remember when we set up our ChatLoader ? ChannelListView was taking the parameter channels but we did'nt explained where does it come from. Now is the time to add the missing piece. Let me present you, your two new best friends: ChannelsBloc and ChannelListCore. ChannelListCore exposes builders to let you customize how to handle errors, loading progress, but most importantly it exposes List<Channel>. It also has options for filters, sorting, and pagination.
Our new ChatLoader we'll look like this:
import 'package:flutter/cupertino.dart';
import 'package:intl/date_symbol_data_local.dart';
import 'package:stream_chat_flutter/stream_chat_flutter.dart'
    show
        Channel,
        ChannelListController,
        ChannelListCore,
        ChannelsBloc,
        LazyLoadScrollView,
        Level,
        PaginationParams,
        SortOption,
        StreamChatCore,

import 'package:imessage/channel_list_view.dart';LazyLoadScrollView 🦥
LazyLoadScrollView, is a wrapper around a Scrollable which triggers onEndOfPage/onStartOfPage when the Scrollable reaches to the start or end of the view extent. It exposes callbacks like onRefresh which comes handy in our case with controller.loadData() and controller.paginateData()
MessageListCore
Same patterns go for MessagePage, thanks to MessageListCore you can have access to different builders, including the one exposing List<Message>:
import 'package:flutter/cupertino.dart';
import 'package:imessage/message_list_view.dart';
import 'package:stream_chat_flutter/stream_chat_flutter.dart'
    show
        LazyLoadScrollView,
        MessageListController,
        MessageListCore,
        StreamChannel,
        StreamChatCore;

import 'package:imessage/channel_image.dart';
import 'package:imessage/channel_name_text.dart';

class MessagePage extends StatelessWidget {
@overrideCongratulations! 👏
This concludes part one of our tutorial on building a iMessage clone using Stream’s Flutter Chat SDK. I hope you found this tutorial useful, and I look forward to hearing your feedback.
In a next article – which will be published later – we will cover how to implement a feature such as Search to search through messages.
Happy coding!
