Change Data Capture in Postgres With Debezium
My colleague @craigkerstiens recently wrote about some guidance for cleaning up your Postgres database. One of the things he mentioned in his post, "Don't put your logs or messages in your database." got a number of questions from people similar to: "But what do I do with my logs such as for an audit purpose?" Well there is a great answer and it does play really well with Postgres. The answer in many cases is, "Use Debezium."
Debezium is built upon the Apache Kafka project and uses Kafka to transport the changes from one system to another. So let’s look at how this works.
The most interesting aspect of Debezium is that at the core it is using Change Data Capture (CDC) to capture the data and push it into Kafka. The source database remains untouched in the sense that we don’t have to add triggers or log tables. This is a huge advantage as triggers and log tables degrade performance. In addition, PostgreSQL manages the changes in such a way that we don't lose them if we restart.
Historically, data was kept in one monolithic datastore and all of the services read or wrote to this datastore. Newer systems are trending towards microservices where the processing of data is broken up into smaller discrete tasks. The challenge at that point is making sure that each microservice has an up-to-date copy of the data. CDC shines at this as it:
- Uses the write ahead logs to track the changes
- Uses the datastore to manage the changes (don’t lose data if offline)
- Pushes changes immediately
This makes the system much more flexible. If you want to add a new microservice, simply subscribe to the topic in Kafka that is pertinent to the service.
To get a picture of what a system might look like, in the following image we have some source databases on the left, source connectors, Kafka in the middle and a JDBC sink on the right pushing data to an analytics database:
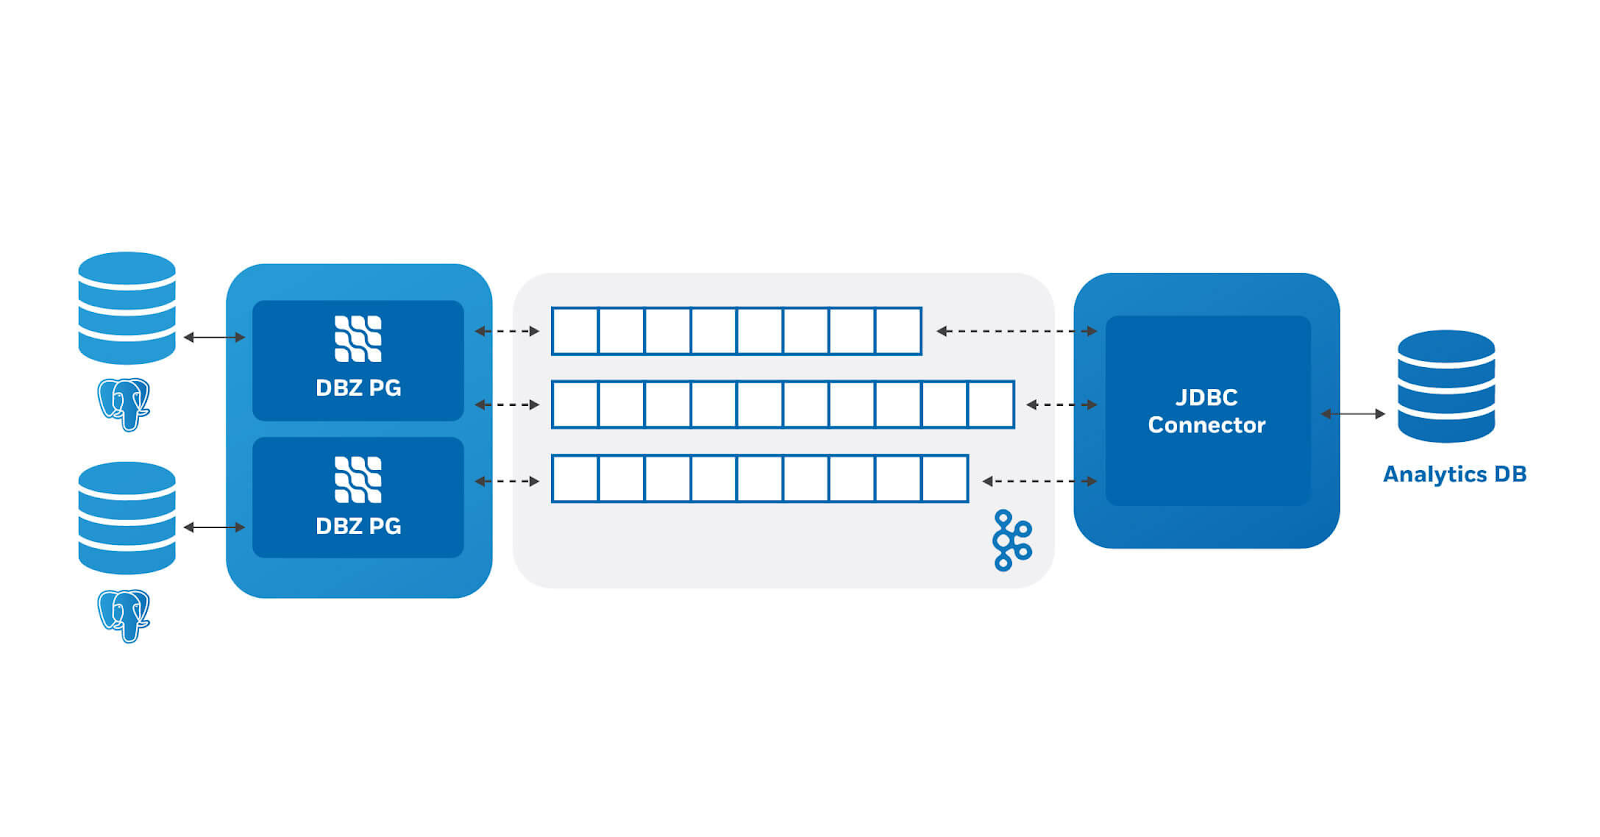 This is just one example of how one could use Debezium. In this case we are
using it to aggregate data from our production databases to an analytics
database.
This is just one example of how one could use Debezium. In this case we are
using it to aggregate data from our production databases to an analytics
database.
Let’s dive in and see how to actually make this work.
Setting up Debezium with Crunchy Bridge
We are using Debezium version 1.4. This is the current version as of when this was written.
We will be using Docker images to make this simpler to get started. The images are provided by the Debezium project. I am running this on my local machine, but in practice you would run this on production machine.
Run Zookeeper and Kafka
First we need to start Zookeeper which is a distributed configuration store. Kafka uses this to keep information about which Kafka node is the controller, and also stores the configuration for topics. This is where the status of what data has been read is stored so that if we stop and start, we don’t lose any data.
docker run -d -it --rm --name zookeeper -p 2181:2181 -p 2888:2888 -p 3888:3888 debezium/zookeeper:1.4
-druns the container in the background.--itruns the container interactively (i.e. attach to the console and redirect the input and output to the screen).--rmwill remove the container when it is stopped. This is useful for demo’s but is ill-advised for production.- We also label the container
zookeeperso that it can be referred to by name by other containers. - The
-poptions expose the ports that zookeeper uses to communicate with Kafka and other Zookeeper instances. - Finally, we are using the image
debezium/zookeeperversion 1.4.
Next, we start Kafka. Open another console and run:
docker run -d -it --rm --name kafka -p 9092:9092 --link zookeeper:zookeeper debezium/kafka:1.4
Similar to Zookeeper, the container is run interactively using --it and will
remove itself when it finishes (--rm). The name of the running container is
kafka and we expose port 9092. The --link option specifies that the
Zookeeper instance can be found in a container labeled zookeeper.
Set up source and destination databases
Before we start the source and sink connectors, we need a database to store data. This is the database that will create change events whenever we make a data modification operation.
Create the source instance on Crunchy Bridge. I
named mine debezium2. You will need the credentials from the instance to
connect. I used psql but any client that can connect to PostgreSQL will work:
psql postgres://postgres:password@p.xnspqxup4zd7dhlr2zc7jp23me.db.postgresbridge.com:5432/postgres
First off, we create a small table for demonstration purposes:
CREATE TABLE customers (id int GENERATED ALWAYS AS IDENTITY PRIMARY KEY, name text);
ALTER TABLE customers REPLICA IDENTITY USING INDEX customers_pkey;
INSERT INTO customers (name) VALUES ('joe'), ('bob'), ('sue');
This is a very simple table; however, there is a nuance that requires
explaining. In order to minimize the amount of data that is stored on the server
for logical replication and transferred through Debezium, we specify the
REPLICA IDENTITY.
Now create a user to handle the replication events:
CREATE USER debezium WITH PASSWORD 'password';
Add the user to the REPLICATION role:
ALTER USER debezium WITH REPLICATION;
Add the user to the SUPERUSER role:
ALTER USER debezium WITH SUPERUSER;
Note that for production you may want to limit the debezium user to just enough permissions to get the job done. See https://www.postgresql.org/docs/current/sql-createpublication.html for details. I will do a follow-up blog which explains how to set all of this up.
Of course we need a destination to send the changes, so create another instance
on Crunchy Bridge. I named my other instance destination. Again you will need
the credentials to connect. Note: I did not create any tables here.
Set up connectors
Now we can bring up the connector image. We will have to make sure the jdbc-sink jar is in the connector image. A simple way to do this is to use the Debezium end-to end JDBC example found here. (The Dockerfile can be downloaded from here).
From this directory, run docker build .. The output from this will be
successfully built 62b583dce71b where the hash code at the end will be unique
to your environment.
Once the container is built, you can tag it (note the use of the hash):
docker tag 62b583dce71b jdbc-sink
You can then use the tag name in the following command to run the container:
docker run -it --rm --name connect -p 8083:8083 -e GROUP_ID=1 -e CONFIG_STORAGE_TOPIC=my_connect_configs -e OFFSET_STORAGE_TOPIC=my_connect_offsets -e STATUS_STORAGE_TOPIC=my_connect_statuses --link zookeeper:zookeeper --link kafka:kafka jdbc-sink
Kafka Connect has a REST endpoint which we can use to see what connectors are enabled in the container:
curl -H "Accept:application/json" localhost:8083/connectors/
As we haven’t created any yet, the result is [] . Let’s create a source
connector.
We send some JSON to the REST API to configure the source connector. I am saving
this in a postgresql-connect.json file.
{
	"name": "customer-connector",
	"config": {
		"connector.class": "io.debezium.connector.postgresql.PostgresConnector",
		"database.hostname": "p.xnspqxup4zd7dhlr2zc7jp23me.db.postgresbridge.com",
		"plugin.name": "pgoutput",
		"database.port": "5432",
		"database.user": "debezium",
		"database.password": "password",
		"database.dbname": "postgres",
		"database.server.name": "debezium2",
		"publication.autocreate.mode": "all_tables",
		"table.includelist": "public.customers"
	}
}
This provides a name for the connector, how to connect to the database, and which table to read.
The following will start a connector that reads the customer table out of the source postgres database:
curl -i -X POST -H "Accept:application/json" -H "Content-Type:application/json" localhost:8083/connectors/ -d @postgresql-connect.json
Then, to configure the sink connector, we create a JSON file (named
jdbc-sink.json in this example):
{
	"name": "jdbc-sink",
	"config": {
		"connector.class": "io.confluent.connect.jdbc.JdbcSinkConnector",
		"tasks.max": "1",
		"topics": "debezium2.public.customers",
		"dialect.name": "PostgreSqlDatabaseDialect",
		"table.name.format": "customers",
		"connection.url": "jdbc:postgresql://p.ti7oqlp5cvad7lqnt3cwikhyiy.db.postgresbridge.com:5432/postgres?user=postgres&password={password}&sslMode=require",
		"transforms": "unwrap",
		"transforms.unwrap.type": "io.debezium.transforms.ExtractNewRecordState",
		"transforms.unwrap.drop.tombstones": "false",
		"auto.create": "true",
		"insert.mode": "upsert",
		"pk.fields": "id",
		"pk.mode": "record_key",
		"delete.enabled": "true"
	}
}
Note: Kafka JDBC sink defaults to creating the destination table with the
same name as the topic, which in this case is debezium2.public.customers. I’m
not sure of other databases but in PostgreSQL this creates a table which needs
to be double quoted to use. I tend to avoid these so I added the
"table.name.format": "customers" to force it to create a table named
customers.
And similarly we enable this connector with:
curl -i -X POST -H "Accept:application/json" -H "Content-Type:application/json" localhost:8083/connectors/ -d @jdbc-sink.json
Test data changes
Using psql again, we see:
-- Source database

postgres=# table customers;
 id | name
----+------
 1 | joe
 2 | bob
 3 | sue

(3 rows)

-- and on destination database

postgres=#
You are now connected to database "customers" as user "postgres".

customers=# table customers;
 name | id
------+----
 joe | 1
 bob | 2
 sue | 3

(3 rows)
The first command shows us the customers table on the PostgreSQL database, and the second the customers table on the customers database.
The most interesting is that the jdbc-sink connector created the table and synced it. Any changes we make now will be propagated to the customers table on the second database.
Additionally, if we update data on the customers table in the postgres database we will see:
postgres=# update customers set name='paul' where id=1;
UPDATE 1
postgres=# \c customers
You are now connected to database "customers" as user "postgres".
customers=# table customers;
name | id
-----+----
bob | 2
sue | 3
paul | 1

(3 rows)
Deletes work similarly:
postgres=# delete from customers where id=1;
DELETE 1
postgres=# \c customers
You are now connected to database "customers" as user "postgres".
customers=# table customers;
name | id
-----+----
bob | 2
sue | 3

(2 rows)
Troubleshooting
What should you do when it doesn't work?
There are two places we can look at errors: Docker and Kafka.
docker logs <containerhash> will show you any errors that Kafka has when
bringing up the connector.
Using Kafka's REST API:
curl localhost:8083/connectors/ | jq
returns the current running connectors, in my case:
["jdbc-sink", "customer-connector"]
The following returns the configuration of the customer-connector:
curl localhost:8083/connectors/customer-connector/config | jq
In my case I get:
{
	"connector.class": "io.debezium.connector.postgresql.PostgresConnector",
	"publication.autocreate.mode": "filtered",
	"database.user": "debezium",
	"database.dbname": "postgres",
	"database.hostname": "p.bbijnlshlvff5bogwaovgsjukm.db.postgresbridge.com",
	"database.password": "password",
	"name": "customer-connector",
	"database.server.name": "debezium2",
	"plugin.name": "pgoutput",
	"database.port": "5432",
	"table.include.list": "public.customers"
}
You can check the status of a connector using:
curl localhost:8083/connectors/jdbc-sink/status | jq
{
	"name": "jdbc-sink",
	"connector": {
		"state": "RUNNING",
		"worker_id": "172.17.0.4:8083"
	},
	"tasks": [
		{
			"id": 0,
			"state": "RUNNING",
			"worker_id": "172.17.0.4:8083"
		}
	],
	"type": "sink"
}
Finally, you can update the configuration of the connector using:
curl -i -X PUT -H "Accept:application/json" -H "Content-Type:application/json" localhost:8083/connectors/jdbc-sink/config -d @jdbc-sink.put
jdbc-sink.put contains:
{
	"connector.class": "io.confluent.connect.jdbc.JdbcSinkConnector",
	"dialect.name": "PostgreSqlDatabaseDialect",
	"table.name.format": "customers",
	"tasks.max": "1",
	"topics": "debezium2.public.customers",
	"transforms": "unwrap",
	"delete.enabled": "true",
	"transforms.unwrap.drop.tombstones": "false",
	"name": "jdbc-sink",
	"transforms.unwrap.type": "io.debezium.transforms.ExtractNewRecordState",
	"auto.create": "true",
	"connection.url": "jdbc:postgresql://p.gpcrfgio5vfnxo3qng4apz633u.db.postgresbridge.com:5432/postgres?user=postgres&password={password}&sslMode=require",
	"insert.mode": "upsert",
	"pk.mode": "record_key",
	"pk.fields": "id"
}
Note: this is the same as the json file used to create the connector without the name and config as they are specified in the REST endpoint.
After updating the the connector you will need to restart it using:
curl -i -X POST -H "Accept:application/json" -H "Content-Type:application/json" localhost:8083/connectors/jdbc-sink/restart
Finally some caveats:
One thing to note is that since logical replication in PostgreSQL does not provide any information about sequences, we do not replicate sequences. They will need to be handled by some other process.
A big thanks to the Debezium team for this impressive and easy to set up framework.
