Goals
In this article I will assist you to deploy a NodeJS application from GitHub into AWS Elastic Beanstalk and Building a CI/CD pipeline.
What is Elastic Beanstalk ?
Using Elastic Beanstalk you will be able to deploy and manage applications within the AWS Cloud without having knowledge about the infrastructure that execute those applications. Elastic Beanstalk reduces management complexness without proscribing selection or control. You just transfer your application and Elastic Beanstalk mechanically handles the main points of capability provisioning, load equalization, scaling and application health observance.
Elastic Beanstalk support applications developed in java, Go, PHP, NodeJS, Python and Ruby. Once you deploy your application, Elastic Beanstalk build the chosen supported platform version and provisions one or additional AWS resources like AmazonEC2 instances, to run your application. Elastic Beanstalk has a default security group, this security group acts as a firewall for the instances.
Elastic Beanstalk console is used to interact with Elastic Beanstalk. You can also use AWS Command line interface or high-level designed interface.
Once you create and deploy application, information about your application can be available on Elastic Beanstalk console.
Why Elastic Beanstalk ?
AWS Elastic Beanstalk makes it easy for developers to share their application across different devices within less amount of time.
Pre-Requisities
We will need pre-built sample of NodeJS application , you can download using this URL from GitHub https://github.com/jspruance/musician-app. You should also have GitHub account and AWS account , you can create a free AWS account from https://aws.amazon.com/.
Click here, to Create AWS Account and enter AWS User name and Password and it will open AWS Management Console page. Click on All services and choose AWS Elastic Beanstalk.
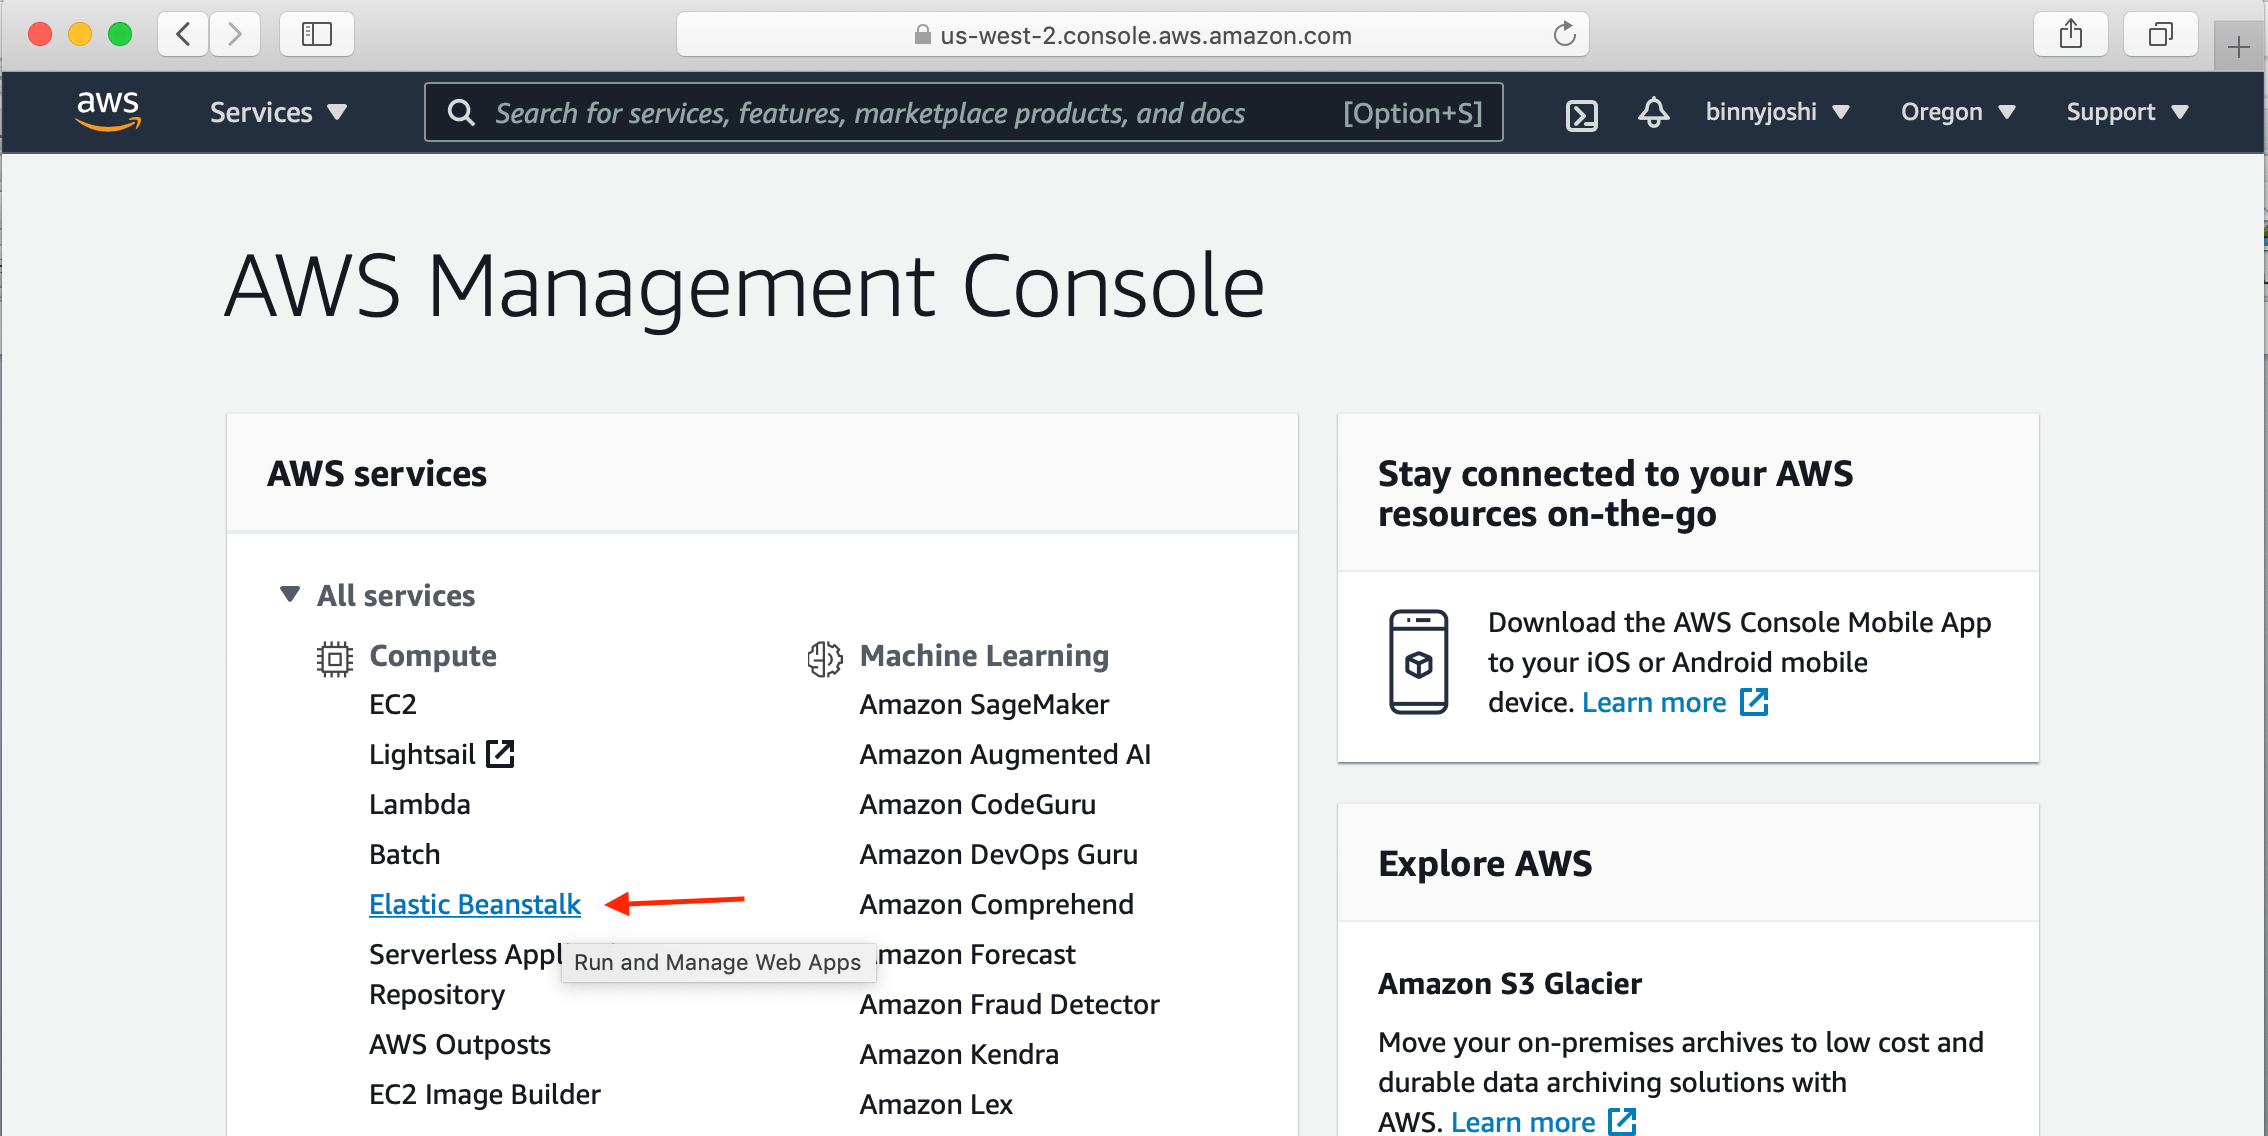
Figure 1: AWS Management console
When you click on Elastic Beanstalk , you will be directed to AWS Elastic Beanstalk Dashboard page and click “Create Application” button and configure your NodeJS application.
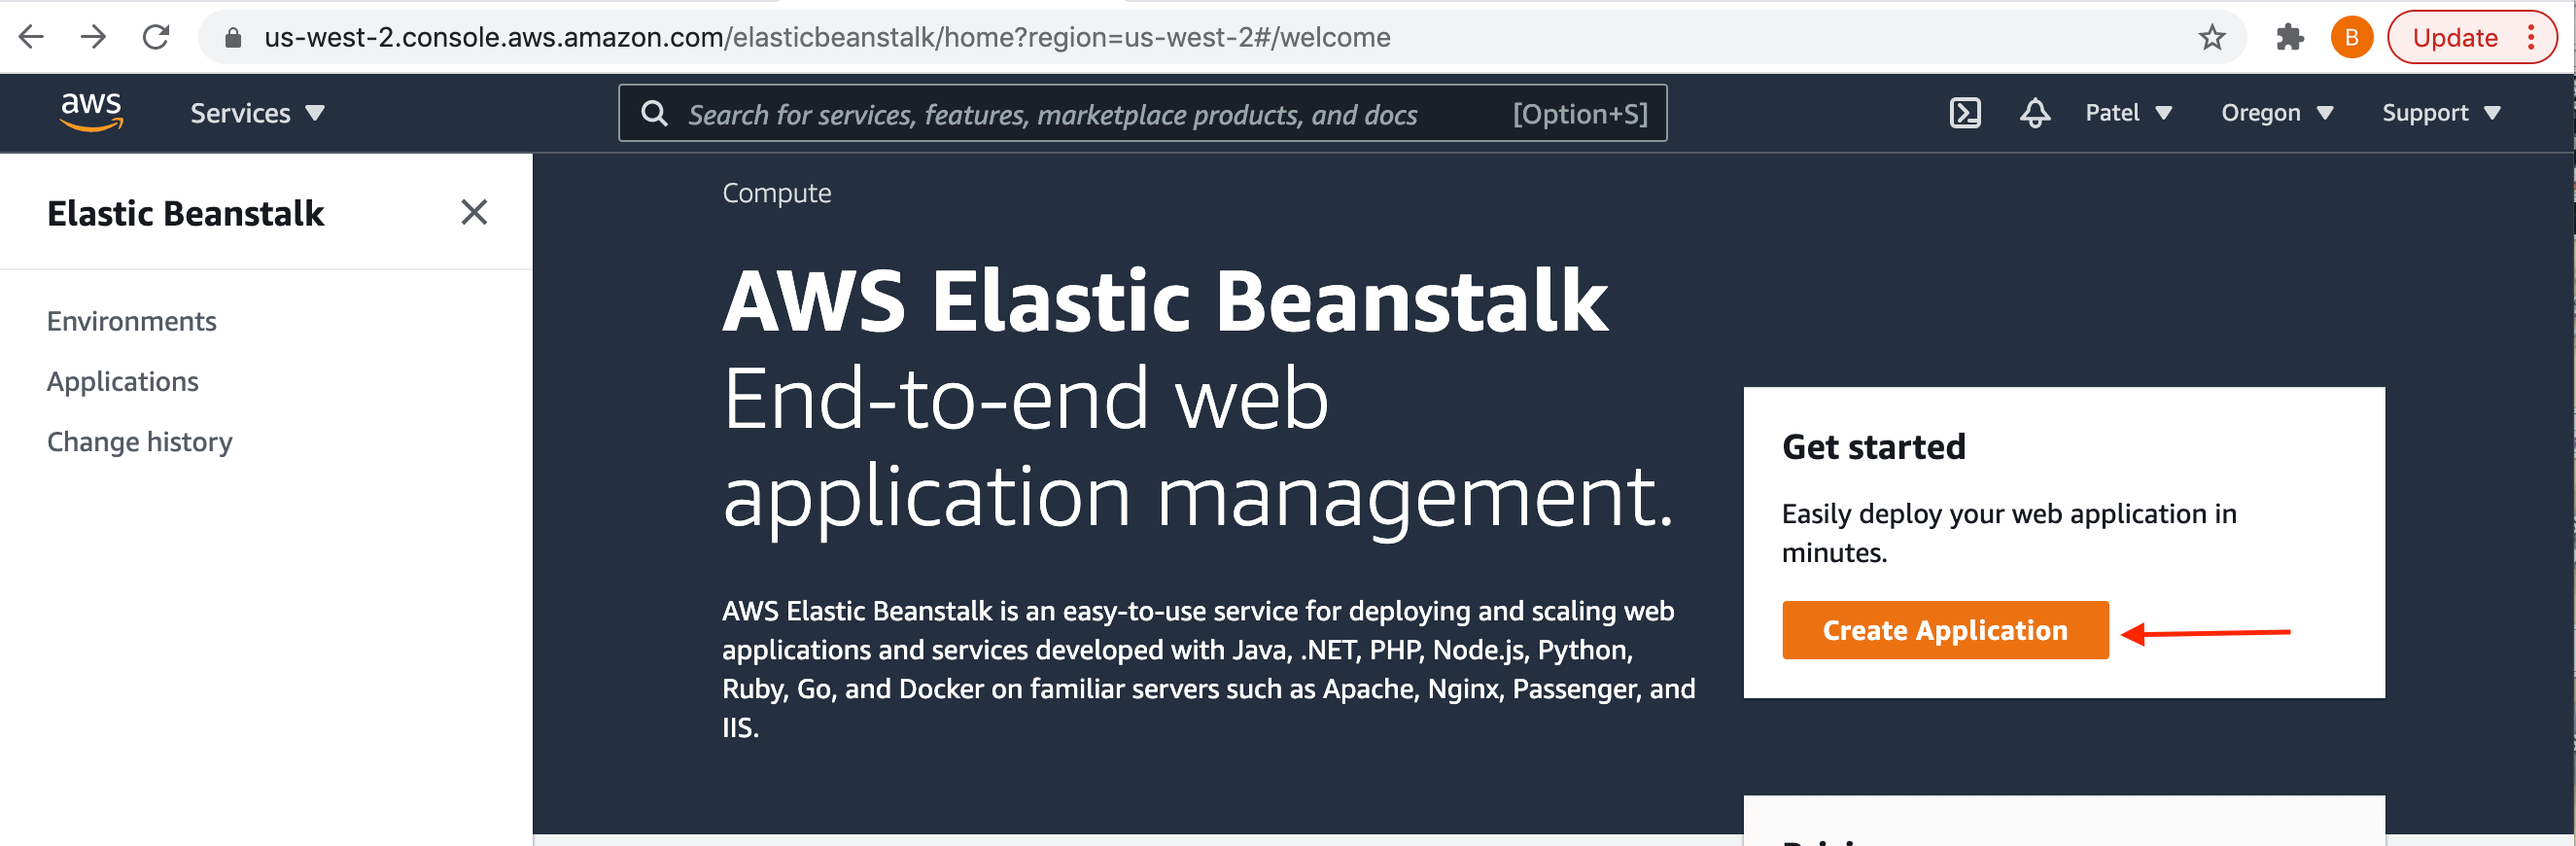
Figure 2: AWS Elastic Beanstalk Dashboard page
To create an Application
You can use “Create Web app” console wizard to create your sample application.
- Specify your Elastic Beanstalk application name information e.g: musician-sample
- Click on Platform drop-down and select your platform e.g: node.js. Platform branch and platform version will be auto populated.
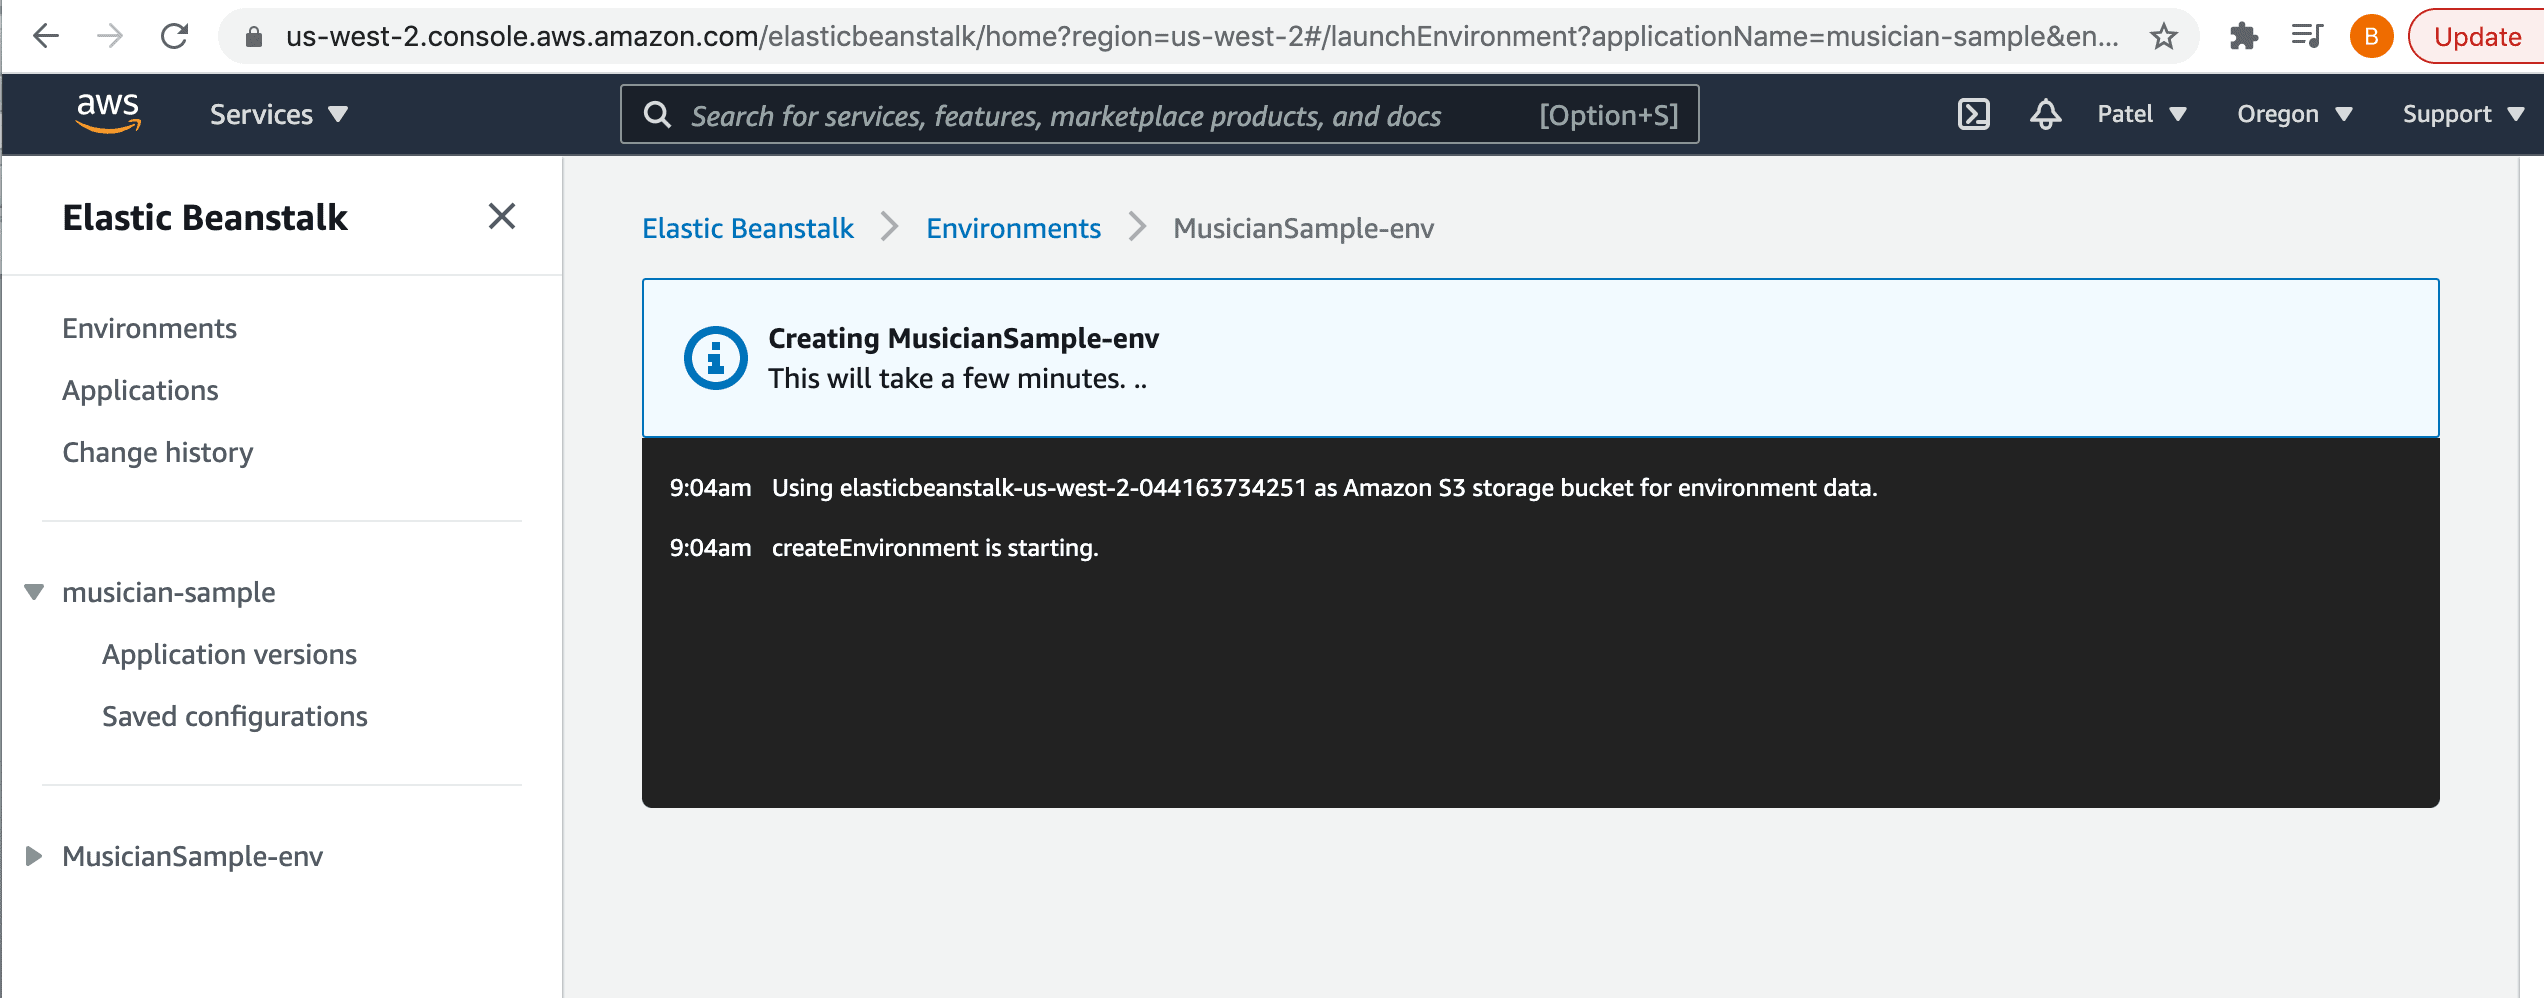
- Select the Sample Application as application code and click on “Create Application “ button. It will take few minutes to launch your application.
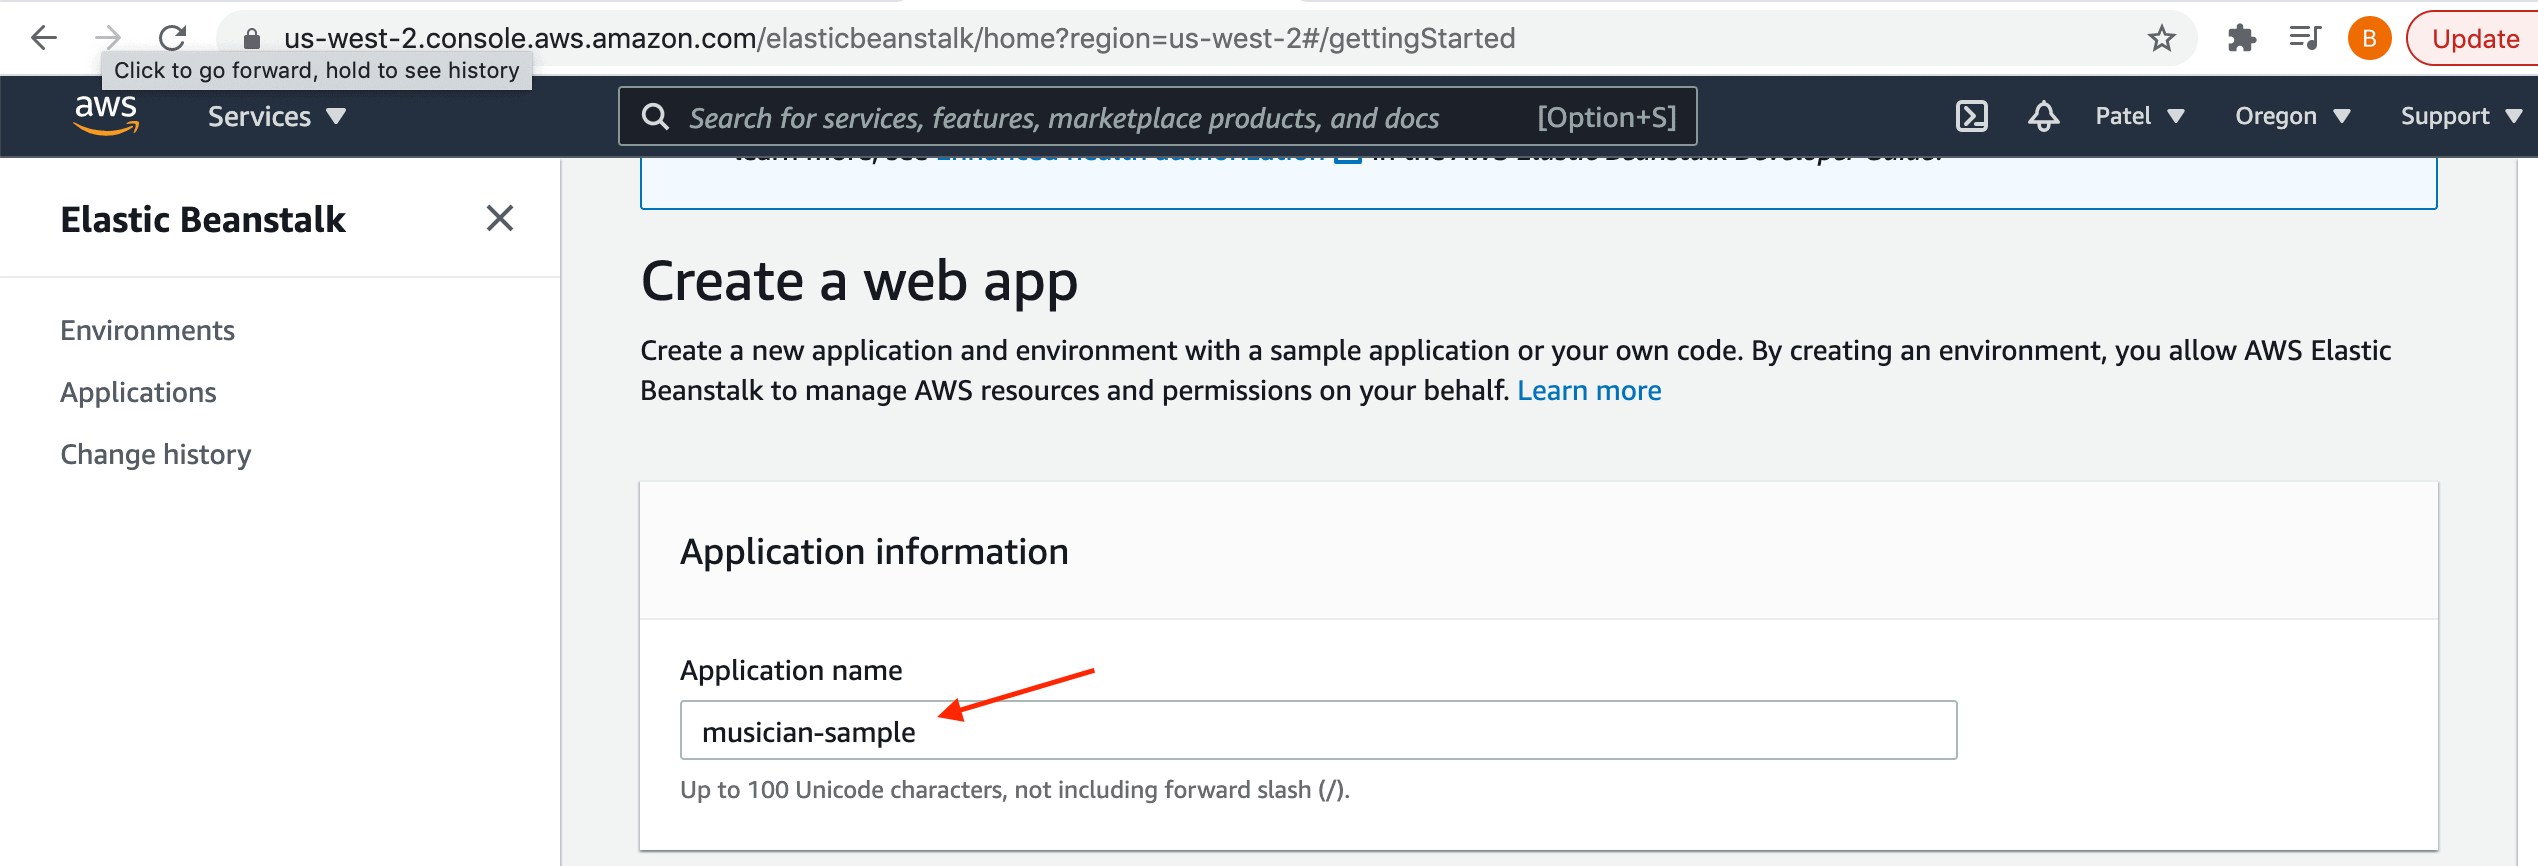
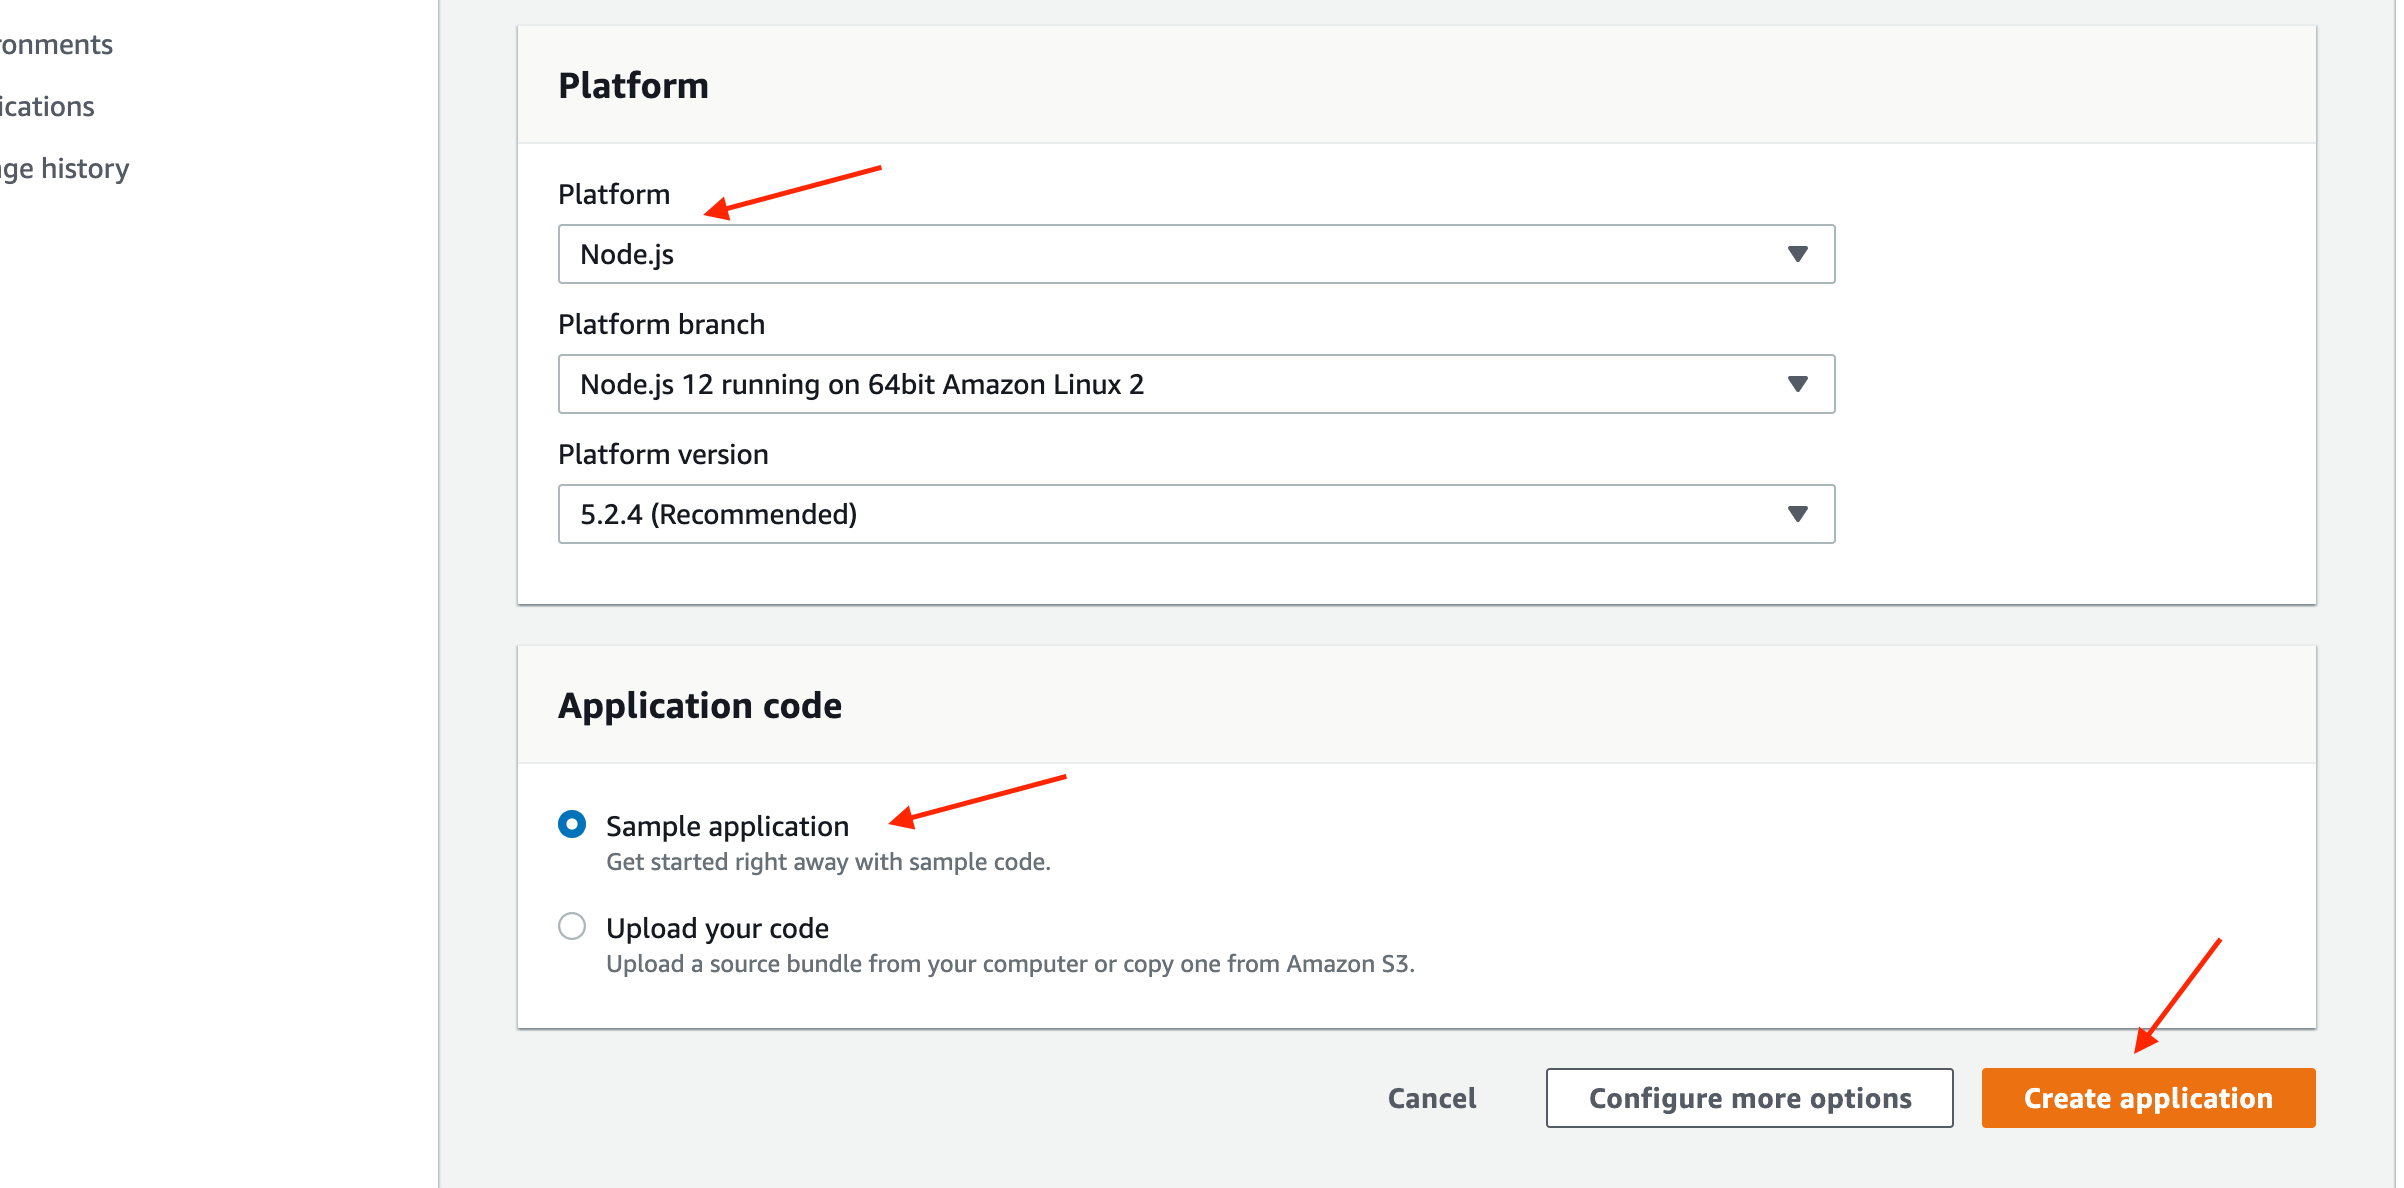
Figure 3: Creating a Web App Information page
This will deploy your application in specific environment and tracks the progress and display events.
Once your Application is successfully launched , you will see Green check mark.
The environment Overview page will display high level of environment information such as Environment Health, Application running version and Application platform version where application is running on.
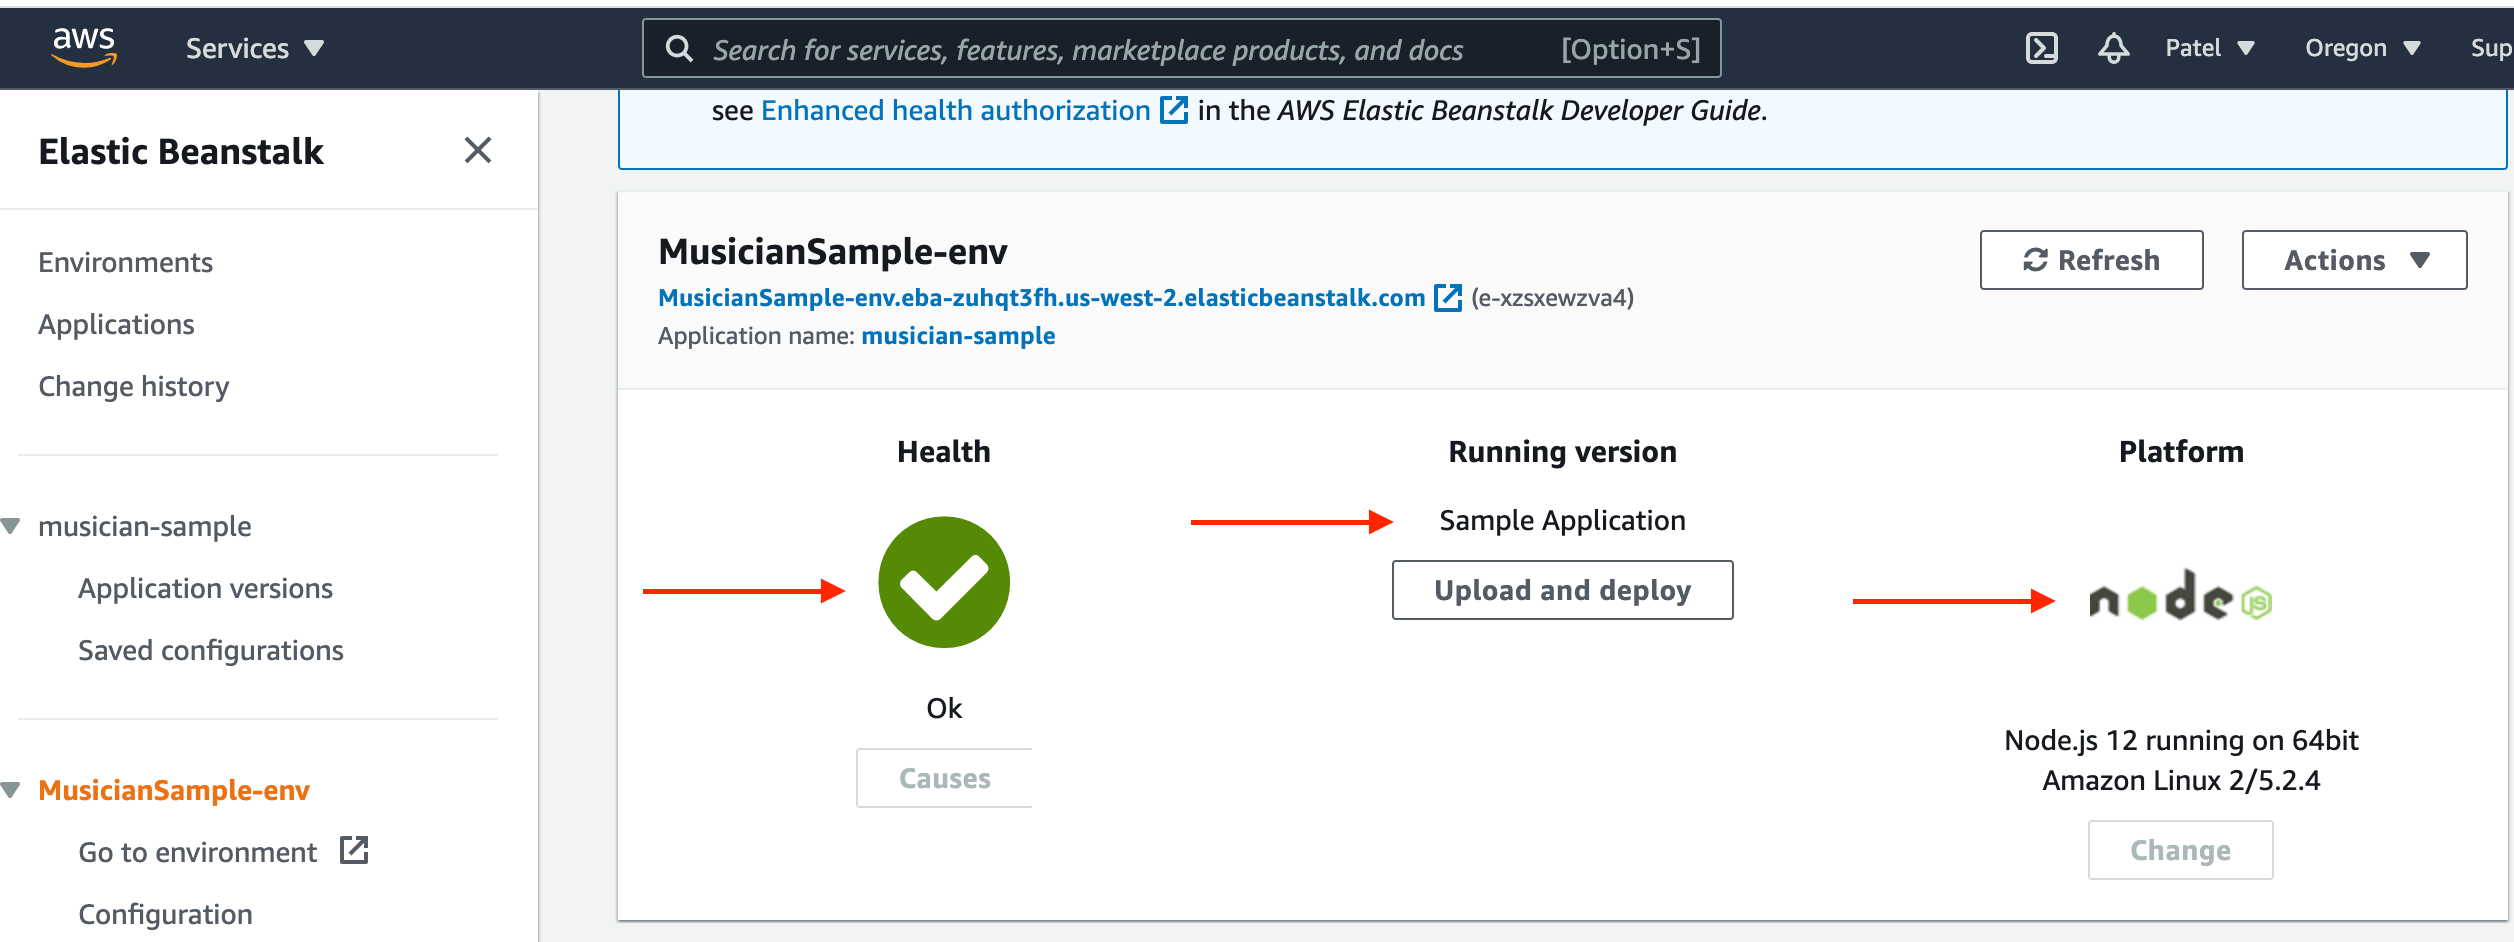
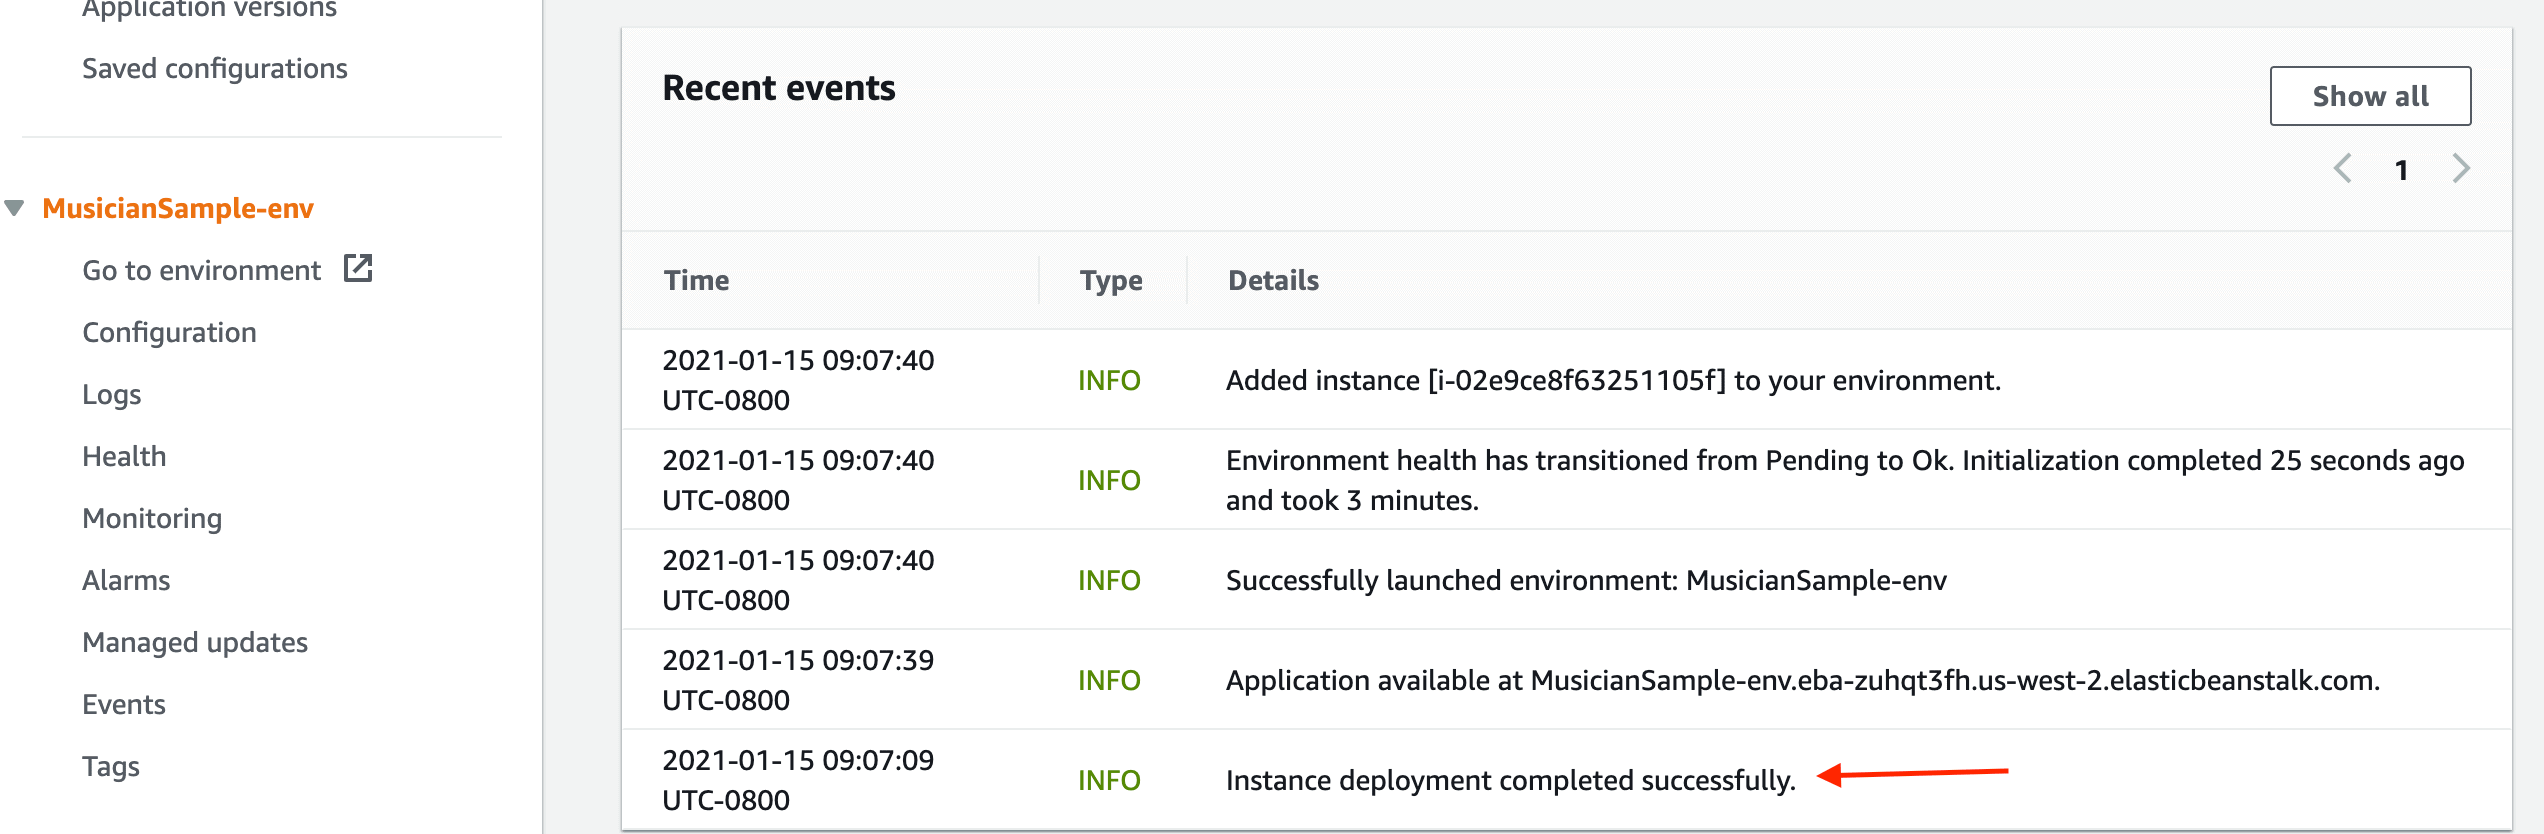
Figure 4: Environment overview page
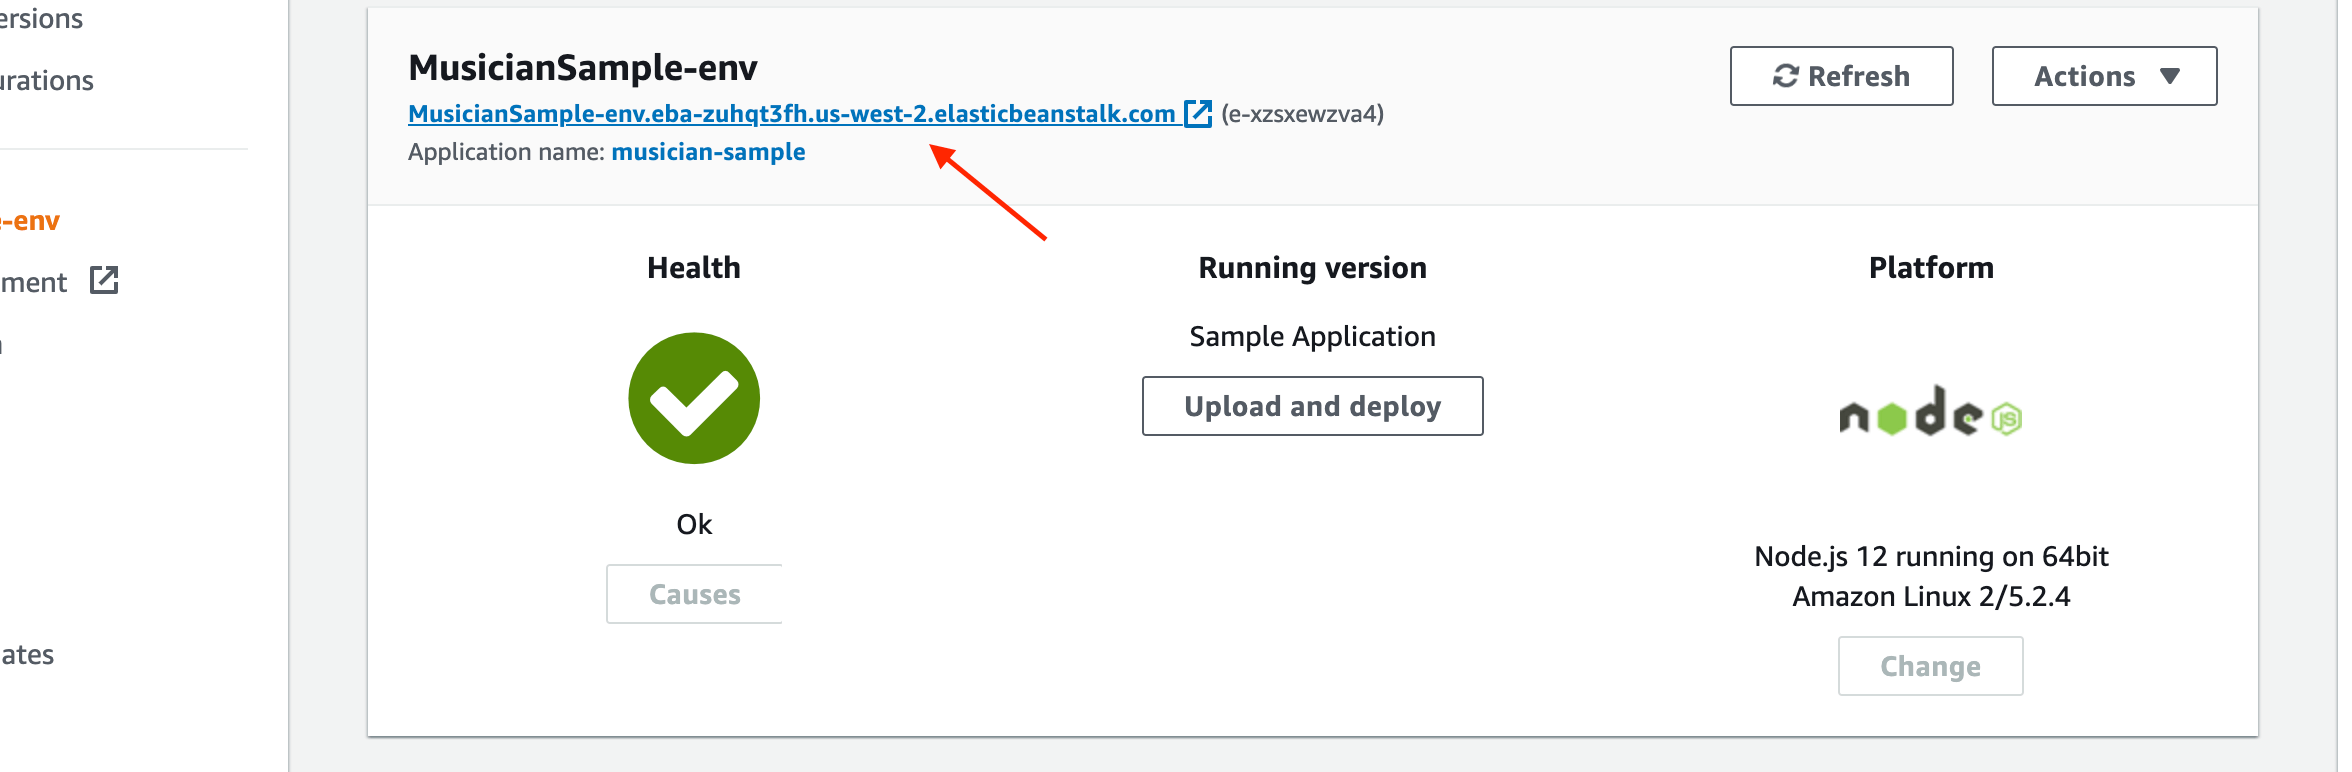
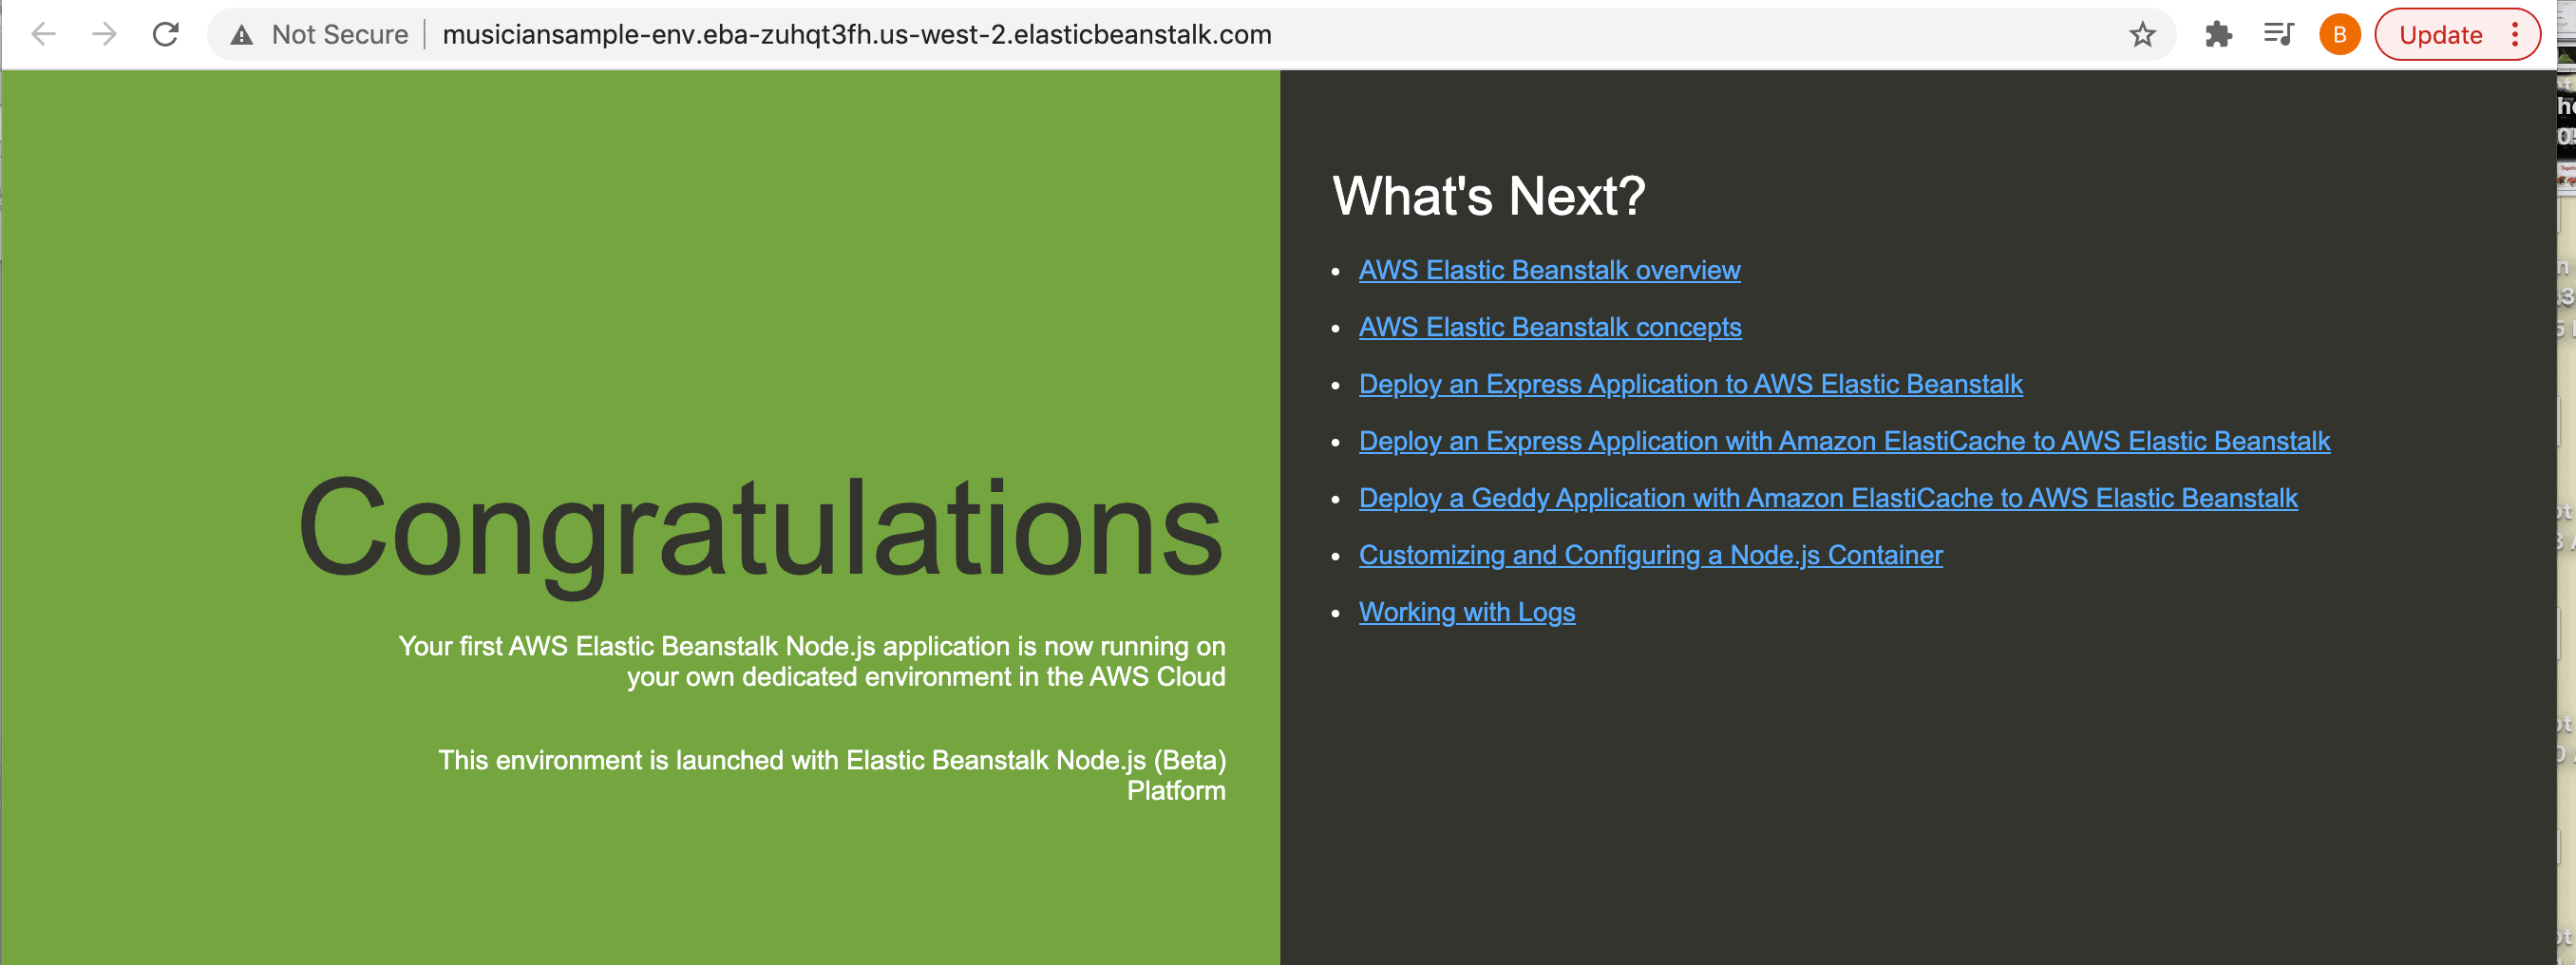
On top of the Overview Page you will see the environment’s URL below the environment name, click on this URL to get to the sample application’s Congratulations Page.
Once your application is successfully deploy, we will set up a Continuous Integration and Continuous Delivery (CI/CD) AWS pipeline using AWS Code Pipeline Service. AWS Code pipeline services helps you to Build, Tests and Deploy code when there is any code changes in your source code.
We will learn how to create a simple pipeline that pulls code from GitHub repository and automatically deploy to AWS EC2 instances.
Click on “Service” dropdown and Select “CodePipeline” as shown in below picture OR you can also search “CodePipeline” in search bar.
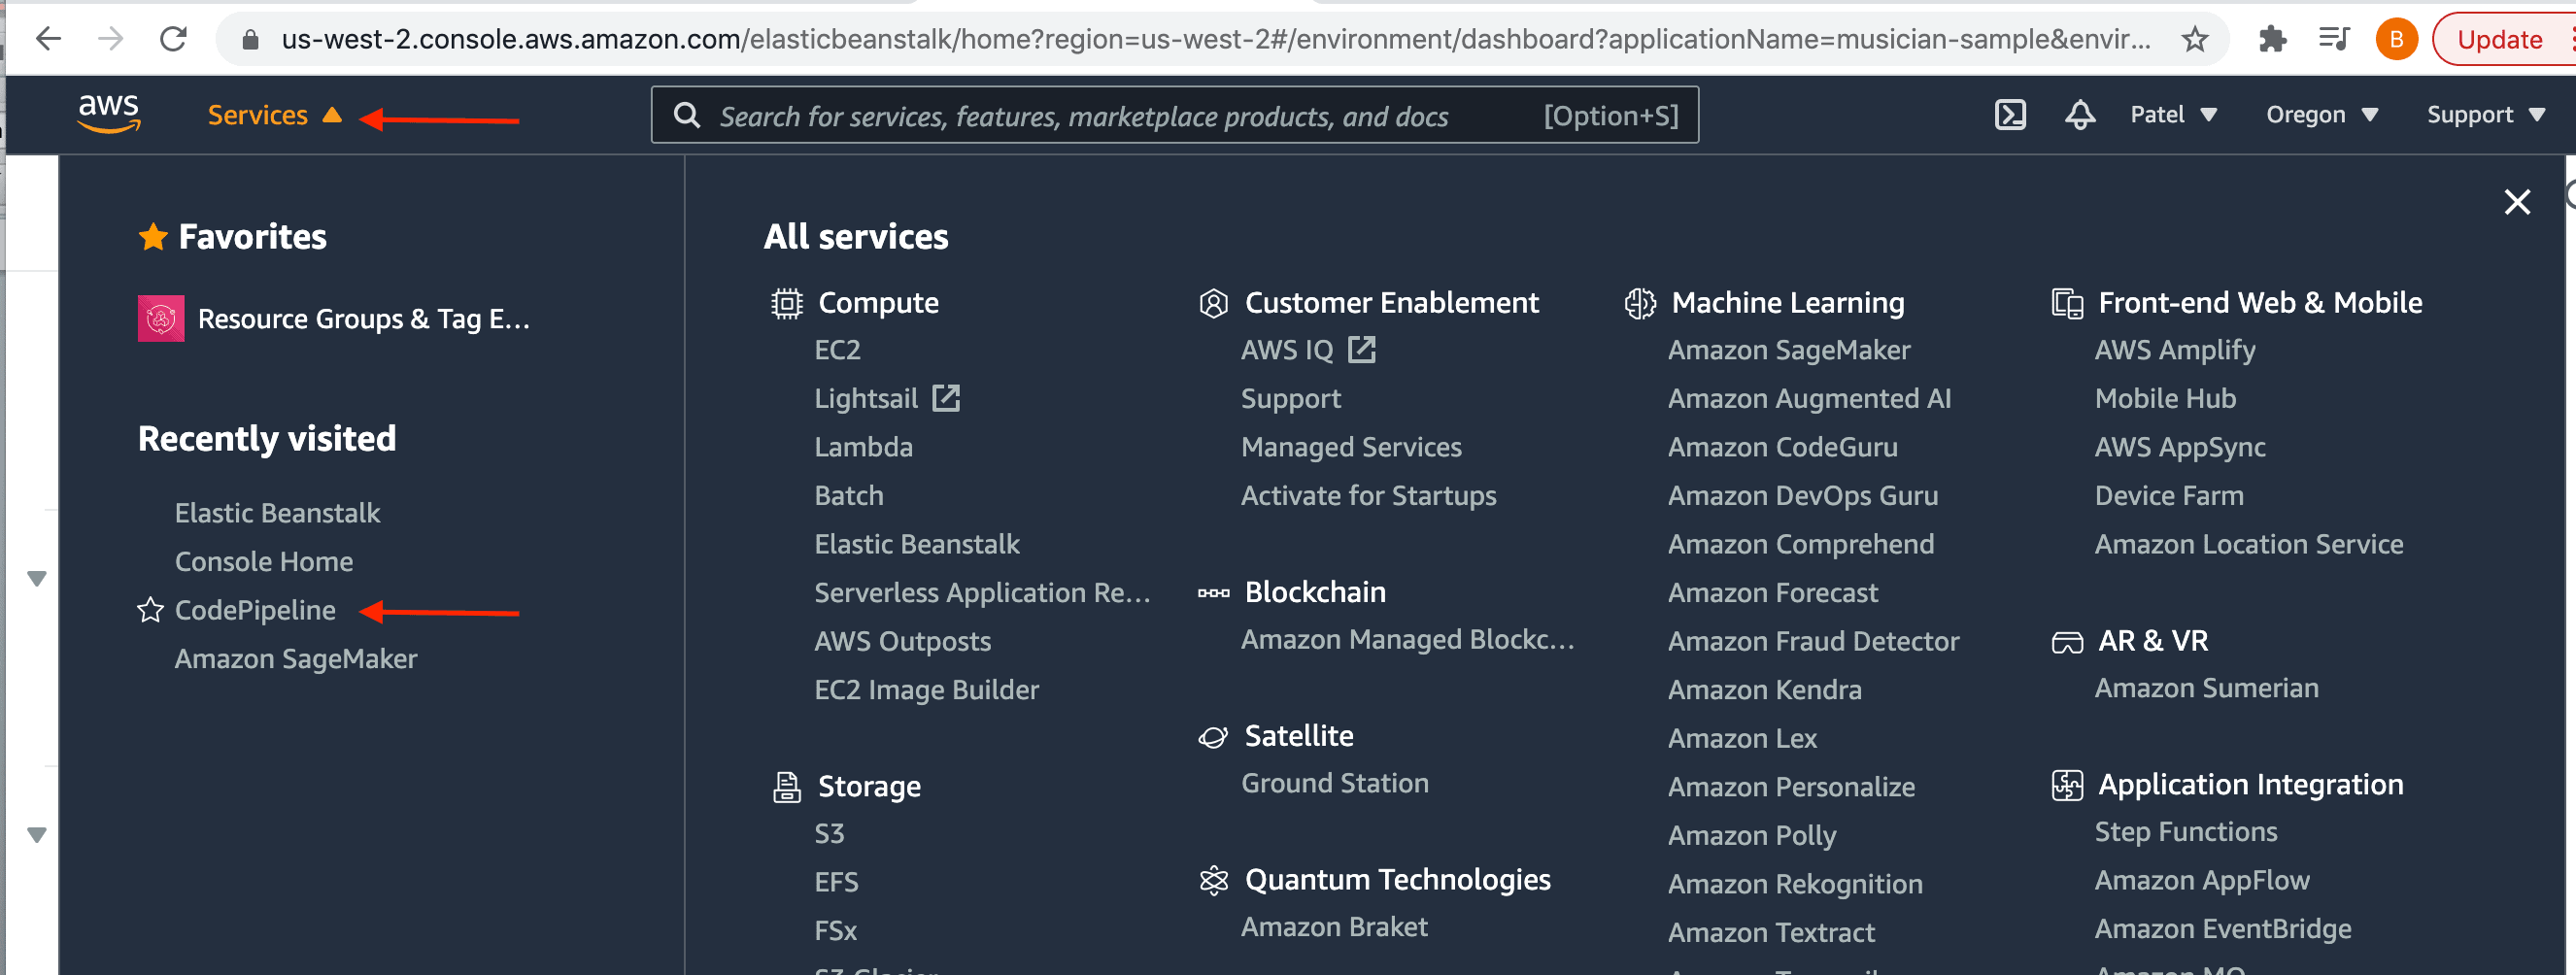
Figure 5: AWS Service page
On CodePipeline Dashboard page choose “Create Pipeline”. Click on Get started for the first time user.
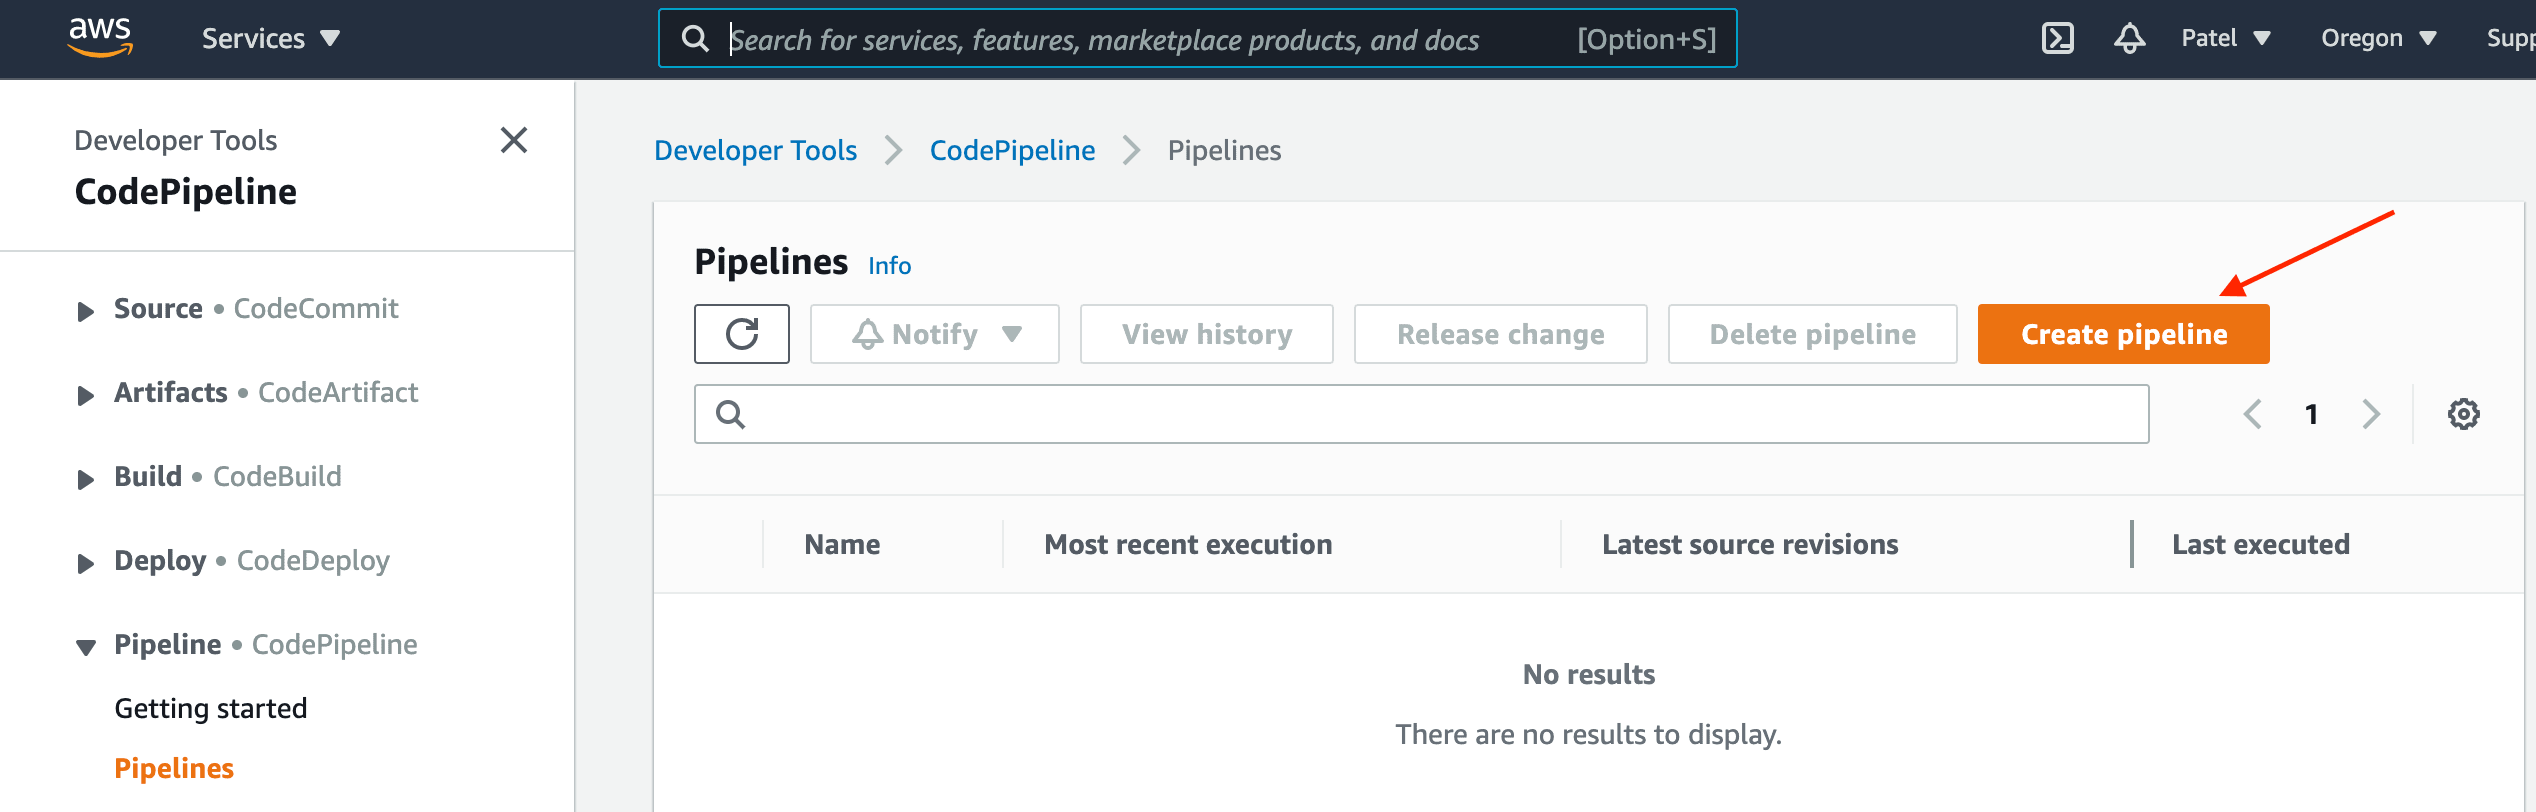
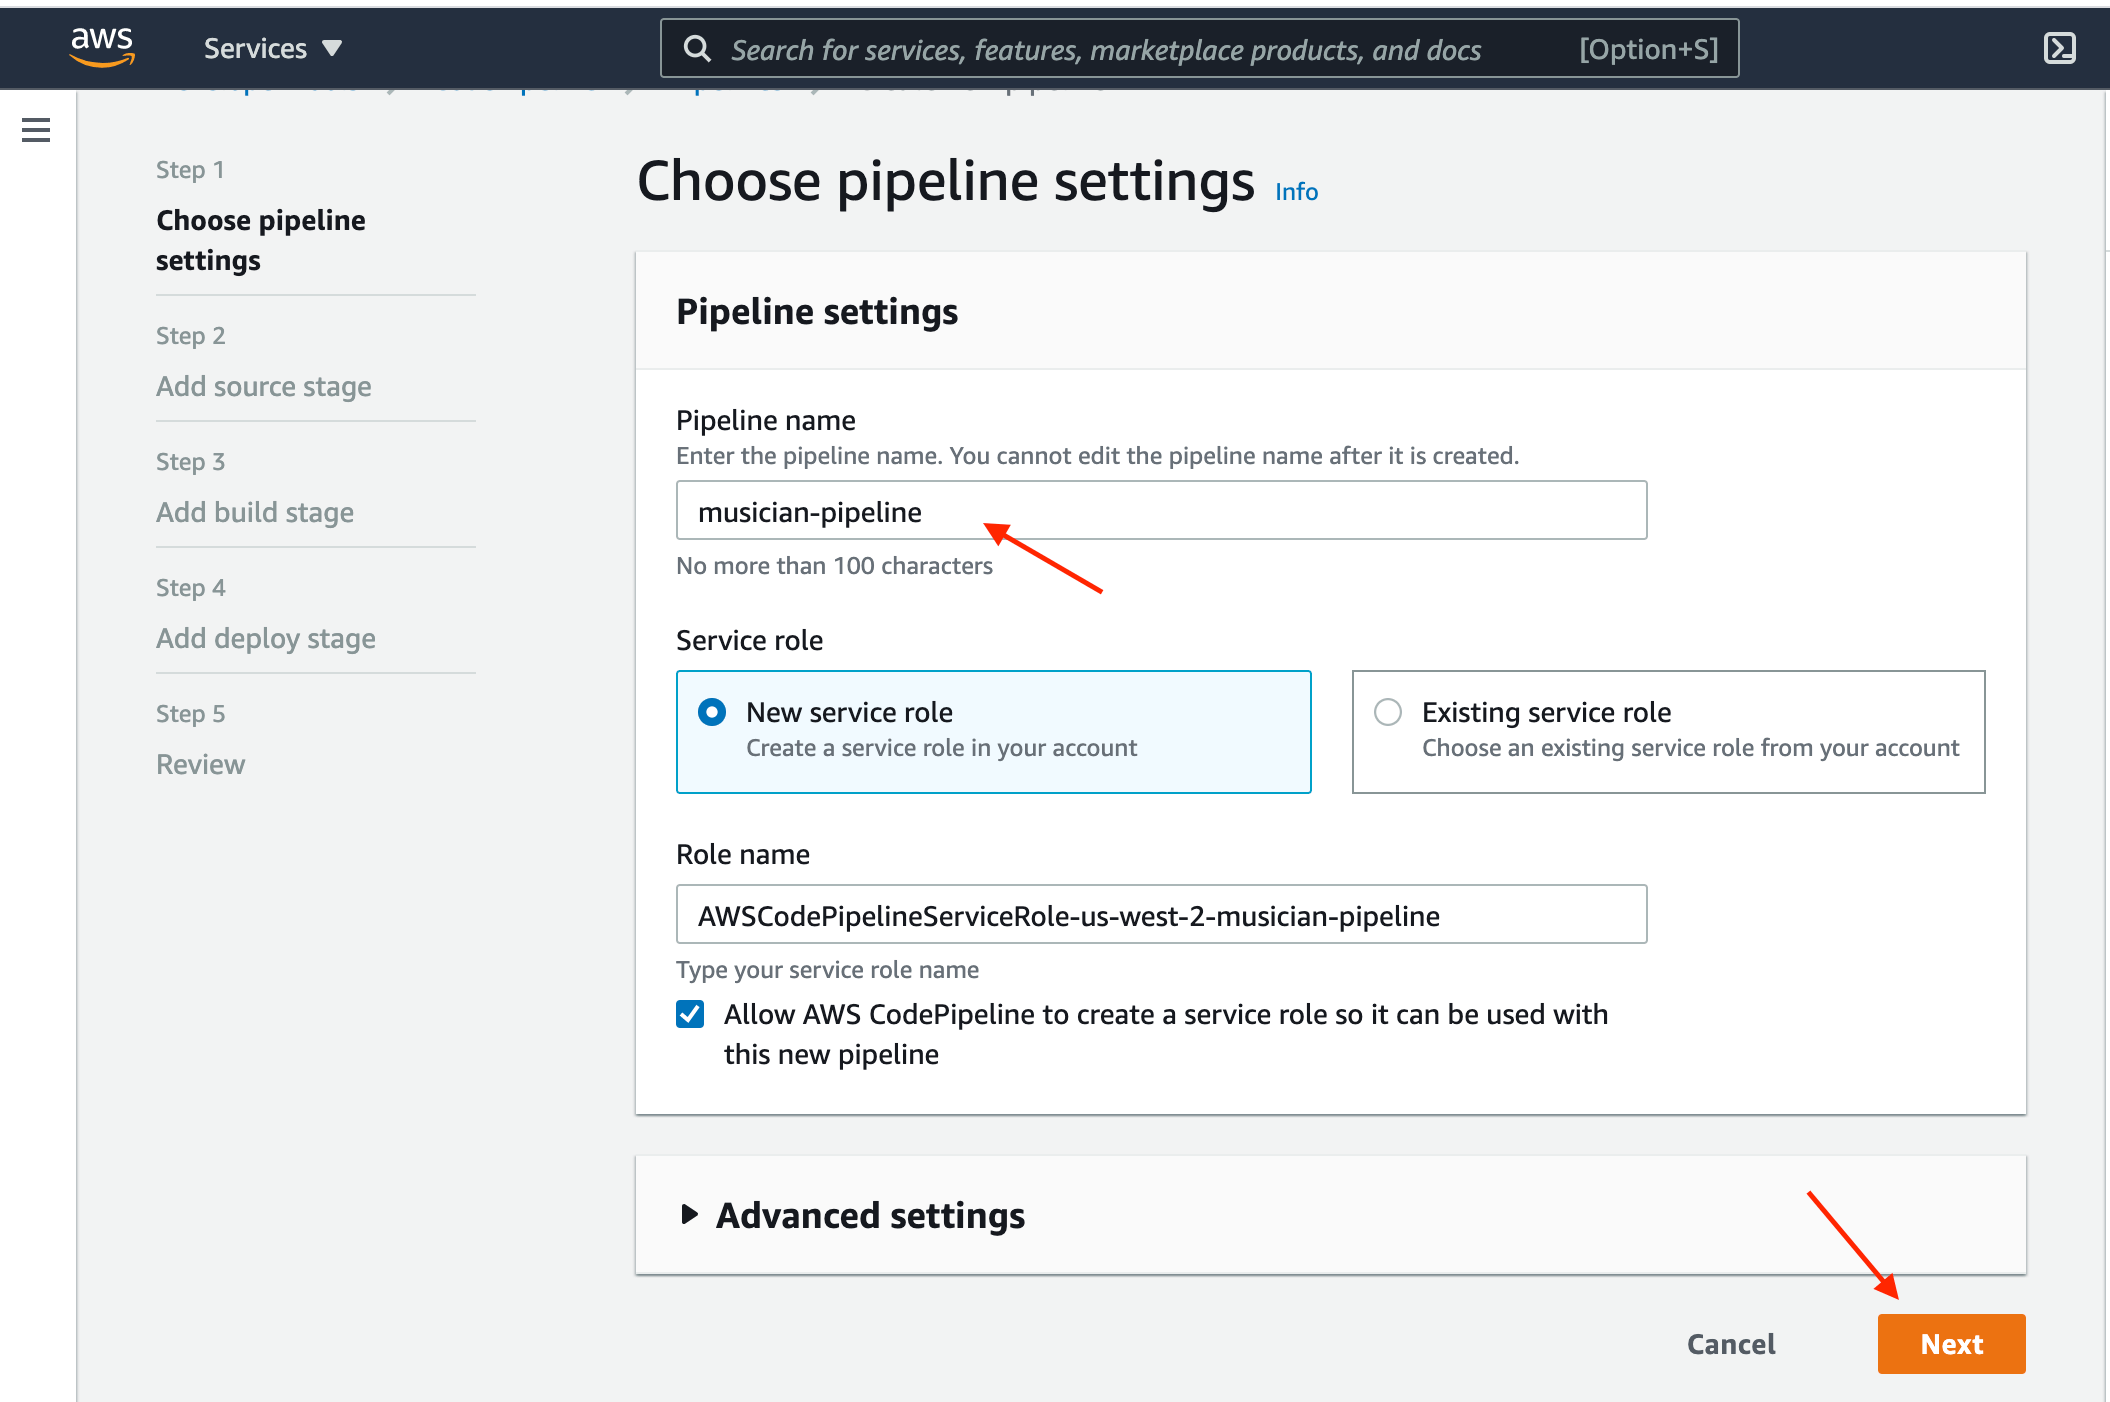
Figure 6: Create pipeline page
Choose Pipeline settings
AWS source resources you created must be in same region as your pipeline.
- In Pipeline Name enter name of the pipeline. e.g: “musician-pipeline”. You cannot edit pipeline name once it is created.
- In Service Role default to ‘New Service Role’, it will help CodePipeline to create a new service role in IAM.
- In Role Name default to ‘AWSCodePipelineServiceRole-Region-pipeline name’ .Example,this is the service role created for a pipeline named AWSCodePipelineServiceRole-us-west-2-musician-pipeline.
- Click on Next Button as shown in figure.
Step 1: Add Source Stage
- On Source page, under Source Provider ,choose GitHub(Version 1).
- If you have not created GitHub connection , click on “Connect to GitHub” button to grant permission to AWS Code pipeline to access your GitHub repository. This will help AWS Code Pipeline to upload your committed changes from GitHub to AWS Code Pipeline.
- GitHub connection page will appear as shown below.
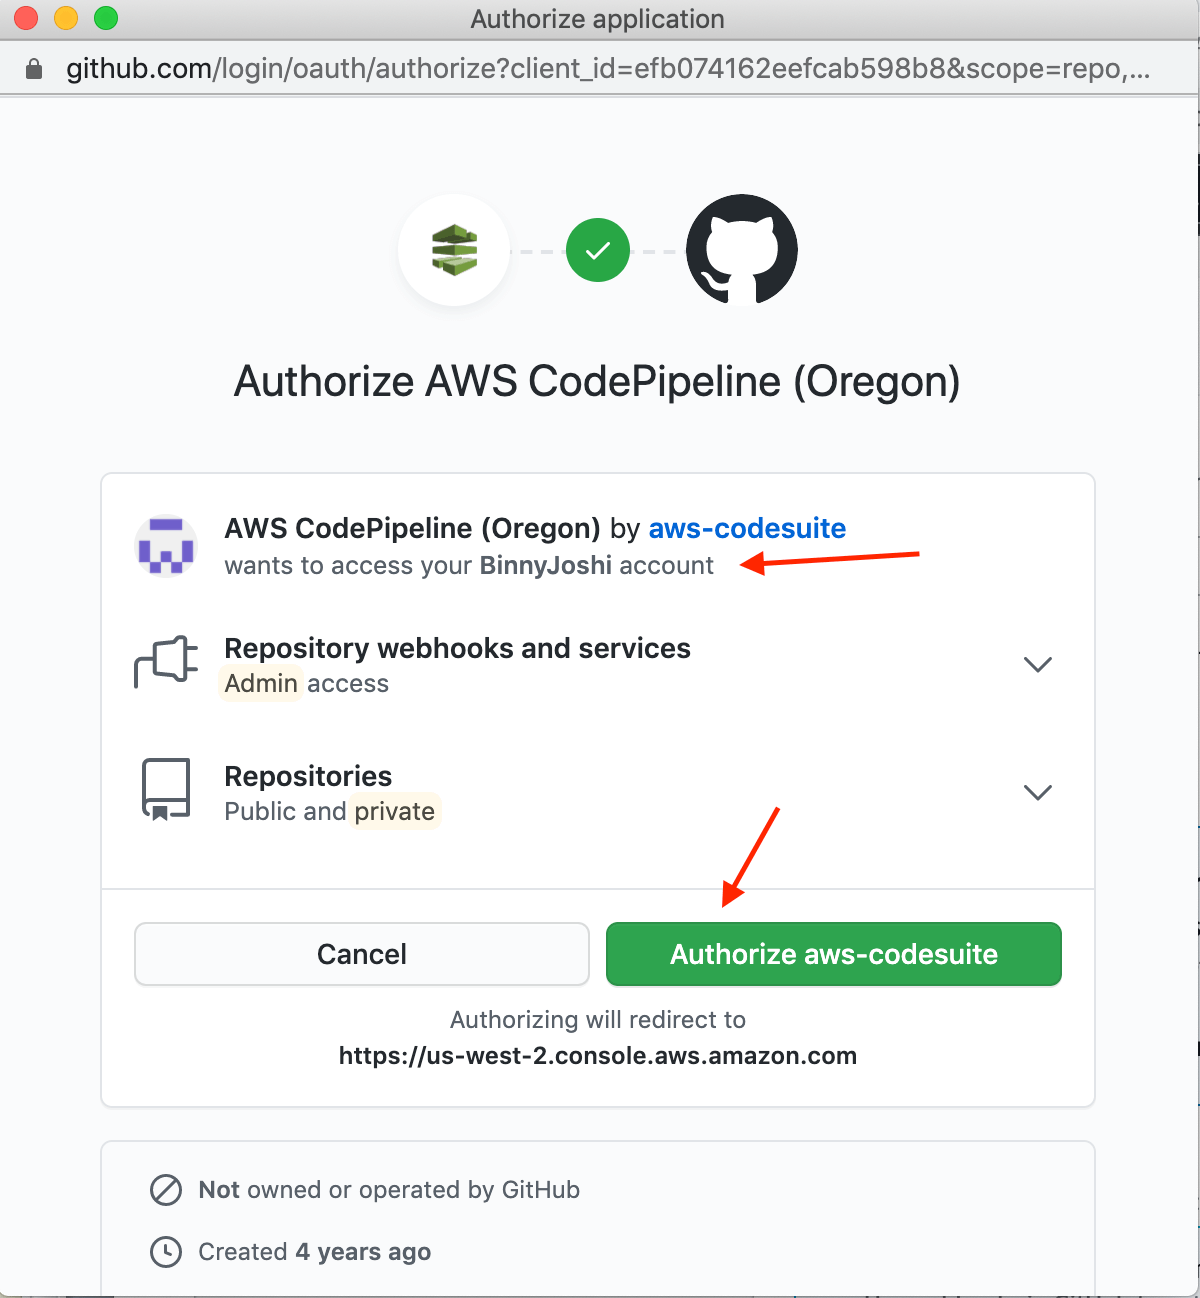
- Click on “Authorize aws-codesuite” . It will grant permission to connect to GitHub
- To connect to GitHub you need to click on “ Authorize AWS code-suite” green button. Once you are successfully connected you will see the successful message in green box.
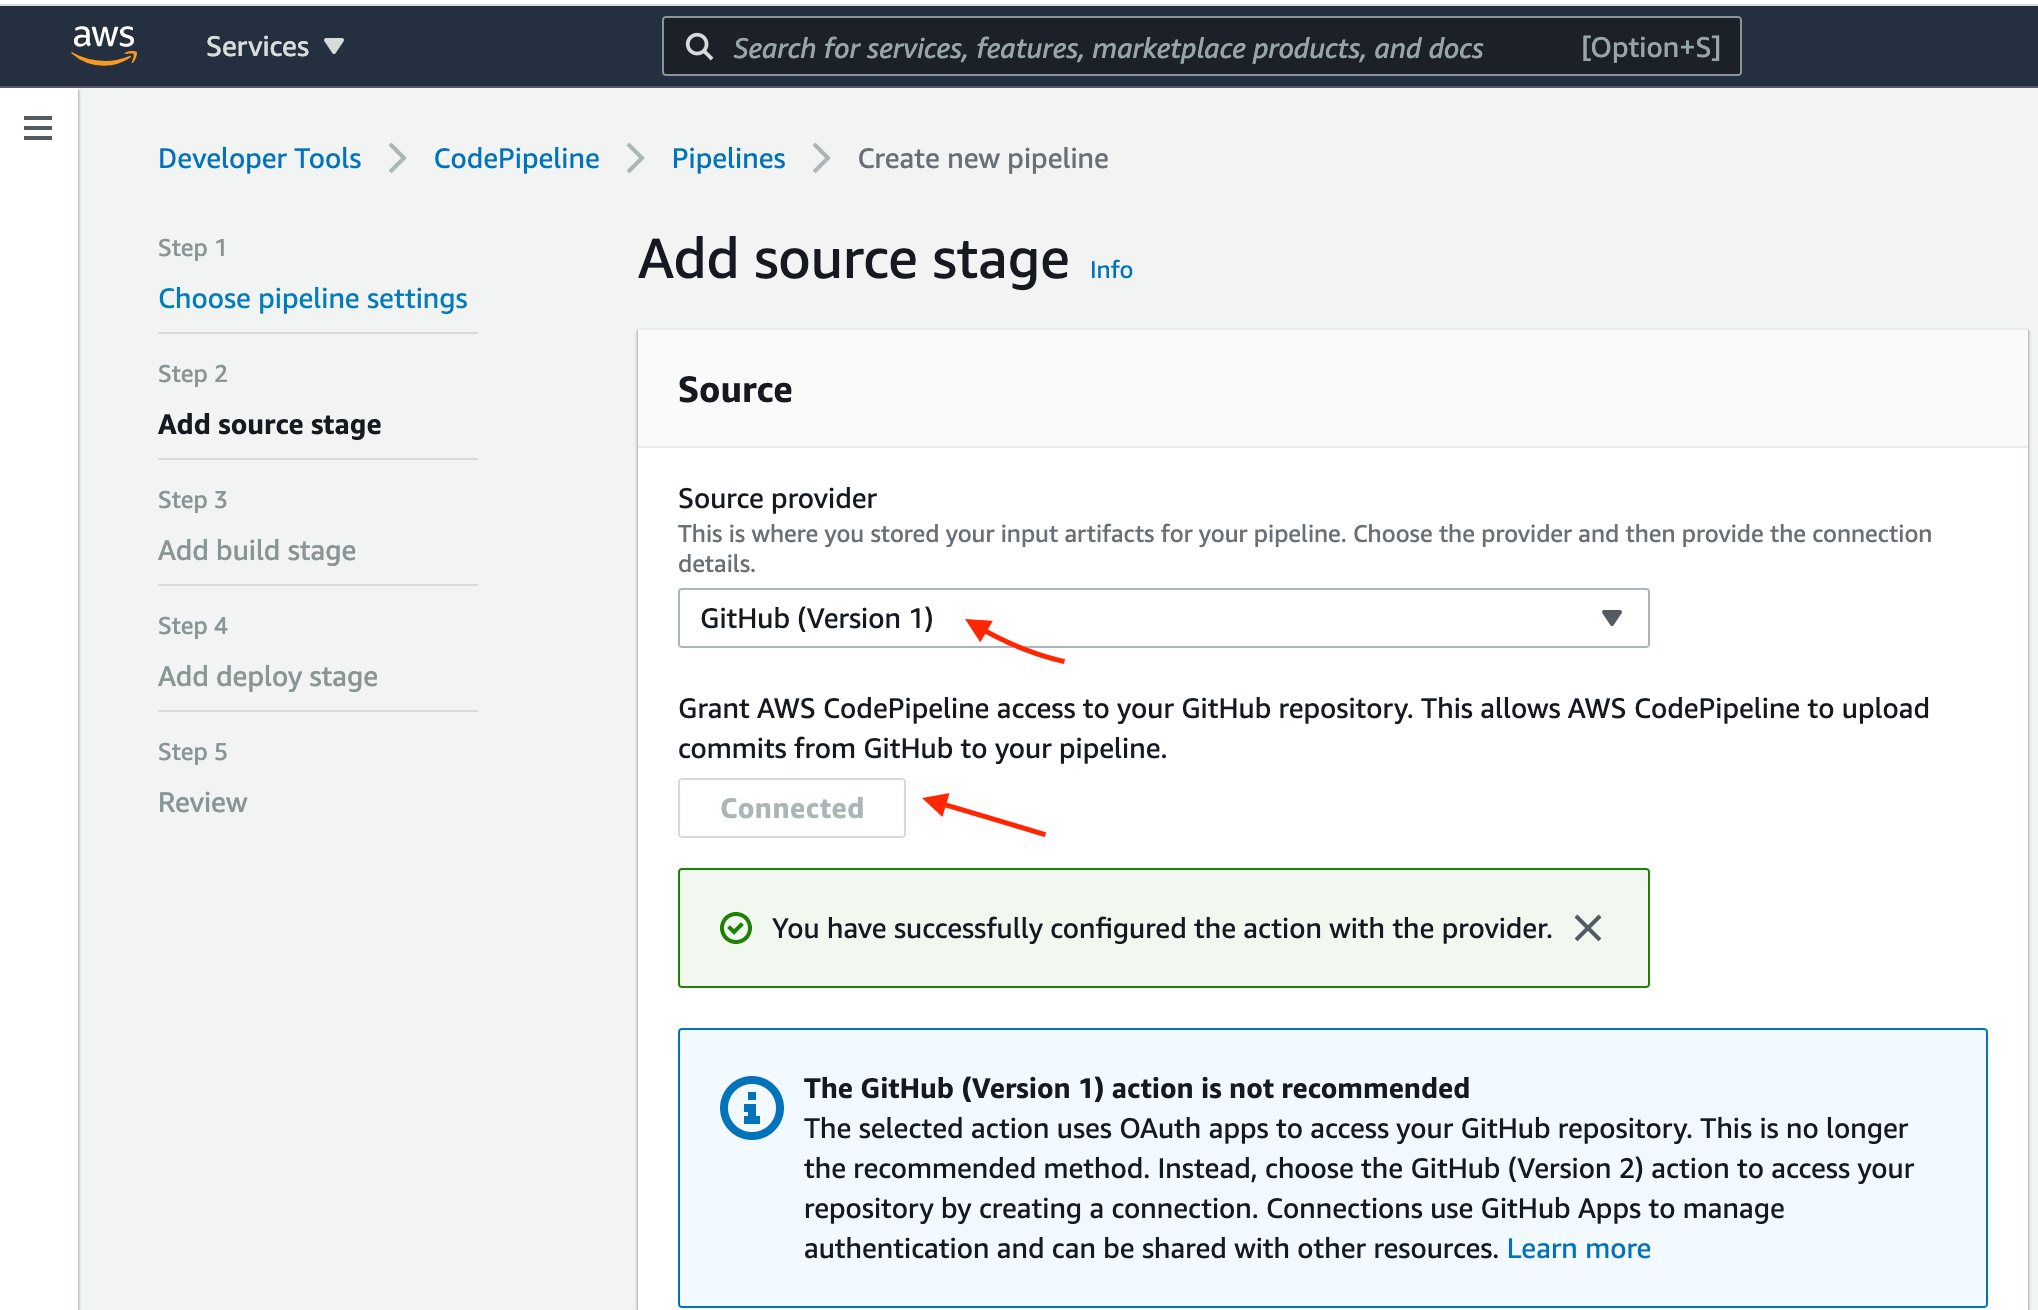
Figure 7: Add source stage
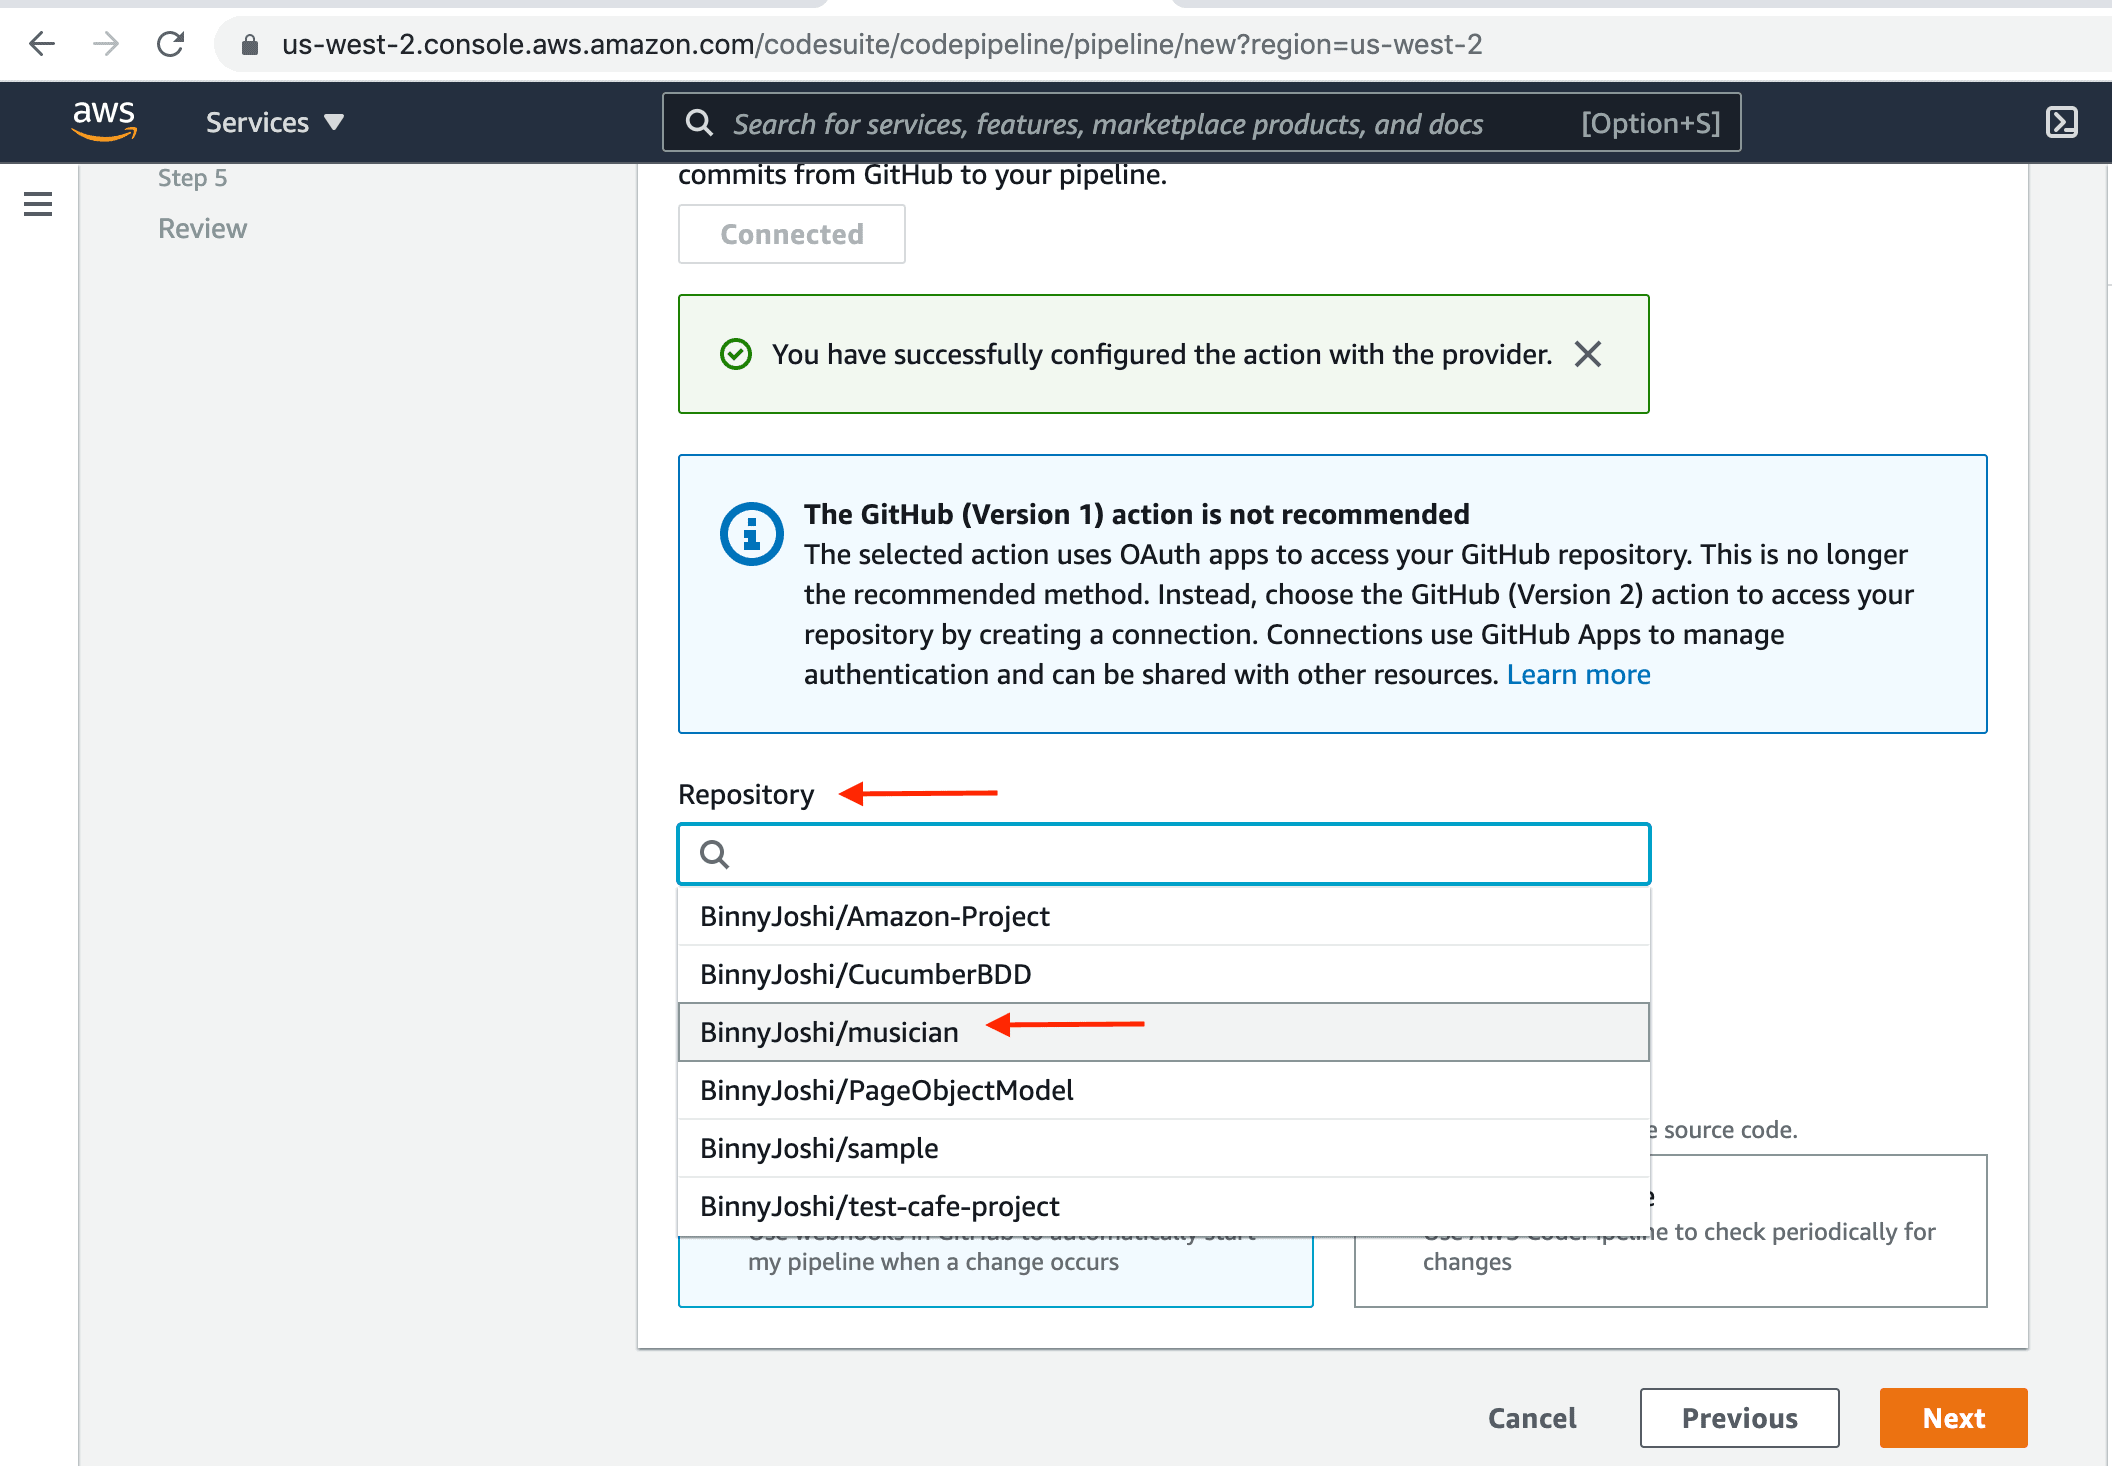
Figure 7.1 : Add source stage
- In repository choose the name of your repository where you committed your code ,example : BinnyJoshi/musician
- In Branch select the branch name where you want your pipeline to detect source code. Example: Master
- Choose GitHub webhooks, this will allow to trigger pipeline whenever there is any code changes to repository.
- Click on NEXT button.

Step 2 : Add Build stage
1 ) Skip Build Stage, click on “Skip” button.
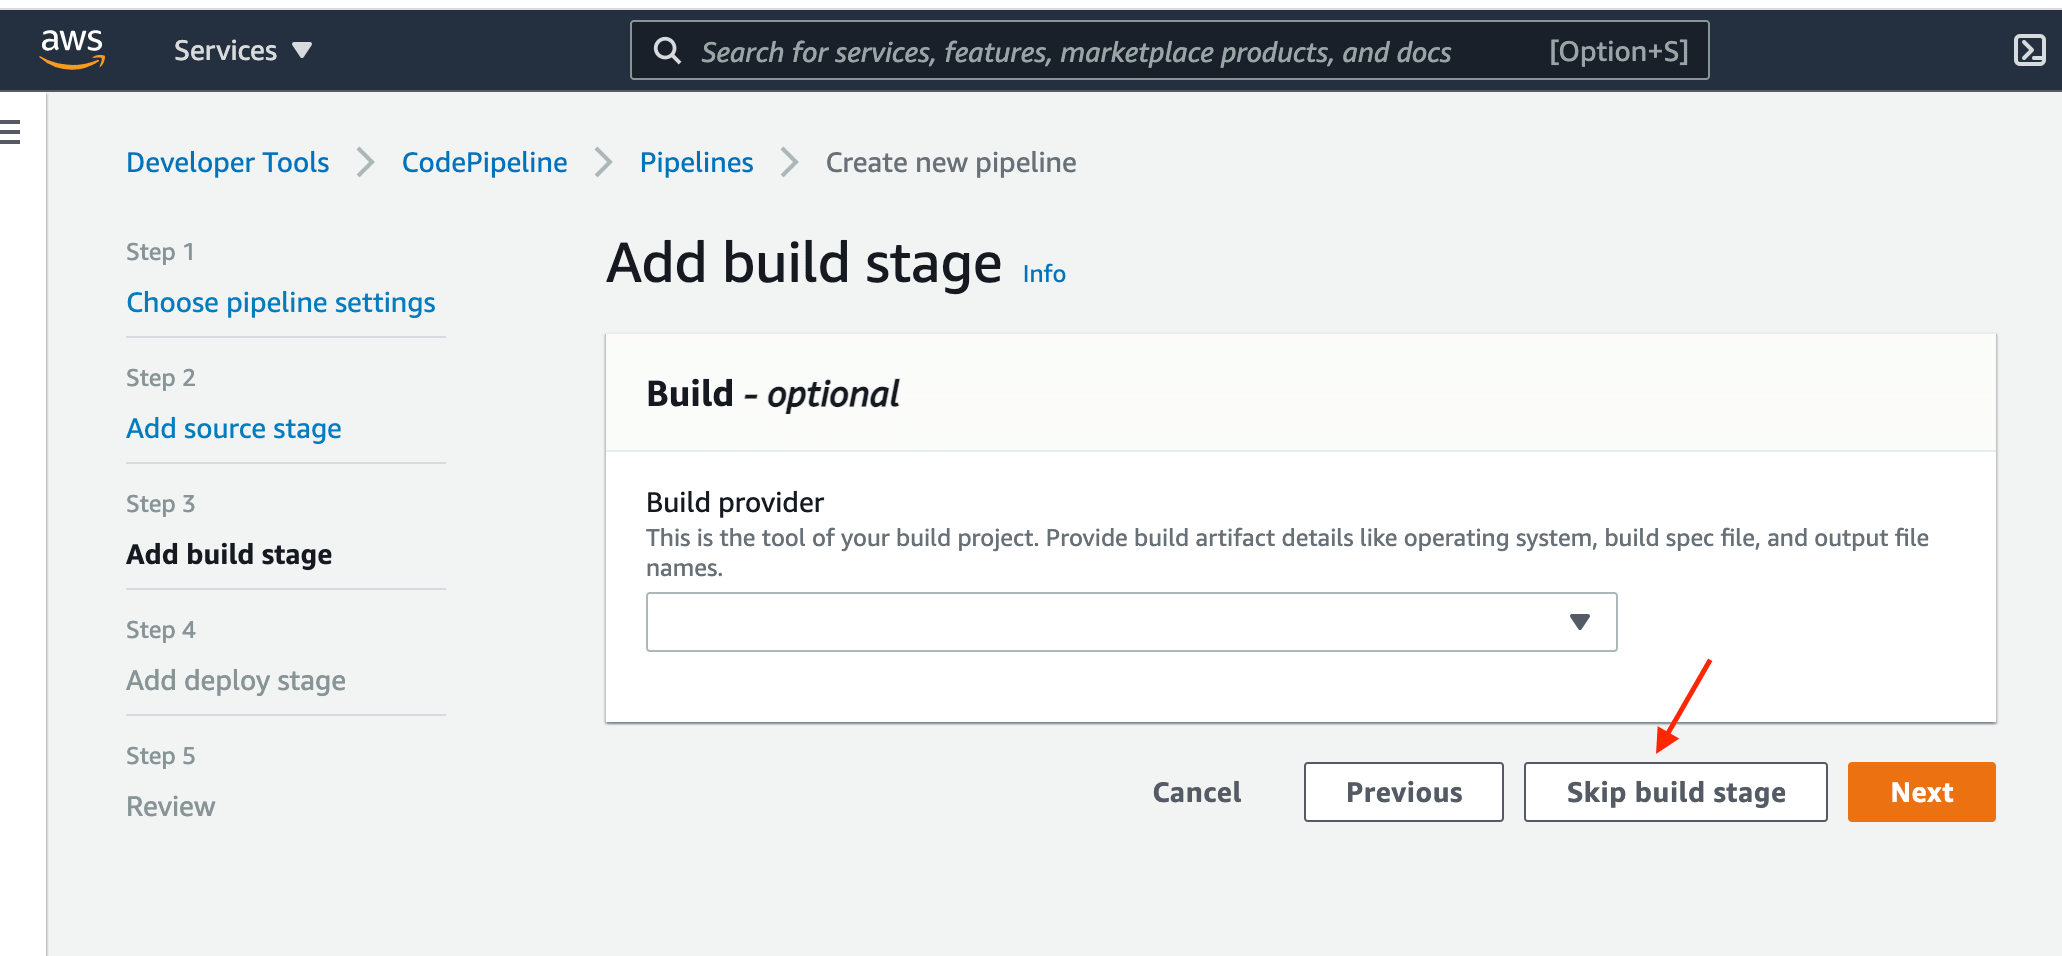
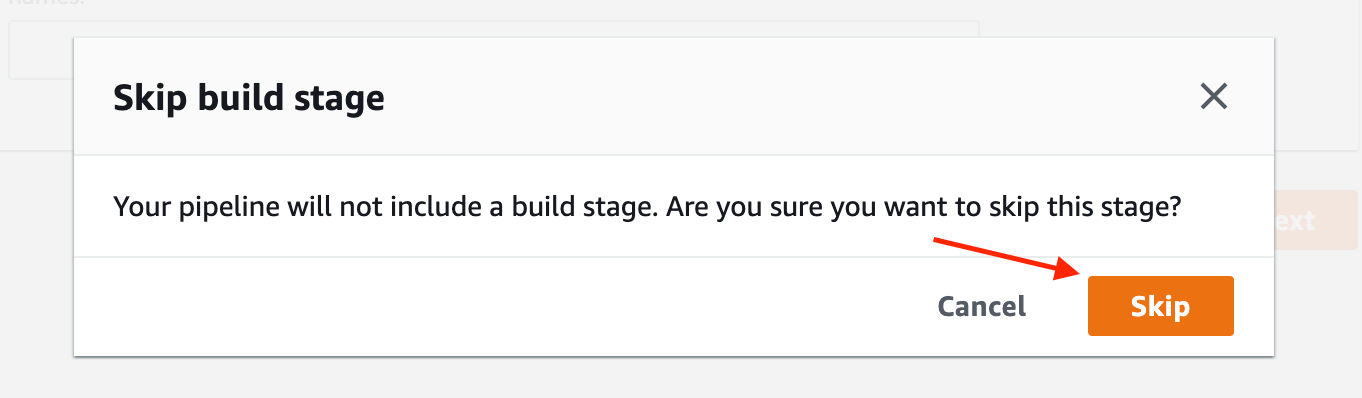
Figure 9: Add Build stage
Step 3 : Add Deploy Stage details
- In Deploy provider , choose AWS Elastic Beanstalk.
- In Region select the region where you have created your source code.
- In Application name enter or choose the name that you have already created on AWS Elastic Beanstalk console.
- In Environment name enter or choose the name that you already created on AWS Elastic Beanstalk console.
- Click “Next” button
- You will be directed to pipeline “Review page”.
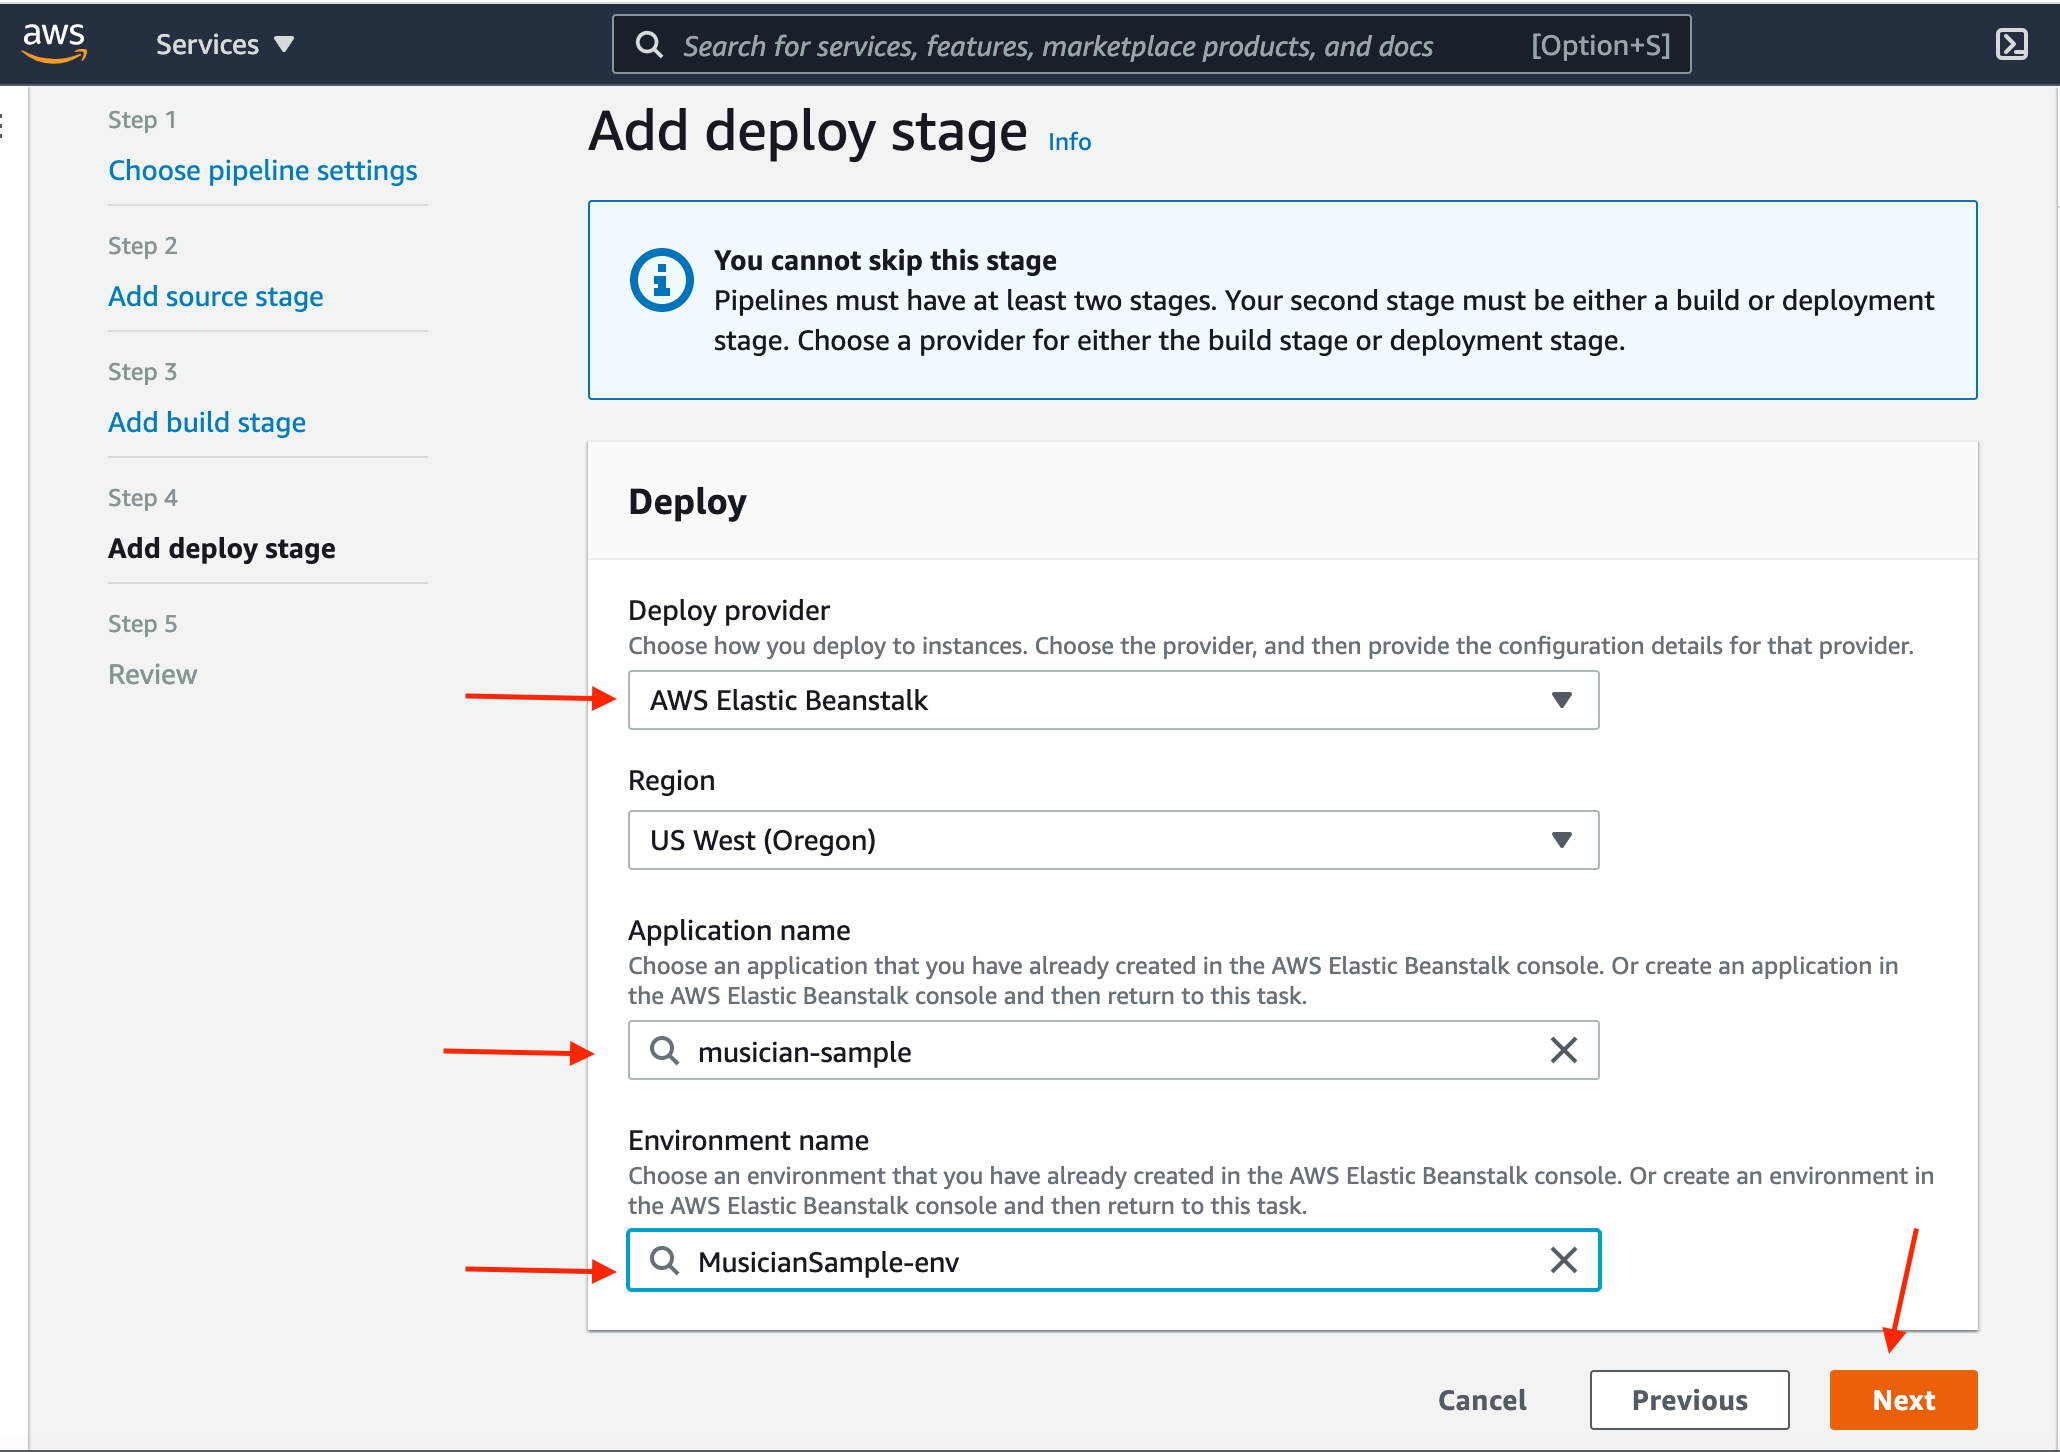
Figure 10: Add deploy stage
Pipeline Review page details – as shown in below figure:
- Pipeline Settings,
- Add Source stage
- Add Build stage
- Add Deploy stage
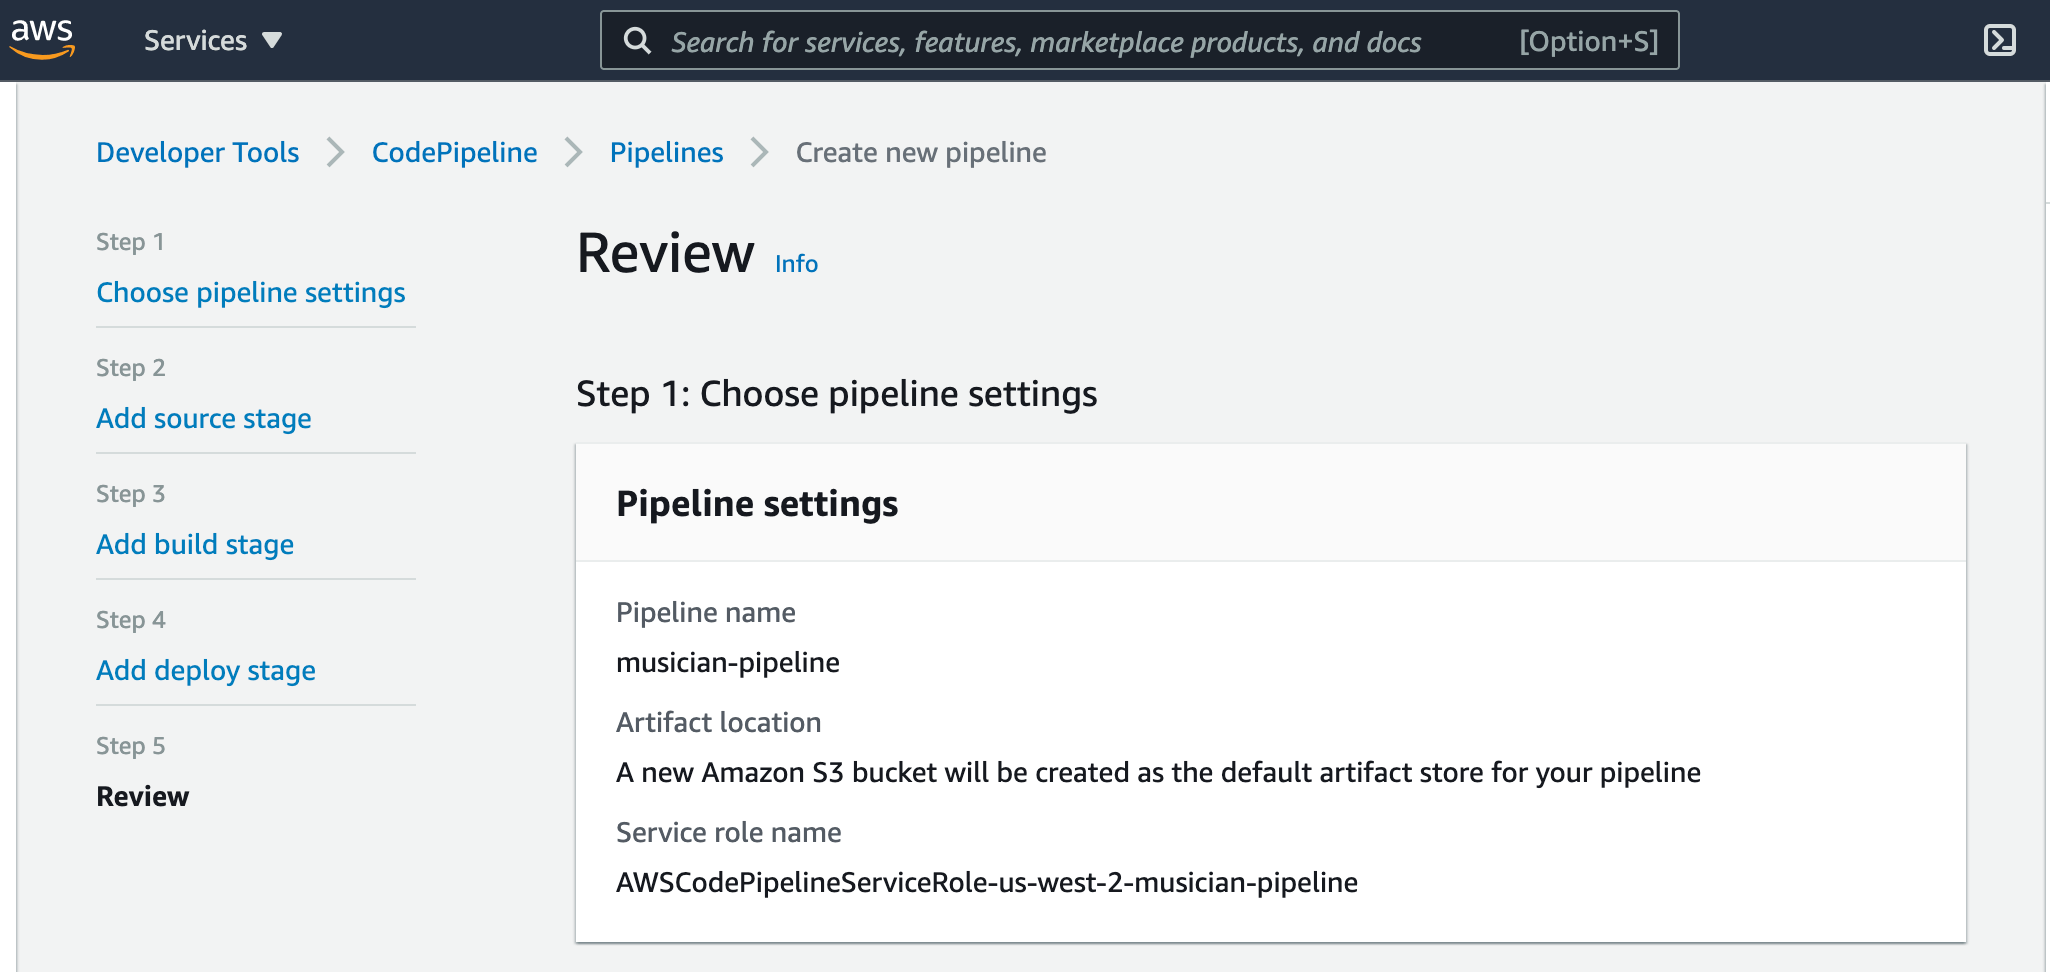
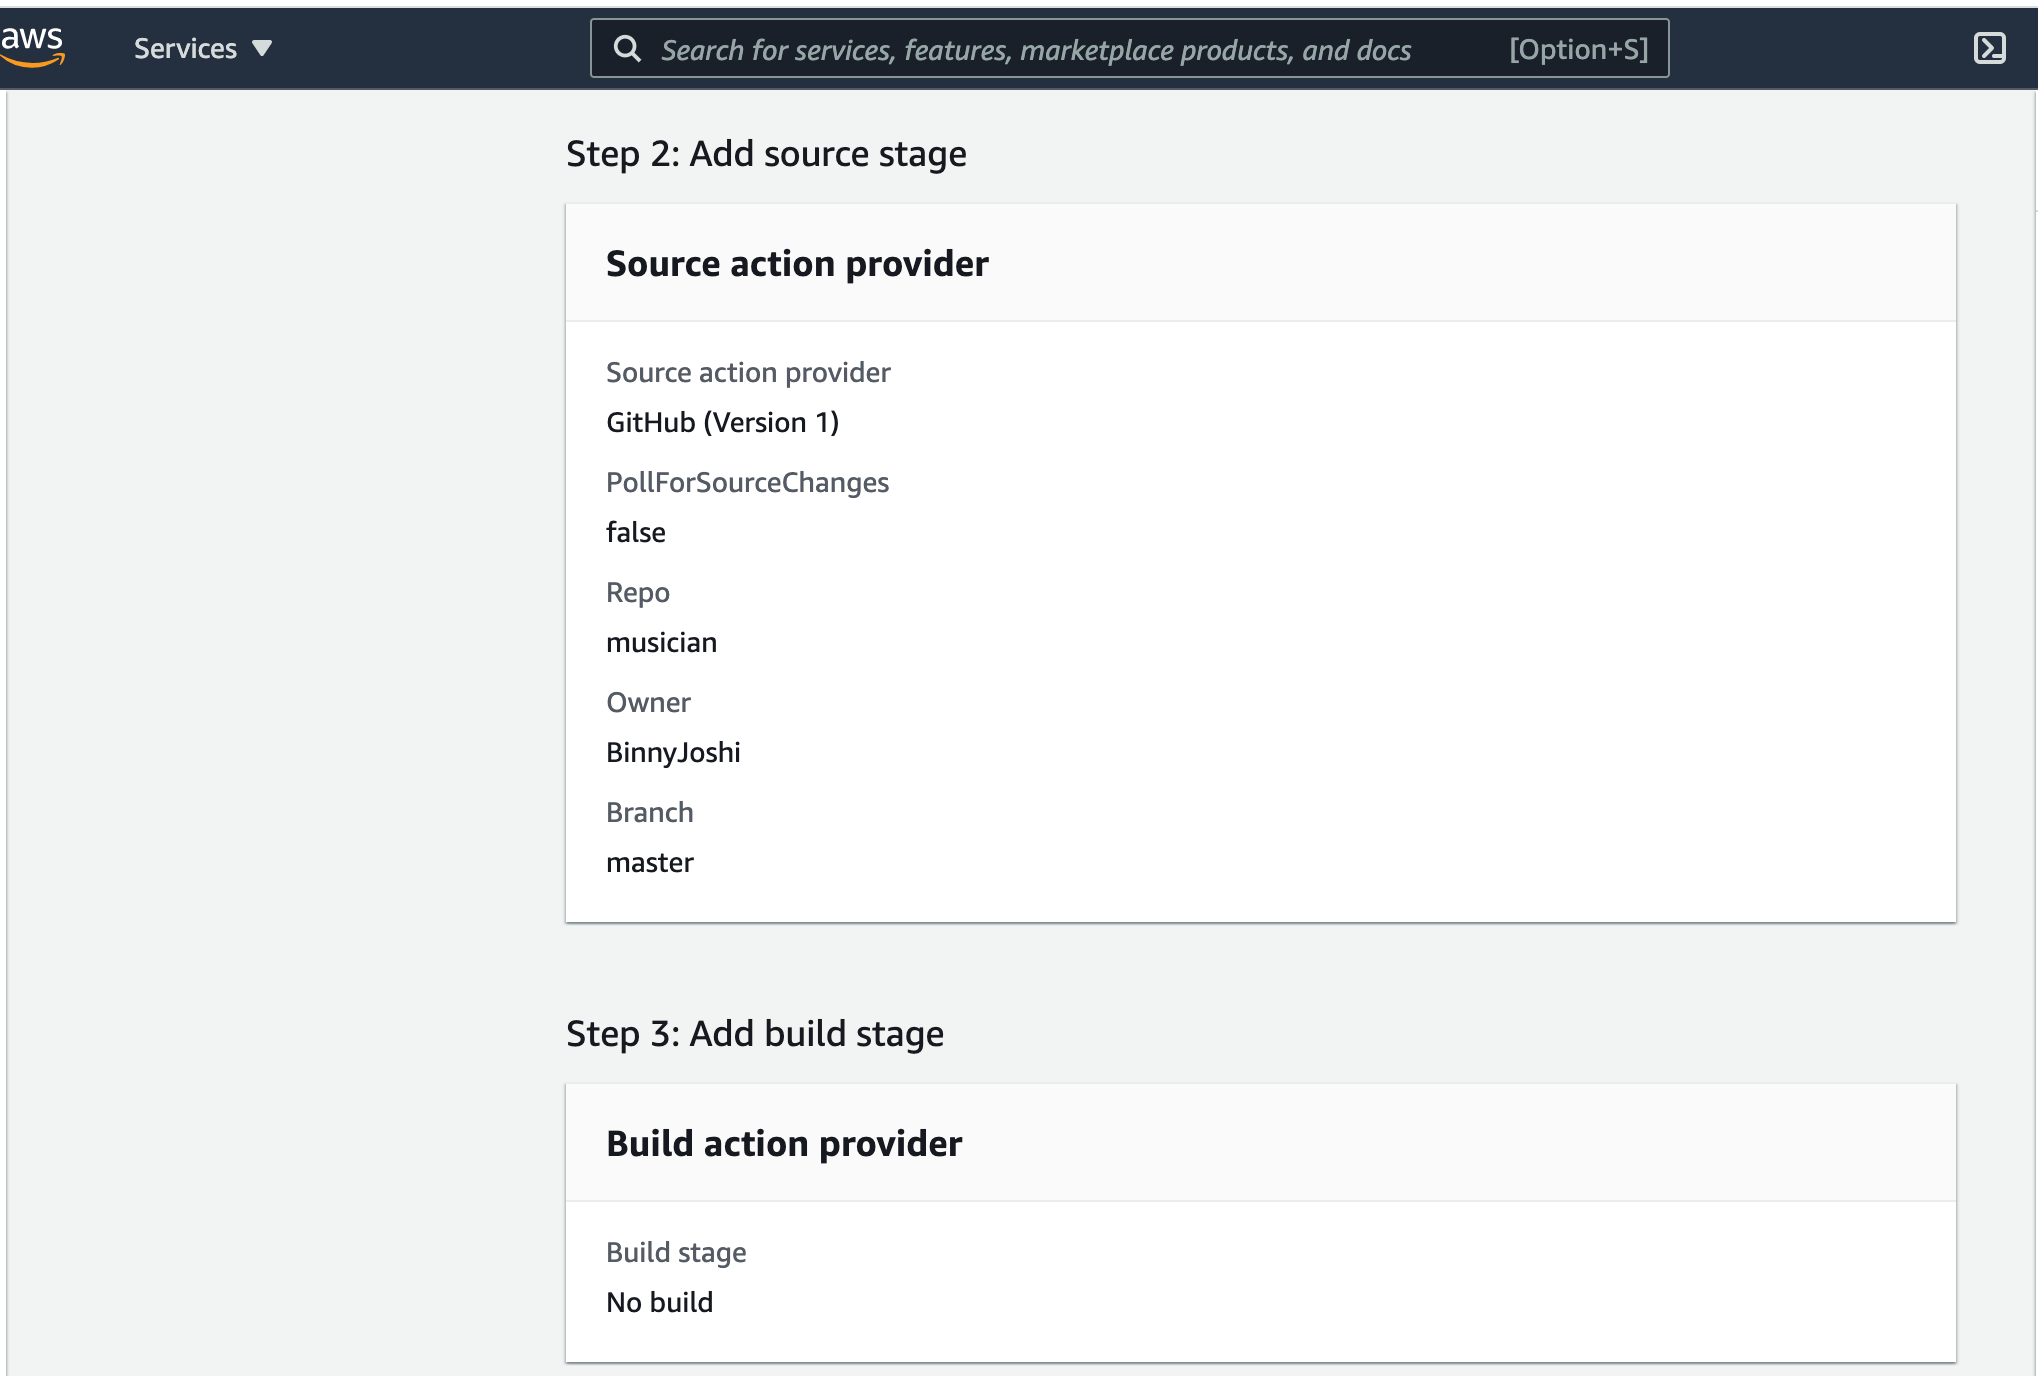
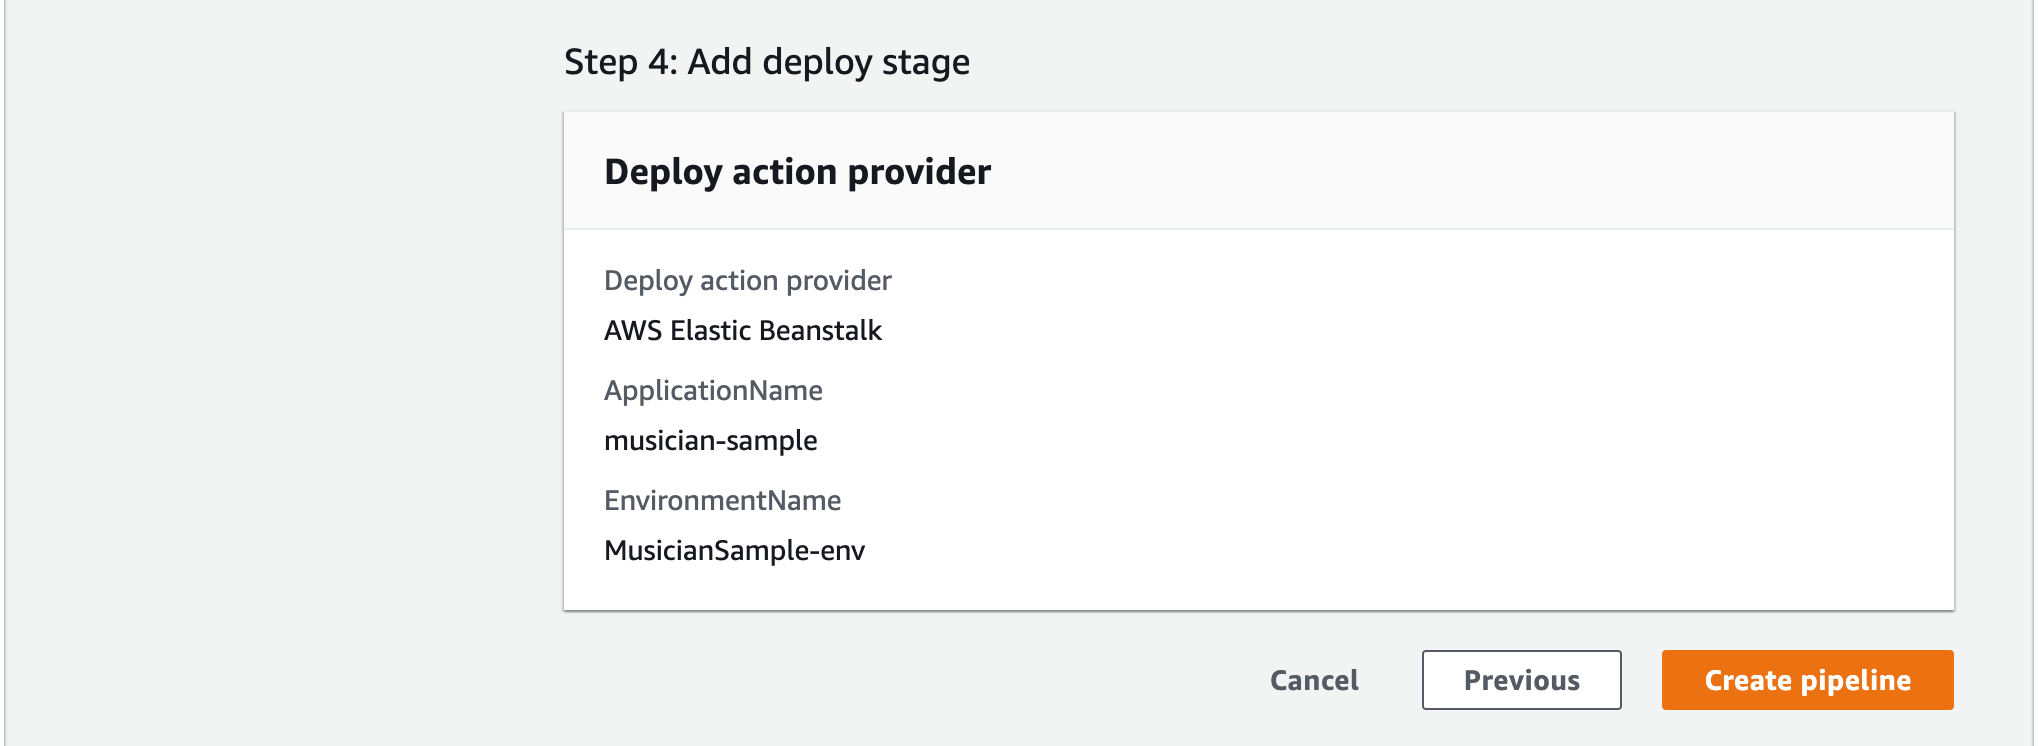
Figure 11: Review page
Click on “Create pipeline” button.
In the pipeline view, you will see the success message banner is displayed, and the build action continues until it is completed.
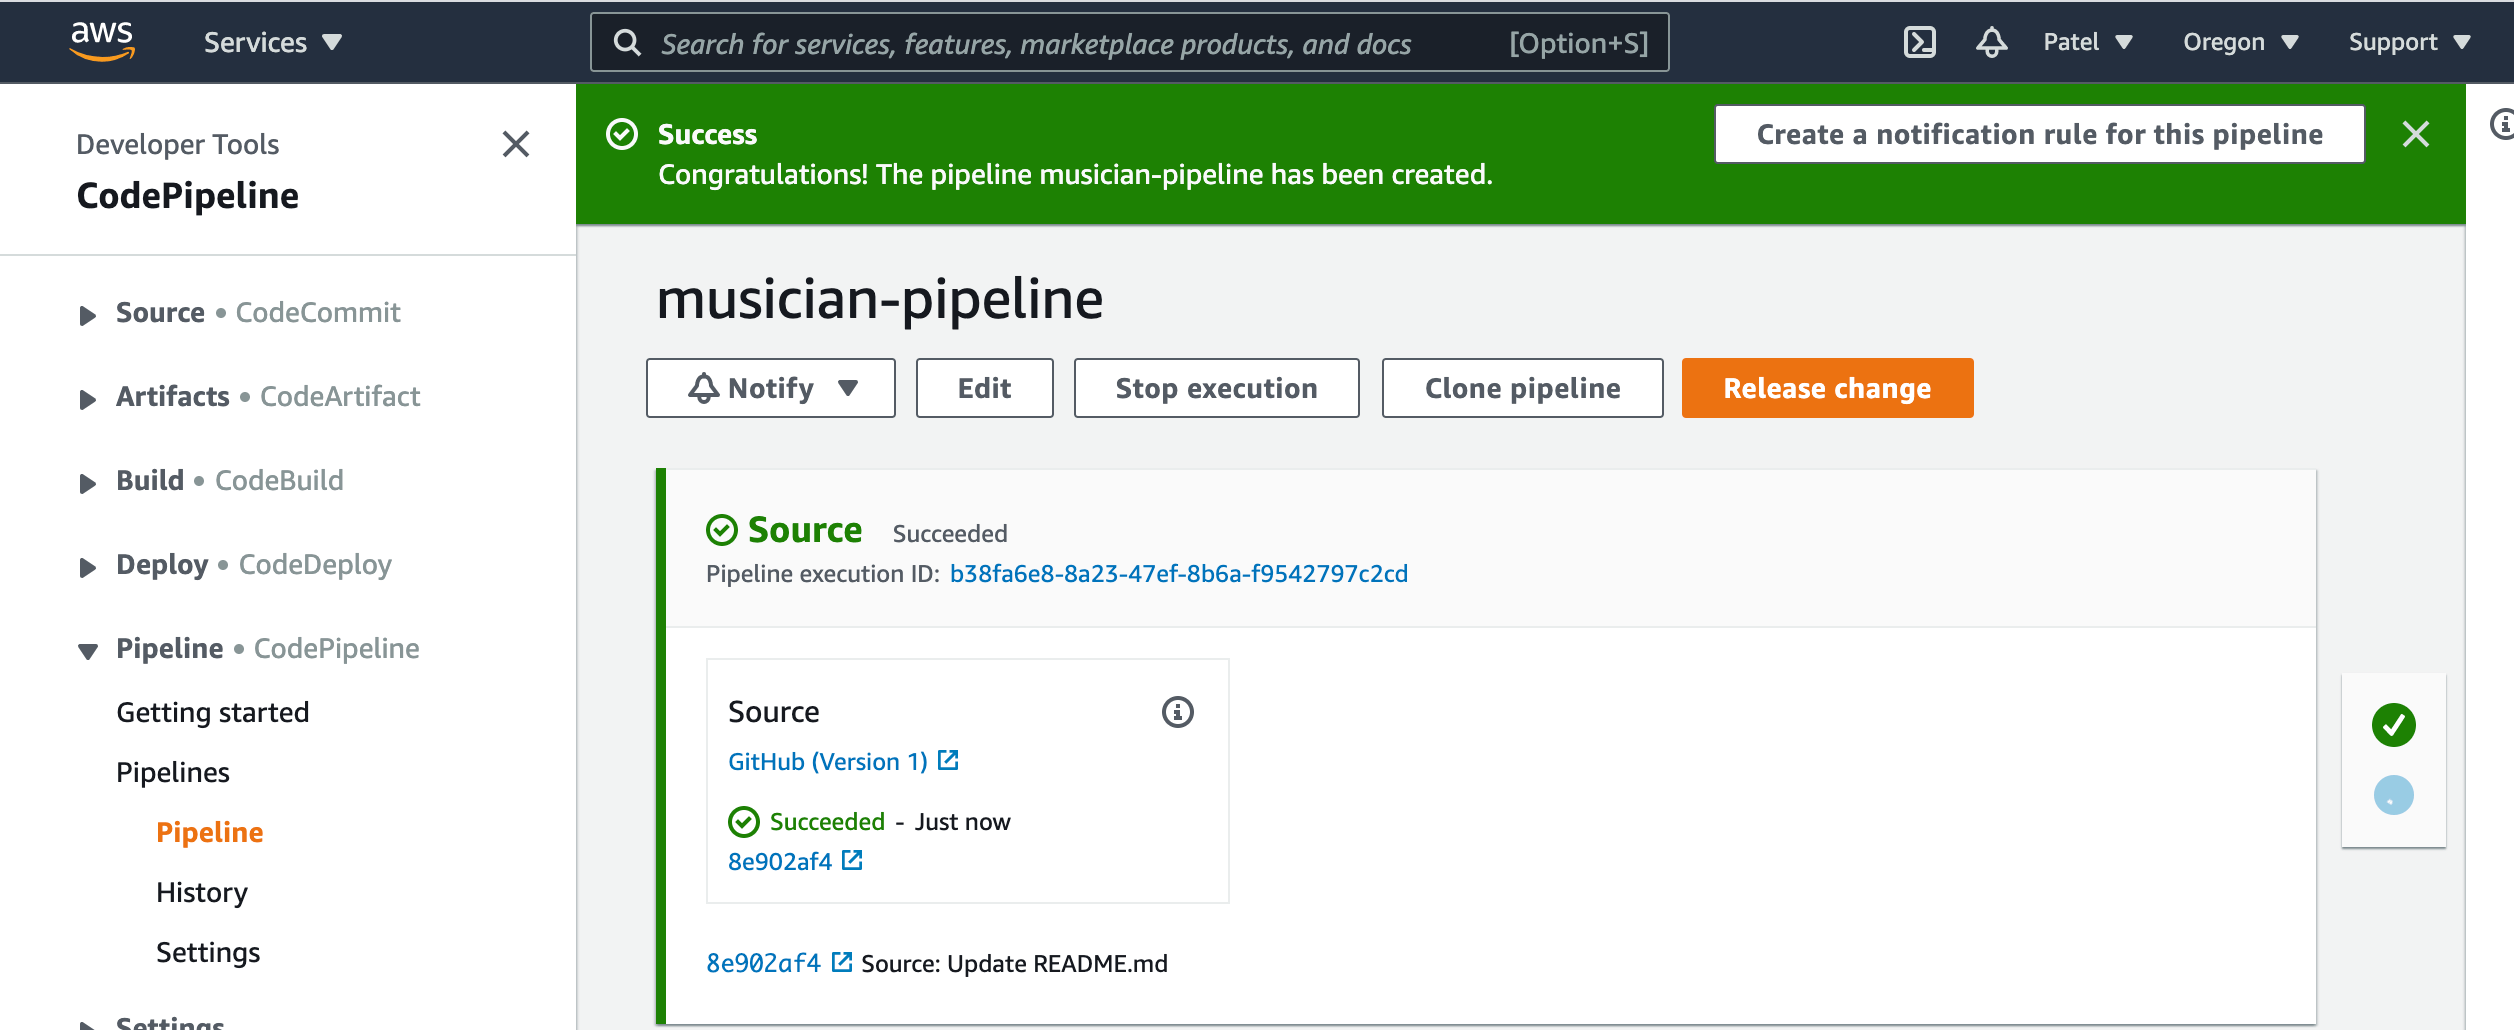
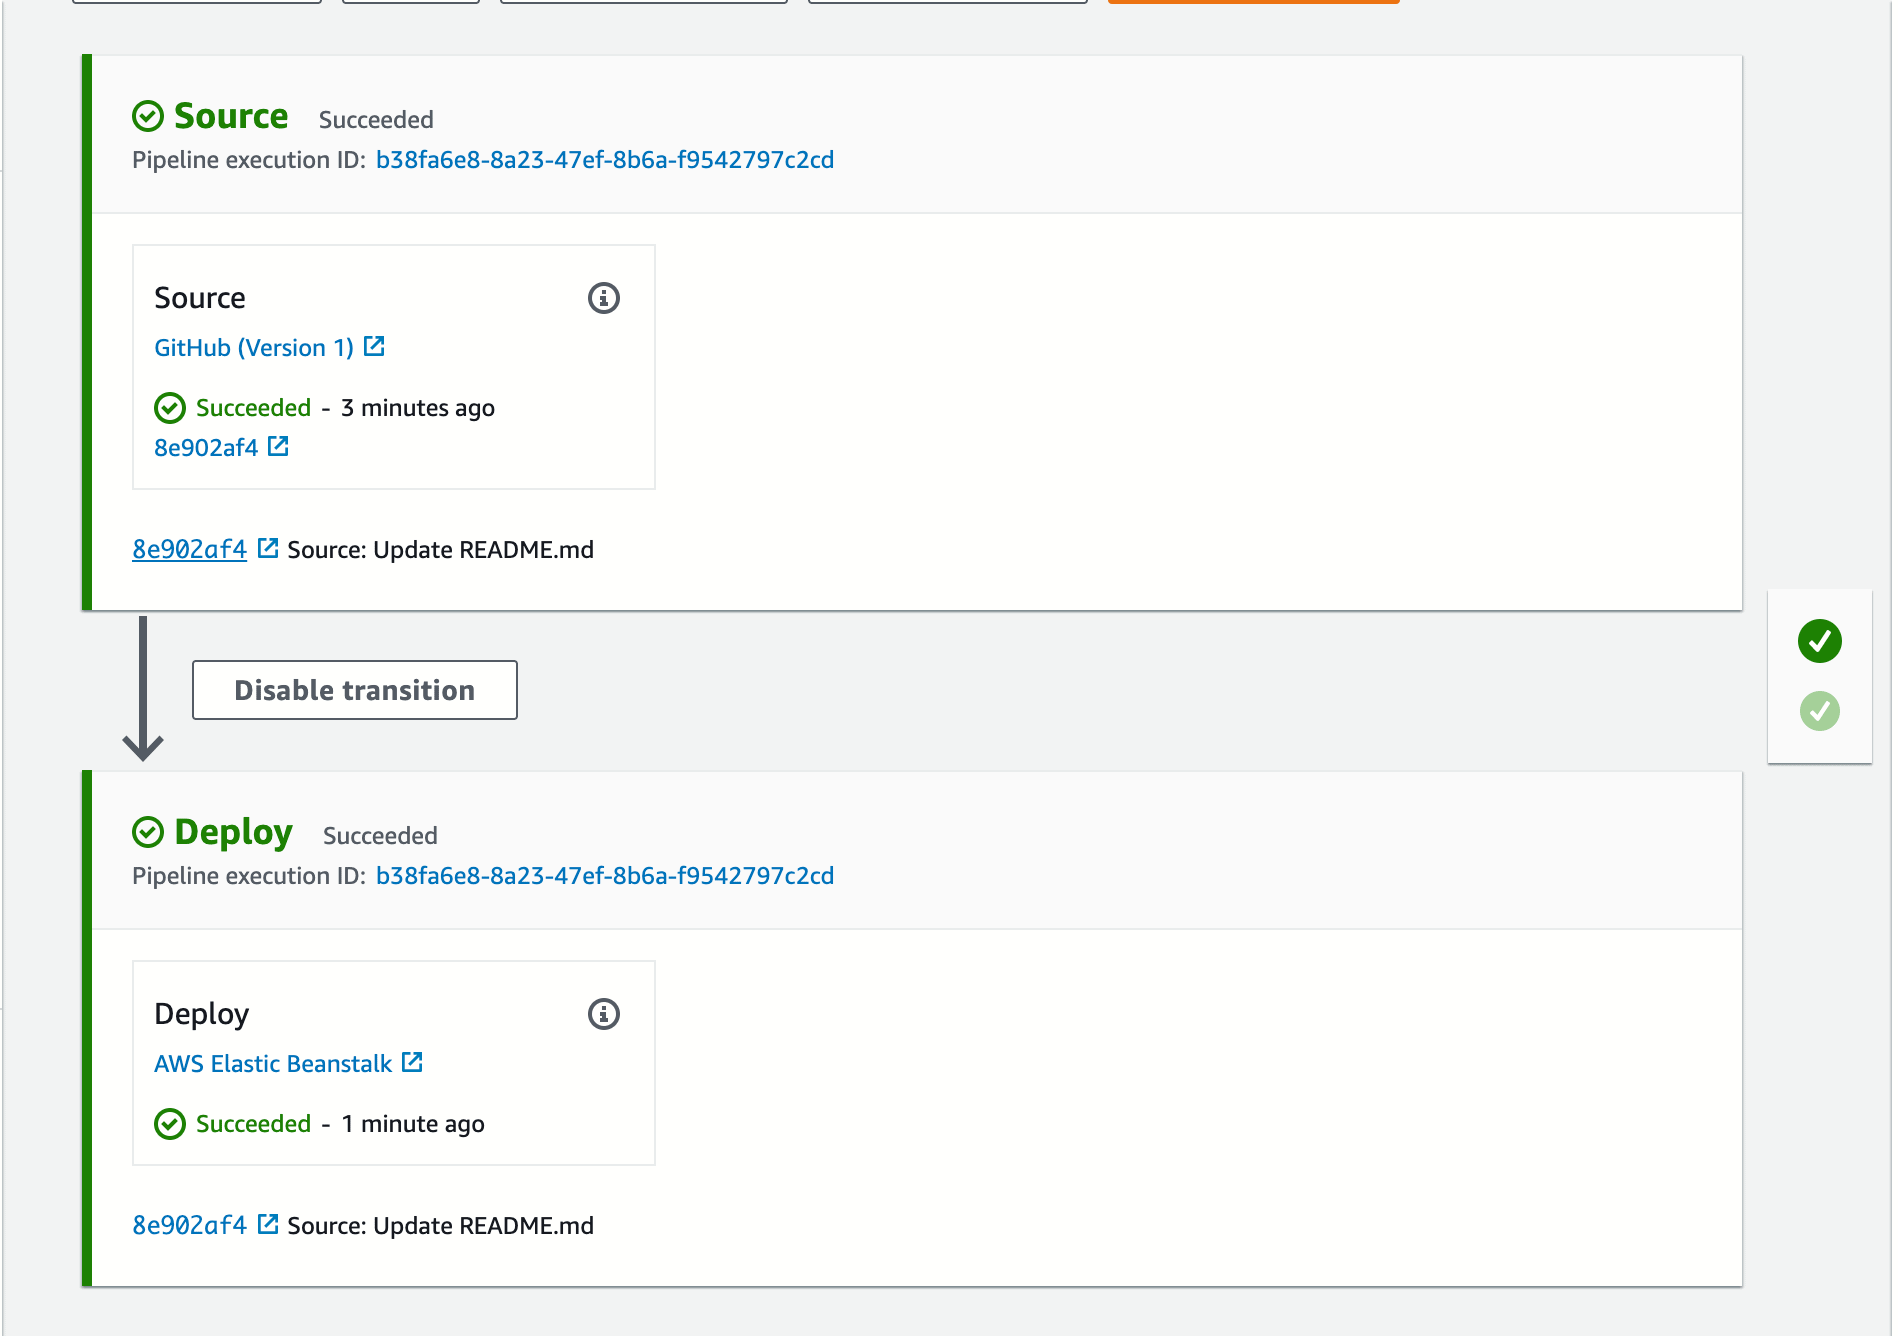
Figure 12: Pipeline View page
Delete Application
a) Login into AWS Account here and search for AWS Elastic Beanstalk service and open console.
b) Select “Applications” .
c) Find your application name and select that you want to delete .
d) Select “Delete Application” from Action drop-down.
e) Turn on Delete version and select “Delete “ and “Done”.

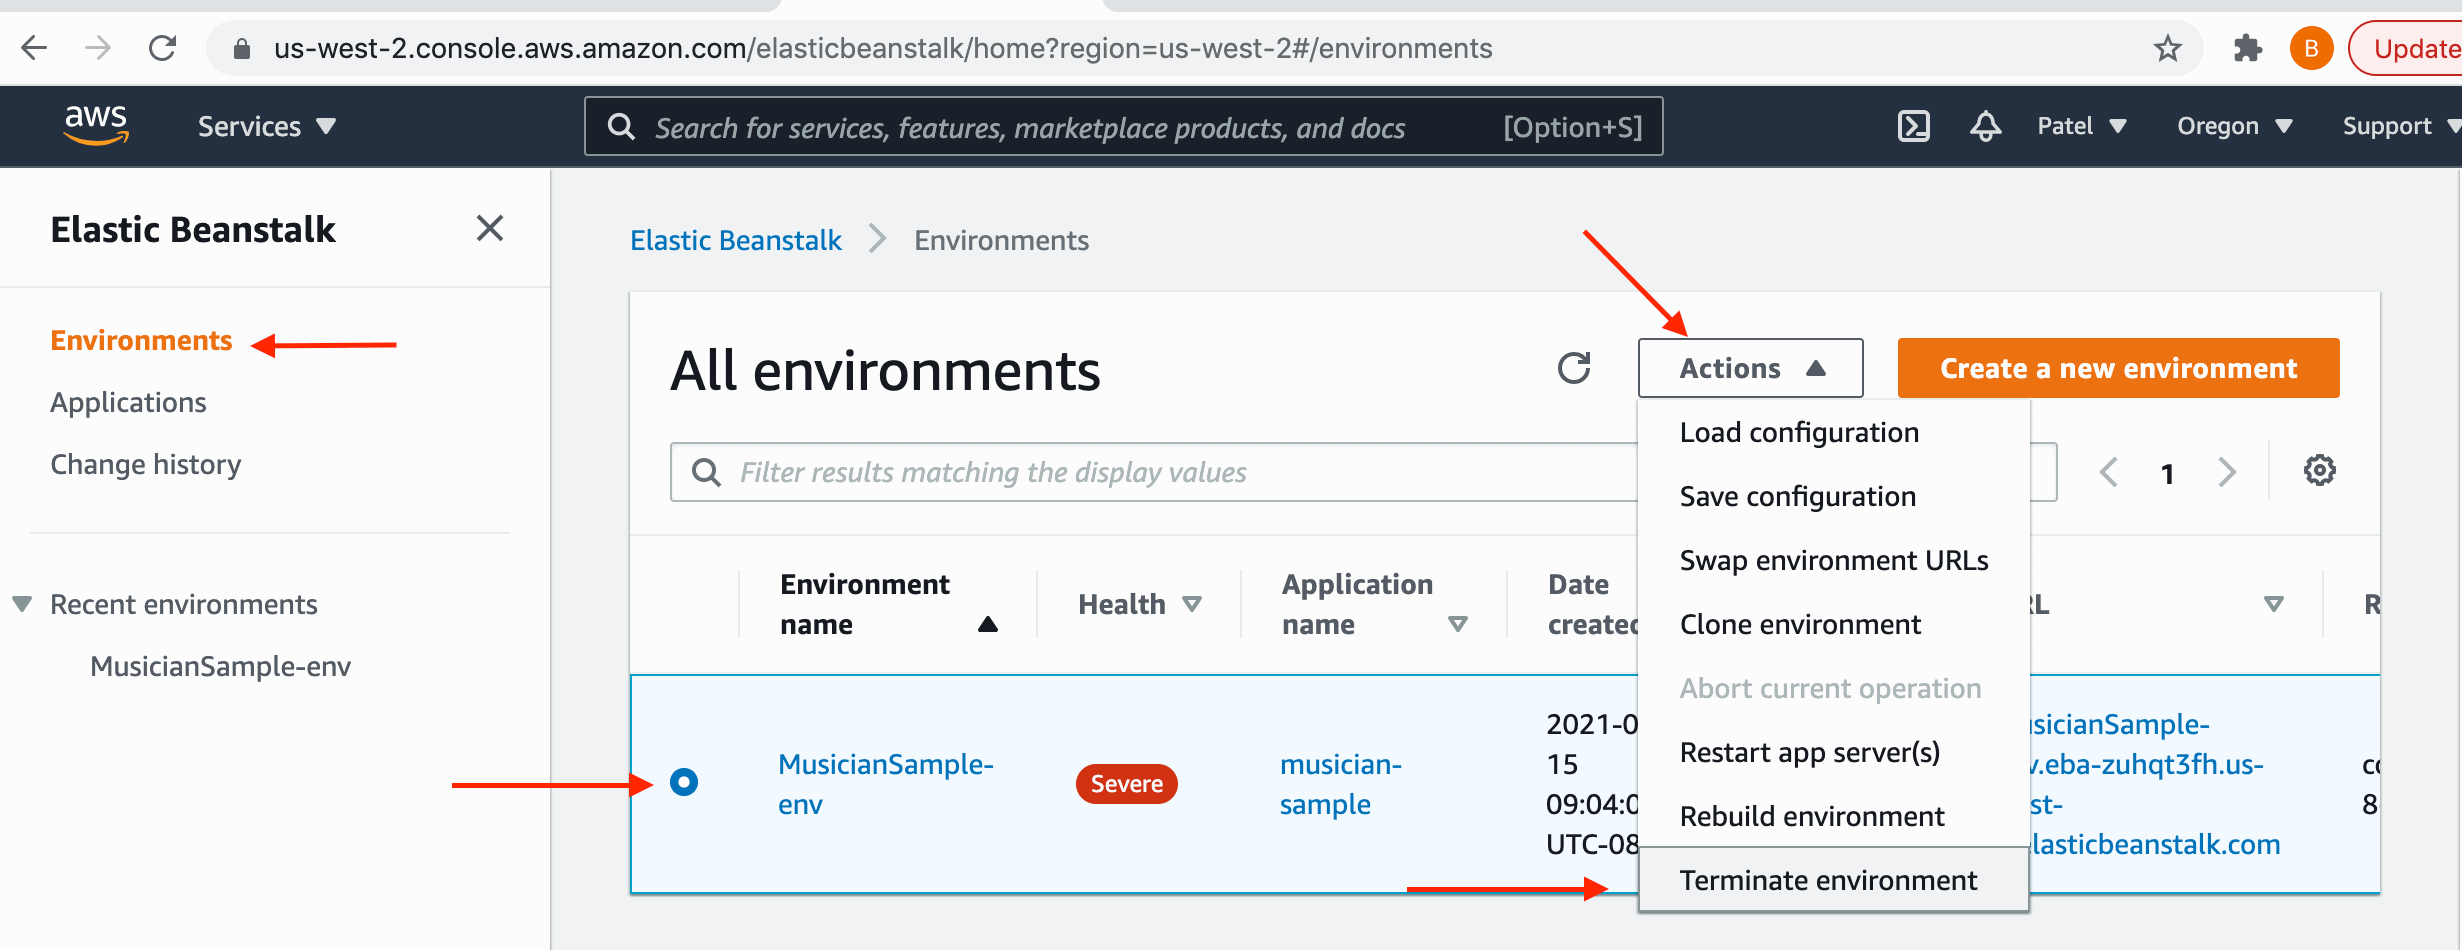
Delete Environment
- Login into AWS Account here and search for AWS Elastic Beanstalk service and open console.
- In the Navigation pane on left choose “Environments” .
- In the Navigation pane, find your Environment name that you want to delete.
- Click on Environment “Action” drop-down and choose “Terminate Environment” button.
- Type Environment name and than choose Terminate .
How to start Pipeline Execution ?
When a developer makes changes to there code and pushed to a repository , the configured pipeline will detect changes and start execution. you can either trigger this pipeline execution manually by staring your pipeline or it can be automatically executed.
CI/CD Process
Before we tend to get to automated deployment to Elastic Beanstalk, however, it’s vital to refine the CI/CD pipeline for the cloud surroundings. Elastic Beanstalk is meant from the bottom up to be sturdy and climbable, therefore you’ve got to adapt your pipeline to totally leverage the benefits offered by the cloud platform. For starters, you’ll be able to standardized the event and preparation surroundings. A pipeline run should not be allowed to switch the surroundings as a result of extra runs can face difficulties in adapting to the new changes. Instead, the runtime should keep your surroundings clean.
Quality assurance and security checks got to be components of the method. For the pipeline to own shorter cycles whereas remaining reliable, these tasks got to be embedded into the progress. You’ll be able to keep your cloud surroundings safe by integration security into development.
Last however never least, confirm reviews and checks are performed before preparation. Scripts got to be checked against famed attacks and malicious scripts databases to form certain that dangerous line of code never get to the assembly surroundings.
The last half is very important. You’ll be able to assemble Elastic Beanstalk to expect bound flags or configuration entires before deploying a replacement update. As for integration the pipeline itself, the method is fairly simple with the tools that are currently on the market.
Benefits of CI/CD pipeline
Software Release Process can be Automated:
Continuous delivery provides a technique for your team to check-in the code that’s technically designed, tested, and ready for unharness to production in order that your software delivery is resilient, rapid and secure.
Increased in the Productivity of Developers:
CI/CD practices enhance your team’s productivity by releasing developers from manual tasks, acting on advanced dependencies, and returning focus to delivering new options. Rather than desegregation their code with different components of the business and outlay time on a way to deploy this code to a platform, developers will specialize in coding logic that delivers the options you wish.
Improving Code Quality:
Continuous Delivery will assist you to discover and address bugs within the delivery method before they grow into bigger issues later. Your team will simply perform extra varieties of code tests as a result of the complete method has been machine-driven. With the discipline of a lot testing of the complete method that has been iterated quicker with immediate feedback on the impact of changes. This permits groups to drive quality code with high assurance of stability and security. Developers can understand through immediate feedback whether or not the new code works and whether or not any breaking changes or bugs were introduced. Mistakes caught earlier within the development phase are simplest to repair.
Faster Updates Delivery
CD helps your team deliver updates to customers quickly and regularly. Once CI/CD is enforced, the velocity of the complete team, as well as the discharge of options and bugs fixes, is accumulated. Enterprises will respond quicker to plug changes, security challenges, client desires, and value pressures. For example, if new security feature is needed, your team will implement CI/CD with automatic testing to introduce the fix quickly and dependably to production systems with high confidence. What accustomed take weeks and months will currently take days or perhaps hours.
View Progress:
You will be able to review current status of your running application, checks alerts, failed actions, read details regarding the supply revisions utilized in the newest pipeline execution in every stage, and manually rerun any pipeline.
View Pipeline History :
You will be able to read details regarding executions of a pipeline, together with begin and finish times, run period, and execution ID’s.
Challenges of CI/CD Pipeline:
Security
The orchestration tool employed by the team ought to have an efficient security model that would offer higher visibility into the state of the complete CI/CD pipeline for example , to spot the causes of check failure, the team would need to examine the results of the check section. However they ought to not lean permission to switch or disable the configuration of that check step.
Managing multiple CI/CD pipeline
It would be troublesome to investigate metrics like turnouts, sure-fire execution, and cycle time if each pipeline ends at completely different stages within the delivery method. It’s easier to manage an outsized set of CI/CD pipelines if every one is predicated on a regular example. This may facilitate in purposeful comparative coverage and it will offer helpful feedback to boost alternative pipelines.
Limited dedicated Environments
Restricted shared check environment will increase the risks of a bottlenecks during CI/CD pipeline implementation. You’d have to be compelled to reserve associate degree surroundings to avoid multiple CI/CD pipelines running aspect by aspect from making an attempt to deploy and check within the same surroundings. One among the leading causes of readying failures is misconfigured environments changed by previous groups or check runs.
Summary
Continuous Integration and Continuous Delivery together is the fast and effective process of getting your product in market as well as releasing new feature and bug fixes to keep your current customer happy.
References
https://aws.amazon.com/
Load comments