
How to Use the Coordinator Pattern in SwiftUI
When developing iOS apps with UIKit, many developers have used the Coordinator pattern to abstract away the connections between individual view components. This increases the reusability of view components (such as view controllers), reduces responsibilities of the frequently overcrowded UIViewController implementations and makes connections, such as transitions and data exchange, between view components more visible.
Implementing apps with the Coordinator pattern in UIKit is pretty straight-forward once you’ve understood the idea. (To further simplify the implementation, we introduced XCoordinator, a framework that provides tools to make coordinators and transitions as elegant and powerful as possible.) However, with SwiftUI released roughly two and a half years ago and maturing ever since, the question arises of how to use the Coordinator pattern with SwiftUI.
It turns out that it’s not as easy as replacing all the UIKit views (and view controllers) with their SwiftUI equivalents. That’s due to the fundamentally changed paradigms and the fact that views are no longer class objects, but short-lived instances of structs. In this article, we’re going to explore how we can implement the Coordinator pattern with declarative UI frameworks such as SwiftUI and then create a little sample app to showcase how the pattern can be applied. If you can’t wait to see how it works, here’s the link to our sample app repo upfront:
The Coordinator Pattern
The Coordinator pattern, as introduced to the iOS community by Soroush Khanlou in 2015, extracts transition logic between view controllers into separate components which we call coordinators. You can look at them as the “glue” between different scenes (view controllers or “screens”) since their job is to control the data flow between these scenes, define which kind of transition is performed on the basis of a certain event, and create new scenes.
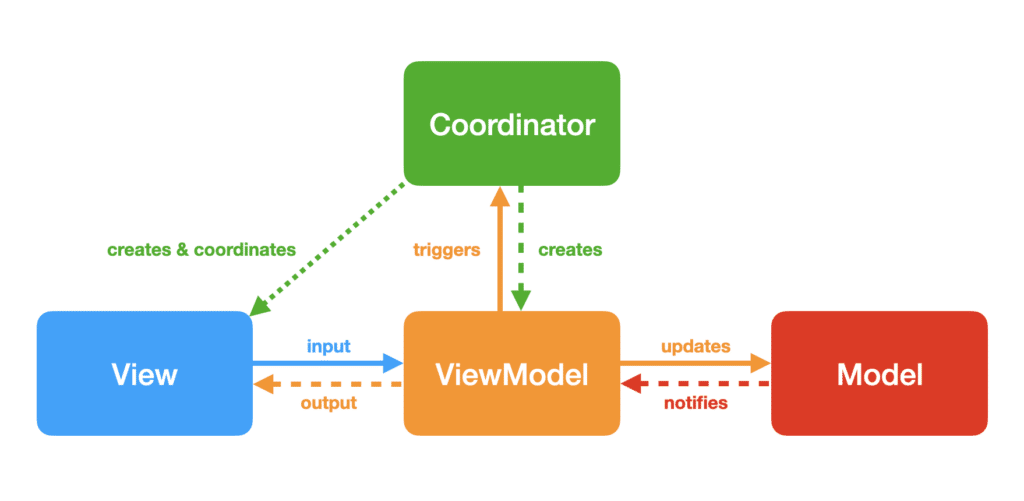
In conjunction with the MVVM (Model-View-ViewModel) architecture pattern, we get a clear separation of concerns between view components and business logic. As with other app architectures, Model components are built for persistence, networking, and calculation capabilities of an application. ViewModels prepare and forward the information retrieved from the Models to View components, which in turn define the user interface. In combination with the Coordinator pattern, we can use coordinators to exchange information between different view models and to define transition logic.
How SwiftUI is Different
How can we now make this work in SwiftUI? As mentioned in the introduction, we cannot simply use the same kind of structure as in UIKit. The reason is that SwiftUI follows a declarative approach. Rather than describing the process of how to build a user interface with long-living objects, we simply define what the view should look like on the basis of the current state of the app. Whenever that state changes, the view is recreated and the user interface is updated accordingly. Therefore, we can define a SwiftUI view as a function of the current state, or mathematically put:

Every time the state changes, a new view is created:

As a result, performing transitions in SwiftUI is not a simple method call as in UIKit, which makes it more of a challenge to adopt the Coordinator pattern. Instead, we need to think about what role our coordinators play in UIKit and how these individual responsibilities can be transferred to SwiftUI.
In UIKit, a coordinator has the following responsibilities:
- It controls a view’s context, i.e. whether it is used inside of a
UINavigationController, aUITabBarControlleror just as is. - It defines which transitions are performed when certain events occur, such as presenting a new view controller or pushing it onto the current navigation stack.
- It creates view controllers and manages the memory exchange between them (e.g. by creating new view models).
Now, let’s see how we can translate these responsibilities to SwiftUI!
A Coordinator in SwiftUI
We will be using an MVVM approach (quite similar to our MVVM approach in a previous blog post), so each view will have a corresponding view model conforming to ObservableObject, defining the view’s state. But here comes the crazy part: Not only will our views have view models – our coordinators will have view models, too!
A coordinator in SwiftUI consists of two components:
- a coordinator view,
- and a coordinator object.
The coordinator view is part of the view hierarchy and controls the transition logic and the overall view context of its child views. The coordinator view requires a coordinator object to create view models and allow communication between different scenes. Similar to coordinators in UIKit, we can have a reference to the coordinator from view models of child scenes and trigger transition events in the coordinator based on the business logic of the view models.
❓ Why do we split our coordinators into two parts?
In SwiftUI, we have two different responsibilities to be taken care of by a coordinator: A view’s context needs to be controlled by a View that is part of the view hierarchy. But we do not have control of a view’s lifecycle. This can be achieved easily with an ObservableObject. We can easily pass it around by reference and make it conform to the Identifiable protocol.
Coordinators in Practice
Now let’s see how that looks in practice! First, we’ll explore the general setup of a coordinator view with its companion coordinator object and then tackle individual transitions and their usage with this setup.
General Setup
We start with creating a simple SwiftUI view. It has an ObservedObject property as its coordinator object:
struct CoordinatorView: View {

    @ObservedObject var object: CoordinatorObject

    var body: some View {
        /* create the view based on the state of `object` */
    }

}
This CoordinatorObject object must therefore conform to the ObservableObject protocol.
class CoordinatorObject: ObservableObject {

    init() {
        /* setup object */
    }

}
In this setup, the CoordinatorView sets the general view context. It creates NavigationViews or TabViews, introduces sheets, popovers and NavigationLinks based on the object‘s state.
The coordinator object keeps its state in the form of @Published-wrapped properties. This state is mostly comprised of view models or context-related information, such as information needed to create a certain sheet or a popover. Some of these view models might have (weak or unowned) references to the coordinator object. Rather than acting on the coordinator object’s state itself, the coordinator object provides methods to be triggered when a certain event occurs.
Sounds a bit theoretical? “Sometimes you gotta run before you can walk”, so let’s have a look at some common user interface components to get a feeling for these new coordinators!
Developer as a Service: Extend the Developer Team of your Company
Do you need mobile engineers who care about good software engineering practices? Extend your existing team with our mobile engineers.
Contact us here for an initial consultation session.
🇩🇪 Quality Made in Germany 🇩🇪
NavigationView
Navigation Views are preferably created inside a coordinator view rather than a certain view itself. This allows for the view to be reused across different contexts without the need to change its code.
First, let’s have a look at the underlying logic and the state management:
class CoordinatorObject: ObservableObject {

    @Published var listViewModel: ListViewModel!
    @Published var detailViewModel: DetailViewModel?

    init() {
        self.listViewModel = ListViewModel(coordinator: self)
    }

    func open(_ item: ListItem) {
        self.detailViewModel = DetailViewModel(item: item, coordinator: self)
    }

}
This CoordinatorObject keeps track of the listViewModel (responsible for the master view) and an optional detailViewModel (responsible for the detail view). Whenever we call the open method, we create a new DetailViewModel and assign it to our detailViewModel property. Whenever this property is set to a non-nil view model, we intend to trigger a push transition. But that’s a job for our CoordinatorView!
❓ Why is listViewModel force-unwrapped?
Because its value depends on CoordinatorObject to be fully initialized. The listViewModel needs the coordinator itself when it’s created which can only happen after the CoordinatorObject is fully initialized. Once its created, it’s safe to be force-unwrapped, as long as we never explicitly set it to nil. Normally, we could use a lazy property for this purpose, but wrapped properties cannot be marked lazy.
Now, let’s create the corresponding coordinator view:
struct CoordinatorView: View {

    @ObservedObject var object: CoordinatorObject

    var body: some View {
        NavigationView {
            ListView(viewModel: object.listViewModel)
               .navigation(item: object.detailViewModel) { DetailView(viewModel: $0) }
        }
    }

}
All we do is that we wrap our existing ListView in a NavigationView and – as you might have spotted – add a navigation view modifier to the ListView. This is a custom view modifier we created specifically for the purpose of adding a new “page” (with the view we want to show) to the NavigationView. It’s used in a similar fashion as sheet and popover and uses a NavigationLink internally. If you’re interested in how it works, you can find its source code here.
We can now display a NavigationView and push new child views from the coordinator object, but we haven’t yet looked at the mechanism to trigger the push transition from the ListView. Let’s do that next!
struct ListView: View {
    @ObservedObject var viewModel: ListViewModel

    var body: some View {
        List(viewModel.items) { item in
            Cell(item)
                .onNavigation { viewModel.open(item) }
        }
    }

}
ListView shows a list of items. To get the same user interface as if we were using NavigationLink directly, we provide a custom onNavigation view modifier that performs a closure whenever an item is selected. In its closure, we call a method on our view model, that in turn forwards the call to the coordinator:
class ListViewModel: ObservableObject, Identifiable {

    @Published var items = [ListItem]()

    private unowned let coordinator: CoordinatorObject

    init(coordinator: CoordinatorObject) {
        self.coordinator = coordinator
    }

    func open(_ item: ListItem) {
        coordinator.open(item)
    }

}
As we’ve seen above, the coordinator will then change its state by creating a new view model and assigning it to its detailViewModel property. As a consequence, the push transition is performed.
❓ Why so complicated?
You might ask yourself why we should involve all these components to achieve the same goal which could have been done within a single view in SwiftUI. The reason is that we want to make our individual scenes (in this case ListView and DetailView) completely independent from their view context. For example, we want to be able to change the transition from to ListView to the DetailView to a sheet instead of a push transition – without actually touching the ListView. Further, we don’t want to create the DetailView‘s view model inside the ListViewModel as this would create a dependency between the two and complicate testing a lot. Now, we can simply replace the CoordinatorObject to easily change all creations of view models in this part of the app.
TabView
Tab Views are quite easy to understand… so, let’s just get straight to the code and start with the CoordinatorObject:
enum CoordinatorTab {
    case one
    case two
}

class CoordinatorObject: ObservableObject {

    @Published var tab = CoordinatorTab.one
    @Published var tabOneViewModel: TabOneViewModel!
    @Published var tabTwoViewModel: TabTwoViewModel!

    init() {
        self.tabOneViewModel = TabOneViewModel(coordinator: self)
        self.tabTwoViewModel = TabTwoViewModel(coordinator: self)
    }

    func switchToTabOne() {
        self.tab = .one
    }

}
Again, we have different view models and a tab property inside the coordinator object and keep them wrapped in @Published-property wrappers. We can switch tabs by simply making an assigning to the tab property, as you can see in the switchToTabOne method. But one question still remains: How does the view make use of these properties? It’s quite simple:
struct CoordinatorView: View {

    @ObservedObject var object: CoordinatorObject

    var body: some View {
        TabView(selection: $object.tab) {
            Tab1View(viewModel: object.tabOneViewModel)
                .tabItem { /* ... */ }
                .tag(CoordinatorTab.one)

            Tab2View(viewModel: object.tabTwoViewModel)
                .tag(CoordinatorTab.two)
                .tabItem { /* ... */ }
        }
    }

}
Since we do not want to let Tab1View and Tab2View know about their view context, we add tag and tabItem in the coordinator view as well, rather than their body properties.
Sheets & Popovers
By now, you should be familiar with our pattern – and it’s the same for sheets and popovers. We first create an observable CoordinatorObject with the respective view model and a method to trigger the sheet (or the popover):
class CoordinatorObject: ObservableObject {

    @Published var sheetViewModel: SheetViewModel?

    func openSheet(_ info: SheetInformation) {
        self.sheetViewModel = SheetViewModel(info: info)
    }

}
Just as NavigationViews, sheets and popovers are created with view modifiers:
struct CoordinatorView: View {

    @ObservedObject var object: CoordinatorObject

    var body: some View {
        Text("Hello, World!")
            .sheet(item: $object.sheetViewModel) {
                SomeSheet(viewModel: $0)
            }
    }

}
Especially in the case of popovers, the placement of these view modifiers (in this case the .sheet modifier) is especially crucial as it defines the source view of the popover (i.e. where its arrow is pointing at). Thus, it needs to be created inside the scene view itself.
There are two ways to handle such a situation:
- We inject the coordinator object into the view, wrapped as an
@ObservedObject– just like we do it in a coordinator view. This way, the view can observe the coordinator’s state and trigger the popover whenever the corresponding property is set. - We inject a view modifier into the view to be used in the place where the popover should be. This is a bit more tricky, which is why we won’t explain this approach in detail in this article. However, if you are an experienced developer, feel free to check out our solution in our example application.
For many SwiftUI developers (especially beginners), the first solution is probably much easier, but it creates a dependency from a scene view to its coordinator, which is precisely what we try to avoid with coordinators. That’s why we definitely recommend using the second solution, if you feel comfortable with it.
⚠️ Note:
Do not try to get access to the coordinator’s state via a scene’s view model – we tried and failed to make this work in a reasonable fashion.
Let’s bring it all together!
We have now seen that our approach to implementing the coordinator pattern with SwiftUI certainly works in many different scenarios and already supports the most commonly used transitions and view contexts in iOS. For the purpose of this blog post, we have experimented with a sample application, which we want to share with you!

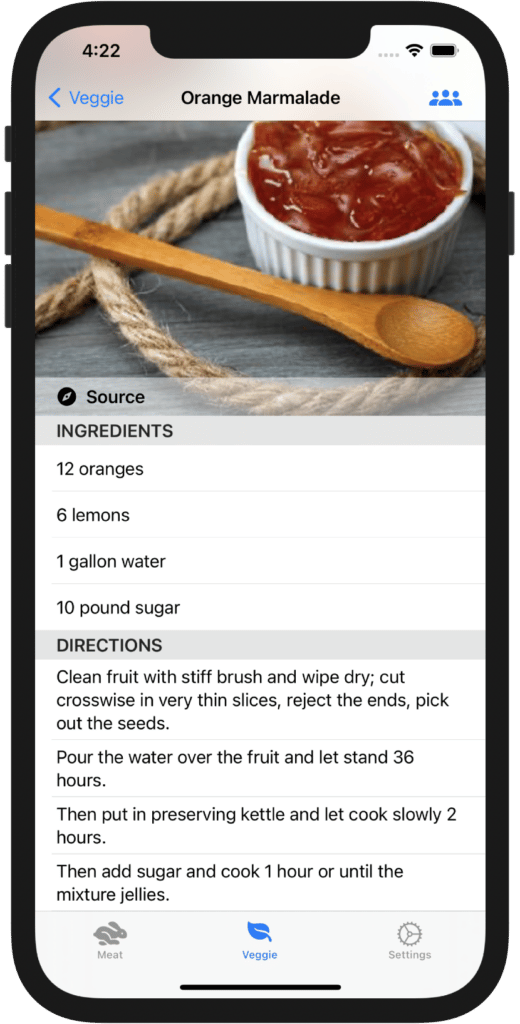
It’s a simple app for displaying recipes. Vegetarian and non-vegetarian recipes are shown in different tabs. By selecting a specific recipe in a tab, you can view its ingredients below a photo of the meal, followed by the instructions to prepare it. From this detail screen, you can also have a look at reviews from other users. For each recipe, if available, you can also open a sheet containing the source (a URL) of the recipe. (We didn’t create these recipes ourselves but “stole” them from publicdomainrecipes.org. Sorry to disappoint you… 😉)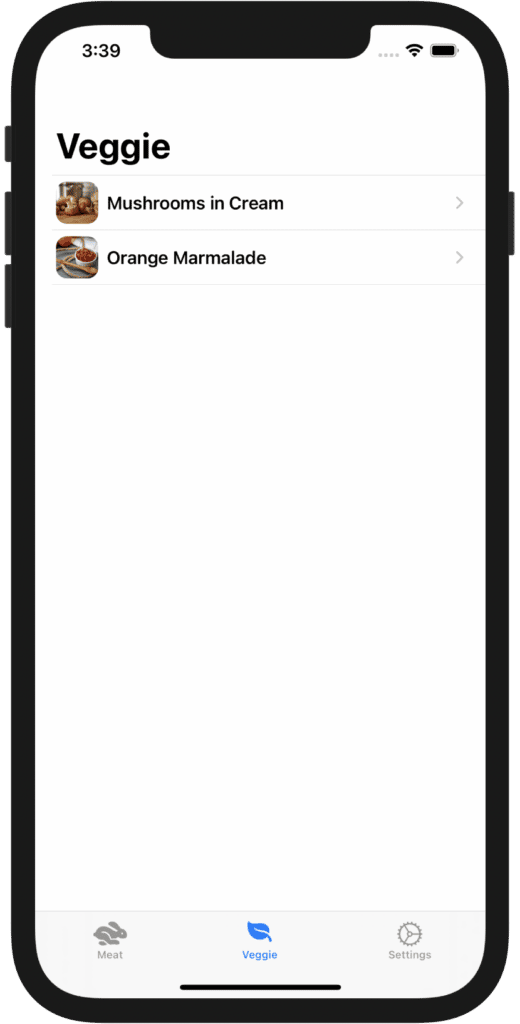
To give you a little insight into this sample app, we want to end this article by showing you the code for the app’s HomeCoordinatorView, which brings all these different kinds of view contexts into one single coordinator:
struct HomeCoordinatorView: View {

  @ObservedObject var coordinator: HomeCoordinator

  var body: some View {
     TabView(selection: $coordinator.tab) {

        RecipeListCoordinatorView(coordinator: coordinator.meatCoordinator)
          .tabItem { Label("Meat", systemImage: "hare.fill") }
          .tag(HomeTab.meat)

        RecipeListCoordinatorView(coordinator: coordinator.veggieCoordinator)
          .tabItem { Label("Veggie", systemImage: "leaf.fill") }
          .tag(HomeTab.veggie)

        NavigationView {
          SettingsView(coordinator: coordinator)
        }
        .tabItem { Label("Settings", systemImage: "gear") }
        .tag(HomeTab.settings)

      }
      .sheet(item: $coordinator.openedURL) {
        SafariView(url: $0)
          .edgesIgnoringSafeArea(.all)
      }
  }

}
In the example app, we also demonstrate how to use multiple coordinators and how to connect them. It’s actually quite similar to how we create and connect view models, which is why we don’t explain it in detail here. In a production app, we would advise you to use a separate coordinator for each flow containing closely-connected scenes inside a specific view context (for example one coordinator per NavigationView or TabView).
Here’s the repo for our freely available Coordinators sample app:
Discussion
As we have seen in this article, it is definitely possible to bring the Coordinator pattern to SwiftUI. In some views, using this pattern can complicate the view code – but it also enforces a clean and organized app architecture with clear responsibilities, and coordinators to keep these distinct components connected. Of course, one could argue that these coordinators are simply scenes with view models and view components without business logic out with fewer responsibilities. However, they do serve a completely different purpose, which might not be obvious at first glance.
The Coordinator pattern reduces direct dependencies between scenes and allows us to abstract transition logic and the creation of view models into coordinator objects with corresponding coordinator views. In the setup explained in this article (and showcased in our sample app), we heavily rely on concrete classes of view models and coordinator objects, so these dependencies are only hidden away, but still exist. However, a generic, protocol-oriented approach that abstracts the concrete coordinator object implementations would eliminate those dependencies.
What’s also important to note is that with coordinators, we can drastically speed up the integration of deep links in our app. From the coordinator hierarchy, we have access to all the view models and can adapt their state according to these kinds of actions without requiring large modifications of the app. This is a big win if we want the app to open specific scenes when the user taps on a notification.
With SwiftUI bugs becoming less dramatic over time and the right architecture at hand, you can easily build complex, powerful applications with declarative code. We are eager to see your take on SwiftUI app architectures!
Developer as a Service: Extend the Developer Team of your Company
Do you need mobile engineers who care about good software engineering practices? Extend your existing team with our mobile engineers.
Contact us here for an initial consultation session.
🇩🇪 Quality Made in Germany 🇩🇪
