


Spring came out in 2003 to tackle the complex Java enterprise spec, J2EE. With building blocks for the web, JSON, validation, concurrency, and more, it quickly became the go-to framework for building production-grade apps. But flexibility and robustness came with a price: a vast ecosystem and an unsavory amount of XML.
Favoring convention over configuration and sensible assumptions, Spring Boot came to life in 2013. It stripped away the XML bloat and made it ridiculously easy to get started. Today, it remains one of the most popular JVM frameworks around, with companies like Netflix using it to power their backend.
Stick around, and you'll see its simplicity and power first-hand.
What You Will Build
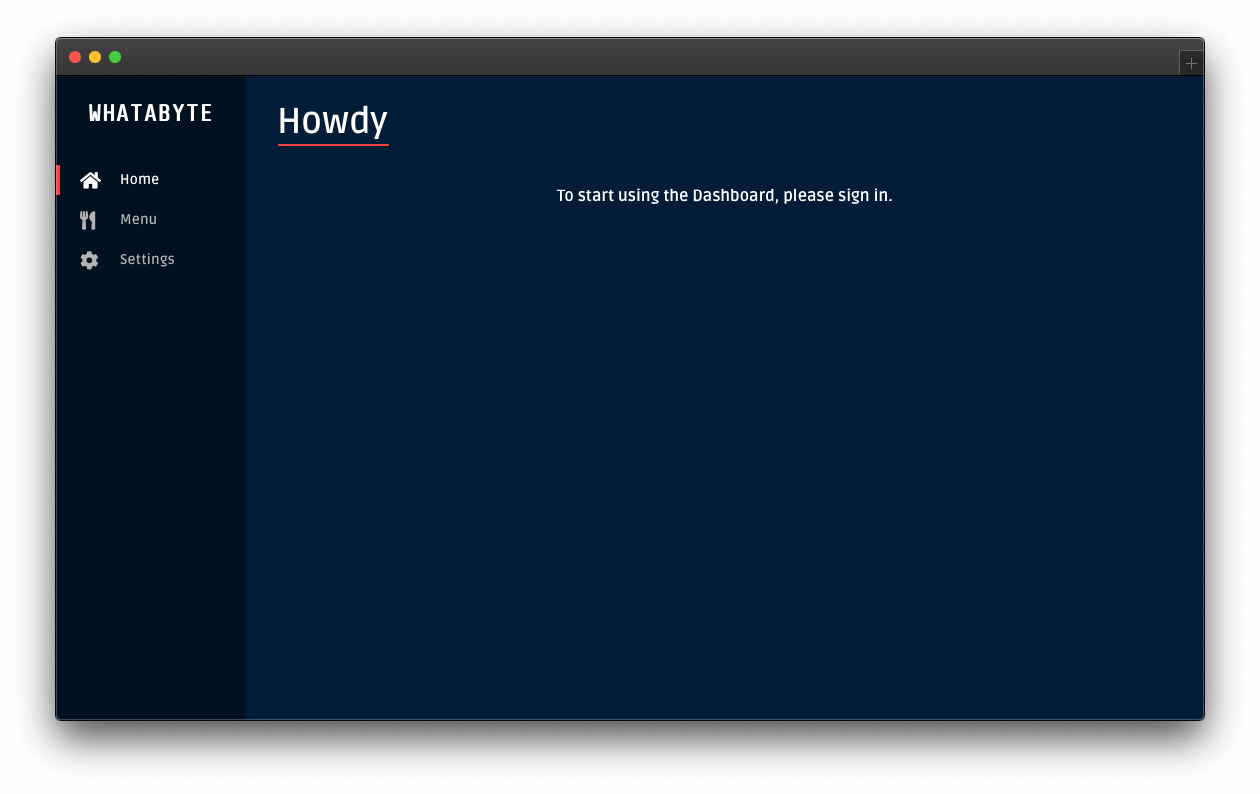
Imagine you're not only a savvy developer but also a restaurant owner. As with every other business, a web presence is a must. Your friend offered a helping hand and built a cool single-page web app:
To complete it, you need to provide an API to create, read, update, and delete the menu items.
Keeping it simple, you'll store the menu items in-memory. However, security is important! Everyone should be able to retrieve the menu items, but only users with the menu-admin role should create, update, or delete them.
A quick refresher: authentication ensures the users are who they say they are by, e.g., asking for a username and password. Authorization then checks if a user has the required permission to perform a particular task, such as downloading a file or modifying a menu item. You'll use both in this tutorial.
Get Started with Spring Boot
Spring Boot simplifies project creation by providing starters, a one-stop-shop for all the plumbing and dependencies. You'll use spring-boot-starter-web for all the necessary firepower to build a RESTful API.
Head over to start.spring.io and follow these steps to scaffold a Spring Boot project quickly:
Under the Project section, select Gradle Project.
Choose Java as the Language.
The Spring Boot version used in this tutorial is 2.4.1.
Update the Project Metadata section like so:
- Group:
com.example - Artifact:
menu - Name:
menu - Description:
Menu CRUD API using Spring Boot - Package name:
com.example.menu - Packaging:
Jar Java:
11Ensure that you set the Java version to 11.
- Group:
Then, locate the Dependencies section on the right-hand side of the screen and click the "Add" button. Locate the "Web" section in the list that comes up and select
Spring Web.
The final form should look like this:
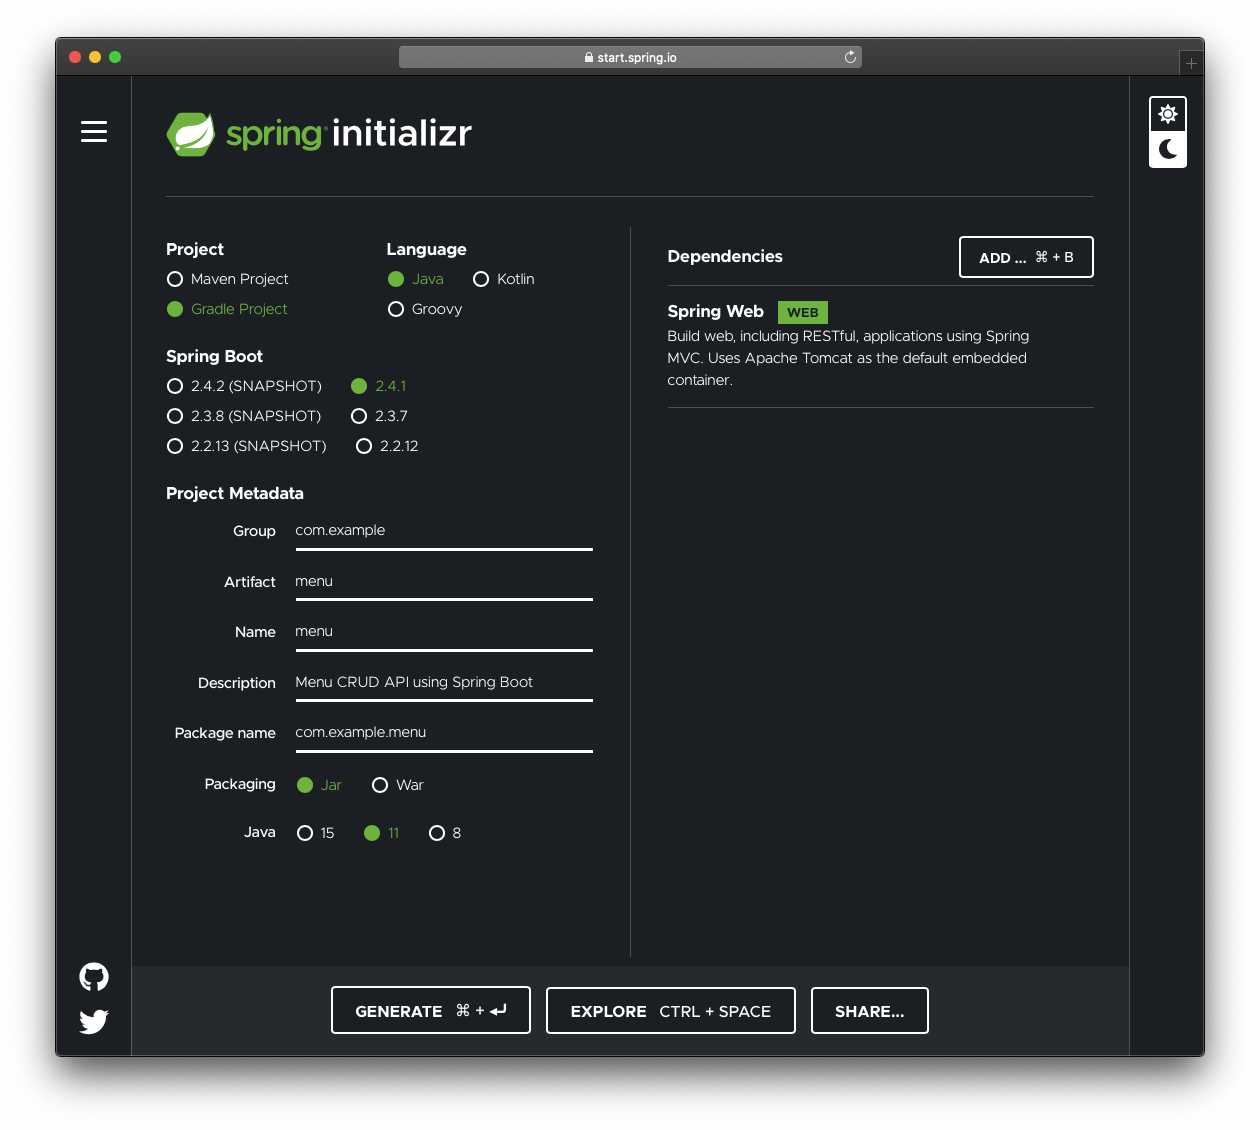
Click on the Generate button. This will download a compressed starter project. Once downloaded, unzip the folder and open it on your preferred IDE or code editor.
The main HTTP port in a fresh Spring Boot project defaults to 8080, but you can easily change it. Open the application.properties file in src/main/resources and add:
server.port=7000The variables from this file will be added to the Spring environment. server.port will be applied automatically, and you'll see how to refer to others later on.
Open a terminal window and execute the following Gradle command to run the project:
./gradlew bootRunEnsure that your Spring project directory is the current working directory in the terminal.
You'll refer to that Gradle command whenever you need to run or re-run the project.
Gradle is an open-source build automation tool, slightly more flexible and performant from the alternative provided by Spring starters, Maven.
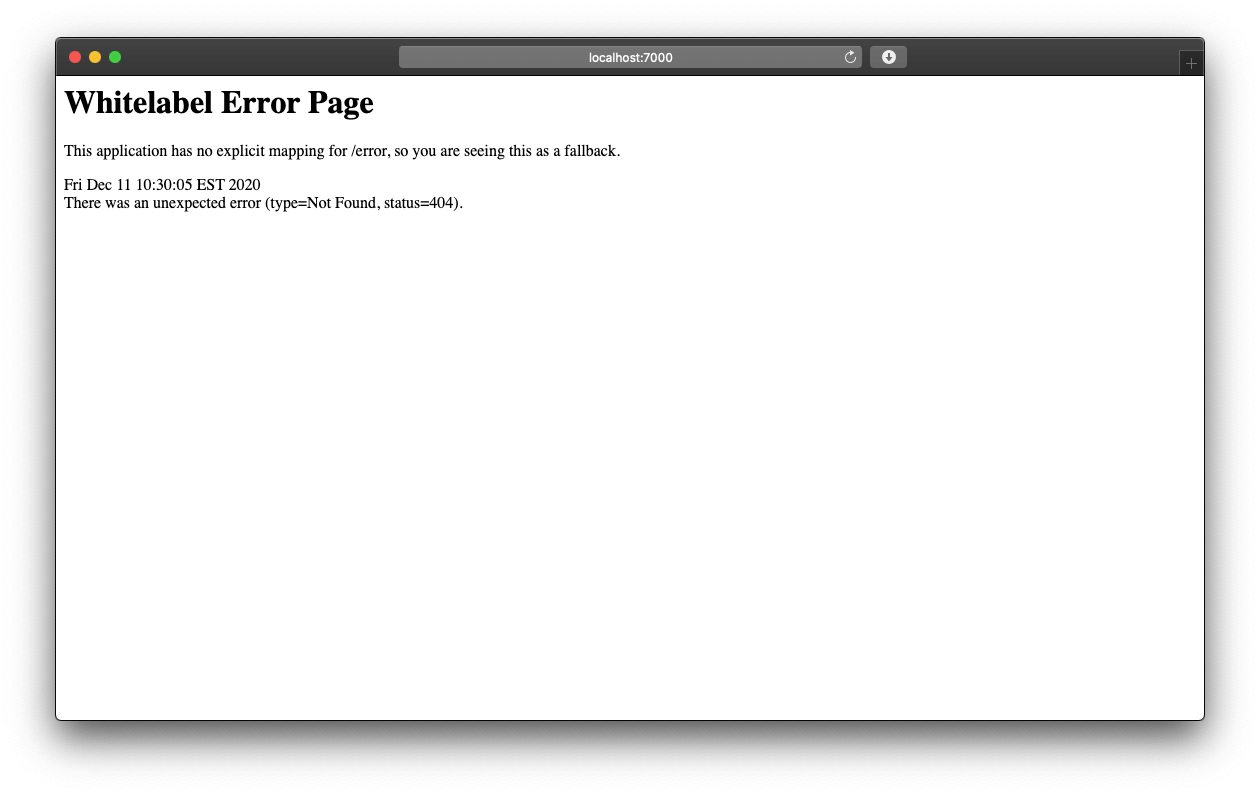
Hit http://localhost:7000/. You'll be greeted with a rather dull error message, but you're up and running alright!
Create Data Models and Services
Spring Boot does not require any specific code layout to work, but there are best practices you should follow.
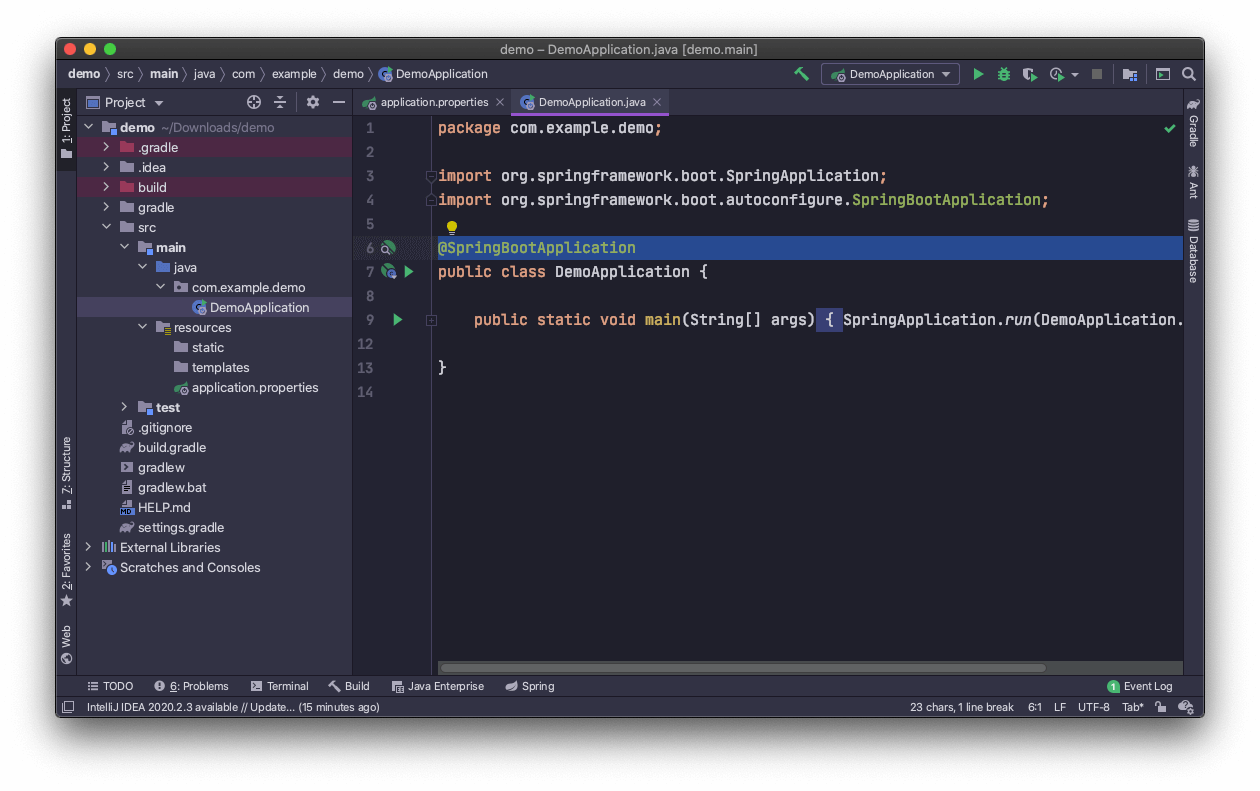
It's good to have your main application class in a root package above other classes. This will simplify the discovery of various Spring components. The class has the @SpringBootApplication annotation, which you can find in the com.example.menu package under the src/main/java directory of your project:
The rest of the project should follow a domain-driven structure:
com
 +- example
   +- menu
     +- MenuApplication.java
     |
     +- item
     |  +- Item.java
     |  +- ItemController.java
     |  +- ItemService.java
     |  +- InMemoryItemRepository.java
This is the structure you'll be using throughout this tutorial.
Get down to business
Before you define the models, have a quick peek at what the frontend payload looks like:
{
  "id": 1,
  "name": "Burger",
  "price": 599,
  "description": "Tasty",
  "image": "https://cdn.auth0.com/blog/whatabyte/burger-sm.png"
}
The item object contains a few self-explanatory fields. price represents a monetary value expressed in cents.
Never use floating-point numbers to represent monetary values. They cannot precisely represent all real numbers, and floating-point operations cannot precisely represent true arithmetic operations. This could lead to many surprising situations.
Spring Boot uses Jackson to process JSON under the hood. One of its modules, databind, ensures JSON payloads can become Java classes, and vice versa. By default, Jackson maps the fields in a JSON object to fields in a Java object by matching the names of the fields.
To create a class representing a menu item, first create an item package under the same directory where MenuApplication.java is: com/example/menu/.
Create a class called Item in the item package:
// com/example/menu/item/Item.java

package com.example.menu.item;

public class Item {
    private final Long id;
    private final String name;
    private final Long price;
    private final String description;
    private final String image;

    public Item(
            Long id,
            String name,
            Long price,
            String description,
            String image
    ) {
        this.id = id;
        this.name = name;
        this.price = price;
        this.description = description;
        this.image = image;
    }

    public Long getId() {
        return id;
    }

    public String getName() {
        return name;
    }

    public Long getPrice() {
        return price;
    }

    public String getDescription() {
        return description;
    }

    public String getImage() {
        return image;
    }

    public Item updateWith(Item item) {
        return new Item(
            this.id,
            item.name,
            item.price,
            item.description,
            item.image
        );
    }
}
The purpose of the Item class is to hold data. Most of the time, you want such classes to be immutable. To be succinct, you'll leave out some details, but check out what Joshua Bloch has to say about minimizing mutability in the book Effective Java. You can also refer to libraries and frameworks such as Lombok or AutoValue for immutability without boilerplate. From Java 14 onwards, records provide a compact syntax for immutable data holders.
The updateWith method is a simple static factory you can use to update an item’s properties, preserving its id. It favors immutability, making the code safer and contemporary.
Repository and service
You'll use an in-memory repository to store and retrieve items. To avoid the mundane implementation details, Spring Data KeyValue will help. Open your build.gradle file, and add the dependency:
dependencies {
  implementation 'org.springframework.data:spring-data-keyvalue'
  // ...
}
When adding a new dependency, Gradle needs to sync — go through the list of dependencies and download the missing ones. In most cases, it needs a network connection to do so. If you're using a powerful IDE, it might sync automatically or give you a visual cue when required to sync manually. Alternatively, run the following command: ./gradlew --refresh-dependencies.
Then, create an InMemoryItemRepository interface in the item package:
// com/example/menu/item/InMemoryItemRepository.java

package com.example.menu.item;

import org.springframework.data.repository.CrudRepository;
import org.springframework.stereotype.Repository;

@Repository
public interface InMemoryItemRepository extends CrudRepository<Item, Long> {}
CrudRepository is a Spring interface declaring generic CRUD operations. The first generic type, Item, represents the objects you'll store. The second type, Long, is the unique identifier type for an Item.
To tell Spring which Item entity denotes a unique identifier, use the @Id annotation. Update the Item class by annotating the getId() method with an @Id:
// com/example/menu/item/Item.java

package com.example.menu.item;

// ✨ New import ✨
import org.springframework.data.annotation.Id;

public class Item {
    private final Long id;
    private final String name;
    private final Long price;
    private final String description;
    private final String image;

    public Item(
            Long id,
            String name,
            Long price,
            String description,
            String image
    ) {
        this.id = id;
        this.name = name;
        this.price = price;
        this.description = description;
        this.image = image;
    }

    @Id // ✨ New annotation ✨
    public Long getId() {
        return id;
    }

    // Other getter and class methods...
}
Believe it or not, the one-liner interface is all you need to store, retrieve, update, and delete an Item. The KeyValue dependency will magically provide all the implementation details on your behalf.
The goal of Spring Data repository abstraction is to significantly reduce the amount of boilerplate code required to implement data access layers for various persistence stores. To learn more, check out the official docs.
You may be wondering why we are annotating the getId() method instead of the id field in the Item class. We do that for the same reason we have getters: the value might be tweaked, validated, or manipulated in some way to provide the desired result. That wouldn't be possible by using a field.
Besides persistence, you often need business logic around the data you have. This is where services come into play. Under the item package, create an ItemService class and pass in a CrudRepository instance via the constructor:
// com/example/menu/item/ItemService.java

package com.example.menu.item;

import org.springframework.data.map.repository.config.EnableMapRepositories;
import org.springframework.data.repository.CrudRepository;
import org.springframework.stereotype.Service;

@Service
@EnableMapRepositories
public class ItemService {
  private final CrudRepository<Item, Long> repository;

  public ItemService(CrudRepository<Item, Long> repository) {
    this.repository = repository;
  }
}
Dependency injection, also known as inversion of control (IoC), is one of the core components of the framework. It helps to instantiate, assemble, and manage simple Java objects known as beans. To find them, Spring looks for various annotations such as @EnableMapRepositories.
For example, when a CrudRepository implementation is found within the KeyValue dependency, Spring knows how to construct an ItemService instance via constructor-based dependency injection. It looks at the constructor parameters, checks all of them are instantiated, then passes them in and creates it on your behalf.
Next, create a few items your restaurant will always have in stock:
// com/example/menu/item/ItemService.java

package com.example.menu.item;

import org.springframework.data.map.repository.config.EnableMapRepositories;
import org.springframework.data.repository.CrudRepository;
import org.springframework.stereotype.Service;

// ✨ New import! 👇 ✨
import java.util.List;

@Service
@EnableMapRepositories
public class ItemService {
  private final CrudRepository<Item, Long> repository;

  public ItemService(CrudRepository<Item, Long> repository) {
    this.repository = repository;
    // ✨ New! 👇 Populate the in-memory store ✨
    this.repository.saveAll(defaultItems());
  }

  // ✨ New! 👇 List of items ✨
  private static List<Item> defaultItems() {
    return List.of(
      new Item(1L, "Burger", 599L, "Tasty", "https://cdn.auth0.com/blog/whatabyte/burger-sm.png"),
      new Item(2L, "Pizza", 299L, "Cheesy", "https://cdn.auth0.com/blog/whatabyte/pizza-sm.png"),
      new Item(3L, "Tea", 199L, "Informative", "https://cdn.auth0.com/blog/whatabyte/tea-sm.png")
    );
  }
}
Note the saveAll method in the constructor. The power of CrudRepository comes with the functionality it provides out-of-the-box. Methods such as findById, findAll, save, deleteById will help you implement the remaining CRUD functionality.
Update your ItemService class to its final form:
// com/example/menu/item/ItemService.java

package com.example.menu.item;

import org.springframework.data.map.repository.config.EnableMapRepositories;
import org.springframework.data.repository.CrudRepository;
import org.springframework.stereotype.Service;

import java.util.ArrayList;
import java.util.Date;
import java.util.List;
import java.util.Optional;


@Service
@EnableMapRepositories
public class ItemService {
    private final CrudRepository<Item, Long> repository;

    public ItemService(CrudRepository<Item, Long> repository) {
        this.repository = repository;
        this.repository.saveAll(defaultItems());
    }

    private static List<Item> defaultItems() {
        return List.of(
                new Item(1L, "Burger", 599L, "Tasty", "https://cdn.auth0.com/blog/whatabyte/burger-sm.png"),
                new Item(2L, "Pizza", 299L, "Cheesy", "https://cdn.auth0.com/blog/whatabyte/pizza-sm.png"),
                new Item(3L, "Tea", 199L, "Informative", "https://cdn.auth0.com/blog/whatabyte/tea-sm.png")
        );
    }

    public List<Item> findAll() {
        List<Item> list = new ArrayList<>();
        Iterable<Item> items = repository.findAll();
        items.forEach(list::add);
        return list;
    }

    public Optional<Item> find(Long id) {
        return repository.findById(id);
    }

    public Item create(Item item) {
        // To ensure the item ID remains unique,
        // use the current timestamp.
        Item copy = new Item(
                new Date().getTime(),
                item.getName(),
                item.getPrice(),
                item.getDescription(),
                item.getImage()
        );
        return repository.save(copy);
    }

    public Optional<Item> update( Long id, Item newItem) {
        // Only update an item if it can be found first.
        return repository.findById(id)
                .map(oldItem -> {
                   Item updated = oldItem.updateWith(newItem);
                   return repository.save(updated);
                });
    }

    public void delete(Long id) {
        repository.deleteById(id);
    }
}
Java classes and interfaces can have super-types and sub-types. With interface Animal {} and interface Dog extends Animal {}, you can say an Animal is a super-type of Dog and a Dog is a sub-type of Animal. You know this as inheritance or an "is-a" relationship, where Dog is-a Animal.
InMemoryCrudRepository is-a CrudRepository. Spring IoC understands this, so you can refer to objects by their interfaces, as best practice dictates.
While inheritance is powerful, it violates encapsulation. Composition, a "has-a" relationship, is equally powerful, less fragile, and should be your tool of choice unless a genuine subtype relationship exists between the subclass and the superclass. ItemService has-a CrudRepository, it doesn't extend it. Does it make a good composition example?
Create Endpoints
Here are the endpoints you're going to need:
# get all items
GET api/menu/items/

# get a single item using an id parameter
GET api/menu/items/{id}

# create an item
POST api/menu/items/

# update an item
PUT api/menu/items/

# delete an item using an id parameter
DELETE api/menu/items/{id}
In Spring, HTTP requests are handled by controllers, which are identified by the @RestController annotation. Create an ItemController class within the item package injecting an ItemService class:
// com/example/menu/item/ItemController.java

package com.example.menu.item;

import org.springframework.web.bind.annotation.RequestMapping;
import org.springframework.web.bind.annotation.RestController;

@RestController
@RequestMapping("api/menu/items")
public class ItemController {
  private final ItemService service;

  public ItemController(ItemService service) {
    this.service = service;
  }
}@RequestMapping("api/menu/items") ensures all the endpoints share the same resource path. As explained in the previous chapter, Spring IoC injects an ItemService instance, which will help you implement the methods denoting the endpoints. Start with the GET methods first:
// com/example/menu/item/ItemController.java

package com.example.menu.item;

// ✨ New! Updated imports
import org.springframework.http.ResponseEntity;
import org.springframework.web.bind.annotation.GetMapping;
import org.springframework.web.bind.annotation.PathVariable;
import org.springframework.web.bind.annotation.RequestMapping;
import org.springframework.web.bind.annotation.RestController;

import java.util.List;
import java.util.Optional;

@RestController
@RequestMapping("api/menu/items")
public class ItemController {
    private final ItemService service;

    public ItemController(ItemService service) {
        this.service = service;
    }

    // ✨ New! GET controller methods
    @GetMapping
    public ResponseEntity<List<Item>> findAll() {
        List<Item> items = service.findAll();
        return ResponseEntity.ok().body(items);
    }

    @GetMapping("/{id}")
    public ResponseEntity<Item> find(@PathVariable("id") Long id) {
        Optional<Item> item = service.find(id);
        return ResponseEntity.of(item);
    }
}
The @GetMapping annotation denotes the GET /api/menu/items path, and @GetMapping("/{id}") the GET /api/menu/items/{id} path, as you have probably guessed. To get the {id} value, you need to annotate the appropriate method parameter with another annotation: @PathVariable("id"). The method names don't matter, but it helps to use something descriptive and intuitive.
Note the Optional type. This is a container object which may or may not contain a value. If you find an item with a specific id, you return it in a response body. Otherwise, you return a 404 Not Found response.
An
Optionaltype is a polymorphic type that represents an encapsulation of an optional value. Its origin steams from functional programming and type theory. It provides a fluid way of handling the value with method chaining.
ResponseEntity is a helper class to fully describe the response, including the status code, headers, and body. It makes it easy to set appropriate values without trying to remember what a value should be. For example, you don't need to know what the status code not found is. Similarly, it prohibits you from adding a body if you set the status to no content.
You use ResponseEntity.of() within the find method. This is a shortcut for creating a ResponseEntity with either a valid body and the 200 OK status, or no body and a 404 Not Found status.
Handling POST requests is simple too:
// com/example/menu/item/ItemController.java

package com.example.menu.item;

import org.springframework.http.ResponseEntity;
// ✨ New! 👇 Compact imports ✨
import org.springframework.web.bind.annotation.*;
import org.springframework.web.servlet.support.ServletUriComponentsBuilder;

import java.net.URI;
import java.util.List;
import java.util.Optional;

@RestController
@RequestMapping("api/menu/items")
public class ItemController {
    private final ItemService service;

    public ItemController(ItemService service) {
        this.service = service;
    }

    @GetMapping
    public ResponseEntity<List<Item>> findAll() {...}

    @GetMapping("/{id}")
    public ResponseEntity<Item> find(@PathVariable("id") Long id) {...}

    // ✨ New! 👇 POST definition ✨
    @PostMapping
    public ResponseEntity<Item> create(@RequestBody Item item) {
        Item created = service.create(item);
        URI location = ServletUriComponentsBuilder.fromCurrentRequest()
                .path("/{id}")
                .buildAndExpand(created.getId())
                .toUri();
        return ResponseEntity.created(location).body(created);
    }
}
The POST /api/menu/items request should have a body which Spring will deserialize in an Item instance and provide it as a method argument since it's annotated with @RequestBody.
Finally, add the remaining endpoints to update and delete a menu item:
// com/example/menu/item/ItemController.java

package com.example.menu.item;

import org.springframework.http.ResponseEntity;
import org.springframework.web.bind.annotation.*;
import org.springframework.web.servlet.support.ServletUriComponentsBuilder;

import java.net.URI;
import java.util.List;
import java.util.Optional;

@RestController
@RequestMapping("api/menu/items")
public class ItemController {
    private final ItemService service;

    public ItemController(ItemService service) {...}

    @GetMapping
    public ResponseEntity<List<Item>> findAll() {...}

    @GetMapping("/{id}")
    public ResponseEntity<Item> find(@PathVariable("id") Long id) {...}

    @PostMapping
    public ResponseEntity<Item> create(@RequestBody Item item) {...}

    // ✨ New! 👇 PUT definition ✨
    @PutMapping("/{id}")
    public ResponseEntity<Item> update(
            @PathVariable("id") Long id,
            @RequestBody Item updatedItem) {

        Optional<Item> updated = service.update(id, updatedItem);

        return updated
                .map(value -> ResponseEntity.ok().body(value))
                .orElseGet(() -> {
                    Item created = service.create(updatedItem);
                    URI location = ServletUriComponentsBuilder.fromCurrentRequest()
                            .path("/{id}")
                            .buildAndExpand(created.getId())
                            .toUri();
                    return ResponseEntity.created(location).body(created);
                });
    }

    // ✨ New! 👇 DELETE definition ✨
    @DeleteMapping("/{id}")
    public ResponseEntity<Item> delete(@PathVariable("id") Long id) {
        service.delete(id);
        return ResponseEntity.noContent().build();
    }
}
If we refer to the HTTP/1.1 PUT standard docs, we'd find the following insight about the design of a PUT endpoint:
The PUT method requests that the state of the target resource be created or replaced with the state defined by the representation enclosed in the request message payload.
As such, you let your PUT endpoint be an additional method for creating a resource.
Re-run the Gradle command to restart your Sprint Boot API server and include your latest changes in its build:
./gradlew bootRunTest the Spring Boot API Endpoints
With the controllers all set up, it's time to test them out. To make this process simple, you can use cUrl from your terminal, which should work across operating systems.
Are you developing on Windows? Learn more about Windows PowerShell Commands for Web Developers.
- Get all items:
curl http://localhost:7000/api/menu/items -iThe
-iflag includes protocol headers in the output.
You should get a 200 OK response with an array that includes three menu items.
- Get an item:
curl http://localhost:7000/api/menu/items/2 -iYou should get a 200 OK response with a JSON object describing a pizza.
- Add an item:
curl -X POST -H 'Content-Type: application/json' -d '{
  "name": "Salad",
  "price": 499,
  "description": "Fresh",
  "image": "https://images.ctfassets.net/23aumh6u8s0i/5pnNAeu0kev0P5Neh9W0jj/5b62440be149d0c1a9cb84a255662205/whatabyte_salad-sm.png"
}' http://localhost:7000/api/menu/items -i
You should get an 201 Created response with a JSON object describing a salad.
- Verify that you added the "Salad" menu item:
curl http://localhost:7000/api/menu/items/ -iThe last item in the JSON object response should describe a salad and match the data from the POST request you sent previously.
- Update an item:
curl -X PUT -H 'Content-Type: application/json' -d '{
  "name": "Spicy Pizza",
  "price": 599,
  "description": "Blazing Good",
  "image": "https://images.ctfassets.net/23aumh6u8s0i/2x1D2KeepKoZlsUq0SEsOu/bee61947ed648848e99c71ce22563849/whatabyte_pizza-sm.png"
}' http://localhost:7000/api/menu/items/2 -i
You should get a 200 OK response with a JSON object describing the updated menu item.
- Verify that your API updated the item:
curl http://localhost:7000/api/menu/items/2 -iYou should get a 200 OK response with the updated menu item.
- Delete an item:
curl -X DELETE http://localhost:7000/api/menu/items/2 -iYou should get an 204 No Content response from the server.
- Verify that you deleted the item:
curl http://localhost:7000/api/menu/items/ -iYou should get a 200 OK response with a JSON object that includes three menu items. None of the items is a pizza.
Data Validation with Spring Boot
Before storing or updating a menu item, it's good to sanitize the data. You don't want a Salad price to be -$5, or name an empty string. Spring makes this easy. To get the required building blocks, add a new dependency in your build.gradle file:
dependency {
  implementation 'org.springframework.boot:spring-boot-starter-validation'
  // ...
}
Do a Gradle sync, then decorate the Item class instance variables with the following annotations:
// com/example/demo/item/Item.java

package com.example.menu.item;

// ✨ New! Updated imports ✨
import org.hibernate.validator.constraints.URL;
import org.springframework.data.annotation.Id;

import javax.validation.constraints.*;

public class Item {
    private final Long id;

    // ✨ New! Decorated class instance variables ✨
    @NotNull(message = "name is required")
    @Pattern(regexp="^[a-zA-Z ]+$", message = "name must be a string")
    private final String name;

    @NotNull(message = "price is required")
    @Positive(message = "price must be positive")
    private final Long price;

    @NotNull(message = "description is required")
    @Pattern(regexp="^[a-zA-Z ]+$", message = "description must be a string")
    private final String description;

    @NotNull(message = "image is required")
    @URL(message = "image must be a URL")
    private final String image;

    public Item(
            Long id,
            String name,
            Long price,
            String description,
            String image
    ) {...}

    // Getter and setter class methods...
}
The ItemController also needs to know you expect a valid @RequestBody. Update the create and update methods to include the @Valid annotation before the @RequestBody:
// com/example/menu/item/ItemController.java

package com.example.menu.item;

import org.springframework.http.ResponseEntity;
import org.springframework.web.bind.annotation.*;
import org.springframework.web.servlet.support.ServletUriComponentsBuilder;

import java.net.URI;
import java.util.List;
import java.util.Optional;

// ✨ 👇 New import ✨
import javax.validation.Valid;

@RestController
@RequestMapping("api/menu/items")
public class ItemController {
    private final ItemService service;

    public ItemController(ItemService service) {...}

    @GetMapping
    public ResponseEntity<List<Item>> findAll() {...}

    @GetMapping("/{id}")
    public ResponseEntity<Item> find(@PathVariable("id") Long id) {...}

    // ✨ New! 👇 Includes @Valid decorator ✨
    @PostMapping
    public ResponseEntity<Item> create(@Valid @RequestBody Item item) {
        Item created = service.create(item);
        URI location = ServletUriComponentsBuilder.fromCurrentRequest()
                .path("/{id}")
                .buildAndExpand(created.getId())
                .toUri();
        return ResponseEntity.created(location).body(created);
    }

    // ✨ New! 👇 Includes @Valid decorator ✨
    @PutMapping("/{id}")
    public ResponseEntity<Item> update(
            @PathVariable("id") Long id,
            @Valid @RequestBody Item updatedItem) {

        Optional<Item> updated = service.update(id, updatedItem);

        return updated
                .map(value -> ResponseEntity.ok().body(value))
                .orElseGet(() -> {
                    Item created = service.create(updatedItem);
                    URI location = ServletUriComponentsBuilder.fromCurrentRequest()
                            .path("/{id}")
                            .buildAndExpand(created.getId())
                            .toUri();
                    return ResponseEntity.created(location).body(created);
                });
    }

    @DeleteMapping("/{id}")
    public ResponseEntity<Item> delete(@PathVariable("id") Long id) {...}
}
To test this, make sure you re-run the Gradle bootRun command:
./gradlew bootRunThen, trigger the following POST request:
curl -X POST -H 'Content-Type: application/json' -d '{
  "name": 499,
  "price": "499",
  "description": "Fresh",
  "image": "https://cdn.auth0.com/blog/whatabyte/salad-sm.png"
}' http://localhost:7000/api/menu/items -i
You should get a 400 Bad Request response. However, the message field is blank, which makes it hard to pinpoint the issue.
Spring throws a MethodArgumentNotValidException when a validation error happens. To customize the error output, define an exception handler for it in the ItemController class:
// com/example/menu/item/ItemController.java

package com.example.menu.item;

// ✨ New! Updated imports ✨
import org.springframework.http.ResponseEntity;
import org.springframework.validation.FieldError;
import org.springframework.validation.ObjectError;
import org.springframework.web.bind.MethodArgumentNotValidException;
import org.springframework.web.bind.annotation.*;
import org.springframework.web.servlet.support.ServletUriComponentsBuilder;

import java.net.URI;
import java.util.HashMap;
import java.util.List;
import java.util.Map;
import java.util.Optional;

import javax.validation.Valid;

@RestController
@RequestMapping("api/menu/items")
public class ItemController {
    private final ItemService service;

    public ItemController(ItemService service) {...}

    @GetMapping
    public ResponseEntity<List<Item>> findAll() {...}

    @GetMapping("/{id}")
    public ResponseEntity<Item> find(@PathVariable("id") Long id) {...}

    @PostMapping
    public ResponseEntity<Item> create(@Valid @RequestBody Item item) {...}

    @PutMapping("/{id}")
    public ResponseEntity<?> update(
            @PathVariable("id") Long id,
            @Valid @RequestBody Item newItem) {...}

    @DeleteMapping("/{id}")
    public ResponseEntity<Item> delete(@PathVariable("id") Long id) {...}

    // ✨ 👇 New! Exception handler ✨
    @ExceptionHandler(MethodArgumentNotValidException.class)
    public ResponseEntity<Map<String, String>> handleValidationExceptions(MethodArgumentNotValidException ex) {
        List<ObjectError> errors = ex.getBindingResult().getAllErrors();
        Map<String, String> map = new HashMap<>(errors.size());
        errors.forEach((error) -> {
            String key = ((FieldError) error).getField();
            String val = error.getDefaultMessage();
            map.put(key, val);
        });
        return ResponseEntity.badRequest().body(map);
    }
}
Re-run the Gradle command, then execute the POST request again and verify the error message is on-point.
Enable CORS Quickly
In the next section, you'll use a demo client application to test your API. However, as it is, your API server won't serve any cross-domain requests. If you tried to make a GET /api/menu/items request from another domain, such as the domain of a client application, it would fail with a "Network Error".
To fix that, you can add the @CrossOrigin annotation to your ItemController so that your RESTful web service includes CORS access control headers in its response.
Update ItemController as follows:
// com/example/menu/item/ItemController.java

package com.example.menu.item;

import org.springframework.http.ResponseEntity;
import org.springframework.validation.FieldError;
import org.springframework.validation.ObjectError;
import org.springframework.web.bind.MethodArgumentNotValidException;
import org.springframework.web.bind.annotation.*;
import org.springframework.web.servlet.support.ServletUriComponentsBuilder;

import java.net.URI;
import java.util.HashMap;
import java.util.List;
import java.util.Map;
import java.util.Optional;

import javax.validation.Valid;

// ✨ 👇 Quickly enable CORS ✨
@CrossOrigin(origins = "https://dashboard.whatabyte.app")
@RestController
@RequestMapping("api/menu/items")
public class ItemController { ... }
Adding the @CrossOrigin annotation to ItemController enables cross-origin resource sharing only for this specific controller and its handler methods. By default, it allows all origins, all headers, and the HTTP methods specified in the @RequestMapping annotation. However, you are restricting it to enable CORS only from the https://dashboard.whatabyte.app origin, which is the URL of the demo application — as you'll see in the next section.
Rerun the Gradle bootRun command to make your changes effective:
./gradlew bootRunIn the security chapter of this tutorial, you'll learn how to set up CORS in a different way.
Test the API with the Demo Client
You can use a demo application, the WHATABYTE Dashboard, to interact with your Menu API like any user would. The demo application lets you enable and disable its authentication features.
Since you have not yet implemented authorization in your API to protect your endpoints, you'll use the demo client without any authentication features, which allows you to perform read and write operations on your Menu API as an anonymous user.
Set up the demo client application
Head to https://dashboard.whatabyte.app to open the demo client. If this is your first time using this client application, the Auth0 Demo Settings view will open up.
Under the "Auth0 Demo Settings" view, ensure that the Enable Authentication Features option is off:

You should have a form with one field labeled API Server Base URL under its API Configuration section. The value of this field corresponds to your Express server base URL, in this case, http://localhost:7000.
If you are using any other base URL for your server, change the value of the form field.
Now, click the Save button to load the demo client application:
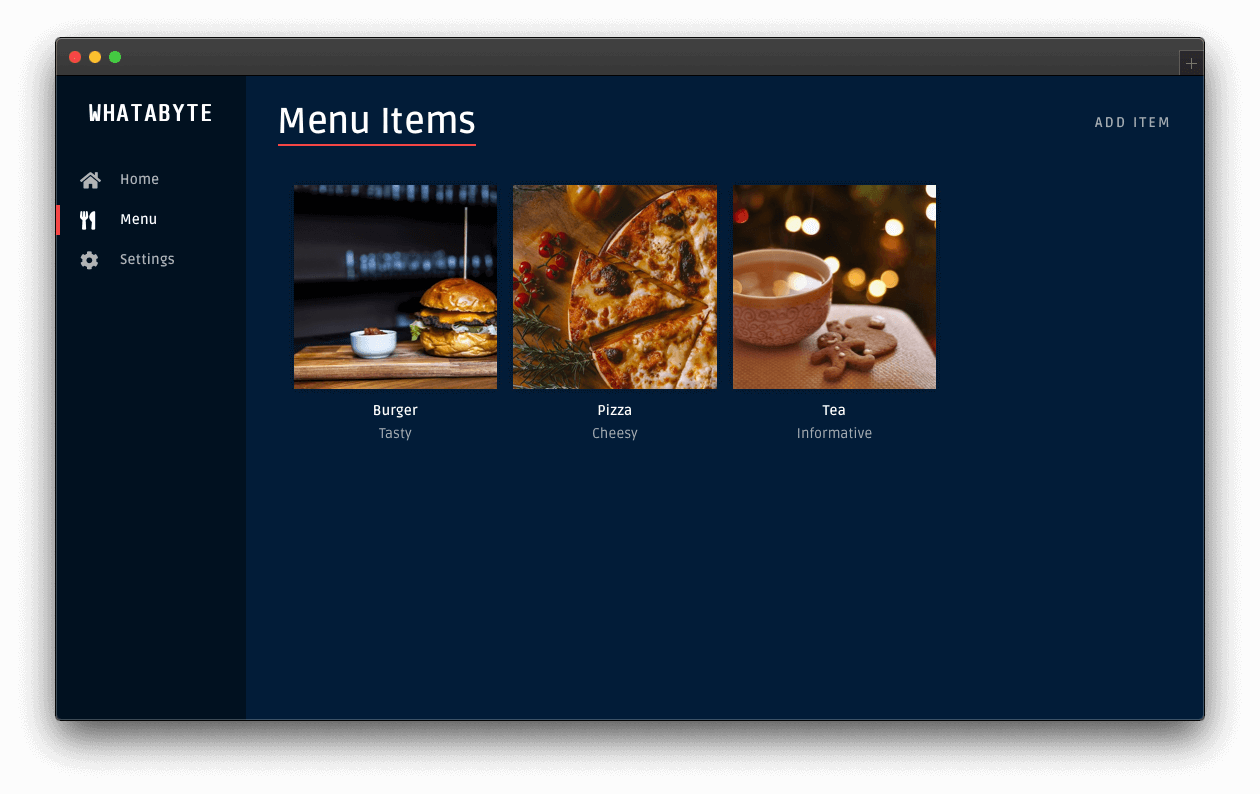
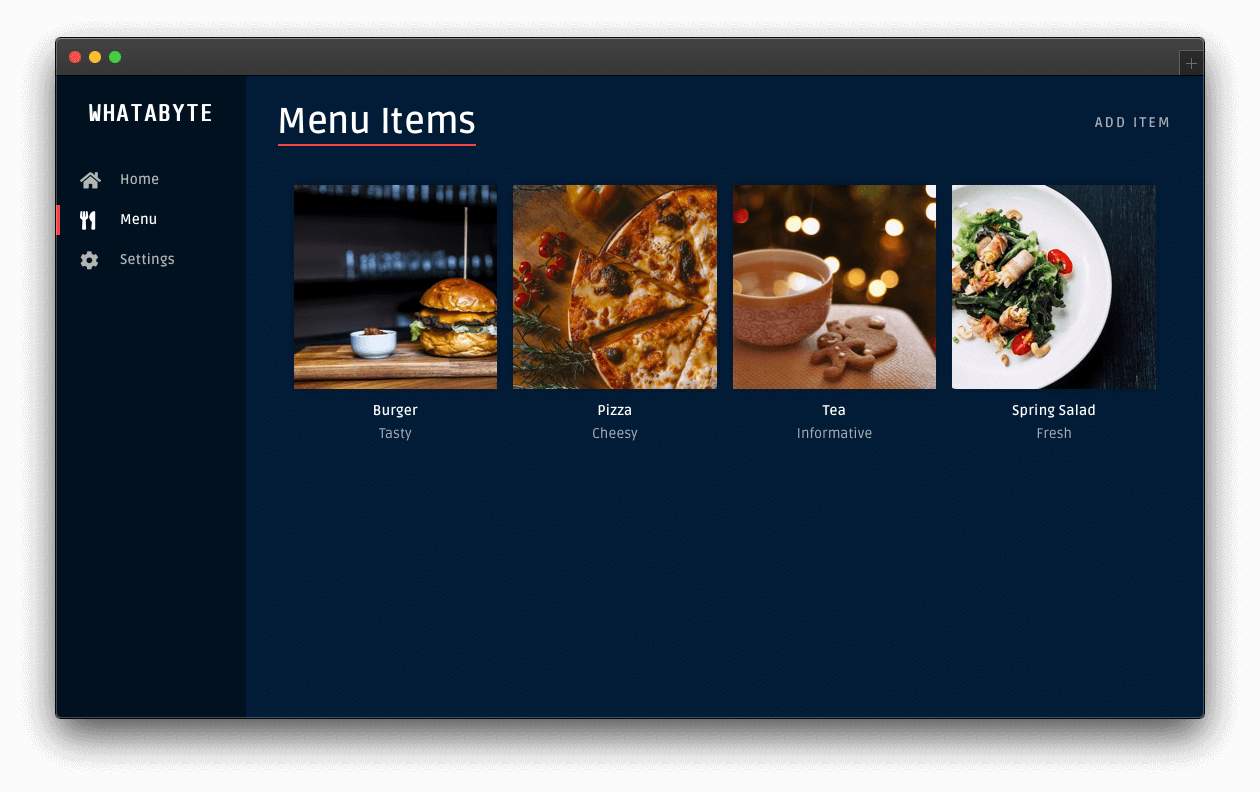
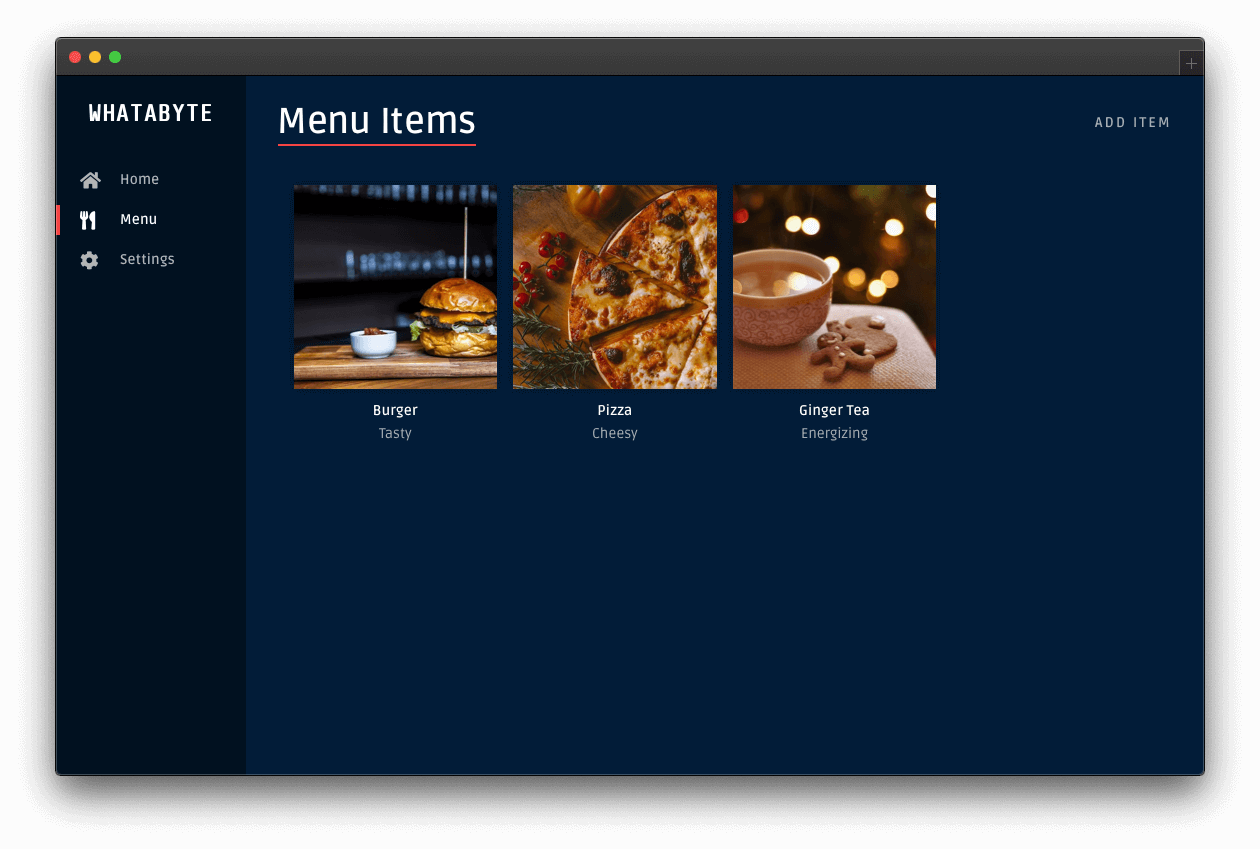
Locate the navigation bar on the left side of the page. Then, click on the Menu tab. Three menu items from your server's store should load up:

Create an item
On the "Menu Items" page, click on the Add Item button on the top-right corner. The "Add Menu Item" page should load up with a pre-populated form:

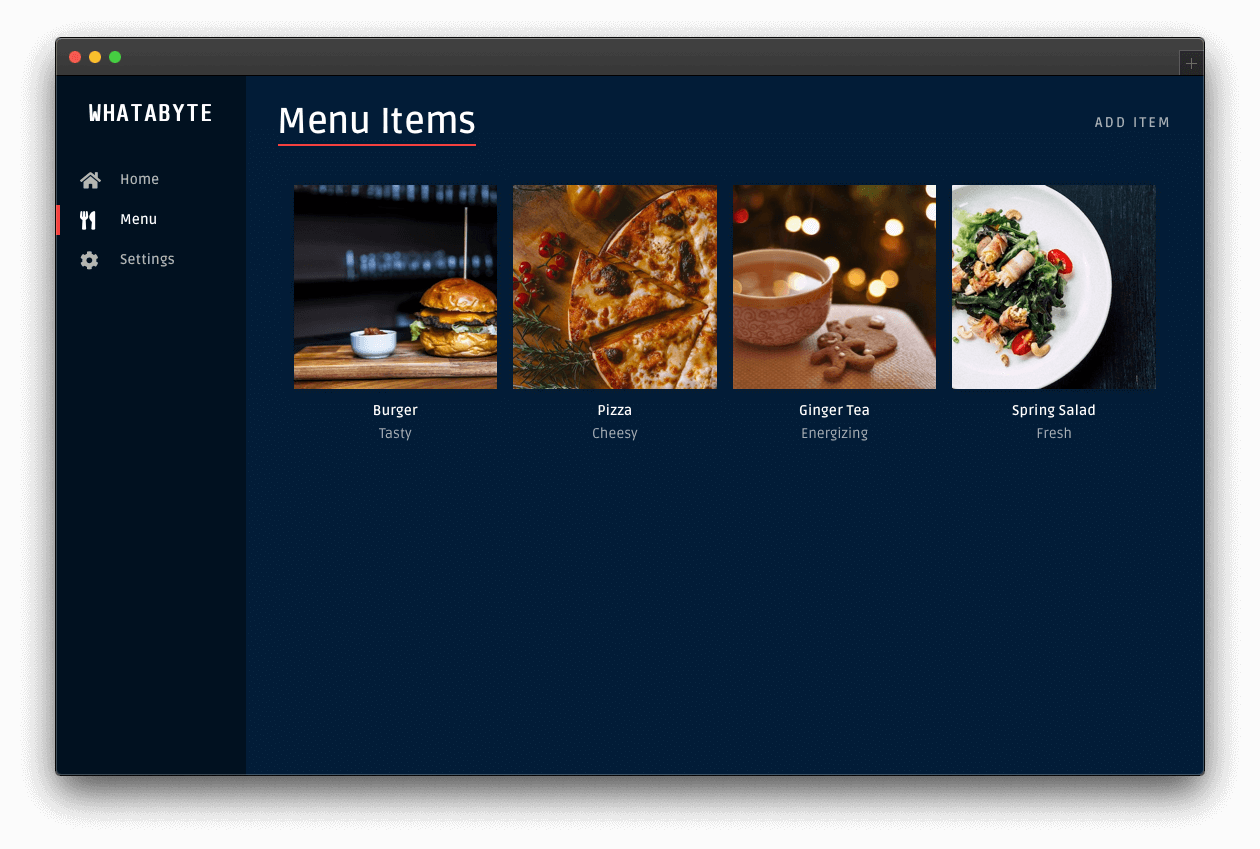
Click on the Save button to add a "Spring Salad" item to your menu.
Once the request-response cycle is complete between the client and the server, the client application loads the "Menu Items" page again. The menu grid now features four items, which includes the "Spring Salad":
Update an item
Now, try updating the property of an item. Click on the "Tea" item to load its item page:
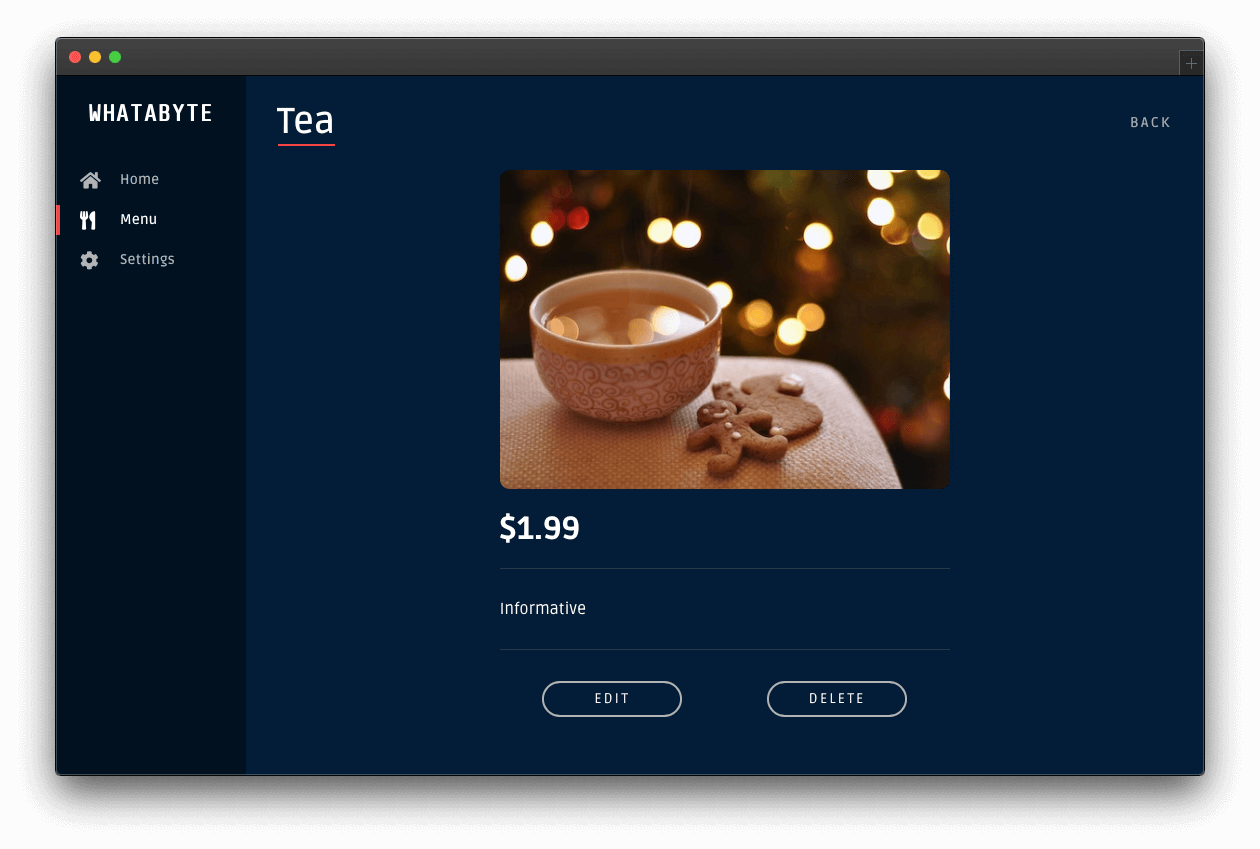
You'll notice two buttons at the bottom: Edit and Delete.
Click the Edit button and modify the form that loads up:
- Change the Name value from "Tea" to "Ginger Tea".
- Change the Description value from "Informative" to "Energizing".
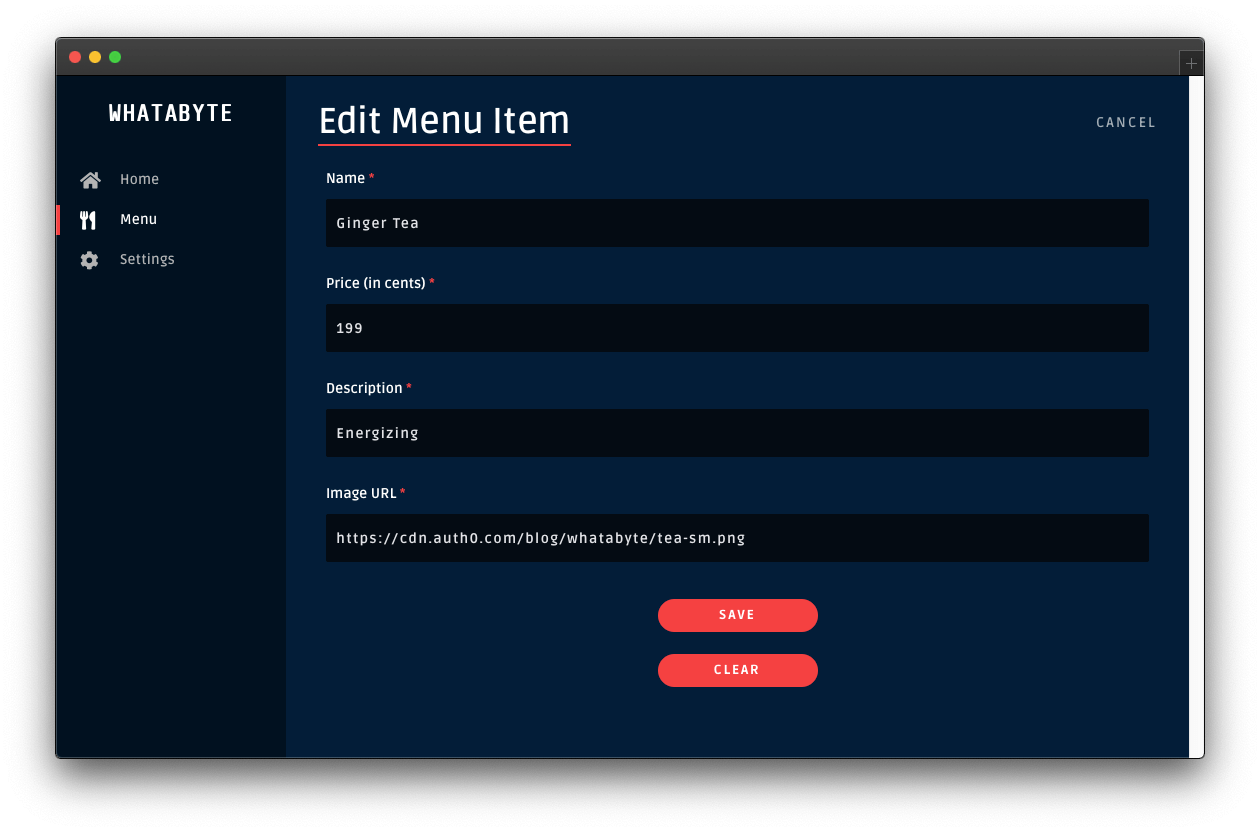
Then, click the Save button. Once the request-response cycle completes again, you'll see four items in the menu grid. However, the "Tea" item will show its new name and description:
Delete an item
Click on any item on the menu grid, such as the "Spring Salad". On the item page, click its Delete button. You'll load up the "Delete Menu Item" page, asking you to confirm if you what to delete the item:

Click the Delete button to confirm the operation. After the request-response cycle completes, the menu grid loads up without that particular item:
Security Considerations
Now that you have a working API with error handling to read and write data, it's time for you to learn how to protect it against unauthorized access by using Auth0.
Auth0 is a flexible, drop-in solution to add authentication and authorization services to your applications. Your team and organization can avoid the cost, time, and risk that comes with building your solution to authenticate and authorize users. Auth0 offers tons of guidance and SDKs for you to get started and integrate Auth0 in your stack easily.
As it is, anyone could use the client application to perform write operations. Someone could delete all the menu items:

To prevent such a data catastrophe from happening, you need to secure your write endpoints by implementing authorization on the API layer. Once your Menu API has authorization in place, you can enable the authentication features of the demo client to improve the UX of the end-users.
In the next part of this tutorial, you'll require users to log in to perform write operations on the API. Additionally, you'll further increase your API's security by requiring users to have a set of permissions (defined through a role) to perform any write operation.
Next Step: Next Step: I'm Ready to Secure My Spring Boot API


