How to Install and Configure SeaweedFS Cluster on Ubuntu 20.04
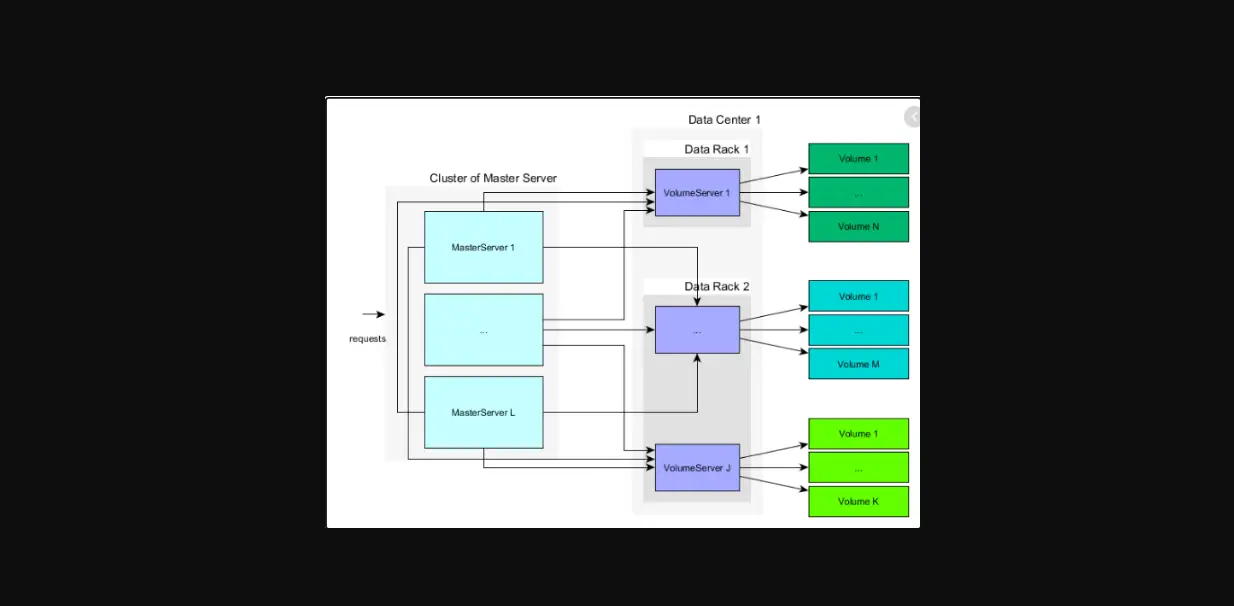
SeaweedFS is an open-source, simple, and highly scalable distributed file system to store and serve billions of files fast. It is very similar to other file systems including, Ceph, GlusterFS, and HDFS. It can be easily integrated with the cloud and achieve both fast access time without any client-side changes. It has a rich set of features including, Automatic master servers failover, Automatic entry TTL expiration, Parallel processing, Handle large and small files, Low-latency access to any file, and many more.
In this tutorial, we will show you how to set up the SeaweedFS cluster on Ubuntu 20.04 server.
Prerequisites
- A server running Ubuntu 20.04 server.
- A root password is configured on the server.
Getting Started
Before starting, it is recommended to update your system packages to the latest version. You can update them with the following command:
apt-get update -y
Once all the packages are updated, you will need to install some other required dependencies in your server. You can install all of them by running the following command:
apt-get install build-essential autoconf automake gdb git libffi-dev zlib1g-dev libssl-dev unzip -y
After installing all the dependencies, you also need to install Golang in yor system. You can install it with the following command:
apt-get install golang -y
Once the installation is completed, you can proceed to the next step.
Install SeaweedFS
By default, the SeaweedFS is not available in the Ubuntu 20.04 default repository. So you will need to download and compile it from the source.
First, download the latest version of SeaweedFS from the Git repository using the following command:
git clone https://github.com/chrislusf/seaweedfs.git
Once the download is completed, change the directory to SeaweedFS and install it with the following command:
cd ~/seaweedfs
make install
The above command will install the SeaweedFS binary inside ~/go/bin/ directory. Now, copy the installed binary to the /usr/loca/bin directory with the following command:
cp ~/go/bin/weed /usr/local/bin/
Next, verify the installed version of SeaweedFS with the following command:
weed version
You should get the following output:
version 30GB 2.14 4211601e linux amd64
Once you are finished, you can proceed to the next step.
Create a Systemd Service File for Master
First, you will need to create a systemd service file to manage the SeaweedFS service. You can create it by running the following command:
nano /etc/systemd/system/seaweedmaster.service
Add the following lines:
[Unit]
Description=SeaweedFS Master
After=network.target

[Service]
Type=simple
User=root
Group=root

ExecStart=/usr/local/bin/weed master
WorkingDirectory=/usr/local/bin/
SyslogIdentifier=seaweedfs-master

[Install]
WantedBy=multi-user.target
Save and close the file then reload the systemd daemon with the following command:
systemctl daemon-reload
Next, start the SeaweedFS service and enable it to start at system reboot with the following command:
systemctl start seaweedmaster
systemctl enable seaweedmaster
You can verify the status of SeaweedFS master with the following command:
systemctl status seaweedmaster
You should get the following output:
? seaweedmaster.service - SeaweedFS Master
     Loaded: loaded (/etc/systemd/system/seaweedmaster.service; disabled; vendor preset: enabled)
     Active: active (running) since Wed 2020-12-09 08:30:06 UTC; 3s ago
   Main PID: 25740 (weed)
      Tasks: 10 (limit: 4691)
     Memory: 8.0M
     CGroup: /system.slice/seaweedmaster.service
             ??25740 /usr/local/bin/weed master

Dec 09 08:30:06 ubuntu2004 seaweedfs-master[25740]: I1209 08:30:06 25740 master_server.go:107] Volume Size Limit is 30000 MB
Dec 09 08:30:06 ubuntu2004 seaweedfs-master[25740]: I1209 08:30:06 25740 master_server.go:192] adminScripts:
Dec 09 08:30:06 ubuntu2004 seaweedfs-master[25740]: I1209 08:30:06 25740 master.go:122] Start Seaweed Master 30GB 2.14 4211601e at 0.0.0.0:9333
Dec 09 08:30:06 ubuntu2004 seaweedfs-master[25740]: I1209 08:30:06 25740 raft_server.go:70] Starting RaftServer with 69.87.216.36:9333
Dec 09 08:30:06 ubuntu2004 seaweedfs-master[25740]: I1209 08:30:06 25740 raft_server.go:129] current cluster leader:
Dec 09 08:30:06 ubuntu2004 seaweedfs-master[25740]: I1209 08:30:06 25740 master.go:146] Start Seaweed Master 30GB 2.14 4211601e grpc server at>
Dec 09 08:30:08 ubuntu2004 seaweedfs-master[25740]: I1209 08:30:08 25740 masterclient.go:78] No existing leader found!
Dec 09 08:30:08 ubuntu2004 seaweedfs-master[25740]: I1209 08:30:08 25740 raft_server.go:154] Initializing new cluster
Dec 09 08:30:08 ubuntu2004 seaweedfs-master[25740]: I1209 08:30:08 25740 master_server.go:141] leader change event:  => 69.87.216.36:9333
Dec 09 08:30:08 ubuntu2004 seaweedfs-master[25740]: I1209 08:30:08 25740 master_server.go:143] [ 69.87.216.36:9333 ] 69.87.216.36:9333 becomes>
Once you are finished, you can proceed to the next step.
Create and Start Volume Servers
At this point, the master server is started and waiting for the volumes. First, createtwo volume directory with the following command:
mkdir /mnt/{vol1,vol2}
Next, create a systemd service file to manage the Volume1 with the following command:
nano /etc/systemd/system/seaweedvolume1.service
Add the following lines:
[Unit]
Description=SeaweedFS Volume
After=network.target

[Service]
Type=simple
User=root
Group=root

ExecStart=/usr/local/bin/weed volume -dir="/mnt/vol1" -max=10 -mserver="69.87.216.36:9333" -port=8081
WorkingDirectory=/usr/local/bin/
SyslogIdentifier=seaweedfs-volume

[Install]
WantedBy=multi-user.target
Save and close the file then reload the systemd daemon with the following command:
systemctl daemon-reload
Next, start the Volume1 service and enable it to start at system reboot:
systemctl start seaweedvolume1.service
systemctl enable seaweedvolume1.service
You can verfiy the status of the Volume1 service with the following command:
systemctl status seaweedvolume1
You should get the folloiwng output:
? seaweedvolume1.service - SeaweedFS Volume
     Loaded: loaded (/etc/systemd/system/seaweedvolume1.service; disabled; vendor preset: enabled)
     Active: active (running) since Wed 2020-12-09 08:31:14 UTC; 4s ago
   Main PID: 25870 (weed)
      Tasks: 9 (limit: 4691)
     Memory: 7.3M
     CGroup: /system.slice/seaweedvolume1.service
             ??25870 /usr/local/bin/weed volume -dir=/mnt/vol1 -max=10 -mserver=69.87.216.36:9333 -port=8081

Dec 09 08:31:14 ubuntu2004 systemd[1]: Started SeaweedFS Volume.
Dec 09 08:31:14 ubuntu2004 seaweedfs-volume[25870]: I1209 08:31:14 25870 file_util.go:23] Folder /mnt/vol1 Permission: -rwxr-xr-x
Dec 09 08:31:14 ubuntu2004 seaweedfs-volume[25870]: I1209 08:31:14 25870 disk_location.go:154] Store started on dir: /mnt/vol1 with 0 volumes >
Dec 09 08:31:14 ubuntu2004 seaweedfs-volume[25870]: I1209 08:31:14 25870 disk_location.go:157] Store started on dir: /mnt/vol1 with 0 ec shards
Dec 09 08:31:14 ubuntu2004 seaweedfs-volume[25870]: I1209 08:31:14 25870 volume_grpc_client_to_master.go:52] Volume server start with seed mas>
Dec 09 08:31:14 ubuntu2004 seaweedfs-volume[25870]: I1209 08:31:14 25870 volume.go:334] Start Seaweed volume server 30GB 2.14 4211601e at 0.0.>
Dec 09 08:31:14 ubuntu2004 seaweedfs-volume[25870]: I1209 08:31:14 25870 volume_grpc_client_to_master.go:114] Heartbeat to: 69.87.216.36:9333
Next, create a systemd service file for Volume2 with the following command:
nano /etc/systemd/system/seaweedvolume2.service
Add the following lines:
[Unit]
Description=SeaweedFS Volume
After=network.target

[Service]
Type=simple
User=root
Group=root

ExecStart=/usr/local/bin/weed volume -dir="/mnt/vol2" -max=5  -mserver="69.87.216.36:9333" -port=8080
WorkingDirectory=/usr/local/bin/
SyslogIdentifier=seaweedfs-volume2

[Install]
WantedBy=multi-user.target
Save and close the file then reload the systemd daemon with the following command:
systemctl daemon-reload
Next, start the Volume2 service and enable it to start at system reboot:
systemctl start seaweedvolume2.service
systemctl enable seaweedvolume2.service
You can verfiy the status of the Volume2 service with the following command:
systemctl status seaweedvolume2
You should get the following output:
? seaweedvolume2.service - SeaweedFS Volume
     Loaded: loaded (/etc/systemd/system/seaweedvolume2.service; disabled; vendor preset: enabled)
     Active: active (running) since Wed 2020-12-09 08:32:03 UTC; 4s ago
   Main PID: 25921 (weed)
      Tasks: 10 (limit: 4691)
     Memory: 7.7M
     CGroup: /system.slice/seaweedvolume2.service
             ??25921 /usr/local/bin/weed volume -dir=/mnt/vol2 -max=5 -mserver=69.87.216.36:9333 -port=8080

Dec 09 08:32:03 ubuntu2004 systemd[1]: Started SeaweedFS Volume.
Dec 09 08:32:03 ubuntu2004 seaweedfs-volume2[25921]: I1209 08:32:03 25921 file_util.go:23] Folder /mnt/vol2 Permission: -rwxr-xr-x
Dec 09 08:32:03 ubuntu2004 seaweedfs-volume2[25921]: I1209 08:32:03 25921 disk_location.go:154] Store started on dir: /mnt/vol2 with 0 volumes>
Dec 09 08:32:03 ubuntu2004 seaweedfs-volume2[25921]: I1209 08:32:03 25921 disk_location.go:157] Store started on dir: /mnt/vol2 with 0 ec shar>
Dec 09 08:32:03 ubuntu2004 seaweedfs-volume2[25921]: I1209 08:32:03 25921 volume.go:334] Start Seaweed volume server 30GB 2.14 4211601e at 0.0>
Dec 09 08:32:03 ubuntu2004 seaweedfs-volume2[25921]: I1209 08:32:03 25921 volume_grpc_client_to_master.go:52] Volume server start with seed ma>
Dec 09 08:32:03 ubuntu2004 seaweedfs-volume2[25921]: I1209 08:32:03 25921 volume_grpc_client_to_master.go:114] Heartbeat to: 69.87.216.36:9333
Once you are finished, you can proceed to the next step.
Write a Sample File to the Volume
First, you will need to send a HTTP POST, PUT, or GET request to get a file ID and volume server URL. You can do it with the following command:
curl http://localhost:9333/dir/assign
You should see the file ID and volume server URL in the following output:
{"fid":"7,016bad1bc0","url":"69.87.216.36:8080","publicUrl":"69.87.216.36:8080","count":1}
Next, add a sample file named file1.png to the volume using the file ID and volume URL as shown below:
curl -F file=@/root/file1.png http://69.87.216.36:8080/7,016bad1bc0
You should get the following output:
{"name":"file1.png","size":74912,"eTag":"7a6511cbeda98ca00346544ca2968046"}
Once you have file uploaded on the volume, you can read it with the following command:
curl http://69.87.216.36:9333/dir/lookup?volumeId=7
You should get the following output:
{"volumeId":"7","locations":[{"url":"69.87.216.36:8080","publicUrl":"69.87.216.36:8080"}]}
Once you are finished, you can proceed to the next step.
Access SeaweedFS
You can now access the SeaweedFS using the URL http://your-server-ip:8080/7,016bad1bc0 to view the file you stored in SeaweedFS object store:
You can see your file which you have uploaded earlier in the above screen.
Conclusion
Congratulations! you have successfully installed and configured the SeaweedFS cluster on Ubuntu 20.04 server. For more information, visit the SeaweedFS documentation page. Feel free to ask me if you have any questions.

